https://velog.io/@minyoungxi/YOLO-v1-%EB%85%BC%EB%AC%B8-%EB%A6%AC%EB%B7%B0
이전 포스팅(YOLO v1 - 이미지에서 객체 탐지를 해볼까? - 논문 리뷰)에 이어서 논문을 구현하는 포스팅을 준비했습니다. !!
yolo v1 논문을 from scratch로 구현했습니다.
우선 터미널에서 project 폴더에 Vision/yoloScratch 폴더에 파일들을 생성했습니다.
dataset.py loss.py models.py train.py utils.py
이렇게 총 5개의 python 파일들을 생성하고 vim models.py 터미널 명령어를 통해 models.py에 논문에서 사용한 모델의 구조를 정의해줄 것입니다.
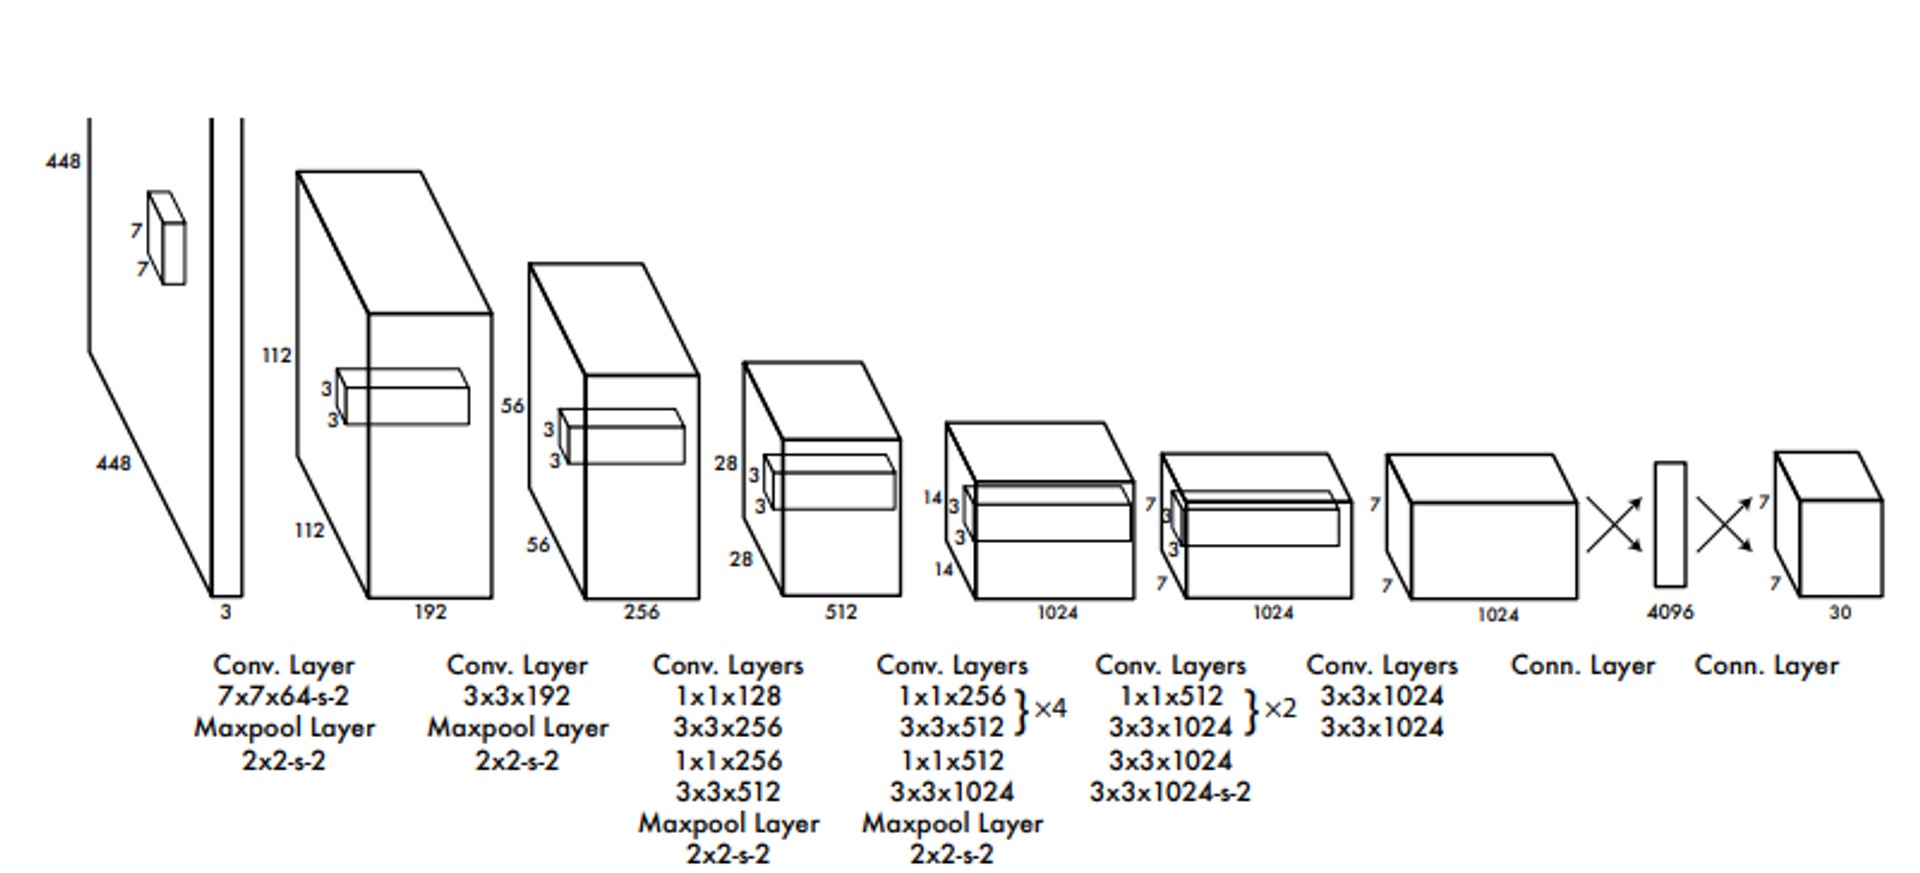
Figure 3: The Architecture. Our detection network has 24 convolutional layers followed by 2 fully connected layers. Alternating 1 × 1
convolutional layers reduce the features space from preceding layers. We pretrain the convolutional layers on the ImageNet classification
task at half the resolution (224 × 224 input image) and then double the resolution for detection.
논문에서는1000개의 클래스를 가진 224x224 ImageNet 데이터로 conv layers를 사전 학습 ( pretrained ) 했다고 언급했네요. 사전 학습에는 20개의 conv와 avg. pooling 1층, fc 1층을 사용했다고 합니다.
본 논문에서 언급한 fine-tuning에 대한 내용으로 3가지를 정리했습니다.
- 4개의 conv와 2개의 fc 추가 모델 사용 → 총 24개의 conv와 2개의 fully connected layers 사용
- 448 x 448 이미지를 사용
- 마지막 층을 제외한 모든 층에 LeakyReLU 함수 적용
The final output of our network is the 7 × 7 × 30 tensor
of predictions.
448x448 이미지를 입력으로 받아 최종적으로 7x7x30의 output이 나타나도록 모델이 구현되어 있습니다.
7x7x30의 output이 나타나도록 모델을 구현한 이유는 S라는 grid cell을 S S 로 나눴기 때문이고 30은 25 (Bounding Box) + 20(Class Probability)이기 때문입니다.
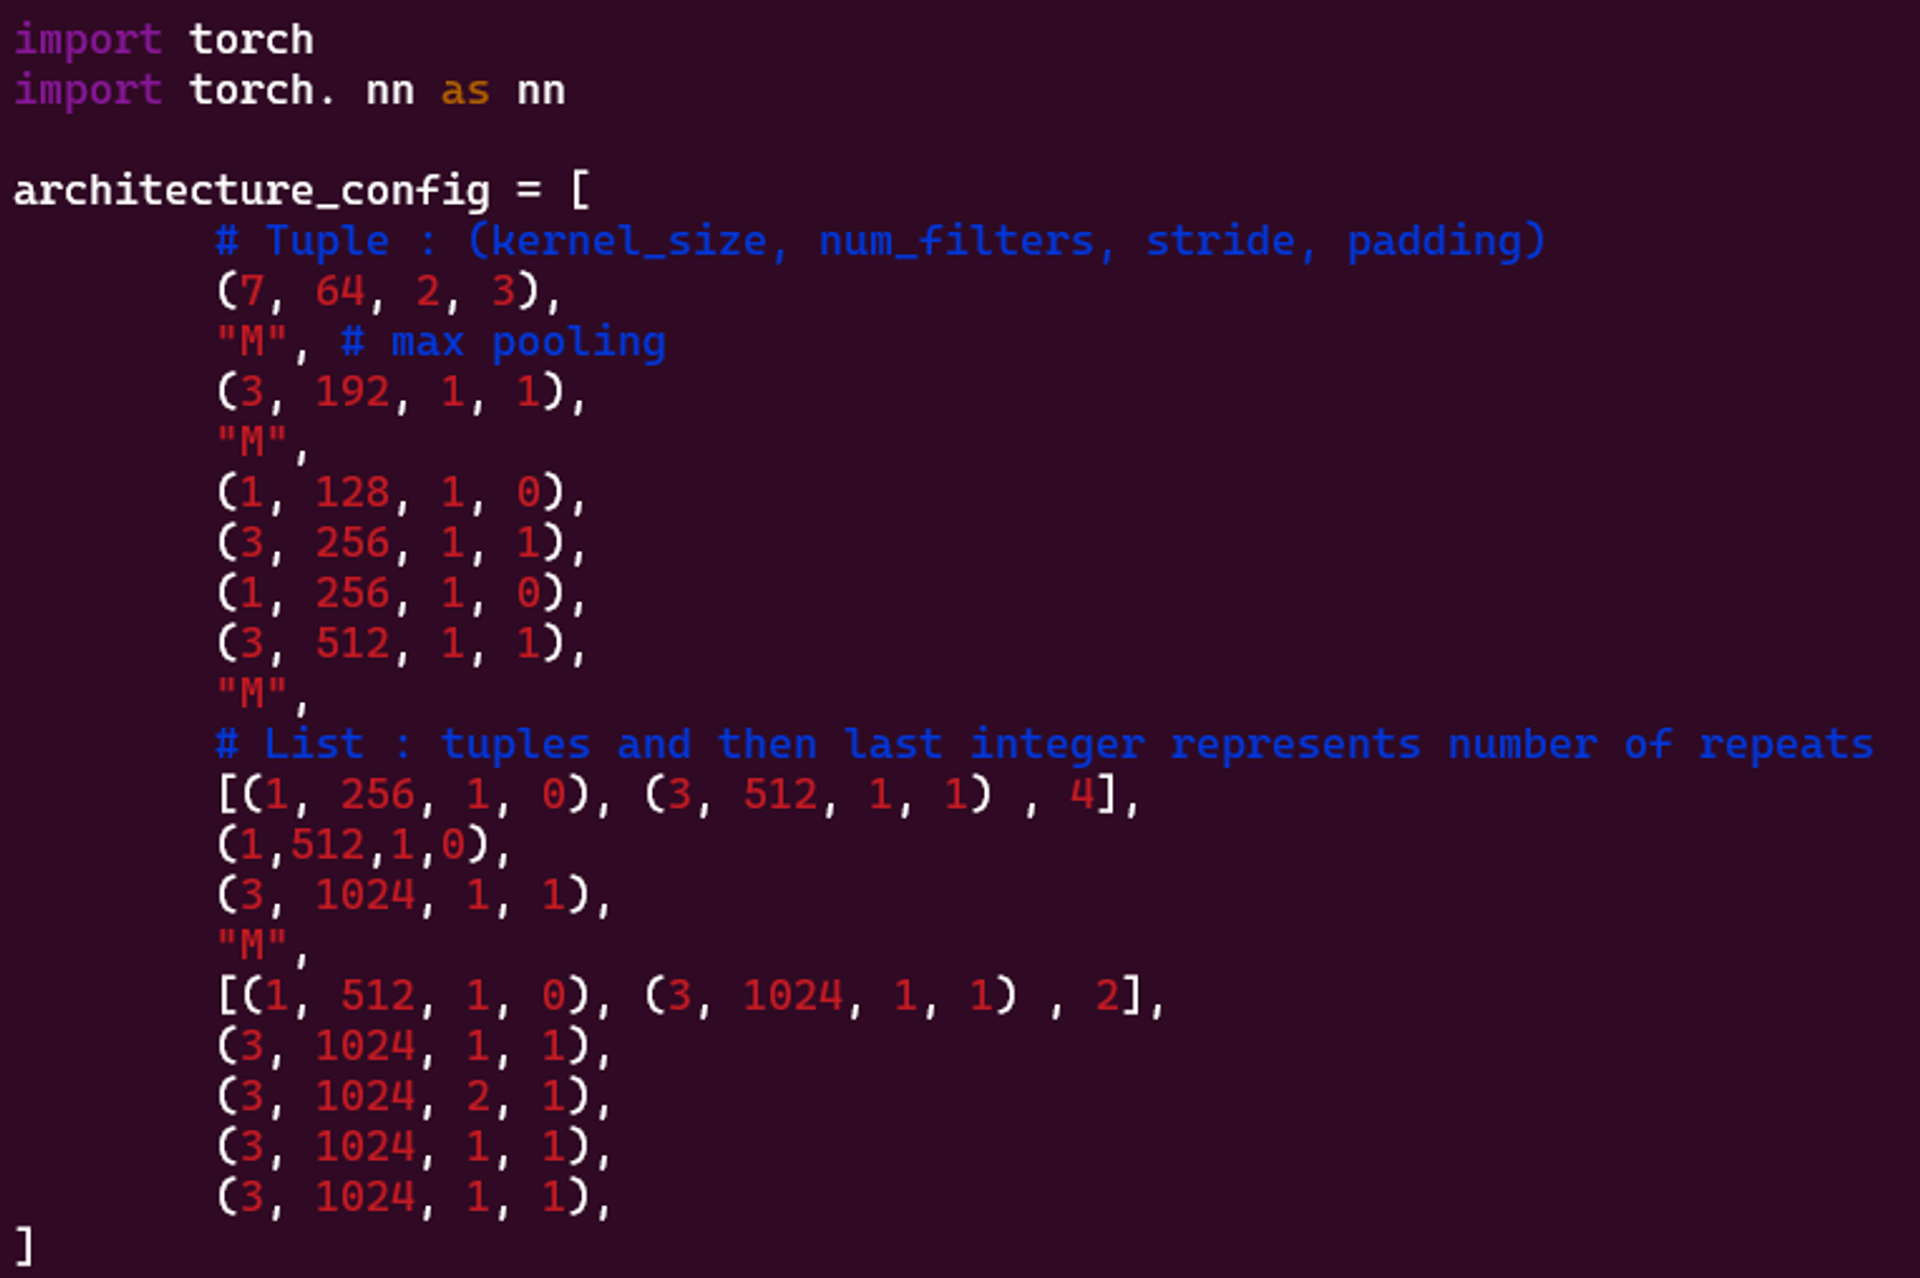
다음은 모델 아키텍쳐를 코드로 구현한 내용입니다.
- architecture_config 목록은 모델 아키텍처의 개요입니다. 커널 크기, 필터 수, 보폭 및 패딩과 같은 모델의 각 컨볼루션 계층의 특성을 나열합니다. "M"은 최대 풀링 계층을 나타내고 중첩 목록은 동일한 유형의 여러 계층을 나타냅니다.
import torch
import torch. nn as nn

architecture_config = [
        # Tuple : (kernel_size, num_filters, stride, padding)
        (7, 64, 2, 3),
        "M", # max pooling
        (3, 192, 1, 1),
        "M",
        (1, 128, 1, 0),
        (3, 256, 1, 1),
        (1, 256, 1, 0),
        (3, 512, 1, 1),
        "M",
        # List : tuples and then last integer represents number of repeats
        [(1, 256, 1, 0), (3, 512, 1, 1) , 4],
        (1,512,1,0),
        (3, 1024, 1, 1),
        "M",
        [(1, 512, 1, 0), (3, 1024, 1, 1) , 2],
        (3, 1024, 1, 1),
        (3, 1024, 2, 1),
        (3, 1024, 1, 1),
        (3, 1024, 1, 1),
]-
CNNBlock클래스는 모델에 사용되는 표준 블록으로, 배치 정규화 및 Leaky ReLU 활성화 함수가 뒤따르는 컨볼루션 계층으로 구성됩니다.배치 정규화 ( Batch Norm)은 논문에는 없지만 ( 본 논문이 나올 때 배치 정규화가 없었다고 들었음) 정규화에 대한 장점을 살리고자 적용했습니다.
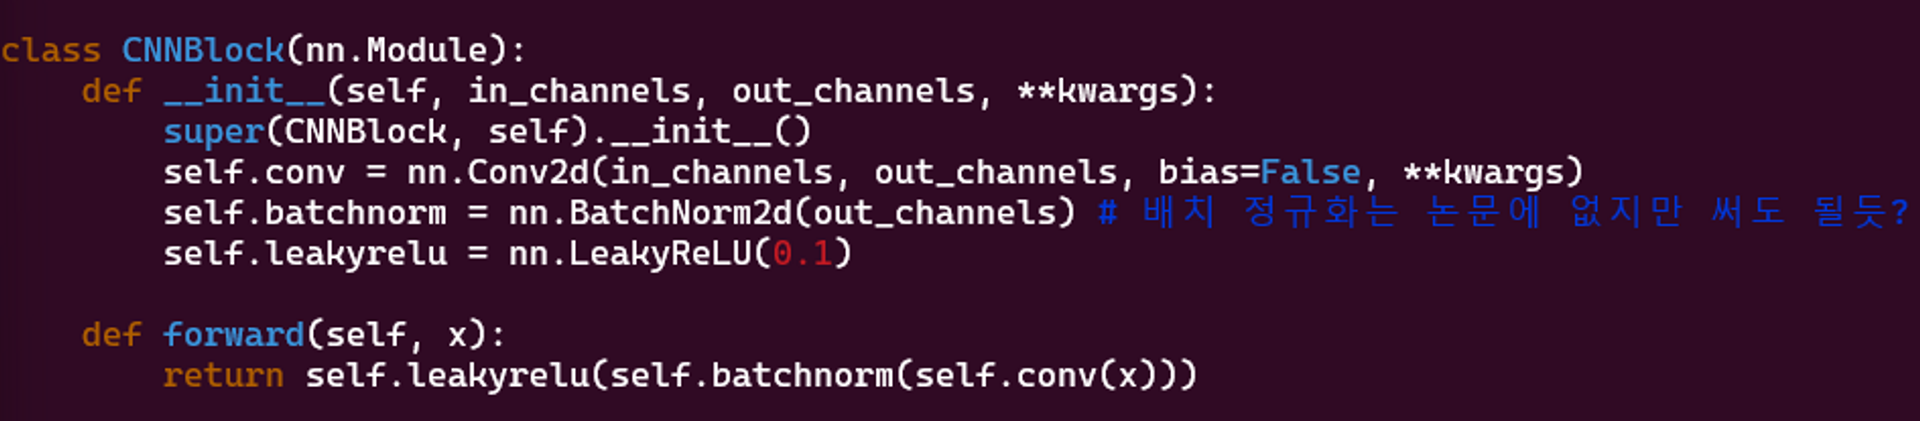
class CNNBlock(nn.Module):
    def __init__(self, in_channels, out_channels, **kwargs):
        super(CNNBlock, self).__init__()
        self.conv = nn.Conv2d(in_channels, out_channels, bias=False, **kwargs)
        self.batchnorm = nn.BatchNorm2d(out_channels) # 배치 정규화는 논문에 없지만 써도 될듯?
        self.leakyrelu = nn.LeakyReLU(0.1)

    def forward(self, x):
return self.leakyrelu(self.batchnorm(self.conv(x)))-
Yolov1클래스는 YOLOv1 모델의 메인 클래스입니다.Yolov1클래스의forward메서드는 모델의 정방향 패스를 정의합니다.Yolov1클래스의_create_conv_layers메서드는architecture_config목록을 사용하여 모델을 구성하는 레이어 시퀀스를 생성합니다.
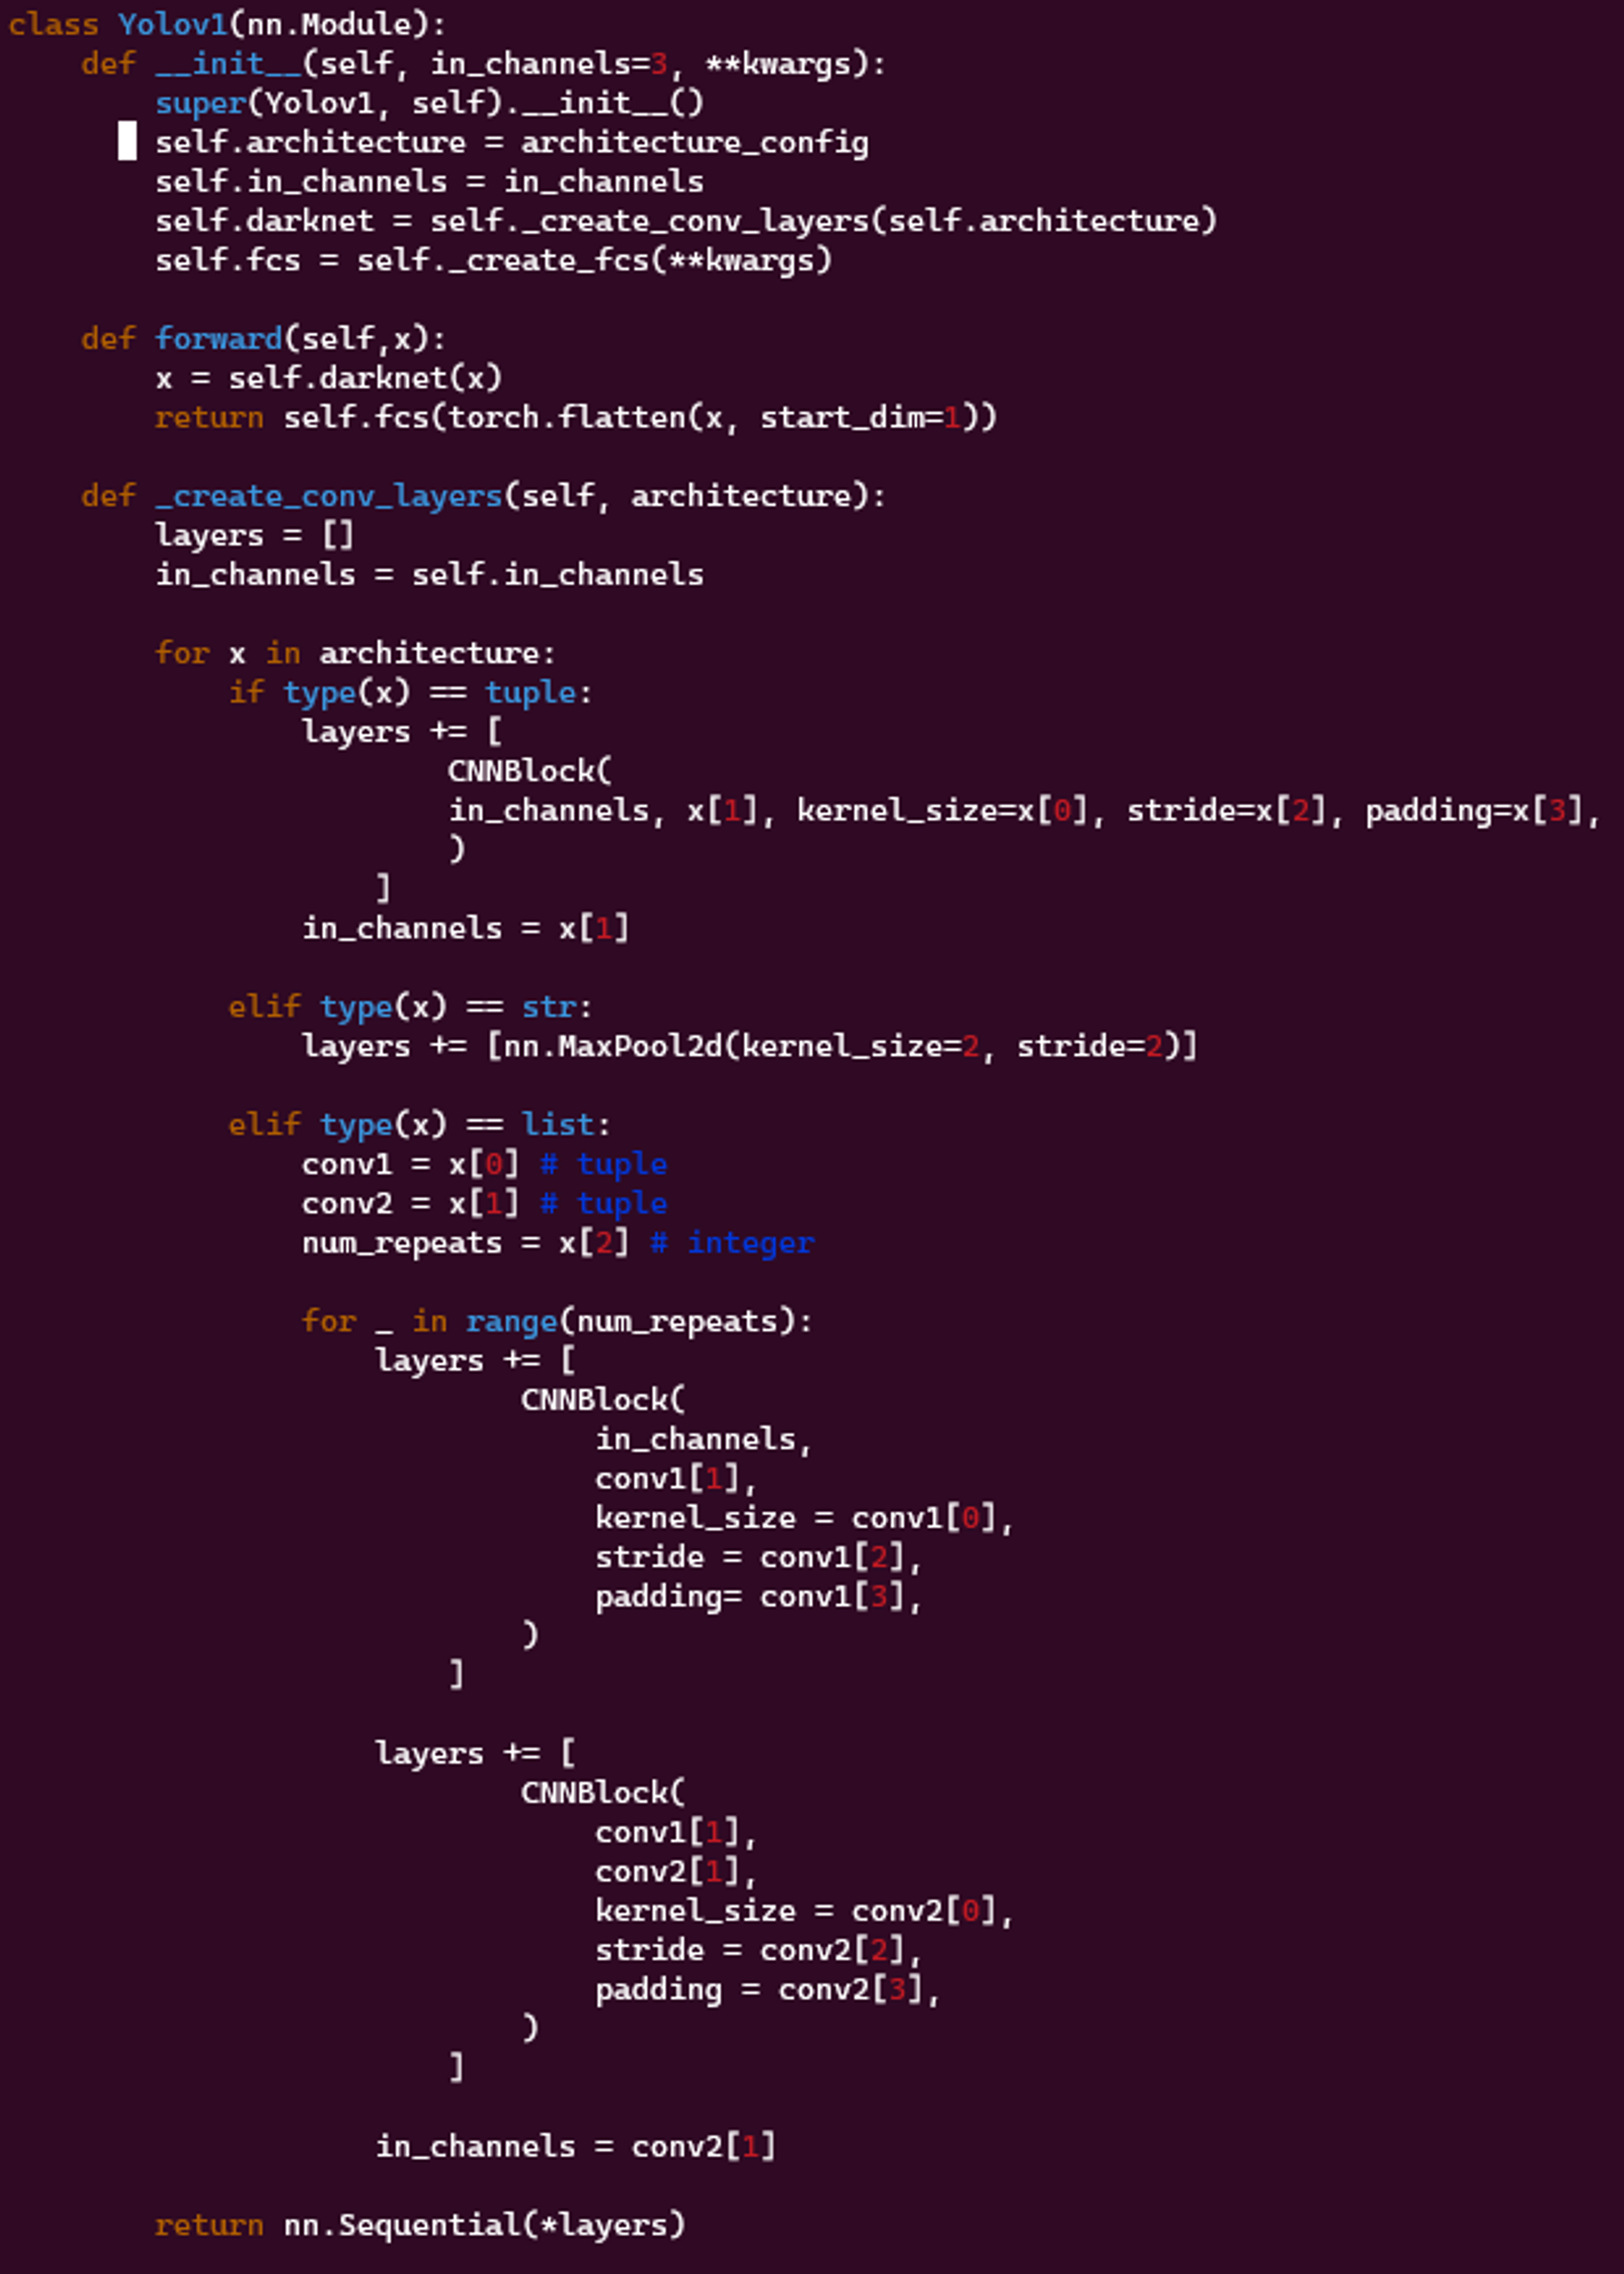
class Yolov1(nn.Module):
    def __init__(self, in_channels=3, **kwargs):
        super(Yolov1, self).__init__()
        self.architecture = architecture_config
        self.in_channels = in_channels
        self.darknet = self._create_conv_layers(self.architecture)
        self.fcs = self._create_fcs(**kwargs)

    def forward(self,x):
        x = self.darknet(x)
        return self.fcs(torch.flatten(x, start_dim=1))

    def _create_conv_layers(self, architecture):
        layers = []
        in_channels = self.in_channels

				for x in architecture:
            if type(x) == tuple:
                layers += [
                        CNNBlock(
                        in_channels, x[1], kernel_size=x[0], stride=x[2], padding=x[3],
                        )
                    ]
                in_channels = x[1]

            elif type(x) == str:
                layers += [nn.MaxPool2d(kernel_size=2, stride=2)]

            elif type(x) == list:
                conv1 = x[0] # tuple
                conv2 = x[1] # tuple
                num_repeats = x[2] # integer

                for _ in range(num_repeats):
                    layers += [
                            CNNBlock(
                                in_channels,
                                conv1[1],
                                kernel_size = conv1[0],
                                stride = conv1[2],
                                padding= conv1[3],
                            )
                        ]

										layers += [
                            CNNBlock(
                                conv1[1],
                                conv2[1],
                                kernel_size = conv2[0],
                                stride = conv2[2],
                                padding = conv2[3],
                            )
                        ]

                    in_channels = conv2[1]

return nn.Sequential(*layers)-
_create_fcs함수는 모델의 완전 연결 레이어를 생성하는 도우미 함수입니다. 이러한 레이어는 그리드 크기(S), 그리드 셀당 경계 상자 수(B) 및 클래스 수(C)에 따라 달라지는 출력 크기와 일치하도록 기능 맵 크기를 줄이는 역할을 합니다.).끝에 있는 'test' 함수는 크기가 '(2, 3, 448, 448)'인 임의 텐서로 YOLOv1 모델을 테스트하는 데 사용됩니다. 여기서 2는 배치 크기이고 3은 이미지의 색상 채널을 나타냅니다. , 448x448은 이미지의 크기입니다. 예상되는 출력 모양은 그리드의 각 셀에 대한 예측을 나타내는
(2, S*S*(C+B*5))입니다(클래스 확률 및 경계 상자 매개변수).
- FC1에 dropout ( drop rate = 0.5 ) 적용
- 마지막 레이어에는 당연하지만 정규화 사용하면 안됌. ( 온전한 값이 나와야 함 )
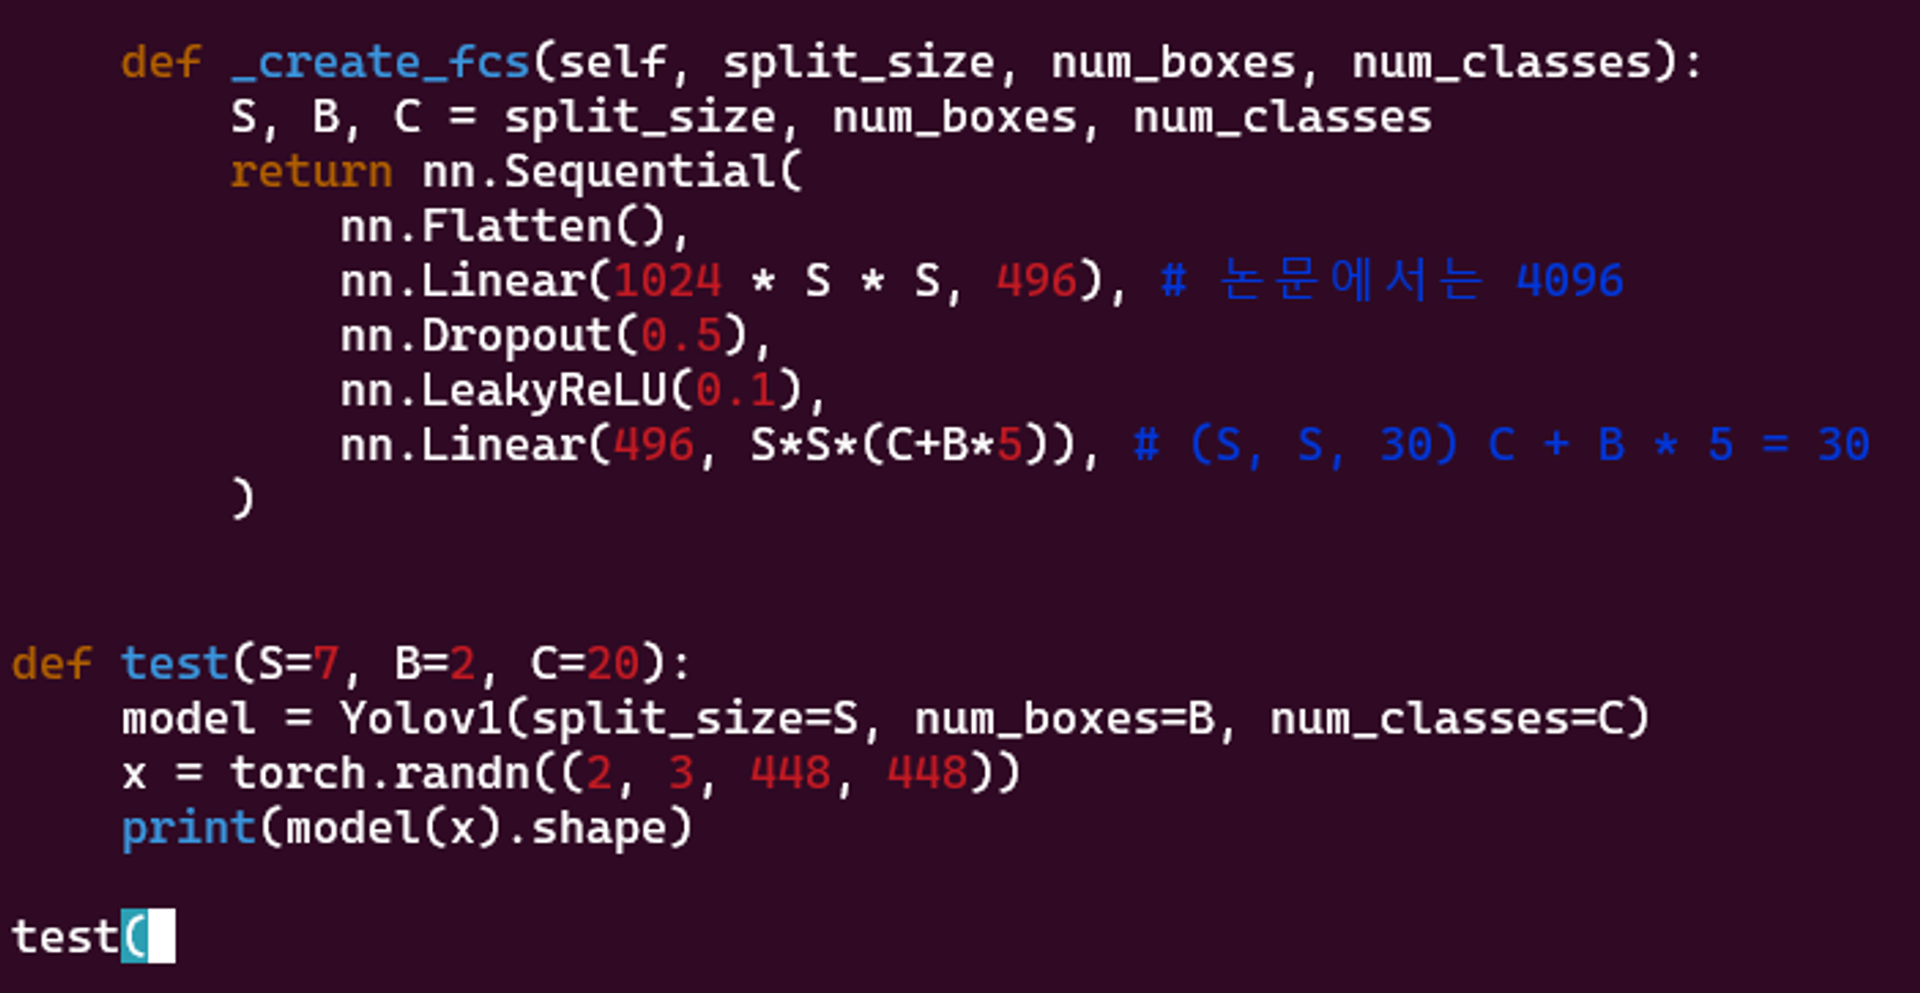
def _create_fcs(self, split_size, num_boxes, num_classes):
        S, B, C = split_size, num_boxes, num_classes
        return nn.Sequential(
            nn.Flatten(),
            nn.Linear(1024 * S * S, 496), # 논문에서는 4096
            nn.Dropout(0.5),
            nn.LeakyReLU(0.1),
            nn.Linear(496, S*S*(C+B*5)), # (S, S, 30) C + B * 5 = 30
        )


def test(S=7, B=2, C=20):
    model = Yolov1(split_size=S, num_boxes=B, num_classes=C)
    x = torch.randn((2, 3, 448, 448))
    print(model(x).shape)

test()
scratch로만 모델링하는 것을 연습하고 있습니다.
확실히 코드 한 줄씩 전부 이해하려니 너무 힘드네요.
다음 포스팅은 loss.py from scratch 를 준비할 예정입니다.
읽어주셔서 감사합니다 :)