최근에 web.dev의 html 파트를 정독하면서 용어 정리를 다시 하면서 몰랐던 부분도 많이 배우고 있다. 그 중에서 가장 기초게 되는 element에 대해서 정리해보았다.
element란?
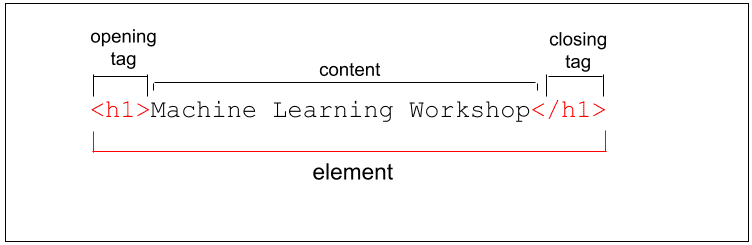
위의 이미지처럼 여는 태그부터 닫는 태그까지 그 모두를 통칭하는게 element이다.
element는 여는 태그와 닫는 태그로 이루어져있다. 그리고 태그 사이의 것을 content라고 부른다.
tag란?
element의 시작과 종료를 표시하는 데 사용되는것이다. tag의 이름은 tag에서 대괄호를 뺀 부분을 tag의 이름으로 부른다. 예를 들면 <h1> tag의 이름은 h1이다.
void tag
닫는 tag가 없는 tag이다. void tag들은 자식 요소를 중첩할 수 없다. 예시로는 input이나 img를 들 수 있다.
닫는 tag를 생략한 경우
닫는 tag가 필요한 tag중에서 닫는 tag를 생략한 경우에는 브라우저에서 암묵적으로 닫는 tag를 생성한다. 그렇다고 해서 닫는 tag를 생략해도 된다는 뜻이 아니다. 암묵적으로 생성한 닫는 tag 때문에 개발자가 의도한 바와 전혀 다른 결과물이 생성될 수도 있기 때문이다.
script, style, title 등의 tag는 닫는 tag를 생략한 경우 해당 tag 이후의 콘텐츠의 렌더링이 중단되는 경우도 있다.
테스트
<!DOCTYPE html>
<html lang="en">
  <head>
    <meta charset="UTF-8" />
    <meta name="viewport" content="width=device-width, initial-scale=1.0" />
    <title>Document</title>
  </head>
  <body>
    <div>test1</div>
    <script>  <!-- script의 닫는 tag 생략-->
    <div>test2</div>
  </body>
</html>
script 요소의 닫는 tag를 생략했다. 예상대로라면 test1은 렌더링되지만 test2는 렌더링되지 않아야 한다.
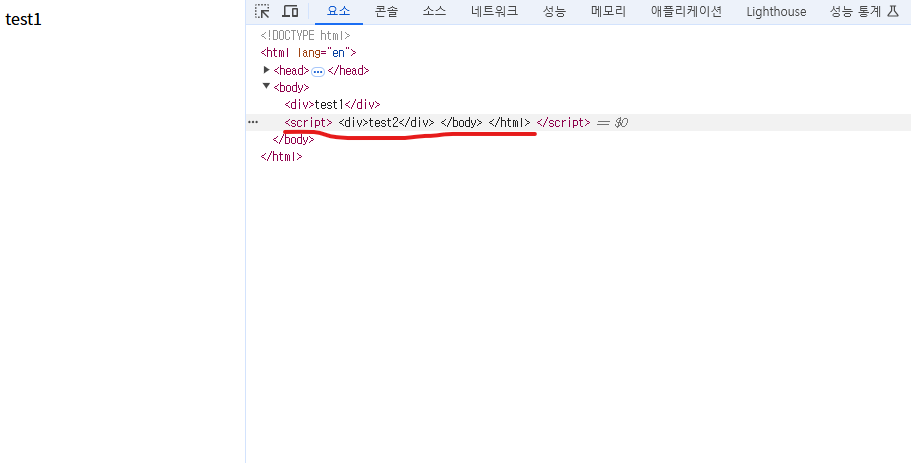
예상대로 test1만 렌더링된 모습을 확인할 수 있다. 그리고 요소 트리를 확인해보니 생략된 닫는 script tag를 브라우저에서 생성하면서 script 요소의 content가 이상하게 적용된 것을 확인할 수 있다.
속성
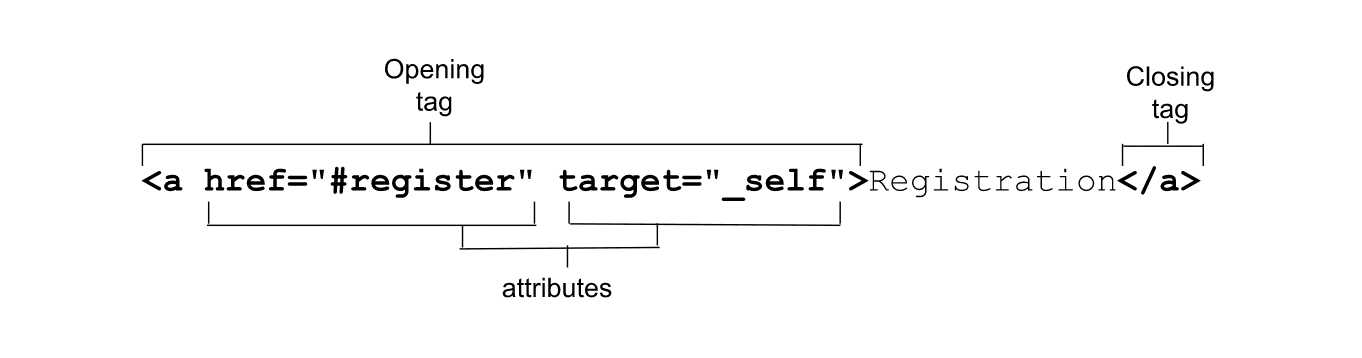
속성읜 element의 정보를 제공한다. 속성은 여는 태그에만 작성할 수 있고 여러 속성을 적용할 경우에는 하나 이상의 빈칸으로 구분한다. 하나의 속성은 속성 이름과 값으로 이루어진다.
부울 속성
boolean 속성인 경우에는 값을 추가하지 않고 값이 true인 경우에는 이름만 여는 tag에 추가해주면 된다. 값도 같이 적용할 경우에 적용한 값이 유효하지 않더라도 속성의 값을 true로 간주한다.
테스트
<!DOCTYPE html>
<html lang="en">
  <head>
    <meta charset="UTF-8" />
    <meta name="viewport" content="width=device-width, initial-scale=1.0" />
    <title>Document</title>
  </head>
  <body>
    <!-- true -->
    <h6>checked true</h6>
    <input type="checkbox" checked />
    <input type="checkbox" checked="" />
    <input type="checkbox" checked="true" />
    <input type="checkbox" checked="checked" />
    <input type="checkbox" checked="false" />
    <br />
    <!-- false -->
    <h6>checked false</h6>
    <input type="checkbox" />
  </body>
</html>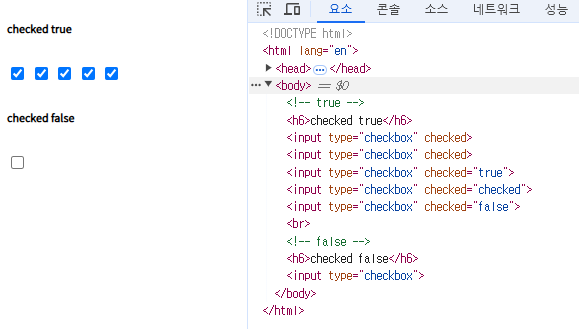
열거형 속성
사전에 정해진 값만 속성의 값으로 사용할 수 있는 속성이다.
불리언 속성과는 달리 생략한다고 해서 속성이 정해지지 않는게 아니라 default 값이 지정된다.
예를 들어 input의 경우 type을 생략할 경우 text 가 default로 적용된다.
테스트
<!DOCTYPE html>
<html lang="en">
  <head>
    <meta charset="UTF-8" />
    <meta name="viewport" content="width=device-width, initial-scale=1.0" />
    <title>Document</title>
  </head>
  <body>
    <div>
      <h3>default type test</h3>
      <input id="none-type-input" />
      <div></div>
    </div>
    <div>
      <h3>text type test</h3>
      <input id="text-type-input" type="text" />
      <div></div>
    </div>
    <div>
      <h3>invalid type test</h3>
      <input type="true" id="true-type-input" />
      <div></div>
    </div>
    <script>
      const noneTypeInputEl = document.querySelector("#none-type-input");
      const textTypeInputEl = document.querySelector("#text-type-input");
      const trueTypeInputEl = document.querySelector("#true-type-input");

      noneTypeInputEl.parentNode.lastChild.textContent =
        "input type is : " + noneTypeInputEl.type;
      textTypeInputEl.parentNode.lastChild.textContent =
        "input type is : " + textTypeInputEl.type;
      trueTypeInputEl.parentNode.lastChild.textContent = textContent =
        "input type is : " + trueTypeInputEl.type;
    </script>
  </body>
</html>
type을 명시하지 않은 input, type을 text로 명시한 input, 잘못된 값을 type으로 적용한 input 3개의 type을 text로 표현하도록 했다.
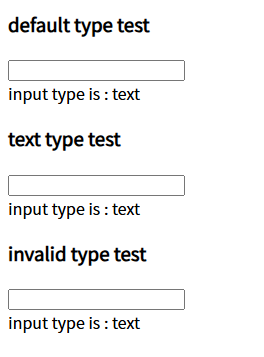
결과는 위와같이 모두 text type이 적용된것을 확인할 수 있었다.
커스텀 속성
필요한 경우 data- 프리렛을 추가해서 커스텀 속성을 지정할 수 있다. element.dataset[속성이름]으로 커스텀 속성의 값을 가져올 수 있다.
테스트
<!DOCTYPE html>
<html lang="en">
  <head>
    <meta charset="UTF-8" />
    <meta name="viewport" content="width=device-width, initial-scale=1.0" />
    <title>Document</title>
  </head>
  <body>
    <span data-test-att="test"></span>
    <script>
      const spanEl = document.querySelector("span");
      console.log(spanEl.dataset["testAtt"]);
    </script>
  </body>
</html>
경험적으로만 알고 있는 내용들을 정독으로 이론을 다지는 것은 매우 중요한 것 같습니다!
저는 생각만 하고 잘 안하게 되더라구요ㅜ
링크 걸어 둔 https://web.dev/?hl=ko 이 사이트는 저는 얼마 전에 우연히 웹 서핑중에 알게되어서
구글에서도 이런 좋은 사이트를 만들어 놨구나..했었는데,
정독할 정도의 좋은 사이트였군요! html 같은 웹의 기초부터 차근차근 설명해 놓은 줄은 몰랐습니다
저도 정독 욕심이 나네요!! ㅎ.ㅎ