준비물
Git- Git 명령어를 사용하기 위한 프로그램 다운로드
https://git-scm.com/- Unity ML-Agents Release 12를 CMD를 사용하여 원하는 경로에 Clone한다.
$ git clone --branch release_12 https://github.com/Unity-Technologies/ml-agents.gitAnaconda(Python)
https://www.anaconda.com/products/individual#Downloads- 설치 이후 설치가 잘되었는 지 확인한다.
conda -Vconda 4.8.3
⚠️ 아나콘다를 설치했는데 다음 명령어가 없다고 나오면, 아나콘다 환경변수가 설정이 되지 않았다.
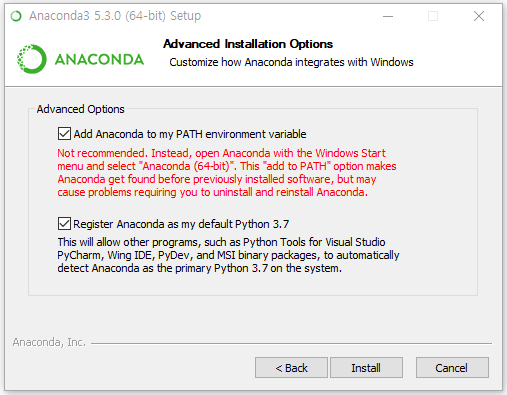
🛠 Add Anaconda to my PATH environment variable 을 체크 후 아나콘다를 설치하면 윈도우 환경변수에 아나콘다 환경을 추가하여 설치해준다.
Unity
- 2019.4.4f1 버전으로 정상작동 확인하였다.
파이썬 환경설정
- Anaconda 설치 후 CMD 창을 연다.
- 파이썬 가상환경 설치(파이썬 프로젝트 간 충돌을 피하기 위해)
conda create -n "ml-agents"- 파이썬 가상환경 적용
conda activate ml-agentsmlagent설치
pip install mlagents==0.23.0pytorch설치
pip3 install torch==1.7.0 -f https://download.pytorch.org/whl/torch_stable.html유니티 프로젝트 생성
ML-Agents를 사용하기 위한 새로운 유니티 프로젝트를 생성한다.
Unity ML-Agent 적용
생성한 유니티 프로젝트에 ML-Agents Release 12 버전의 com.unity.ml-agents 폴더 패키지를 통해 설치 진행한다
- Unity > Window > Package Manager
- Package Manager 내 + 버튼을 클릭한다.
- Add package from disk 를 클릭한다.
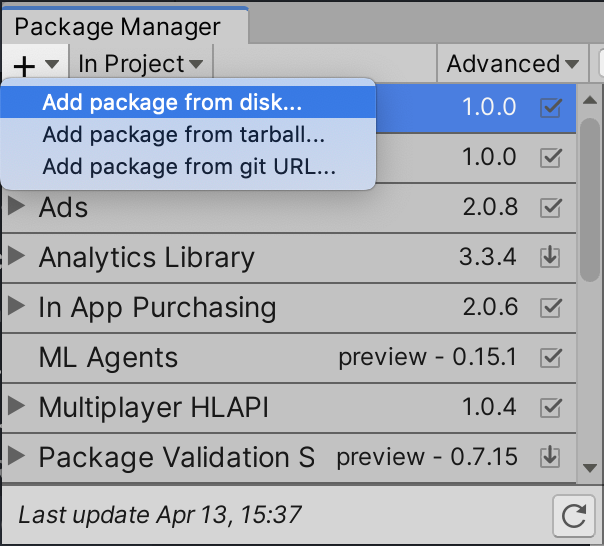
- com.unity.ml-agents 폴더를 찾는다.
- com.unity.ml-agents 폴더 내의 package.json 파일을 클릭하여 적용한다.

ML-Agents 예제 프로젝트
✅ 예제 프로젝트는 다음 문서를 참조하여 작성한다.
https://github.com/Unity-Technologies/ml-agents/blob/master/docs/Learning-Environment-Create-New.md
환경 생성
바닥 평면(Floor), 타겟 큐브(Target), 에이전트(RollerAgent)를 담당할 3D Object 를 생성하고 이를 그룹화하여 TrainingArea라는 이름을 붙힌다.
에이전트 스크립트 생성
- 에이전트(
RollerAgent)를 클릭한다. Add Component를 클릭한다.- 가장 아래 항목에 있는
New Script를 클릭한다. - Script 이름을 정한다. (RollerAgent.cs)
- 이름을 정한 후
Create and Add를 클릭한다.
에이전트 스크립트 작업
- 생성한 에이전트 스크립트를 코드 에디터에서 연다. (RollerAgent.cs)
- ML-Agent 패키지를 코드 내 추가한다.
using Unity.MLAgents;
using Unity.MLAgents.Sensors;
using Unity.MLAgents.Actuators;-
오버라이드를
MonoBehaviour에서Agent로 변경한다. -
스크립트 메소드 중에
Update()는 제거하고Start()는 남겨둔다.
Agent 클래스를 오버라이드 했을 때 다음 메소드들을 상속받아야 한다.
OnEpisodeBegin()- Agent가 목표에 도달할 때마다 에피소드 종료 후, 새로운 에피소드가 생성됨에 따른 환경을 설정해주기 위한 메소드다.
CollectObservations(VectorSensor sensor)- Agent가 환경에 대한 행동 결정을 내리는 메소드다.
OnActionReceived(ActionBuffers actionBuffers)- Agent가 액션에 대한 보상을 결정하는 메소드다.
- 보상 획득 이후, 에피소드를 종료하는 분기를 설정할 수 있다.
Agent 동작 Script를 생성 및 작성
- 동작할 Agent에 Add Component를 클릭한다.
- 항목 가장 아래에 New Script를 클릭한다.
- Script 이름을
RollerAgent로 설정한다. - 아래의 코드를 입력한다.
using System.Collections.Generic;
using UnityEngine;
using Unity.MLAgents;
using Unity.MLAgents.Sensors;

public class RollerAgent : Agent
{
		// Agent 설정
	  Rigidbody rBody;
	  void Start () {
	      rBody = GetComponent<Rigidbody>();
	  }

		// 목표물 설정
	  public Transform Target;
	  public override void OnEpisodeBegin()
	  {
	     // If the Agent fell, zero its momentum
	      if (this.transform.localPosition.y < 0)
	      {
	          this.rBody.angularVelocity = Vector3.zero;
	          this.rBody.velocity = Vector3.zero;
	          this.transform.localPosition = new Vector3( 0, 0.5f, 0);
	      }

	      // Move the target to a new spot
	      Target.localPosition = new Vector3(Random.value * 8 - 4,
	                                         0.5f,
	                                         Random.value * 8 - 4);
	  }

		public override void CollectObservations(VectorSensor sensor)
		{
		    // Target and Agent positions
		    sensor.AddObservation(Target.localPosition);
		    sensor.AddObservation(this.transform.localPosition);

		    // Agent velocity
		    sensor.AddObservation(rBody.velocity.x);
		    sensor.AddObservation(rBody.velocity.z);
		}

		public float forceMultiplier = 10;
		public override void OnActionReceived(ActionBuffers actionBuffers)
		{
		    // Actions, size = 2
		    Vector3 controlSignal = Vector3.zero;
		    controlSignal.x = actionBuffers.ContinuousActions[0];
		    controlSignal.z = actionBuffers.ContinuousActions[1];
		    rBody.AddForce(controlSignal * forceMultiplier);

		    // Rewards
		    float distanceToTarget = Vector3.Distance(this.transform.localPosition, Target.localPosition);

		    // Reached target
		    if (distanceToTarget < 1.42f)
		    {
		        SetReward(1.0f);
		        EndEpisode();
		    }

		    // Fell off platform
		    else if (this.transform.localPosition.y < 0)
		    {
						SetReward(-3.0f);
		        EndEpisode();
		    }
		}
}
Hyperparameter 설정
Hyperparameter는 딥러닝 학습을 위해 유저가 설정가능한 파라미터를 말한다. ML-Agents에서는 yaml 형식에 양식을 정하여 해당 파라미터를 저장하고 있다.
해당 양식은 아래와 같다.
behaviors:
  RollerAgent:
    trainer_type: ppo
    hyperparameters:
      batch_size: 10
      buffer_size: 100
      learning_rate: 3.0e-4
      beta: 5.0e-4
      epsilon: 0.2
      lambd: 0.99
      num_epoch: 3
      learning_rate_schedule: linear
    network_settings:
      normalize: false
      hidden_units: 128
      num_layers: 2
    reward_signals:
      extrinsic:
        gamma: 0.99
        strength: 1.0
    max_steps: 500000
    time_horizon: 64
    summary_freq: 10000
👉 해당 파라미터의 상세 사항들을 참조하려면 Unity ML-Agents Training-Configuration-File.md 문서를 확인한다.
학습 실행
위에서 작성한 내용들을 바탕으로 학습을 진행한다.
-
프로젝트가 존재하는 디렉토리에
Shell(bash, zsh, cmd, powershell 등)을 실행한다. -
Shell에mlagents-learn ./hyperparameter/hyperparameter.yaml —run-id=test01을 입력한다.mlagents-learnpython환경에 설치된mlagents라이브러리가 동작시켜주는 명령어이다.- 해당 명령어를 실행시키려면
python mlagents가 설치되어야 한다.(없으면pip install mlagents=0.23.0)
./hyperparameter/hyperparameter.yaml- 강화학습을 위한 Hyperparameter가 저장된 yaml 파일을 불러온다.
—run-id=test01result에 강화학습 모델이 저장되는 폴더의 이름이다.- 해당 폴더에는 결과 딥러닝 모델인 onnx와 pt 파일이 들어가있다.
-
명령어를 작성하고 Enter를 누르면 아래와 같은 화면이 나온다.
Lenovo@DESKTOP-PE262IM MINGW64 ~/Desktop/RollerBall (master)
$ mlagents-learn ./hyperparameter/hyperparameter.yaml --run-id=test01
2021-02-03 10:23:27.191678: W tensorflow/stream_executor/platform/default/dso_loader.cc:55] Could not load dynamic library 'cudart64_101.dll'; dlerror: cudart64_101.dll not found
2021-02-03 10:23:27.191976: I tensorflow/stream_executor/cuda/cudart_stub.cc:29] Ignore above cudart dlerror if you do not have a GPU set up on your
machine.
WARNING:tensorflow:From c:\users\lenovo\anaconda3\lib\site-packages\tensorflow\python\compat\v2_compat.py:96: disable_resource_variables (from tensorflow.python.ops.variable_scope) is deprecated and will be removed in a future version.
Instructions for updating:
non-resource variables are not supported in the long term

                        ▄▄▄▓▓▓▓
                   ╓▓▓▓▓▓▓█▓▓▓▓▓
              ,▄▄▄m▀▀▀'  ,▓▓▓▀▓▓▄                           ▓▓▓  ▓▓▌
            ▄▓▓▓▀'      ▄▓▓▀  ▓▓▓      ▄▄     ▄▄ ,▄▄ ▄▄▄▄   ,▄▄ ▄▓▓▌▄ ▄▄▄    ,▄▄
          ▄▓▓▓▀        ▄▓▓▀   ▐▓▓▌     ▓▓▌   ▐▓▓ ▐▓▓▓▀▀▀▓▓▌ ▓▓▓ ▀▓▓▌▀ ^▓▓▌  ╒▓▓▌
        ▄▓▓▓▓▓▄▄▄▄▄▄▄▄▓▓▓      ▓▀      ▓▓▌   ▐▓▓ ▐▓▓    ▓▓▓ ▓▓▓  ▓▓▌   ▐▓▓▄ ▓▓▌
        ▀▓▓▓▓▀▀▀▀▀▀▀▀▀▀▓▓▄     ▓▓      ▓▓▌   ▐▓▓ ▐▓▓    ▓▓▓ ▓▓▓  ▓▓▌    ▐▓▓▐▓▓
          ^█▓▓▓        ▀▓▓▄   ▐▓▓▌     ▓▓▓▓▄▓▓▓▓ ▐▓▓    ▓▓▓ ▓▓▓  ▓▓▓▄    ▓▓▓▓`
            '▀▓▓▓▄      ^▓▓▓  ▓▓▓       └▀▀▀▀ ▀▀ ^▀▀    `▀▀ `▀▀   '▀▀    ▐▓▓▌
               ▀▀▀▀▓▄▄▄   ▓▓▓▓▓▓,                                      ▓▓▓▓▀
                   `▀█▓▓▓▓▓▓▓▓▓▌
                        ¬`▀▀▀█▓

 Version information:
  ml-agents: 0.23.0,
  ml-agents-envs: 0.23.0,
  Communicator API: 1.3.0,
  PyTorch: 1.7.0+cu110
2021-02-03 10:23:31 INFO [learn.py:275] run_seed set to 3500
2021-02-03 10:23:33.327915: W tensorflow/stream_executor/platform/default/dso_loader.cc:55] Could not load dynamic library 'cudart64_101.dll'; dlerror: cudart64_101.dll not found
2021-02-03 10:23:33.328029: I tensorflow/stream_executor/cuda/cudart_stub.cc:29] Ignore above cudart dlerror if you do not have a GPU set up on your
machine.
WARNING:tensorflow:From c:\users\lenovo\anaconda3\lib\site-packages\tensorflow\python\compat\v2_compat.py:96: disable_resource_variables (from tensorflow.python.ops.variable_scope) is deprecated and will be removed in a future version.
Instructions for updating:
non-resource variables are not supported in the long term
2021-02-03 10:23:35 INFO [environment.py:204] Listening on port 5004. Start training by pressing the Play button in the Unity Editor.
2021-02-03 10:23:35 INFO [environment.py:204] Listening on port 5004. Start training by pressing the Play button in the Unity Editor.말과 같이 Unity Editor에서 환경을 실행시킨다.
해당 학습은 hyperparameter에서 작성했듯이 50만번 Episode를 진행한다. 약 20분정도 소요된다.
학습 모델 적용
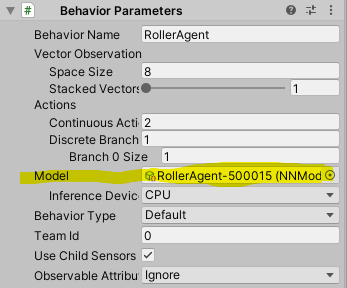
- 프로젝트 폴더 > results 에 각 실행 당 학습 결과 모델 및 지표들이 저장되어 있다. 그 중에서
TrainingModel-Step.onnx형식으로 된 파일을Assets폴더에 추가한다. - Agents를 클릭하고 Behavior Parameters를 클릭한다.
- Behavior Parameters 내 Model 부분에서 오른쪽 + 를 클릭한다.
- 1번에서 Assets에 추가한 onnx 파일을 클릭하여 적용한다.
Tensorboard 학습 결과 분석
Tensorboard는 학습의 진행 상황을 분석하는 Dashboard를 제공한다.
$ tensorboard --logdir results --port 6006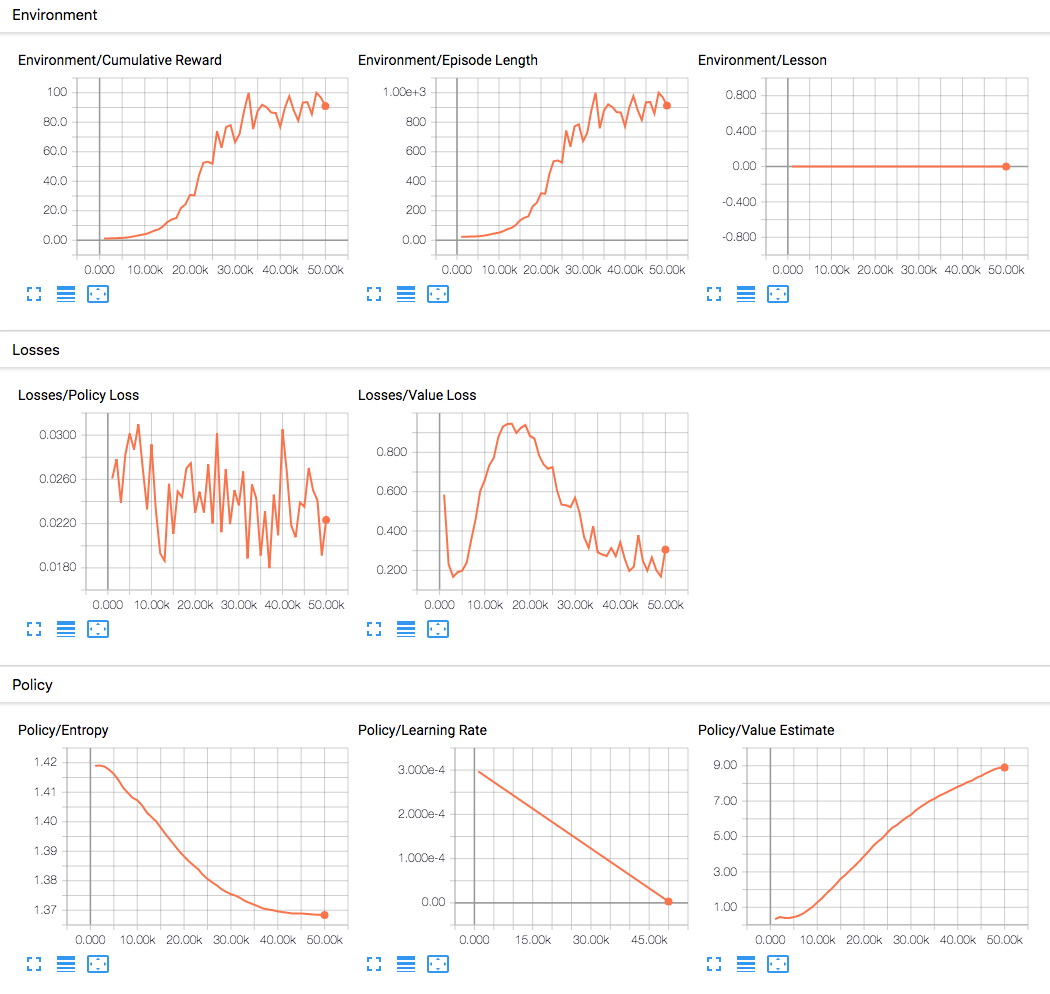
학습 파라미터에 대한 변화 정도를 보여준다.

감사히 읽었습니다 선생님