AppBar 에 관하여 2
import 'package:flutter/material.dart';
void main() => runApp(MyApp());
class MyApp extends StatelessWidget {
const MyApp({Key? key}) : super(key: key);
Widget build(BuildContext context) {
return MaterialApp(
title: 'AppBar Practice',
theme: ThemeData(primarySwatch: Colors.teal),
debugShowCheckedModeBanner: false,
home: MyScreen(),
);
}
}
class MyScreen extends StatelessWidget {
const MyScreen({Key? key}) : super(key: key);
Widget build(BuildContext context) {
return Scaffold(
appBar: AppBar(
title: const Text(
'Appbar icon Menu',
style: TextStyle(
letterSpacing: 2.0,
fontWeight: FontWeight.normal,
),
),
centerTitle: true,
elevation: 0.0,
leading: IconButton(
onPressed: () {
print('Menu icon was clicked');
},
icon: const Icon(Icons.menu),
),
actions: [
IconButton(
onPressed: () {
print('Shopping Cart icon was clicked');
},
icon: const Icon(Icons.shopping_cart),
),
IconButton(
onPressed: () {
print('Search icon was clicked');
},
icon: const Icon(Icons.search),
),
IconButton(
onPressed: () {
print('Account icon was clicked');
},
icon: const Icon(Icons.account_circle),
)
],
),
);
}
}
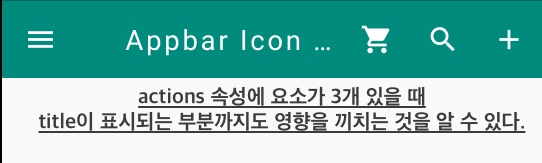
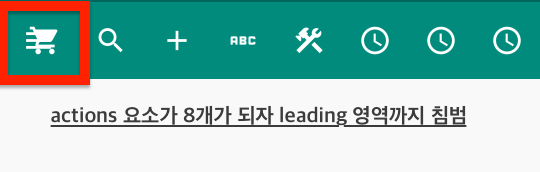
지난 시간 위의 예제 코드를 통해서 AppBar() 위젯에 대해서 여러가지를 확인하는 도중 actions 속성에 IconButton 요소가 3개 이상이 존재할 때 title이 표시되는 범위까지도 침범하여 영향을 끼치는 것을 알 수 있었다.
이렇게 actions 속성에 요소가 여러개 있을 경우 title이 표시되는 범위까지도 침범하여 title 요소의 텍스트의 길이가 ... 으로 숨겨지는 것을 해결하기 위해 actions 속성에 여러가지 요소를 구성하는 것보다 AppBar() 위젯의 bottom 속성에 요소들을 배치하는 방향으로 구현해보기로 한다.
TabBar() 위젯의 사용
import 'package:flutter/material.dart';
void main() => runApp(MyApp());
class MyApp extends StatelessWidget {
const MyApp({Key? key}) : super(key: key);
Widget build(BuildContext context) {
return MaterialApp(
title: 'AppBar Practice',
theme: ThemeData(primarySwatch: Colors.teal),
debugShowCheckedModeBanner: false,
home: MyScreen(),
);
}
}
class MyScreen extends StatelessWidget {
const MyScreen({Key? key}) : super(key: key);
Widget build(BuildContext context) {
return DefaultTabController( // 기본 탭 컨트롤러를 이용 Scaffold 위젯을 감싼다
length: 3, // Tab 탭 수를 지정
child: Scaffold(
appBar: AppBar(
title: const Text(
'Appbar icon Menu',
style: TextStyle(
letterSpacing: 2.0,
fontWeight: FontWeight.normal,
),
),
centerTitle: true,
elevation: 0.0,
leading: IconButton(
onPressed: () {
print('Menu icon was clicked');
},
icon: const Icon(Icons.menu),
),
bottom: const TabBar( // bottom 속성에 TabBar() 위젯 작성.
tabs: [
Tab(
icon: Icon(Icons.shopping_cart),
text: '쇼핑하기',
),
Tab(
icon: Icon(Icons.search),
text: '검색',
),
Tab(
icon: Icon(Icons.account_circle),
text: '내 정보',
),
],
),
actions: [
IconButton(
onPressed: () {
print('Add icon was clicked');
},
icon: const Icon(Icons.add),
),
],
),
),
);
}
}
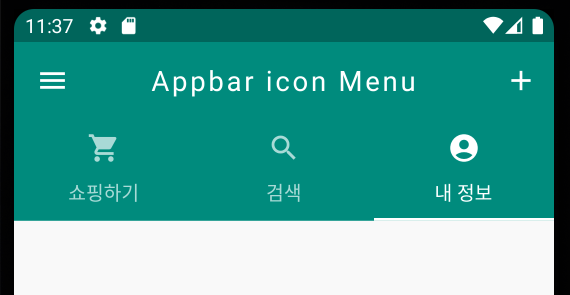
actions 속성에 있는 요소들을 줄이고 bottom 속성에 TabBar() 위젯을 통해서 각 요소들을 Tab으로써 이용할 수 있도록 변경하면 AppBar() 위젯 내 title 속성의 텍스트 요소를 저해하지 않고 구현이 가능하다. 이렇게 진행하면 지난 시간 actions 요소에 8개의 요소를 삽입했을 때에도 어느정도 대처가 가능하다.
isScrollable 속성과 unselectedLabelColor 속성
import 'package:flutter/material.dart';
void main() => runApp(MyApp());
class MyApp extends StatelessWidget {
const MyApp({Key? key}) : super(key: key);
Widget build(BuildContext context) {
return MaterialApp(
title: 'AppBar Practice',
theme: ThemeData(primarySwatch: Colors.teal),
debugShowCheckedModeBanner: false,
home: MyScreen(),
);
}
}
class MyScreen extends StatelessWidget {
const MyScreen({Key? key}) : super(key: key);
Widget build(BuildContext context) {
return DefaultTabController(
length: 8,
child: Scaffold(
appBar: AppBar(
title: const Text(
'Appbar icon Menu',
style: TextStyle(
letterSpacing: 2.0,
fontWeight: FontWeight.normal,
),
),
centerTitle: true,
elevation: 0.0,
leading: IconButton(
onPressed: () {
print('Menu icon was clicked');
},
icon: const Icon(Icons.menu),
),
bottom: TabBar(
tabs: [
Tab(
icon: Icon(Icons.shopping_cart),
text: '쇼핑하기',
),
Tab(
icon: Icon(Icons.search),
text: '검색',
),
Tab(
icon: Icon(Icons.account_circle),
text: '내 정보',
),
Tab(
icon: Icon(Icons.shopping_cart),
text: '쇼핑하기',
),
Tab(
icon: Icon(Icons.search),
text: '검색',
),
Tab(
icon: Icon(Icons.account_circle),
text: '내 정보',
),
Tab(
icon: Icon(Icons.search),
text: '검색',
),
Tab(
icon: Icon(Icons.account_circle),
text: '내 정보',
),
],
),
actions: [
IconButton(
onPressed: () {
print('Add icon was clicked');
},
icon: const Icon(Icons.add),
),
],
),
),
);
}
}
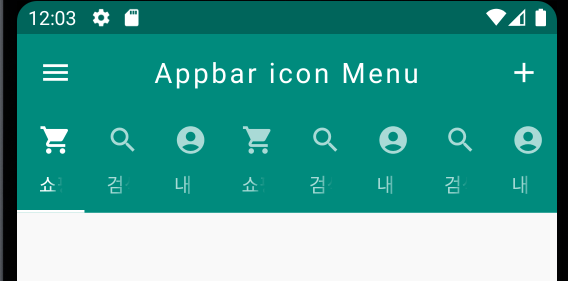
AppBar() 위젯 내의 title 속성의 텍스트 요소에는 영향을 끼치지 않았지만 bottom 속성에 존재하는 요소들이 그 갯수가 많아지니 TabBar() 위젯 내의 tab 요소 안 텍스트 요소들이 제대로 표기되지 않는 상황이 추가적으로 확인된다. 여기서 tab 요소 내의 텍스트 요소들이 모두 표기되면서 디자인적 요소를 가미하기 위해 TabBar() 위젯에서 isScrollable 속성과 unselectedLabelColor 속성을 추가한다.
import 'package:flutter/material.dart';
void main() => runApp(MyApp());
class MyApp extends StatelessWidget {
const MyApp({Key? key}) : super(key: key);
Widget build(BuildContext context) {
return MaterialApp(
title: 'AppBar Practice',
theme: ThemeData(primarySwatch: Colors.teal),
debugShowCheckedModeBanner: false,
home: MyScreen(),
);
}
}
class MyScreen extends StatelessWidget {
const MyScreen({Key? key}) : super(key: key);
Widget build(BuildContext context) {
return DefaultTabController(
length: 8,
child: Scaffold(
appBar: AppBar(
title: const Text(
'Appbar icon Menu',
style: TextStyle(
letterSpacing: 2.0,
fontWeight: FontWeight.normal,
),
),
centerTitle: true,
elevation: 0.0,
leading: IconButton(
onPressed: () {
print('Menu icon was clicked');
},
icon: const Icon(Icons.menu),
),
bottom: TabBar(
isScrollable: true,
unselectedLabelColor: Colors.white.withOpacity(0.2),
tabs: [
Tab(
icon: Icon(Icons.shopping_cart),
text: '쇼핑하기',
),
Tab(
icon: Icon(Icons.search),
text: '검색',
),
Tab(
icon: Icon(Icons.account_circle),
text: '내 정보',
),
Tab(
icon: Icon(Icons.shopping_cart),
text: '쇼핑하기',
),
Tab(
icon: Icon(Icons.search),
text: '검색',
),
Tab(
icon: Icon(Icons.account_circle),
text: '내 정보',
),
Tab(
icon: Icon(Icons.search),
text: '검색',
),
Tab(
icon: Icon(Icons.account_circle),
text: '내 정보',
),
],
),
actions: [
IconButton(
onPressed: () {
print('Add icon was clicked');
},
icon: const Icon(Icons.add),
),
],
),
),
);
}
}
bottom: TabBar(
            isScrollable: true, // TabBar 위젯 내의 Tab 요소에서 스크롤이 가능
            unselectedLabelColor: Colors.white.withOpacity(0.2), // 선택되지 않은 요소에 대해 투명도 설정
이제는 제법 그럴싸한 AppBar() 위젯이 만들어진 것 같다. 이제 각각의 탭 메뉴들에 진입했을 때 동작의 변화를 눈에 띄게 확인하기 위해 각 탭을 선택할 때마다 탭의 내용을 살펴볼 수 있도록 TabView() 위젯으로 작동을 살펴보았다.
import 'package:flutter/material.dart';
void main() => runApp(MyApp());
class MyApp extends StatelessWidget {
const MyApp({Key? key}) : super(key: key);
Widget build(BuildContext context) {
return MaterialApp(
title: 'AppBar Practice',
theme: ThemeData(primarySwatch: Colors.teal),
debugShowCheckedModeBanner: false,
home: MyScreen(),
);
}
}
class MyScreen extends StatelessWidget {
const MyScreen({Key? key}) : super(key: key);
Widget build(BuildContext context) {
return DefaultTabController(
length: 8,
child: Scaffold(
appBar: AppBar(
title: const Text(
'Appbar icon Menu',
style: TextStyle(
letterSpacing: 2.0,
fontWeight: FontWeight.normal,
),
),
centerTitle: true,
elevation: 0.0,
leading: IconButton(
onPressed: () {
print('Menu icon was clicked');
},
icon: const Icon(Icons.menu),
),
bottom: TabBar(
isScrollable: true,
unselectedLabelColor: Colors.white.withOpacity(0.2),
tabs: [
Tab(
icon: Icon(Icons.shopping_cart),
text: '쇼핑하기',
),
Tab(
icon: Icon(Icons.search),
text: '검색',
),
Tab(
icon: Icon(Icons.account_circle),
text: '내 정보',
),
Tab(
icon: Icon(Icons.shopping_cart),
text: '쇼핑하기',
),
Tab(
icon: Icon(Icons.search),
text: '검색',
),
Tab(
icon: Icon(Icons.account_circle),
text: '내 정보',
),
Tab(
icon: Icon(Icons.search),
text: '검색',
),
Tab(
icon: Icon(Icons.account_circle),
text: '내 정보',
),
],
),
actions: [
IconButton(
onPressed: () {
print('Add icon was clicked');
},
icon: const Icon(Icons.add),
),
],
),
body: TabBarView(
children: [
Container(
color: Colors.lightGreen,
),
Container(
color: Colors.tealAccent,
),
Container(
color: Colors.lightBlue,
),
Container(
color: Colors.lightGreenAccent,
),
Container(
color: Colors.limeAccent,
),
Container(
color: Colors.blueAccent,
),
Container(
color: Colors.cyanAccent,
),
Container(
color: Colors.green,
),
],
),
),
);
}
}
완성 및 테스트.