Drawer 메뉴.
Drawer 라는 단어는 사전적인 의미로 서랍, 서랍장 제도사, 어음 발행인(명사)로 사용된다.
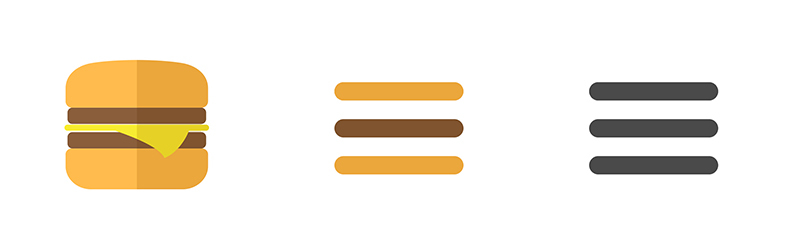
우리가 서랍을 열고 닫을 때 끌어 당겨서 사용하듯 Drawer() 위젯 역시도 마치 서랍을 이용하는 것과 같은 이미지를 준다. 주로 앱 상단에 네비게이션으로 사용되는 메뉴로, 여러가지 다양한 기능들을 하나의 네비게이션 안에 담을 수 있기 때문에 흔하게 사용하는 메뉴이자 방식이다. 기본 아이콘 모양이 마치 햄버거 모양과 닮았다고 하여 Drawer Menu를 햄버거 메뉴라고 부르는 경우도 있다.
Drawer 메뉴 구현하기.
import 'package:flutter/material.dart';
void main() => runApp(MyApp());
class MyApp extends StatelessWidget {
const MyApp({Key? key}) : super(key: key);
Widget build(BuildContext context) {
return MaterialApp(
title: 'AppBar Practice',
theme: ThemeData(primarySwatch: Colors.teal),
debugShowCheckedModeBanner: false,
home: MyScreen(),
);
}
}
class MyScreen extends StatefulWidget {
const MyScreen({Key? key}) : super(key: key);
State<MyScreen> createState() => _MyScreenState();
}
class _MyScreenState extends State<MyScreen> {
Widget build(BuildContext context) {
return DefaultTabController(
length: 3,
child: Scaffold(
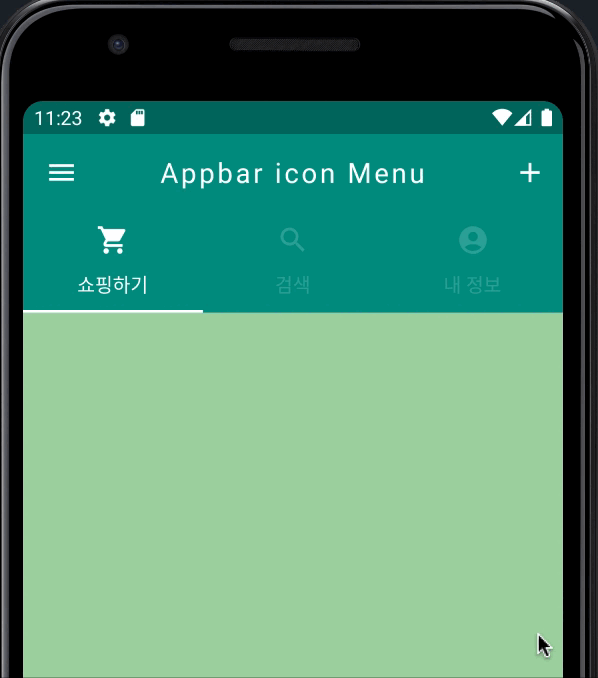
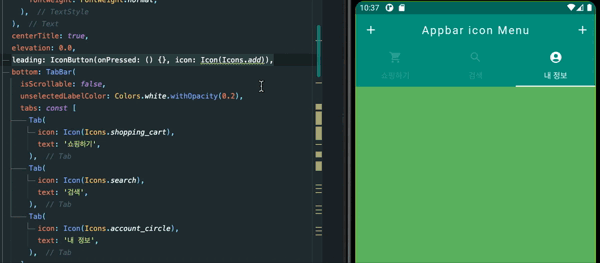
appBar: AppBar(
title: const Text(
'Appbar icon Menu',
style: TextStyle(
letterSpacing: 2.0,
fontWeight: FontWeight.normal,
),
),
centerTitle: true,
elevation: 0.0,
bottom: TabBar(
isScrollable: false,
unselectedLabelColor: Colors.white.withOpacity(0.2),
tabs: const [
Tab(
icon: Icon(Icons.shopping_cart),
text: '쇼핑하기',
),
Tab(
icon: Icon(Icons.search),
text: '검색',
),
Tab(
icon: Icon(Icons.account_circle),
text: '내 정보',
),
],
),
actions: [
IconButton(
onPressed: () {
print('Add icon was clicked');
},
icon: const Icon(Icons.add),
),
],
), // Drawer() 위젯의 경우 기본적으로 Scaffold() 위젯 내에 존재한다.
drawer: Drawer(
child: ListView(
padding: EdgeInsets.zero,
children: [
UserAccountsDrawerHeader(
currentAccountPicture: CircleAvatar(
backgroundColor: Colors.white,
backgroundImage: AssetImage('images/5yattree.jpeg'),
),
accountName: Text(
'5yattree',
style: TextStyle(
letterSpacing: 1.0,
fontSize: 25,
fontWeight: FontWeight.bold,
),
),
accountEmail: Text(
'5yattree@email.com',
style: TextStyle(
letterSpacing: 0.7,
fontSize: 15,
fontWeight: FontWeight.normal,
),
),
onDetailsPressed: () {
print('Arrow will rotate after clicking');
},
decoration: BoxDecoration(
color: Colors.teal[300],
borderRadius: BorderRadius.only(
bottomLeft: Radius.circular(40.0),
bottomRight: Radius.circular(40.0),
),
),
otherAccountsPictures: [
CircleAvatar(
backgroundColor: Colors.white,
backgroundImage: AssetImage('images/5yattree_2.jpeg'),
),
],
),
ListTile(
leading: Icon(
Icons.home,
color: Colors.grey[850],
),
title: Text('Home'),
onTap: () {
print('Home is clicked');
},
trailing: Icon(Icons.add),
),
ListTile(
leading: Icon(
Icons.settings,
color: Colors.grey[850],
),
title: Text('Setting'),
onTap: () {
print('Setting is clicked');
},
trailing: Icon(Icons.add),
),
ListTile(
leading: Icon(
Icons.question_answer,
color: Colors.grey[850],
),
title: Text('Q&A'),
onTap: () {
print('Q&A is clicked');
},
trailing: Icon(Icons.add),
),
],
),
),
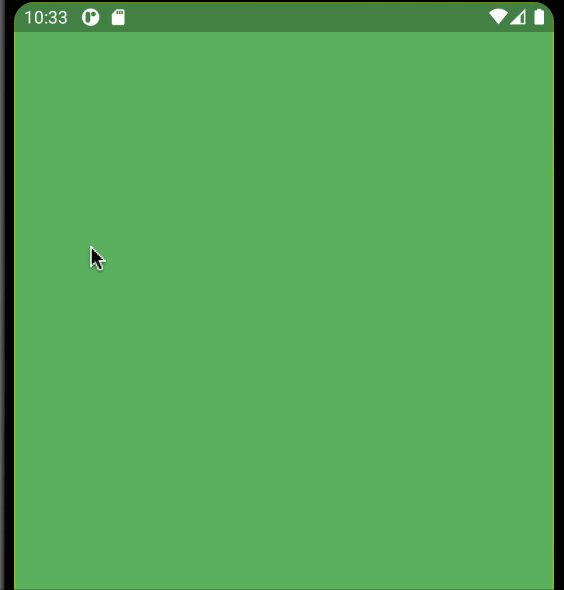
body: TabBarView(
children: [
Container(
color: Colors.green[200],
),
Container(
color: Colors.green[300],
),
Container(
color: Colors.green[400],
),
],
),
),
);
}
}
위의 코드는 Drawer() 위젯을 연습하기 위 해 작성한 예시 코드이다.
지난 AppBar() 위젯을 알아보는 시간에 작성한 코드에 추가적인 Drawer() 위젯을 곁들여 작성해 보았다.
기본적으로 Drawer() 위젯은 AppBar() 위젯 내의 leading 속성이 표시되는 영역에 그려져
AppBar() 위젯 내에서 이용될 것 같지만 실제로는 AppBar() 위젯 영역 밖에서 작성되고 Scaffold() 위젯 내에서 작성된다.
Drawer() 위젯과 AppBar() 위젯의 관계
만일 AppBar() 위젯 내에서 leading 속성에 이미 다른 위젯이 존재하는 상태에서 Drawer() 위젯이 추후에 작성된다면 어떻게 될까?
- AppBar() 위젯의 leading 속성에 IconButton() 위젯을 지정한 뒤 추후 Drawer() 위젯을 사용하면 다음과 같이 Drawer() 위젯을 작동시키던 햄버거 메뉴가 존재하지 않게되지만 여전히 끌어 당기는 모션을 통해서는 Drawer() 위젯을 사용할 수 있다.
만일 AppBar() 위젯이 없이 Drawer() 위젯만 작성된다면?
- 위와 마찬가지로 leading 속성을 통해서 제공되는 햄버거 버튼은 없지만 끌어 당기는 모션을 통해서 Drawer() 위젯을 사용할 수 있다.
즉,
Drawer()위젯을 사용할 때 기본적으로 제공되는 햄버거 메뉴는AppBar()위젯 내에서leading속성이 작성되지 않아야 이용이 가능하며, 만일 leading 속성이 작성되어 햄버거 메뉴를 이용하지 못한다고 하더라도 옆으로 끌어 당기는 모션으로 Drawer() 위젯을 사용할 수는 있다.
Drawer() 위젯의 세부 속성에 대해 알아보기.
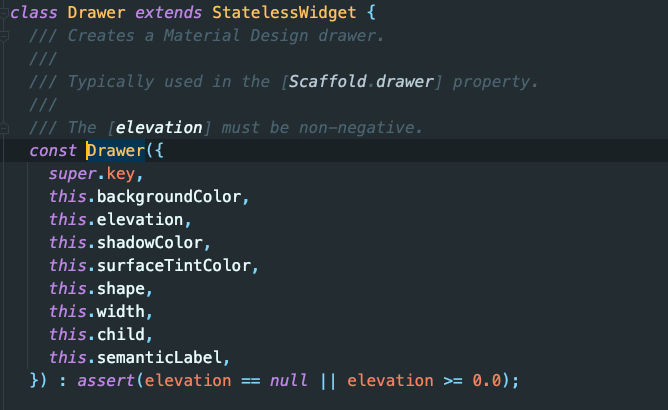
Drawer() 위젯에는 위와 같은 여러가지 속성들이 존재하며 배경색을 지정하는 backgroundColor, 그림자 설정의 elevation, Drawer 위젯의 너비를 담당하는 width 속성, Drawer 위젯내에 추가적인 위젯들을 적용하기 위한 child 속성도 확인된다.
class MyScreen extends StatefulWidget {
const MyScreen({Key? key}) : super(key: key);
State<MyScreen> createState() => _MyScreenState();
}
class _MyScreenState extends State<MyScreen> {
Widget build(BuildContext context) {
return Scaffold(
appBar: AppBar(
title: Text('Drawer Menu'),
),
drawer: Drawer(
backgroundColor: Colors.brown[200], // Drawer 위젯의 백그라운드 컬러 속성
width: 200, // Drawer 위젯의 너비 속성 기본값은 304.0
elevation: 0.0, // Drawer 위젯의 그림자 속성
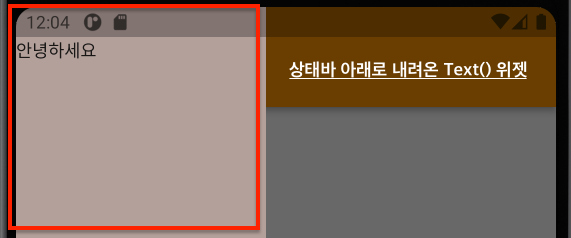
child: Text('안녕하세요'), // Drawer 위젯은 child 속성으로 자식 요소를 하나만 가질 수 있다.
),
body: Center(
child: Text('Drawer 예제'),
),
);
}
}
그 결과로 실행된 앱의 화면을 살펴보면 child(자식) 요소로 지정한 Text() 위젯의 '안녕하세요'가 Status Bar(상태바)에 걸쳐있는 것을 알 수 있다.
ListVeiw() 위젯과의 이용.
위의 예시를 통해서 Drawer 위젯을 이용했을 때 그 시작 범위가 어디부터인지 알 수 있다. 따라서 보통 Drawer() 위젯을 이용하는 경우 child(자식) 요소로 ListVeiw() 위젯을 사용하는 편인데 이는 내용이 Status Bar(상태바)를 침범하여 디자인을 저해하는 것을 방지하는 이유도 있지만, Drawer() 위젯 내에서 스크롤을 허용할 수 있도록 하는 장점도 있기에 많이 이용된다.

class MyScreen extends StatefulWidget {
const MyScreen({Key? key}) : super(key: key);
State<MyScreen> createState() => _MyScreenState();
}
class _MyScreenState extends State<MyScreen> {
Widget build(BuildContext context) {
return Scaffold(
appBar: AppBar(
title: Text('Drawer Menu'),
),
drawer: Drawer(
backgroundColor: Colors.brown[200],
width: 200,
elevation: 0.0,
child: ListView( // ListView 위젯을 이용하면 상태바를 저해하지 않고, 스크롤 또한 가능.
children: [
Text('안녕하세요'),
],
),
),
body: Center(
child: Text('Drawer 예제'),
),
);
}
}
위의 코드에서 살펴 볼 수 있는 것처럼 ListView() 위젯은 Muti-child layout widget으로 여러개의 자식 요소(자식 위젯)를 가질 수 있는데 Dart 언어를 사용하여 앱을 개발하는 Flutter는 이러한 자식 위젯들을 표현하고 관리하기 위해서 Dart 언어의 데이터 타입 중 리스트, List 타입으로 관리하는 것을 알 수 있다.
decoration 속성을 통한 DrawerHeader() 위젯의 범위 확인.
class MyScreen extends StatefulWidget {
const MyScreen({Key? key}) : super(key: key);
State<MyScreen> createState() => _MyScreenState();
}
class _MyScreenState extends State<MyScreen> {
Widget build(BuildContext context) {
return Scaffold(
appBar: AppBar(
title: Text('Drawer Menu'),
),
drawer: Drawer(
backgroundColor: Colors.brown[200],
width: 200,
elevation: 0.0,
child: ListView(
children: [
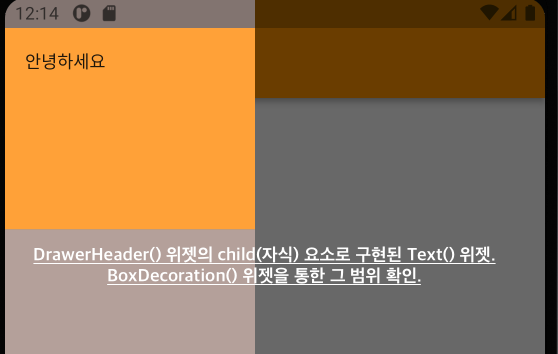
DrawerHeader( // Drawer() 위젯의 Header 부분을
child: Text('안녕하세요'),
decoration: BoxDecoration(
color: Colors.orangeAccent,
),
),
],
),
),
body: Center(
child: Text('Drawer 예제'),
),
);
}
}
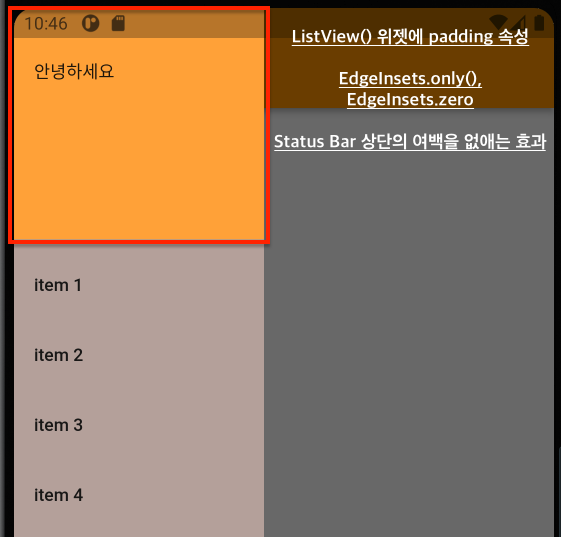
Padding 속성, EdgeInsets.zero
class _MyScreenState extends State<MyScreen> {
Widget build(BuildContext context) {
return Scaffold(
appBar: AppBar(
title: Text('Drawer Menu'),
),
drawer: Drawer(
backgroundColor: Colors.brown[200],
width: 200,
elevation: 0.0,
child: ListView(
padding: EdgeInsets.zero,
// 상단의 Status Bar와의 여백을 없애는 용도로 사용하며 EdgeInsets.only(), 로 작성해도 동일한 효과
children: [
DrawerHeader(
child: Text('안녕하세요'),
decoration: BoxDecoration(
color: Colors.orangeAccent,
),
),
ListTile(
title: Text('item 1'),
onTap: () {
Navigator.pop(context); // 네비게이터
},
),
ListTile(
title: Text('item 2'),
onTap: () {
Navigator.pop(context);
},
),
ListTile(
title: Text('item 3'),
onTap: () {
Navigator.pop(context);
},
),
ListTile(
title: Text('item 4'),
onTap: () {
Navigator.pop(context);
},
),
],
),
),
body: Center(
child: Text('Drawer 예제'),
),
);
}
}