
🏷️[목차]
- React를 배워야 하는 이유
- React Component
- 클래스형 컴포넌트 vs 함수형 컴포넌트
- React-Hooks
- State
- useState
- state를 변수로 사용하는 이유
- 서버컴퓨터로 전송하기 위해 state에 담아두기
- 작성한 내용을 검증하고 잘못된 부분을 빨간색으로 표기하기
- React 디버깅 툴(React-Developer-Tools)
- 이벤트 핸들러 함수(Event Handler)
🖇️ [출처 및 참조]
코드캠프
https://life-with-coding.tistory.com/508
💡 React를 배워야하는 이유
✅ 가장 많은 사용자 수
npm이 javascript로 만들어진 도구들을 다운로드 받을 수 있는 사이트라면,
npm trends는 npm에서 다운로드된 도구들의 다운로드 경향을 보여주는 사이트이다.
프론트엔드의 대표적인 도구인 React, Angular, Vue의 다운로드 수를 확인해보면
react의 사용자가 angular, vue보다 5배 이상 의 다운로드 수치를 나타내고 있음을 알 수 있다.✅ 일석사조
React: 웹을 만드는 도구
React-Native:모바일 앱을 만드는 도구
Electron: React로 만들어진 웹사이트를 한글, PPT와 같은데스크톱 프로그램에서 실행되도록 하는 도구
React와 React-Native는 굉장히 비슷해서
React를 공부하면 React-Native는 어느정도 자연스럽게 할 수 있게 된다.
React-Native는크로스 플랫폼으로 하나를 만들어서 안드로이드, IOS 두 곳에 모두 배포할 수 있다.
이말은 곧, React 하나를 잘하면웹, 안드로이드, IOS, 데스크톱모두 만들 수 있다는 말!
✅ 도구 선택시 고려사항❗️
리액트를 많은이들이 사용하는 가장 인기있는 컴포넌트 기반의 개발 도구이기 때문에
1. 배울 자료가 많음
2. 질문과 검색이 쉬움
3. 취업이나 이직이 쉬움.
💡 React 컴포넌트
✅ 리액트 컴포넌트 란❓
사용자정의태그를 만드는 기술로서
UI 또는 기능을 부품화해서 재사용 가능하게 하는 단위를 말하며,
쉽게 말해 앱을 이루는 가장 작은 조각이다.
예를 들어, 레고블록으로 집을 쌓는다면 하나의 블록이 곧 컴포넌트라 할 수 있다.
하나의 컴포넌트로 여러 곳에서 재사용할 수 있어 편리한 기능을 구현할 수 있다.
컴포넌트는 복사/붙여넣기처럼 하나하나 수정해가며 변경하는 것과는 다른 개념으로,
컴포넌트 원본 하나를 가지고 뿌려주는 개념이다.
따라서 원본만 변경한다면 원본과 연결된 다른 요소에도 적용이 가능해진다.(원본이 통제)
이때, 데이터는 각 컴포넌트에 맞게 변경하여 사용이 가능하다.
✅ 리액트 쓰는 이유 ❗️
부품을 조립하는 식으로 만들기 때문에 컴포넌트를 사용한다.
큰 서비스를 하기에 유용하다.
💡 클래스형 컴포넌트 vs 함수형 컴포넌트
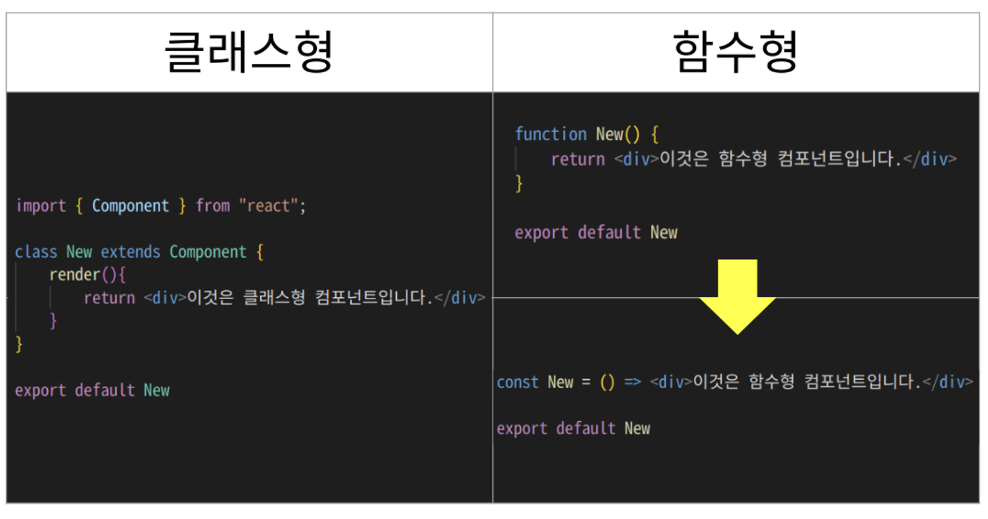
✅ 클래스형 컴포넌트
자바스크립트의 "클래스" 기반 컴포넌트로, class로 정의하고 render() 함수에서 jsx 코드를 반환한다.
<클래스 컴포넌트 생성하기>
클래스 컴포넌트는 React의 ComponentClass를 상속받아 구현되기 때문에
반드시 {Component}를 import 하고 React.Component 를 상속받아야 한다.
Component 를 상속받고, render() 메서드를 통해 return 문 안에 있는 JSX 코드를 반환한다.✅ 함수 컴포넌트
자바스크립트의 "함수(function)" 기반 컴포넌트로, 자바스크립트 함수를 선언하듯이 function 으로 컴포넌트를 정의하고, return 문에 JSX 코드를 반환한다.
화살표 문법으로도 나타낼 수 있다.
✅ 실무적용 - { 클래스형, 함수형 } 언제 사용하는가❓
초반의 React는 클래스형 방법만 존재했다.
하지만 클래스형은 어렵고, 복잡하여 이후에 함수형 컴포넌트 방법이 추가되었다.
최근에는 많은 기업이 함수형 컴포넌트를 주로 사용하지만, 기존에 이미 만들어진 서비스들은 클래스형으로 되어있는 경우도 많으므로, 클래스형도 알아둘 필요가 있다!✅ 클래스형을 반드시 알아야 하는 이유 ❗️
- 클래스로 만들고 그대로 유지하는 경우
- 클래스로 만들었지만 부분 부분만 함수형으로 변경하는 경우
💡 React-Hooks
함수형 컴포넌트가 클래스형 컴포넌트보다 훨씬 간단하다
하지만, 함수형 컴포넌트 그 자체만으로는 클래스형 컴포넌트의 모든 기능을 흉내낼 수 없다.
따라서 React 에서 함수형 컴포넌트에서도 클래스형 컴포넌트와 동일한 기능을 사용 가능하도록 도구를 만들어 주었는데, 이 도구를Hooks(기능)이라고 한다.
대표적인 Hooks 에는
useState,useEffect가 있다.
💡 State
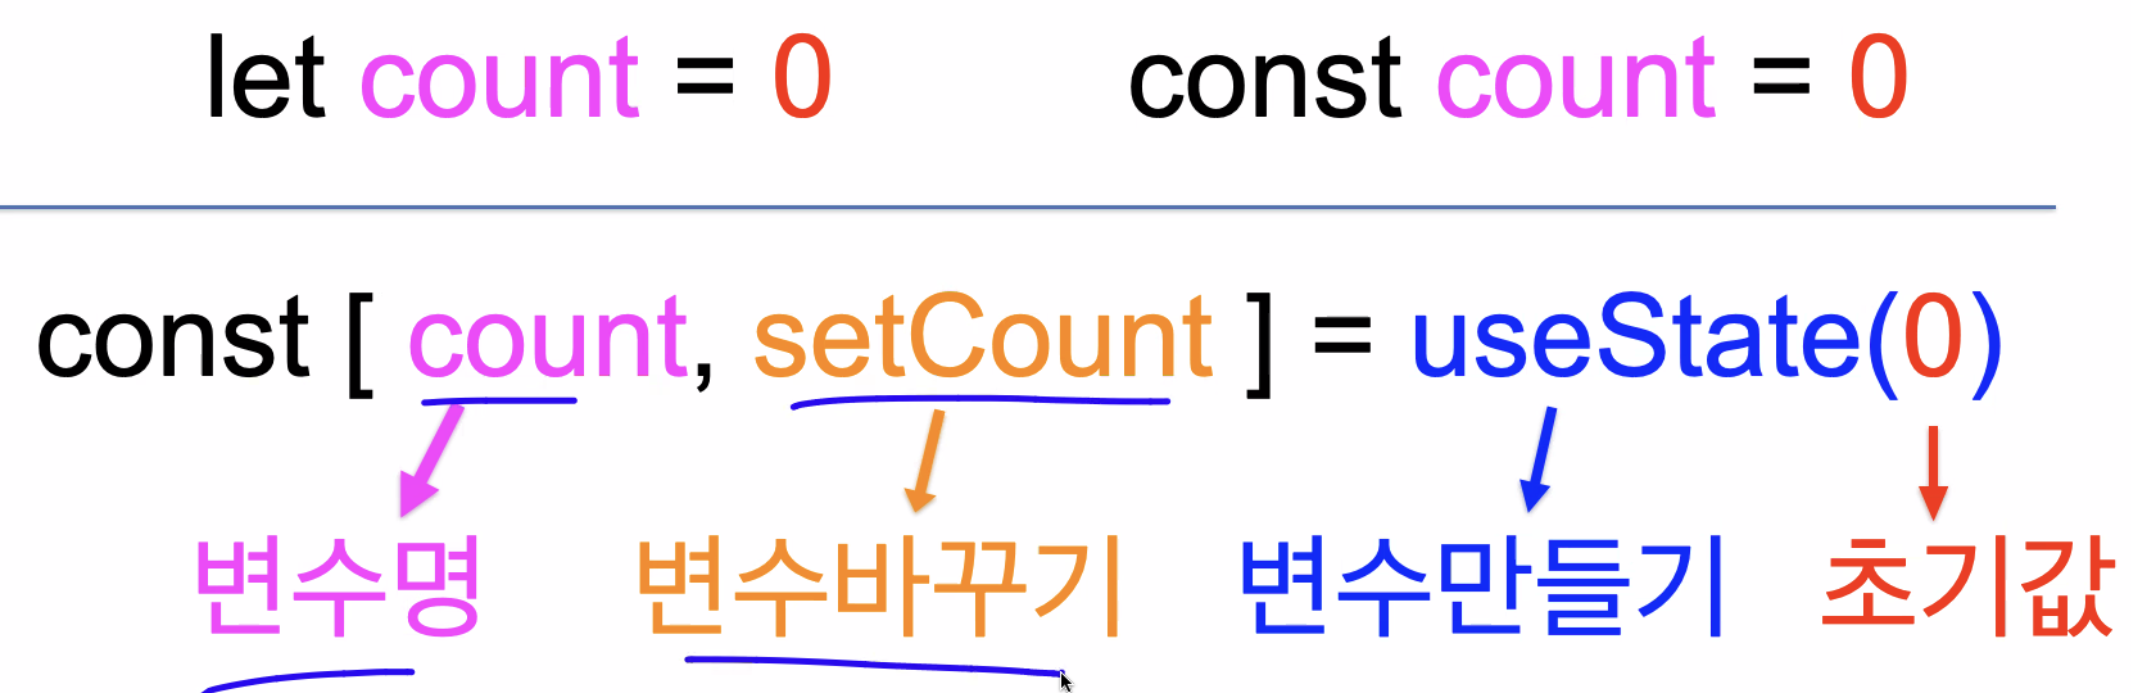
state: 컴포넌트에서 사용하는 변수(state)로 리액트에서 이벤트에 의해 변경되는 동적인 값.setState: 컴포넌트에서 사용하는 변수(state)를 바꿔주는 기능useState: 컴포넌트에서 사용하는 변수(state)를 만들어주는 기능✅ useState로 State변수 만들고, 바꾸기
- 자바스크립트에서 변수 만들기
변수만드는기능 변수명 = 담을내용 ==> let classmate = "철수"
- 리액트 컴포넌트에서 변수 만들기
const [변수명] = 변수만드는기능(담을내용)
==> const [classmate] = useState("철수")
- 자바스크립트에서 변수 바꾸기
let classmate = "철수" , classmate = "영희"
// classmate 가 영희로 바뀜.
- 리액트 컴포넌트에서 변수 바꾸기
const [변수명, 변수바꾸는기능] = 변수만드는기능(담을내용)
const [classmate, setClassmate] = useState("철수")
setClassmate("영희") // classmate 가 영희로 바뀜.
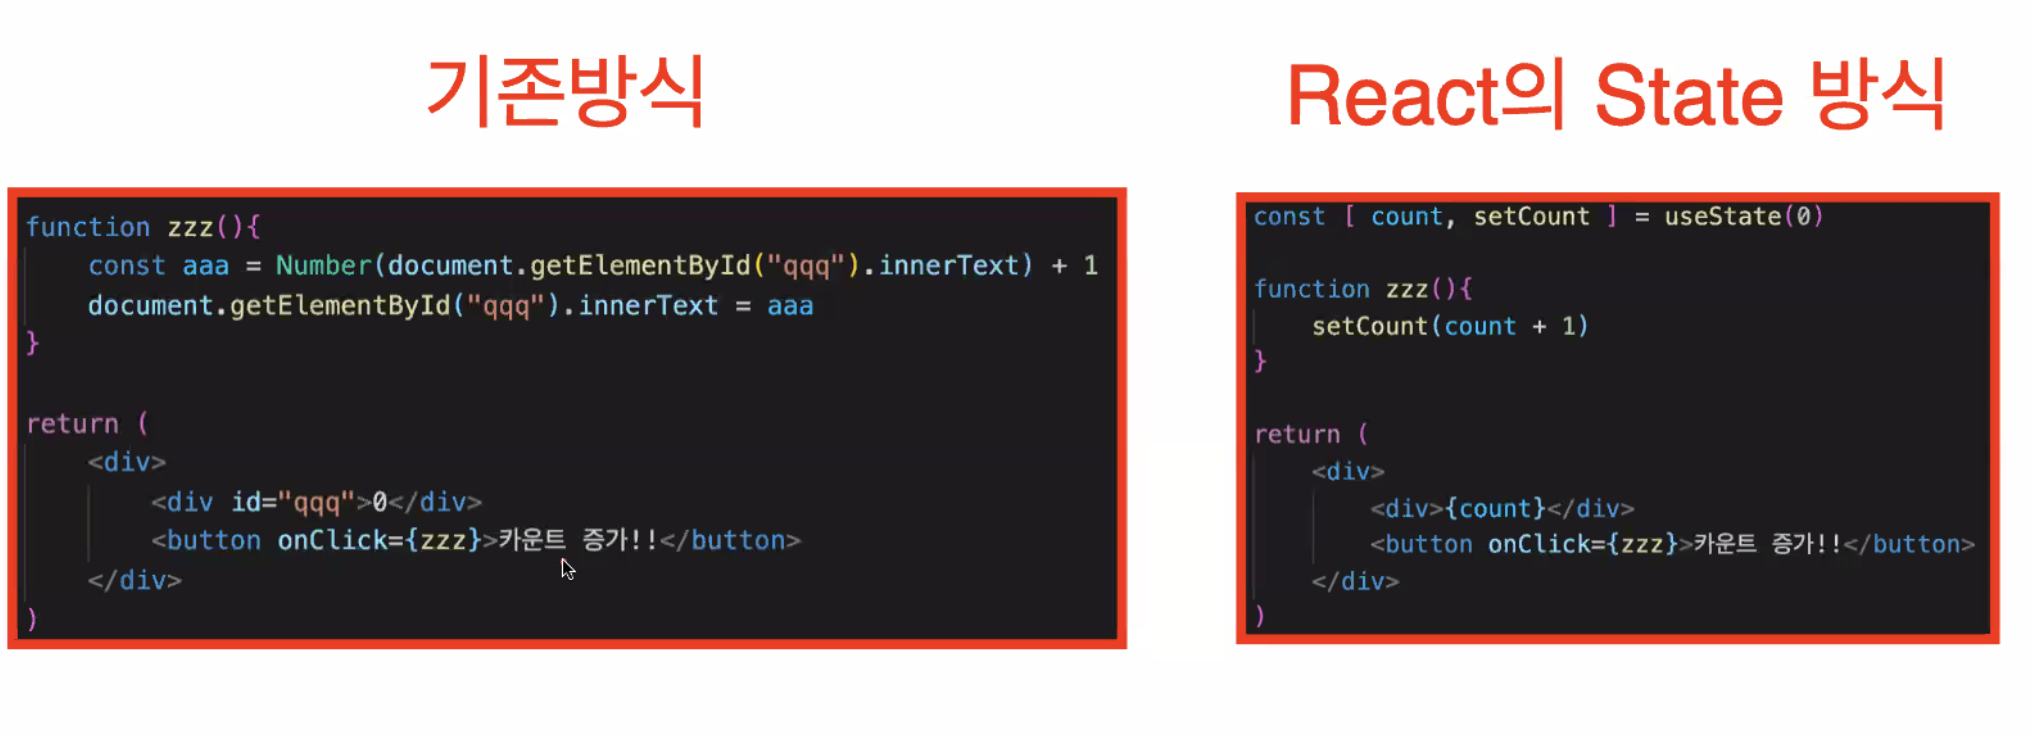
✅ 리액트에서 let을 안쓰고 state를 변수로 사용하는 이유❓
리액트 컴포넌트는 앞쪽에 화면에 보여지는 부분과 뒷쪽에 데이터를 관리하는 부분으로 나눌 수 있다.
만약, 단순히 자바스크립트 변수 let(또는 상수 const) 를 사용해서 화면에 그렸다면, 변경되었을 때 뒷쪽의 데이터 부분만 변경되고, 앞쪽 화면에는 반영이 되지 않는다.
화면에 반영 되길 원한다면,document.getElementById(”아이디”).innerText를 이용해서 화면에 반영해야한다.
하지만, 컴포넌트 변수state를 사용해서 화면에 그리고,setState()를 사용해서 좋아요를 변경하면setState()안에서 화면을 새롭게 그리라는 명령이 실행되어 변경된 데이터가 화면에 새로 그려진다.
- let으로 count 예제 실험해보기(기존 방식)
function New() {
    let count = 0     // let으로 자바스크립트 변수 만들기
  function handleClick() {
    count = count + 1     // 갯수는 증가했지만, 화면에는 반영이 안됨
  }
return (
        <div>
            <h1>{count}</h1>
            <button onClick={handleClick}>let을 사용하여 count 증가</button>
        </div>
    )
}export default New
-> let은 리액트 전용 html에서 변경을 감지하지 못한다.
따라서 state 변수로 사용해야함.
- state로 count 예제 실험해보기
import { useState } from 'react'
function New() {
    const [count, setCount] = useState(0)     // state로 컴포넌트 변수 만들기
function handleClick() {
        setCount(count + 1)     // 갯수가 증가하면서, 화면에 정상적으로 반영됨
}return (
        <div>
            <h1>{count}</h1>
            <button onClick={handleClick}>state를 사용하여 count 증가</button>
        </div>
    )
}export default New

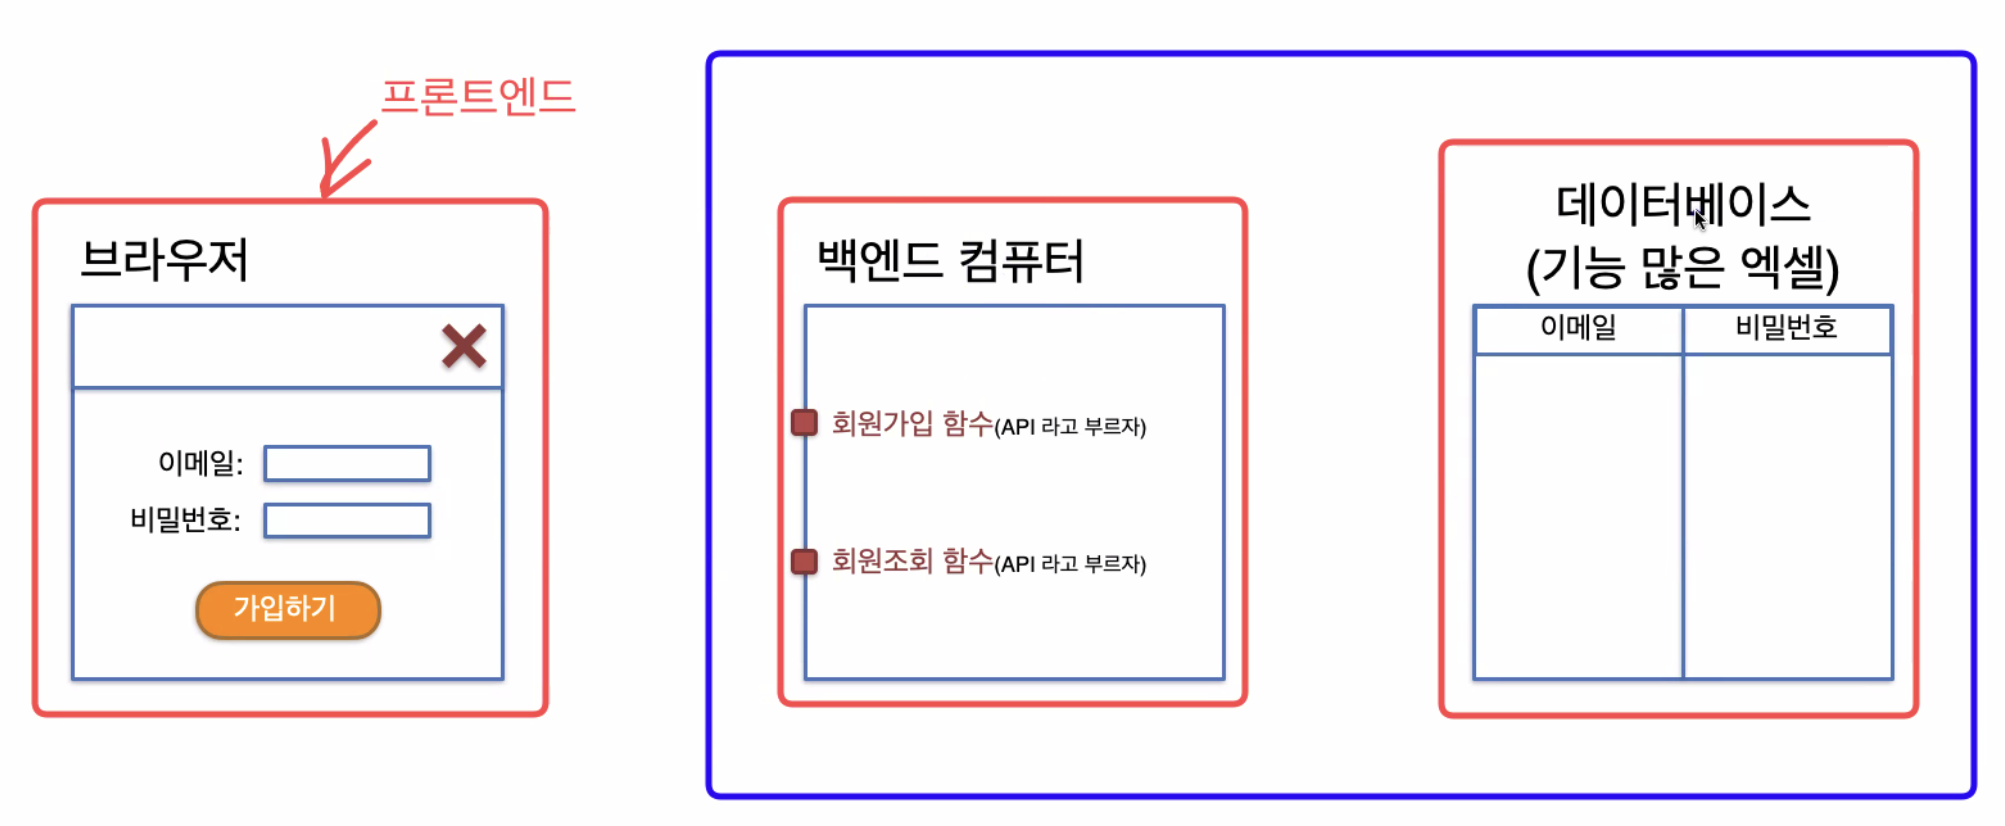
✅ 실무적용 - { state, setState, useState } 언제 사용할까❓
- 회원가입, 게시물작성 내용 등을 서버컴퓨터에 전송하기 위해 변수에 담아둘 때 사용한다.
- 작성한 내용을 검증하고 잘못된 부분을 빨간색으로 표기할 때 사용한다.
- 예제)
- 서버컴퓨터에 전송하기위해 state에 담아두기
import { useState } from "react"
function Login () {
	const [id, setId] = useState('')
    const [pw, setPw] = useState('')
	function handleChangeId(event) {
        const value = event.target.value
        setId(value)
    }
	function handleChangePw(event) {
        const value = event.target.value
        setPw(value)
    }
return (
        <div>
            <h1>로그인</h1>
            <div>아이디 {id}</div>
            <input type="text" onChange={handleChangeId}/>
            <div>비밀번호 {pw}</div>
            <input type="text" onChange={handleChangePw}/>
        </div>
    )
}
export default Login
- 작성한 내용을 검증하고 잘못된 부분을 빨간색으로 표기하기
import { useState } from "react"
function Login () {
    const [id, setId] = useState('')
    const [pw, setPw] = useState('')
		const [errorId, setErrorId] = useState('')
    const [errorPw, setErrorPw] = useState('')
	function handleChangeId(event) {
        const value = event.target.value
        setId(value)
    }
	function handleChangePw(event) {
        const value = event.target.value
        setPw(value)
    }
  	function handleClickLogin() {
        if(id === "") {
            setErrorId('! 아이디를 정확히 입력해 주세요.')
        }
        if(pw === "") {
            setErrorPw('! 비밀번호를 정확히 입력해 주세요.')
        }
        if(id !== "" && pw !== ""){
            alert('아이디와 비밀번호가 모두 입력되었습니다. 로그인을 시작합니다.')
        }
    }
return (
        <div>
            <h1>로그인</h1>
            <div>아이디 {id}</div>
            <input type="text" onChange={handleChangeId}/>
						<div style={{color: 'red'}}>{errorId}</div>
            <div>비밀번호 {pw}</div>
            <input type="text" onChange={handleChangePw}/>
						<div style={{color: 'red'}}>{errorPw}</div>
						<div>
                <button onClick={handleClickLogin}>로그인</button>
            </div>
        </div>
    )
}
export default Login
✅ 함수 컴포넌트를 사용하는 이유
- Hook
useState를 사용해 state 를 관리할 수 있고, useEffect 를 사용해 LifeCycle 을 관리할 수 있다.- 직관적 코드
자바스크립트의 함수(function) 선언, 화살표 함수를 그대로 사용해 컴포넌트를 사용 가능하기 때문에 개발자에게 직관적이다.- 메모리 자원 효율
클래스형 컴포넌트에 비해 함수형 컴포넌트가 비교적 메모리 자원을 적게 사용하다.
✅ 자바스크립트의 event
자바스크립트에서의 event 는 어떤 행위를 했는가를 알려주는 것 이고,
evevt.target 은 행위가 적용된 대상 즉, 태그 자체를 의미한다.
그리고 event.target.value 는 작동된 태그에 입력된 값(내용)을 의미한다.
💡 React 디버깅 툴(React-Developer-Tools)
React-Developer-Tools : 리액트를 개발시 도움을 주는 크롬 도구
리액트로 만들어진 홈페이지에서 개발자도구를 열어보면
자동으로 Components라는 메뉴가 만들어져있다.
컴포넌트가 가지고있는 변수인state도 확인 가능!
💡이벤트 핸들러 함수(Event Handler)
on으로 시작하는 이벤트에 바인딩(연결)된 함수들
즉, 이벤트가 들어오는 함수를 이벤트핸들러함수라고 한다.
📌 실습
JSX
import {
	Wrapper,
	Title,
	Wrapper_input,
	Wrapper_info,
	Name,
	Input,
	Password,
	Wrapper_title,
	Subtitle,
	Sub_Input,
	Wrapper_content,
	Content,
	Content_input,
	Wrapper_address,
	Address_title,
	AddressZip,
	Address_Input,
	Search_btn,
	Address,
	Wrapper_youtube,
	Youtube_title,
	Youtube_Input,
	Wrapper_image,
	Img_title,
	UploadBtn,
	PlusBtn,
	Wrapper_mainSet,
	Main_title,
	Radio,
	RadioButton,
	RadioLabel,
	Wrapper_register,
	RegisterBtn,
	Color,
} from "./css";
import { useState } from "react";
export default function freeBoardFrom() {
	const [TheName, setName] = useState("");
	const [ThePassword, setPassword] = useState("");
	const [TheSubtitle, setSubtitle] = useState("");
	const [TheContent, setContent] = useState("");
	const [NameError, setNameError] = useState("");
	const [PasswordError, setPasswordError] =useState("");
	const [SubtitleError, setSubtitleError] = useState("");
	const [ContentError, setContentError] = useState("");
function onChangeName(event) {
  setName(event.target.value);
}
function onChangePassword(event) {
  setPassword(event.target.value);
}
function onChangeSubtitle(event) {
  setSubtitle(event.target.value);
}
function onChangeContent(event) {
  setContent(event.target.value);
}
function Signup() {
  //가입하기
  if (TheName === "") {
    //이름이 빈값이라면
    setNameError("이름을 입력해주세요");
  } else {
    setNameError("");
  }
  if (ThePassword === "") {
    setPasswordError("비밀번호를 다시 입력해주세요");
  } else {
    setPasswordError("");
  }
  if (TheSubtitle === "") {
    setSubtitleError("제목을 입력해주세요");
  } else {
    setSubtitleError("");
  }
  if (TheContent === "") {
    setContentError("내용을 입력해주세요");
  } else {
    setContentError("");
  }
}
return (
  <Wrapper>
    <Title>게시물등록</Title>
    <Wrapper_input>
      <Wrapper_info>
        <Name>작성자</Name>
        <Input
          type="text"
          placeholder="이름을 적어주세요"
          onChange={onChangeName}
        />
        <Color>{NameError}</Color>
      </Wrapper_info>
      <Wrapper_info>
        <Password>비밀번호</Password>
        <Input
          type="password"
          placeholder="비밀번호를 입력해주세요"
          onChange={onChangePassword}
        />
        <Color>{PasswordError}</Color>
      </Wrapper_info>
    </Wrapper_input>
    <Wrapper_title>
      <Subtitle>제목</Subtitle>
      <Sub_Input
        type="text"
        placeholder="제목을 작성해주세요"
        onChange={onChangeSubtitle}
      />
      <Color>{SubtitleError}</Color>
    </Wrapper_title>
    <Wrapper_content>
      <Content>내용</Content>
      <Content_input
        type="text"
        placeholder="제목을 작성해주세요"
        onChange={onChangeContent}
      />
      <Color>{ContentError}</Color>
    </Wrapper_content>
    <Wrapper_address>
      <Address_title>주소</Address_title>
      <AddressZip>
        <Address_Input type="text" placeholder="07250"></Address_Input>
        <Search_btn>우편번호 검색</Search_btn>
      </AddressZip>
      <Address />
      <Address />
    </Wrapper_address>
    <Wrapper_youtube>
      <Youtube_title>유튜브</Youtube_title>
      <Youtube_Input
        type="text"
        placeholder="링크를 복사해주세요."
</Youtube_Input>
    </Wrapper_youtube>
    <Wrapper_image>
      <Img_title>사진첨부</Img_title>
      <UploadBtn>
        <PlusBtn>+</PlusBtn>
        <PlusBtn>+</PlusBtn>
        <PlusBtn>+</PlusBtn>
      </UploadBtn>
    </Wrapper_image>
    <Wrapper_mainSet>
      <Main_title>메인설정</Main_title>
      <Radio>
        <RadioButton type="radio" id="youtube" name="radio-button" />
        <RadioLabel htmlFor="youtube">유튜브</RadioLabel>
        <RadioButton type="radio" id="image" name="radio-button" />
        <RadioLabel htmlFor="image">사진</RadioLabel>
      </Radio>
    </Wrapper_mainSet>
    <Wrapper_register>
      <RegisterBtn onClick={Signup}>등록하기</RegisterBtn>
    </Wrapper_register>
  </Wrapper>
);
}
CSS
import styled from "@emotion/styled";
export const Wrapper = styled.div`
  width: 1200px;
  /* height: 1847px; */
  background: #ffffff;
  box-shadow: 0px 4px 20px rgba(0, 0, 0, 0.2);
  border: none;
  display: flex;
  flex-direction: column;
  align-items: center;
  padding-left: 102px;
  padding-right: 102px;
`;
export const Title = styled.div`
  width: 100%;
  font-style: normal;
  font-weight: 700;
  font-size: 36px;
  text-align: center;
  color: #000000;
  padding-top: 60px;
  padding-bottom: 80px;
`;
export const Wrapper_input = styled.div`
  width: 100%;
  display: flex;
  flex-direction: row;
  justify-content: space-between;
`;
export const Wrapper_info = styled.div`
  /* display: flex;
  flex-direction: column; */
`;
export const Name = styled.div`
  font-family: "Noto Sans CJK KR";
  font-style: normal;
  font-weight: 500;
  font-size: 16px;
  line-height: 24px;
  color: #000000;
  text-shadow: 0px 4px 4px rgba(0, 0, 0, 0.25);
  padding-bottom: 16px;
`;
export const Input = styled.input`
  width: 486px;
  height: 52px;
  background: #ffffff;
  border: 1px solid #bdbdbd;
  padding-left: 10px;
`;
export const Password = styled.div`
  font-family: "Noto Sans CJK KR";
  font-style: normal;
  font-weight: 500;
  font-size: 16px;
  line-height: 24px;
  color: #000000;
  text-shadow: 0px 4px 4px rgba(0, 0, 0, 0.25);
  padding-bottom: 16px;
`;
export const Wrapper_title = styled.div`
  width: 100%;
  padding-top: 40px;
  display: flex;
  flex-direction: column;
  justify-content: center;
`;
export const Subtitle = styled.div`
  font-family: "Noto Sans CJK KR";
  font-style: normal;
  font-weight: 500;
  font-size: 12px;
  line-height: 24px;
  color: #000000;
  text-shadow: 0px 4px 4px rgba(0, 0, 0, 0.25);
  padding-bottom: 16px;
`;
export const Sub_Input = styled.input`
  height: 52px;
  background: #ffffff;
  border: 1px solid #bdbdbd;
  padding-left: 10px;
`;
export const Wrapper_content = styled.div`
  width: 100%;
  padding-top: 40px;
  display: flex;
  flex-direction: column;
  justify-content: center;
`;
export const Content = styled.div`
  font-family: "Noto Sans CJK KR";
  font-style: normal;
  font-weight: 500;
  font-size: 12px;
  color: #000000;
  text-shadow: 0px 4px 4px rgba(0, 0, 0, 0.25);
  padding-bottom: 16px;
`;
export const Content_input = styled.input`
  height: 480px;
  background: #ffffff;
  border: 1px solid #bdbdbd;
  padding-left: 10px;
`;
export const Wrapper_address = styled.div`
  padding-top: 40px;
  display: flex;
  flex-direction: column;
  width: 100%;
  display: flex;
`;
export const Address_title = styled.div`
  font-family: "Noto Sans CJK KR";
  font-style: normal;
  font-weight: 500;
  font-size: 12px;
  color: #000000;
  text-shadow: 0px 4px 4px rgba(0, 0, 0, 0.25);
  padding-bottom: 16px;
`;
export const AddressZip = styled.div`
  display: flex;
  flex-direction: row;
`;
export const Address_Input = styled.input`
  width: 77px;
  height: 52px;
  background: #ffffff;
  border: 1px solid #bdbdbd;
  padding-left: 10px;
  text-align: center;
  margin-right: 10px;
`;
export const Search_btn = styled.div`
  width: 124px;
  background: #000000;
  border: 1px solid #bdbdbd;
  text-align: center;
  color: white;
  padding-top: 15px;
`;
export const Address = styled.div`
  height: 52px;
  background: #ffffff;
  border: 1px solid #bdbdbd;
  padding-left: 10px;
  margin-top: 15px;
`;
export const Wrapper_youtube = styled.div`
  width: 100%;
  padding-top: 40px;
  display: flex;
  flex-direction: column;
  justify-content: center;
`;
export const Youtube_title = styled.div`
  font-family: "Noto Sans CJK KR";
  font-style: normal;
  font-weight: 500;
  font-size: 12px;
  color: #000000;
  text-shadow: 0px 4px 4px rgba(0, 0, 0, 0.25);
  padding-bottom: 16px;
`;
export const Youtube_Input = styled.input`
  height: 52px;
  background: #ffffff;
  border: 1px solid #bdbdbd;
  padding-left: 10px;
`;
export const Wrapper_image = styled.div`
  width: 100%;
  padding-top: 40px;
  display: flex;
  flex-direction: column;
  justify-content: center;
`;
export const Img_title = styled.div`
  font-family: "Noto Sans CJK KR";
  font-style: normal;
  font-weight: 500;
  font-size: 12px;
  color: #000000;
  text-shadow: 0px 4px 4px rgba(0, 0, 0, 0.25);
  padding-bottom: 16px;
`;
export const UploadBtn = styled.div`
  display: flex;
  flex-direction: row;
  border: none;
  background-color: white;
`;
export const PlusBtn = styled.button`
  width: 78px;
  height: 78px;
  background-color: #bdbdbd;
  margin-right: 24px;
  outline: none;
  border: none;
  cursor: pointer;
  /* padding-top: 10px; */
`;
export const Wrapper_mainSet = styled.div`
  width: 100%;
  padding-top: 40px;
  display: flex;
  flex-direction: column;
  justify-content: center;
`;
export const Main_title = styled.div`
  font-family: "Noto Sans CJK KR";
  font-style: normal;
  font-weight: 500;
  font-size: 12px;
  color: #000000;
  text-shadow: 0px 4px 4px rgba(0, 0, 0, 0.25);
  padding-bottom: 16px;
`;
export const Radio = styled.div`
  display: flex;
  flex-direction: row;
  border: none;
  background-color: white;
`;
export const RadioButton = styled.input`
  cursor: pointer;
`;
export const RadioLabel = styled.label`
  margin-left: 8px;
  margin-right: 20px;
  font-weight: 500;
  cursor: pointer;
`;
export const Wrapper_register = styled.div`
  width: 100%;
  padding-top: 40px;
  display: flex;
  flex-direction: column;
  justify-content: center;
  align-items: center;
`;
export const RegisterBtn = styled.button`
  width: 179px;
  height: 52px;
  border: none;
  font-size: 16px;
  font-weight: 500;
  cursor: pointer;
  background-color: yellow;
  margin-bottom: 80px;
`;
export const Color = styled.div`
  color: red;
`;
Image

🥚 MEMO
- export default를 하단에 빼줘도 됨.
- state: 컴포넌트 전용 변수(let과 const의 업그레이드 버전)
- jsx전체를 한번 감싸줘야 하는 것 잊지말자.(html작성시)
- Cmd누르고 클릭하면 해당 태그에 대한 css확인가능
ctl + 마이너스하면 원래커서로 돌아감
ctl + shift + 마이너스는 다시 한번 css로- 개발 시에는 안드로이드와 ios 2가지를 만들어야 함.
백엔드는 검증.에러처리- CSS에서 최상위 부모요소에 전체높이를 굳이 지정하지 않는 이유는
그 안의 자식들이 부모영역 안에서 높이를 가지기 때문에 알아서 높이가 지정된다.- 리액트 컴포넌트는 리액트 엘리먼트를 좀 더 자유롭게 다루기 위한 하나의 문법이다.
컴포넌트를 만드는 가장 간단한 방법은 자바스크립트의 함수를 활용하는 것이다.
🥚 Q&A
과제를 하면서 생긴 의문점,,
작성자와 비밀번호영역이 서로 적당한 거리감이 있어야 하는데,
space-between를 해주면 거리가 너무 멀어지는 현상이 발생했다.
그 부분만 빼고 완성을 해서 내일 페어분 것과 비교해서 어떤게 잘못된 것 인지
찾아서 수정해야 겠다.
🥚 생각 정리
정신없는 첫날이 지나가고,,3시간 눈 붙이고 시작한 두번째 날
처음에는 상단 import에 태그를 넣어주는 것을 자꾸 깜빡했는데,
포트폴리오 과제를 하다보니 리액트 사용에 좀 더 익숙해 진 것 같다.
역시 사람은 하다보면 익숙해지는 법,,💪
그리고 확실히 useState라는 훅을 사용해서 구현하는 리액트의 특성이 잘 와닿았고,
간편해짐을 느꼈다.
매일 과제에 치이느라 TIL작성이 제대로 되지 않고 있다,,
안 그래도 신경써서 쓰는 타입이라 시간이 걸리는데, 더 오래걸리는 듯 하다🥲
내일도 힘내자!