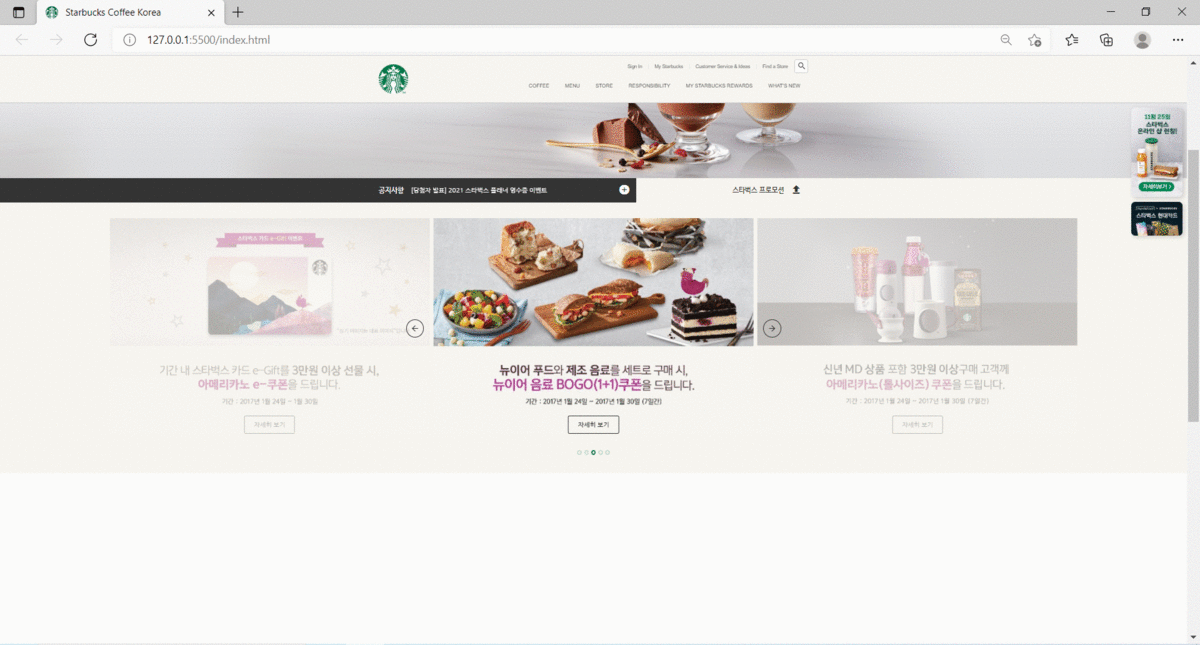
패스트캠퍼스 온라인 강의를 통해 만든 ★다방 랜딩페이지. 슬라이드 요소를 가운데에 배치하고 활성화된 요소만 불투명하게 보이도록 하는 방법에 대해 배웠다!

HTML
- 가로로 슬라이드 되도록 하기 위해 swiper.js 문법대로 작성
- 5개의 이미지 밑에 "자세히보기" 버튼이 올 수 있도록 a tag로 작성 후, 임시적으로 동작하지 않도록 javascript:void(0)를 줌
<div class="promotion">
        <div class="swiper-container">
         <div class="swiper-wrapper">
           <div class="swiper-slide">
             <img src="./images/promotion_slide1.jpg" alt="2021 뉴이어, 스타벅스와 함께 즐겁고 활기차게 시작하세요!">
              <a href="javascript:void(0)" class="btn">자세히 보기</a>
            </div>
            <div class="swiper-slide">
              <img src="./images/promotion_slide2.jpg" alt="2021 뉴이어, 스타벅스와 함께 즐겁고 활기차게 시작하세요!">
               <a href="javascript:void(0)" class="btn">자세히 보기</a>
             </div>
             <div class="swiper-slide">
              <img src="./images/promotion_slide3.jpg" alt="2021 뉴이어, 스타벅스와 함께 즐겁고 활기차게 시작하세요!">
               <a href="javascript:void(0)" class="btn">자세히 보기</a>
             </div>
             <div class="swiper-slide">
              <img src="./images/promotion_slide4.jpg" alt="2021 뉴이어, 스타벅스와 함께 즐겁고 활기차게 시작하세요!">
               <a href="javascript:void(0)" class="btn">자세히 보기</a>
             </div>
             <div class="swiper-slide">
              <img src="./images/promotion_slide5.jpg" alt="2021 뉴이어, 스타벅스와 함께 즐겁고 활기차게 시작하세요!">
               <a href="javascript:void(0)" class="btn">자세히 보기</a>
             </div>
         </div>
        </div>
JS
- new Swiper 생성자를 통해 해당 라이브러리 작동할 수 있도록 함
- 수평 슬라이드는 auto값은 direction: 'horizontal'(생략가능)
- slidesPerView: 3 > 한번에 보여줄 슬라이드 개수 3개라는 뜻
- spaceBetween: 10 > 슬라이드 사이 여백 10px
- centeredSlides: true > 1번 슬라이드가 가운데 보이도록 함
- loop: true > 반복재생 옵션
- autoplay: { delay: 5000 } > 자동슬라이드 몇 초에 한 번씩 될것인가. 5초 지정
   new Swiper('.promotion .swiper-container', {
    slidesPerView: 3,
    spaceBetween: 10,
    centeredSlides: true,
    loop: true,
    autoplay: {
        delay: 5000
    }
    });
CSS
- .notice .promotion .swiper-container { width: calc(819px * 3 + 20px)} > 슬라이드가 돌아가는 영역의 가로너비를 자동으로 계산해주기 위해 calc함수 사용
- width: calc(100% - 50px); 이런 방식으로도 사용 가능
- 화면 크기가 변할 때에도 요소가 계속 중앙에 오도록 position: absolute; 지정 후에 top, left, margin-left 값을 줌
- 요소를 위치상 부모요소 기준으로 왼쪽에서 50% 되는 지점에 위치시킨 후 다시 왼쪽으로 1238.5px(notice. pomotion의 절반인 1238.5px) 끌어옴. 이때, calc함수를 사용.
- .notice .promotion .swiper-slide {opacity: .3} > 가운데가 아닌 다른 슬라이드 요소들 투명도 0.5, 자연스럽게 바뀌기 위한 전환효과 추가
- .notice .promotion .swiper-slide .btn : 슬라이드에 들어간 자세히보기 버튼 스타일, btn stlye을 지정할 때, width값을 130px로 지정해줬기 때문에 동일한 사이즈라면 별도로 지정해줄 필요 없음
- swiper-slide-active : 가운데 활성화된 요소 > 투명도 기본값으로 복구
라이브러리를 통해 작성된 선택자 확인

 .notice .promotion {
    height: 693px;
    background-color: #f6f5ef;
    position: relative;
}

.notice .promotion .swiper-container {
    width: calc(819px * 3 + 20px);
    height: 553px;
    position: absolute;
    top: 40px;
    left: 50%;
    margin-left: calc((819px * 3 + 20px)/-1/2);
}


.notice .promotion .swiper-slide {
    opacity: .3;
    transition: opacity 1s;
    position: relative;
}


.notice .promotion .swiper-slide-active {
    opacity: 1;
}

.notice .promotion .swiper-slide .btn {
    position: absolute;
    bottom: 0;
    left: 0;
    right: 0;
    margin: auto;
}
♪(^∇^*) 워-후!!(^∀^*)ノシ