
📌 Notice
Istio Hands-on Study (=Istio)
직접 실습을 통해 Isito를 배포 및 설정하는 내용을 정리한 블로그입니다.
CloudNetaStudy그룹에서 스터디를 진행하고 있습니다.
Gasida님께 다시한번 🙇 감사드립니다.
EKS 관련 이전 스터디 내용은 아래 링크를 통해 확인할 수 있습니다.
📌 Overview
이번 스터디에서는 분산 시스템의 가장 큰 도전 과제인 '안정적인 서비스 운영'을 위한 Istio의 핵심 기능들을 살펴봅니다.
실제 운영 환경에서 마주하게 되는 네트워크 지연, 간헐적 장애, 서비스 과부하 등의 문제를 어떻게 효과적으로 해결할 수 있는지 구체적인 방법과 실습을 통해 배우게 됩니다.
이 글을 읽으신 후에는:
- 로드 밸런싱 알고리즘의 차이와 상황별 최적의 선택 방법을 이해하실 수 있습니다
- 지역 인식 로드 밸런싱으로 네트워크 비용과 지연 시간을 최소화하는 방법을 익히실 수 있습니다
- 타임아웃과 재시도 설정으로 일시적 장애를 우아하게 처리하는 방법을 배우실 수 있습니다
- 서킷 브레이커 패턴으로 연쇄 장애를 방지하는 구체적인 설정 방법을 습득하실 수 있습니다
무엇보다 이 모든 복원력 패턴을 애플리케이션 코드 변경 없이 적용하는 방법을 알게 되어, 운영 중인 서비스의 안정성을 즉시 개선할 수 있는 실질적인 지식을 얻으실 수 있습니다.
📌 Resilience: Solving application networking challenges
👉 Step 00. 실습 환경 구성
[실습 환경 구성] k8s(1.23.17) 배포 : NodePort(30000 HTTP, 30005 HTTPS)
먼저, 실습 환경을 구성하기 위해 Kubernetes 클러스터와 Istio를 설치합니다.
실습에서는 Kind를 사용하여 로컬에 Kubernetes 클러스터를 생성합니다.
# kind 클러스터 생성
kind create cluster --name myk8s --image kindest/node:v1.23.17 --config - <<EOF
kind: Cluster
apiVersion: kind.x-k8s.io/v1alpha4
nodes:
- role: control-plane
  extraPortMappings:
  - containerPort: 30000 # Sample Application (istio-ingrssgateway) HTTP
    hostPort: 30000
  - containerPort: 30001 # Prometheus
    hostPort: 30001
  - containerPort: 30002 # Grafana
    hostPort: 30002
  - containerPort: 30003 # Kiali
    hostPort: 30003
  - containerPort: 30004 # Tracing
    hostPort: 30004
  - containerPort: 30005 # Sample Application (istio-ingrssgateway) HTTPS
    hostPort: 30005
  - containerPort: 30006 # TCP Route
    hostPort: 30006
  - containerPort: 30007 # kube-ops-view
    hostPort: 30007
networking:
  podSubnet: 10.10.0.0/16
  serviceSubnet: 10.200.1.0/24
EOF

# 설치 확인
docker ps

# 노드에 기본 툴 설치
docker exec -it myk8s-control-plane sh -c 'apt update && apt install tree psmisc lsof wget bridge-utils net-tools dnsutils tcpdump ngrep iputils-ping git vim -y'
[실습 환경 구성] istio 1.17.8 설치 (addon 필수)
# myk8s-control-plane 진입 후 설치 진행
docker exec -it myk8s-control-plane bash
-----------------------------------
# (옵션) 코드 파일들 마운트 확인
tree /istiobook/ -L 1
혹은
git clone ... /istiobook

# istioctl 설치
export ISTIOV=1.17.8
echo 'export ISTIOV=1.17.8' >> /root/.bashrc

curl -s -L https://istio.io/downloadIstio | ISTIO_VERSION=$ISTIOV sh -
cp istio-$ISTIOV/bin/istioctl /usr/local/bin/istioctl
istioctl version --remote=false

# default 프로파일 컨트롤 플레인 배포
istioctl install --set profile=default -y

# 설치 확인 : istiod, istio-ingressgateway, crd 등
kubectl get istiooperators -n istio-system -o yaml
kubectl get all,svc,ep,sa,cm,secret,pdb -n istio-system
kubectl get cm -n istio-system istio -o yaml
kubectl get crd | grep istio.io | sort

# 보조 도구 설치
kubectl apply -f istio-$ISTIOV/samples/addons
kubectl get pod -n istio-system

# 빠져나오기
exit
-----------------------------------

# 실습을 위한 네임스페이스 설정
kubectl create ns istioinaction
kubectl label namespace istioinaction istio-injection=enabled
kubectl get ns --show-labels

# istio-ingressgateway 서비스 : NodePort 변경 및 nodeport 지정 변경 , externalTrafficPolicy 설정 (ClientIP 수집)
kubectl patch svc -n istio-system istio-ingressgateway -p '{"spec": {"type": "NodePort", "ports": [{"port": 80, "targetPort": 8080, "nodePort": 30000}]}}'
kubectl patch svc -n istio-system istio-ingressgateway -p '{"spec": {"type": "NodePort", "ports": [{"port": 443, "targetPort": 8443, "nodePort": 30005}]}}'
kubectl patch svc -n istio-system istio-ingressgateway -p '{"spec":{"externalTrafficPolicy": "Local"}}'
kubectl describe svc -n istio-system istio-ingressgateway

# NodePort 변경 및 nodeport 30001~30003으로 변경 : prometheus(30001), grafana(30002), kiali(30003), tracing(30004)
kubectl patch svc -n istio-system prometheus -p '{"spec": {"type": "NodePort", "ports": [{"port": 9090, "targetPort": 9090, "nodePort": 30001}]}}'
kubectl patch svc -n istio-system grafana -p '{"spec": {"type": "NodePort", "ports": [{"port": 3000, "targetPort": 3000, "nodePort": 30002}]}}'
kubectl patch svc -n istio-system kiali -p '{"spec": {"type": "NodePort", "ports": [{"port": 20001, "targetPort": 20001, "nodePort": 30003}]}}'
kubectl patch svc -n istio-system tracing -p '{"spec": {"type": "NodePort", "ports": [{"port": 80, "targetPort": 16686, "nodePort": 30004}]}}'

# Prometheus 접속 : envoy, istio 메트릭 확인
open http://127.0.0.1:30001

# Grafana 접속
open http://127.0.0.1:30002

# Kiali 접속 1 : NodePort
open http://127.0.0.1:30003

# (옵션) Kiali 접속 2 : Port forward
kubectl port-forward deployment/kiali -n istio-system 20001:20001 &
open http://127.0.0.1:20001

# tracing 접속 : 예거 트레이싱 대시보드
open http://127.0.0.1:30004


# 내부 접속 테스트용 netshoot 파드 생성
cat <<EOF | kubectl apply -f -
apiVersion: v1
kind: Pod
metadata:
  name: netshoot
spec:
  containers:
  - name: netshoot
    image: nicolaka/netshoot
    command: ["tail"]
    args: ["-f", "/dev/null"]
  terminationGracePeriodSeconds: 0
EOF
👉 Step.01 복원력 패턴이 필요한 이유
✅ Building resilience into the application
복원력 패턴이 필요한 이유
마이크로서비스 아키텍처에서는 네트워크를 통한 서비스 간 통신이 필수적입니다.
'장애가 발생하지 않도록 구축하면 된다'는 이상적인 접근 방식은 현실적이지 않습니다.
실제로 분산 시스템에서는 네트워크 지연, 서비스 장애, 일시적 오류 등 다양한 문제가 발생할 수 있으며, 이는 전체 시스템의 가용성에 영향을 미칠 수 있습니다.
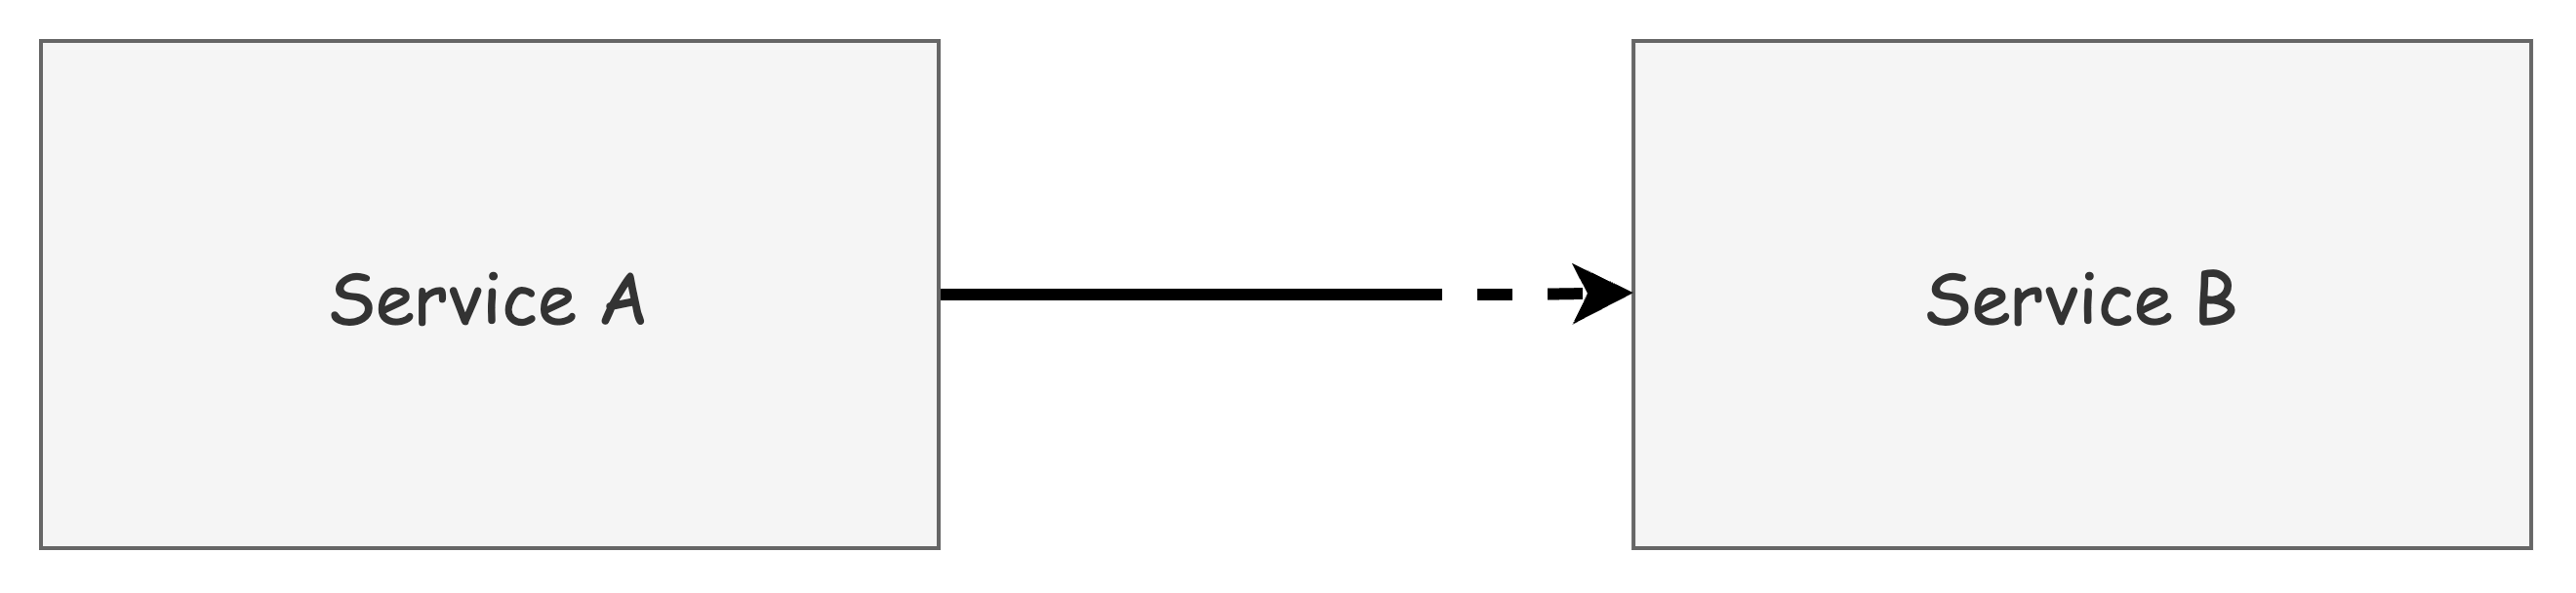
위 그림과 같이 서비스 A가 서비스 B를 호출할 때 문제가 발생할 수 있습니다.
서비스 B의 특정 엔드포인트에서 지연이 발생하거나 오류가 발생할 경우, 서비스 A는 다음과 같은 대응이 필요합니다:
- 다른 엔드포인트나 가용 영역으로 라우팅
- 실패한 요청 재시도
- 서비스 B가 회복될 때까지 요청 중단 (서킷 브레이킹)
무분별한 재시도는 오히려 시스템에 과부하를 줄 수 있어, 적절한 복원력 패턴의 적용이 중요합니다.
✅ 애플리케이션 라이브러리를 통한 복원력 구현의 한계
서비스 메시 기술이 등장하기 전에는 개발자들이 애플리케이션 코드에 직접 복원력 패턴을 구현해야 했습니다.
이를 위해 다양한 오픈소스 프레임워크가 등장했습니다:
Twitter Finagle:
스칼라/자바/JVM 환경의 RPC 복원력 프레임워크
- 타임아웃, 재시도, 서킷 브레이킹 등의 패턴 제공
- https://blog.x.com/engineering/en_us/a/2011/finagle-a-protocol-agnostic-rpc-system
Netflix OSS:
Netflix의 복원력 프레임워크 컴포넌트
이러한 프레임워크들은 자바 커뮤니티에서 큰 인기를 얻었고, Spring Cloud Netflix에도 통합되었습니다. 하지만 다음과 같은 한계점이 있었습니다:
- 언어 종속성: 자바 외 다른 언어를 사용하는 개발자들은 별도의 구현체를 찾거나 직접 개발해야 함
- 코드 침투성: 실제 비즈니스 로직과 네트워킹 코드가 섞여 코드 복잡도 증가
- 운영 부담: 다양한 언어와 프레임워크 조합에 대한 유지보수 어려움
✅ Istio를 통한 복원력 문제 해결
Istio의 서비스 프록시는 애플리케이션 옆에 위치하여 모든 네트워크 트래픽을 처리합니다.
이 프록시가 애플리케이션 수준의 요청을 이해하므로, 애플리케이션 코드 변경 없이 복원력 기능을 구현할 수 있습니다.
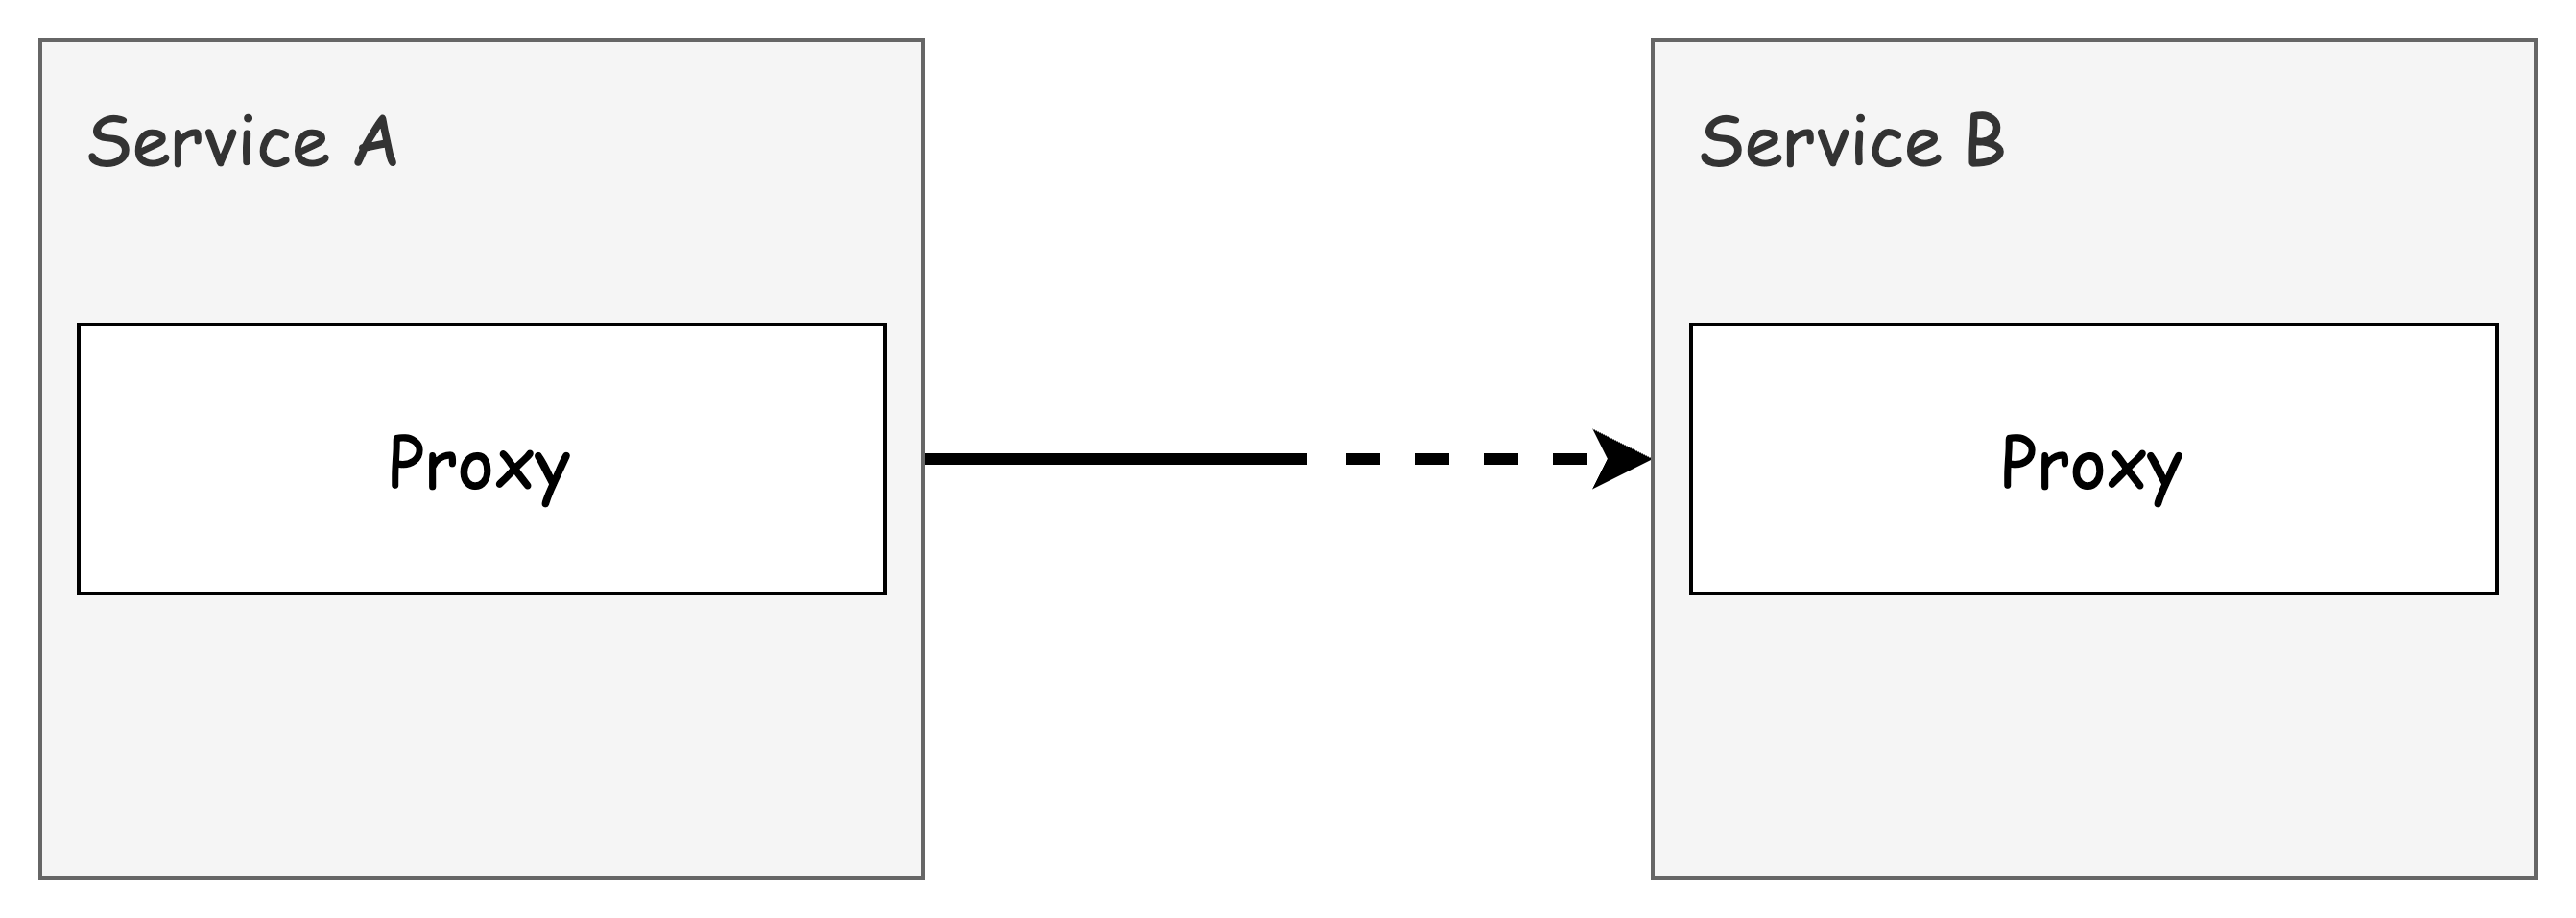
Istio의 서비스 프록시는 다음과 같은 복원력 패턴을 기본적으로 제공합니다:
- 클라이언트 측 로드 밸런싱
- 지역 인식 로드 밸런싱
- 타임아웃 및 재시도
- 서킷 브레이킹
예를 들어, HTTP 503 오류 발생 시 최대 3번까지 재시도하도록 설정할 수 있으며, 각 서비스 인스턴스마다 재시도 동작을 세밀하게 제어할 수 있습니다.
✅ 복원력 패턴의 분산 구현
Istio의 접근 방식은 기존의 중앙집중식 복원력 구현과 다릅니다.
과거에는 하드웨어 로드 밸런서, 메시징 시스템, ESB(Enterprise Service Bus) 등의 중앙집중식 미들웨어가 사용되었지만, 이는 동적인 클라우드 환경에서는 한계가 있었습니다.
Istio는 각 애플리케이션 인스턴스와 함께 배포되는 분산 방식을 채택하여, 더 유연하고 확장 가능한 복원력 패턴을 제공합니다.
이후 예제에서는 Nick Jackson의 Fake Service 프로젝트(https://github.com/nicholasjackson/fake-service)를 활용하여 실제 운영 환경에서의 시나리오를 살펴볼 예정입니다.
👉 Step 02. Client-side Load Balancing (실습)
✅ EDS와 DestinationRule을 통한 클라이언트 측 로드 밸런싱
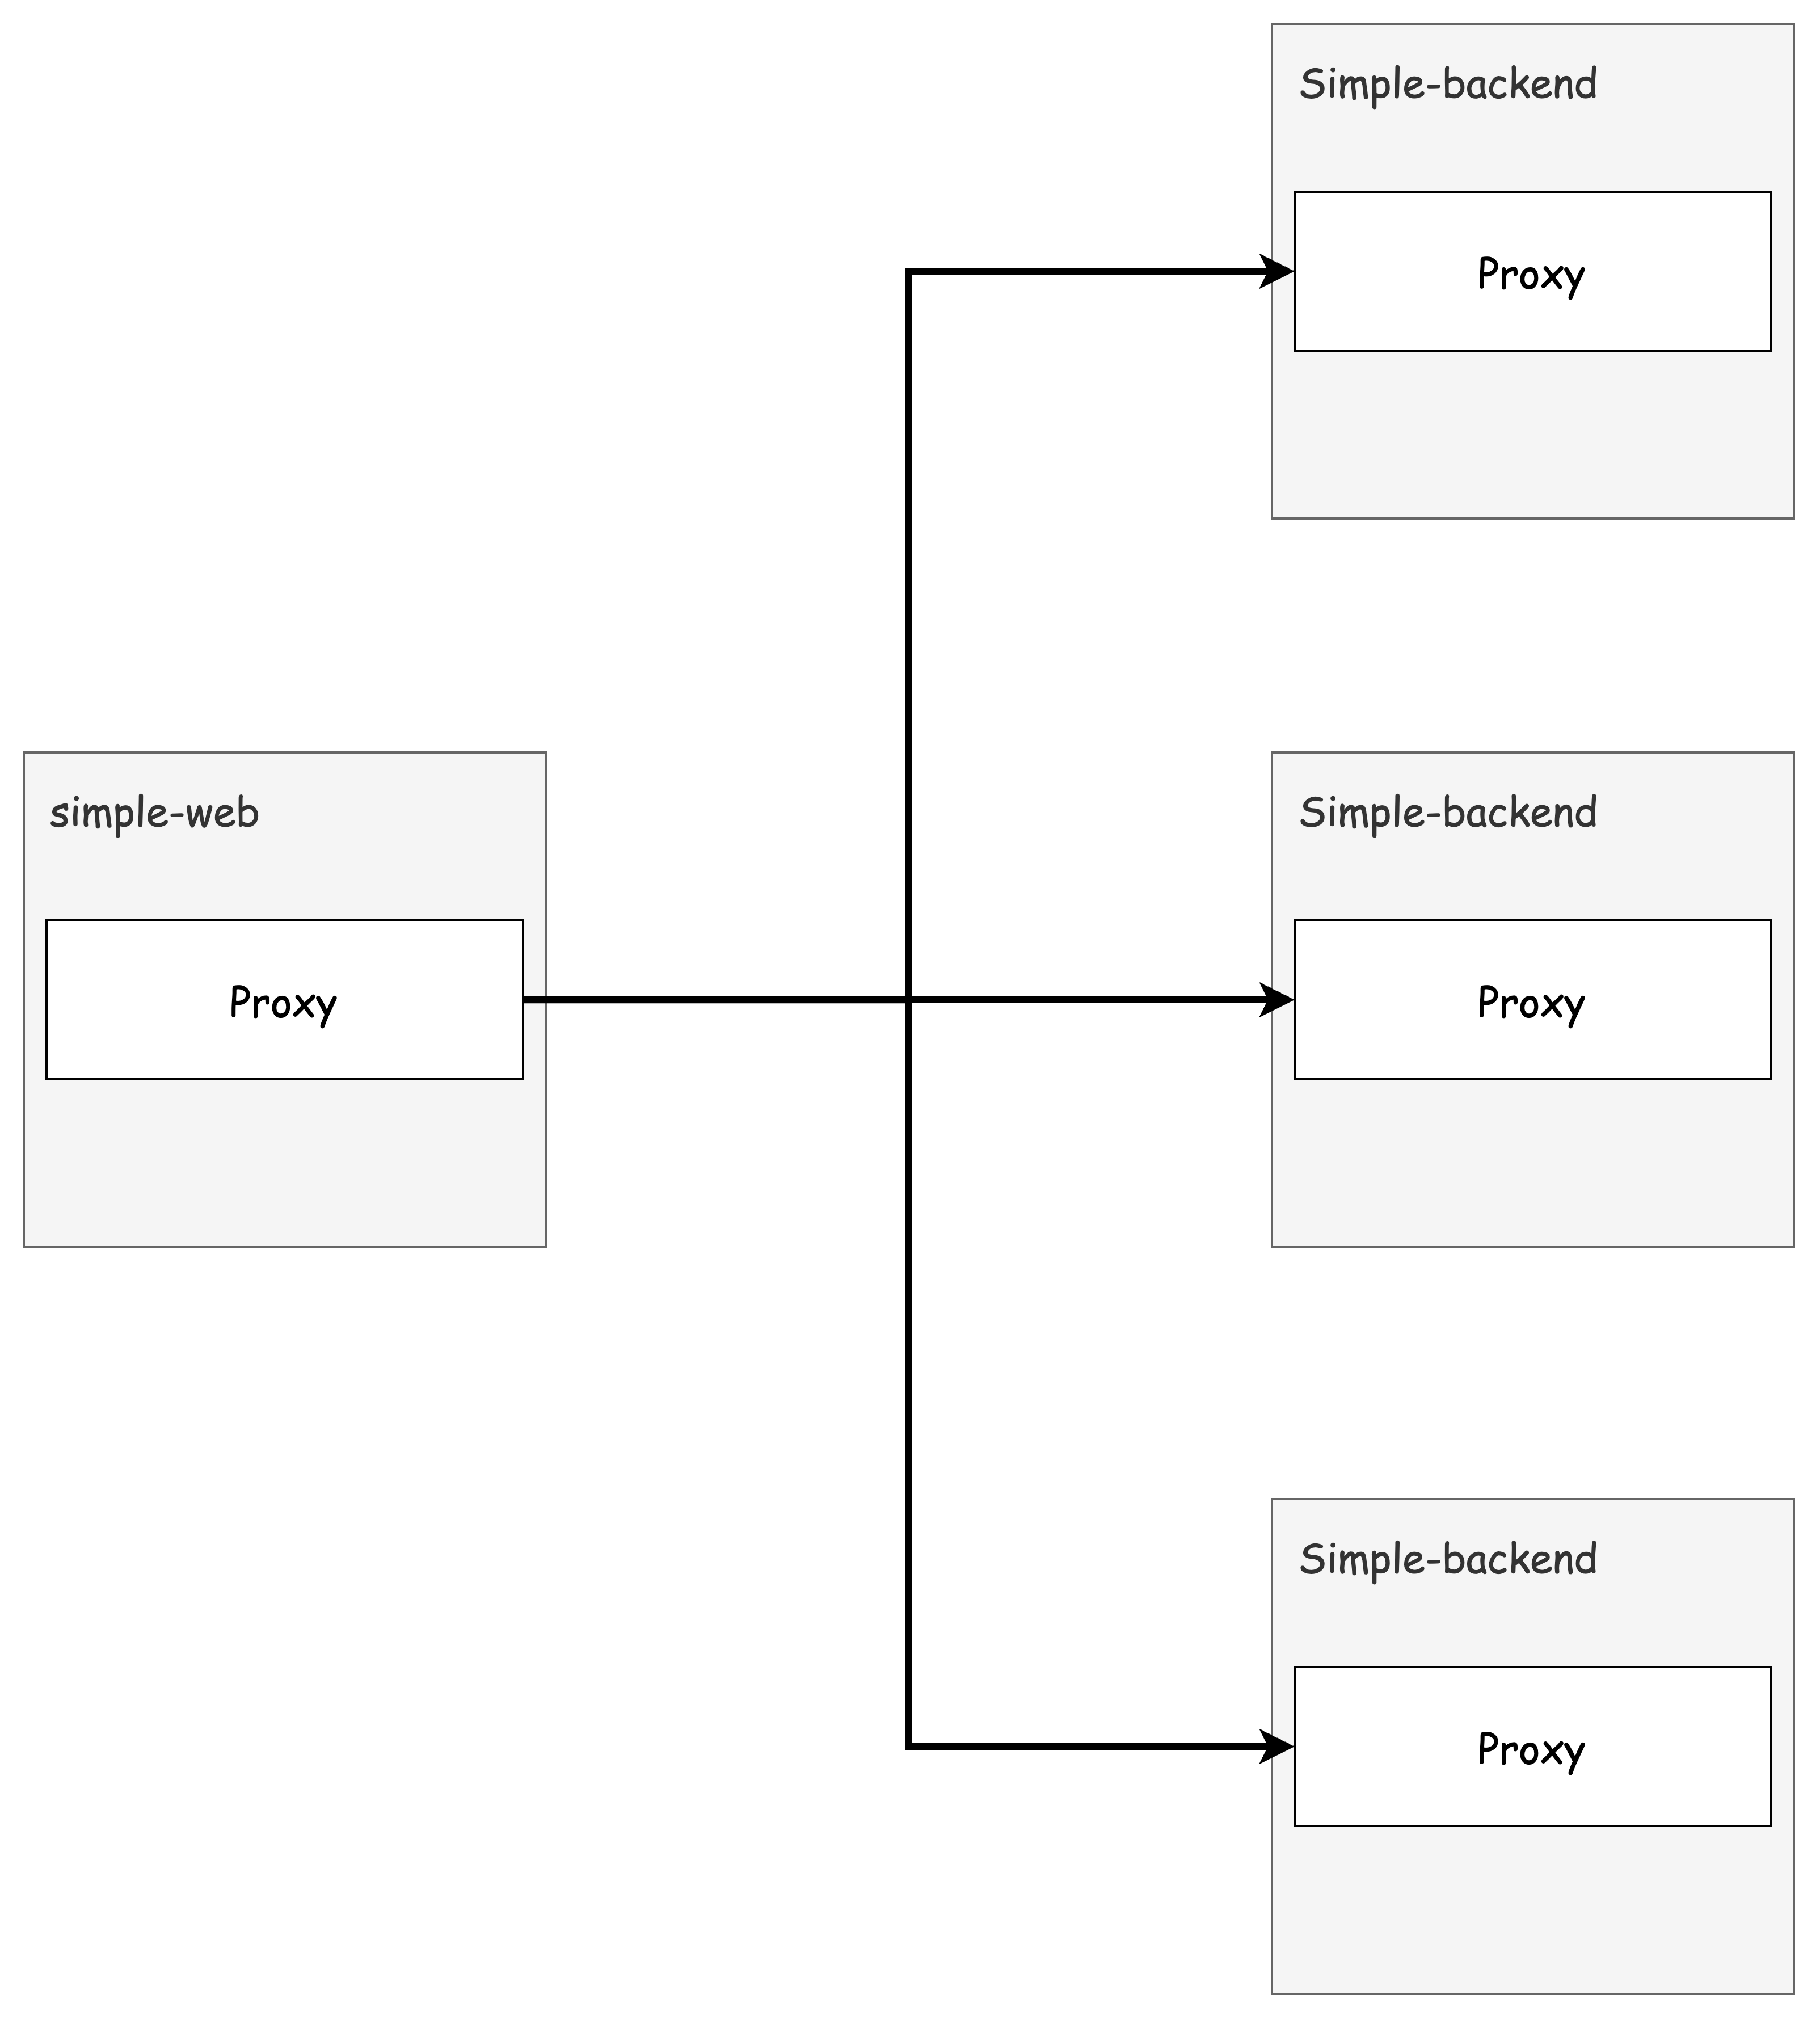
클라이언트 측 로드 밸런싱이란, 서비스에서 사용할 수 있는 여러 엔드포인트를 클라이언트에게 알려주고, 클라이언트가 특정 로드 밸런싱 알고리즘을 선택해 요청을 분산시키는 방식입니다.
이 방식을 사용하면 중앙집중식 로드 밸런서에 의존할 필요가 줄어들고, 클라이언트는 군더더기 홉을 거치지 않고 직접적으로 엔드포인트로 요청을 보낼 수 있습니다.
이스티오는 서비스 및 엔드포인트 디스커버리를 사용해 클라이언트 프록시에 최신 정보를 제공하며, 이를 통해 변화하는 토폴로지에도 유연하게 대응할 수 있습니다.
DestinationRule 리소스를 통해 어떤 로드 밸런싱 알고리즘을 사용할지 지정할 수 있으며, 엔보이의 기본 로드 밸런싱 알고리즘은 다음과 같습니다:
- 라운드 로빈 (기본값)
- 랜덤
- 가중 최소 요청
Server-side Load Balancing vs. Client-side Load Balancing 장단점 비교
Server side LB
출처 - CloudNet@
Client side LB
출처 - CloudNet@
✅ Getting started with client-side load balancing: DestinationRule
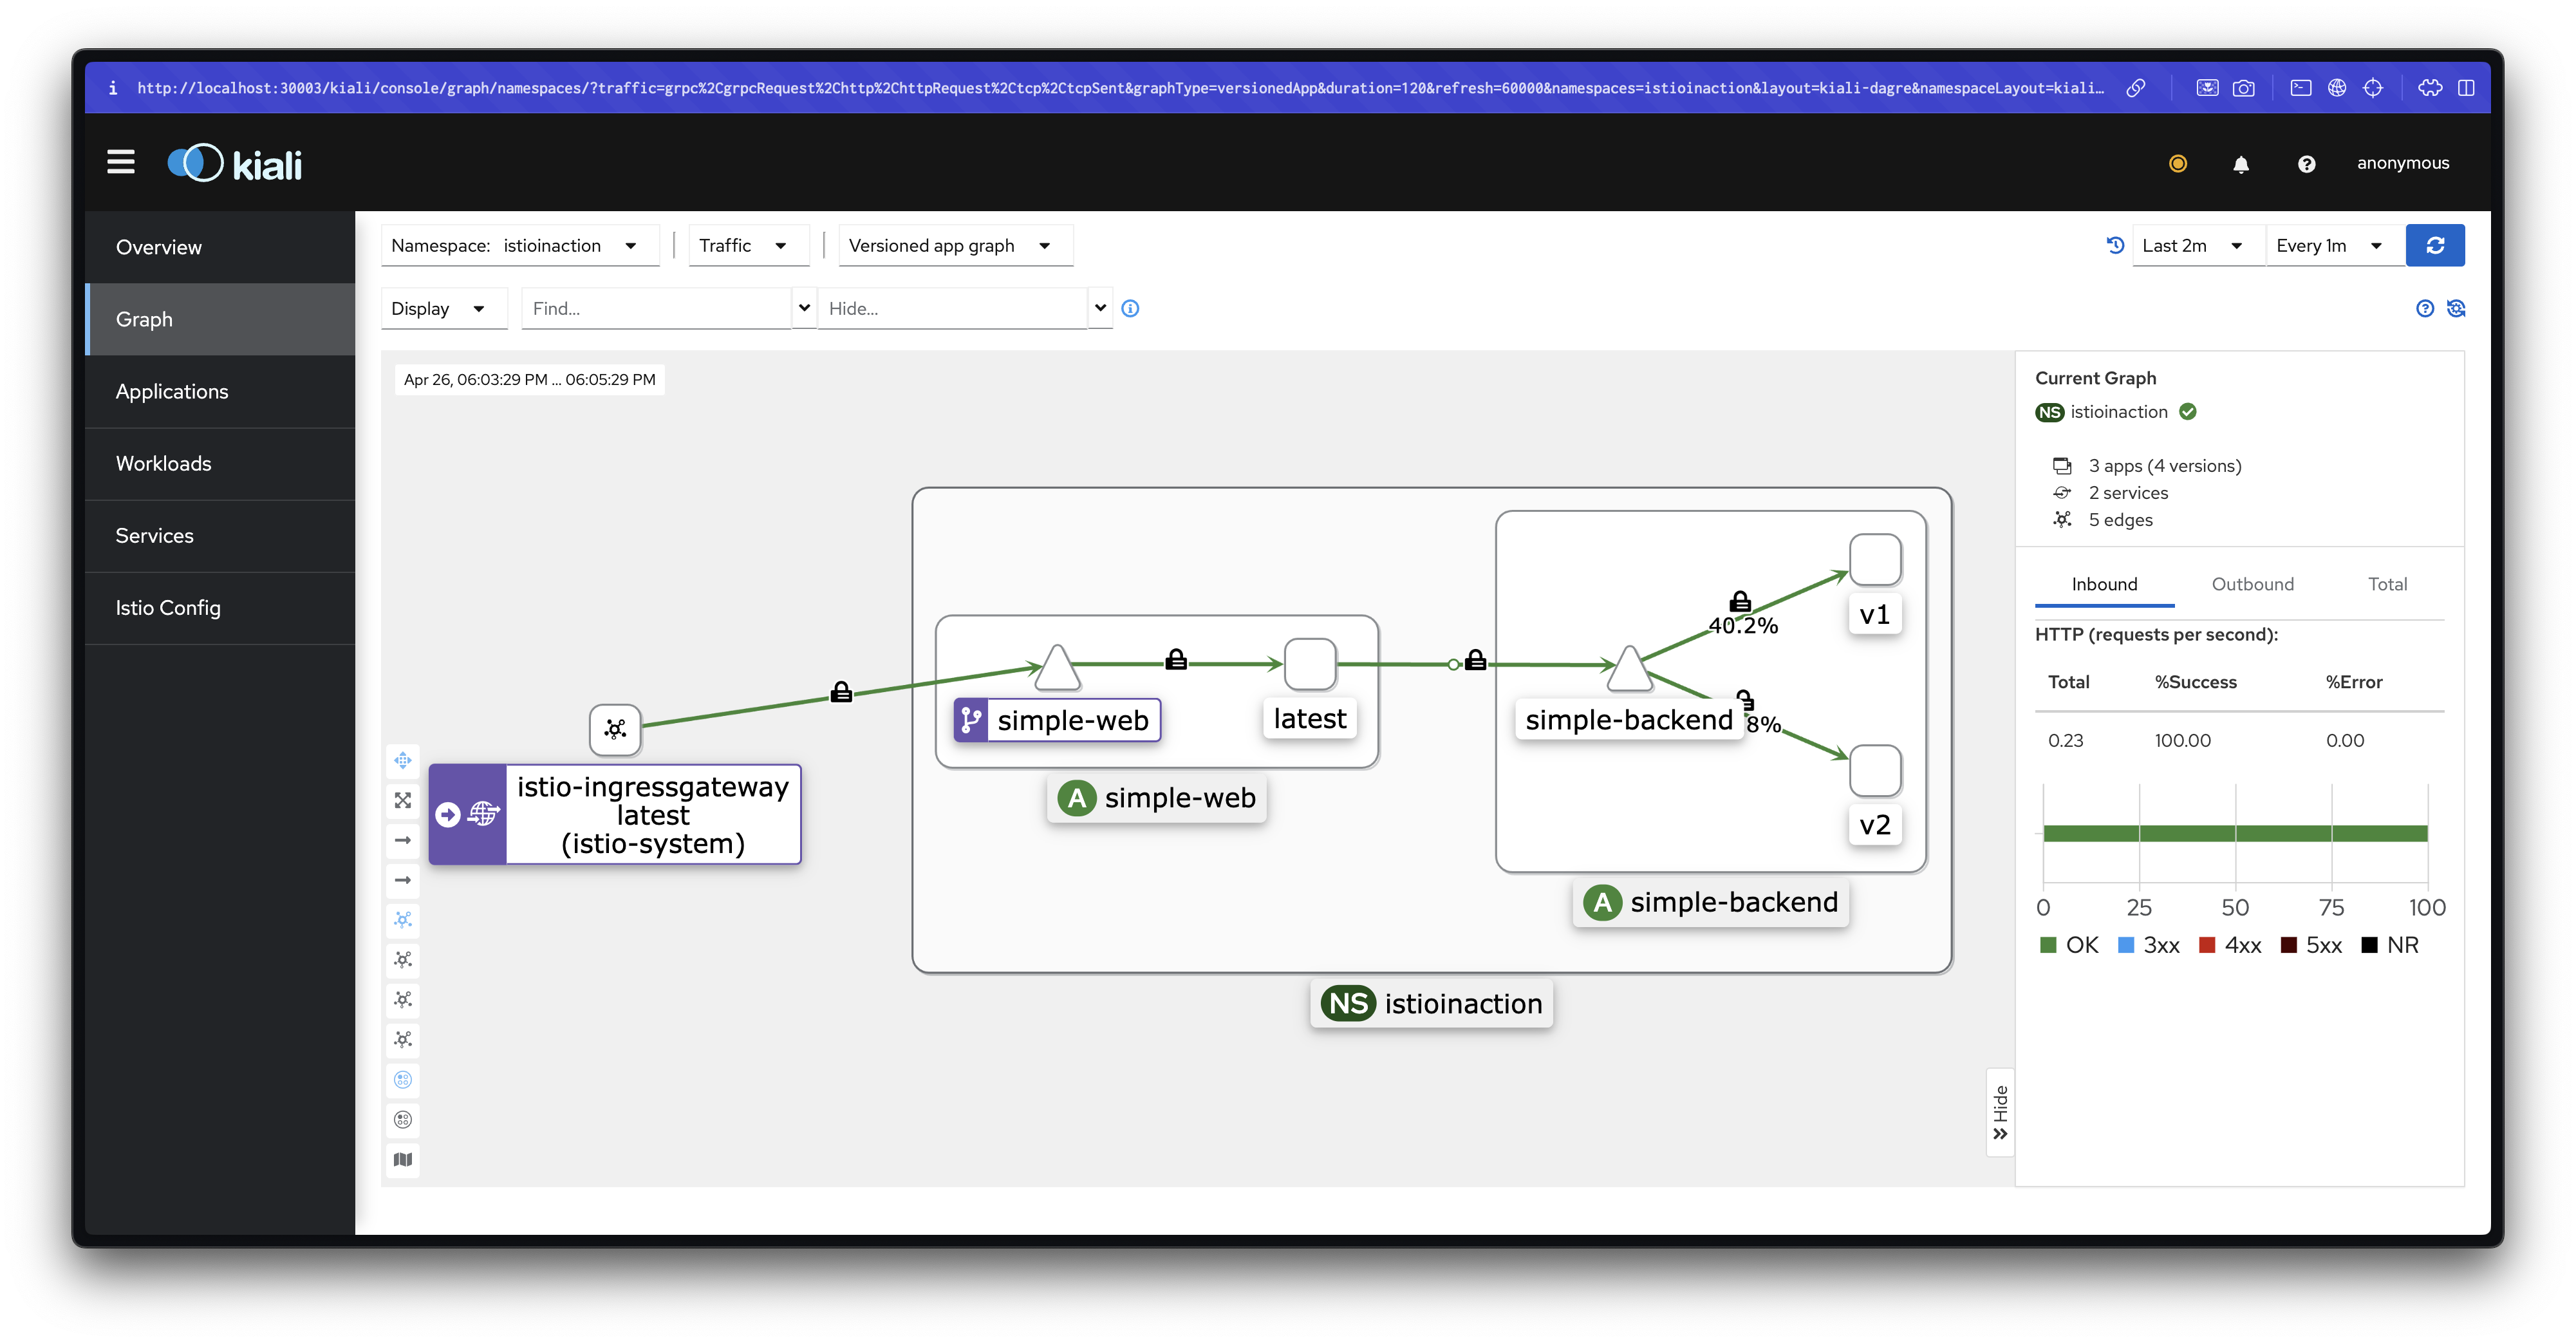
# (옵션) kiali 에서 simple-backend-1,2 버전 확인을 위해서 labels 설정 : ch6/simple-backend.yaml
open ch6/simple-backend.yaml
...
apiVersion: apps/v1
kind: Deployment
metadata:
  labels:
    app: simple-backend
    version: v1
  name: simple-backend-1
spec:
  replicas: 1
  selector:
    matchLabels:
      app: simple-backend
  template:
    metadata:
      labels:
        app: simple-backend
        version: v1
...
apiVersion: apps/v1
kind: Deployment
metadata:
  labels:
    app: simple-backend
    version: v2
  name: simple-backend-2
spec:
  replicas: 2
  selector:
    matchLabels:
      app: simple-backend
  template:
    metadata:
      labels:
        app: simple-backend
        version: v2
...

# 예제 서비스 2개 배포
kubectl apply -f ch6/simple-backend.yaml -n istioinaction
kubectl apply -f ch6/simple-web.yaml -n istioinaction

# 확인
kubectl get deploy,pod,svc,ep -n istioinaction -o wide
NAME                               READY   UP-TO-DATE   AVAILABLE   AGE    CONTAINERS       IMAGES                                 SELECTOR
deployment.apps/simple-backend-1   1/1     1            1           105m   simple-backend   nicholasjackson/fake-service:v0.17.0   app=simple-backend
deployment.apps/simple-backend-2   2/2     2            2           105m   simple-backend   nicholasjackson/fake-service:v0.17.0   app=simple-backend
deployment.apps/simple-web         1/1     1            1           105m   simple-web       nicholasjackson/fake-service:v0.17.0   app=simple-web
...

# gw,vs 배포
cat ch6/simple-web-gateway.yaml
apiVersion: networking.istio.io/v1alpha3
kind: Gateway
metadata:
  name: simple-web-gateway
spec:
  selector:
    istio: ingressgateway
  servers:
  - port:
      number: 80
      name: http
      protocol: HTTP
    hosts:
    - "simple-web.istioinaction.io"
---
apiVersion: networking.istio.io/v1alpha3
kind: VirtualService
metadata:
  name: simple-web-vs-for-gateway
spec:
  hosts:
  - "simple-web.istioinaction.io"
  gateways:
  - simple-web-gateway
  http:
  - route:
    - destination:
        host: simple-web

kubectl apply -f ch6/simple-web-gateway.yaml -n istioinaction

# 확인
kubectl get gw,vs -n istioinaction

docker exec -it myk8s-control-plane istioctl proxy-status
NAME                                                  CLUSTER        CDS        LDS        EDS        RDS        ECDS         ISTIOD                      VERSION
istio-ingressgateway-996bc6bb6-ztcx5.istio-system     Kubernetes     SYNCED     SYNCED     SYNCED     SYNCED     NOT SENT     istiod-7df6ffc78d-xmjbj     1.17.8
simple-backend-1-7449cc5945-d9zmc.istioinaction       Kubernetes     SYNCED     SYNCED     SYNCED     SYNCED     NOT SENT     istiod-7df6ffc78d-xmjbj     1.17.8
simple-backend-2-6876494bbf-vdttr.istioinaction       Kubernetes     SYNCED     SYNCED     SYNCED     SYNCED     NOT SENT     istiod-7df6ffc78d-xmjbj     1.17.8
simple-backend-2-6876494bbf-zn6v9.istioinaction       Kubernetes     SYNCED     SYNCED     SYNCED     SYNCED     NOT SENT     istiod-7df6ffc78d-xmjbj     1.17.8
simple-web-7cd856754-tjdv6.istioinaction              Kubernetes     SYNCED     SYNCED     SYNCED     SYNCED     NOT SENT     istiod-7df6ffc78d-xmjbj     1.17.8
# 도메인 질의를 위한 임시 설정 : 실습 완료 후에는 삭제 해둘 것
echo "127.0.0.1       simple-web.istioinaction.io" | sudo tee -a /etc/hosts
cat /etc/hosts | tail -n 3

# 호출
curl -s http://simple-web.istioinaction.io:30000
open http://simple-web.istioinaction.io:30000

# 신규 터미널 : 반복 접속 실행 해두기
while true; do curl -s http://simple-web.istioinaction.io:30000 | jq ".upstream_calls[0].body" ; date "+%Y-%m-%d %H:%M:%S" ; sleep 1; echo; done


# 로그 확인
kubectl stern -l app=simple-web -n istioinaction
kubectl stern -l app=simple-web -n istioinaction -c istio-proxy
kubectl stern -l app=simple-web -n istioinaction -c simple-web
kubectl stern -l app=simple-backend -n istioinaction
kubectl stern -l app=simple-backend -n istioinaction -c istio-proxy
kubectl stern -l app=simple-backend -n istioinaction -c simple-backend


# (옵션) proxy-config
# proxy-config : simple-web
docker exec -it myk8s-control-plane istioctl proxy-config listener deploy/simple-web.istioinaction

docker exec -it myk8s-control-plane istioctl proxy-config routes deploy/simple-web.istioinaction
docker exec -it myk8s-control-plane istioctl proxy-config routes deploy/simple-web.istioinaction | grep backend
80                                                            simple-backend, simple-backend.istioinaction + 1 more...     /*

docker exec -it myk8s-control-plane istioctl proxy-config cluster deploy/simple-web.istioinaction --fqdn simple-backend.istioinaction.svc.cluster.local
SERVICE FQDN                                       PORT     SUBSET     DIRECTION     TYPE     DESTINATION RULE
simple-backend.istioinaction.svc.cluster.local     80       -          outbound      EDS

docker exec -it myk8s-control-plane istioctl proxy-config cluster deploy/simple-web.istioinaction --fqdn simple-backend.istioinaction.svc.cluster.local -o json
...
       "name": "outbound|80||simple-backend.istioinaction.svc.cluster.local",
        "type": "EDS",
        "edsClusterConfig": {
            "edsConfig": {
                "ads": {},
                "initialFetchTimeout": "0s",
                "resourceApiVersion": "V3"
            },
            "serviceName": "outbound|80||simple-backend.istioinaction.svc.cluster.local"
        },
        "connectTimeout": "10s",
        "lbPolicy": "LEAST_REQUEST",
...

docker exec -it myk8s-control-plane istioctl proxy-config endpoint deploy/simple-web.istioinaction
docker exec -it myk8s-control-plane istioctl proxy-config endpoint deploy/simple-web.istioinaction --cluster 'outbound|80||simple-backend.istioinaction.svc.cluster.local'
ENDPOINT            STATUS      OUTLIER CHECK     CLUSTER
10.10.0.14:8080     HEALTHY     OK                outbound|80||simple-backend.istioinaction.svc.cluster.local
10.10.0.15:8080     HEALTHY     OK                outbound|80||simple-backend.istioinaction.svc.cluster.local
10.10.0.16:8080     HEALTHY     OK                outbound|80||simple-backend.istioinaction.svc.cluster.local

docker exec -it myk8s-control-plane istioctl proxy-config endpoint deploy/simple-web.istioinaction --cluster 'outbound|80||simple-backend.istioinaction.svc.cluster.local' -o json
...
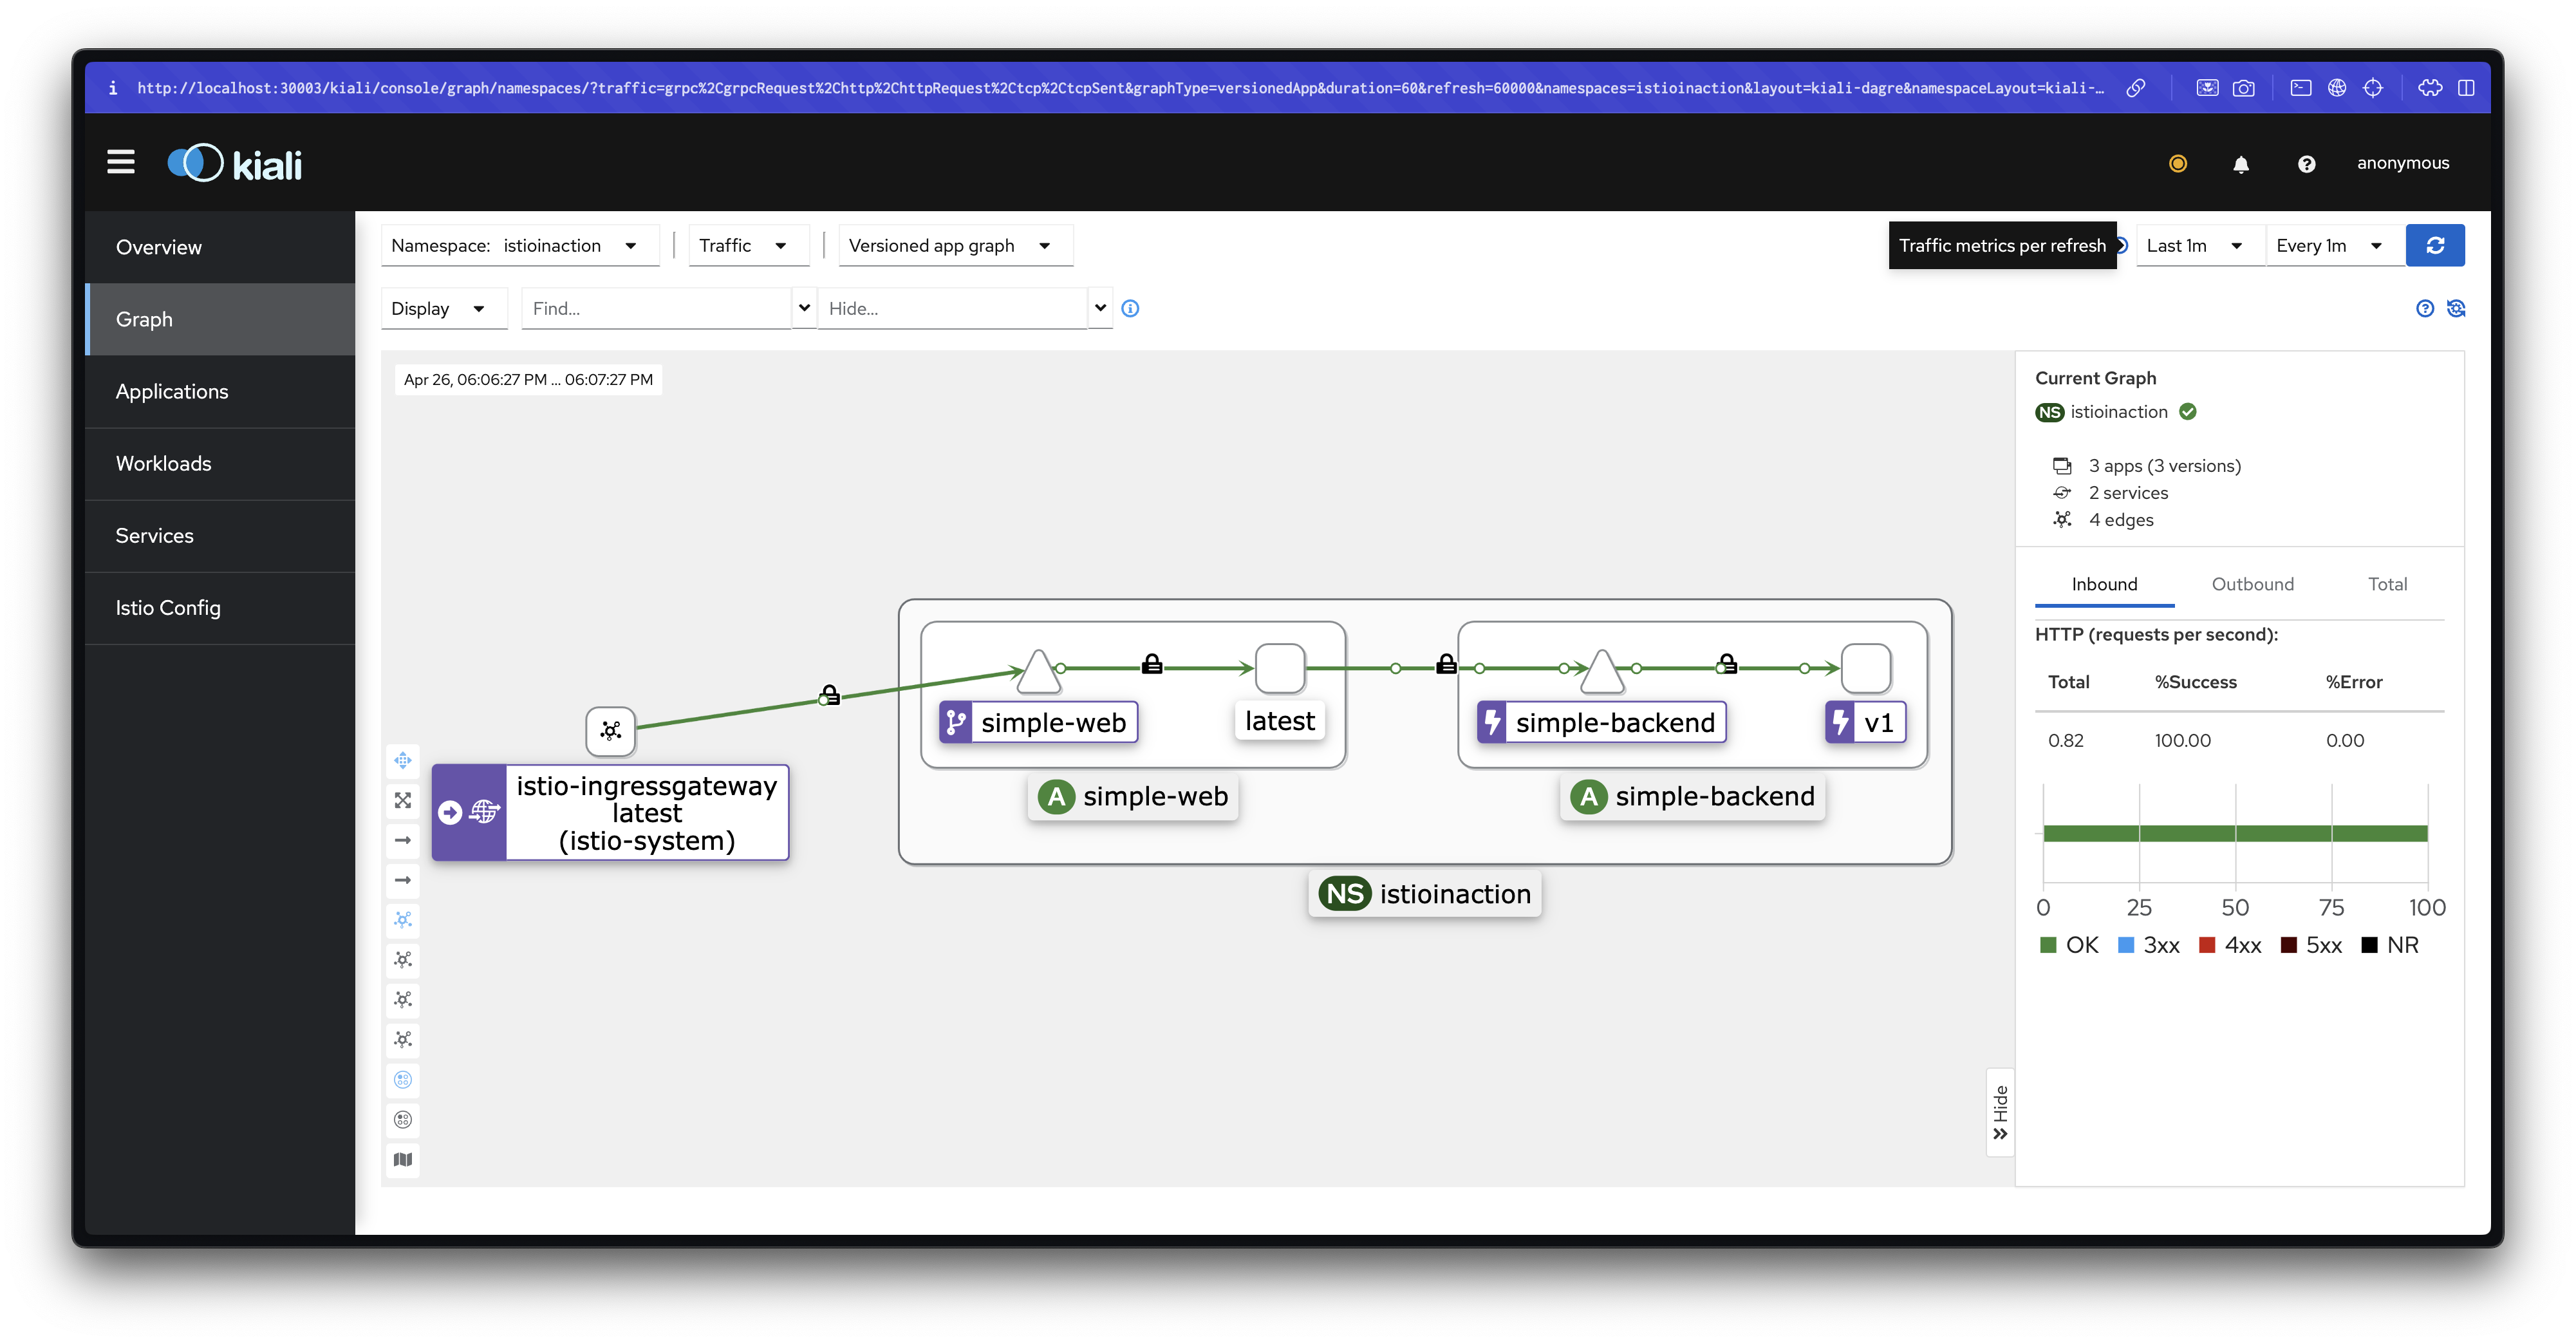
DestinationRule는 특정 목적지를 호출하는 메시 내 클라이언트들에 정책을 지정합니다.
# DestinationRule 적용 : ROUND_ROBIN
cat ch6/simple-backend-dr-rr.yaml
kubectl apply -f ch6/simple-backend-dr-rr.yaml -n istioinaction

# 확인 : DestinationRule 단축어 dr
kubectl get dr -n istioinaction
NAME                HOST                                             AGE
simple-backend-dr   simple-backend.istioinaction.svc.cluster.local   11s

kubectl get destinationrule simple-backend-dr -n istioinaction \
 -o jsonpath='{.spec.trafficPolicy.loadBalancer.simple}{"\n"}'
ROUND_ROBIN

# 호출 : 이 예시 서비스 집합에서는 호출 체인을 보여주는 JSON 응답을 받느다
## simple-web 서비스는 simple-backend 서비스를 호출하고, 우리는 궁극적으로 simple-backend-1 에서 온 응답 메시지 Hello를 보게 된다.
## 몇 번 더 반복하면 simple-backend-1 과 simple-backend-2 에게 응답을 받는다.
curl -s http://simple-web.istioinaction.io:30000 | jq ".upstream_calls[0].body"

# 반복 호출 확인 : 파드 비중은 backend-2가 2개임
for in in {1..10}; do curl -s http://simple-web.istioinaction.io:30000 | jq ".upstream_calls[0].body"; done
for in in {1..50}; do curl -s http://simple-web.istioinaction.io:30000 | jq ".upstream_calls[0].body"; done | sort | uniq -c | sort -nr


# 로그 확인 : backend 요청을 하면 요청을 처리할 redirect 주소를 응답 (301), 전달 받은 redirect(endpoint)로 다시 요청
kubectl stern -l app=simple-web -n istioinaction -c istio-proxy
## simpleweb → simple-backend (301) redirect 응답 수신
simple-web-7cd856754-tjdv6 istio-proxy [2025-04-20T04:22:24.317Z] "GET // HTTP/1.1" 301 - via_upstream - "-" 0 36 3 3 "172.18.0.1" "curl/8.7.1" "ee707715-7e7c-42c3-a404-d3ee22f79d11" "simple-backend:80" "10.10.0.16:8080" outbound|80||simple-backend.istioinaction.svc.cluster.local 10.10.0.17:46590 10.200.1.161:80 172.18.0.1:0 - default
## simpleweb → simple-backend (200)
simple-web-7cd856754-tjdv6 istio-proxy [2025-04-20T04:22:24.324Z] "GET / HTTP/1.1" 200 - via_upstream - "-" 0 278 156 156 "172.18.0.1" "curl/8.7.1" "ee707715-7e7c-42c3-a404-d3ee22f79d11" "simple-backend:80" "10.10.0.14:8080" outbound|80||simple-backend.istioinaction.svc.cluster.local 10.10.0.17:38336 10.200.1.161:80 172.18.0.1:0 - default
## simpleweb → 외부 curl 응답(200)
simple-web-7cd856754-tjdv6 istio-proxy [2025-04-20T04:22:24.307Z] "GET / HTTP/1.1" 200 - via_upstream - "-" 0 889 177 177 "172.18.0.1" "curl/8.7.1" "ee707715-7e7c-42c3-a404-d3ee22f79d11" "simple-web.istioinaction.io:30000" "10.10.0.17:8080" inbound|8080|| 127.0.0.6:40981 10.10.0.17:8080 172.18.0.1:0 outbound_.80_._.simple-web.istioinaction.svc.cluster.local default

kubectl stern -l app=simple-backend -n istioinaction -c istio-proxy
## simple-backend → (응답) simpleweb (301)
simple-backend-2-6876494bbf-zn6v9 istio-proxy [2025-04-20T04:22:45.209Z] "GET // HTTP/1.1" 301 - via_upstream - "-" 0 36 3 3 "172.18.0.1" "curl/8.7.1" "71ba286a-a45f-41bc-9b57-69710ea576d7" "simple-backend:80" "10.10.0.14:8080" inbound|8080|| 127.0.0.6:54105 10.10.0.14:8080 172.18.0.1:0 outbound_.80_._.simple-backend.istioinaction.svc.cluster.local default
## simple-backend → (응답) simpleweb (200)
simple-backend-1-7449cc5945-d9zmc istio-proxy [2025-04-20T04:22:45.216Z] "GET / HTTP/1.1" 200 - via_upstream - "-" 0 278 152 152 "172.18.0.1" "curl/8.7.1" "71ba286a-a45f-41bc-9b57-69710ea576d7" "simple-backend:80" "10.10.0.15:8080" inbound|8080|| 127.0.0.6:43705 10.10.0.15:8080 172.18.0.1:0 outbound_.80_._.simple-backend.istioinaction.svc.cluster.local default

#
docker exec -it myk8s-control-plane istioctl proxy-config cluster deploy/simple-web.istioinaction --fqdn simple-backend.istioinaction.svc.cluster.local -o json
...
       "name": "outbound|80||simple-backend.istioinaction.svc.cluster.local",
        "type": "EDS",
        "edsClusterConfig": {
            "edsConfig": {
                "ads": {},
                "initialFetchTimeout": "0s",
                "resourceApiVersion": "V3"
            },
            "serviceName": "outbound|80||simple-backend.istioinaction.svc.cluster.local"
        },
        "connectTimeout": "10s",
        "lbPolicy": "LEAST_REQUEST", # RR은 기본값(?)이여서, 해당 부분 설정이 이전과 다르게 없다
...

#
docker exec -it myk8s-control-plane istioctl proxy-config endpoint deploy/simple-web.istioinaction --cluster 'outbound|80||simple-backend.istioinaction.svc.cluster.local' -o json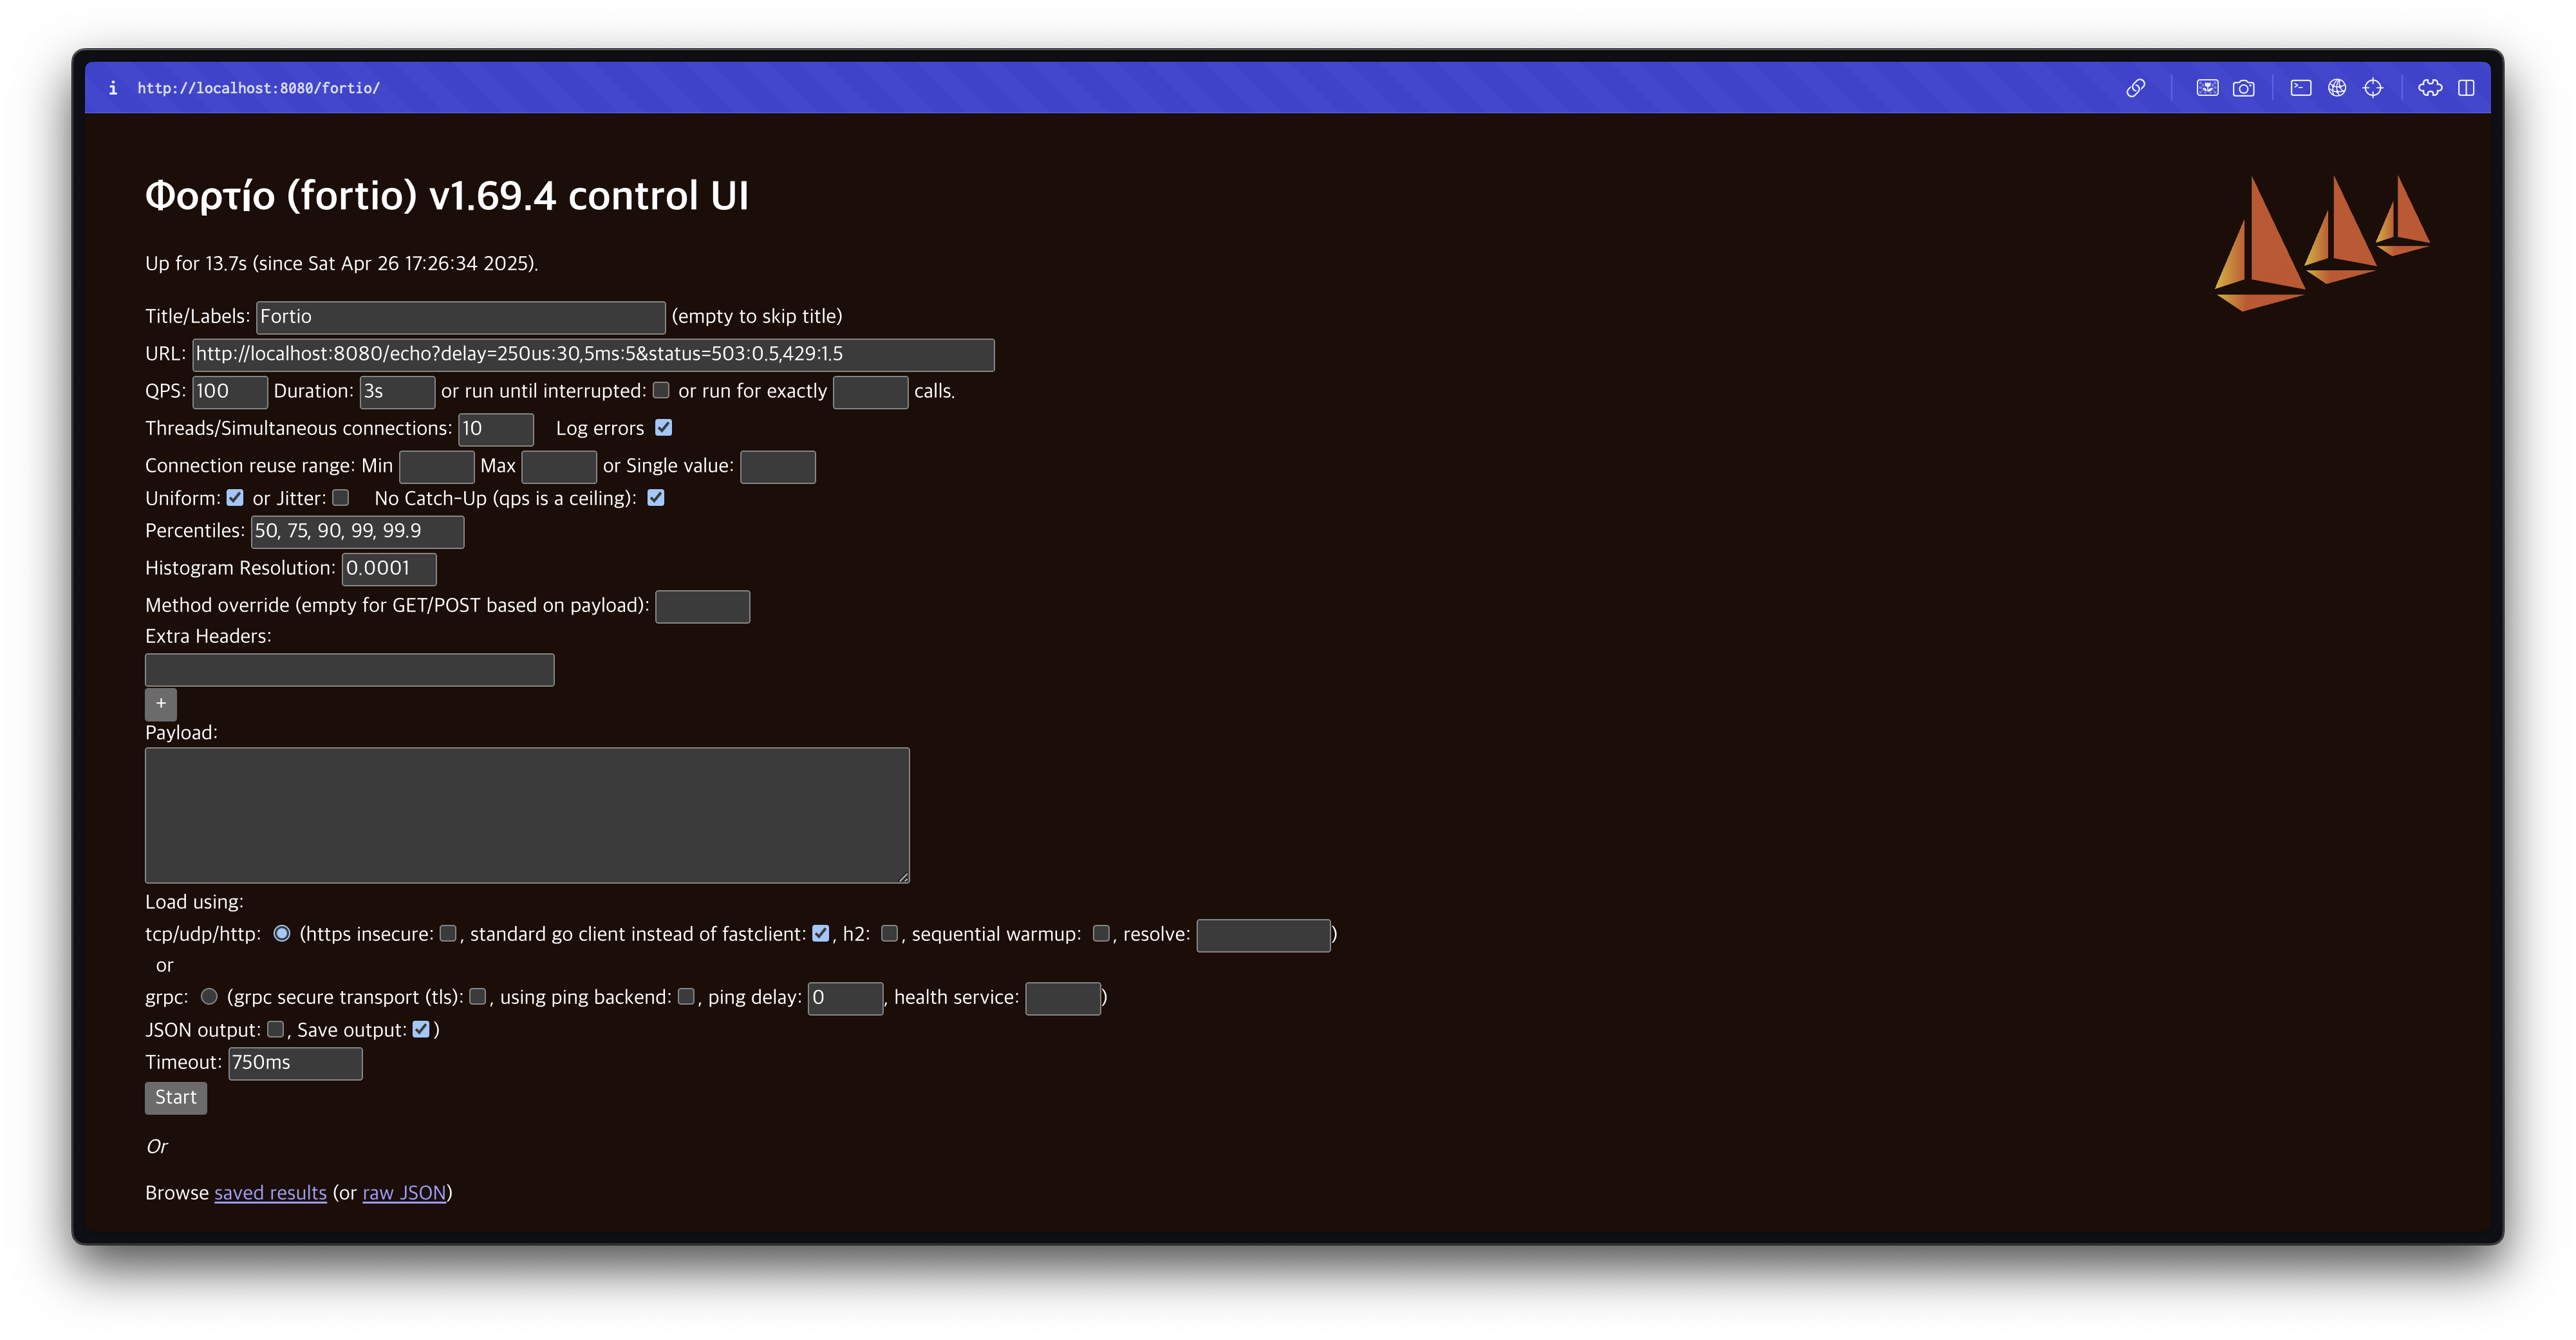
✅ Setting up our scenario: Fortio 설치 및 테스트 준비
실제 운영 환경에서는 서비스가 요청을 처리하는 데 다양한 이유로 시간이 걸릴 수 있습니다.
대표적인 원인은 다음과 같습니다:
- 요청 크기(Request size): 요청 데이터의 크기가 클수록 처리 시간이 증가합니다.
- 처리 복잡도(Processing complexity): 비즈니스 로직이 복잡할수록 시간이 오래 걸립니다.
- 데이터베이스 사용량(Database usage): DB 조회 및 쓰기 작업이 많으면 지연이 발생할 수 있습니다.
- 다른 서비스 호출(Calling other services that take time): 외부 시스템 호출로 인한 지연이 생길 수 있습니다.
또한, 서비스 외적인 이유들도 응답 시간에 영향을 미칠 수 있습니다:
- 가비지 컬렉션(Unexpected stop-the-world garbage collections): 언어 런타임의 GC 동작으로 요청 처리가 멈출 수 있습니다.
- 리소스 경합(Resource contention): CPU, 메모리, 네트워크 등의 자원을 여러 프로세스가 경쟁하면 지연이 발생합니다.
- 네트워크 혼잡(Network congestion): 네트워크 상의 혼잡으로 패킷 지연이 발생할 수 있습니다.
이를 실험적으로 모방하기 위해, 우리는 예제 서비스의 응답 시간에 지연(Delays) 과 편차(Variance) 를 인위적으로 추가합니다.
그리고 이를 통해 서비스 응답 시간이 매번 달라지는 현상을 직접 관찰해볼 것입니다.
먼저 현재 simple-web 서비스를 호출할 때 소요되는 시간을 측정해 봅니다.
이를 위해 netshoot 파드에서 내부 DNS를 사용하여 simple-web 서비스로 접속해봅니다.
# 호출 3회 반복 : netshoot 에서 서비스명으로 내부 접속
kubectl exec -it netshoot -- time curl -s -o /dev/null http://simple-web.istioinaction
kubectl exec -it netshoot -- time curl -s -o /dev/null http://simple-web.istioinaction
kubectl exec -it netshoot -- time curl -s -o /dev/null http://simple-web.istioinaction
예상 결과:
real    0m 0.17s
user    0m 0.00s
sys     0m 0.00s
...
호출할 때마다 미세하게 응답 시간이 다르게 나타납니다.
이렇게 변동성 있는 응답 시간은 클라이언트 측 로드 밸런싱 전략이 필요함을 보여줍니다.
Fortio 설치 및 준비
이제 본격적으로 부하 테스트를 위해 Fortio 라는 부하 생성 도구를 설치하고 사용할 준비를 합니다.
Fortio는 초당 요청 수(QPS)를 설정해 부하를 발생시키고, 지연 시간 히스토그램 및 다양한 통계를 수집할 수 있는 강력한 CLI 도구입니다.
# mac 설치
brew install fortio
fortio -h
fortio server
open http://127.0.0.1:8080/fortio
✅ Testing various client-side load-balancing strategies
이제 Fortio 로드 테스트 클라이언트를 사용할 준비가 완료되었습니다.
이번 실습에서는 Fortio를 사용하여 다양한 로드 밸런싱 알고리즘에 따라 성능 차이를 관찰합니다.
테스트 계획은 다음과 같습니다:
- 60초 동안
- 10개의 커넥션을 통해
- 초당 1000개의 요청(1,000 RPS)을 전송합니다.
Fortio는 각 요청의 지연 시간을 추적하며, 이를 백분위수 분석 및 히스토그램 형태로 시각화할 수 있습니다.
테스트를 시작하기 전에, 일부 엔드포인트의 지연 시간을 인위적으로 늘려 실제 환경에서 발생할 수 있는 지연 상황을 시뮬레이션합니다.
이제 지연된 simple-backend-1 서비스를 배포하겠습니다.
#
cat ch6/simple-backend-delayed.yaml
...
- env:
- name: "LISTEN_ADDR"
value: "0.0.0.0:8080"
- name: "SERVER_TYPE"
value: "http"
- name: "NAME"
value: "simple-backend"
- name: "MESSAGE"
value: "Hello from simple-backend-1"
- name: "TIMING_VARIANCE"
value: "10ms"
- name: "TIMING_50_PERCENTILE"
value: "1000ms"
- name: KUBERNETES_NAMESPACE
valueFrom:
fieldRef:
fieldPath: metadata.namespace
image: nicholasjackson/fake-service:v0.17.0
...
kubectl apply -f ch6/simple-backend-delayed.yaml -n istioinaction
kubectl rollout restart deployment -n istioinaction simple-backend-1
# 확인???
kubectl exec -it deploy/simple-backend-1 -n istioinaction -- env | grep TIMING
TIMING_VARIANCE=10ms
TIMING_50_PERCENTILE=150ms # ???
kubectl exec -it deploy/simple-backend-2 -n istioinaction -- env | grep TIMING
TIMING_VARIANCE=10ms
TIMING_50_PERCENTILE=150ms
# 직접 deploy 편집 수정???
KUBE_EDITOR="nano" kubectl edit deploy/simple-backend-1 -n istioinaction
...
- name: TIMING_50_PERCENTILE
value: 1000ms
...
kubectl rollout restart deployment -n istioinaction simple-backend-1
kubectl exec -it deploy/simple-backend-1 -n istioinaction -- env | grep TIMING
TIMING_VARIANCE=10ms
TIMING_50_PERCENTILE=150ms # ???
# 동작 중 파드에 env 직접 수정..
kubectl exec -it deploy/simple-backend-1 -n istioinaction -- sh
-----------------------------------
export TIMING_50_PERCENTILE=1000ms
exit
-----------------------------------
#
kubectl describe pod -n istioinaction -l app=simple-backend | grep TIMING_50_PERCENTILE:
TIMING_50_PERCENTILE: 1000ms
TIMING_50_PERCENTILE: 150ms
TIMING_50_PERCENTILE: 150ms
# 테스트
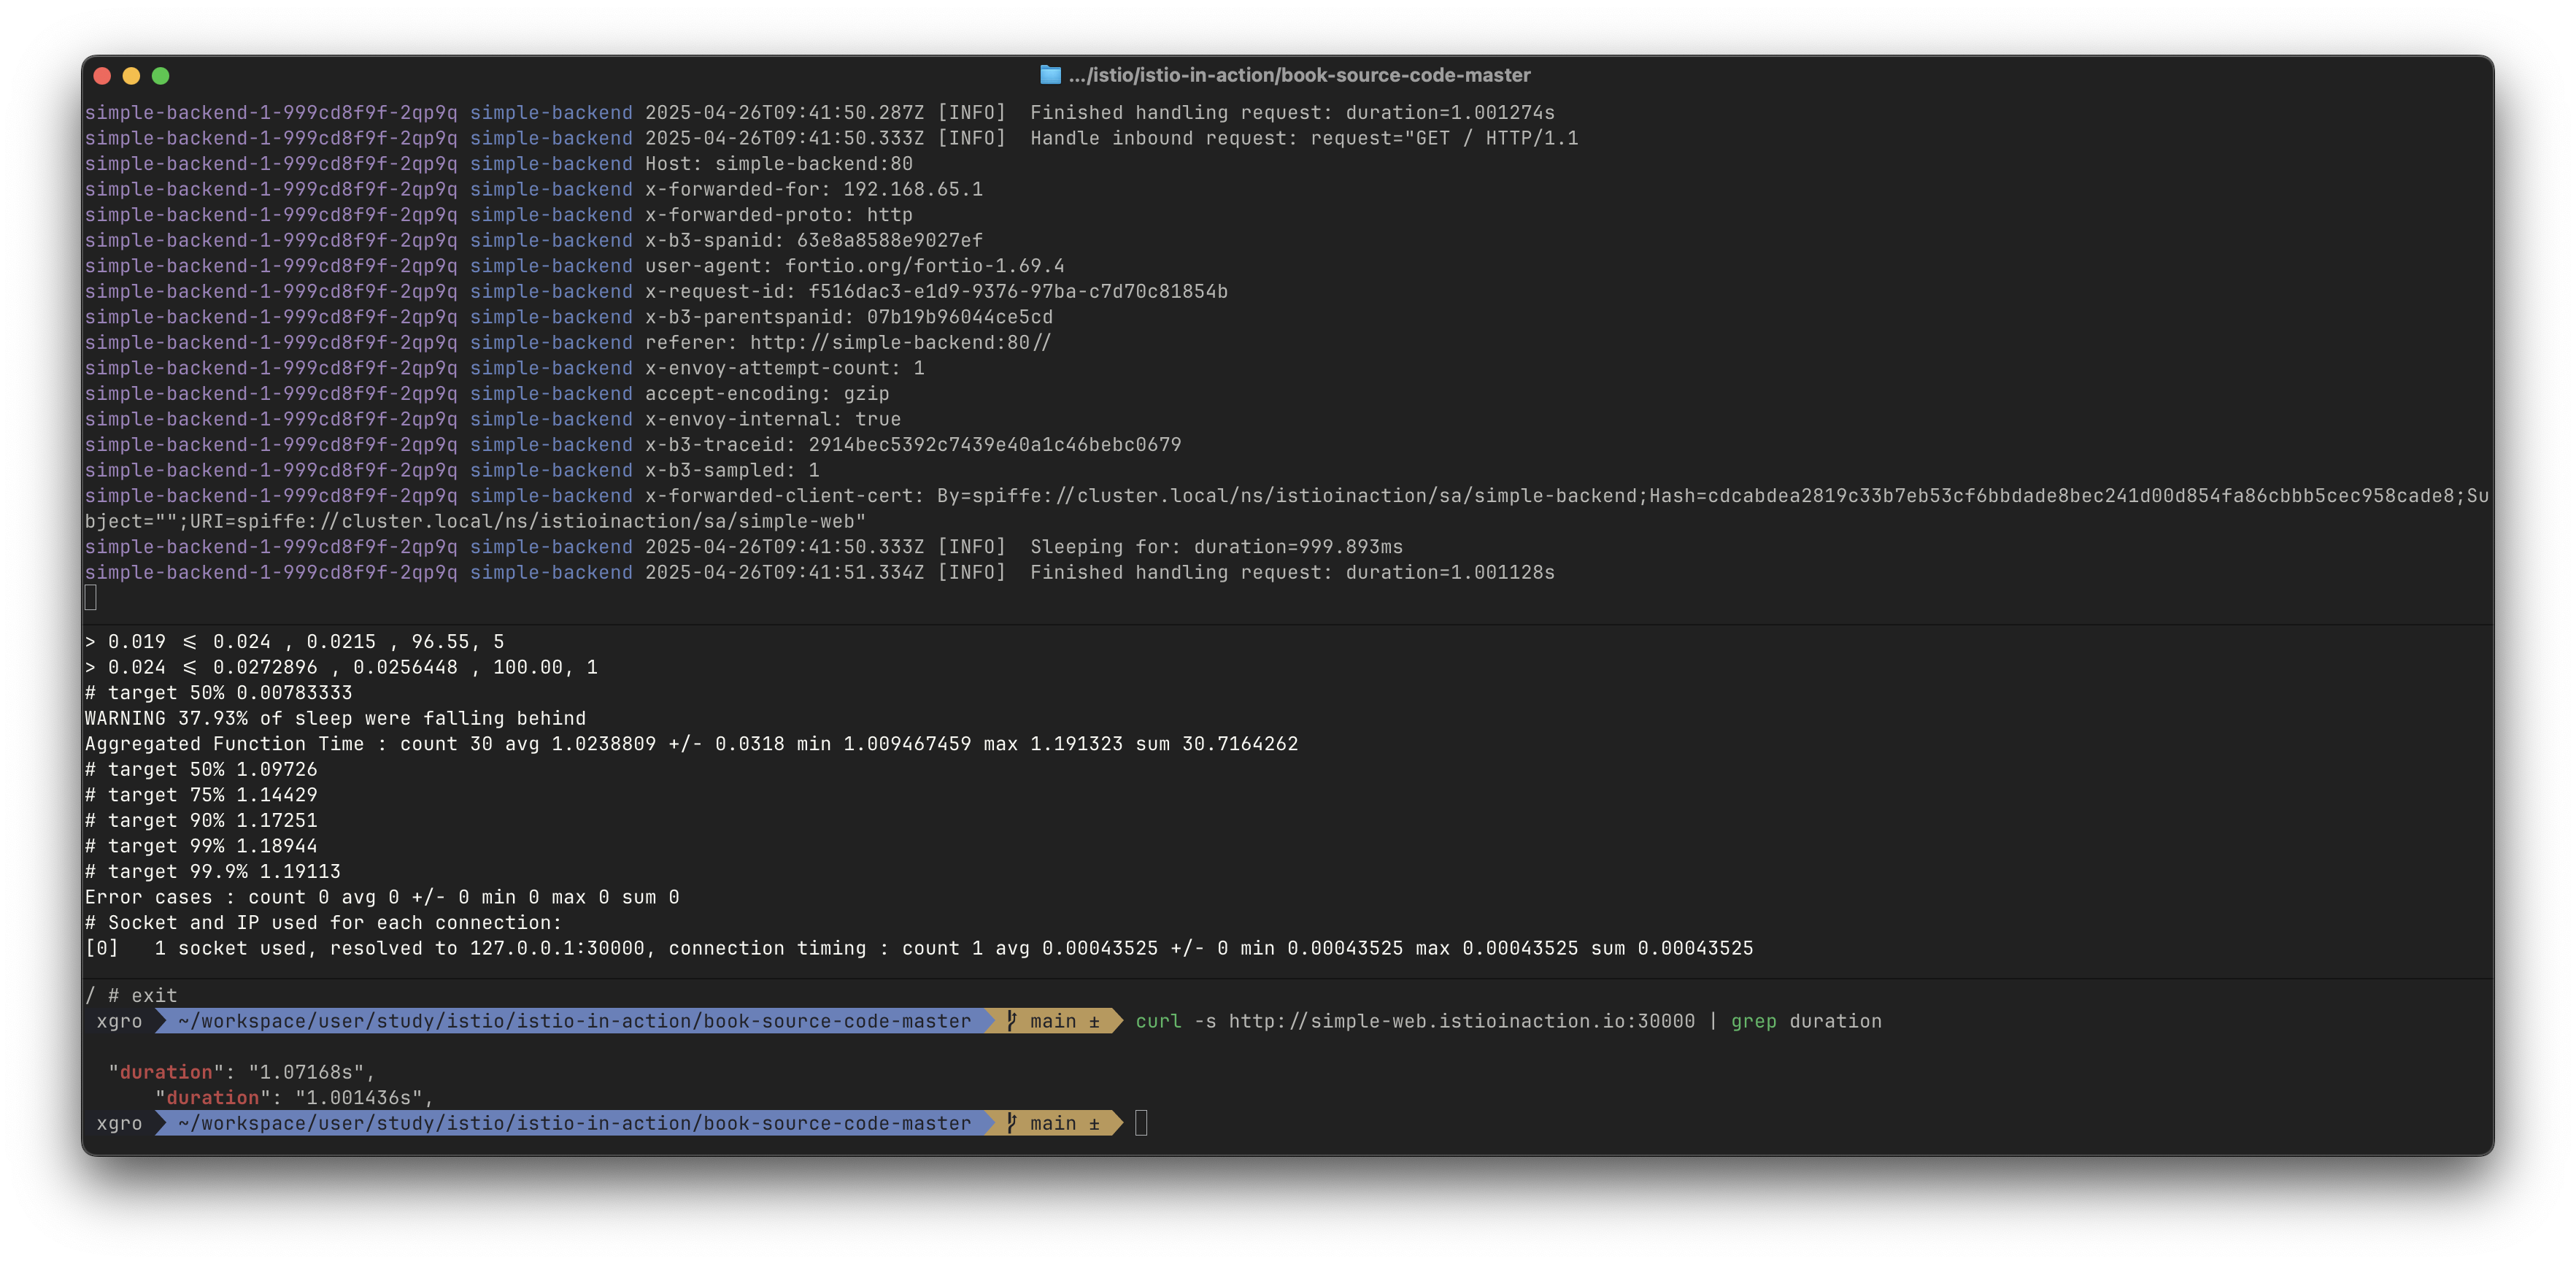
curl -s http://simple-web.istioinaction.io:30000 | grep duration
curl -s http://simple-web.istioinaction.io:30000 | grep duration
curl -s http://simple-web.istioinaction.io:30000 | grep duration
"duration": "1.058699s",
"duration": "1.000934s",Fortio 웹 대시보드에서 부하 테스트 실행
Fortio 서버를 실행합니다.
fortio server웹 브라우저를 열어 Fortio 대시보드에 접속합니다.
http://127.0.0.1:8080/fortio/테스트를 다음과 같이 설정합니다:
- Title: roundrobin
- URL: http://simple-web.istioinaction.io:30000
- QPS: 1000
- Duration: 60s
- Threads: 10
- Jitter: 체크
- No Catch-up: 체크 해제
- Extra Headers: User-Agent: fortio
- Timeout: 2000ms
⇒ Start 버튼 클릭
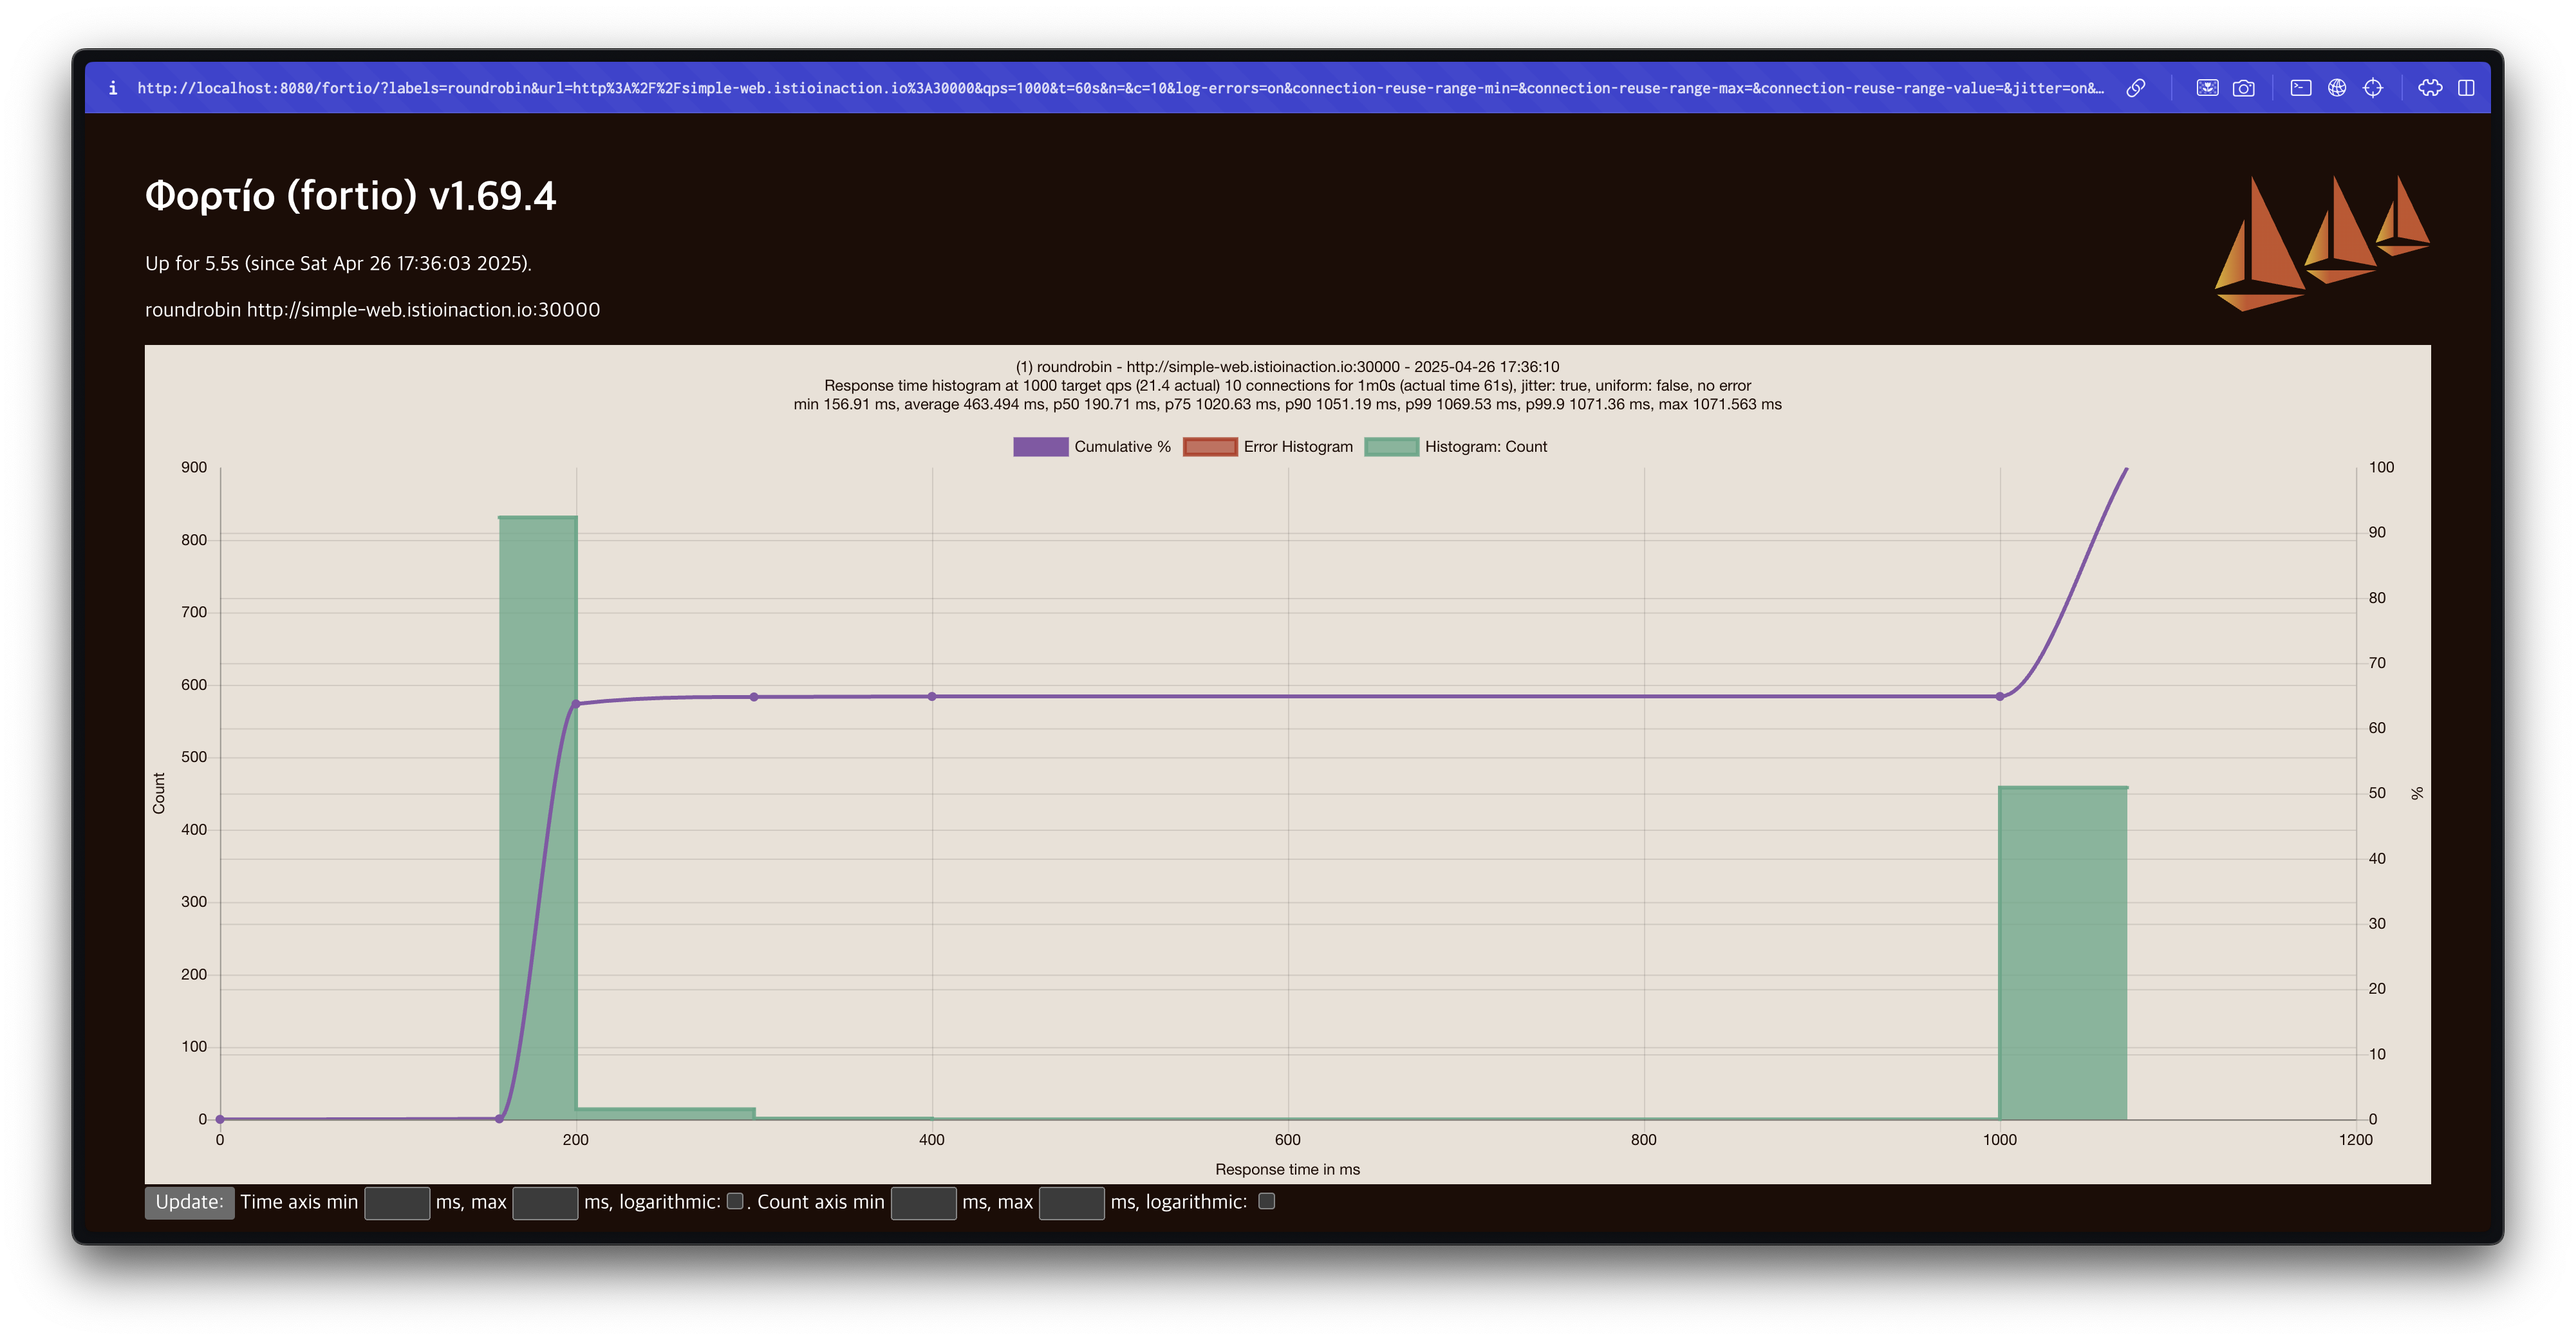
테스트가 완료되면 결과 파일이 저장되고, 결과 그래프가 표시됩니다.
라운드로빈(Round Robin) 결과 분석
라운드로빈 방식에서는 75% 지연 시간이 1초를 초과하는 것을 확인할 수 있습니다.
target 50%: 0.189584s
target 75%: 1.03067s
target 90%: 1.10307s
target 99%: 1.14652s
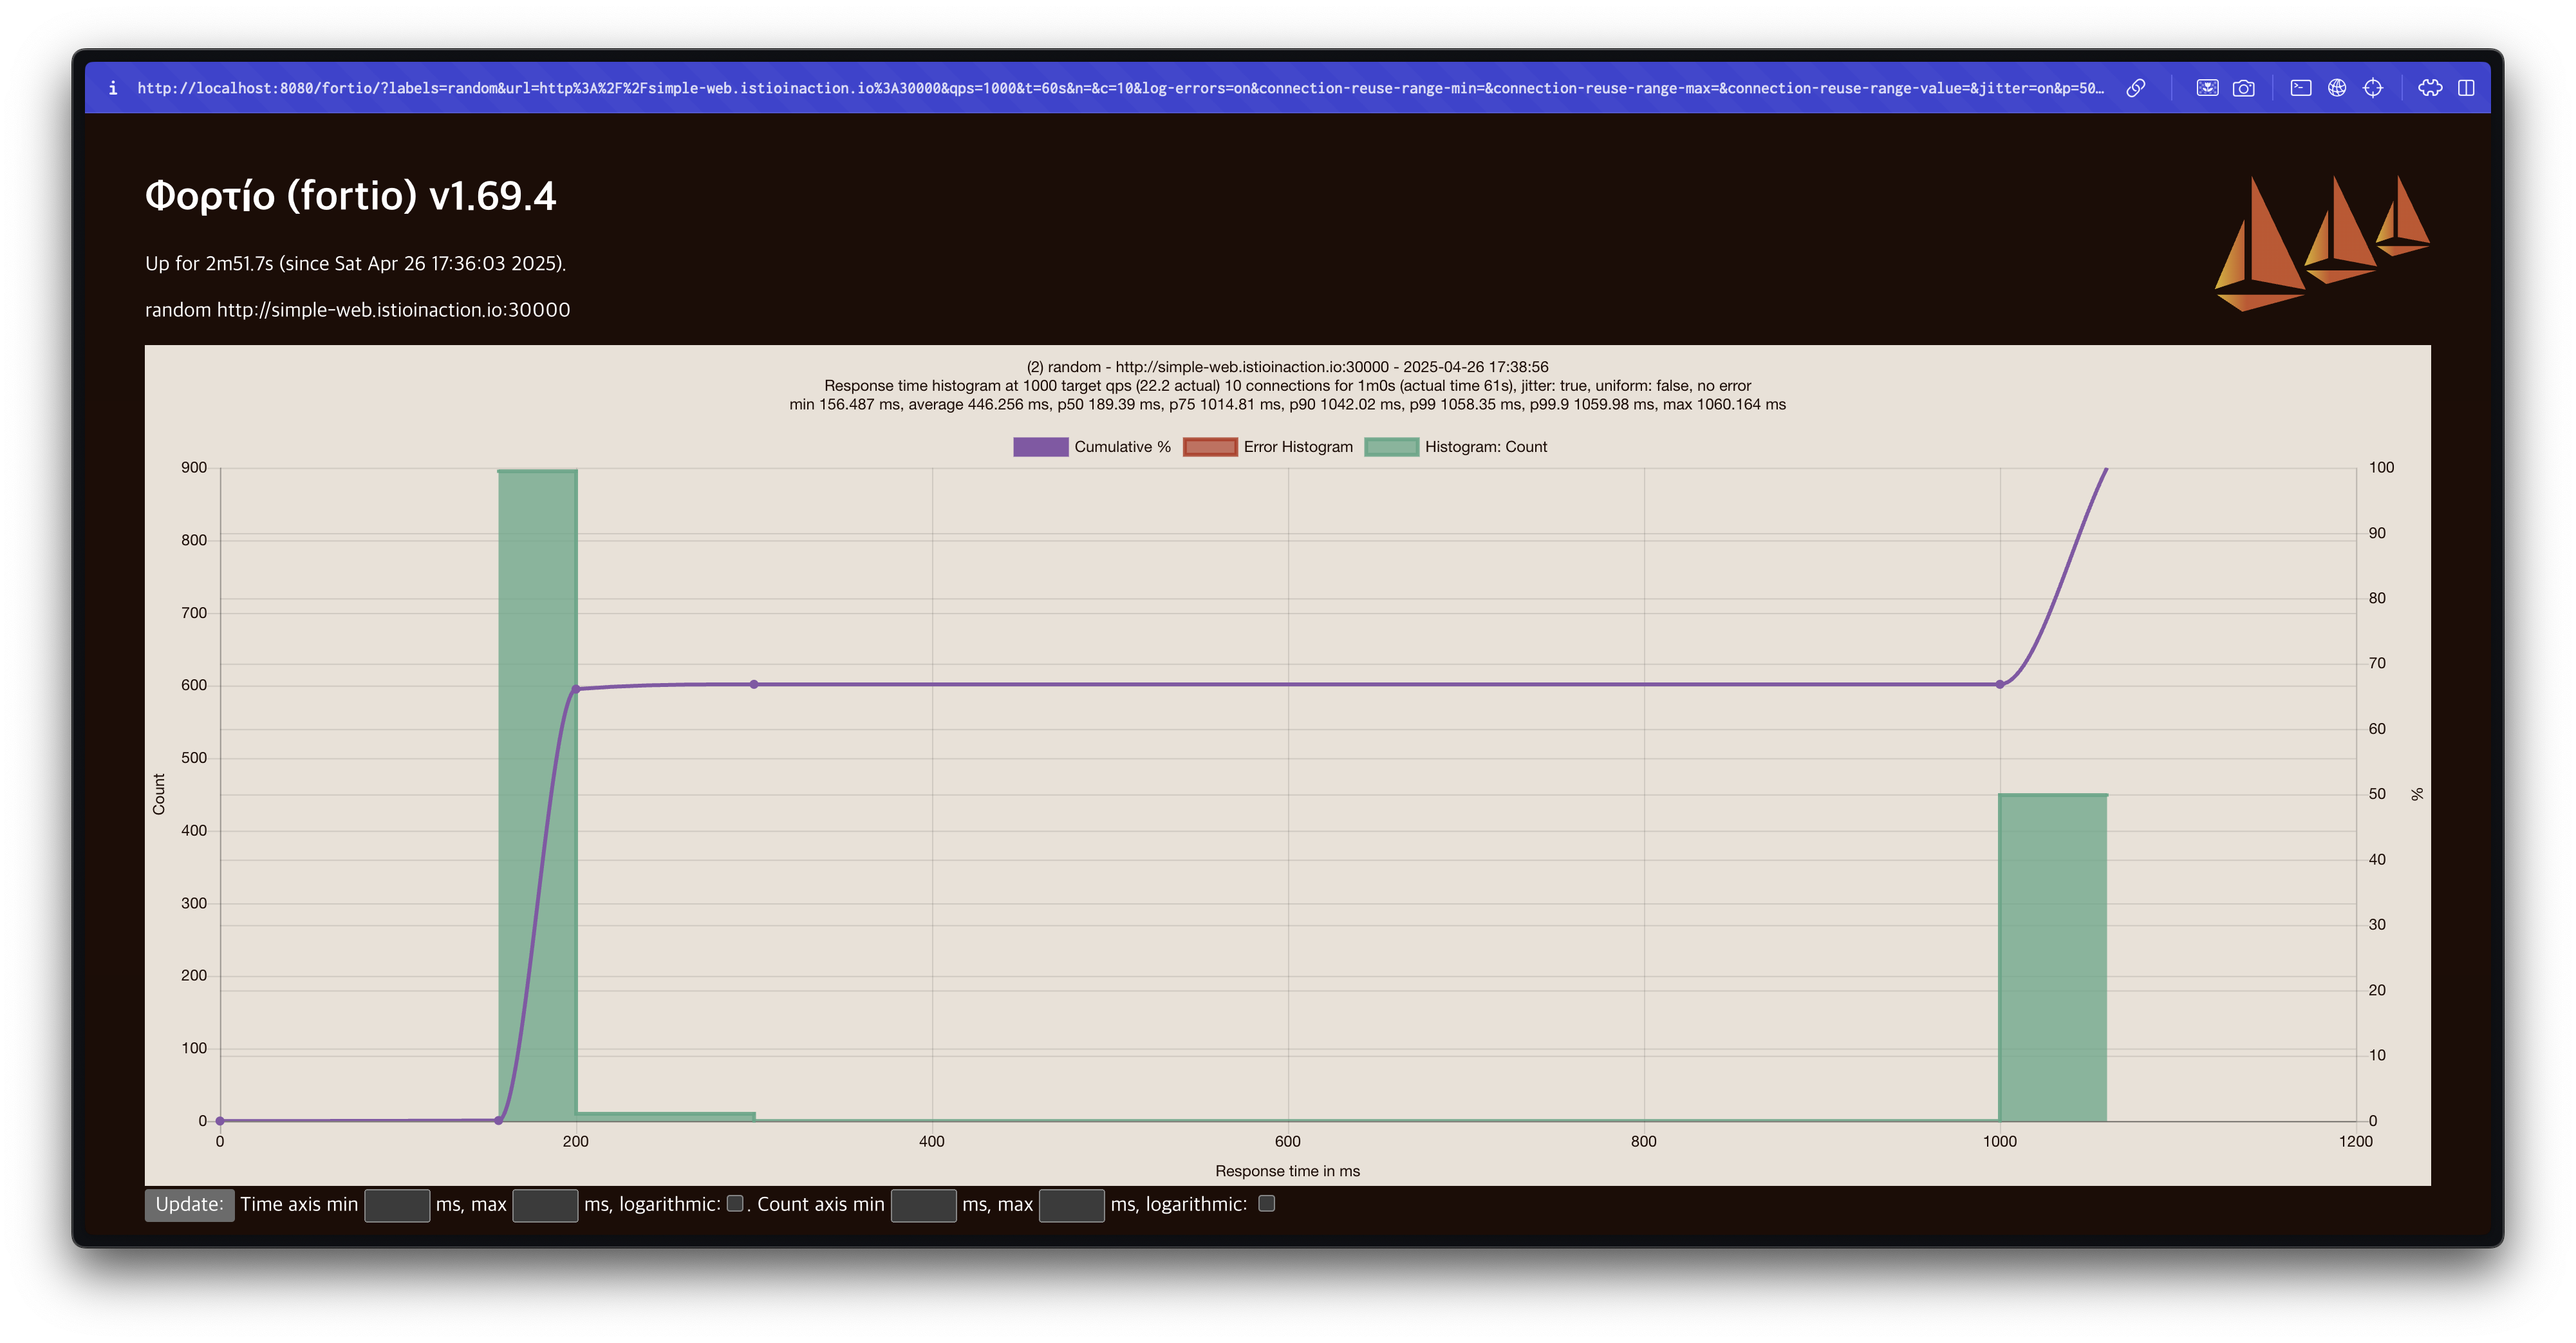
target 99.9%: 1.15086s로드 밸런싱 알고리즘을 RANDOM으로 변경하여 테스트
DestinationRule을 RANDOM으로 변경합니다.
# simple-backend-dr-random.yaml
cat ch6/simple-backend-dr-random.yaml
apiVersion: networking.istio.io/v1beta1
kind: DestinationRule
metadata:
  name: simple-backend-dr
spec:
  host: simple-backend.istioinaction.svc.cluster.local
  trafficPolicy:
    loadBalancer:
      simple: RANDOM

kubectl apply -f ch6/simple-backend-dr-random.yaml -n istioinaction
설정이 적용되었는지 확인합니다.
kubectl get destinationrule simple-backend-dr -n istioinaction -o jsonpath='{.spec.trafficPolicy.loadBalancer.simple}{"\n"}'
docker exec -it myk8s-control-plane istioctl proxy-config cluster deploy/simple-web.istioinaction --fqdn simple-backend.istioinaction.svc.cluster.local -o json | grep lbPolicy
Fortio 웹 대시보드에서 동일한 설정으로 다시 테스트를 수행합니다.
Title만 random으로 변경합니다.
테스트 결과, RANDOM 알고리즘도 75% 지연 시간이 1초를 초과합니다.
target 50%: 0.19306s
# target 50% 0.189389
# target 75% 1.01481
# target 90% 1.04202
# target 99% 1.05835
# target 99.9% 1.05998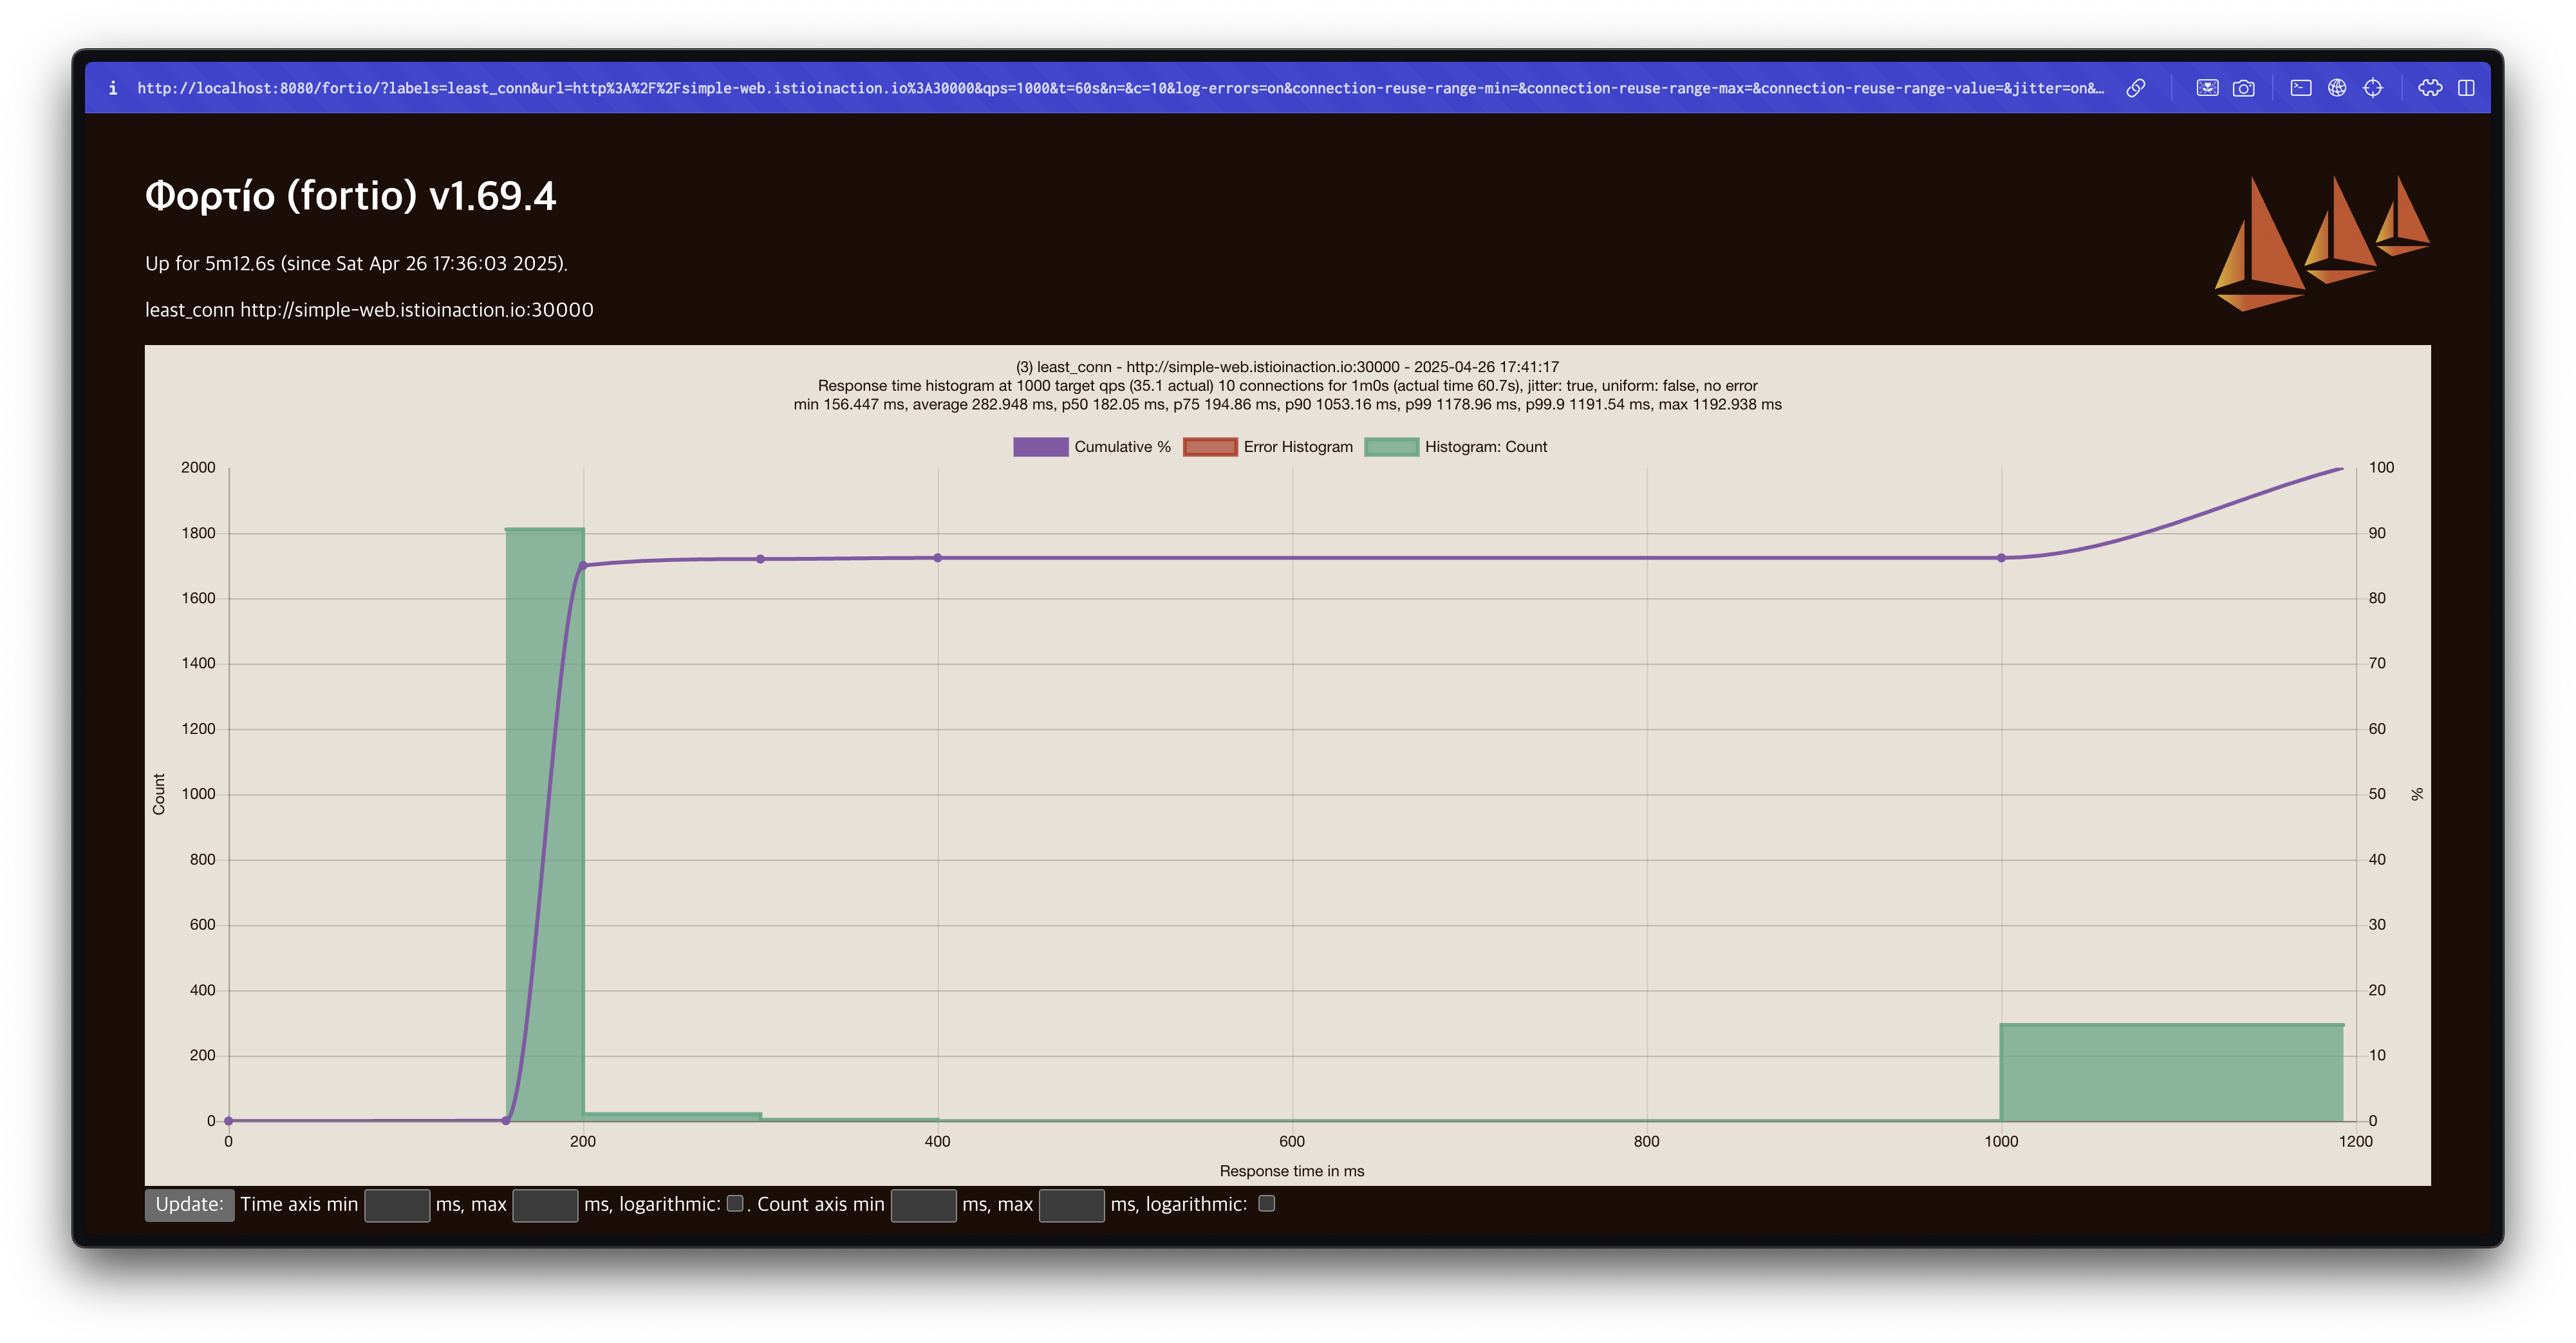
로드 밸런싱 알고리즘을 LEAST_CONN으로 변경하여 테스트
이번에는 로드 밸런싱 방식을 Least Connection(LEAST_REQUEST)로 변경합니다.
# simple-backend-dr-least-conn.yaml
cat ch6/simple-backend-dr-least-conn.yaml
apiVersion: networking.istio.io/v1beta1
kind: DestinationRule
metadata:
  name: simple-backend-dr
spec:
  host: simple-backend.istioinaction.svc.cluster.local
  trafficPolicy:
    loadBalancer:
      simple: LEAST_CONN

kubectl apply -f ch6/simple-backend-dr-least-conn.yaml -n istioinaction
설정이 적용되었는지 확인합니다.
kubectl get destinationrule simple-backend-dr -n istioinaction -o jsonpath='{.spec.trafficPolicy.loadBalancer.simple}{"\n"}'
docker exec -it myk8s-control-plane istioctl proxy-config cluster deploy/simple-web.istioinaction --fqdn simple-backend.istioinaction.svc.cluster.local -o json | grep lbPolicy
Fortio 웹 대시보드에서 동일한 설정으로 테스트를 수행하며, Title을 least_conn으로 변경합니다.
테스트 결과, Least Connection 방식에서는 지연 시간이 크게 개선되었습니다.
# target 50% 0.182049
# target 75% 0.194863
# target 90% 1.05316
# target 99% 1.17896
# target 99.9% 1.19154
75% 지연 시간이 200ms 이하로 줄어드는 것을 확인할 수 있습니다.

Fortio 서버 종료
모든 테스트가 완료되었으면 Fortio 서버를 종료합니다.
Ctrl+C✅ Understanding the different load-balancing algorithms
로드 테스트 결과 종합
앞선 테스트를 통해 다양한 로드 밸런싱 알고리즘의 성능 차이를 관찰할 수 있었습니다.
종합하면 다음과 같은 결과를 얻을 수 있습니다:
- 여러 로드 밸런싱 방식은 현실적인 서비스 지연 상황에서 서로 다른 결과를 만들어냅니다.
- 수집된 히스토그램과 지연 시간 백분위수 데이터 역시 알고리즘마다 차이가 있습니다.
- 특히, 최소 커넥션(Least Connection) 방식이 랜덤(Random) 또는 라운드 로빈(Round Robin) 방식보다 더 나은 성능을 보여주었습니다.
이번에는 왜 최소 커넥션(Least Connection) 방식이 더 좋은 결과를 보였는지 그 이유를 자세히 살펴보겠습니다.
간단한 로드 밸런싱: 라운드 로빈과 랜덤
라운드 로빈과 랜덤은 모두 간단한 로드 밸런싱 알고리즘입니다.
이들은 구현이 쉽고, 이해하기도 간단한 특징을 가지고 있습니다.
-
라운드 로빈(Round Robin) 방식은 엔드포인트를 순서대로 하나씩 선택하여 요청을 전달합니다.
-
랜덤(Random) 방식은 엔드포인트를 무작위로 균등하게 선택하여 요청을 전달합니다.
이 두 방식 모두 이론적으로는 고른 분포를 기대할 수 있습니다.
그러나 실제 운영 환경에서는 엔드포인트 간 리소스 상황이나 상태가 균일하지 않기 때문에 문제가 발생할 수 있습니다.
예를 들어, 테스트에서 시뮬레이션했던 것처럼
- 특정 엔드포인트에서 가비지 컬렉션이 발생하거나,
- CPU 또는 네트워크 경합이 발생하거나,
- 내부 지연이 급증하는 상황이 생길 수 있습니다.
이러한 런타임 이슈들은 라운드 로빈이나 랜덤 방식으로는 고려되지 않습니다.
결국 성능이 저하된 엔드포인트로도 똑같이 트래픽이 분산되어 응답 지연이 증가하게 됩니다.
스마트한 로드 밸런싱: 최소 커넥션(Least Connection)
반면, 최소 커넥션(Least Connection) 방식은 이러한 비균질한 상태를 반영하여 로드 밸런싱을 수행합니다.
(※ 이스티오에서는 LEAST_CONN으로 설정하지만, 실제로는 최소 요청(Least Request) 기반으로 동작합니다.)
최소 요청 기반 로드 밸런서의 동작 방식은 다음과 같습니다:
- 요청을 보낼 때, 현재 활성 요청(active requests) 수를 기준으로 가장 부하가 적은 엔드포인트를 선택합니다.
- 활성 요청이 가장 적은 엔드포인트에 트래픽을 우선적으로 전달합니다.
이를 통해 다음과 같은 효과를 얻을 수 있습니다:
- 지연이 높은 엔드포인트에 요청이 몰리는 것을 방지할 수 있습니다.
- 더 빠른 응답이 가능한 엔드포인트를 선호하여, 전체적인 응답 품질을 향상시킬 수 있습니다.
즉, 단순히 엔드포인트를 순서대로 선택하는 것이 아니라, 실시간 상태를 반영하여 좀 더 '똑똑한' 선택을 하게 되는 것입니다.
Envoy의 최소 요청(Least Request) 방식
추가로, Envoy 기반의 최소 요청 로드 밸런싱은 다음과 같은 방식으로 동작합니다:
👉🏻 주의: "LEAST_CONN"이라고 이름은 붙어있지만, 실제로는 "커넥션 수"가 아니라 "활성 요청 수(request depth)"를 기준으로 동작합니다.
로드 밸런서는 무작위로 두 개의 엔드포인트를 선택합니다.
두 엔드포인트 중 활성 요청이 더 적은 엔드포인트를 선택합니다.
이후에도 같은 방식으로 연속적으로 비교하여 선택을 반복합니다.
이 접근 방법은 '두 가지 선택의 힘(Power of Two Choices)'라는 이름으로도 알려져 있습니다. >
모든 엔드포인트를 일일이 비교하는 것보다 훨씬 가볍고 빠르게 동작하면서도 좋은 분산 효과를 얻을 수 있는 것으로 알려져 있습니다.
관련된 자세한 내용은 Envoy 공식 문서를 참고할 수 있습니다 - docs
👉 Step 03. Locality-aware Load Balancing
✅ 지역 인식 로드 밸런싱 배경 소개
이스티오와 같은 서비스 메시의 컨트롤 플레인 역할 중 하나는 전체 서비스 토폴로지를 이해하고, 이를 기반으로 효율적인 라우팅과 로드 밸런싱을 자동으로 결정하는 것입니다.
서비스 메시가 서비스 위치 정보를 활용하면, 다음과 같은 이점이 있습니다:
- 가까운 위치의 엔드포인트를 우선 선택하여 지연 시간(latency)을 줄일 수 있습니다.
- 리전 간 통신 비용을 줄이고, 네트워크 효율성을 높일 수 있습니다.
예를 들어, simple-web 서비스가 us-west 리전에 배포되어 있다면, simple-backend 호출 시 동일한 리전에 위치한 인스턴스를 우선적으로 선택하는 것이 바람직합니다.
✅ Hands-on with locality load balancing
지역 인식 로드 밸런싱을 위한 환경 설정
일반적으로 쿠버네티스에서는 노드에 다음과 같은 레이블을 통해 지역 정보를 설정합니다:
topology.kubernetes.io/regiontopology.kubernetes.io/zone
그러나 이번 실습은 노드가 1대인 환경이므로, 파드에 직접 지역 정보를 주입하는 방식을 사용합니다.
이를 위해 파드에 istio-locality 레이블을 명시적으로 추가합니다.
다음은 simple-web과 simple-backend 서비스에 지역 레이블을 설정한 배포 파일입니다.
# ch6/simple-service-locality.yaml
---
apiVersion: apps/v1
kind: Deployment
metadata:
  labels:
    app: simple-web
  name: simple-web
spec:
  replicas: 1
  selector:
    matchLabels:
      app: simple-web
  template:
    metadata:
      labels:
        app: simple-web
        istio-locality: us-west1.us-west1-a
---
apiVersion: apps/v1
kind: Deployment
metadata:
  labels:
    app: simple-backend
  name: simple-backend-1
spec:
  replicas: 1
  selector:
    matchLabels:
      app: simple-backend
  template:
    metadata:
      labels:
        app: simple-backend
        istio-locality: us-west1.us-west1-a
        version: v1 # 추가해두자!
---
apiVersion: apps/v1
kind: Deployment
metadata:
  labels:
    app: simple-backend
  name: simple-backend-2
spec:
  replicas: 2
  selector:
    matchLabels:
      app: simple-backend
  template:
    metadata:
      labels:
        app: simple-backend
        istio-locality: us-west1.us-west1-b
        version: v2 # 추가해두자!
서비스 배포 및 확인
kubectl apply -f ch6/simple-service-locality.yaml -n istioinaction배포된 서비스의 지역 정보를 확인합니다.
# simple-backend-1
kubectl get deployment.apps/simple-backend-1 -n istioinaction -o jsonpath='{.spec.template.metadata.labels.istio-locality}{"\n"}'

# simple-backend-2
kubectl get deployment.apps/simple-backend-2 -n istioinaction -o jsonpath='{.spec.template.metadata.labels.istio-locality}{"\n"}'
지역 인식 로드 밸런싱 기본 동작
이스티오에서는 Locality-aware Load Balancing이 기본적으로 활성화되어 있습니다.
(참고: Istio 공식 문서)
- 동일 리전/영역 내 엔드포인트를 우선적으로 선택합니다.
- 실패 시 다른 리전/영역으로 트래픽을 넘깁니다.
특정 상황에서는 이 설정을 끌 수도 있으며, 이 경우 meshConfig.localityLbSetting.enabled: false로 설정하면 됩니다.
지역 인식 로드 밸런싱 테스트
호출 테스트 1: 기본 상태
simple-web에서 simple-backend로 반복 호출을 수행하여 어떤 엔드포인트로 트래픽이 가는지 관찰합니다.
# 반복 호출
while true; do curl -s http://simple-web.istioinaction.io:30000 | jq ".upstream_calls[0].body"; date "+%Y-%m-%d %H:%M:%S"; sleep 1; echo; done
# 파드별 호출 빈도 확인
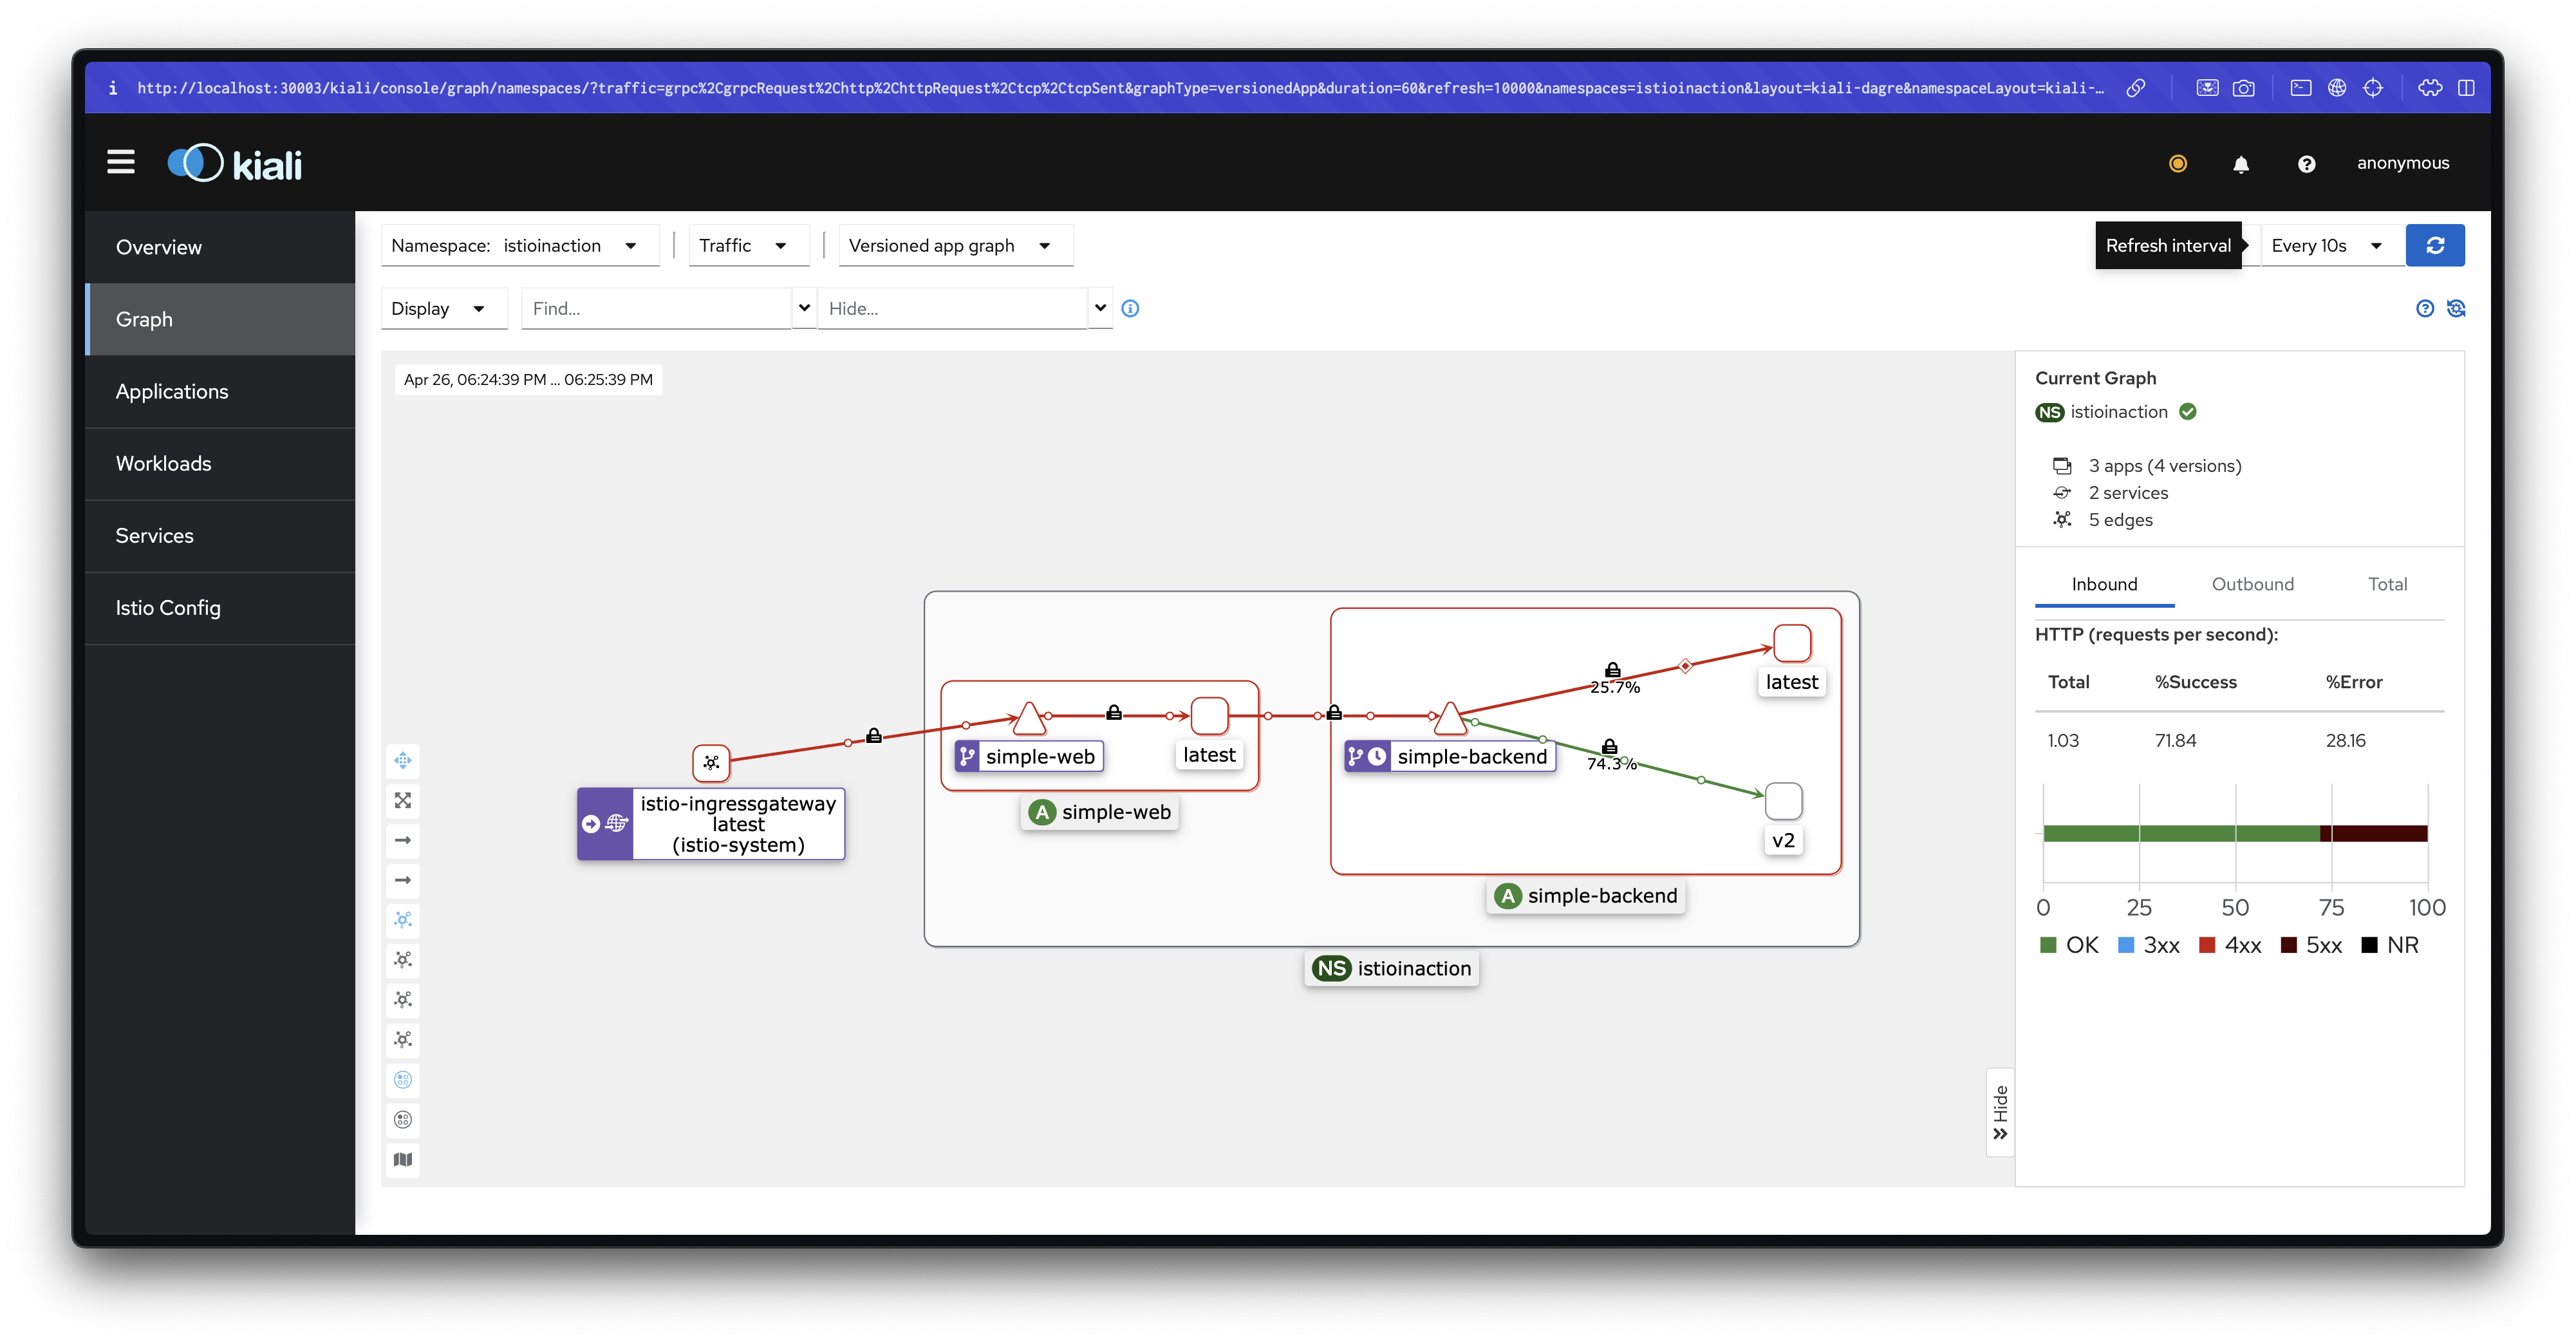
for in in {1..50}; do curl -s http://simple-web.istioinaction.io:30000 | jq ".upstream_calls[0].body"; done | sort | uniq -c | sort -nr설명: 현재는 모든 엔드포인트로 트래픽이 고르게 분산되며, 아직 지역별 차별화가 적용되지 않은 상태입니다.
헬스 체크를 통한 이상값 감지 설정
이스티오가 엔드포인트의 비정상 상태를 판단하고, 지역 간 트래픽 이동을 올바르게 수행하려면 헬스 체크 설정이 필요합니다.
DestinationRule에 이상값 감지(outlier detection)를 추가합니다.
# ch6/simple-backend-dr-outlier.yaml
apiVersion: networking.istio.io/v1beta1
kind: DestinationRule
metadata:
  name: simple-backend-dr
spec:
  host: simple-backend.istioinaction.svc.cluster.local
  trafficPolicy:
    outlierDetection:
      consecutive5xxErrors: 1
      interval: 5s
      baseEjectionTime: 30s
      maxEjectionPercent: 100

kubectl apply -f ch6/simple-backend-dr-outlier.yaml -n istioinaction
설정이 정상적으로 적용되었는지 확인합니다.
kubectl get dr -n istioinaction simple-backend-dr -o jsonpath='{.spec}' | jq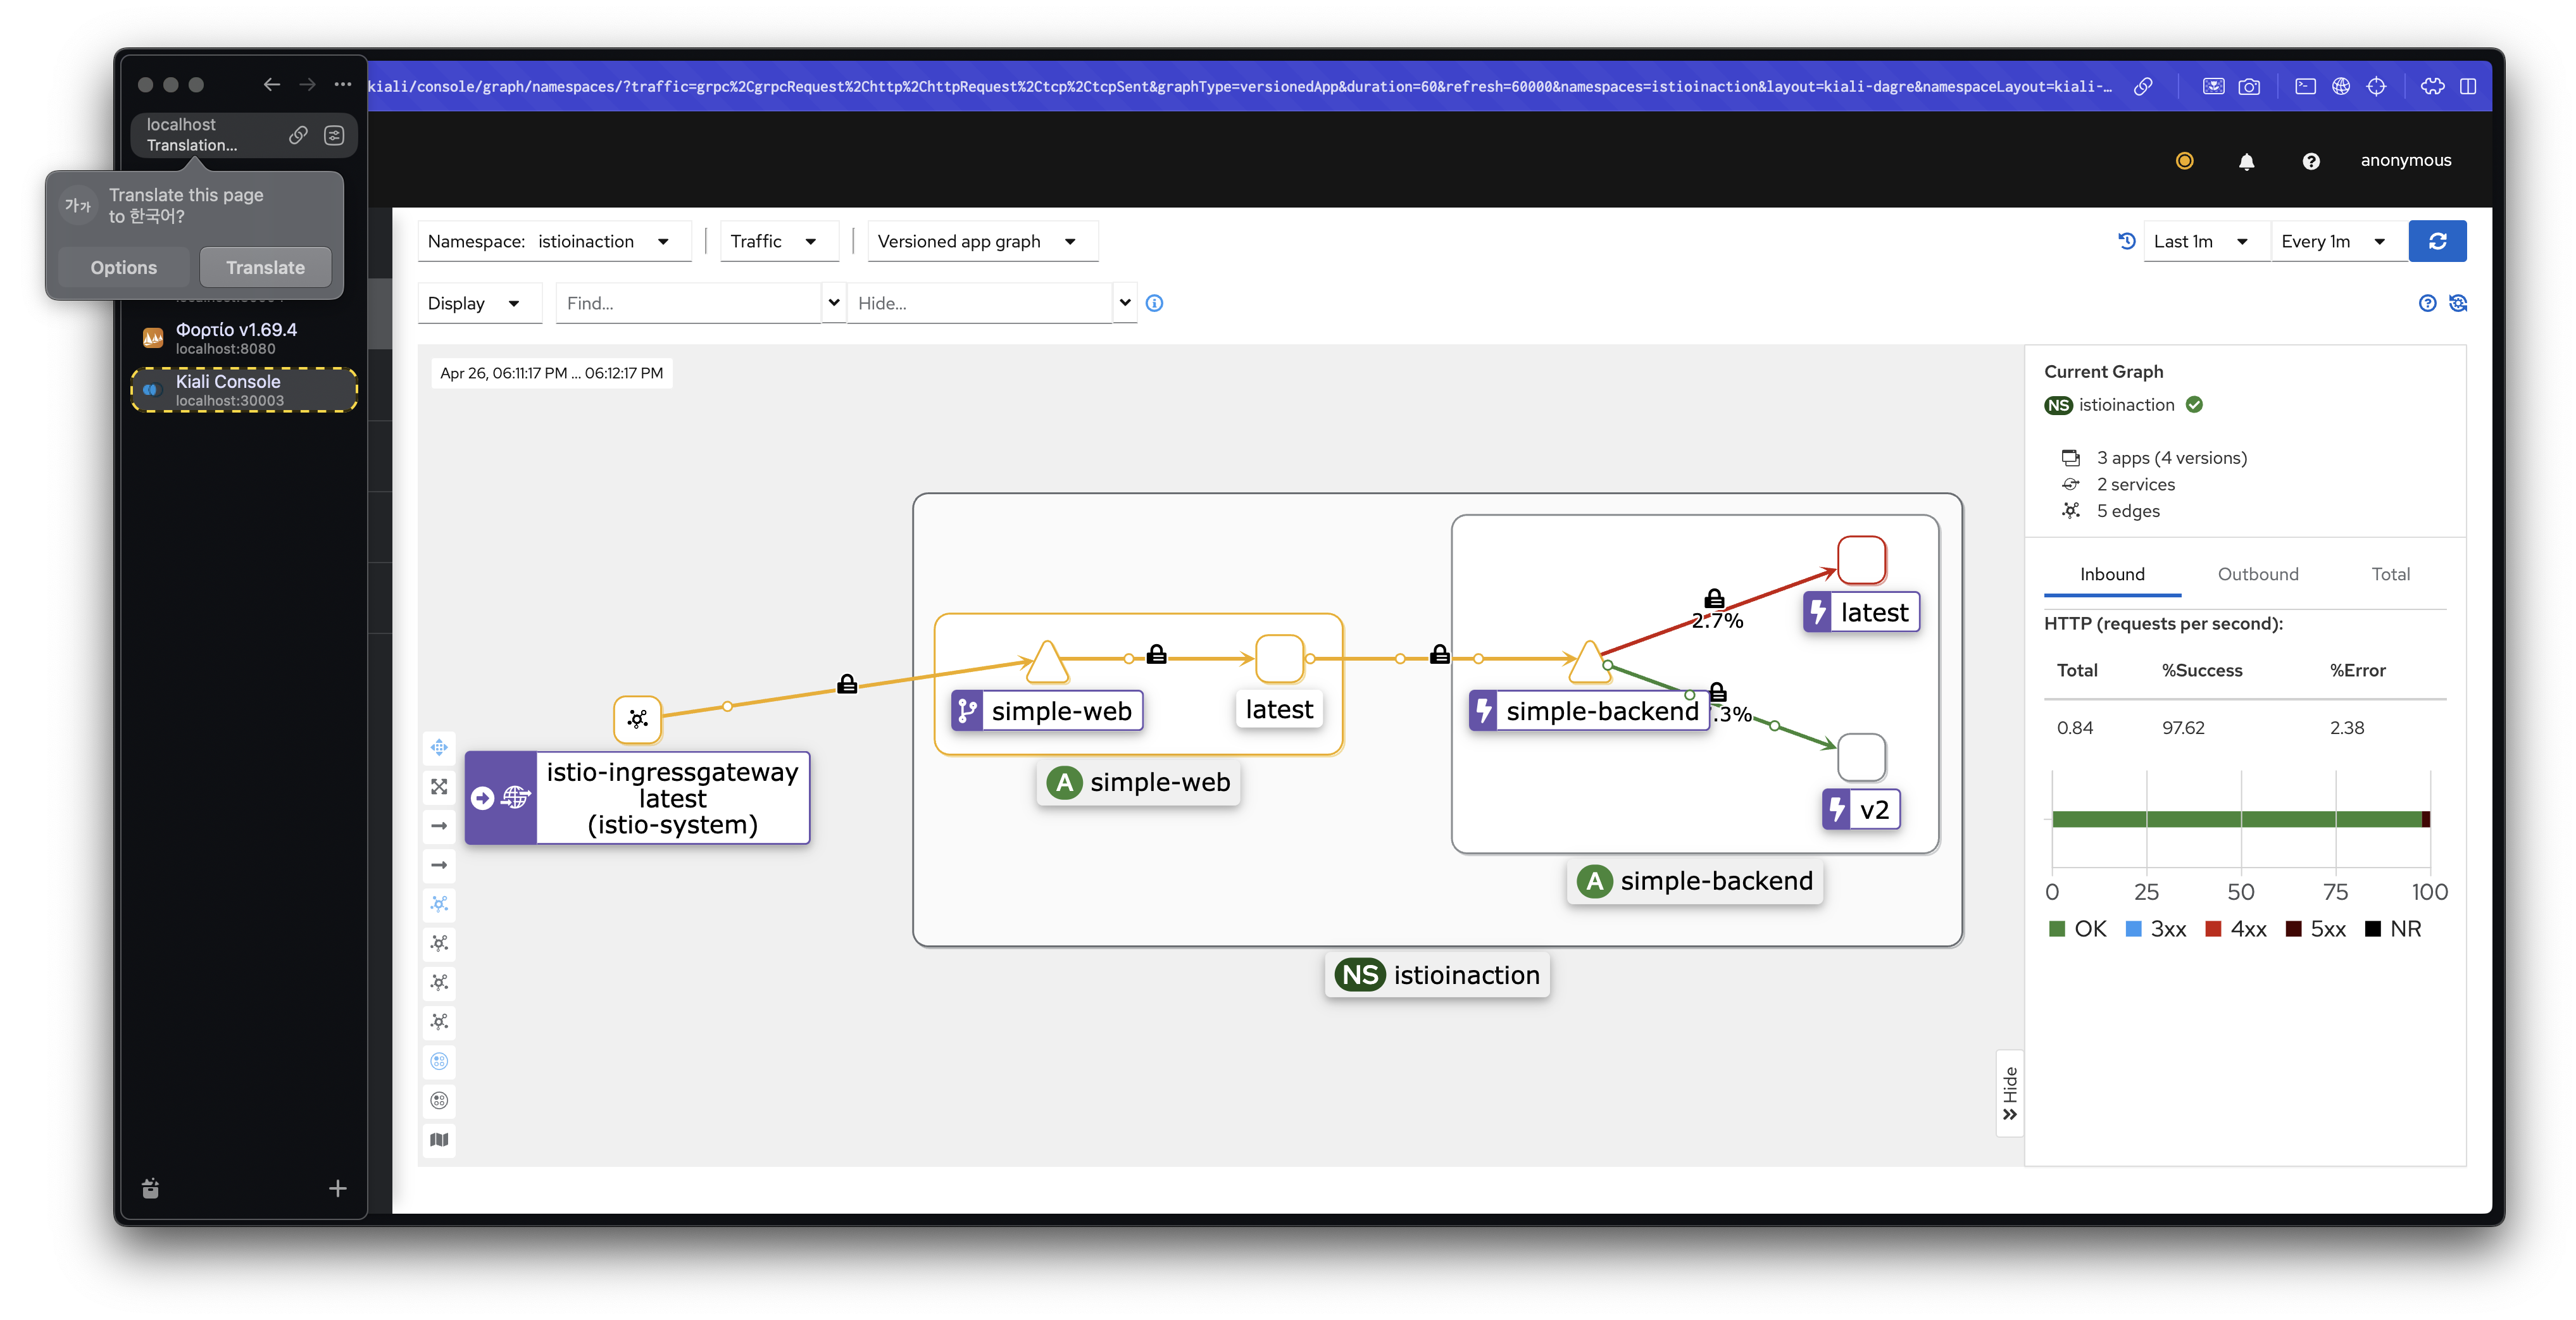
호출 테스트 2: 오동작 주입 후 확인
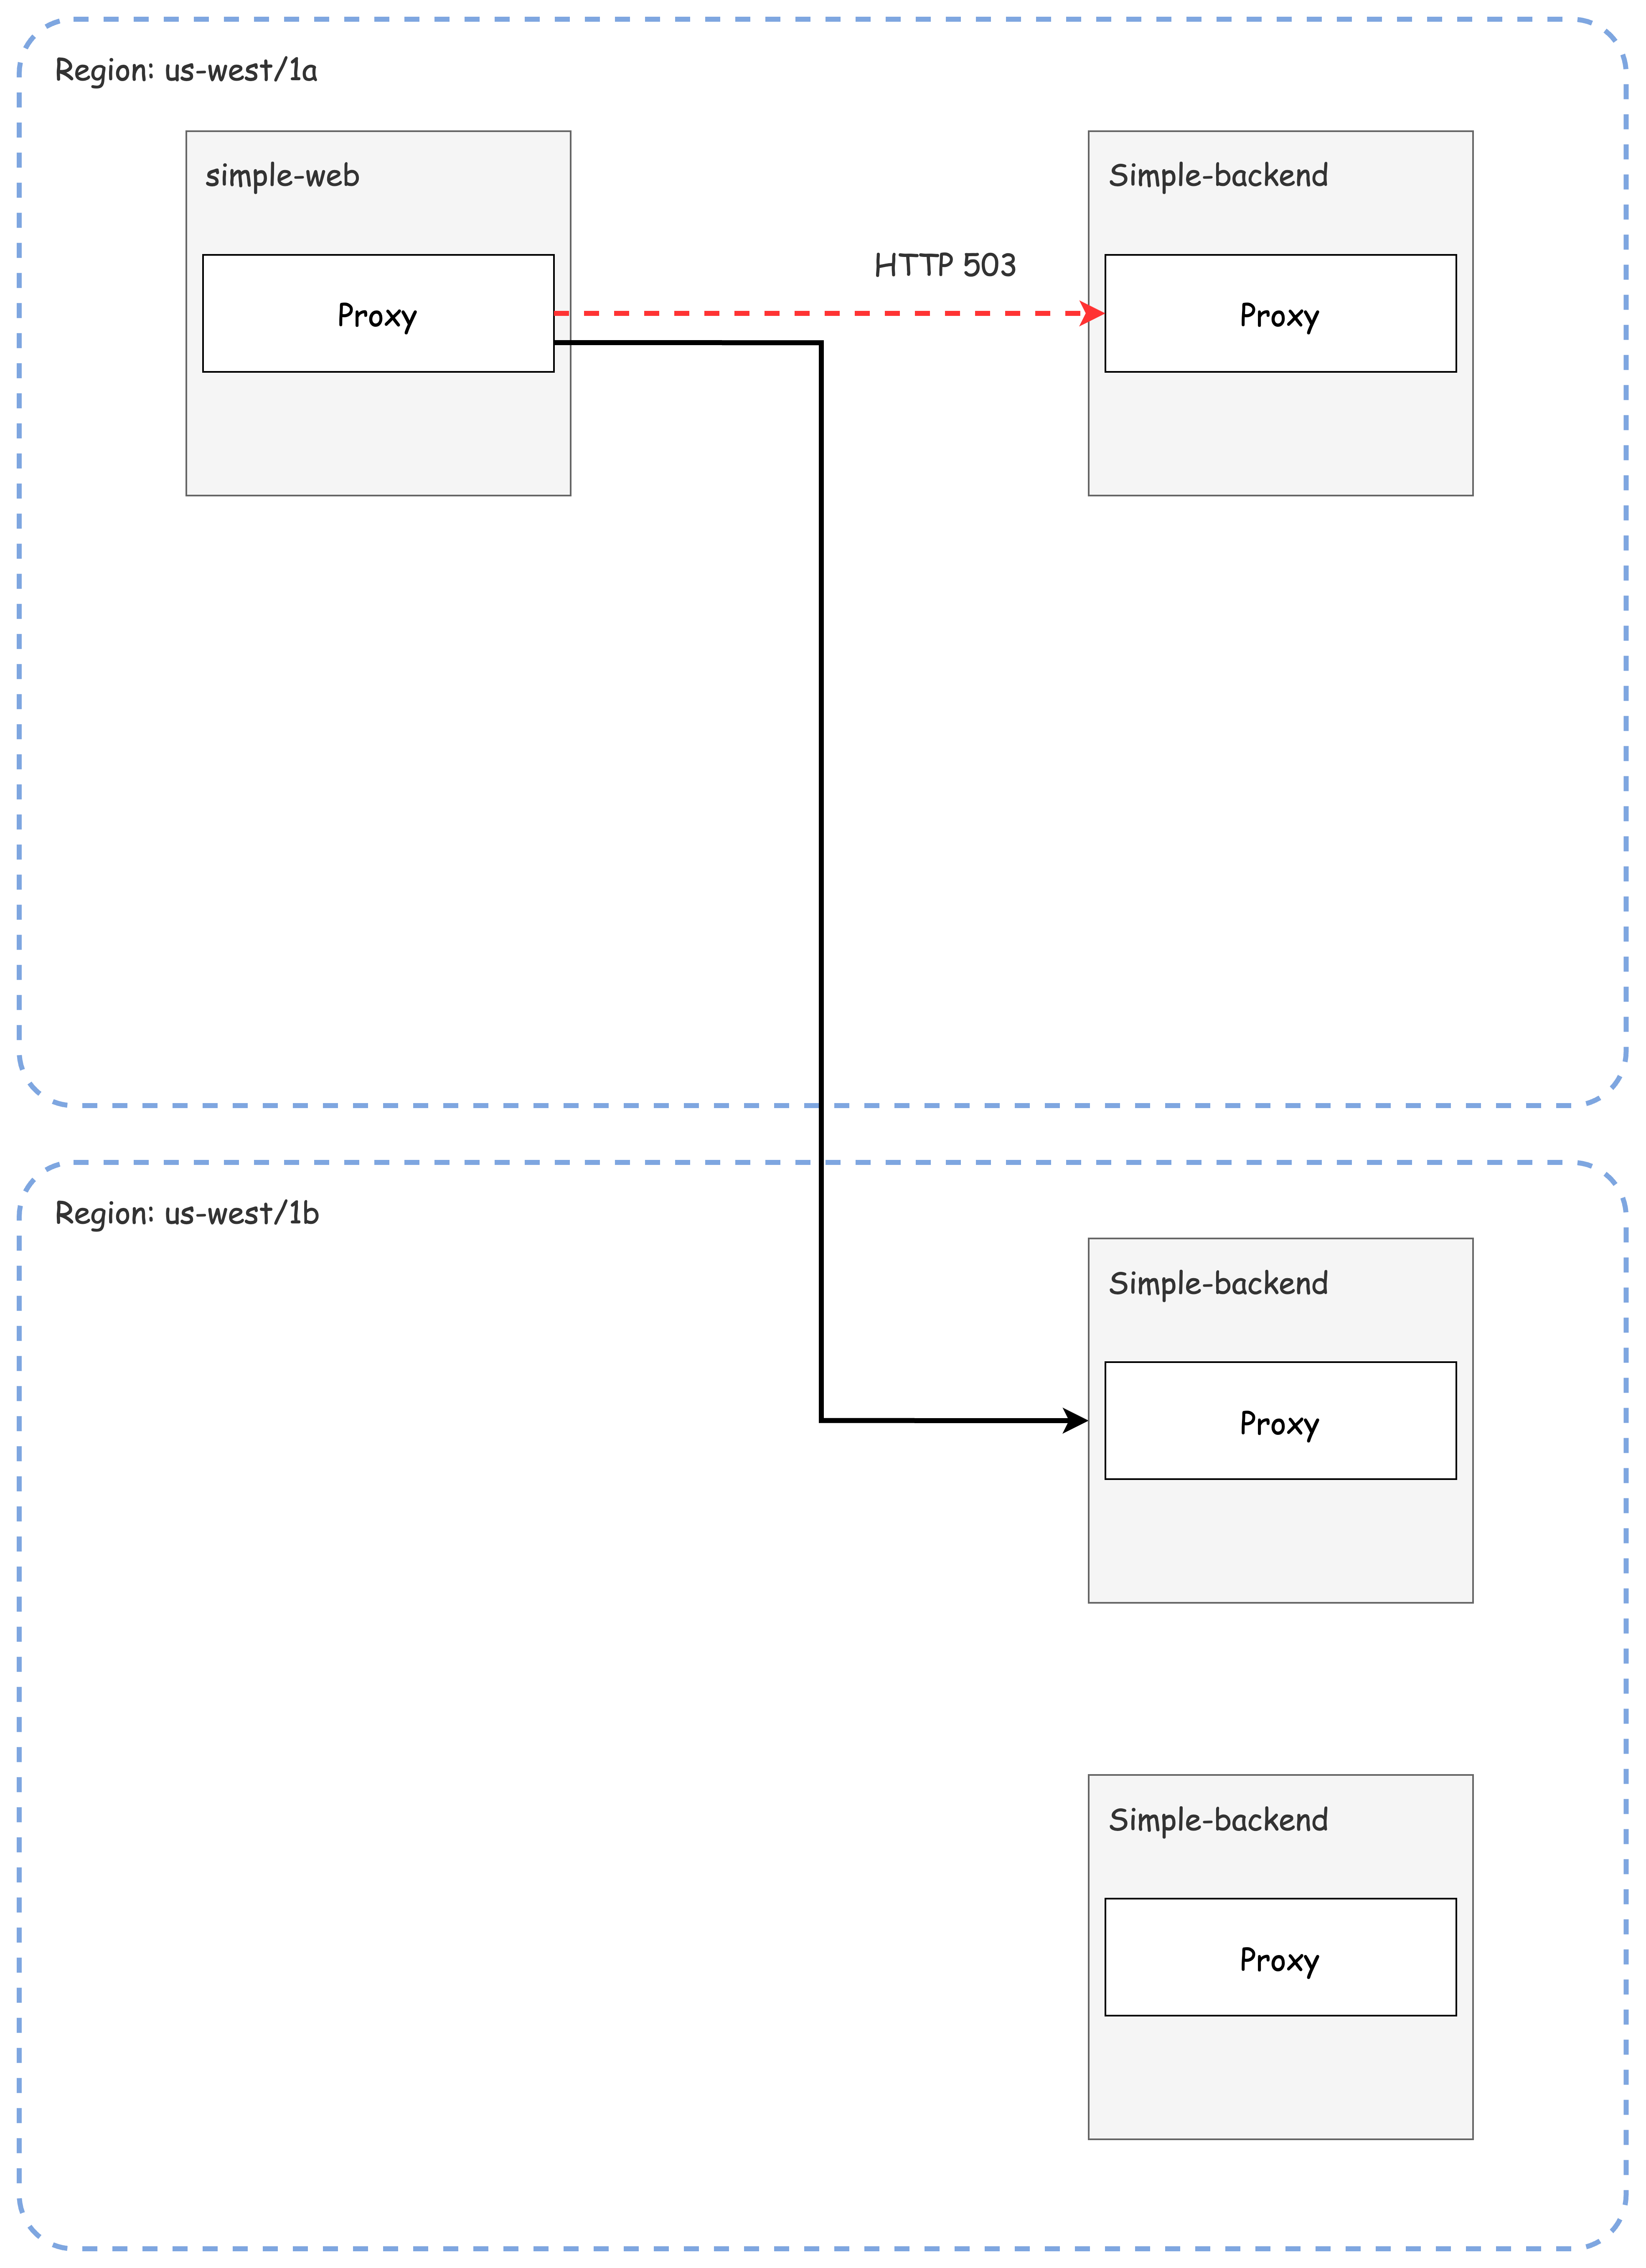
simple-backend-1을 강제로 오류 상태로 만들어 트래픽이 다른 지역으로 넘어가는지 관찰합니다.
# simple-backend-1을 500 에러를 반환하도록 설정
cat ch6/simple-service-locality-failure.yaml
...
    - name: "ERROR_TYPE"
      value: "http_error"
    - name: "ERROR_RATE"
      value: "1"
    - name: "ERROR_CODE"
      value: "500"
...

kubectl apply -f ch6/simple-service-locality-failure.yaml -n istioinaction
simple-web에서 다시 호출을 반복하면서 트래픽 이동을 관찰합니다.
for in in {1..50}; do curl -s http://simple-web.istioinaction.io:30000 | jq ".upstream_calls[0].body"; done | sort | uniq -c | sort -nr또한, proxy-config를 통해 엔드포인트 상태를 직접 확인합니다.
docker exec -it myk8s-control-plane istioctl proxy-config endpoint deploy/simple-web.istioinaction --cluster 'outbound|80||simple-backend.istioinaction.svc.cluster.local'설명: simple-backend-1이 실패 상태가 되면, 트래픽은 다른 지역(us-west1-b)의 simple-backend-2로 넘어갑니다.
서비스 복구
다음 실습을 위해 simple-backend-1을 정상 상태로 되돌립니다.
kubectl apply -f ch6/simple-service-locality.yaml -n istioinaction✅ More Control over Locality Load Balancing with Weighted Distribution
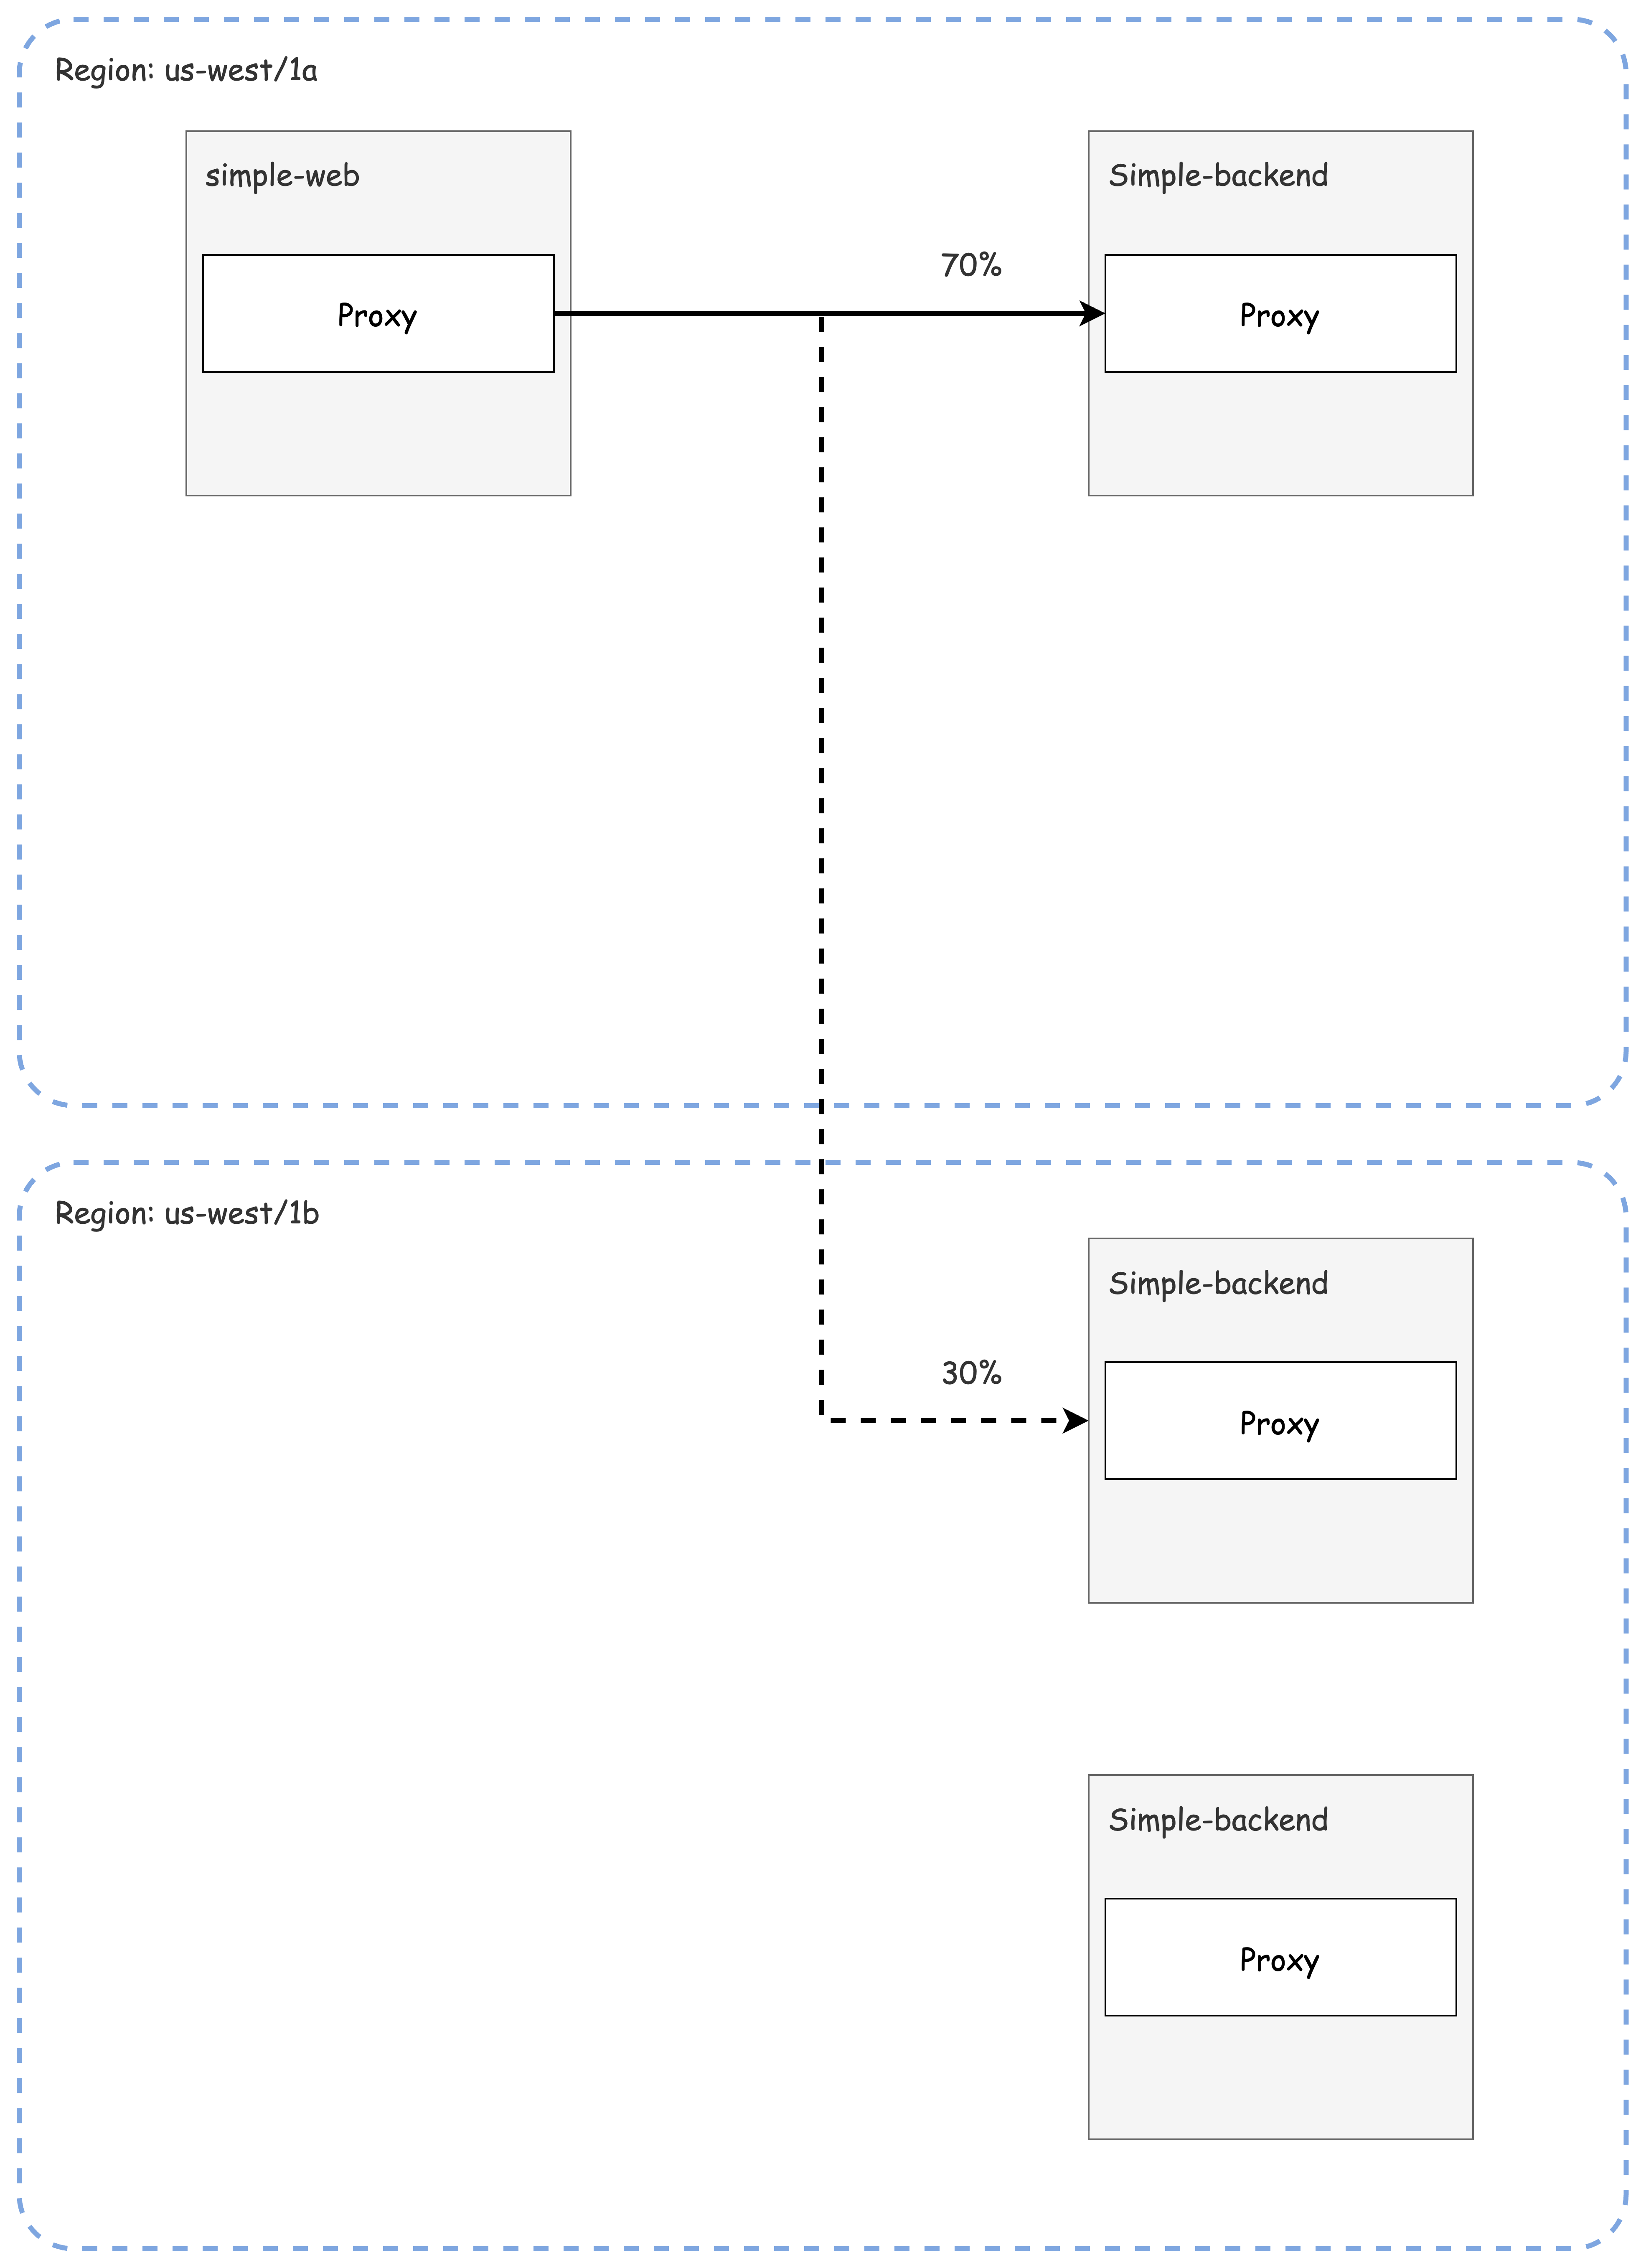
가중치를 통한 지역 트래픽 분산 제어
앞선 기본 지역 인식 로드 밸런싱은 "최대한 가까운 곳"만 선호했습니다.
그러나 때로는 트래픽 일부를 다른 지역으로 분산해야 하는 경우도 발생할 수 있습니다.
이를 위해 Locality Weighted Distribution 기능을 사용할 수 있습니다.

가중치 설정 실습
simple-backend로 향하는 트래픽의 70%를 us-west1-a, 30%를 us-west1-b로 분산하도록 설정합니다.
# ch6/simple-backend-dr-outlier-locality.yaml
apiVersion: networking.istio.io/v1beta1
kind: DestinationRule
metadata:
  name: simple-backend-dr
spec:
  host: simple-backend.istioinaction.svc.cluster.local
  trafficPolicy:
    loadBalancer:
      localityLbSetting:
        distribute:
        - from: us-west1/us-west1-a/*
          to:
            "us-west1/us-west1-a/*": 70
            "us-west1/us-west1-b/*": 30
    connectionPool:
      http:
        http2MaxRequests: 10
        maxRequestsPerConnection: 10
    outlierDetection:
      consecutive5xxErrors: 1
      interval: 5s
      baseEjectionTime: 30s
      maxEjectionPercent: 100

kubectl apply -f ch6/simple-backend-dr-outlier-locality.yaml -n istioinaction
설정 이후 다시 트래픽 분포를 관찰합니다.
for in in {1..50}; do curl -s http://simple-web.istioinaction.io:30000 | jq ".upstream_calls[0].body"; done | sort | uniq -c | sort -nr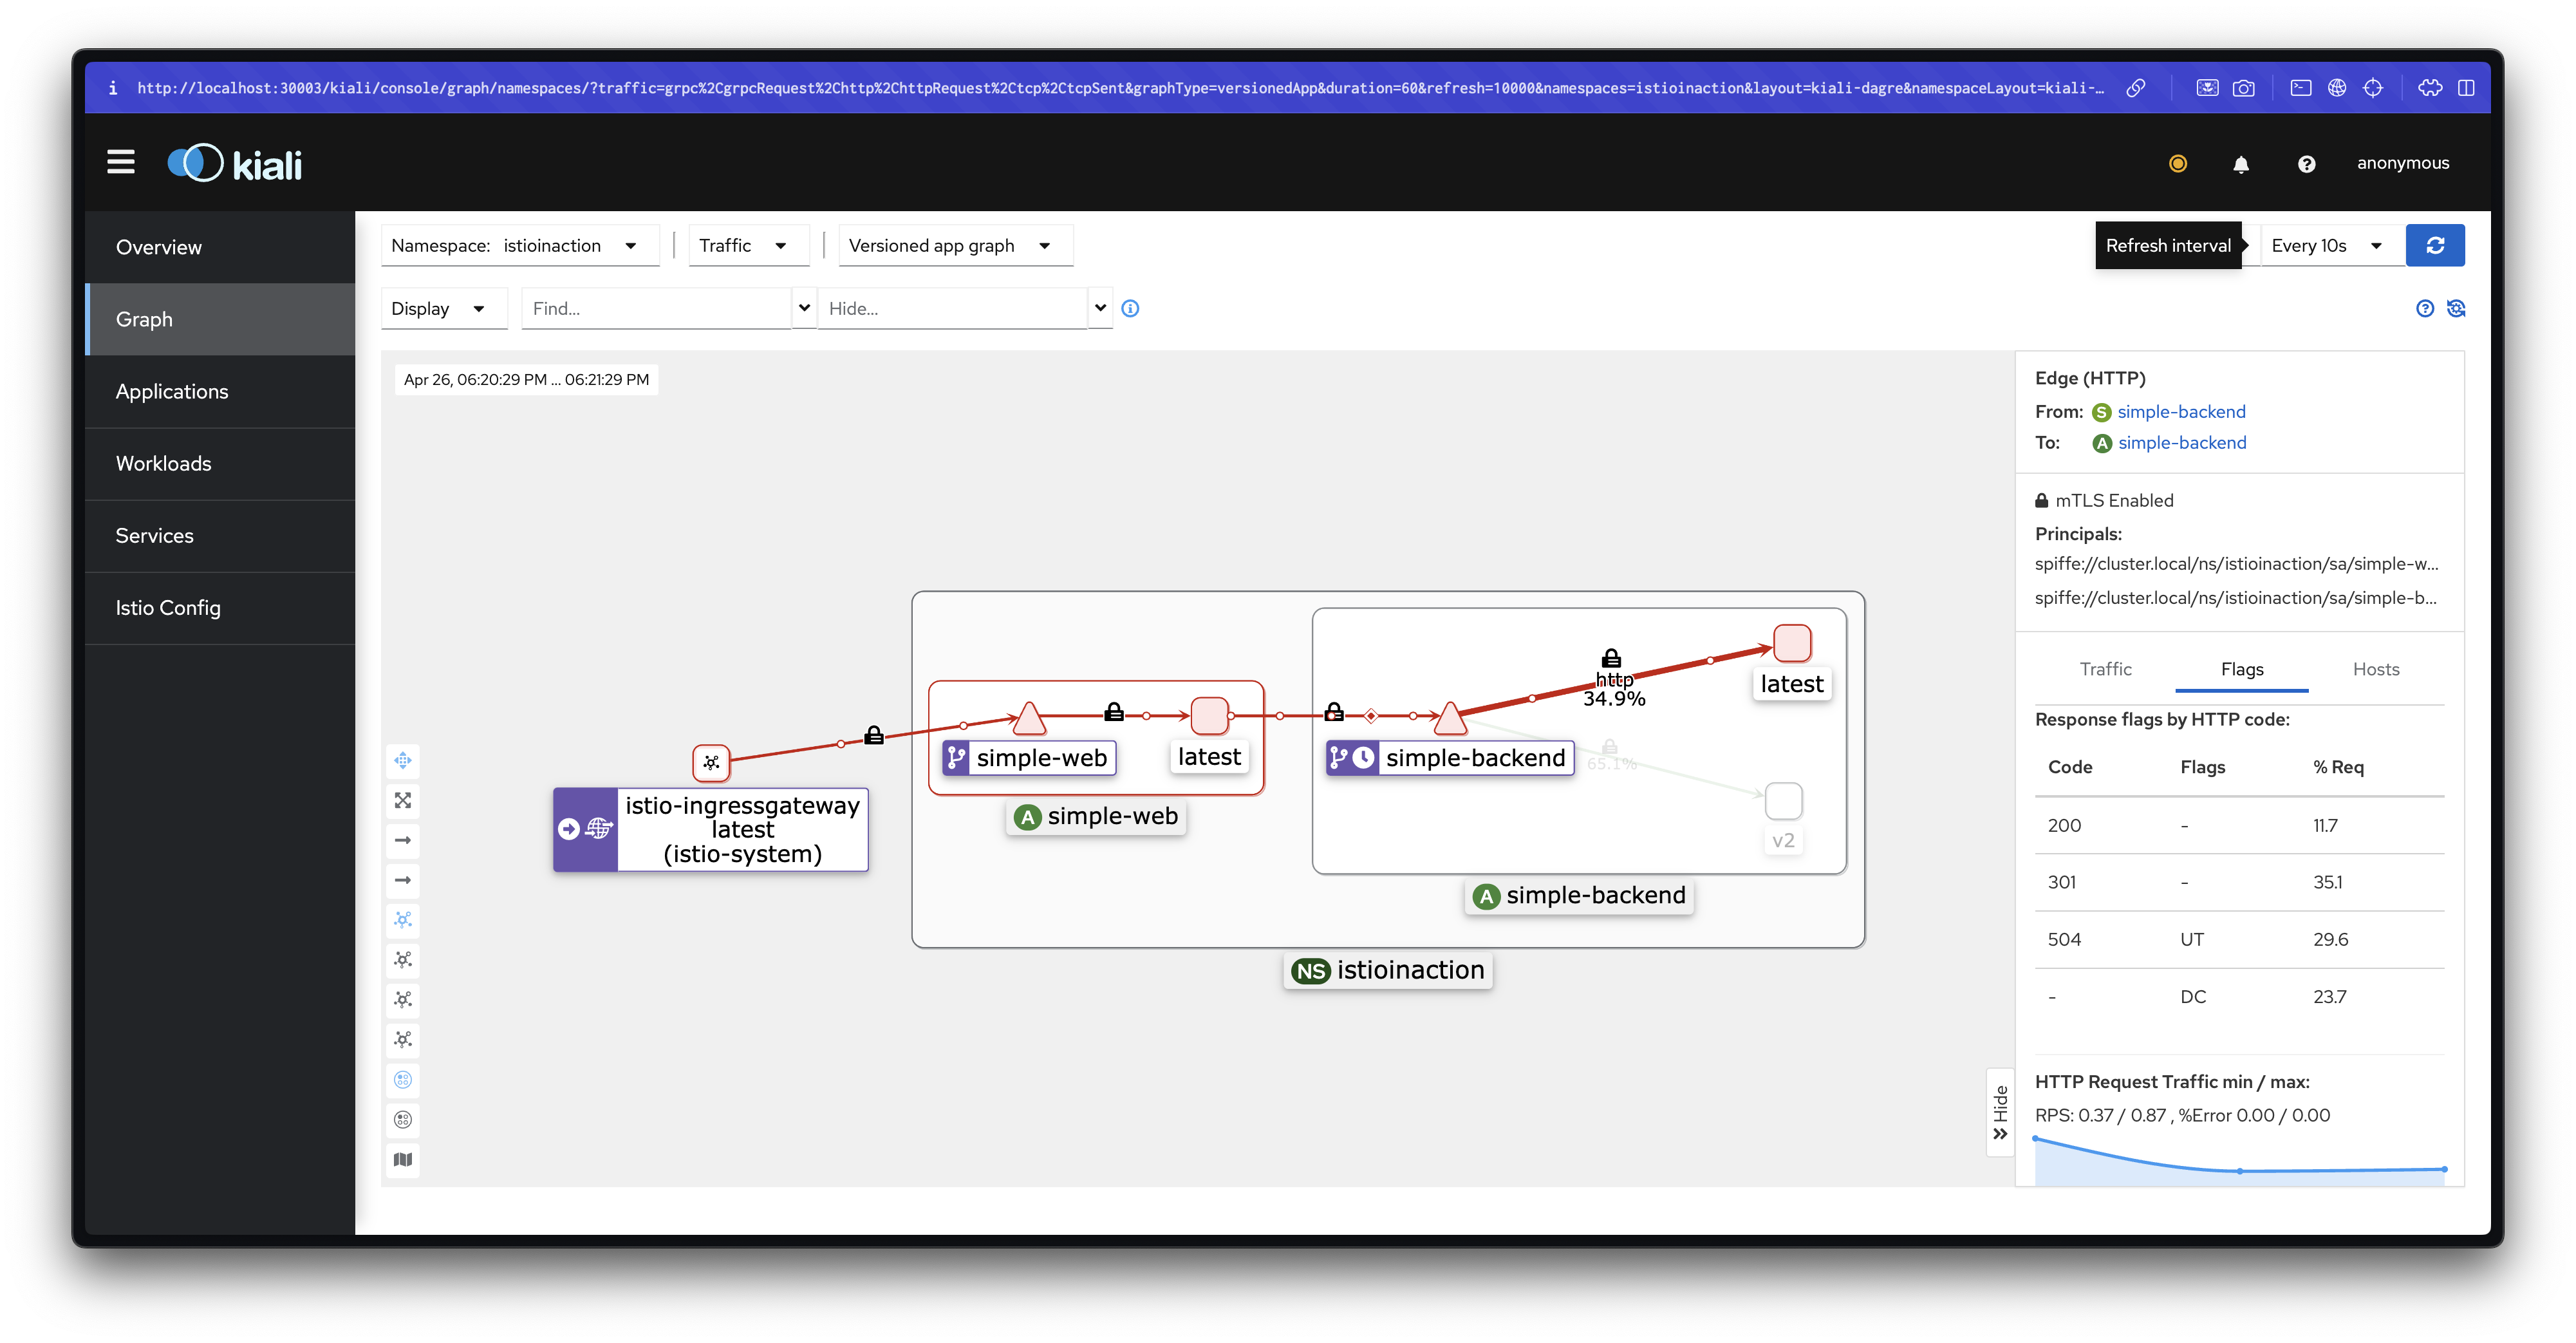
설명: 대부분의 요청은 가까운 지역(us-west1-a)으로 향하지만, 일부 요청은 가중치에 따라 다른 지역(us-west1-b)으로 분산됩니다.
👉 Step 04. Transparent Timeouts and Retries
✅ 네트워크 신뢰성 문제 극복의 필요성
네트워크에 분산된 구성 요소에 의존하는 시스템을 구축할 때 가장 큰 문제는 지연 시간(latency)과 실패(failure)입니다.
앞에서는 이스티오에서 로드 밸런싱과 지역 인식 기능을 통해 이러한 문제를 완화하는 방법을 살펴보았습니다.
그러나 네트워크 호출이 지나치게 오래 걸리거나, 지연이나 장애로 인해 요청이 실패할 경우에는 어떻게 해야 할까요?
이스티오는 이 문제를 해결하기 위해 타임아웃(timeouts)과 재시도(retries)를 설정할 수 있도록 지원합니다.
이를 통해 네트워크의 내재적 불안정성을 극복하고 시스템 복원력을 높일 수 있습니다.
✅ Timeouts: 타임아웃 설정
분산 환경에서는 처리 지연이 발생할 수 있으며, 이는 시스템 전반에 걸쳐 연쇄 장애를 유발할 수 있습니다.
이를 방지하기 위해 요청 수준에서 적절한 타임아웃을 설정하는 것이 매우 중요합니다.
특히 주의해야 할 점은 다중 호출 체인에서의 타임아웃 설정입니다.
- 상위 서비스(A)가 하위 서비스(B)를 호출할 때 A의 타임아웃이 1초이고, B가 또 다른 하위 서비스(C)를 2초로 호출한다면, 보다 제한적인 타임아웃(즉, 1초)이 우선 적용됩니다.
- 일반적으로 밖 → 안으로 갈수록 타임아웃을 짧게 설정하는 것이 좋습니다.
환경 초기화
kubectl apply -f ch6/simple-web.yaml -n istioinaction
kubectl apply -f ch6/simple-backend.yaml -n istioinaction
kubectl delete destinationrule simple-backend-dr -n istioinaction
호출 테스트: simple-backend-1에 1초 지연 적용
# 초기 호출 테스트
for in in {1..10}; do time curl -s http://simple-web.istioinaction.io:30000 | jq .code; done

# simple-backend-1를 1초 지연으로 변경
cat ch6/simple-backend-delayed.yaml
kubectl apply -f ch6/simple-backend-delayed.yaml -n istioinaction

# 파드 환경변수 직접 수정
kubectl exec -it deploy/simple-backend-1 -n istioinaction -- sh
export TIMING_50_PERCENTILE=1000ms
exit

# 호출 테스트
for in in {1..10}; do time curl -s http://simple-web.istioinaction.io:30000 | jq .code; done
1초 정도의 지연은 허용될 수 있으나, 지연 시간이 5초, 100초로 급증하면 시스템에 심각한 영향을 줄 수 있습니다.
Istio에서 타임아웃 적용하기
simple-backend 서비스 호출에 0.5초 타임아웃을 설정해봅니다.
# VirtualService 생성
cat ch6/simple-backend-vs-timeout.yaml

apiVersion: networking.istio.io/v1alpha3
kind: VirtualService
metadata:
  name: simple-backend-vs
spec:
  hosts:
  - simple-backend
  http:
  - route:
    - destination:
        host: simple-backend
    timeout: 0.5s

kubectl apply -f ch6/simple-backend-vs-timeout.yaml -n istioinaction
설정 적용 후 호출을 테스트합니다.
for in in {1..10}; do time curl -s http://simple-web.istioinaction.io:30000 | jq .code; done설명: 0.5초를 초과하는 응답은 타임아웃으로 실패하게 됩니다.
✅ Retries: 재시도 설정
기본 환경 초기화
kubectl apply -f ch6/simple-web.yaml -n istioinaction
kubectl apply -f ch6/simple-backend.yaml -n istioinaction
재시도의 필요성
네트워크 장애나 일시적 오류가 발생할 경우, 재시도를 통해 사용자 경험을 향상시킬 수 있습니다.
단, 무분별한 재시도는 오히려 시스템 부하를 가중시킬 수 있으므로 주의가 필요합니다.
기본 재시도 비활성화
docker exec -it myk8s-control-plane bash
# Istio 기본 재시도 0으로 변경
istioctl install --set profile=default --set meshConfig.defaultHttpRetryPolicy.attempts=0
exit
실패 주입: 75% 확률로 503 오류 반환
cat ch6/simple-backend-periodic-failure-503.yaml
kubectl apply -f ch6/simple-backend-periodic-failure-503.yaml -n istioinaction
simple-web을 통해 호출하여 오류를 확인합니다.
for in in {1..10}; do time curl -s http://simple-web.istioinaction.io:30000 | jq .code; done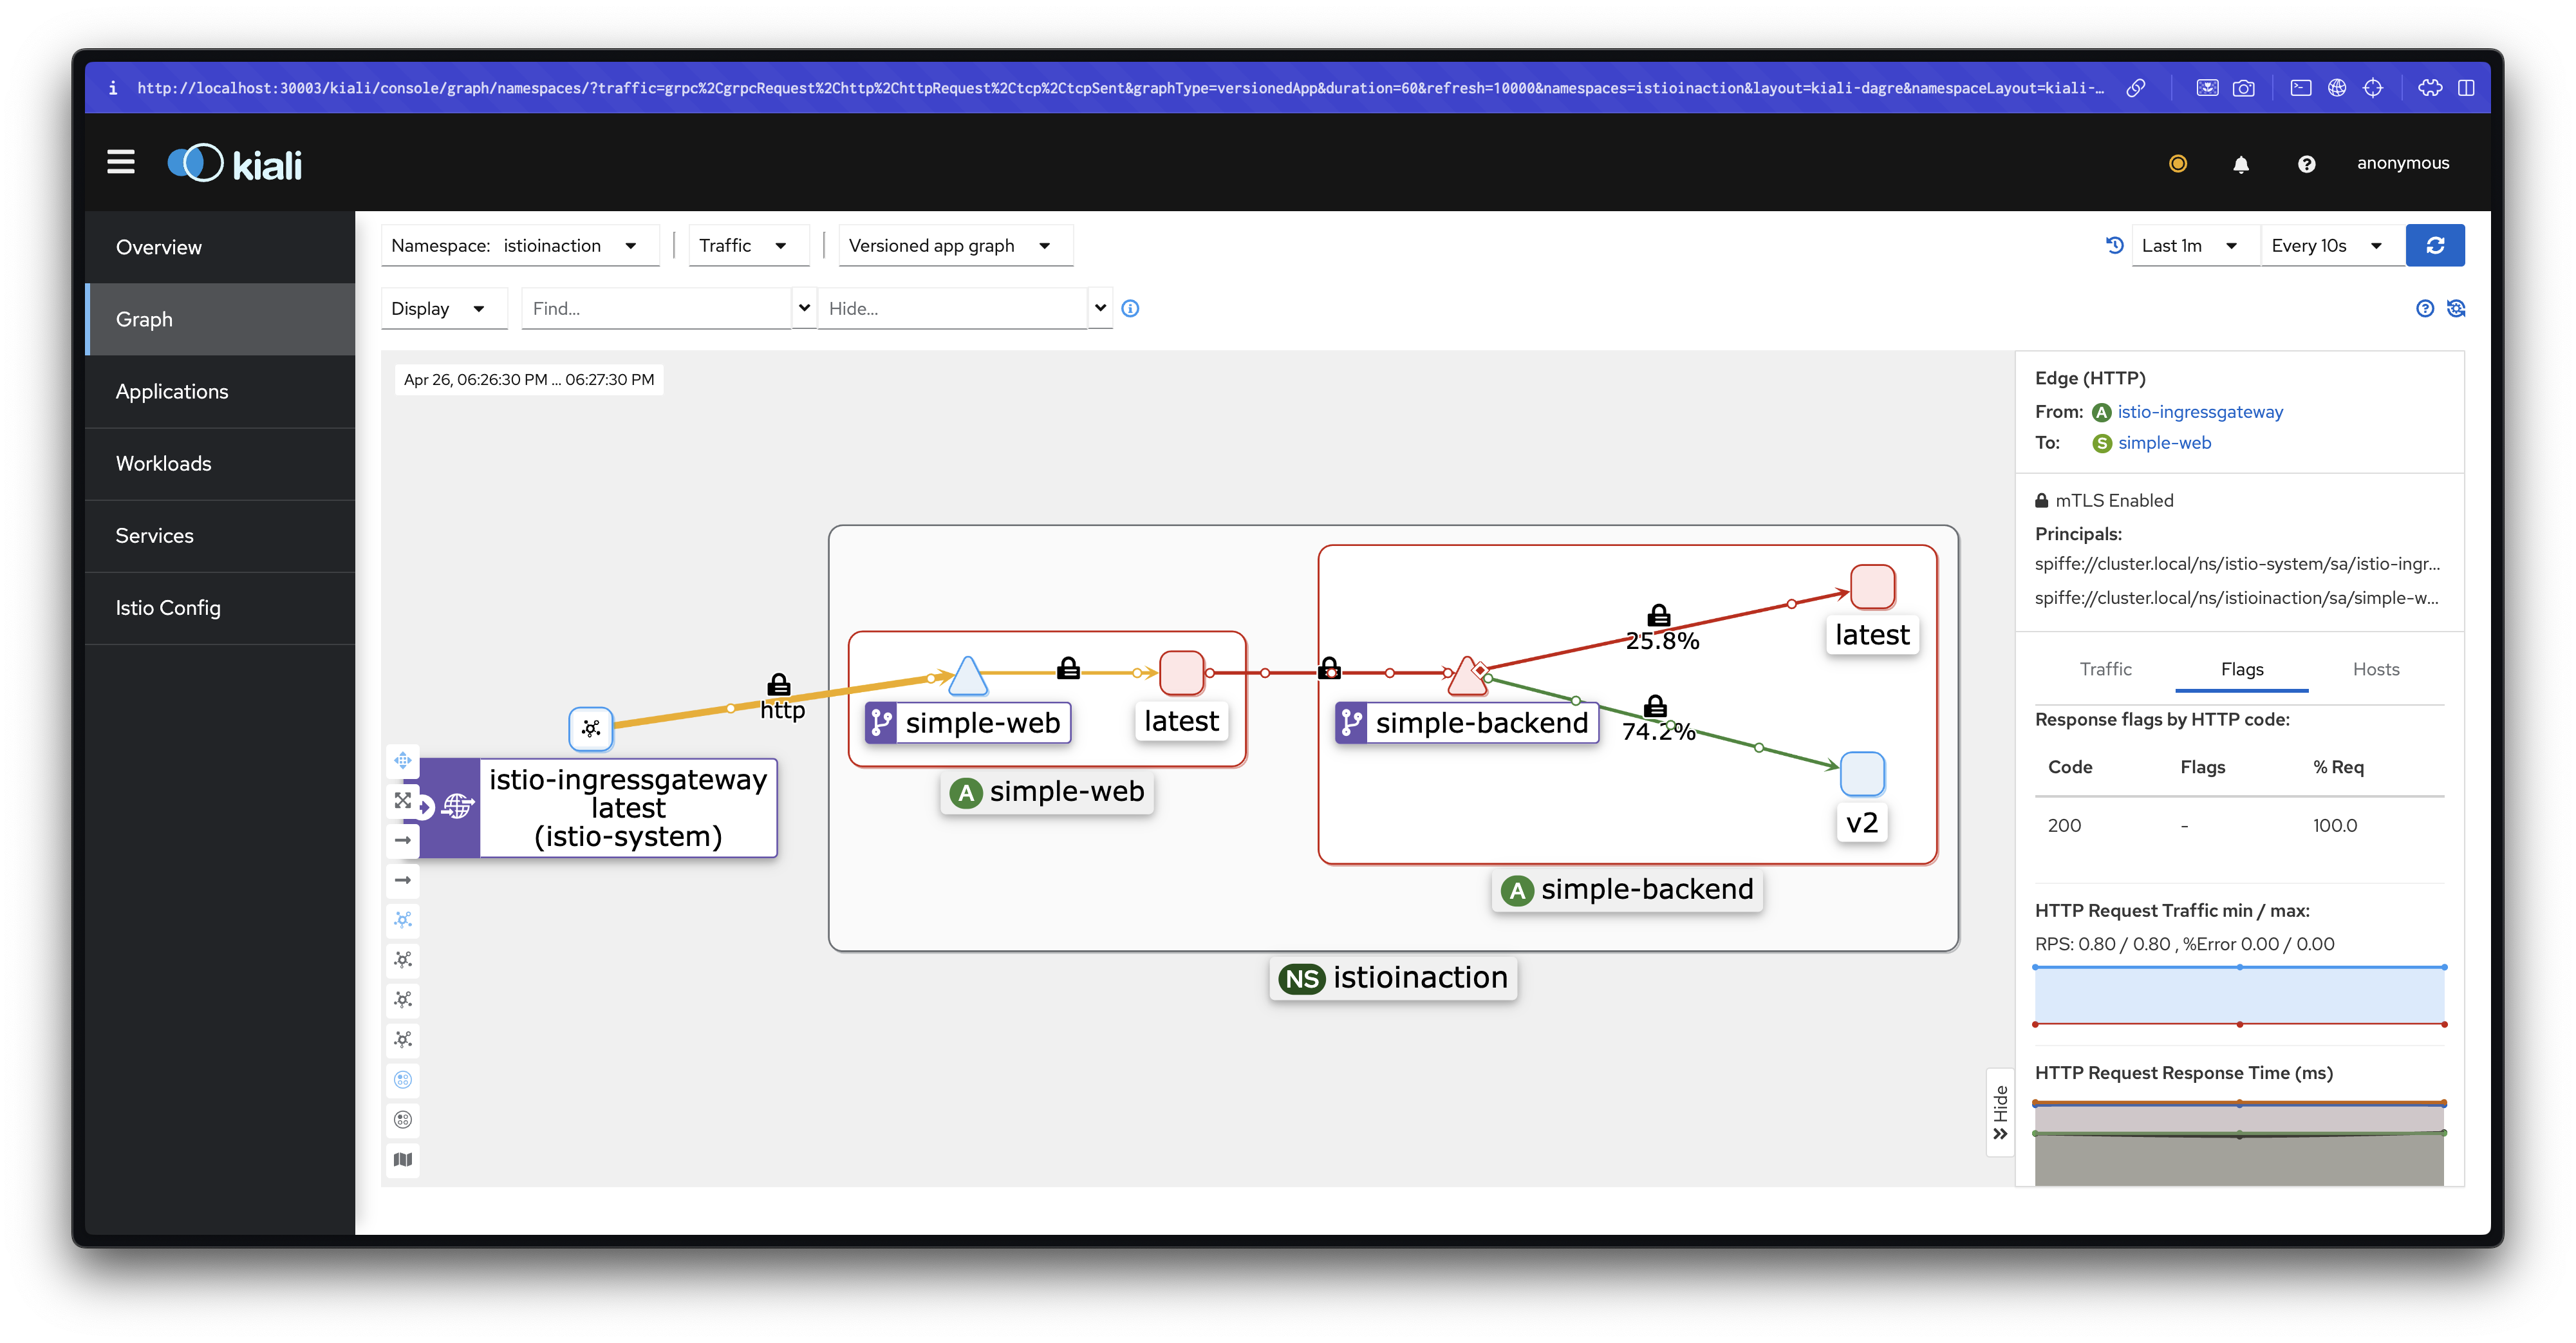
명시적 재시도 설정
이제 VirtualService를 수정해 2회 재시도를 명시적으로 설정합니다.
cat ch6/simple-backend-enable-retry.yaml

apiVersion: networking.istio.io/v1alpha3
kind: VirtualService
metadata:
  name: simple-backend-vs
spec:
  hosts:
  - simple-backend
  http:
  - route:
    - destination:
        host: simple-backend
    retries:
      attempts: 2

kubectl apply -f ch6/simple-backend-enable-retry.yaml -n istioinaction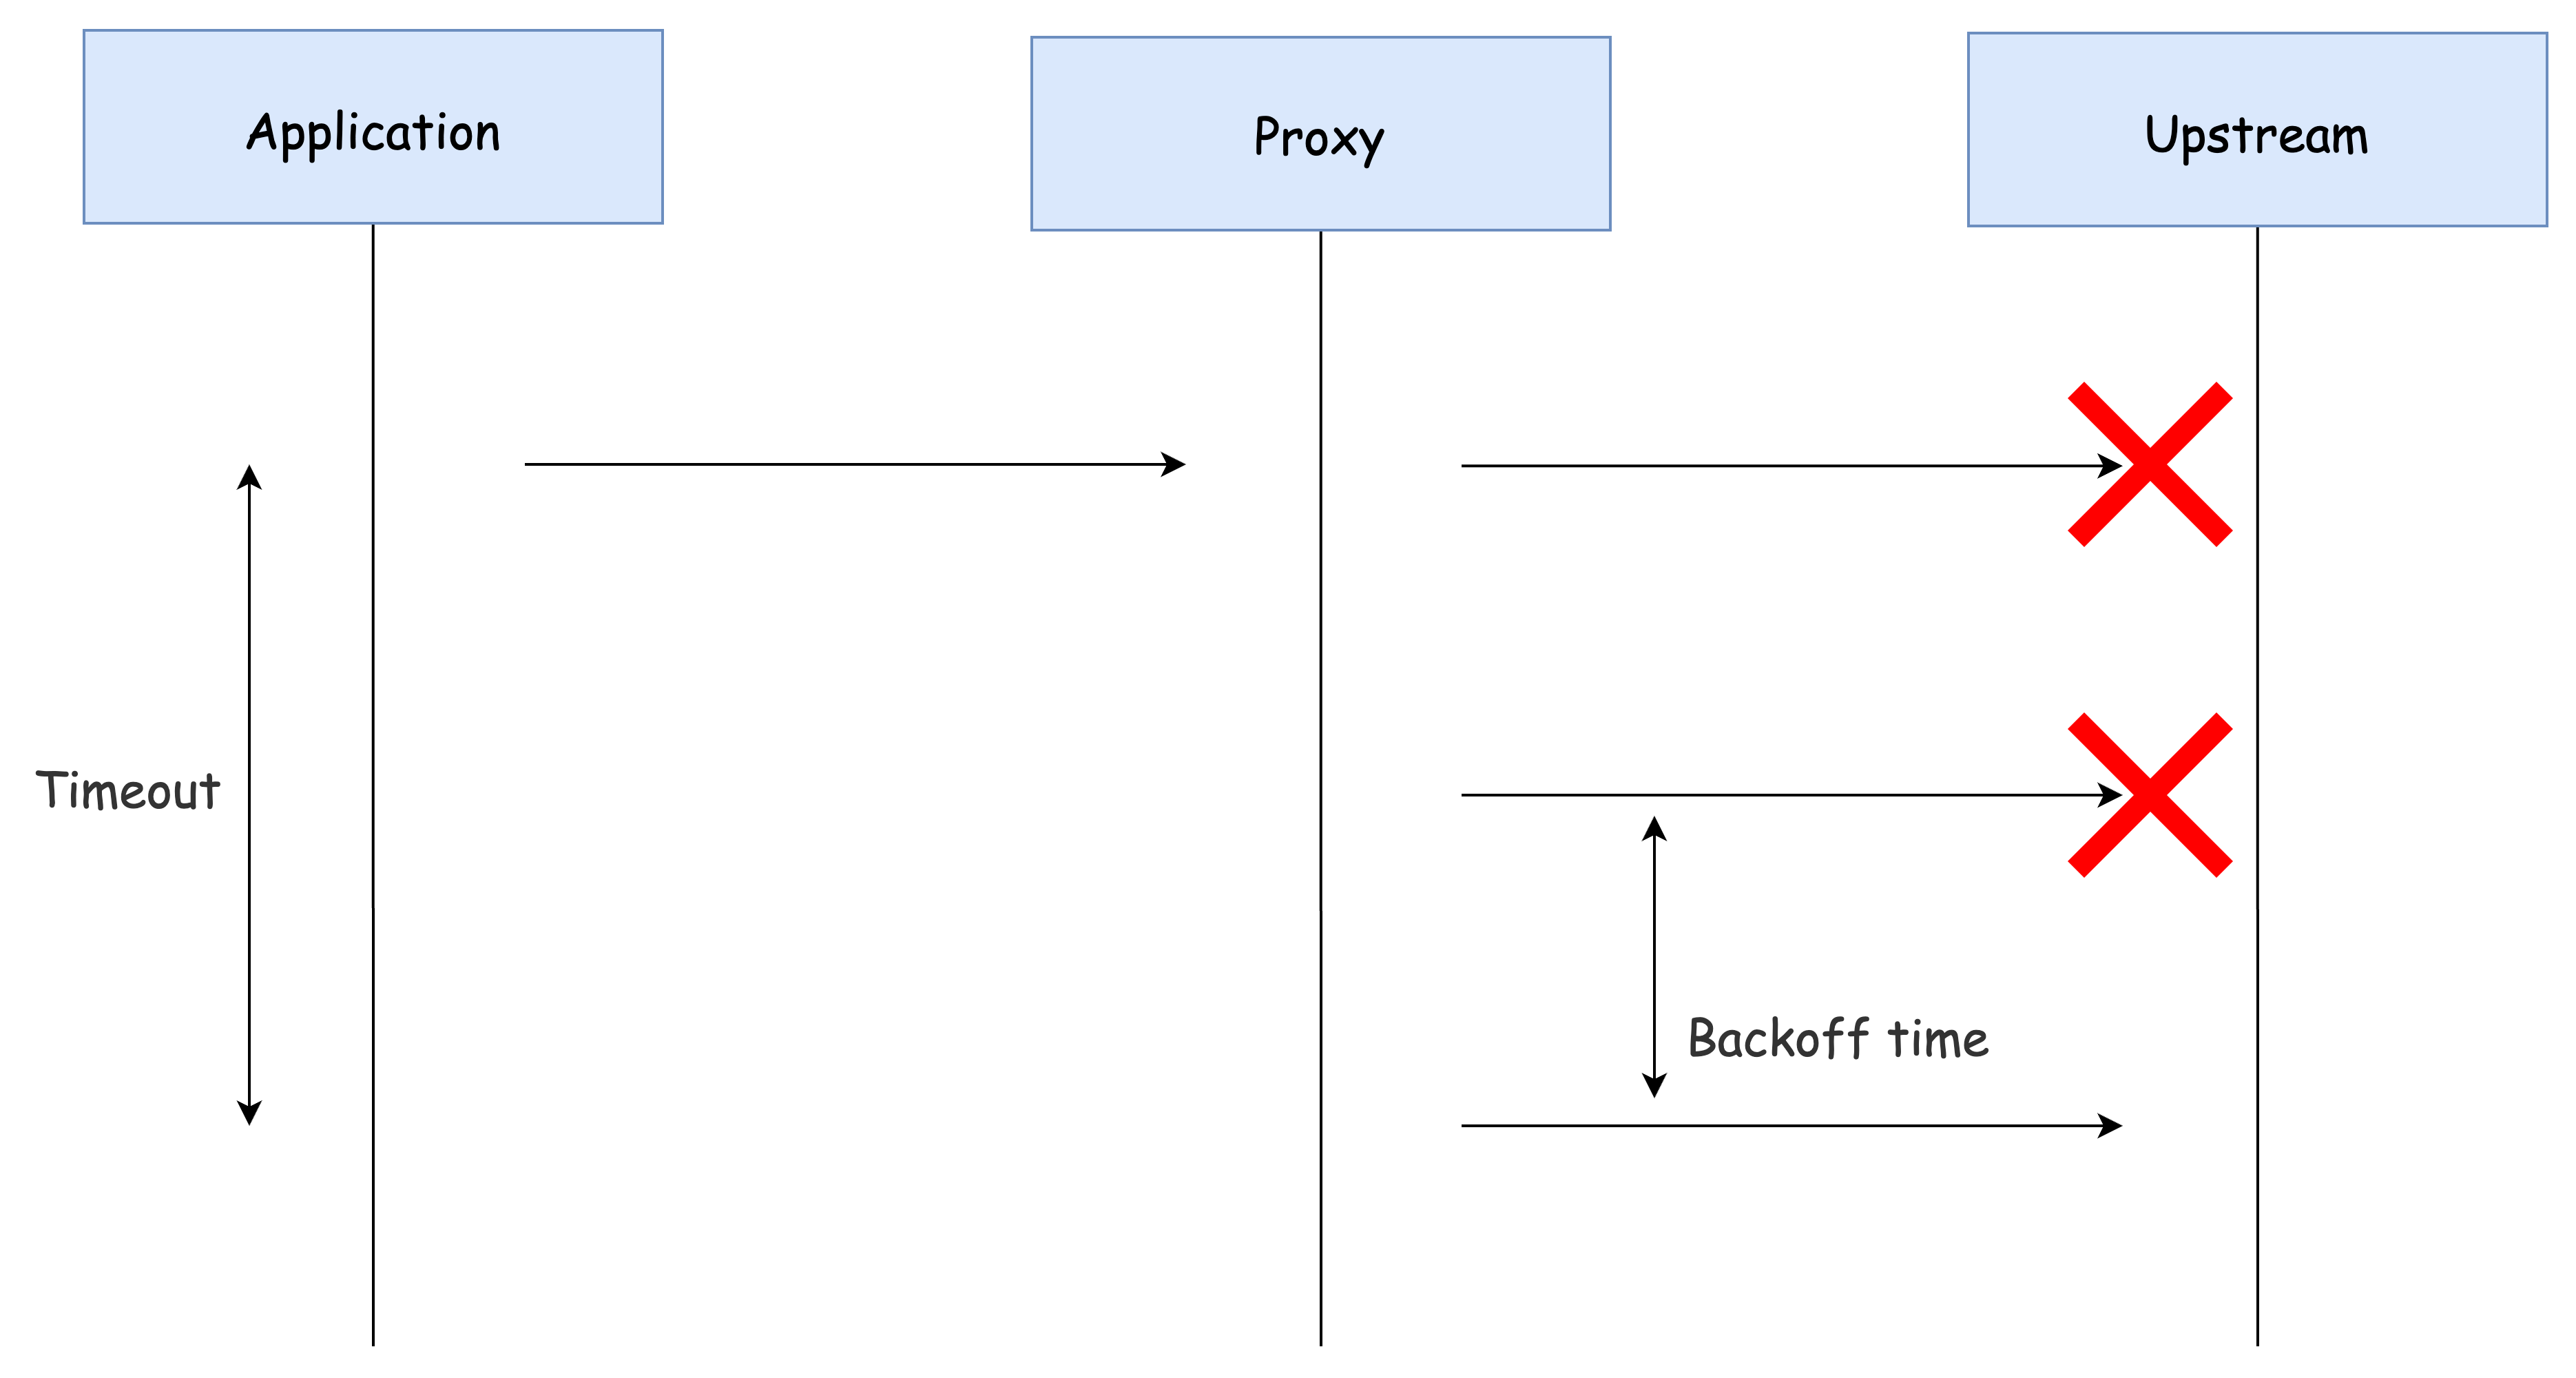
추가 실험: 500 오류 재시도
503 이외의 오류(예: 500)를 재시도하려면 다음과 같이 설정을 수정합니다.
cat ch6/simple-backend-vs-retry-500.yaml

apiVersion: networking.istio.io/v1alpha3
kind: VirtualService
metadata:
  name: simple-backend-vs
spec:
  hosts:
  - simple-backend
  http:
  - route:
    - destination:
        host: simple-backend
    retries:
      attempts: 2
      retryOn: 5xx

kubectl apply -f ch6/simple-backend-vs-retry-500.yaml -n istioinaction
타임아웃에 따른 재시도
각 재시도에는 고유한 제한 시간(perTryTimeout) 설정이 존재합니다.
여기서 주의할 점은 다음과 같습니다.
-
perTryTimeout에시도 횟수(attempts)를 곱한 값이, 전체 요청 제한 시간(overall timeout)보다 작아야 합니다.수식:
perTryTimeout × attempts < overall timeout
예를 들어, 총 요청 제한 시간이 1초이고, 각 재시도(per try)의 제한 시간이 500ms이며, 3회까지 재시도하도록 설정한 경우를 생각해봅시다.
이 경우, 전체 요청 제한 시간이 초과되어 재시도 정책이 의도대로 동작하지 않을 수 있습니다.
또한, 각 재시도 사이에는 백오프(Backoff) 지연 시간이 있다는 점도 반드시 고려해야 합니다.
-
실제 계산은 다음과 같이 이루어집니다.
수식:
perTryTimeout × attempts + backoffTime × (attempts - 1) < overall timeout
따라서 백오프 시간도 전체 제한 시간에 포함된다는 점을 명심해야 합니다.
재시도 작동 방식
이스티오에서는 요청이 서비스 프록시를 거쳐 업스트림으로 전달되는 데 실패할 경우, 해당 요청을 '실패'로 표시하고 VirtualService 리소스에 정의된 최대 재시도 횟수까지 재시도를 시도합니다.
- 재시도 횟수(attempts)가 2회로 설정된 경우, 실제로는 최대 3회 요청이 발생합니다.
(초기 요청 1회 + 재시도 2회)
이스티오는 재시도 간에 25ms를 기본 베이스로 백오프(backoff)하여 재시도를 지연시키는 방식을 사용합니다.
이 과정을 다음 그림에서 시각적으로 이해할 수 있습니다.
요청 실패 시 재시도 요청 흐름
요약하면, 이스티오는 연속적인 재시도 요청 간에 25ms × 재시도 횟수 만큼 지연을 추가하여, 시스템에 과도한 부하가 걸리는 것을 방지하고자 합니다.
다만, 현재 베이스 백오프 시간(25ms)은 고정값이며, 이 값은 엔보이 API를 직접 수정해야만 변경할 수 있습니다.
재시도 폭발(thundering herd) 문제
이스티오의 기본 재시도 횟수는 2회입니다.
그러나 시스템 내에서 호출 체인이 길어질 경우, 이 기본 재시도 설정은 심각한 부하 문제를 야기할 수 있습니다.
예를 들어, 서비스가 5단계로 연결되어 있고 각 단계가 2회 재시도하도록 설정된 경우, 단일 요청이 최대 32회의 호출을 유발할 수 있습니다.
- (2 재시도 + 1 원본 호출)⁵ = 3⁵ = 243 → 실제로는 재시도 구조에 따라 32회 수준이 발생할 수 있음.
이 상황은 체인 마지막에 있는 서비스에 과도한 부하(thundering herd) 를 일으켜 전체 시스템 장애로 이어질 수 있습니다.
이를 방지하기 위한 전략은 다음과 같습니다:
- 아키텍처 가장자리(edge)에서는 재시도 횟수를 1회 또는 0회로 제한합니다.
- 중간 계층에서는 재시도를 아예 하지 않습니다.
- 호출 스택의 깊은 곳에서만 필요한 경우 재시도를 허용합니다.
그러나 이 전략만으로 모든 문제를 해결할 수는 없습니다.
따라서 전체 시스템 차원의 재시도 상한선(예: 재시도 예산, retry budget)을 설정하는 것이 이상적입니다.
다만, 현재 이스티오 API에서는 이러한 기능을 직접 지원하지는 않습니다.
재시도와 지역(Locality)
마지막으로, 재시도 동작은 기본적으로 자기 지역(locality) 내 엔드포인트를 대상으로 합니다.
즉, 같은 리전, 같은 가용 영역 내에서 재시도를 시도합니다.
이스티오는 retryRemoteLocalities 설정을 통해 이 동작을 제어할 수 있습니다.
- retryRemoteLocalities: true로 설정하면, 재시도 시 다른 지역의 엔드포인트로 요청을 보낼 수 있도록 허용합니다.
이 설정은 특히, 같은 지역 내 엔드포인트들이 모두 오작동하고 있을 때 유용하게 작동할 수 있습니다.
(※ 이상값 감지(Outlier Detection)와 함께 사용하면 효과적입니다.)
👉 Step 05. Circuit Breaking with Istio
이번에는 이스티오를 이용해 서킷 브레이킹(circuit breaking) 을 구현하는 방법에 대해 알아봅니다.
✅ 서킷 브레이커 소개
서킷 브레이커는 부분적 장애 또는 연쇄적 장애를 방지하기 위해 사용하는 패턴입니다.
오작동하거나 느려진 시스템에 계속 요청을 보내는 대신, 해당 시스템으로 향하는 트래픽을 줄이거나 중단하여 나머지 시스템을 보호할 수 있습니다.
이 개념은 집의 전기 회로 차단기와 유사합니다. 장애가 발생하면 회로를 열어 나머지 회로를 보호하는 것처럼,
네트워크 시스템에서도 오류가 반복되면 트래픽을 차단하여 전체 장애로 번지는 것을 막을 수 있습니다.
이스티오에는 'CircuitBreaker'라는 이름의 리소스는 없지만,
다음 두 가지 방식으로 효과적인 서킷 브레이커를 구현할 수 있습니다:
- 1. 커넥션 및 미해결 요청 개수 제한
- 2. 오동작하는 엔드포인트 퇴출(Outlier Detection)
✅ 느린 서비스에 대비하기: Connection Pool 제어
첫 번째 방법은 DestinationRule 리소스의 connectionPool 설정을 이용하여,
특정 서비스로 향하는 커넥션과 대기 요청 개수를 제한하는 것입니다.
이 방법을 통해:
- 느린 서비스가 클라이언트를 막아서는 것을 방지할 수 있고
- 과부하를 일으키는 요청을 조기에 차단(fail-fast)할 수 있습니다.
주요 설정 항목
| 설정 항목 | 설명 |
|---|---|
maxConnections | 서비스로의 최대 커넥션 수를 제한 |
http1MaxPendingRequests | 커넥션을 얻지 못한 대기 요청 수 제한 |
http2MaxRequests | 모든 엔드포인트를 통틀어 최대 병렬 요청 수 제한 |
maxRequestsPerConnection | 커넥션당 최대 요청 수 제한 |
사전 작업: 트레이싱 샘플링 100%로 설정
트래픽 흐름을 보다 명확히 관찰하기 위해 샘플링을 1% → 100%로 설정합니다.
# tracing.sampling=100
docker exec -it myk8s-control-plane bash
----------------------------------------
istioctl install --set profile=default --set meshConfig.accessLogFile=/dev/stdout --set meshConfig.defaultConfig.tracing.sampling=100 --set meshConfig.defaultHttpRetryPolicy.attempts=0
y
exit
----------------------------------------

# 확인
kubectl describe cm -n istio-system istio
...
defaultConfig:
  discoveryAddress: istiod.istio-system.svc:15012
  proxyMetadata: {}
  tracing:
    sampling: 100.0
    zipkin:
      address: zipkin.istio-system:9411
...

# 적용 : rollout
kubectl rollout restart deploy -n istio-system istiod
kubectl rollout restart deploy -n istio-system istio-ingressgateway
kubectl rollout restart deploy -n istioinaction simple-web
kubectl rollout restart deploy -n istioinaction simple-backend-1
실습 환경 구성
- simple-web과 simple-backend-1만 남기고 설정
- simple-backend-1은 1초 지연 응답을 가지도록 구성
# 현재 적용되어 있는 상태
kubectl apply -f ch6/simple-web.yaml -n istioinaction
kubectl apply -f ch6/simple-web-gateway.yaml -n istioinaction
kubectl apply -f ch6/simple-backend-vs-retry-on.yaml -n istioinaction

# destinationrule 삭제
kubectl delete destinationrule --all -n istioinaction

# simple-backend-2 제거
kubectl scale deploy simple-backend-2 --replicas=0 -n istioinaction

# 응답지연(1초)을 발생하는 simple-backend-1 배포
kubectl apply -f ch6/simple-backend-delayed.yaml -n istioinaction

# 동작 중 파드에 env 직접 수정..
kubectl exec -it deploy/simple-backend-1 -n istioinaction -- sh
-----------------------------------
export TIMING_50_PERCENTILE=1000ms
exit
-----------------------------------

# 테스트
curl -s http://simple-web.istioinaction.io:30000 | grep duration
  "duration": "1.058699s",
      "duration": "1.000934s",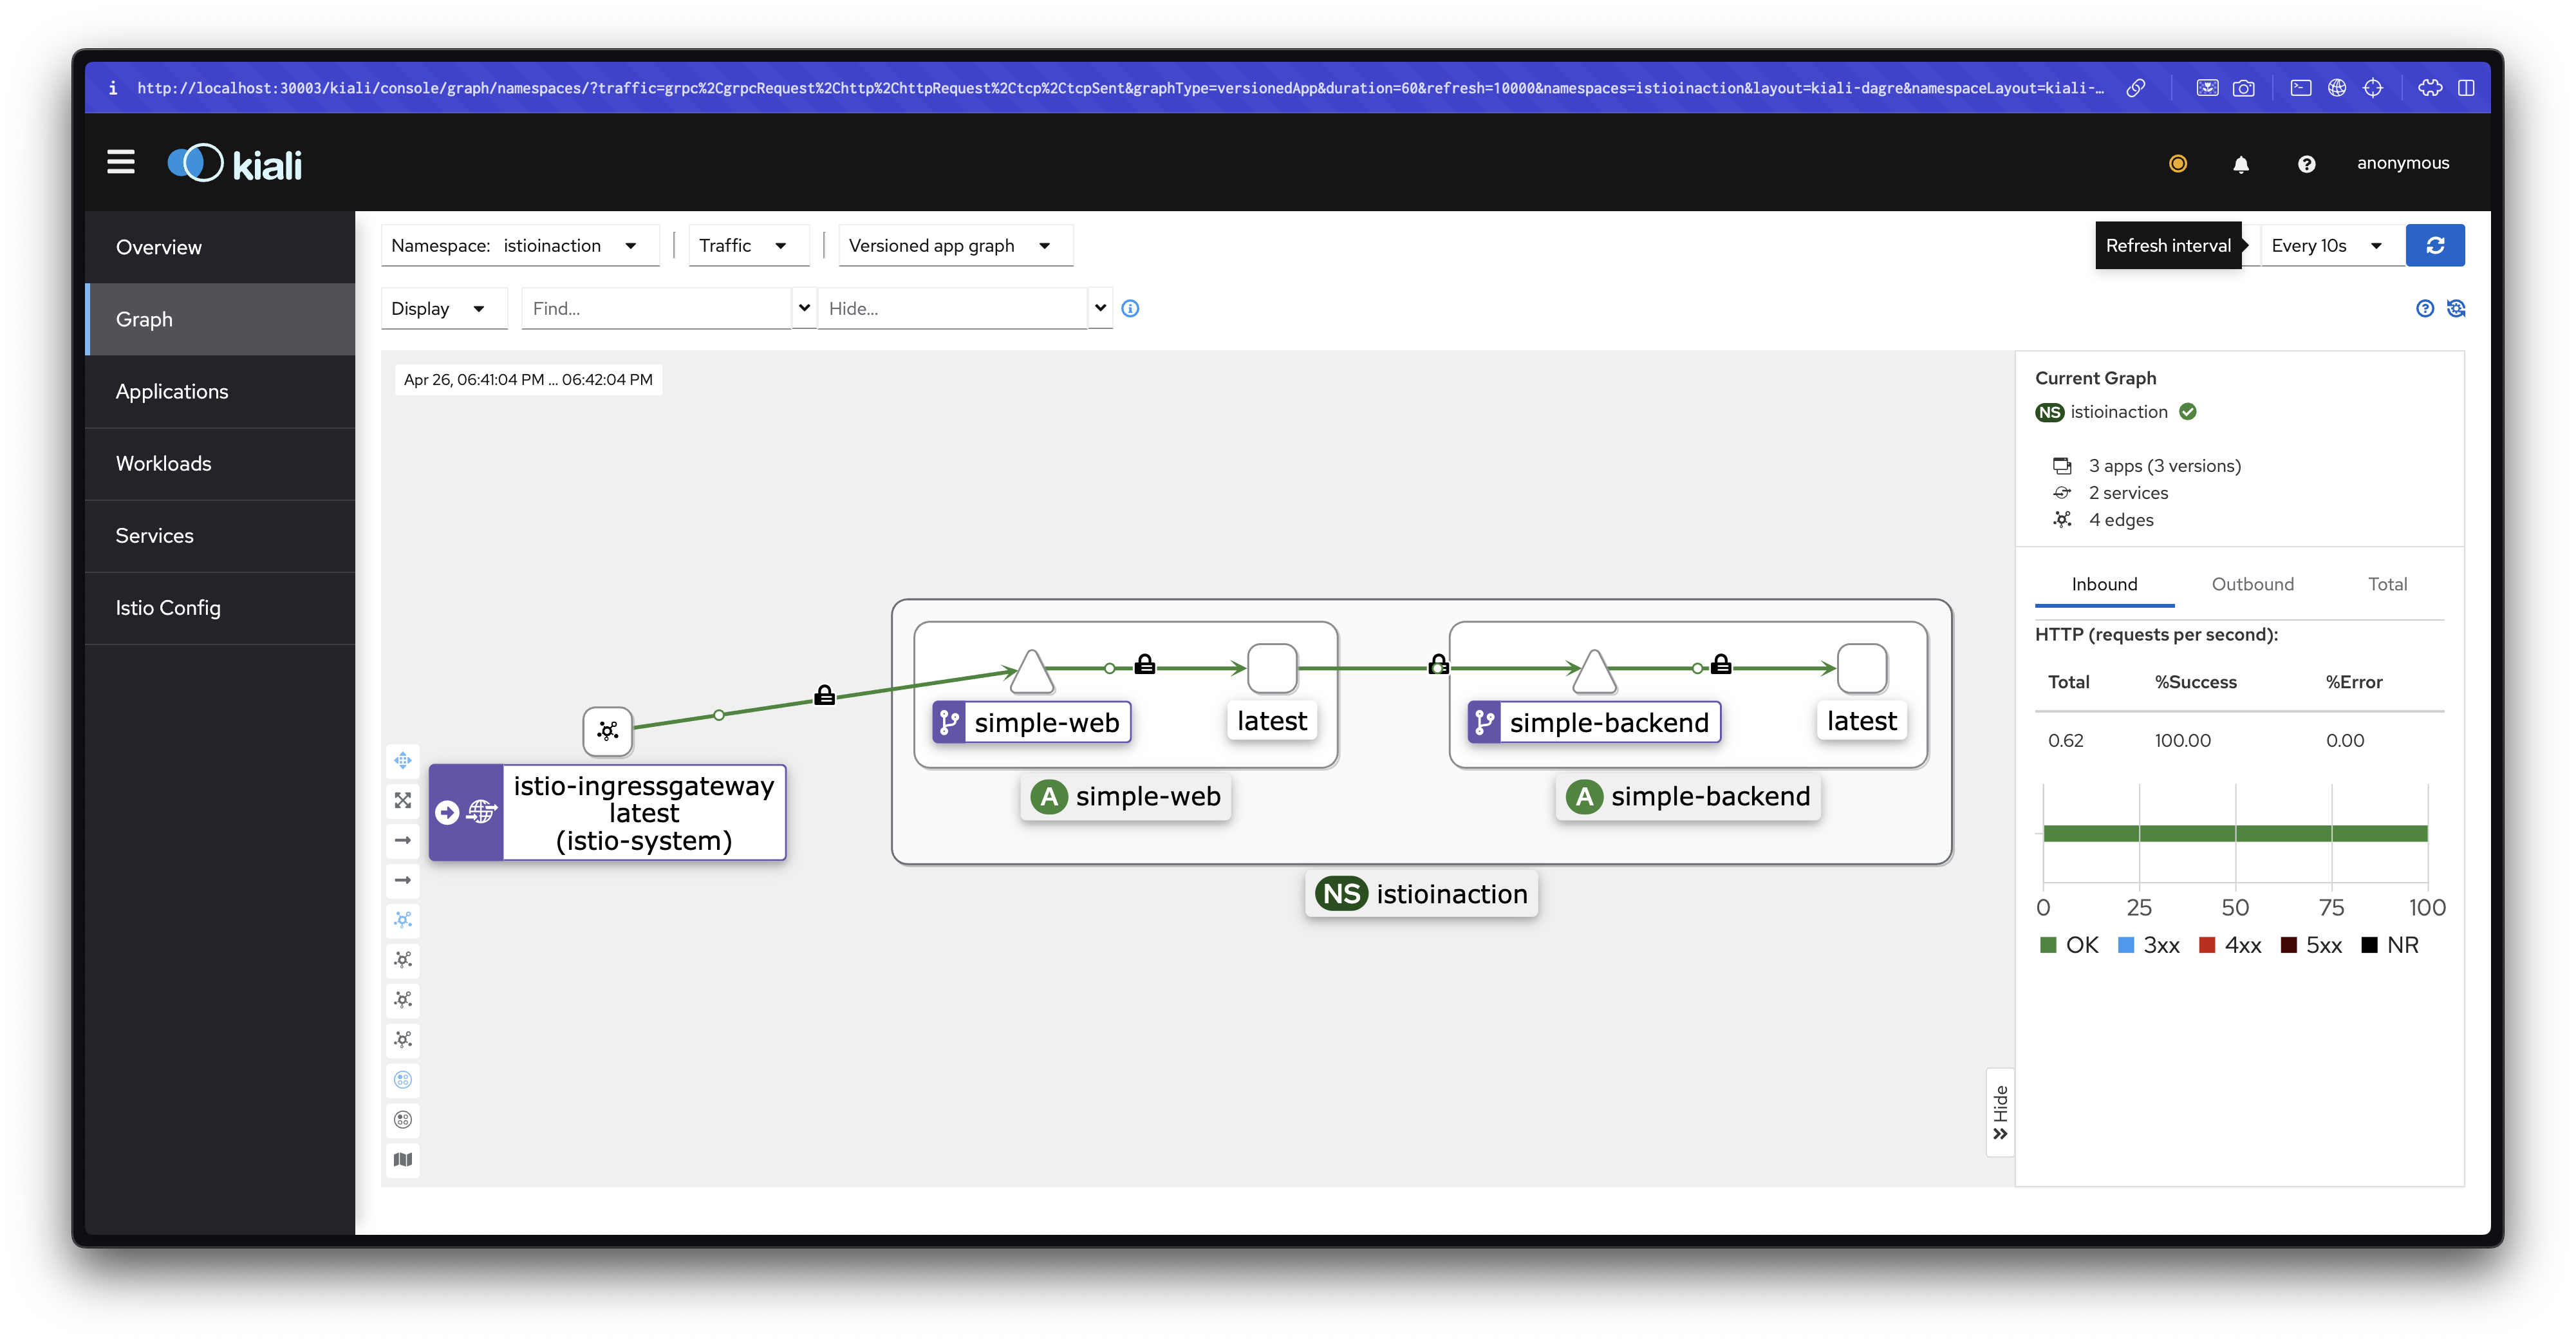
커넥션 및 요청 제한 설정
# cat ch6/simple-backend-dr-conn-limit.yaml
apiVersion: networking.istio.io/v1beta1
kind: DestinationRule
metadata:
  name: simple-backend-dr
spec:
  host: simple-backend.istioinaction.svc.cluster.local
  trafficPolicy:
    connectionPool:
      tcp:
        maxConnections: 1 # 커넥션 총 개수 Total number of connections
      http:
        http1MaxPendingRequests: 1 # 대기 중인 요청 Queued requests
        maxRequestsPerConnection: 1 # 커넥션당 요청 개수 Requests per connection
        maxRetries: 1 # Maximum number of retries that can be outstanding to all hosts in a cluster at a given time.
        http2MaxRequests: 1 # 모든 호스트에 대한 최대 동시 요청 개수 Maximum concurrent requests to all hosts

# DestinationRule 적용 (connection-limiting)
kubectl apply -f ch6/simple-backend-dr-conn-limit.yaml -n istioinaction
kubectl get dr -n istioinaction

#
docker exec -it myk8s-control-plane istioctl proxy-config cluster deploy/simple-backend-1.istioinaction | egrep 'RULE|backend'
SERVICE FQDN                                            PORT      SUBSET     DIRECTION     TYPE             DESTINATION RULE
                                                        8080      -          inbound       ORIGINAL_DST     simple-backend-dr.istioinaction
simple-backend.istioinaction.svc.cluster.local          80        -          outbound      EDS              simple-backend-dr.istioinaction

# 설정 적용 확인
docker exec -it myk8s-control-plane istioctl proxy-config cluster deploy/simple-backend-1.istioinaction --fqdn simple-backend.istioinaction.svc.cluster.local -o json
...
        "connectTimeout": "10s",
        "lbPolicy": "LEAST_REQUEST",
        "circuitBreakers": {
            "thresholds": [
                {
                    "maxConnections": 1, # tcp.maxConnections, 커넥션 총 개수 Total number of connections
                    "maxPendingRequests": 1, # http.http1MaxPendingRequests, 대기 중인 요청 Queued requests
                    "maxRequests": 1, # http.http2MaxRequests, 모든 호스트에 대한 최대 동시 요청 개수
                    "maxRetries": 1, # http.maxRetries
                    "trackRemaining": true
                }
            ]
        },
        "typedExtensionProtocolOptions": {
            "envoy.extensions.upstreams.http.v3.HttpProtocolOptions": {
                "@type": "type.googleapis.com/envoy.extensions.upstreams.http.v3.HttpProtocolOptions",
                "commonHttpProtocolOptions": {
                    "maxRequestsPerConnection": 1 # http.maxRequestsPerConnection, 커넥션당 요청 개수
...

# (참고) 기본값?
docker exec -it myk8s-control-plane istioctl proxy-config cluster deploy/istio-ingressgateway.istio-system --fqdn simple-web.istioinaction.svc.cluster.local -o json
...
        "connectTimeout": "10s",
        "lbPolicy": "LEAST_REQUEST",
        "circuitBreakers": {
            "thresholds": [
                {
                    "maxConnections": 4294967295,
                    "maxPendingRequests": 4294967295,
                    "maxRequests": 4294967295,
                    "maxRetries": 4294967295,
                    "trackRemaining": true
...
커넥션 하나에 초당 요청을 하나 보낼 때 제대로 동작하는지 확인합니다.
# 초당 요청을 하나 보내는(-qps1) 커넥션 하나(-c1)로 진행 :
fortio load -quiet -jitter -t 30s -c 1 -qps 1 --allow-initial-errors http://simple-web.istioinaction.io:30000
...
Sockets used: 1 (for perfect keepalive, would be 1)
Uniform: false, Jitter: true, Catchup allowed: false
Code 200 : 30 (100.0 %)
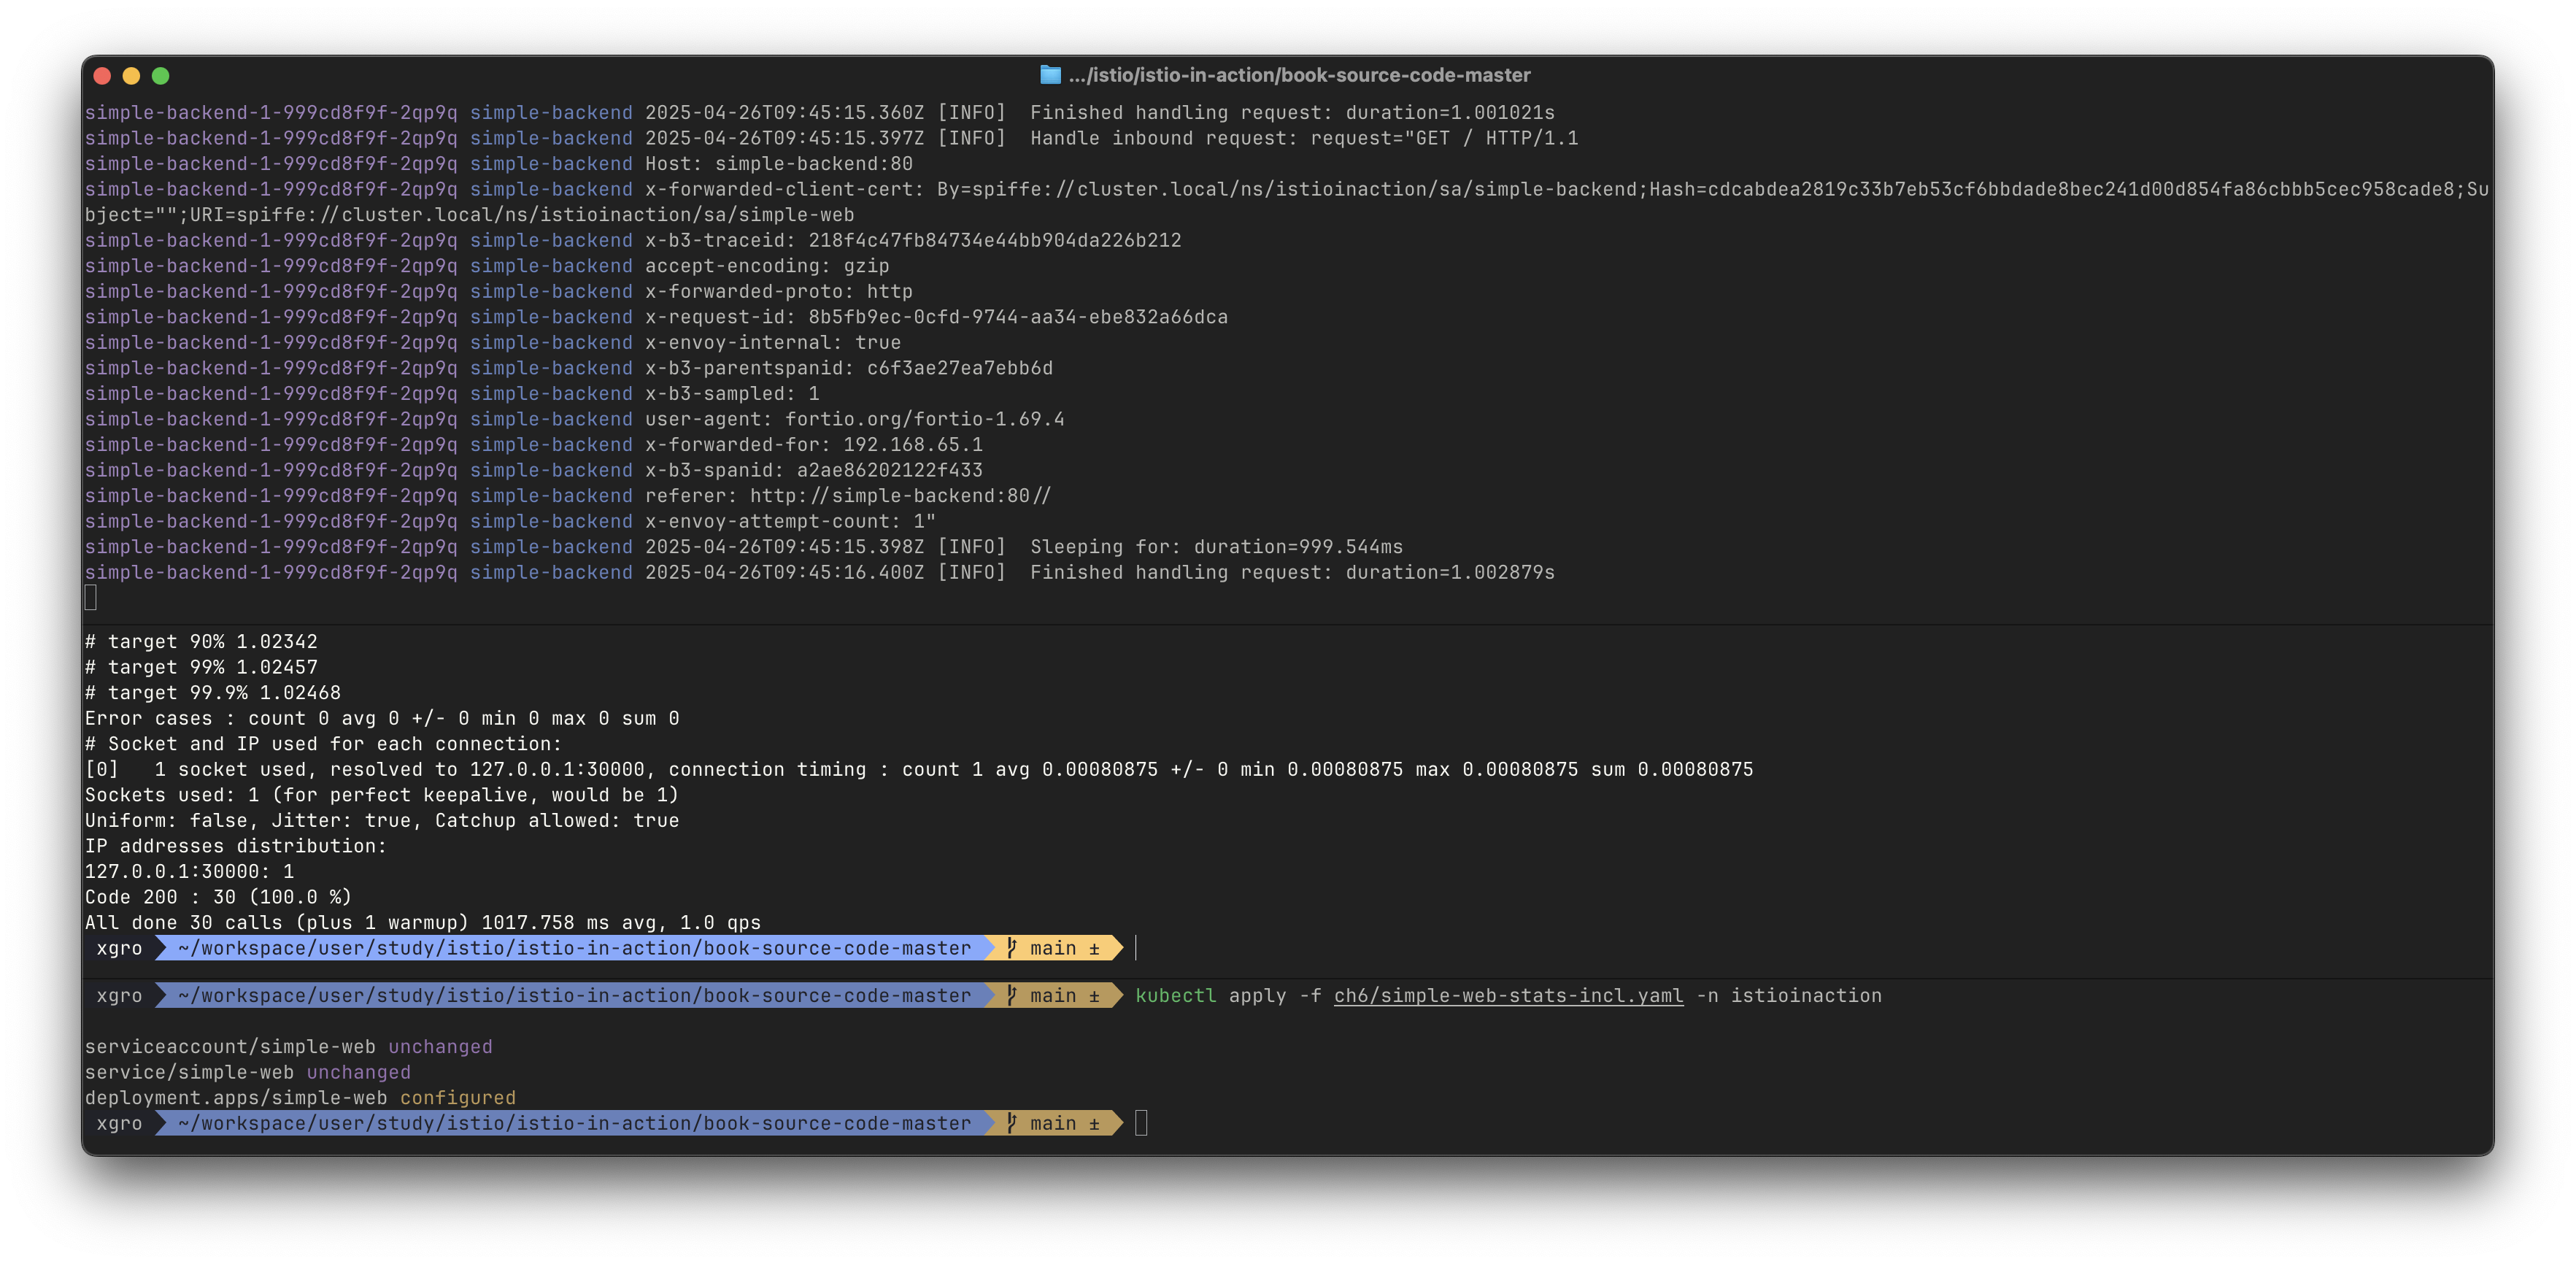
All done 30 calls (plus 1 warmup) 1023.648 ms avg, 1.0 qps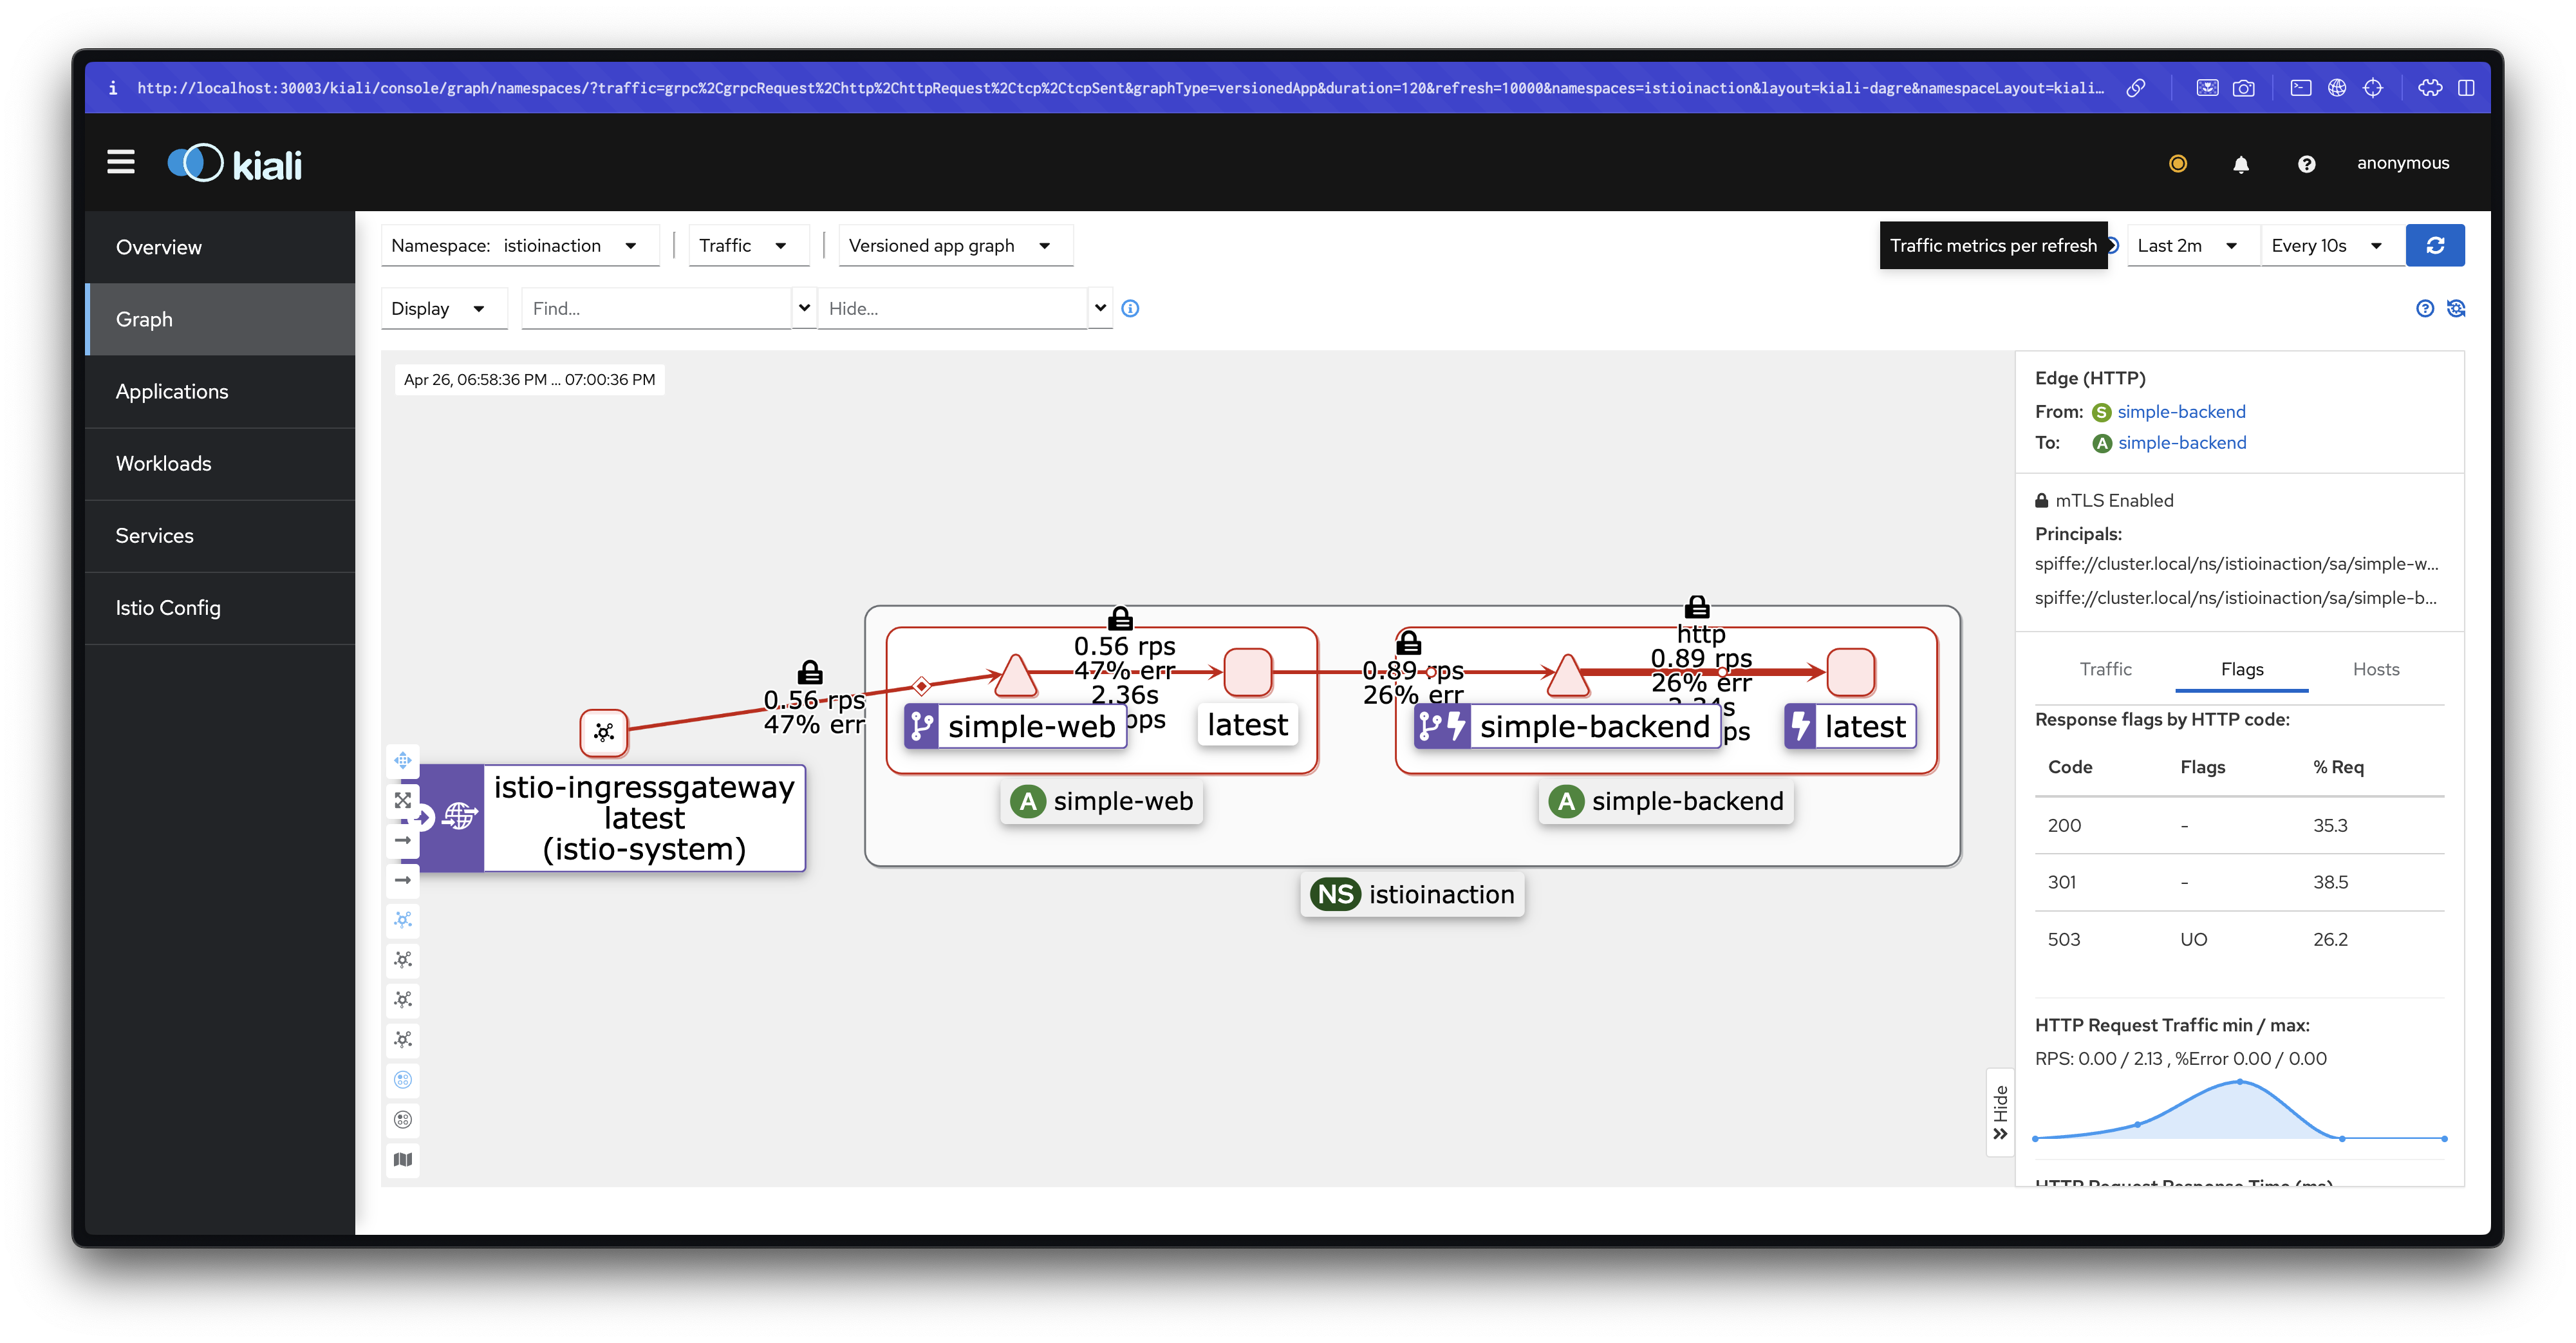
정확한 확인을 위해서 이스티오 서비스 프록시에서 더 많은 통계 수집을 활성화합니다.
# simple-web 디플로이먼트에 sidecar.istio.io/statsInclusionPrefixes="cluster.<이름>" 애너테이션 추가하자
## sidecar.istio.io/statsInclusionPrefixes: cluster.outbound|80||simple-backend.istioinaction.svc.cluster.local
cat ch6/simple-web-stats-incl.yaml | grep statsInclusionPrefixes
        sidecar.istio.io/statsInclusionPrefixes: "cluster.outbound|80||simple-backend.istioinaction.svc.cluster.local"
kubectl apply -f ch6/simple-web-stats-incl.yaml -n istioinaction

# 정확한 확인을 위해 istio-proxy stats 카운터 초기화
kubectl exec -it deploy/simple-web -c istio-proxy -n istioinaction \
-- curl -X POST localhost:15000/reset_counters

# simple-web 에 istio-proxy 의 stats 조회
kubectl exec -it deploy/simple-web -c istio-proxy -n istioinaction \
 -- curl localhost:15000/stats | grep simple-backend | grep overflow
cluster.outbound|80||simple-backend.istioinaction.svc.cluster.local.upstream_cx_overflow: 0
cluster.outbound|80||simple-backend.istioinaction.svc.cluster.local.upstream_cx_pool_overflow: 0
cluster.outbound|80||simple-backend.istioinaction.svc.cluster.local.upstream_rq_pending_overflow: 0
cluster.outbound|80||simple-backend.istioinaction.svc.cluster.local.upstream_rq_retry_overflow: 0

kubectl exec -it deploy/simple-web -c istio-proxy -n istioinaction \
 -- curl localhost:15000/stats | grep simple-backend.istioinaction.svc.cluster.local.upstream
Overflow 발생 확인 (초당 요청량 증가)
커넥션 개수와 초당 요청 수를 2로 늘리면 어떻게 될까요?
2개의 커넥션에서 요청을 초당 하나씩 보내기 시작해보겠습니다.
# 2개의 커넥션에서 요청을 초당 하나씩 보내기 : 요청이 17개 실패한 것으로 반환됐다(HTTP 5xx)
fortio load -quiet -jitter -t 30s -c 2 -qps 2 --allow-initial-errors http://simple-web.istioinaction.io:30000
...
Sockets used: 19 (for perfect keepalive, would be 2)
Code 200 : 30 (63.8 %)
Code 500 : 17 (36.2 %)
All done 47 calls (plus 2 warmup) 925.635 ms avg, 1.5 qps
...

# 로그 확인 : simple-web
kubectl logs -n istioinaction -l app=simple-web -c istio-proxy -f
...
# 오류 요청 (503 Service Unavailable, UO 플래그
## HTTP 503: 서비스가 일시적으로 사용 불가능. Envoy가 업스트림 서버(simple-backend:80)에 요청을 전달하지 못함.
## UO 플래그: "Upstream Overflow"로, Envoy의 서킷 브레이커가 트리거되었거나 최대 연결/요청 제한에 도달했음을 의미.
## upstream_reset_before_response_started{overflow}: 업스트림 서버가 응답을 시작하기 전에 연결이 리셋되었으며, 이는 오버플로우(리소스 제한)로 인함.
[2025-04-22T03:17:24.830Z] "GET // HTTP/1.1" 503 UO upstream_reset_before_response_started{overflow} - "-" 0 81 4 - ...

# 오류 요청 (500 Internal Server Error) : 최종 사용자에게 500 에러 리턴
[2025-04-22T03:17:24.825Z] "GET / HTTP/1.1" 500 - via_upstream - "-" 0 687 11 11 ...
## simple-web 서비스에서 backend 정보를 가져오지 못하여 애플리케이션 레벨 오류 발생
## HTTP 500: 서버 내부 오류. 업스트림 서버(simple-web:30000)가 요청을 처리하는 중 예기치 않은 오류 발생.
## via_upstream: 오류가 Envoy가 아니라 업스트림 서버에서 발생했음을 나타냄.
...

# 통계 확인 : 18개로 +/- 1개 정도는 무시하고 보자. 성능 테스트 실패 갯수(17개)와 아래 통계값이 일치 한다(18-1).
# 큐 대기열이 늘어나 결국 서킷 브레이커를 발동함.
# fail-fast 동작은 이렇게 보류 중 혹은 병행 요청 갯수가 서킷 브레이커 임계값을 넘어 수행된다.
# The fail-fast behavior comes from those pending or parallel requests exceeding the circuit-breaking thresholds.
kubectl exec -it deploy/simple-web -c istio-proxy -n istioinaction \
 -- curl localhost:15000/stats | grep simple-backend | grep overflow
cluster.outbound|80||simple-backend.istioinaction.svc.cluster.local.upstream_cx_overflow: 45
cluster.outbound|80||simple-backend.istioinaction.svc.cluster.local.upstream_cx_pool_overflow: 0
cluster.outbound|80||simple-backend.istioinaction.svc.cluster.local.upstream_rq_pending_overflow: 18
cluster.outbound|80||simple-backend.istioinaction.svc.cluster.local.upstream_rq_retry_overflow: 0

kubectl exec -it deploy/simple-web -c istio-proxy -n istioinaction \
 -- curl localhost:15000/stats | grep simple-backend.istioinaction.svc.cluster.local.upstream
503 UO (Upstream Overflow) : Envoy가 업스트림 서버로의 요청을 처리할 수 없어 오버플로우 발생하는것을 확인할 수 있습니다.
병렬로 발생하는 요청을 더 처리해보기
# 설정 전 확인
docker exec -it myk8s-control-plane istioctl proxy-config cluster deploy/simple-web.istioinaction --fqdn simple-backend.istioinaction.svc.cluster.local -o json | grep maxRequests
docker exec -it myk8s-control-plane istioctl proxy-config cluster deploy/simple-backend-1.istioinaction --fqdn simple-backend.istioinaction.svc.cluster.local -o json | grep maxRequests
                    "maxRequests": 1,
                    "maxRequestsPerConnection": 1

# http2MaxRequests 조정: 1 → 2, '동시요청 처리개수'를 늘림
kubectl patch destinationrule simple-backend-dr -n istioinaction \
-n istioinaction --type merge --patch \
'{"spec": {"trafficPolicy": {"connectionPool": {"http": {"http2MaxRequests": 2}}}}}'

# 설정 후 확인
docker exec -it myk8s-control-plane istioctl proxy-config cluster deploy/simple-backend-1.istioinaction --fqdn simple-backend.istioinaction.svc.cluster.local -o json | grep maxRequests
                    "maxRequests": 2,
                    "maxRequestsPerConnection": 1

# istio-proxy stats 카운터 초기화
kubectl exec -it deploy/simple-web -c istio-proxy -n istioinaction \
-- curl -X POST localhost:15000/reset_counters

# 로그 확인 : simple-web >> 아래 500(503) 발생 로그 확인
kubectl logs -n istioinaction -l app=simple-web -c istio-proxy -f
...
## jaeger 에서 Tags 필터링 찾기 : guid:x-request-id=3e1789ba-2fa4-94b6-a782-cfdf0a405e13
[2025-04-22T03:55:22.424Z] "GET / HTTP/1.1" 503 UO upstream_reset_before_response_started{overflow} - "-" 0 81 0 - "172.18.0.1" "fortio.org/fortio-1.69.3" "3e1789ba-2fa4-94b6-a782-cfdf0a405e13" "simple-backend:80" "-" outbound|80||simple-backend.istioinaction.svc.cluster.local - 10.200.1.137:80 172.18.0.1:0 - -
[2025-04-22T03:55:22.410Z] "GET / HTTP/1.1" 500 - via_upstream - "-" 0 688 15 15 "172.18.0.1" "fortio.org/fortio-1.69.3" "3e1789ba-2fa4-94b6-a782-cfdf0a405e13" "simple-web.istioinaction.io:30000" "10.10.0.18:8080" inbound|8080|| 127.0.0.6:43259 10.10.0.18:8080 172.18.0.1:0 outbound_.80_._.simple-web.istioinaction.svc.cluster.local default
...

# 로그 확인 : simple-backend >> 503 에러가 발생하지 않았다???
kubectl logs -n istioinaction -l app=simple-backend -c istio-proxy -f


# 2개의 커넥션에서 요청을 초당 하나씩 보내기 : 동시요청 처리개수가 기존 1 에서 2로 증가되어서 거의 대부분 처리했다. >> 참고로 모두 성공 되기도함.
fortio load -quiet -jitter -t 30s -c 2 -qps 2 --allow-initial-errors http://simple-web.istioinaction.io:30000
...
Sockets used: 3 (for perfect keepalive, would be 2)
Code 200 : 33 (97.1 %)
Code 500 : 1 (2.9 %)
All done 34 calls (plus 2 warmup) 1789.433 ms avg, 1.1 qps
...

# 'cx_overflow: 40' 대비 'rq_pending_overflow: 1' 가 현저히 낮아짐을 확인
kubectl exec -it deploy/simple-web -c istio-proxy -n istioinaction \
 -- curl localhost:15000/stats | grep simple-backend | grep overflow
cluster.outbound|80||simple-backend.istioinaction.svc.cluster.local.upstream_cx_overflow: 40
cluster.outbound|80||simple-backend.istioinaction.svc.cluster.local.upstream_cx_pool_overflow: 0
cluster.outbound|80||simple-backend.istioinaction.svc.cluster.local.upstream_rq_pending_overflow: 1
cluster.outbound|80||simple-backend.istioinaction.svc.cluster.local.upstream_rq_retry_overflow: 0

kubectl exec -it deploy/simple-web -c istio-proxy -n istioinaction \
 -- curl localhost:15000/stats | grep simple-backend.istioinaction.svc.cluster.local.upstream
보류 대기열 depth를 2로 늘리고 다시 실행해 보도록 하겠습니다.
# http1MaxPendingRequests : 1 → 2, 'queuing' 개수를 늘립니다
kubectl patch destinationrule simple-backend-dr \
-n istioinaction --type merge --patch \
'{"spec": {"trafficPolicy": {"connectionPool": {"http": {"http1MaxPendingRequests": 2}}}}}'

#
docker exec -it myk8s-control-plane istioctl proxy-config cluster deploy/simple-web.istioinaction --fqdn simple-backend.istioinaction.svc.cluster.local -o json | grep maxPendingRequests
docker exec -it myk8s-control-plane istioctl proxy-config cluster deploy/simple-backend-1.istioinaction --fqdn simple-backend.istioinaction.svc.cluster.local -o json | grep maxPendingRequests
                    "maxPendingRequests": 2,

# istio-proxy stats 카운터 초기화
kubectl exec -it deploy/simple-web -c istio-proxy -n istioinaction \
-- curl -X POST localhost:15000/reset_counters


# 2개의 커넥션에서 요청을 초당 하나씩 보내기 : 모두 성공!
fortio load -quiet -jitter -t 30s -c 2 -qps 2 --allow-initial-errors http://simple-web.istioinaction.io:30000
...
Sockets used: 2 (for perfect keepalive, would be 2) # 큐 길이 증가 덕분에, 소켓을 2개만 사용했다.
Code 200 : 33 (100.0 %)
All done 33 calls (plus 2 warmup) 1846.745 ms avg, 1.1 qps
...

# 'cx_overflow가 45이 발생했지만, upstream_rq_pending_overflow 는 이다!
kubectl exec -it deploy/simple-web -c istio-proxy -n istioinaction \
 -- curl localhost:15000/stats | grep simple-backend | grep overflow
cluster.outbound|80||simple-backend.istioinaction.svc.cluster.local.upstream_cx_overflow: 45
cluster.outbound|80||simple-backend.istioinaction.svc.cluster.local.upstream_cx_pool_overflow: 0
cluster.outbound|80||simple-backend.istioinaction.svc.cluster.local.upstream_rq_pending_overflow: 0
cluster.outbound|80||simple-backend.istioinaction.svc.cluster.local.upstream_rq_retry_overflow: 0

kubectl exec -it deploy/simple-web -c istio-proxy -n istioinaction \
 -- curl localhost:15000/stats | grep simple-backend.istioinaction.svc.cluster.local.upstream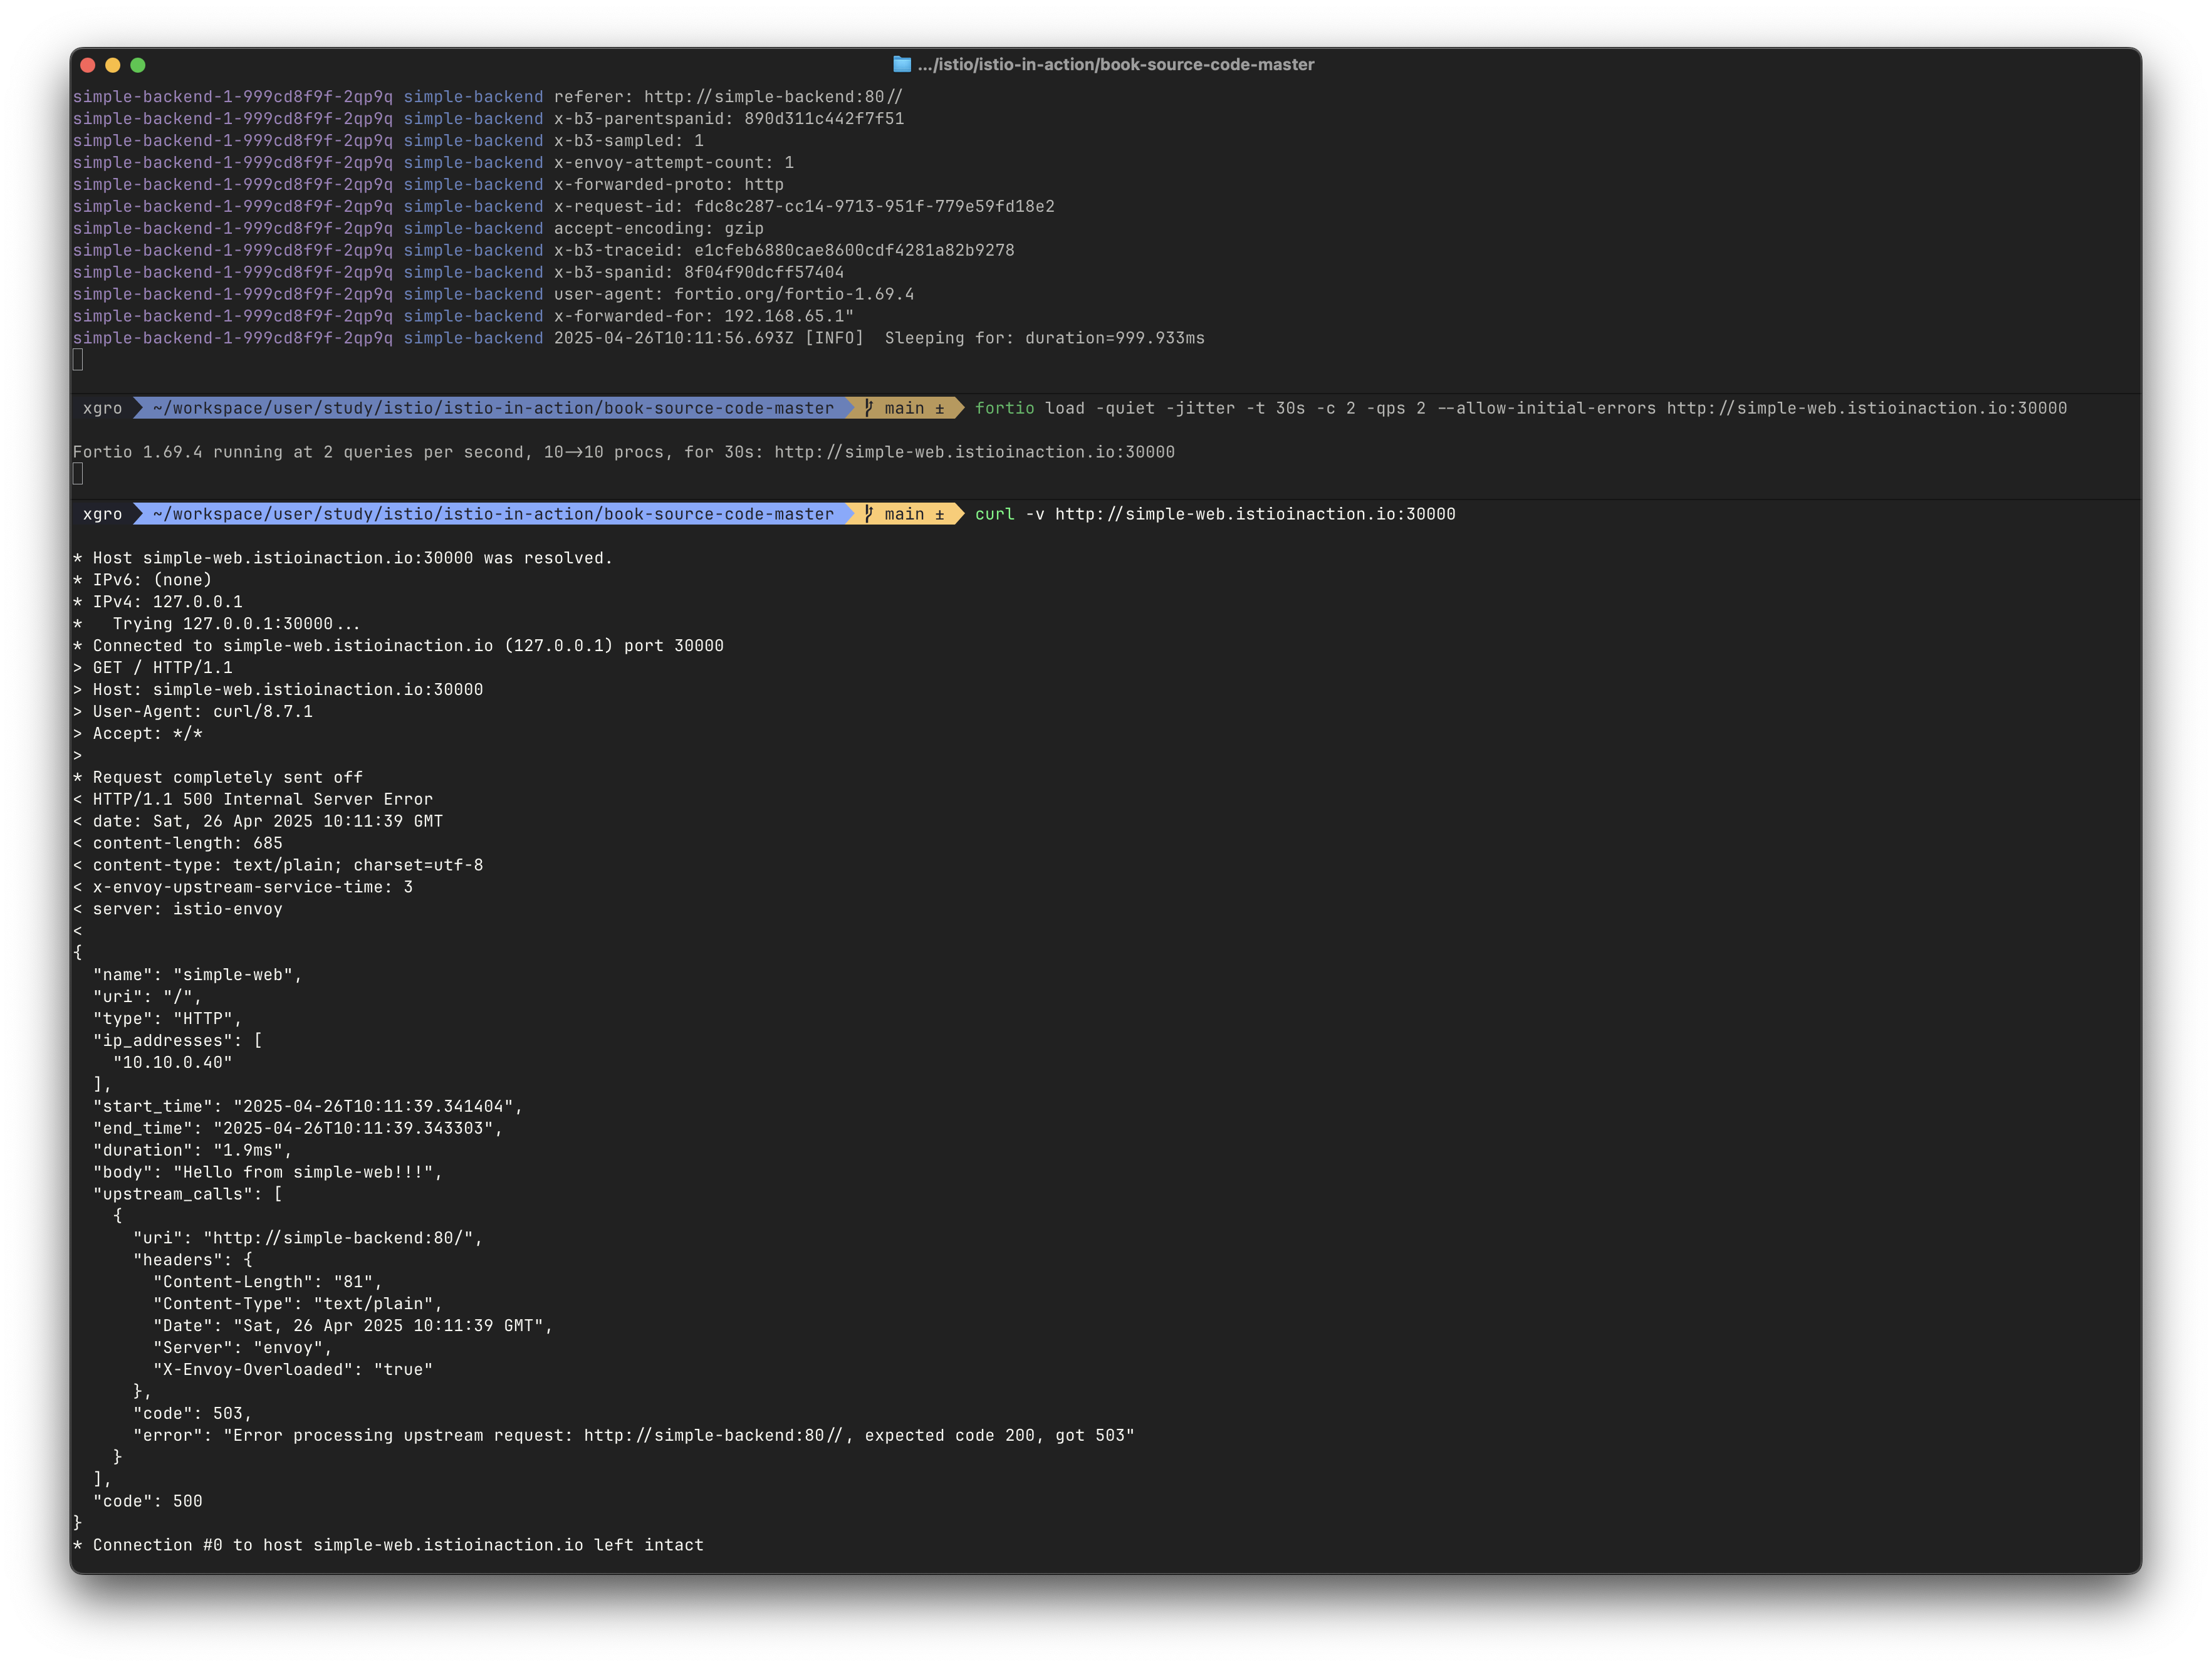
예제에서는 simple-web → simple-backend 를 호출합니다. 그런데 서킷 브레이커 때문에 요청이 실패한다면, simple-web 은 그 사실을 어떻게 알고 애플리케이션이나 네트워크 장애 문제와 구별할 수 있을까요?
요청 서킷 브레이커 임계값을 넘겨 실패하면, 이스티오 서비스 프록시는 x-envoy-overloaded 헤더를 추가합니다.
로드 테스트를 실행하는 도중에 단일 curl 명령도 실행하면 서킷 브레이커 때문에 실패할 가능성이 높아집니다.
#
kubectl patch destinationrule simple-backend-dr \
-n istioinaction --type merge --patch \
'{"spec": {"trafficPolicy": {"connectionPool": {"http": {"http1MaxPendingRequests": 1}}}}}'

kubectl patch destinationrule simple-backend-dr -n istioinaction \
-n istioinaction --type merge --patch \
'{"spec": {"trafficPolicy": {"connectionPool": {"http": {"http2MaxRequests": 1}}}}}'

# 설정 적용 확인
docker exec -it myk8s-control-plane istioctl proxy-config cluster deploy/simple-backend-1.istioinaction --fqdn simple-backend.istioinaction.svc.cluster.local -o json

# istio-proxy stats 카운터 초기화
kubectl exec -it deploy/simple-web -c istio-proxy -n istioinaction \
-- curl -X POST localhost:15000/reset_counters

# 로드 테스트
fortio load -quiet -jitter -t 30s -c 2 -qps 2 --allow-initial-errors http://simple-web.istioinaction.io:30000

# 로드 테스트 하는 상태에서 아래 curl 접속
curl -v http://simple-web.istioinaction.io:30000
{
  "name": "simple-web",
  "uri": "/",
  "type": "HTTP",
  "ip_addresses": [
    "10.10.0.18"
  ],
  "start_time": "2025-04-22T04:23:50.468693",
  "end_time": "2025-04-22T04:23:50.474941",
  "duration": "6.247ms",
  "body": "Hello from simple-web!!!",
  "upstream_calls": [
    {
      "uri": "http://simple-backend:80/",
      "headers": {
        "Content-Length": "81",
        "Content-Type": "text/plain",
        "Date": "Tue, 22 Apr 2025 04:23:50 GMT",
        "Server": "envoy",
        "X-Envoy-Overloaded": "true" # Header indication
      },
      "code": 503,
      "error": "Error processing upstream request: http://simple-backend:80//, expected code 200, got 503"
    }
  ],
  "code": 500
}
✅ 이상값 감지로 비정상 서비스에 대응하기 (Outlier Detection)
개요
서비스의 예기치 못한 지연 시간에 대응하는 방법을 살펴보았습니다.
이번에는 오동작하는 특정 호스트를 서비스 풀에서 제거하는 Istio의 접근법을 다룹니다.
Istio는 이를 위해 Envoy의 이상값 감지(outlier detection) 기능을 활용합니다.
실습 환경 준비
실습에서는 이상값 감지 기능만을 고립시켜 테스트하기 위해 Istio의 기본 재시도 메커니즘을 비활성화합니다. 먼저 기존 설정을 초기화하고 새로운 환경을 구성합니다:
# 기존 설정 초기화
kubectl delete destinationrule --all -n istioinaction
kubectl delete vs simple-backend-vs -n istioinaction

# 샘플 애플리케이션 배포
kubectl apply -f ch6/simple-backend.yaml -n istioinaction
kubectl apply -f ch6/simple-web-stats-incl.yaml -n istioinaction # 통계 활성화

# istio-proxy 통계 카운터 초기화
kubectl exec -it deploy/simple-web -c istio-proxy -n istioinaction \
-- curl -X POST localhost:15000/reset_counters

# 기본 동작 테스트
fortio load -quiet -jitter -t 30s -c 2 -qps 2 --allow-initial-errors http://simple-web.istioinaction.io:30000

# 통계 확인
kubectl exec -it deploy/simple-web -c istio-proxy -n istioinaction \
-- curl localhost:15000/stats | grep simple-backend.istioinaction.svc.cluster.local.upstream
오류 발생 시나리오 구성
simple-backend-1 엔드포인트가 호출의 75%에서 HTTP 500 오류를 반환하도록 설정합니다:
# 주기적 실패 설정 배포
kubectl apply -n istioinaction -f ch6/simple-backend-periodic-failure-500.yaml

# 환경변수 설정
kubectl exec -it deploy/simple-backend-1 -n istioinaction -- sh
---------------------------------------------------------------
export ERROR_TYPE=http_error
export ERROR_RATE=0.75
export ERROR_CODE=500
exit
---------------------------------------------------------------

# 배포 상태 확인
kubectl get deploy,pod -n istioinaction -o wide

# 로드 테스트 실행 - 예상대로 일부 요청 실패
fortio load -quiet -jitter -t 30s -c 2 -qps 2 --allow-initial-errors http://simple-web.istioinaction.io:30000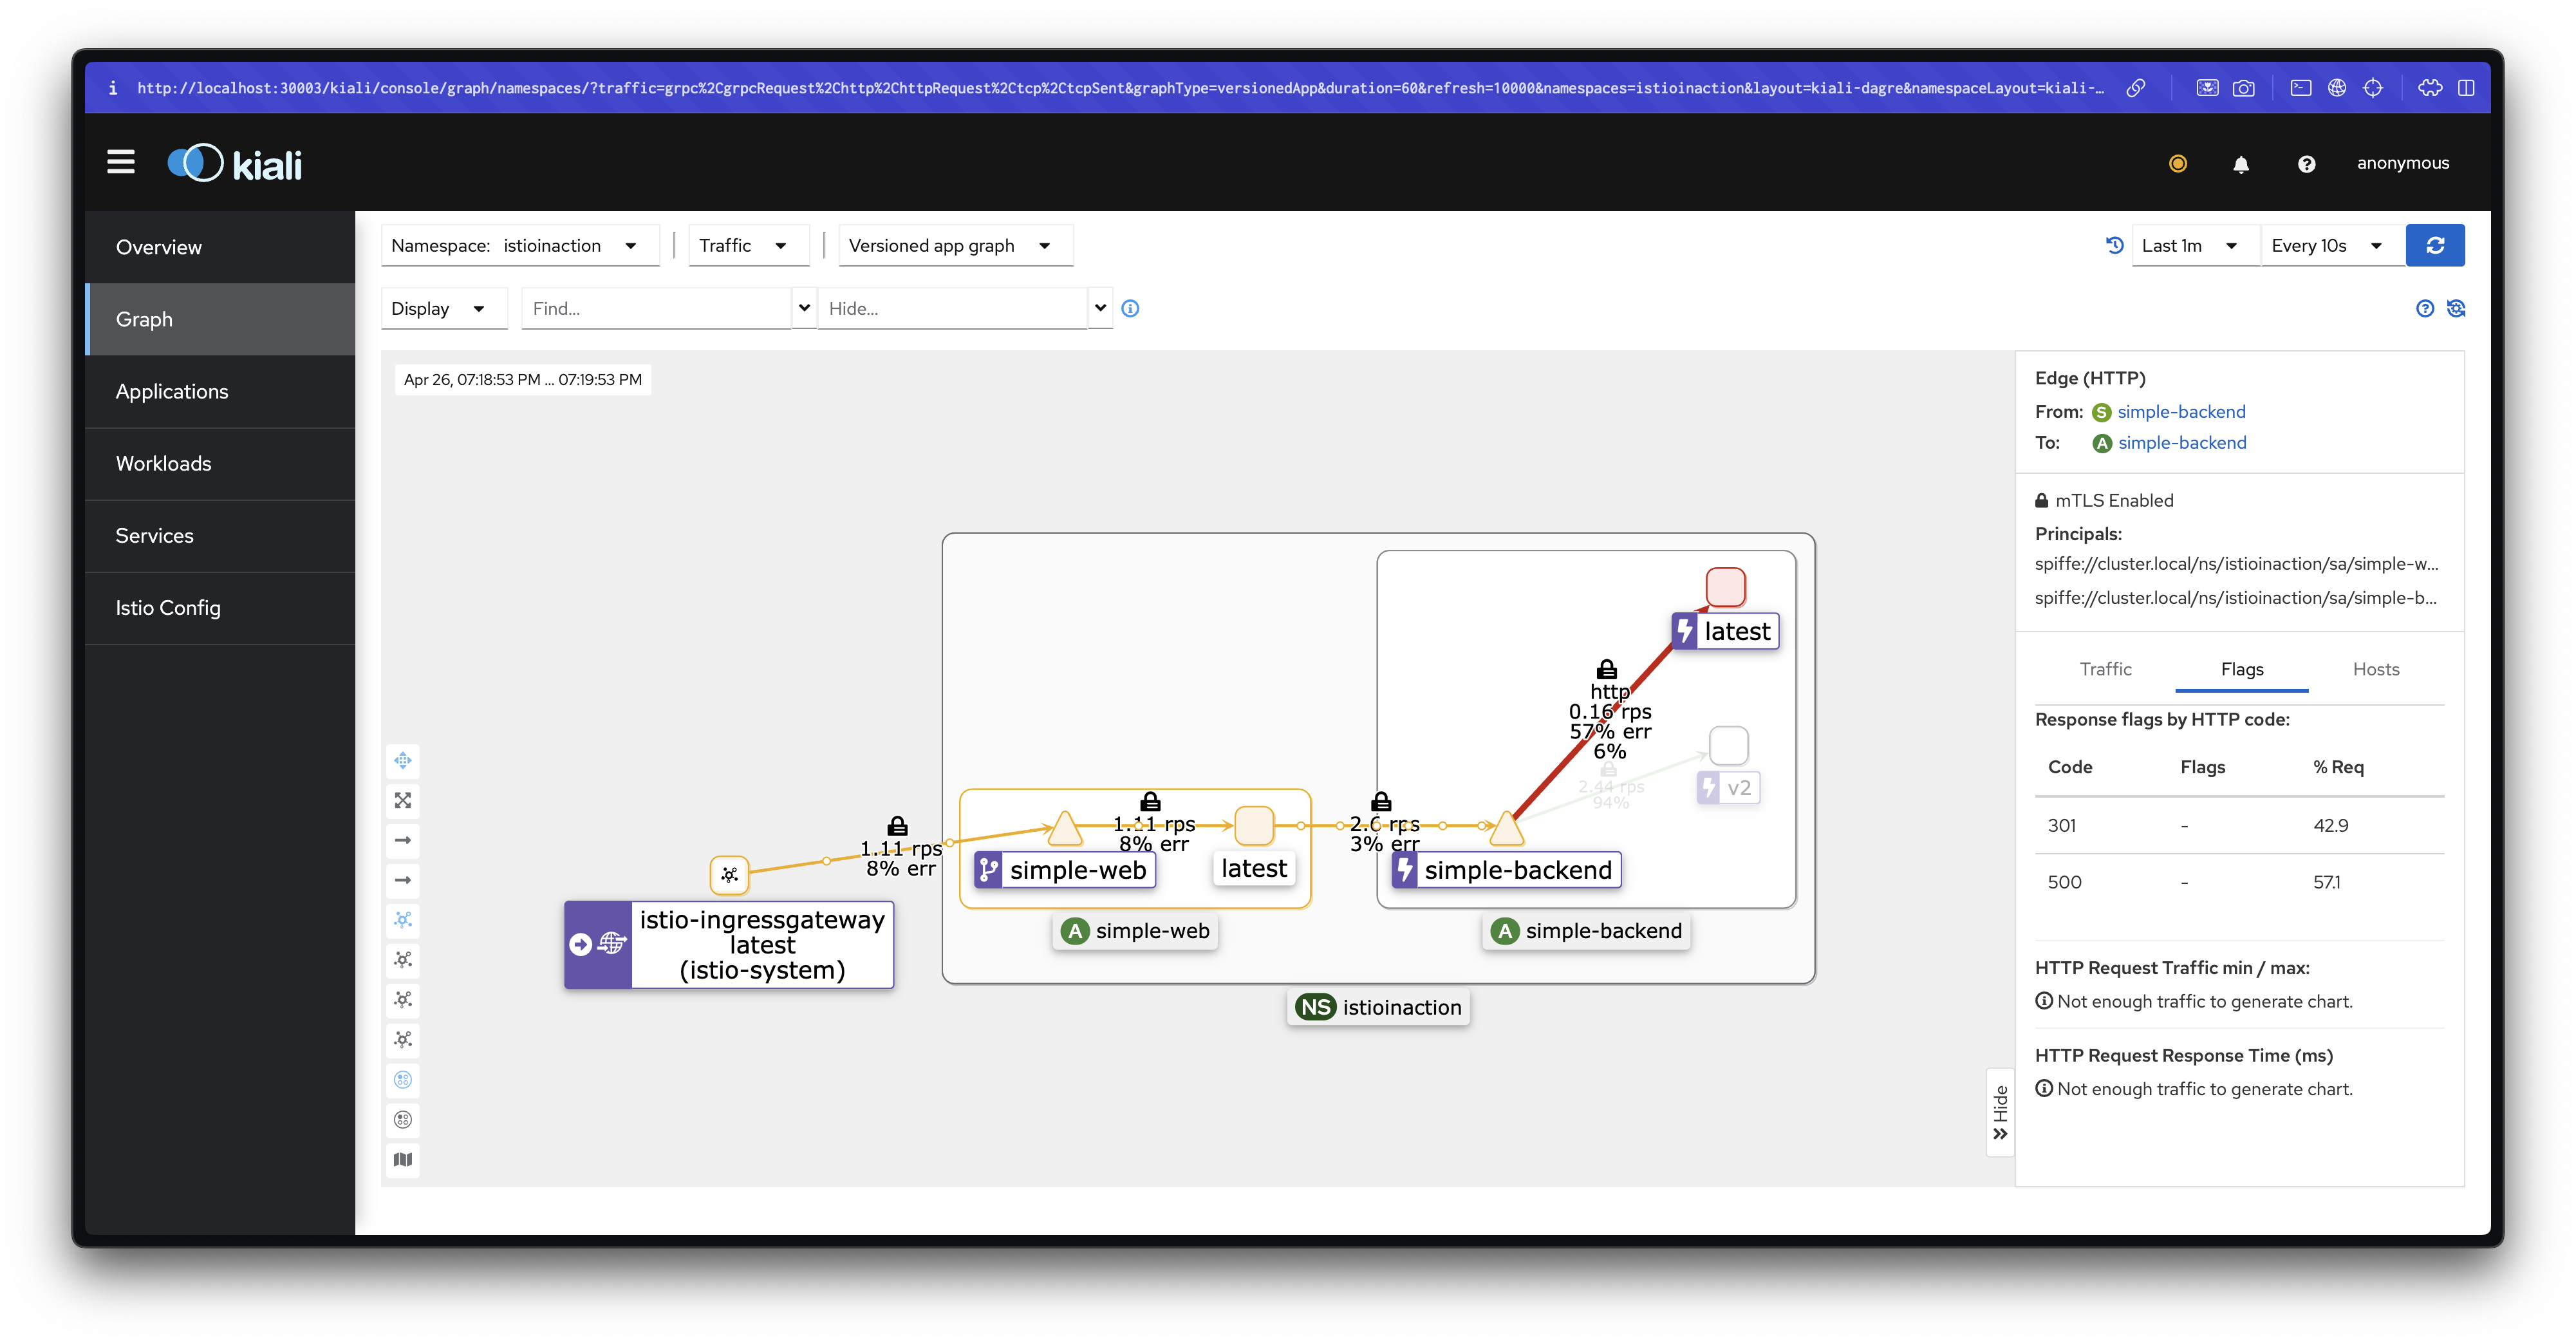
정기적으로 실패하는 서비스에 요청을 보내고 있는데 서비스의 다른 엔드포인트들은 실패하지 않고 있다면, 해당 엔드포인트가 과부하됐거나 어떤 이유로든 성능이 저하된 상태일 수 있으므로 당분간 그 엔드포인트로 트래픽을 전송하는 것을 멈춰야 합니다.
이상값 감지 설정 적용
오동작하는 엔드포인트를 자동으로 감지하고 일시적으로 제거하는 이상값 감지를 설정합니다:
#
cat ch6/simple-backend-dr-outlier-5s.yaml
apiVersion: networking.istio.io/v1beta1
kind: DestinationRule
metadata:
  name: simple-backend-dr
spec:
  host: simple-backend.istioinaction.svc.cluster.local
  trafficPolicy:
    outlierDetection:
      consecutive5xxErrors: 1 # 잘못된 요청이 하나만 발생해도 이상값 감지가 발동. 기본값 5
      interval: 5s # 이스티오 서비스 프록시가 체크하는 주기. 기본값 10초. Time interval between ejection sweep analysis
      baseEjectionTime: 5s # 서비스 엔드포인트에서 제거된다면, 제거 시간은 n(해당 엔드포인트가 쫓겨난 횟수) * baseEjectionTime. 해당 시간이 지나면 로드 밸런싱 풀에 다시 추가됨. 기본값 30초.
      maxEjectionPercent: 100 # 로드 밸런싱 풀에서 제거 가능한 호스트 개수(%). 모든 호스트가 오동작하면 어떤 요청도 통과 못함(회로가 열린 것과 같다). 기본값 10%

kubectl apply -f ch6/simple-backend-dr-outlier-5s.yaml -n istioinaction
kubectl get dr -n istioinaction

#
docker exec -it myk8s-control-plane istioctl proxy-config cluster deploy/simple-web.istioinaction --fqdn simple-backend.istioinaction.svc.cluster.local -o json
...
        "outlierDetection": {
            "consecutive5xx": 1,
            "interval": "5s",
            "baseEjectionTime": "5s",
            "maxEjectionPercent": 100,
            "enforcingConsecutive5xx": 100,
            "enforcingSuccessRate": 0
        },
...

docker exec -it myk8s-control-plane istioctl proxy-config endpoint deploy/simple-web.istioinaction --cluster 'outbound|80||simple-backend.istioinaction.svc.cluster.local'
ENDPOINT            STATUS      OUTLIER CHECK     CLUSTER
10.10.0.27:8080     HEALTHY     OK                outbound|80||simple-backend.istioinaction.svc.cluster.local
10.10.0.29:8080     HEALTHY     OK                outbound|80||simple-backend.istioinaction.svc.cluster.local
10.10.0.30:8080     HEALTHY     OK                outbound|80||simple-backend.istioinaction.svc.cluster.local


# 통계 초기화
kubectl exec -it deploy/simple-web -c istio-proxy -n istioinaction \
-- curl -X POST localhost:15000/reset_counters

# 엔드포인트 모니터링 먼저 해두기 : 신규 터미널
	while true; do docker exec -it myk8s-control-plane istioctl proxy-config endpoint deploy/simple-web.istioinaction --cluster 'outbound|80||simple-backend.istioinaction.svc.cluster.local' ; date; sleep 1; echo; done
	ENDPOINT            STATUS      OUTLIER CHECK     CLUSTER
10.10.0.27:8080     HEALTHY     OK                outbound|80||simple-backend.istioinaction.svc.cluster.local
10.10.0.29:8080     HEALTHY     OK                outbound|80||simple-backend.istioinaction.svc.cluster.local
10.10.0.30:8080     HEALTHY     FAILED            outbound|80||simple-backend.istioinaction.svc.cluster.local


# 로드 테스트 실행 : 기존 오류율 대비 극적으로 감소. 오동작하는 엔드포인트를 잠시 제거했기 때문이다.
fortio load -quiet -jitter -t 30s -c 2 -qps 2 --allow-initial-errors http://simple-web.istioinaction.io:30000
...
Sockets used: 5 (for perfect keepalive, would be 2)
Code 200 : 58 (96.7 %)
Code 500 : 2 (3.3 %)
All done 60 calls (plus 2 warmup) 166.592 ms avg, 2.0 qps
...

# 통계 확인
kubectl exec -it deploy/simple-web -c istio-proxy -n istioinaction \
 -- curl localhost:15000/stats | grep simple-backend.istioinaction.svc.cluster.local.upstream

# 엔드포인트 이상 감지 전에 3번 실패했고, 이상 상태가 되고 나면 로드 밸런서 풀에서 제거되어서 이후 부터는 정상 엔드포인트로 호출 응답됨.
kubectl exec -it deploy/simple-web -c istio-proxy -n istioinaction \
 -- curl localhost:15000/stats | grep simple-backend | grep outlier
cluster.outbound|80||simple-backend.istioinaction.svc.cluster.local.outlier_detection.ejections_active: 0
cluster.outbound|80||simple-backend.istioinaction.svc.cluster.local.outlier_detection.ejections_consecutive_5xx: 3
cluster.outbound|80||simple-backend.istioinaction.svc.cluster.local.outlier_detection.ejections_detected_consecutive_5xx: 3
cluster.outbound|80||simple-backend.istioinaction.svc.cluster.local.outlier_detection.ejections_detected_consecutive_gateway_failure: 0
cluster.outbound|80||simple-backend.istioinaction.svc.cluster.local.outlier_detection.ejections_detected_consecutive_local_origin_failure: 0
cluster.outbound|80||simple-backend.istioinaction.svc.cluster.local.outlier_detection.ejections_detected_failure_percentage: 0
cluster.outbound|80||simple-backend.istioinaction.svc.cluster.local.outlier_detection.ejections_detected_local_origin_failure_percentage: 0
cluster.outbound|80||simple-backend.istioinaction.svc.cluster.local.outlier_detection.ejections_detected_local_origin_success_rate: 0
cluster.outbound|80||simple-backend.istioinaction.svc.cluster.local.outlier_detection.ejections_detected_success_rate: 0
cluster.outbound|80||simple-backend.istioinaction.svc.cluster.local.outlier_detection.ejections_enforced_consecutive_5xx: 3
cluster.outbound|80||simple-backend.istioinaction.svc.cluster.local.outlier_detection.ejections_enforced_consecutive_gateway_failure: 0
cluster.outbound|80||simple-backend.istioinaction.svc.cluster.local.outlier_detection.ejections_enforced_consecutive_local_origin_failure: 0
cluster.outbound|80||simple-backend.istioinaction.svc.cluster.local.outlier_detection.ejections_enforced_failure_percentage: 0
cluster.outbound|80||simple-backend.istioinaction.svc.cluster.local.outlier_detection.ejections_enforced_local_origin_failure_percentage: 0
cluster.outbound|80||simple-backend.istioinaction.svc.cluster.local.outlier_detection.ejections_enforced_local_origin_success_rate: 0
cluster.outbound|80||simple-backend.istioinaction.svc.cluster.local.outlier_detection.ejections_enforced_success_rate: 0
cluster.outbound|80||simple-backend.istioinaction.svc.cluster.local.outlier_detection.ejections_enforced_total: 3
cluster.outbound|80||simple-backend.istioinaction.svc.cluster.local.outlier_detection.ejections_overflow: 0
cluster.outbound|80||simple-backend.istioinaction.svc.cluster.local.outlier_detection.ejections_success_rate: 0
cluster.outbound|80||simple-backend.istioinaction.svc.cluster.local.outlier_detection.ejections_total: 3


# 5초 후(baseEjectionTime: 5s) 다시 엔드포인트 모니터링
ENDPOINT            STATUS      OUTLIER CHECK     CLUSTER
10.10.0.27:8080     HEALTHY     OK                outbound|80||simple-backend.istioinaction.svc.cluster.local
10.10.0.29:8080     HEALTHY     OK                outbound|80||simple-backend.istioinaction.svc.cluster.local
10.10.0.30:8080     HEALTHY     OK                outbound|80||simple-backend.istioinaction.svc.cluster.local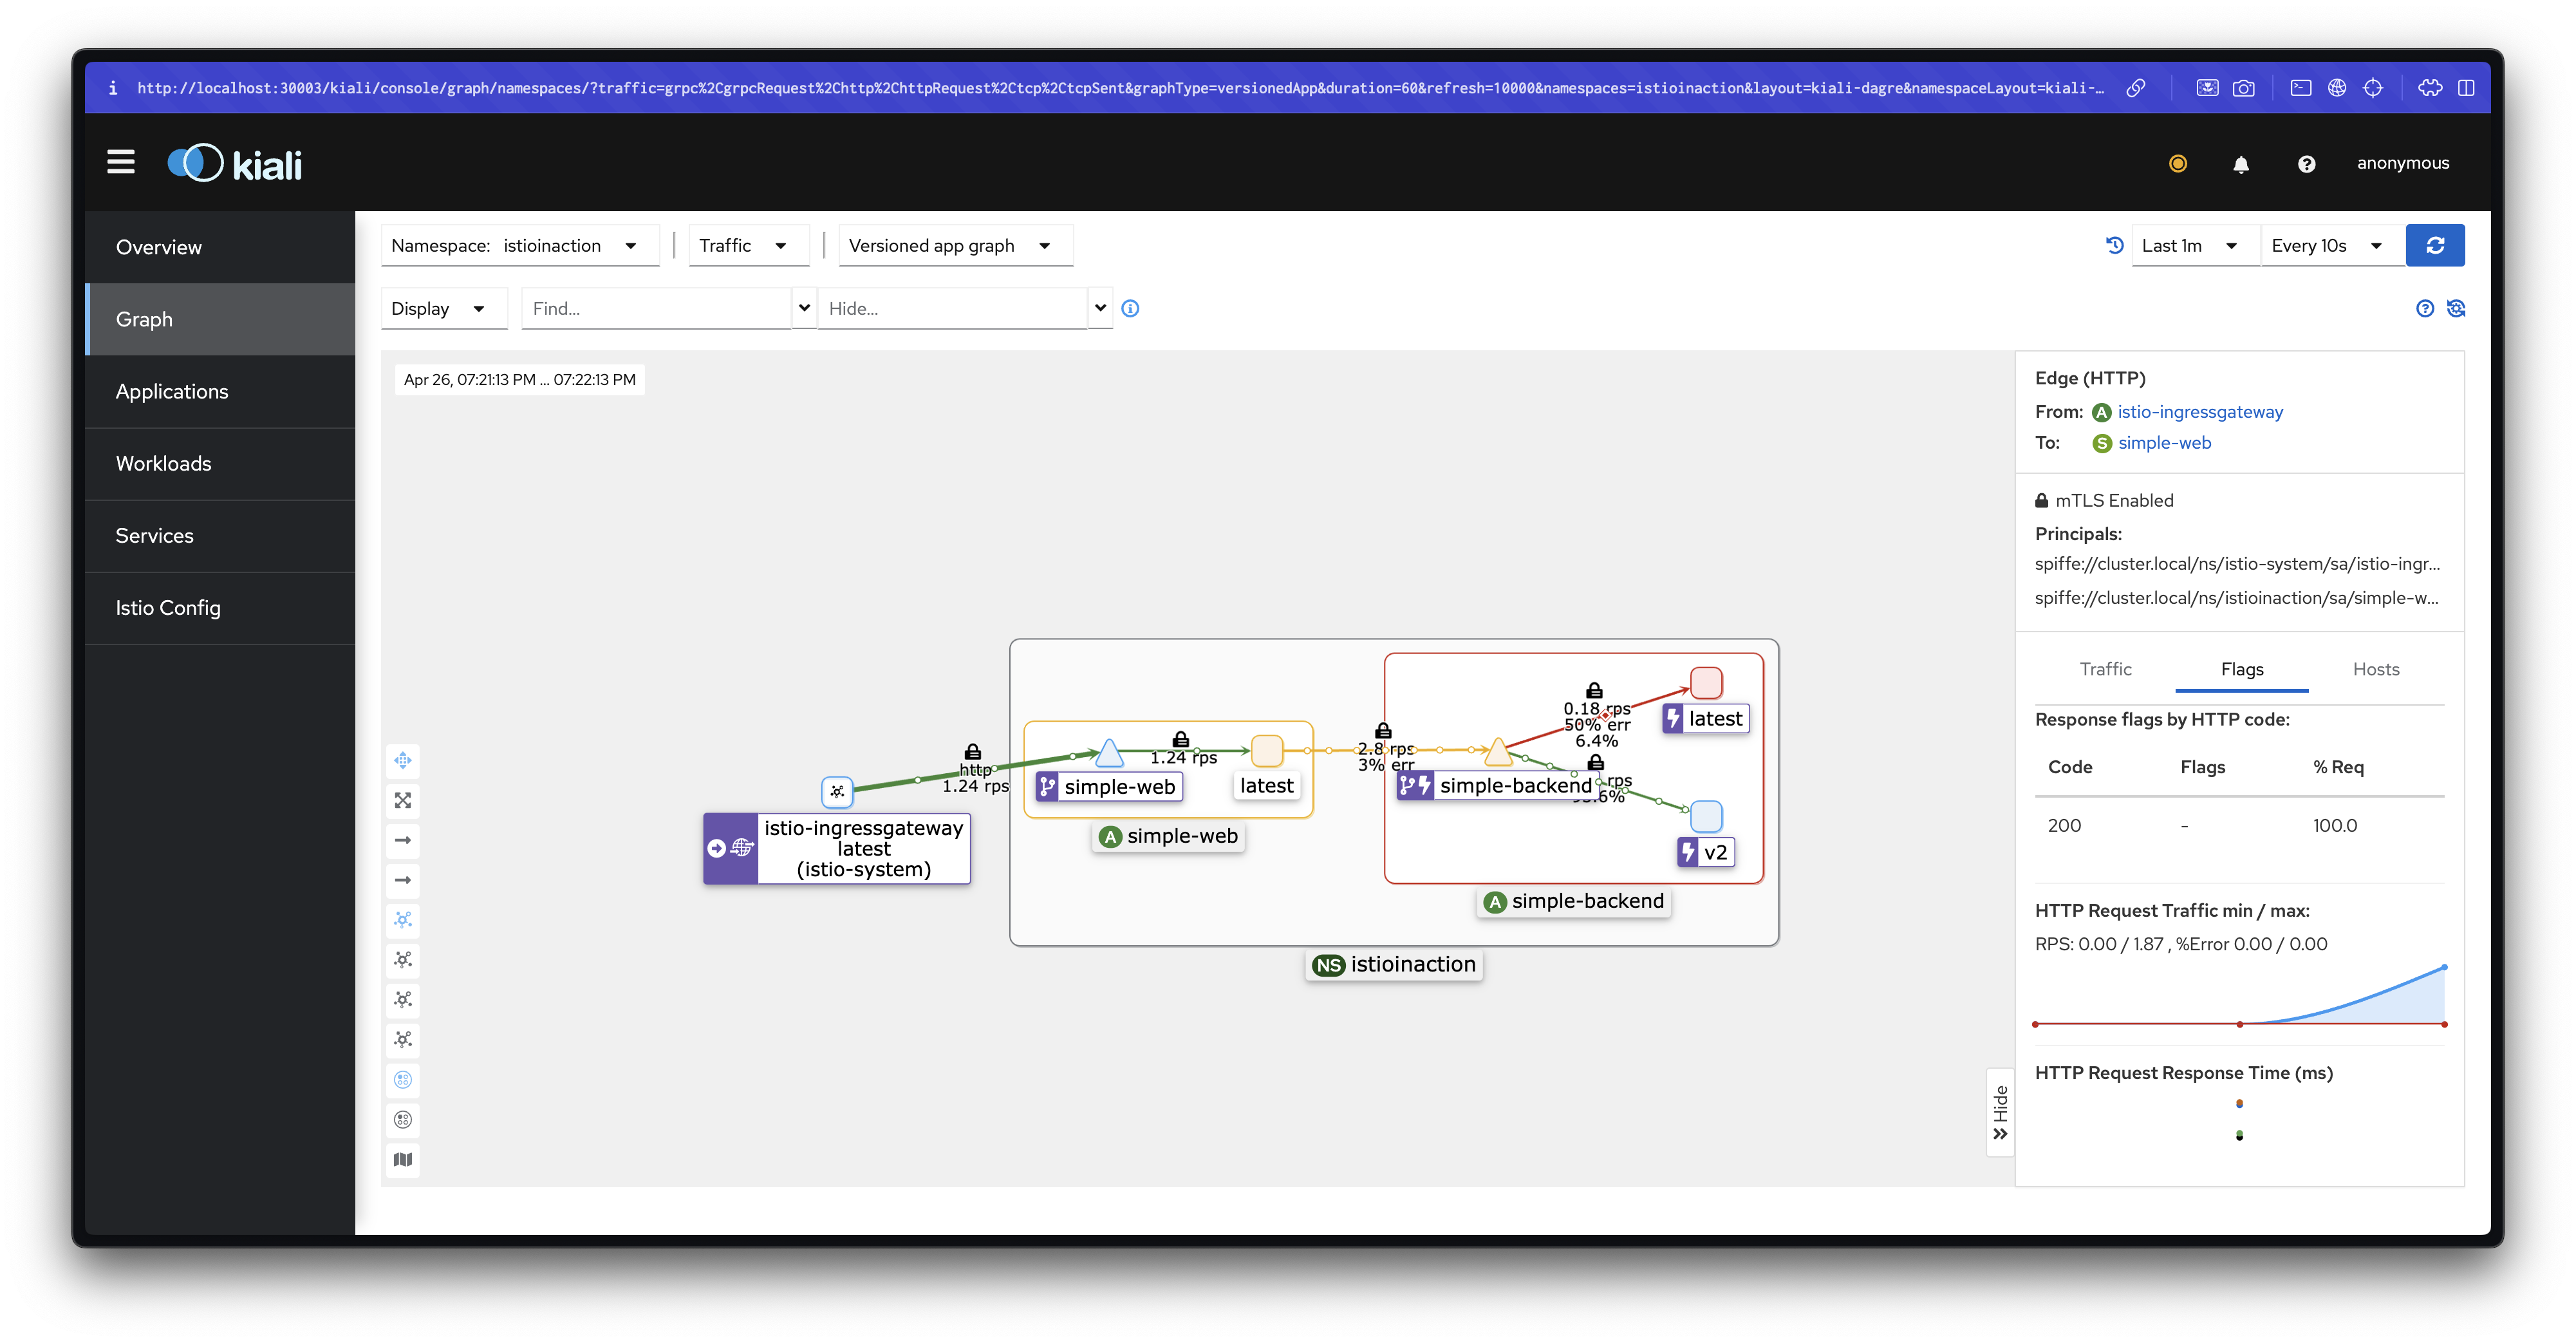
재시도 기능과 함께 사용
이상값 감지와 재시도 기능을 결합하여 오류율을 더욱 개선할 수 있습니다:
#
cat ch6/simple-backend-vs-retry-500.yaml
apiVersion: networking.istio.io/v1alpha3
kind: VirtualService
metadata:
  name: simple-backend-vs
spec:
  hosts:
  - simple-backend
  http:
  - route:
    - destination:
        host: simple-backend
    retries:
      attempts: 2
      retryOn: 5x

kubectl apply -f ch6/simple-backend-vs-retry-500.yaml -n istioinaction

# 통계 초기화
kubectl exec -it deploy/simple-web -c istio-proxy -n istioinaction \
-- curl -X POST localhost:15000/reset_counters

# 엔드포인트 모니터링 먼저 해두기 : 신규 터미널
while true; do docker exec -it myk8s-control-plane istioctl proxy-config endpoint deploy/simple-web.istioinaction --cluster 'outbound|80||simple-backend.istioinaction.svc.cluster.local' ; date; sleep 1; echo; done

# 로드 테스트 실행 : 모두 성공!
fortio load -quiet -jitter -t 30s -c 2 -qps 2 --allow-initial-errors http://simple-web.istioinaction.io:30000
...
Sockets used: 2 (for perfect keepalive, would be 2)
Code 200 : 60 (100.0 %)
All done 60 calls (plus 2 warmup) 173.837 ms avg, 2.0 qps
...

# 엔드포인트 이상 감지 전에 3번 실패했지만, 재시도 retry 덕분에 결과적으로 모두 성공!
kubectl exec -it deploy/simple-web -c istio-proxy -n istioinaction \
 -- curl localhost:15000/stats | grep simple-backend | grep outlier

# 통계 확인
kubectl exec -it deploy/simple-web -c istio-proxy -n istioinaction \
 -- curl localhost:15000/stats | grep simple-backend.istioinaction.svc.cluster.local.upstream | grep retry
cluster.outbound|80||simple-backend.istioinaction.svc.cluster.local.upstream_rq_retry: 4
cluster.outbound|80||simple-backend.istioinaction.svc.cluster.local.upstream_rq_retry_backoff_exponential: 4
cluster.outbound|80||simple-backend.istioinaction.svc.cluster.local.upstream_rq_retry_backoff_ratelimited: 0
cluster.outbound|80||simple-backend.istioinaction.svc.cluster.local.upstream_rq_retry_limit_exceeded: 0
cluster.outbound|80||simple-backend.istioinaction.svc.cluster.local.upstream_rq_retry_overflow: 0
cluster.outbound|80||simple-backend.istioinaction.svc.cluster.local.upstream_rq_retry_success: 4
이상값 감지와 재시도 기능을 조합함으로써:
- 오동작하는 엔드포인트를 자동으로 감지하고 일시적으로 제거
- 실패한 요청을 다른 정상 엔드포인트로 재시도
결과적으로 사용자 입장에서는 거의 영향을 받지 않고 100%에 가까운 성공률을 달성할 수 있습니다.
이러한 복원력 기능들은 대규모 분산 시스템에서 예상치 못한 네트워크 오류에 자동으로 대응할 수 있게 해주며, 수동 개입의 필요성을 크게 줄여줍니다.
📌 Conclusion
이번 스터디를 통해 Istio의 핵심 복원력 기능들을 실습하며 분산 시스템에서 발생할 수 있는 다양한 네트워크 문제를 해결하는 방법을 살펴보았습니다.
우리는 다음과 같은 주요 내용을 학습했습니다:
-
클라이언트 측 로드 밸런싱: Round Robin, Random, Least Connection 등의 알고리즘 비교를 통해 각 방식의 장단점을 이해하고, 실제 서비스 지연 상황에서 Least Connection 방식이 더 효과적임을 확인했습니다.
-
지역 인식 로드 밸런싱: Locality-aware 기능을 통해 네트워크 지연 시간과 비용을 최소화하고, 가중치 설정으로 트래픽 분산을 세밀하게 제어하는 방법을 배웠습니다.
-
타임아웃과 재시도: 적절한 타임아웃 설정으로 연쇄 장애를 방지하고, 재시도 메커니즘을 통해 일시적 오류에 우아하게 대응하는 방법을 익혔습니다.
-
서킷 브레이킹: Connection Pool 제어와 Outlier Detection을 통해 오동작하는 서비스를 자동으로 감지하고 시스템을 보호하는 방법을 실습했습니다.
가장 중요한 점은 이 모든 복원력 패턴들을 애플리케이션 코드 변경 없이 Istio의 선언적 설정만으로 구현할 수 있다는 것입니다. 이는 다양한 프로그래밍 언어로 구성된 마이크로서비스 환경에서 일관된 네트워크 정책을 적용하고, 운영 부담을 크게 줄일 수 있는 장점을 제공합니다.
Istio의 복원력 기능들은 단순히 장애를 방지하는 것을 넘어, 시스템이 자동으로 회복하고 적응할 수 있는 '자가 치유(Self-healing)' 능력을 제공합니다. 이를 통해 클라우드 네이티브 환경에서 진정한 고가용성 시스템을 구축할 수 있습니다.
🔗 Reference
공식 문서
- Istio 공식 문서
- Envoy Load Balancing Documentation
- Istio Traffic Management
- Istio Network Resilience and Testing
참고 서적
- Istio in Action - Christian E. Posta, Rinor Maloku (Manning Publications)