해당 코드는 코딩셰프의 수업을 참고하여 작성하였습니다.
플러터(flutter) 강의: 순한 맛 시즌 2-1 | 플러터 온보딩 스크린(Flutter Onboarding screen) 만들기
main.dart
import 'package:flutter/material.dart';

import 'onboarding.dart';

void main() {
  runApp(const MyApp());
}

class MyApp extends StatelessWidget {
  const MyApp({Key? key}) : super(key: key);

  @override
  Widget build(BuildContext context) {
    return const MaterialApp(
      debugShowCheckedModeBanner: false,
      home: OnBoardingPage(),
    );
  }
}

class MyPage extends StatelessWidget {
  const MyPage({Key? key}) : super(key: key);

  @override
  Widget build(BuildContext context) {
    return Scaffold(
      appBar: AppBar(
        title: const Text(
            'Main page'), // 한번 정해지면 바뀌지 않는 데이터를 사용하는 위젯 앞에는 const를 붙이도록 한다.
      ),
      body: Center(
        child: Column(
          mainAxisAlignment: MainAxisAlignment.center,
          children: [
            const Text(
              'Main Screen',
              style: TextStyle(
                fontWeight: FontWeight.bold,
                fontSize: 25,
              ),
            ),
            ElevatedButton(
              onPressed: (){
                Navigator.of(context).pushReplacement(
                  MaterialPageRoute(
                    builder: (context) => const OnBoardingPage(),
                  ),
                );
              },
              child: const Text('Go to onboarding screen'),
            ),
          ],
        ),
      ),
    );
  }
}
onboarding.dart
import 'package:flutter/material.dart';
import 'package:introduction_screen/introduction_screen.dart';
import 'main.dart';
class OnBoardingPage extends StatelessWidget {
const OnBoardingPage({Key? key}) : super(key: key);
@override
Widget build(BuildContext context) {
return IntroductionScreen(
pages: [
// 대부분의 온보딩 스크린은 여러 페이지로 구성되어 있기 때문에, 칼럼 위젯처럼 pages 알규먼트는 리스트를 불러와야 한다.
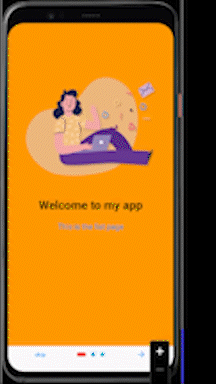
PageViewModel(
title: 'Welcome to my app',
body: 'This is the fist page',
image: Image.asset('image/page1.png'),
decoration: getPageDecoration(),
),
PageViewModel(
title: 'Welcome to my app',
body: 'This is the second page'
'We are making on-boarding screens.'
'It is very interesting ',
image: Image.asset('image/page2.png'),
decoration: getPageDecoration(),
),
PageViewModel(
title: 'Welcome to my app',
body: 'This is the third page'
'We are making on-boarding screens.'
'It is very interesting',
image: Image.asset('image/page3.png'),
decoration: getPageDecoration(),
),
],
done: const Text('done'), // 온보딩 스크린을 마지막까지 보았을 때, 무엇을 할 지 지정해주는 버튼
onDone: () {
Navigator.of(context).pushReplacement(
MaterialPageRoute(
builder: (context) => const MyPage(),
),
);
}, // 버튼이 터치가 되면 무엇을 할 지 지정, onPressed와 유사
next: const Icon(Icons.arrow_forward),
showSkipButton: true,
skip: const Text('skip'),
dotsDecorator: DotsDecorator(
color: Colors.cyan,
size: const Size(10,10),
activeSize: const Size(22,10),
activeShape: RoundedRectangleBorder(
borderRadius: BorderRadius.circular(24),
),
activeColor: Colors.red,
),
curve: Curves.bounceOut,
);
}
PageDecoration getPageDecoration() {
return const PageDecoration(
titleTextStyle: TextStyle(
fontSize: 28,
fontWeight: FontWeight.bold,
),
bodyTextStyle: TextStyle(
fontSize: 18,
color: Colors.blue,
),
imagePadding: EdgeInsets.only(top: 40),
pageColor: Colors.orange,
);
}
}
pubspec.yaml
"image/" 이렇게 작성하면 image 안의 파일을 모두 사용할 수 있다.
  # The following adds the Cupertino Icons font to your application.
  # Use with the CupertinoIcons class for iOS style icons.
  cupertino_icons: ^1.0.2
  introduction_screen: ^3.0.2

   # To add assets to your application, add an assets section, like this:
  assets:
    - image/
크레페는 귀엽다