
CloudTrail
- 감사(Audit) 도구 -> 책임소재의 명확성을 위해

on-demand : 워크로드가 일정하지 않을 때
spot-instance : 워크로드가 일정할 때,
saving plan은 컴퓨터 리소스에 대한 예약
예약 인스턴스는 인스턴스에 대한 예약
고정 ip -> elastic ip0
public IPv4 확인
curl http://169.254.169.254/latest/meta-data : 확인할 수 있는 정보 확인
curl http://169.254.169.254/latest/meta-data/public-ipv4 : ip주소 확인
[root@ip-172-31-35-155 ~]# curl http://169.254.169.254/latest/meta-data/public-ipv4
13.12x.7x.3x
instance에 ping 보내보기
ping -t 10 13.125.74.32
PING 13.125.74.32 (13.125.74.32): 56 data bytes
Request timeout for icmp_seq 0
Request timeout for icmp_seq 1
Request timeout for icmp_seq 2
Request timeout for icmp_seq 3
Request timeout for icmp_seq 4
Request timeout for icmp_seq 5
Request timeout for icmp_seq 6
Request timeout for icmp_seq 7
Request timeout for icmp_seq 8
--- 13.125.74.32 ping statistics ---
10 packets transmitted, 0 packets received, 100.0% packet loss📘 인바인운드 규칙에 ICMP 추가

ping -t 10 13.125.74.32
PING 13.125.74.32 (13.125.74.32): 56 data bytes
64 bytes from 13.125.74.32: icmp_seq=0 ttl=231 time=9.556 ms
64 bytes from 13.125.74.32: icmp_seq=1 ttl=231 time=7.818 ms
64 bytes from 13.125.74.32: icmp_seq=2 ttl=231 time=37.545 ms
64 bytes from 13.125.74.32: icmp_seq=3 ttl=231 time=82.643 ms
64 bytes from 13.125.74.32: icmp_seq=4 ttl=231 time=6.665 ms
64 bytes from 13.125.74.32: icmp_seq=5 ttl=231 time=6.392 ms
64 bytes from 13.125.74.32: icmp_seq=6 ttl=231 time=7.862 ms
64 bytes from 13.125.74.32: icmp_seq=7 ttl=231 time=8.279 ms
64 bytes from 13.125.74.32: icmp_seq=8 ttl=231 time=8.037 ms
64 bytes from 13.125.74.32: icmp_seq=9 ttl=231 time=7.207 ms
--- 13.125.74.32 ping statistics ---
10 packets transmitted, 10 packets received, 0.0% packet loss
round-trip min/avg/max/stddev = 6.392/18.200/82.643/23.263 msauto-scaling
why? 어떤 워크로드가 들어와도 리소스를 빠르게 배치하여 워크로드 대처
수강신청 때 학교 서버 터지는 이유 : 리소스 부족
워크로드를 분산시켜서 서비스를 원활하게 제공한다 = auto=scaling~
auto-scaling은 기본적으로 비용이 없다. -> instance 추가 하는 비용만 든다.
auto scaling을 위한 선제 조건
1) launch template
2) AMI


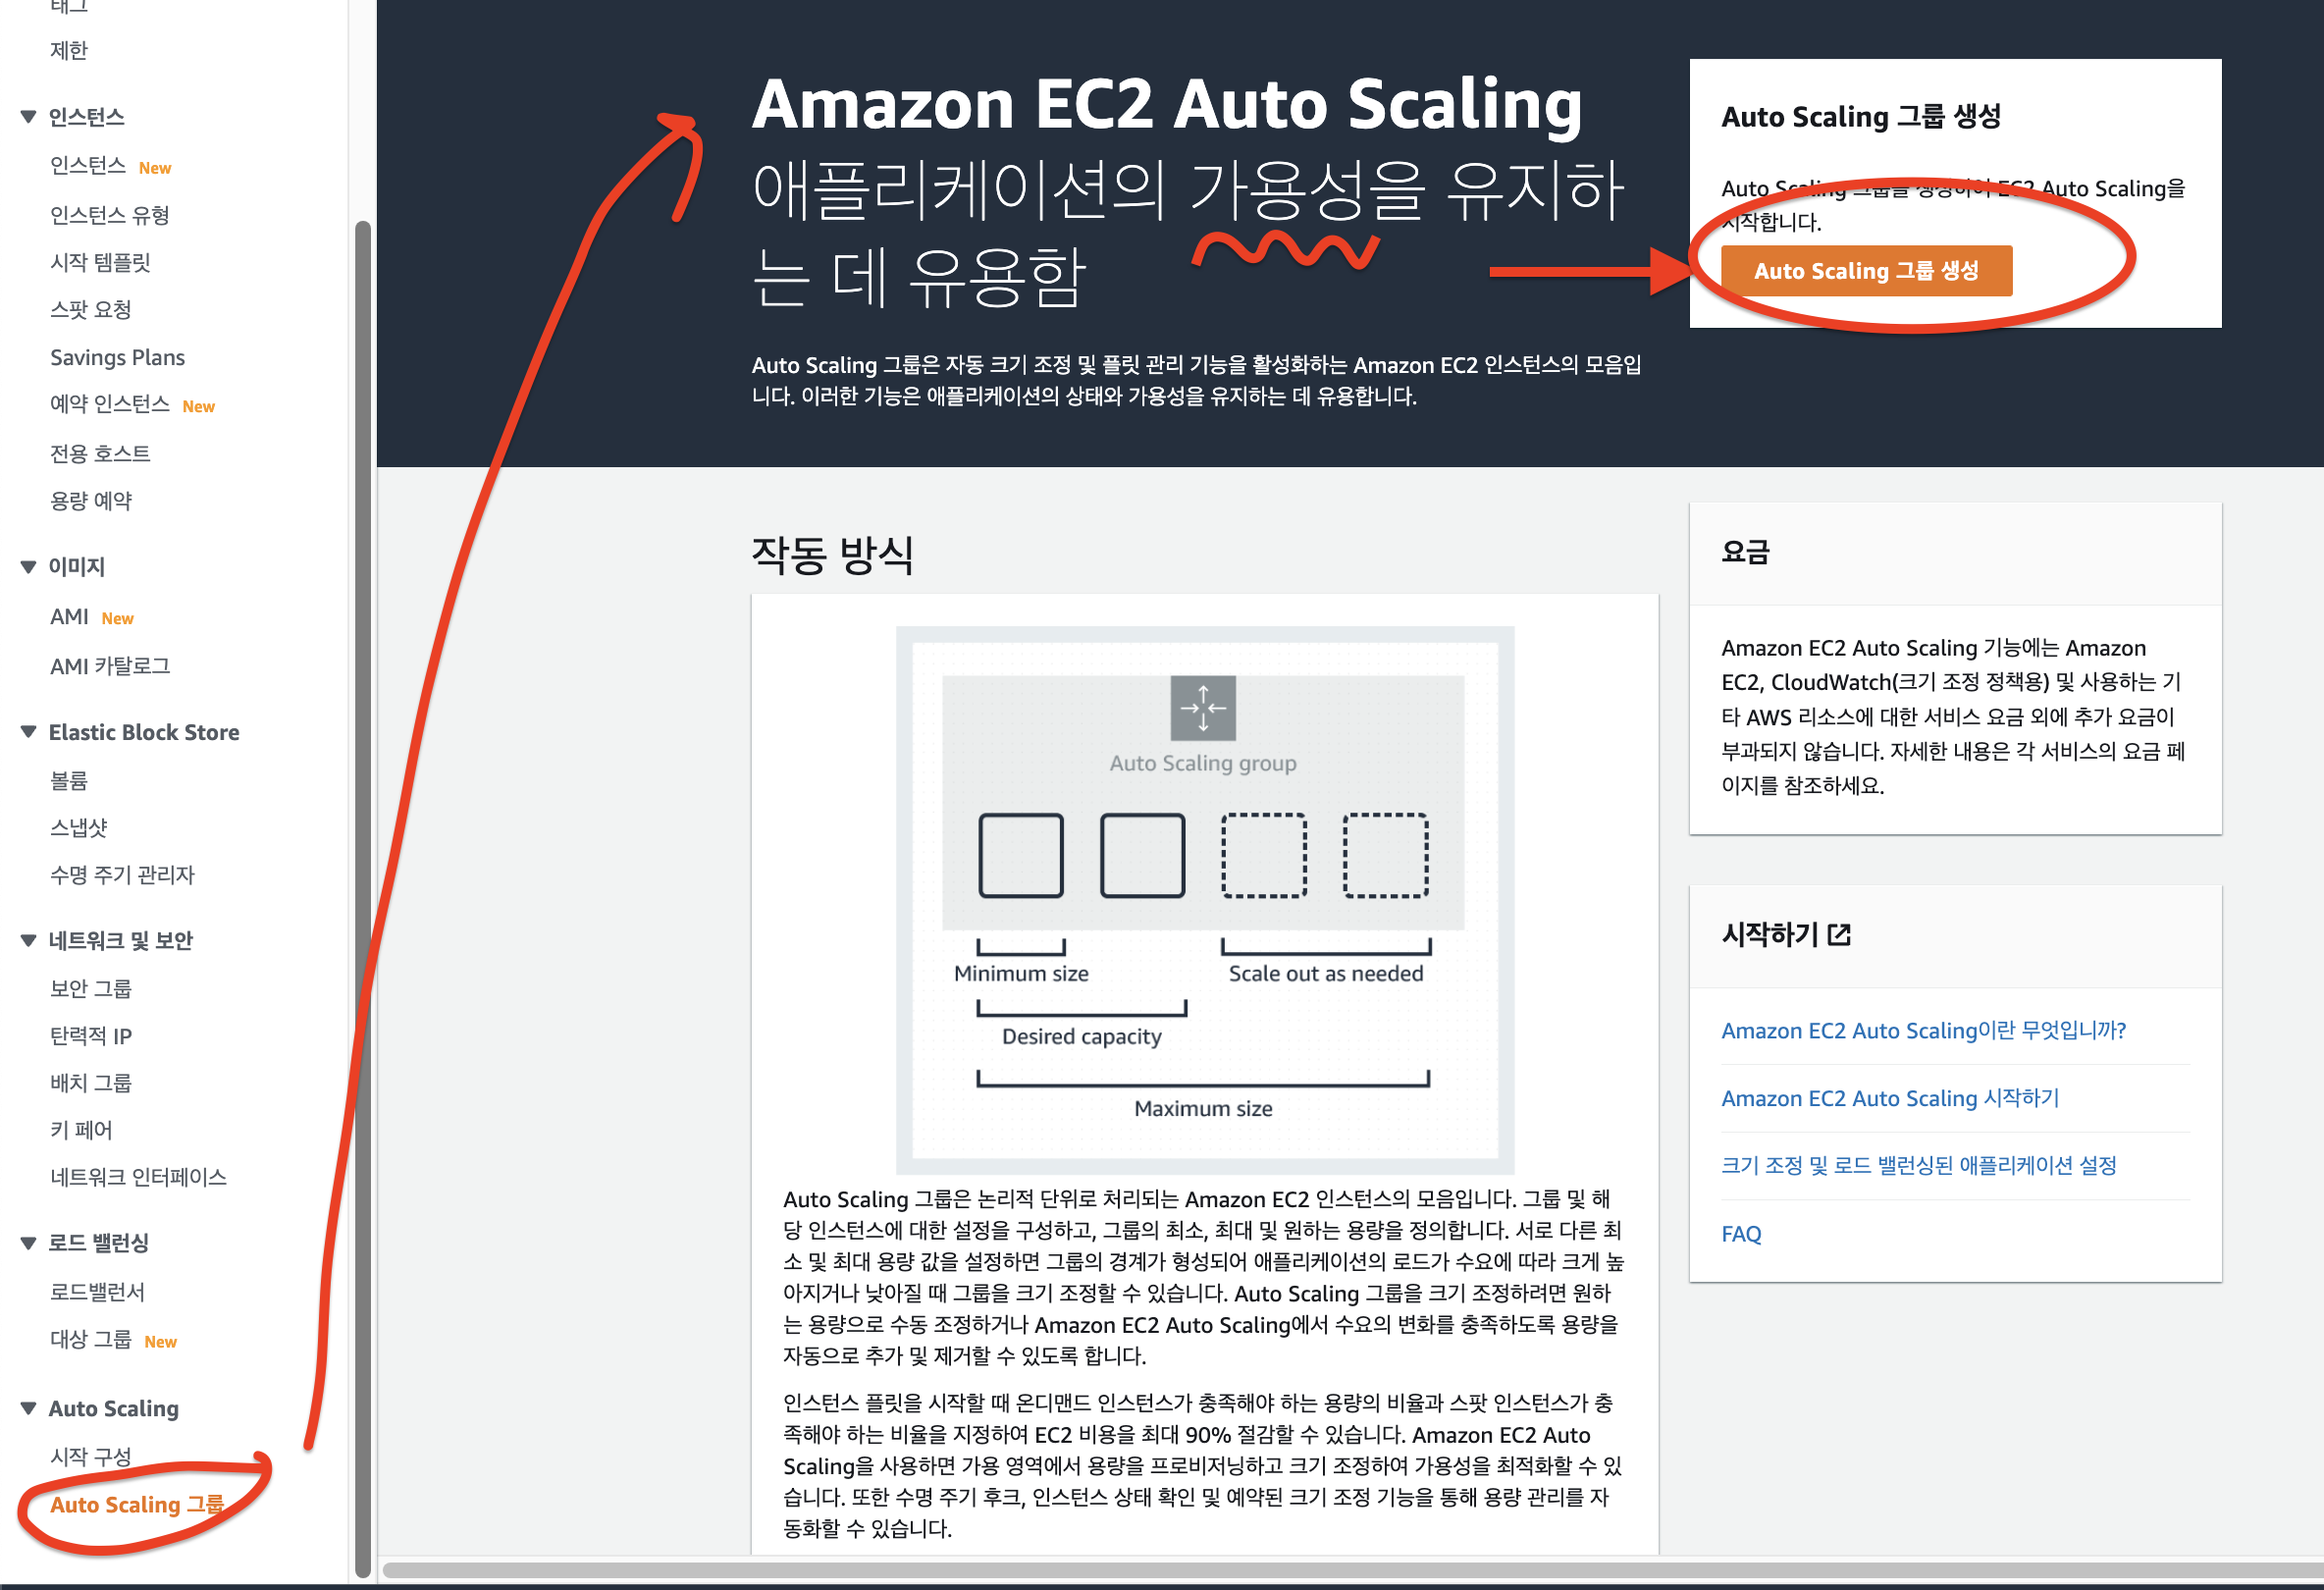
📕 auto scaling 실습
1) EC2 생성 확인 -> 중지 (stop)
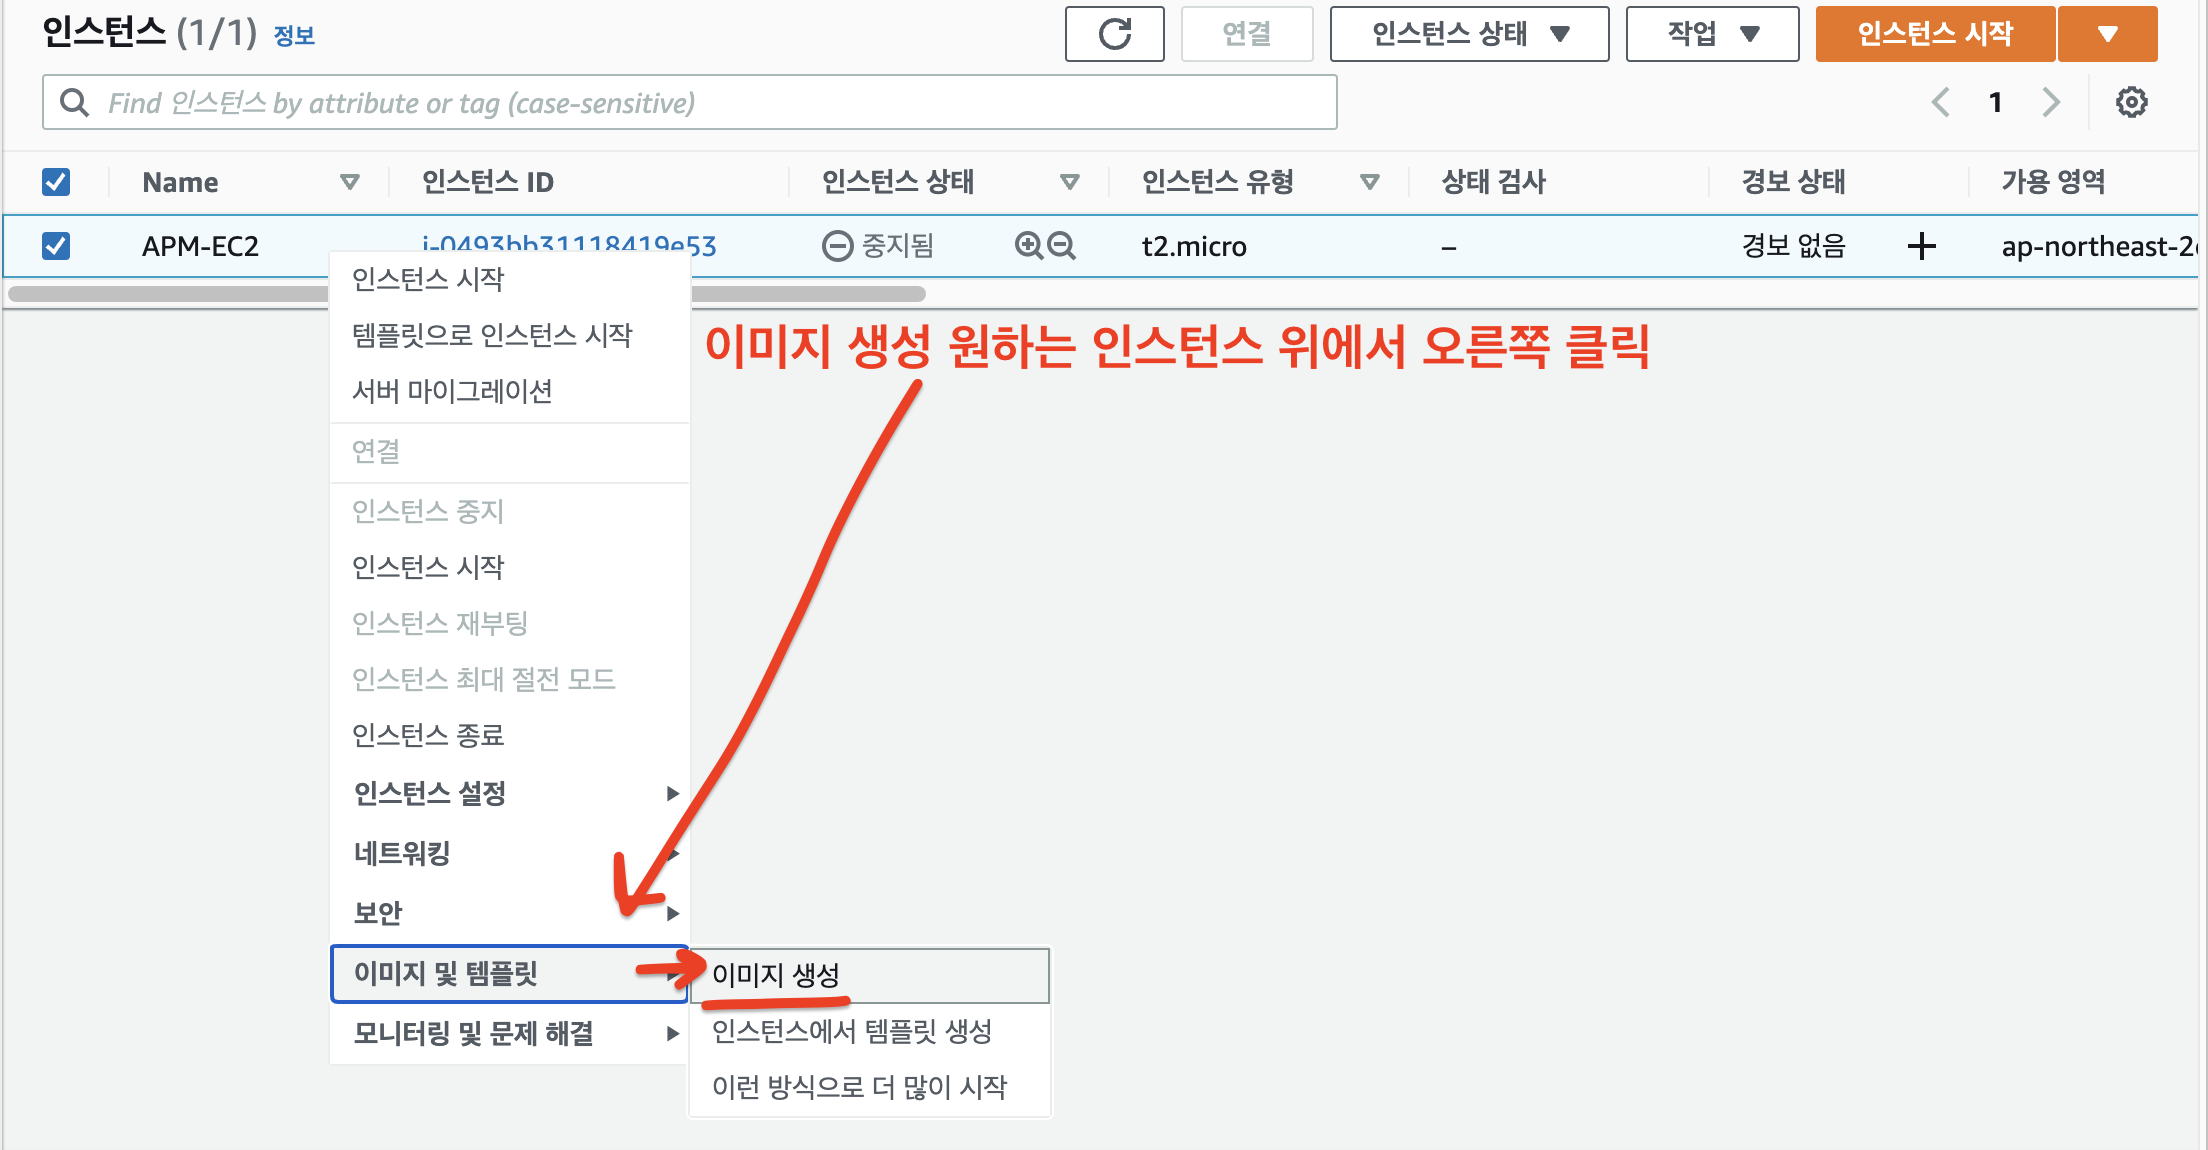
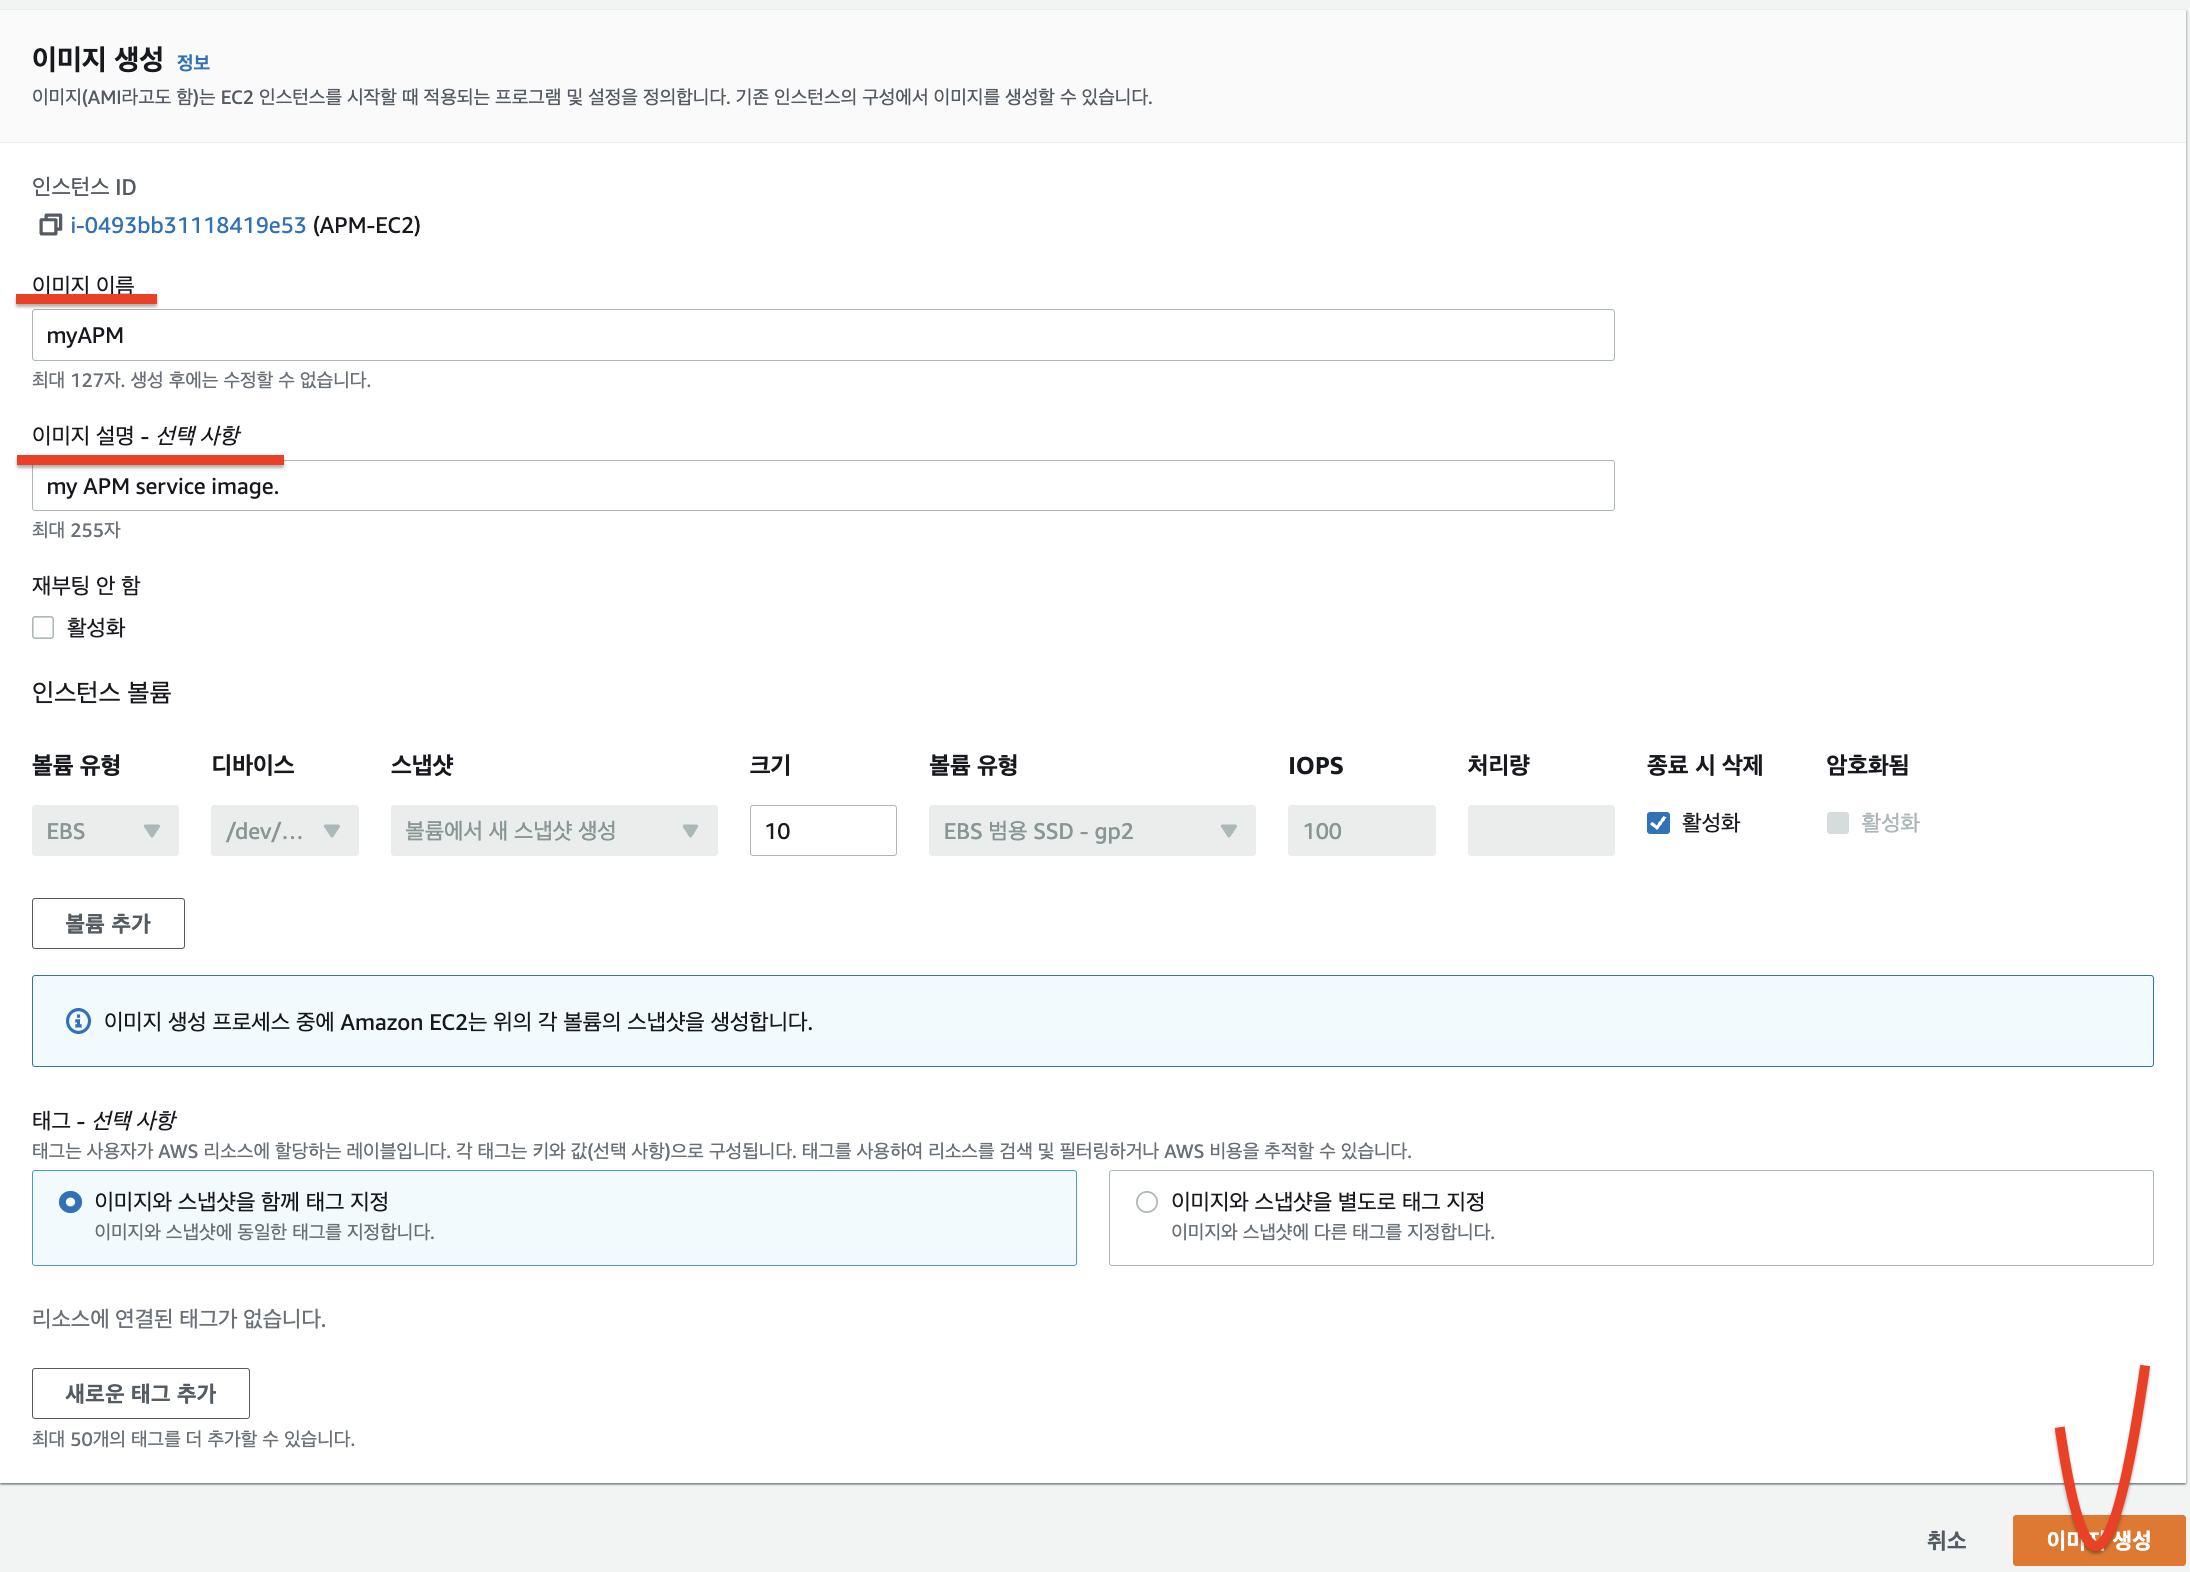
2) AMI 생성
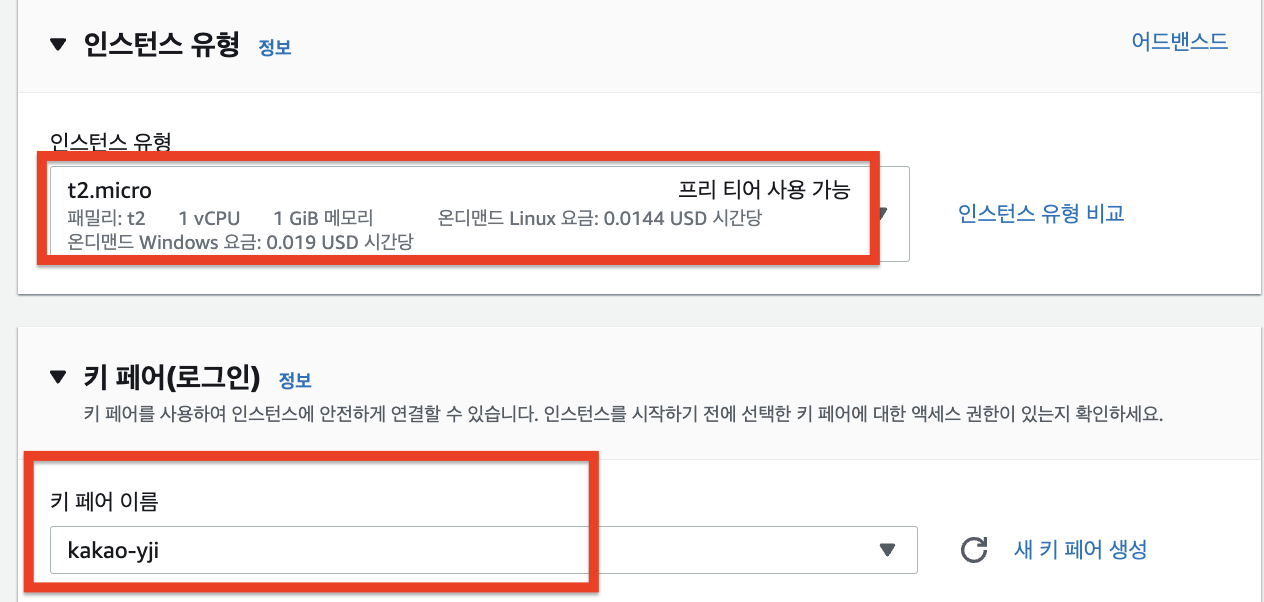
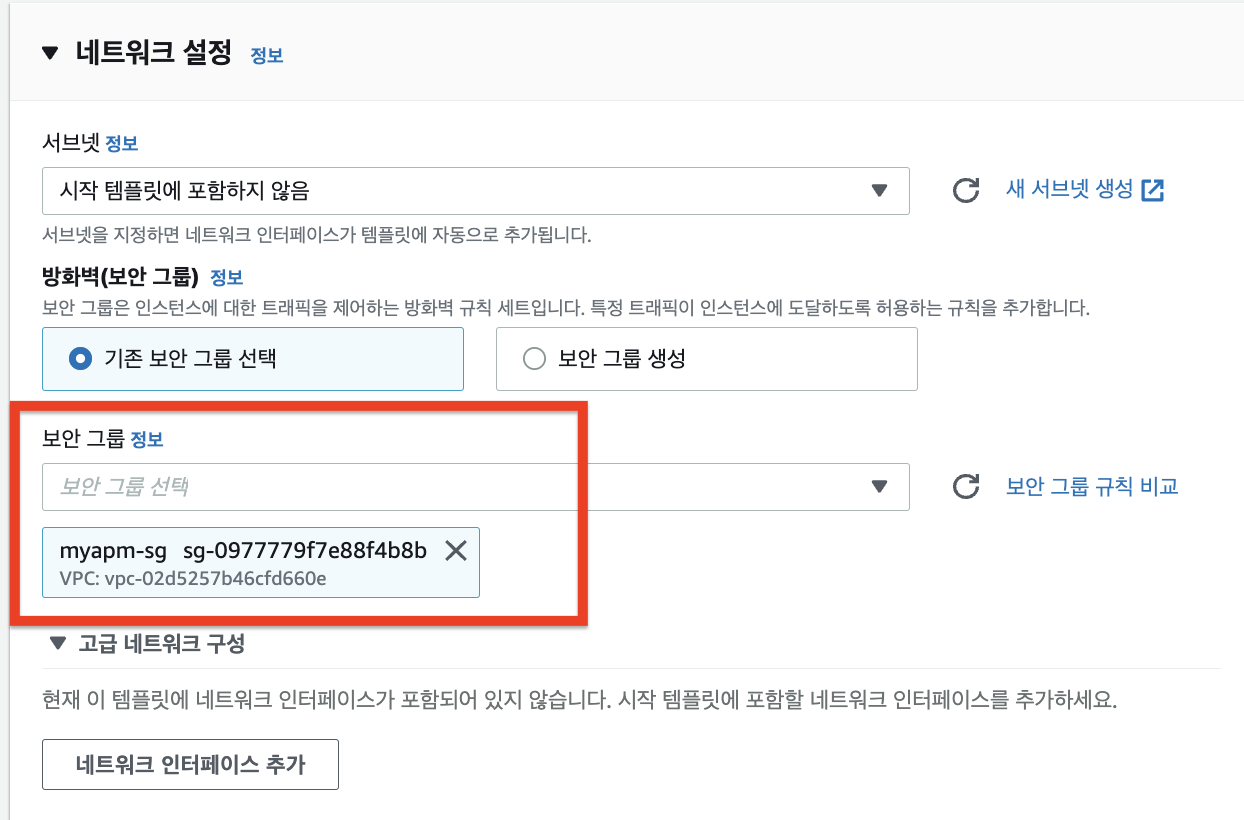
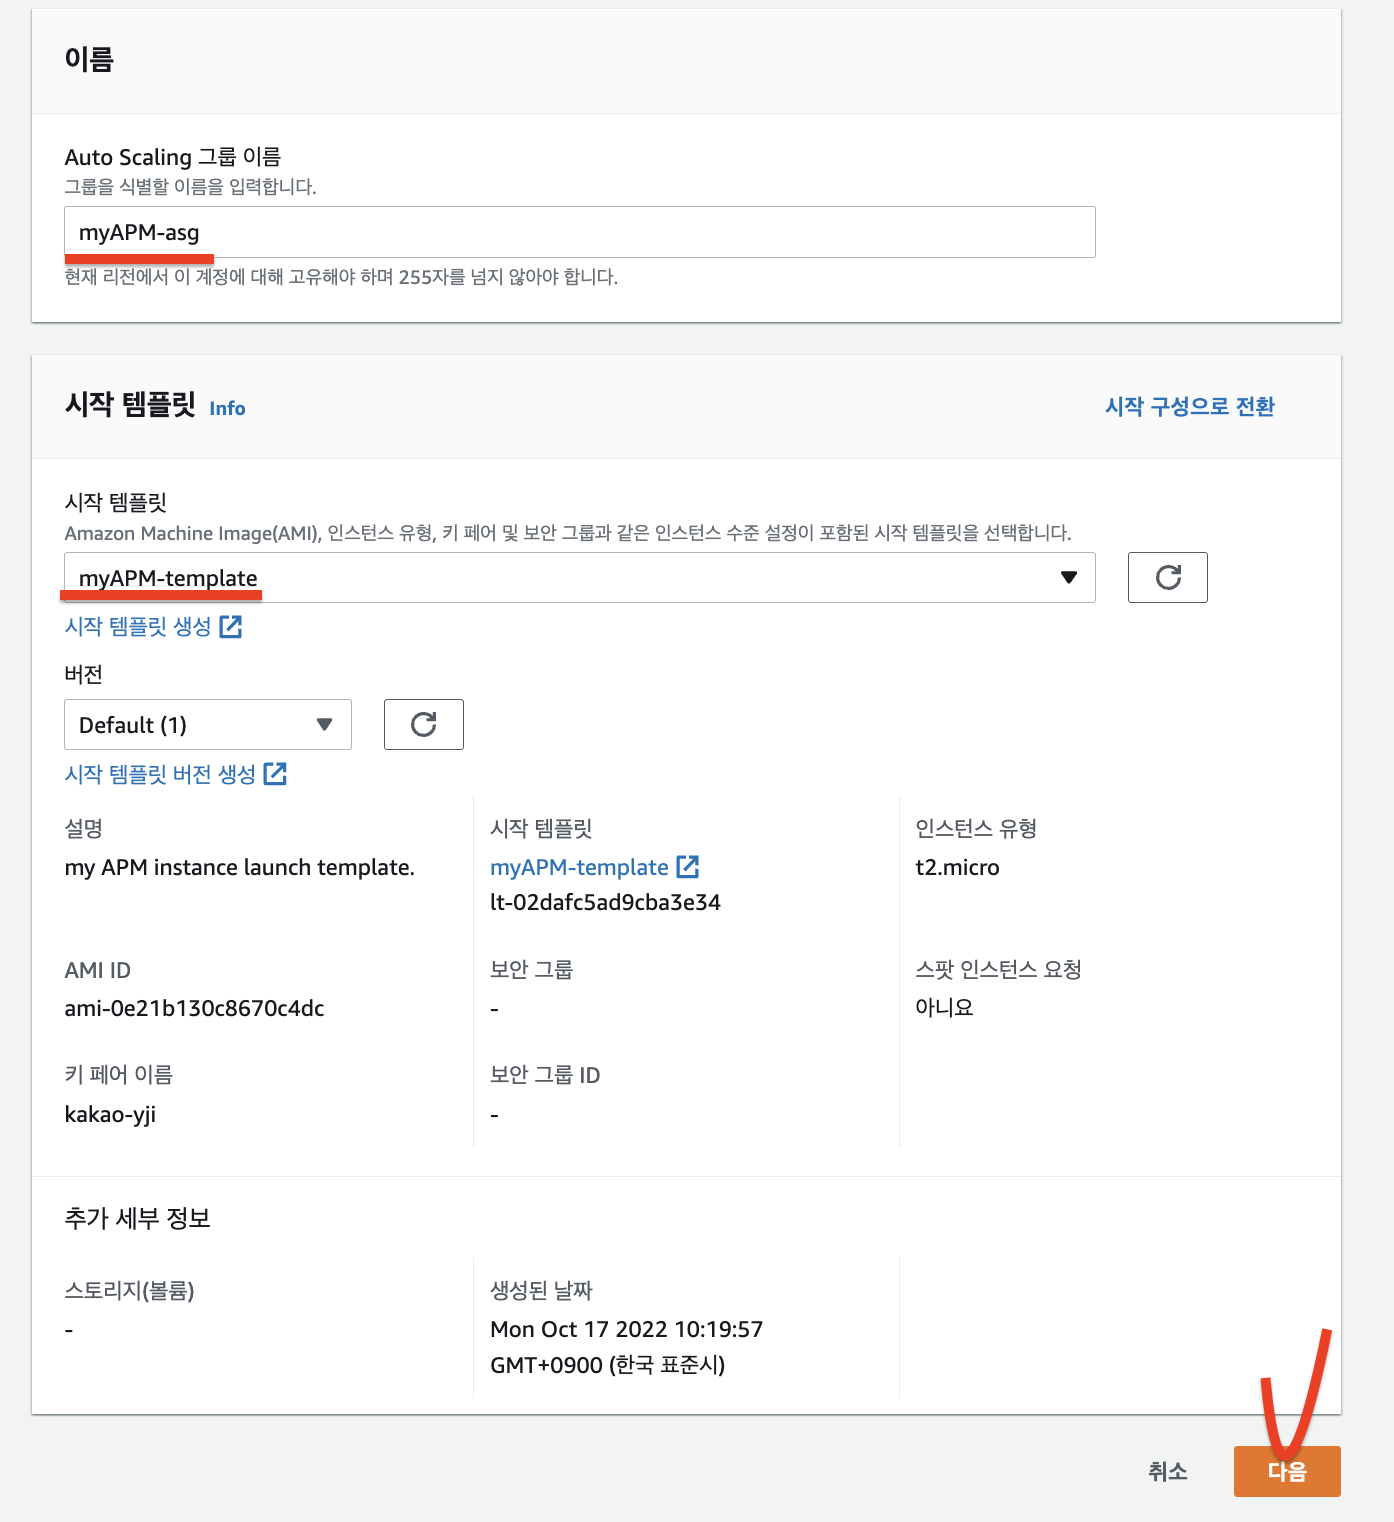
3) 시작 템플릿 -> AMI, SG, Network, ... -> ASG가 확장 시 사용할 포맷(양식)
4) ASG 생성
ec2 인스턴스 🐣중지🐣 하고 시작 !
-
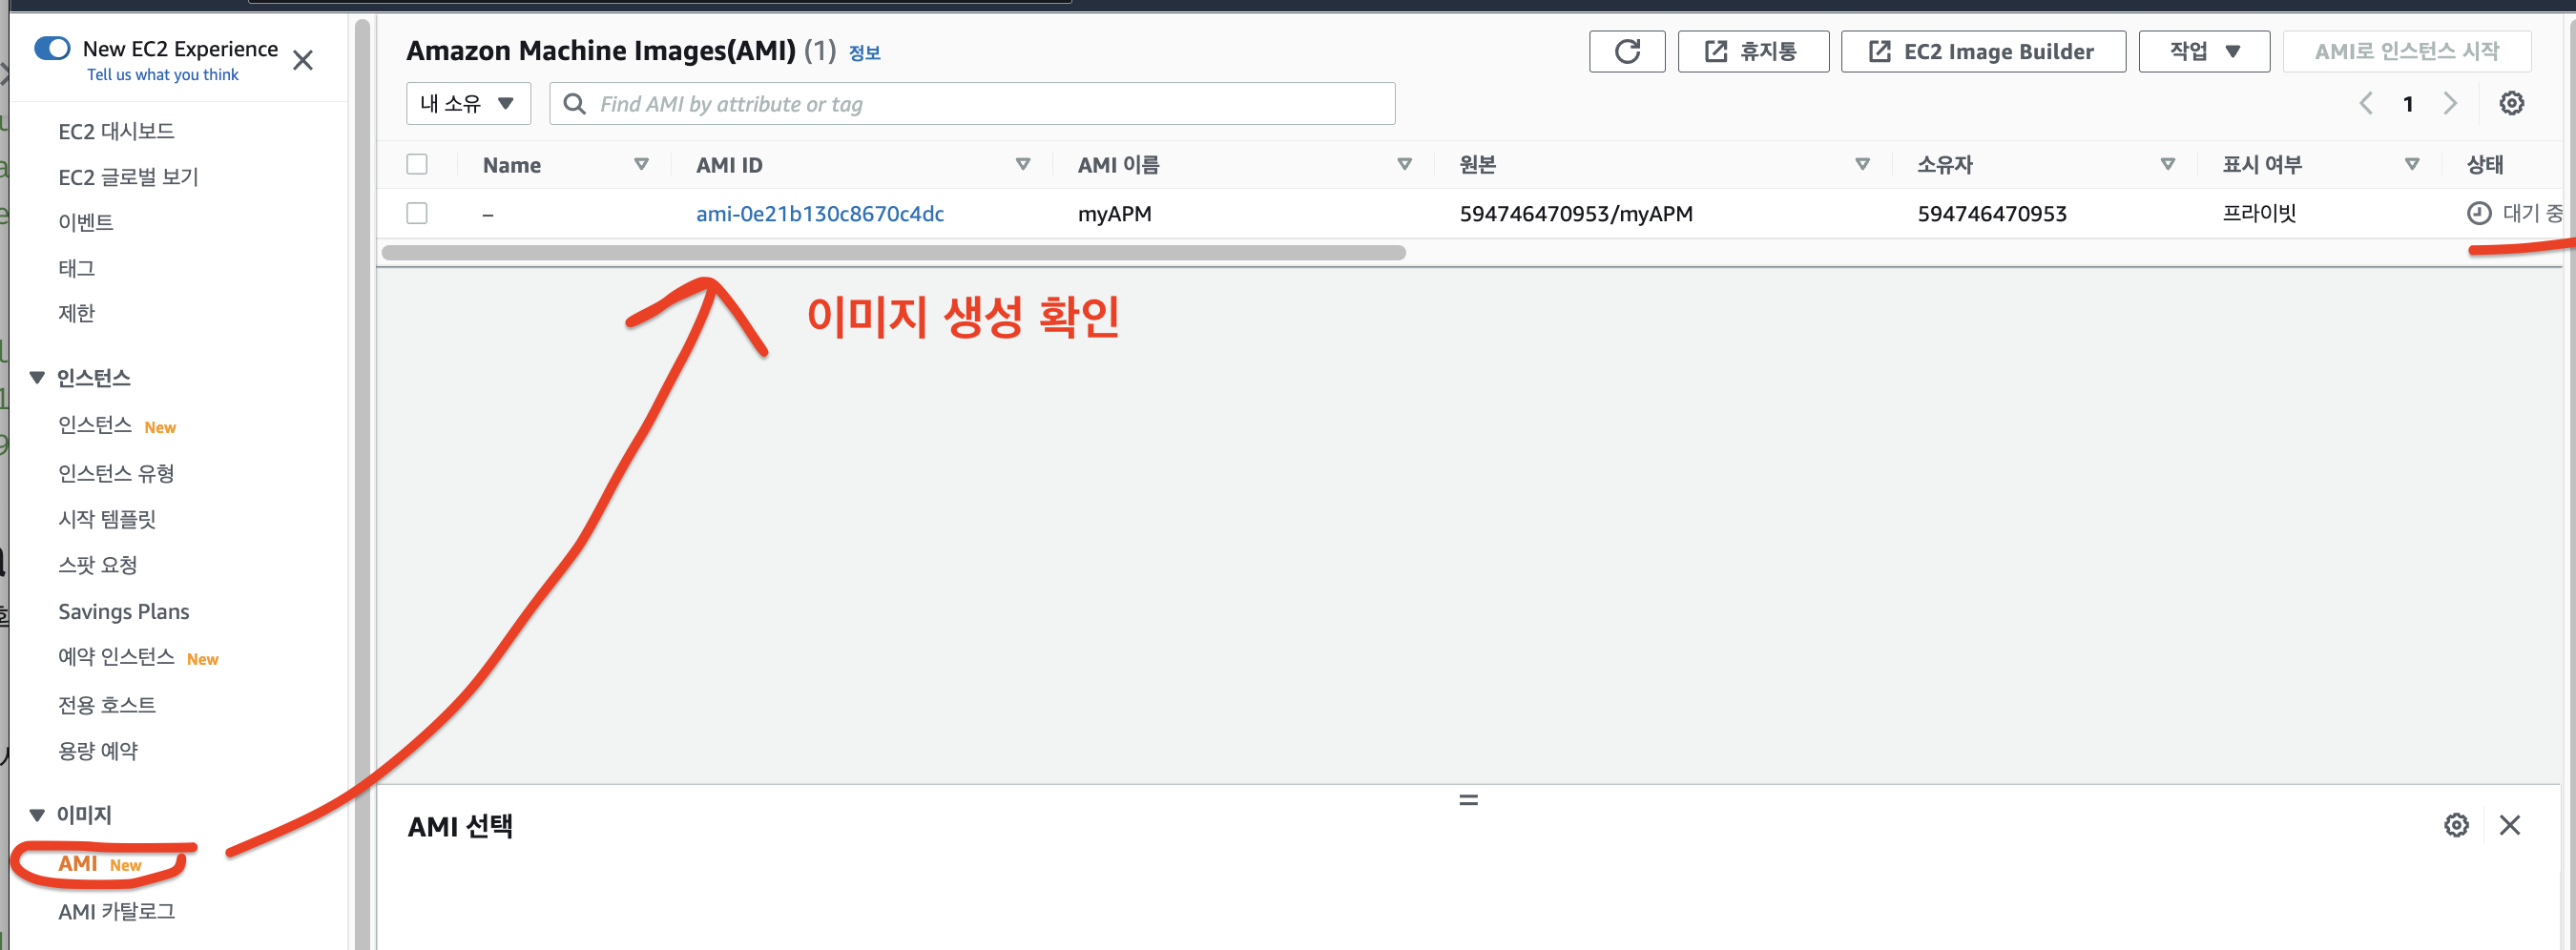
AMI 상태가 사용 가능으로 초록불이 들어오기 전까지 Name을 AMI 이름과 동일하게 변경해주세요~

-
좀 기다리면 사용 가능 상태 뜬다.

-
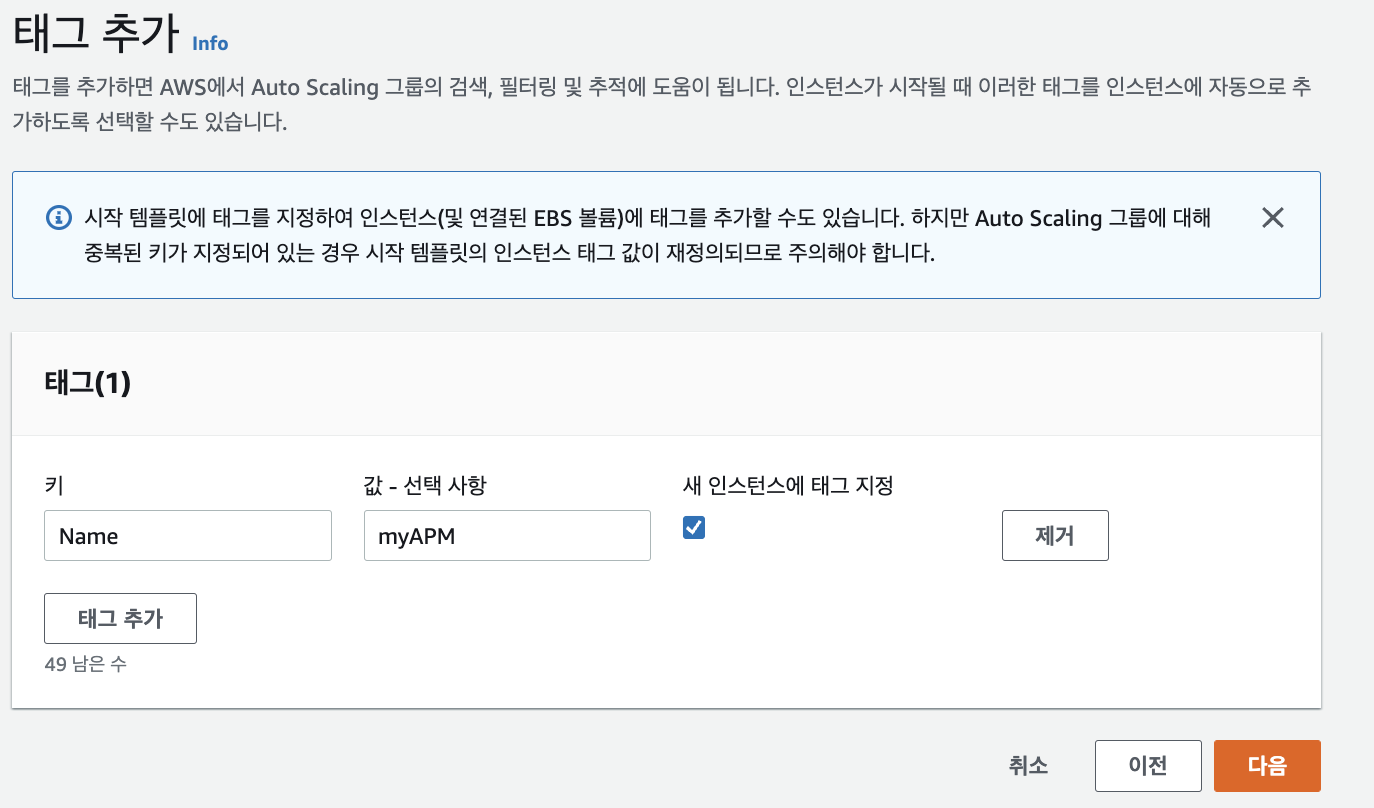
시작 템플릿 생성

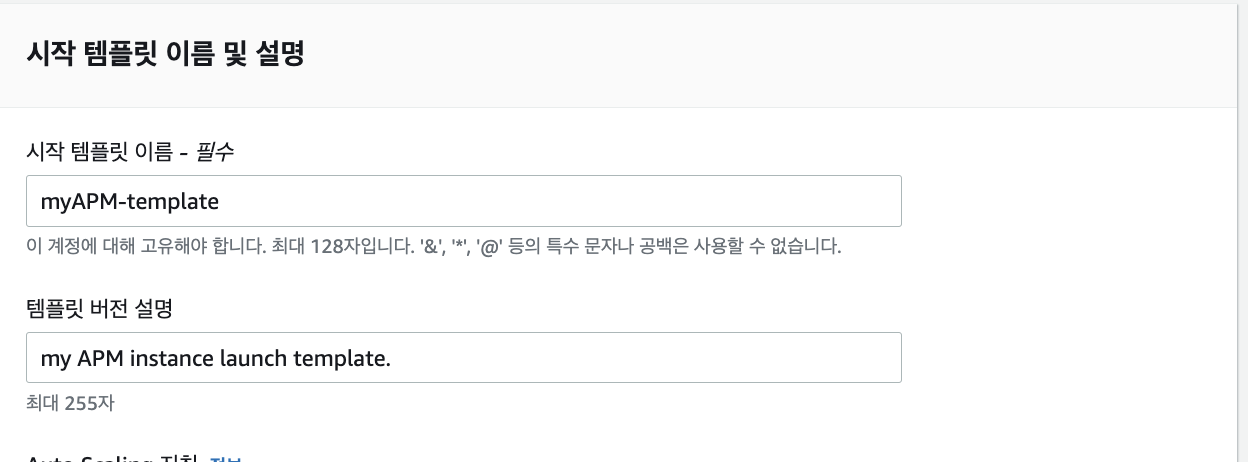


여기까지하고 생성 클릭
-
시작템플릿 생긴거 확인 가능

-
이제 Auto scaling 설정한다.
-
1단계
-
2단계
- 서로 다른 가용영역에 배치하겠다 ... = 서브넷 두개 a, c
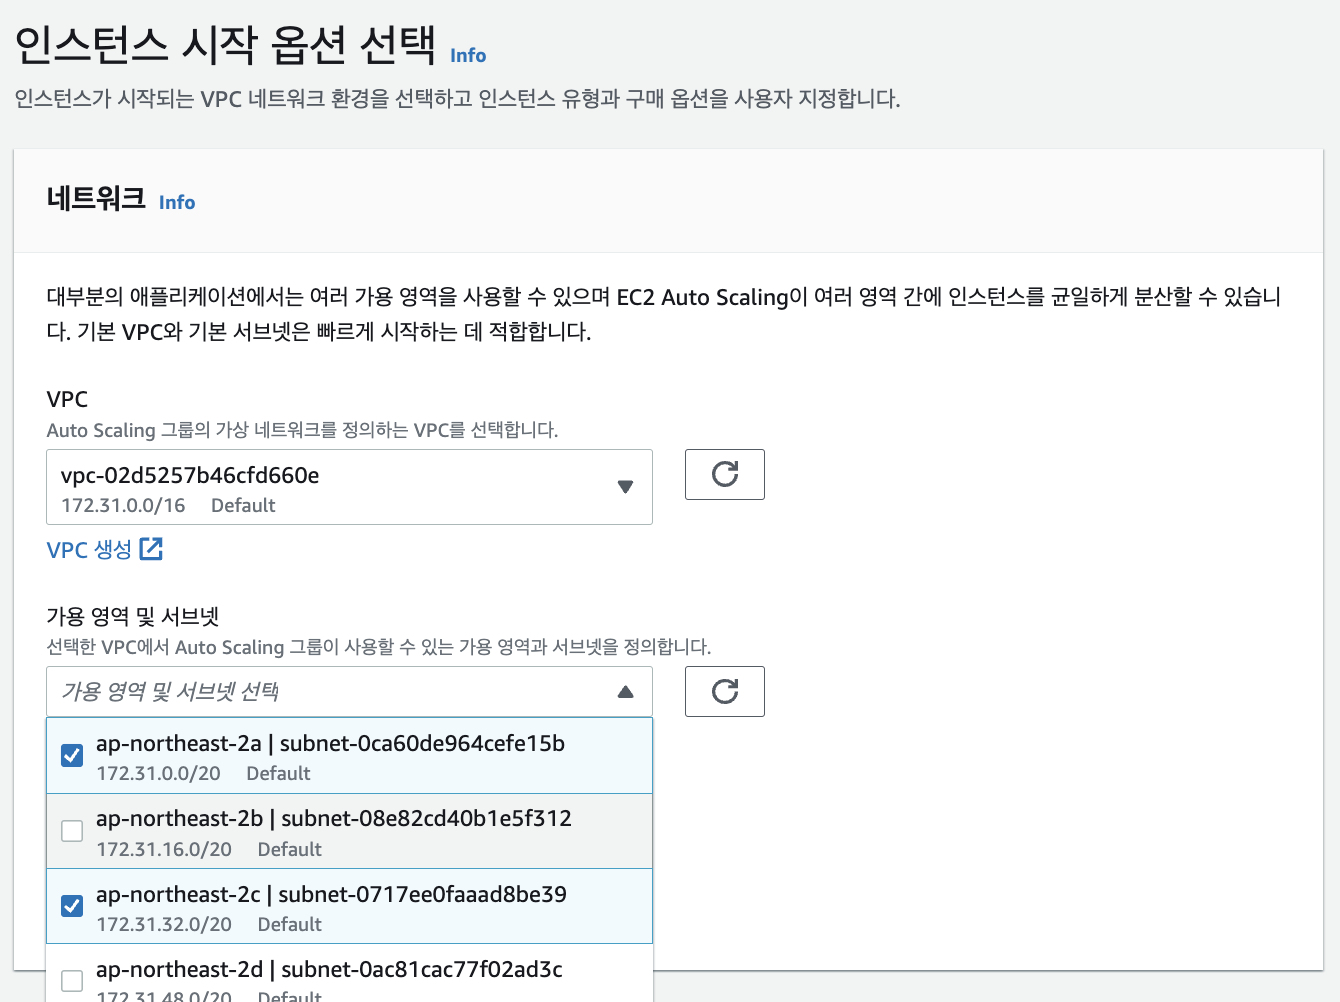
- 서로 다른 가용영역에 배치하겠다 ... = 서브넷 두개 a, c
-
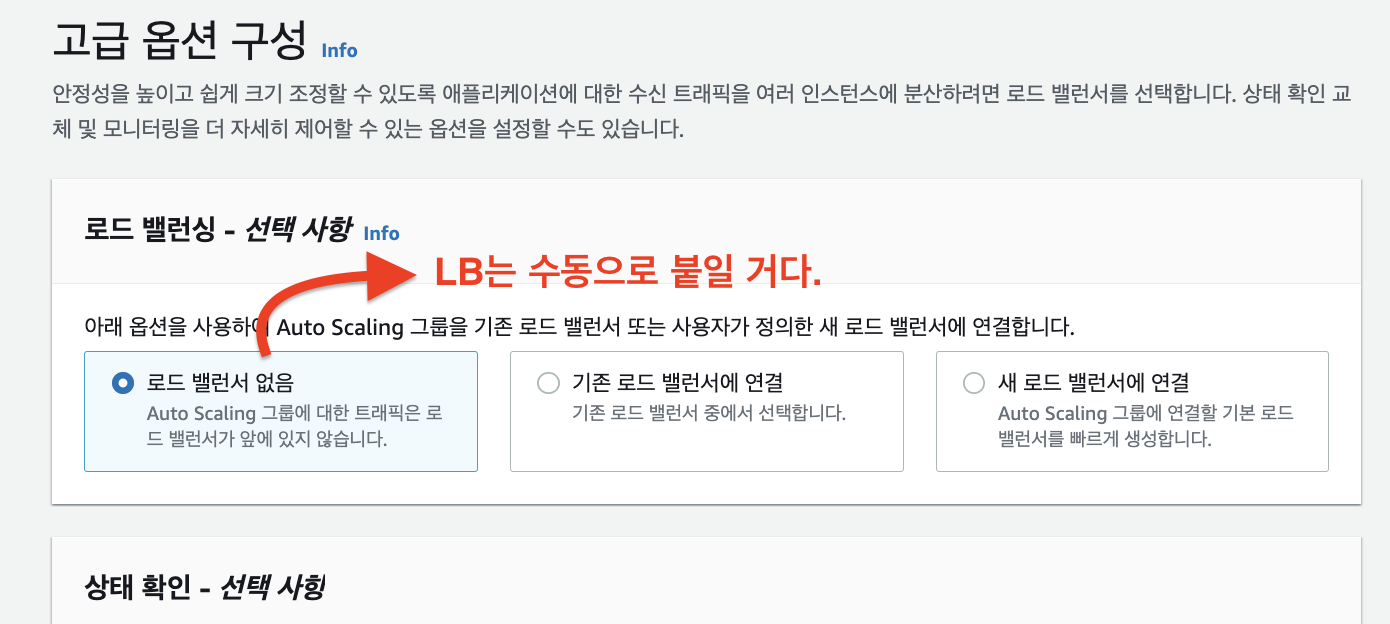
3단계

-
4단계


여기까지하고 다음
-
5단계

-
6단계
-
검토


생성 확인
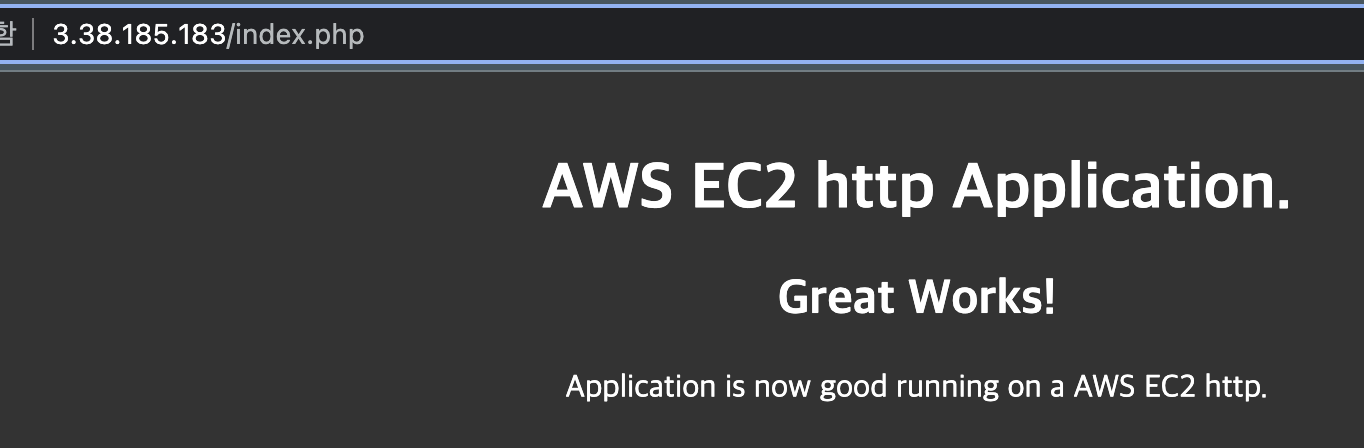
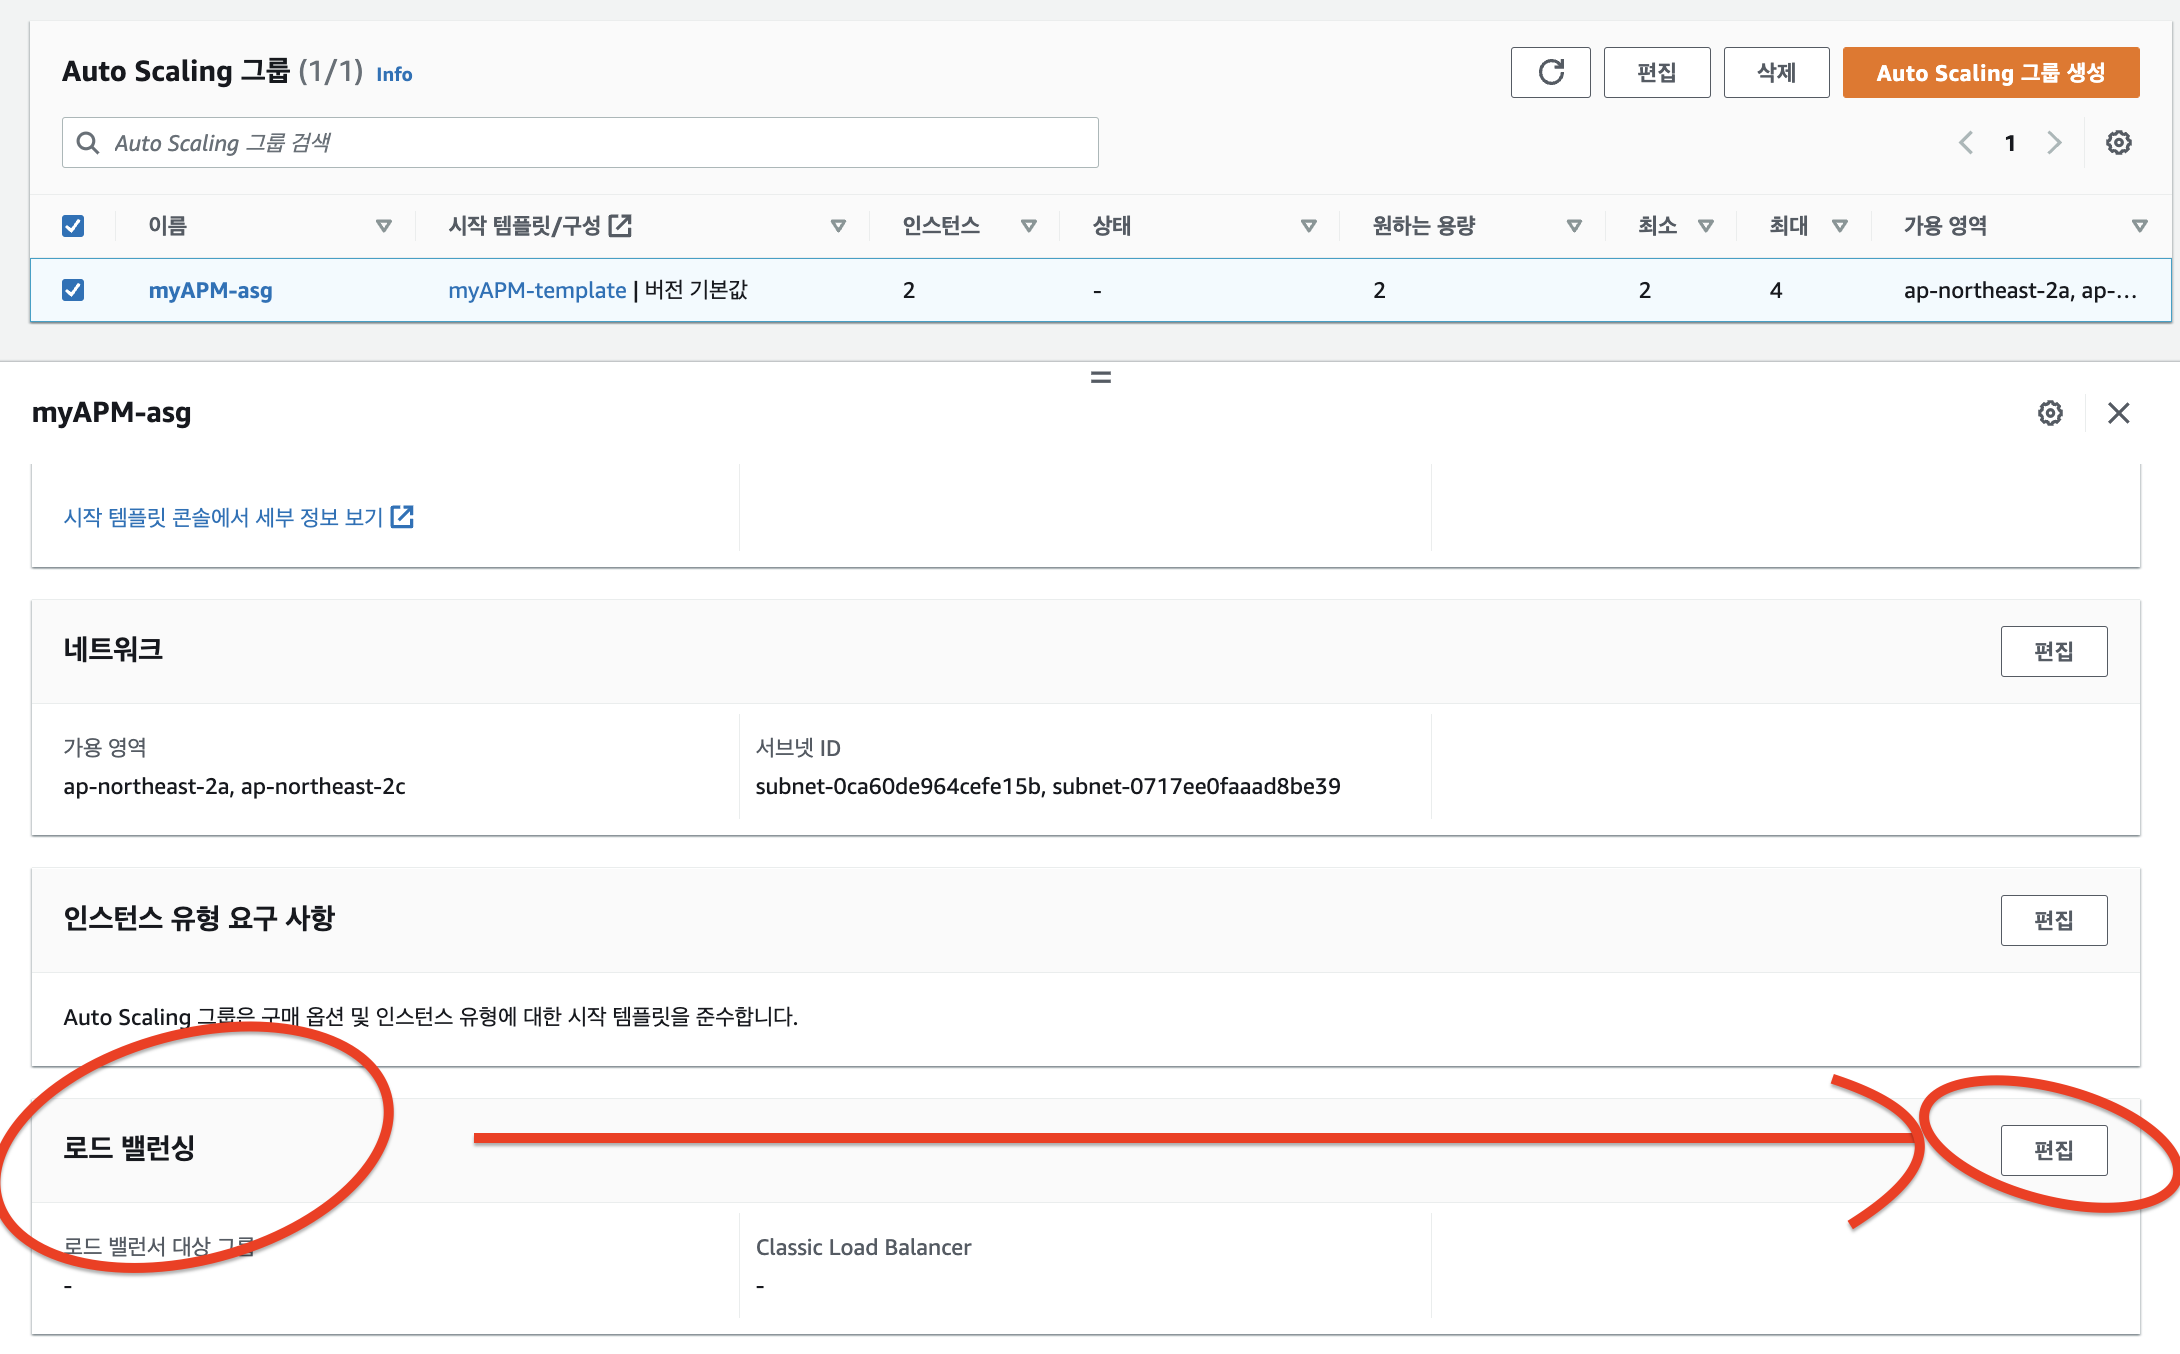
myAPM이 2개가 생김


📕 stress test
# yum 쓰기위해서 epel 올려주기
$ sudo amazon-linux-extras install epel -y

# stress test
$ sudo yum install -y install stress

# t2.micro라서 cpu는 1개, 10분 동안 스트레스 주기
$stress --cpu 1 --timeout 600
stress: info: [4254] dispatching hogs: 1 cpu, 0 io, 0 vm, 0 hdd-
지표수집은 기본적으로 5분마다 한다.
-
stress 테스트 모니터링하기


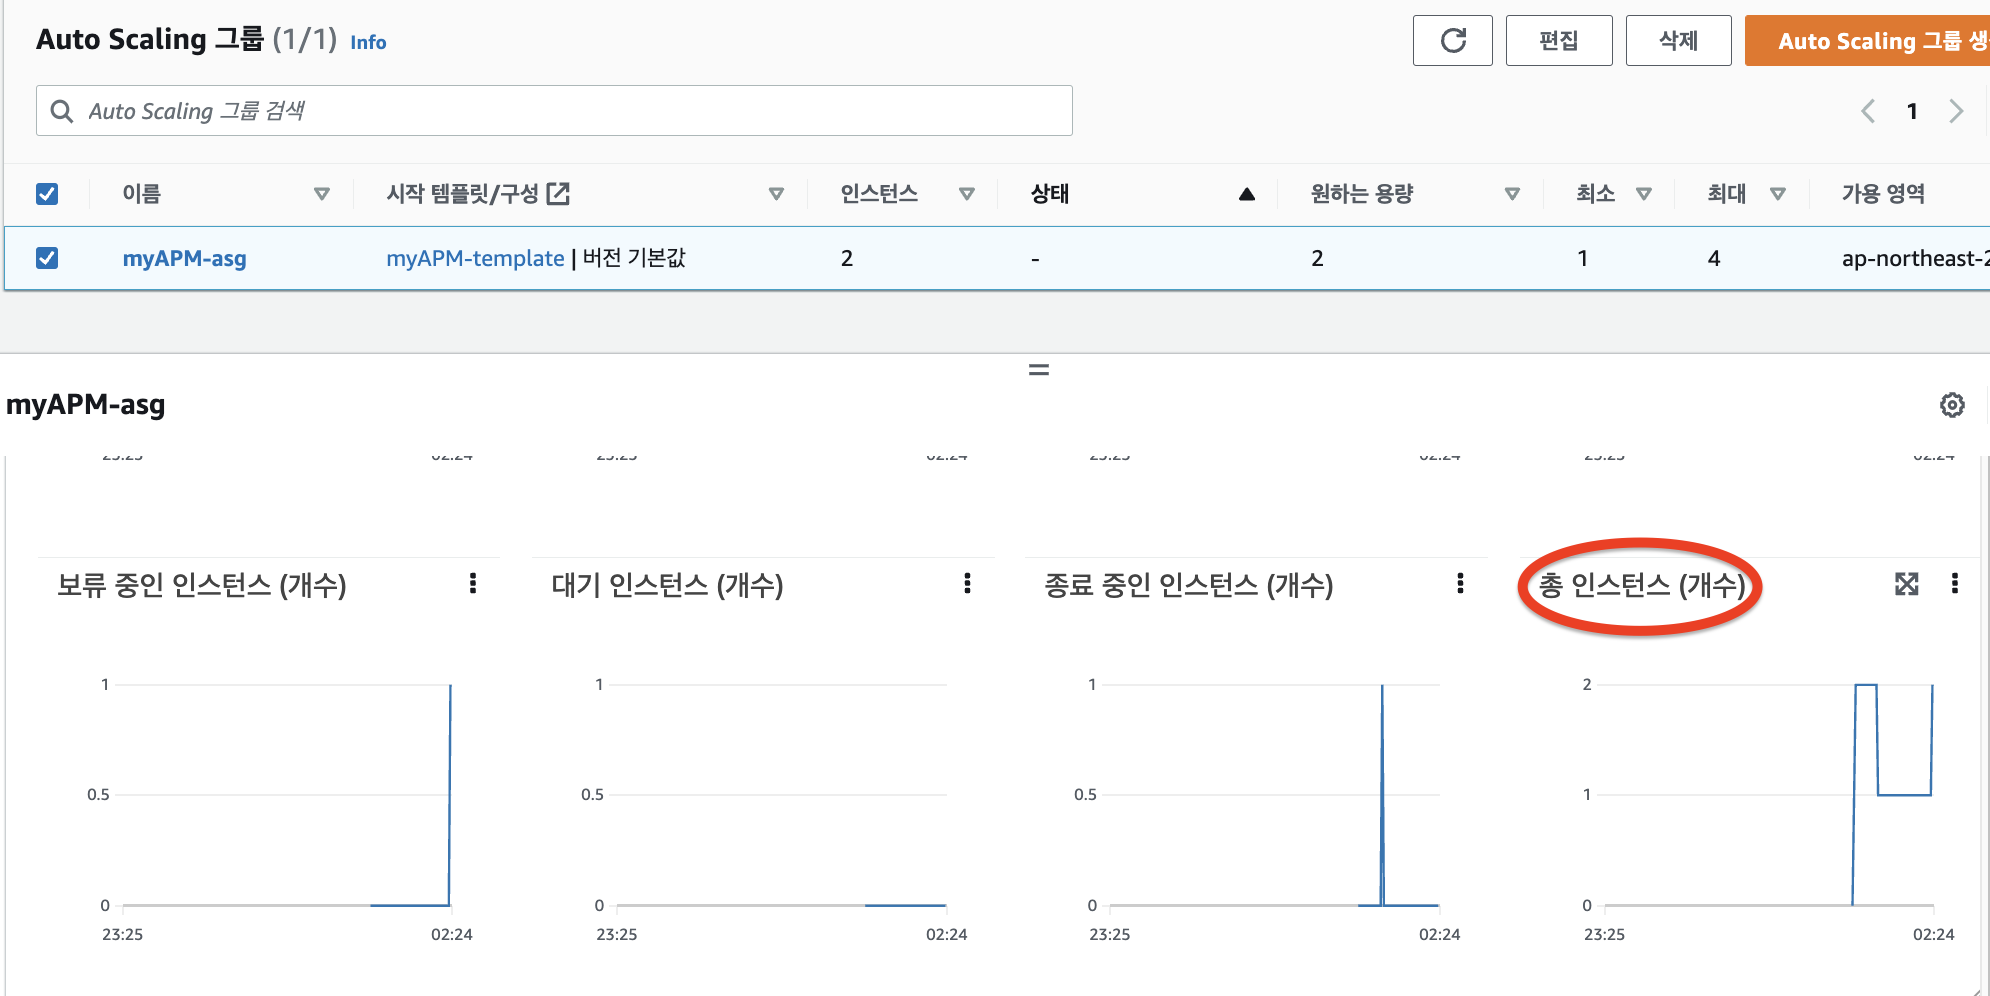

- 활동 에서 Auto-Scaling의 작업 기록도 확인할 수 있다.
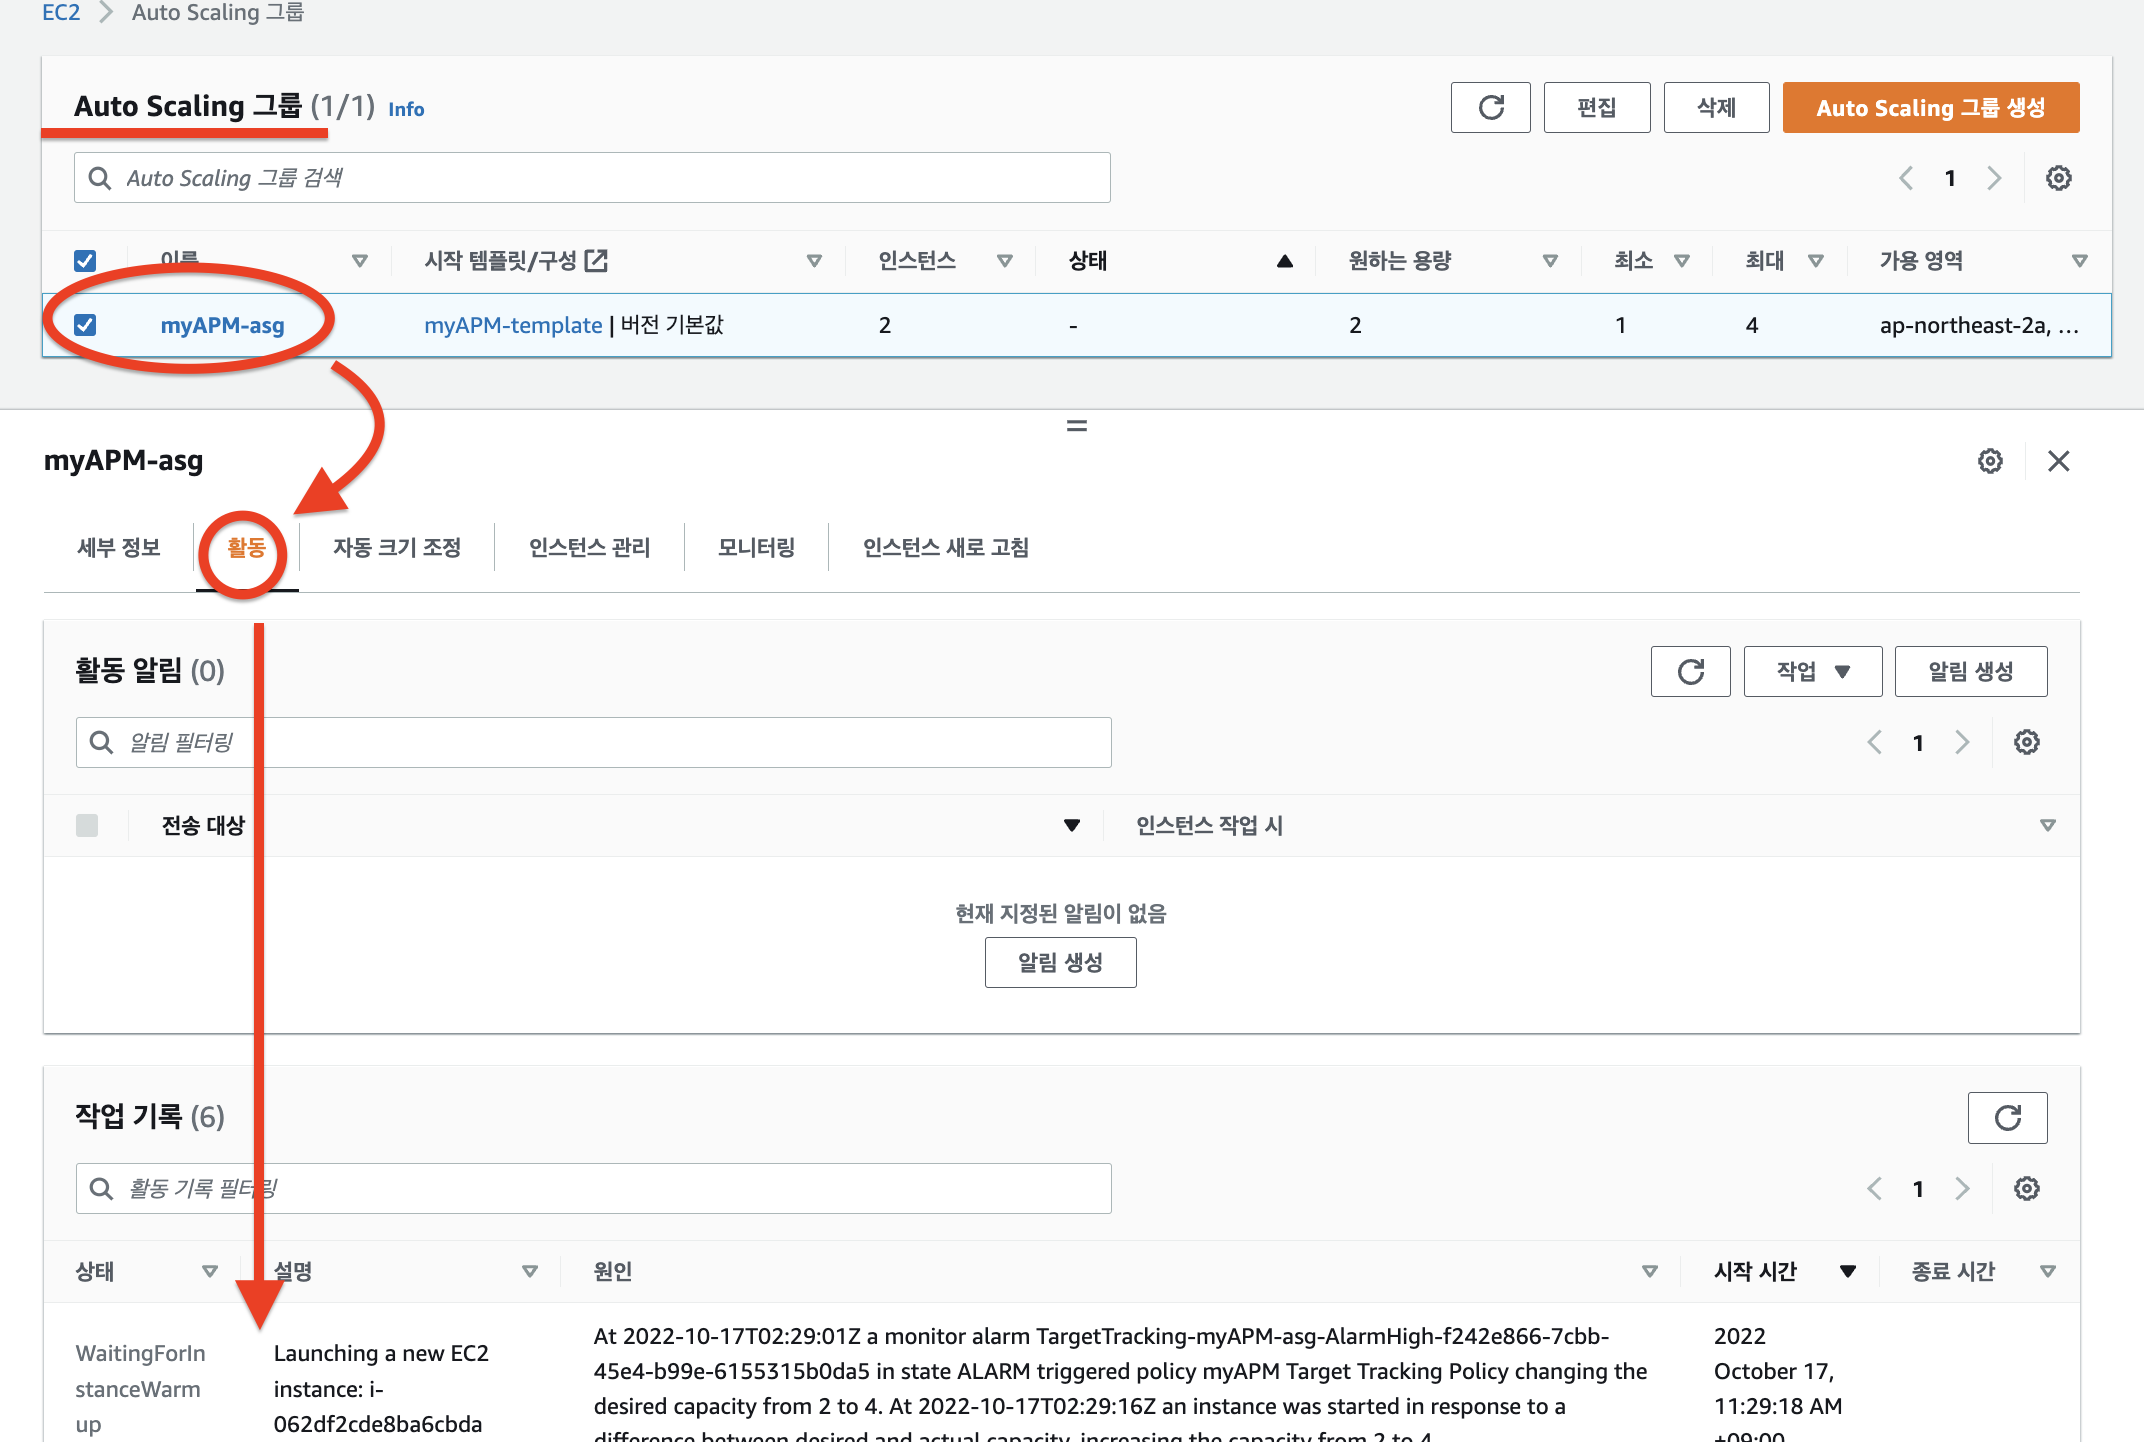
- 4개(내가 설정한 max)까지 늘어났다.. !
- 설정한 가용영역(a, c)에 인스턴스가 생성된 것을 확인할 수 있음
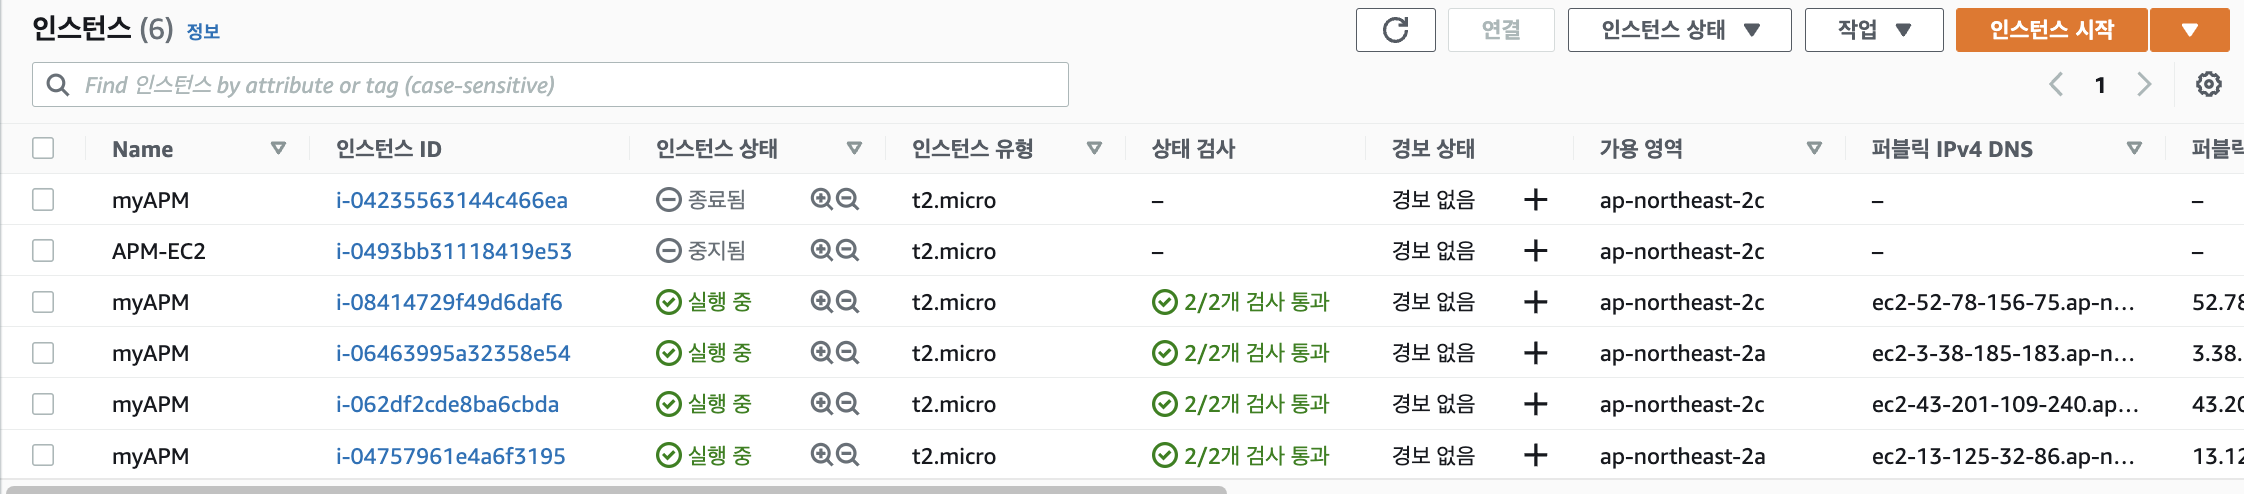
- 설정한 가용영역(a, c)에 인스턴스가 생성된 것을 확인할 수 있음
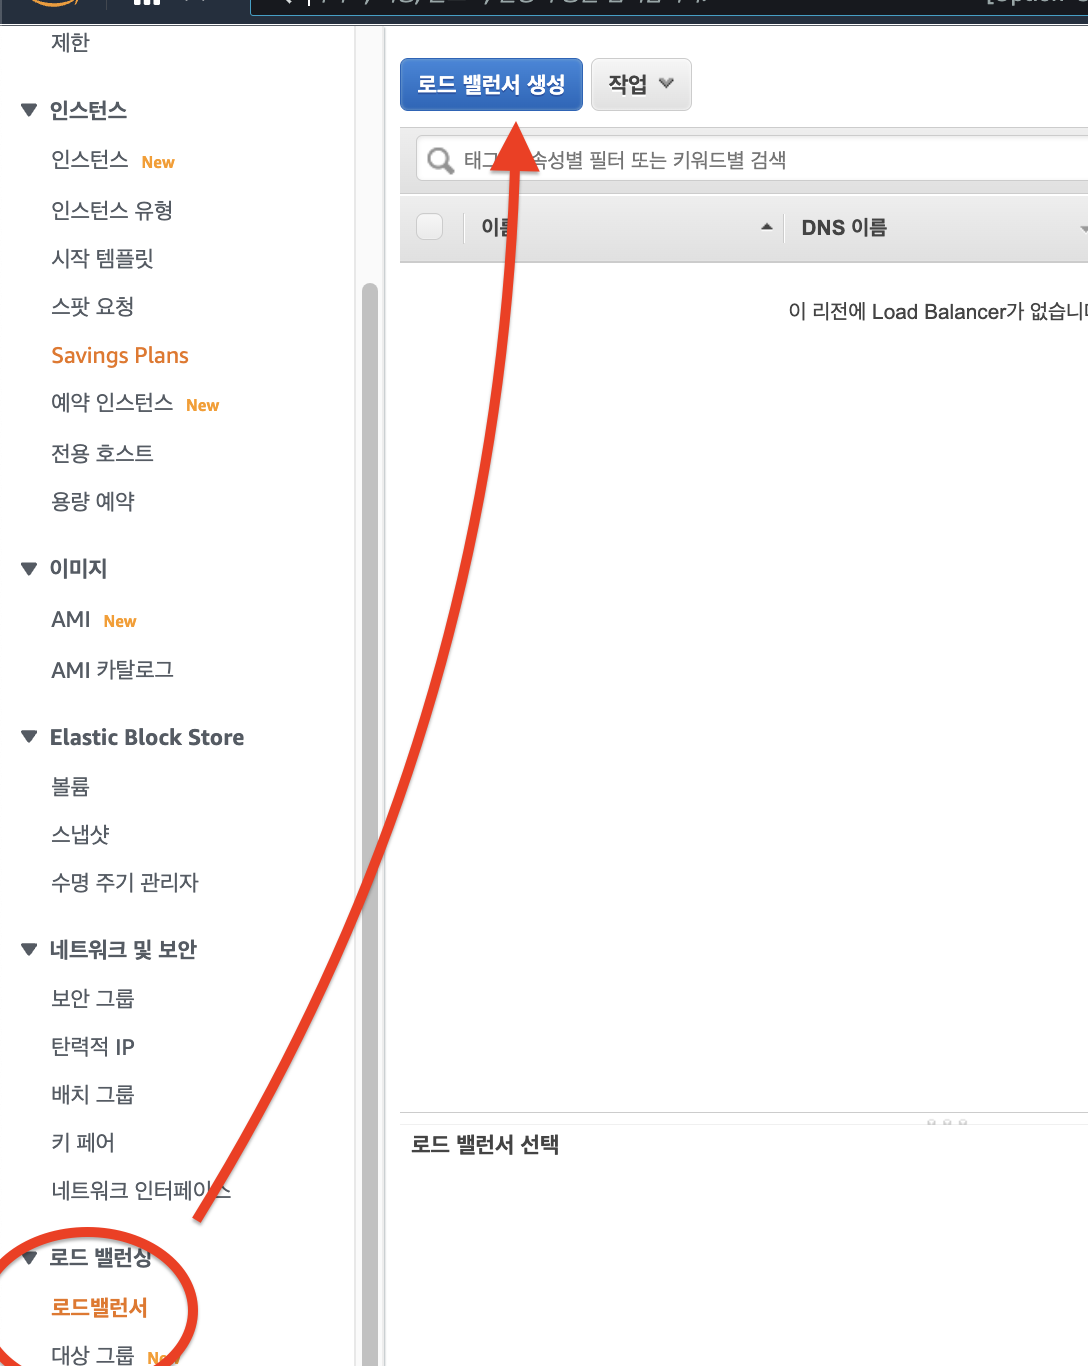
LB 붙여보기
-
1) 대상그룹(target group) 붙여주기
- 대상그룹은 listner가 존재
- 🤔 🤔 이게 뭐야
- 대상그룹은 listner가 존재
-
LB가 health check 하는 이유
- 죽은 서버한테는 트래픽을 주지 않기 위해서
q1 . 답 NLB
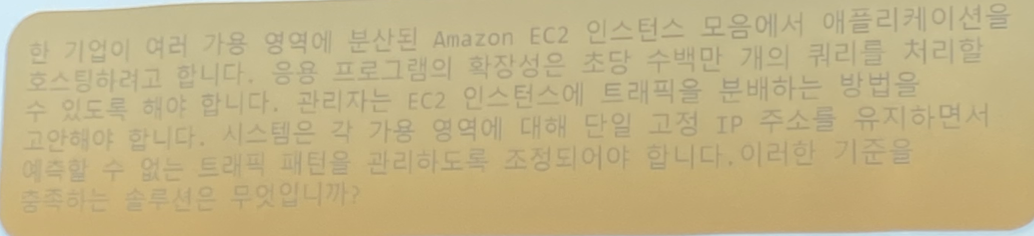
웹 애플리케이션 -> L7
트래픽 분배 -> LB
단일 고정 IP 주소를 유지 -> NLB
실습
Auto-scaling 그룹 크기 변경

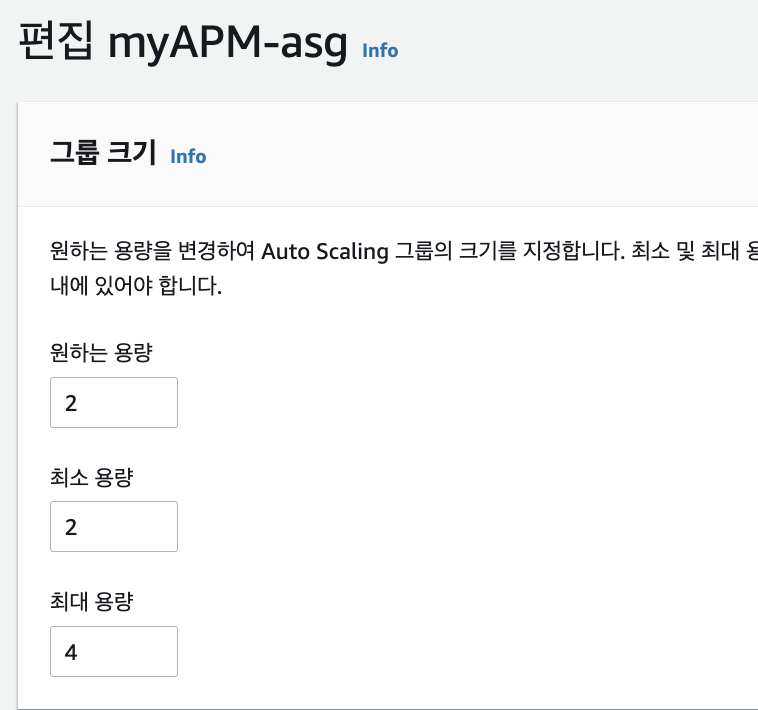
-
최소 용량 갯수(2)에 맞춰서 인스턴스가 하나 더 올라오고 있음을 확인할 수 있다.
-
인스턴스 2개 다 터미널에 연결시켜주기
-
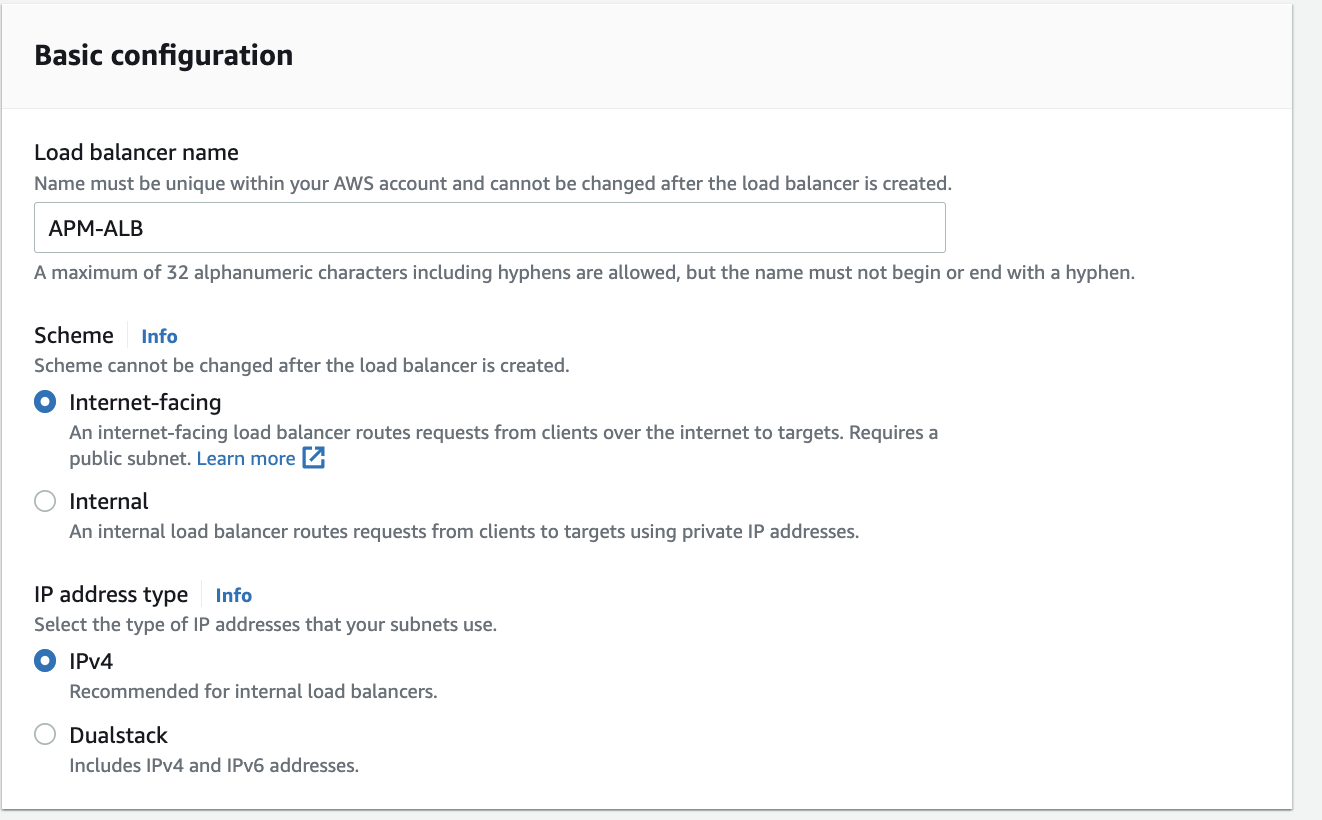
로드밸런서 생성 사진 넣어야딤


-
리스너는 구성한 포트와 프로토콜을 사용하여 연결 요청을 확인하는 프로세스.
-
HTTPS도 추가하고싶으면 aws에서
acm이용하여 인증서 발급받아서 사용할수 있다. -
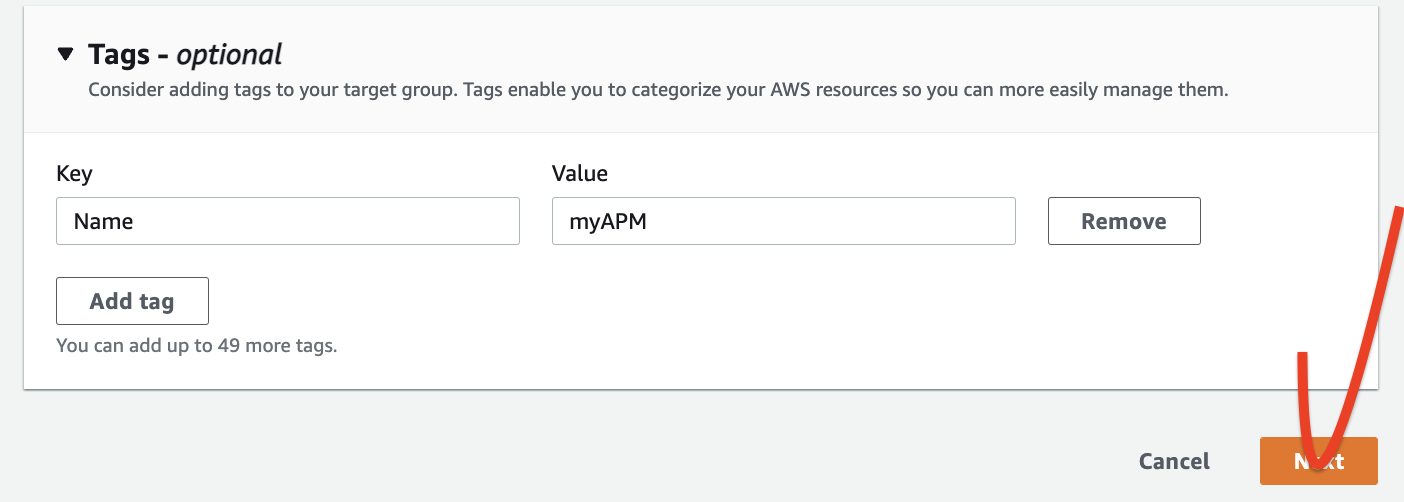
타겟그룹생성


-

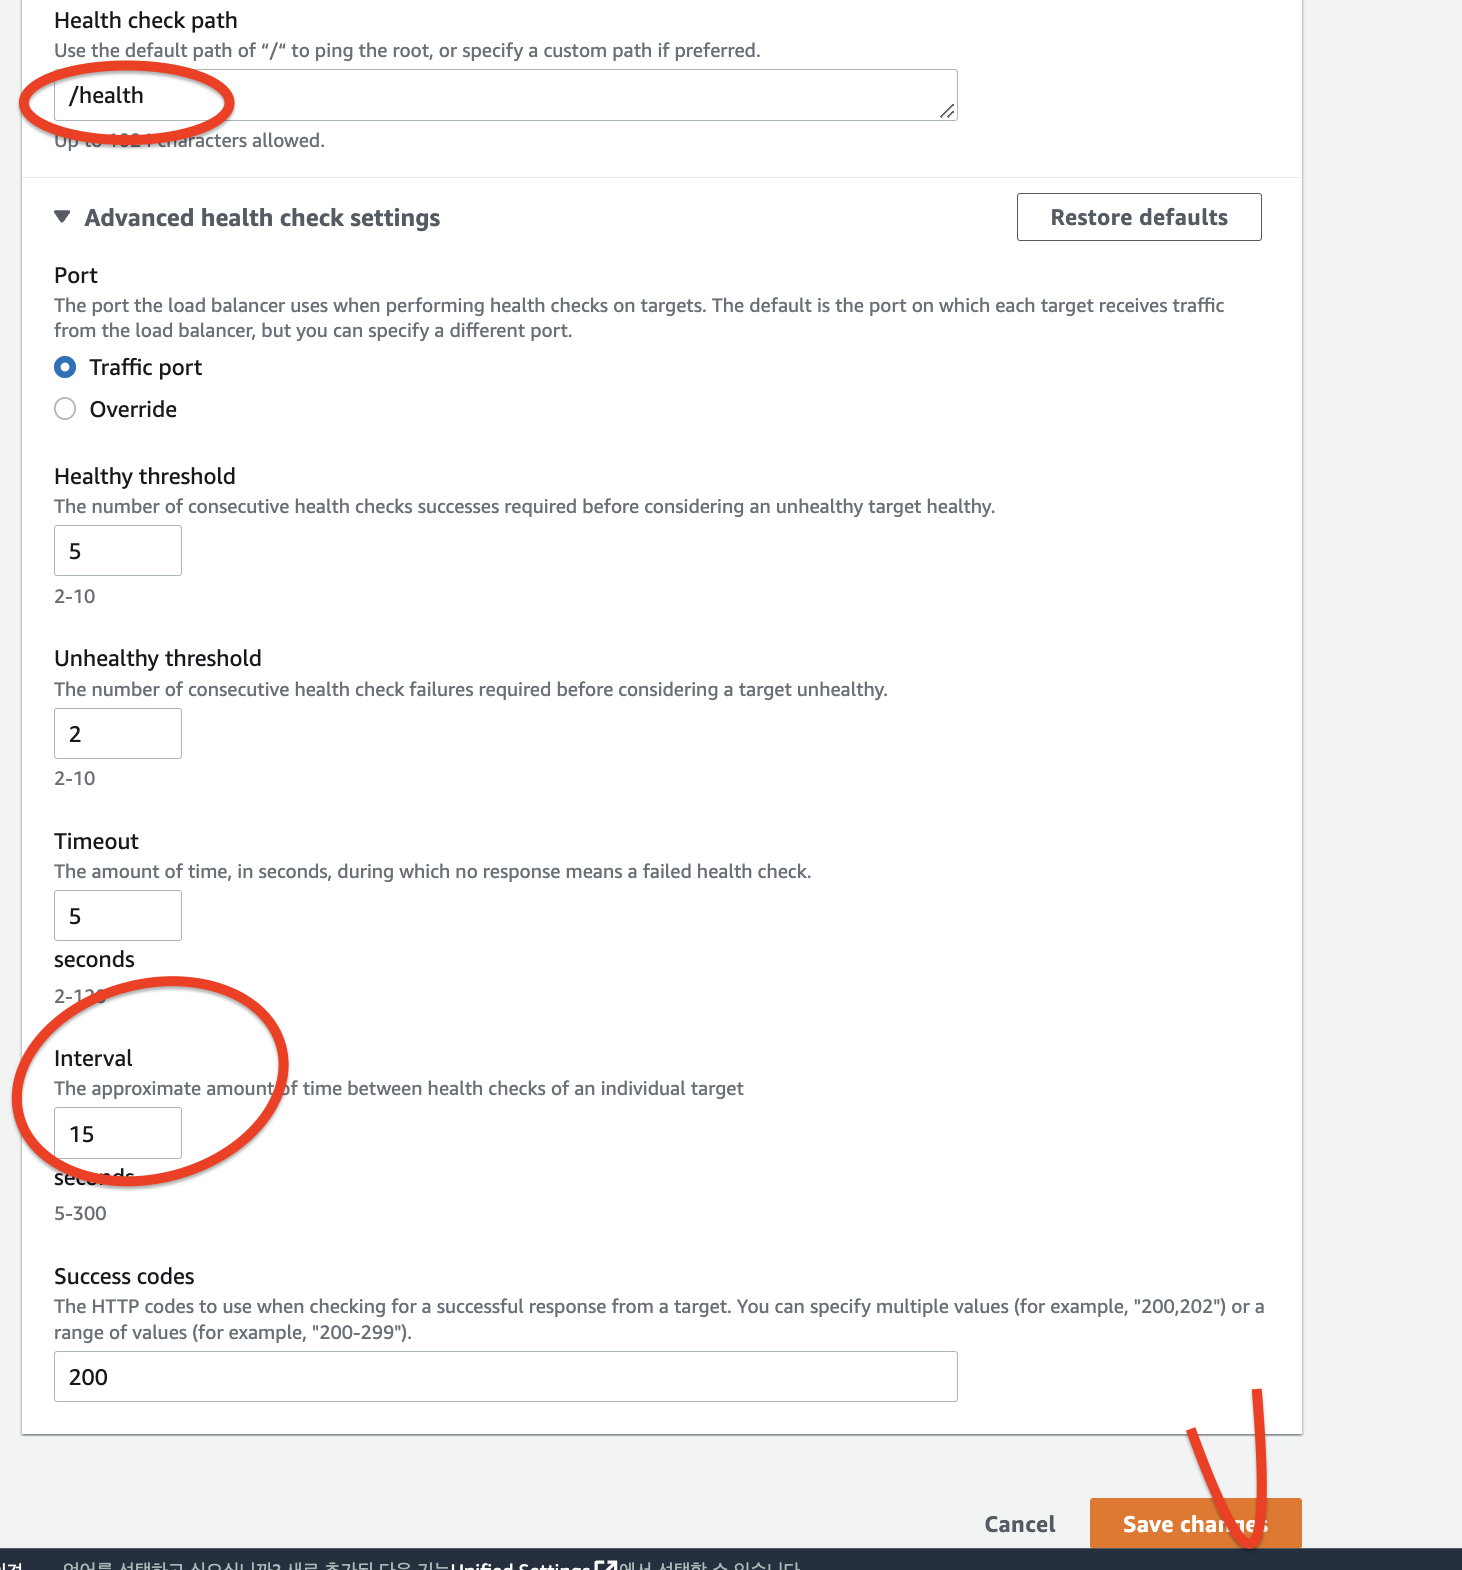
- 30초마다 헬스체크
- 왜? 죽은 서버에는 트래픽 보내지 않도록 !
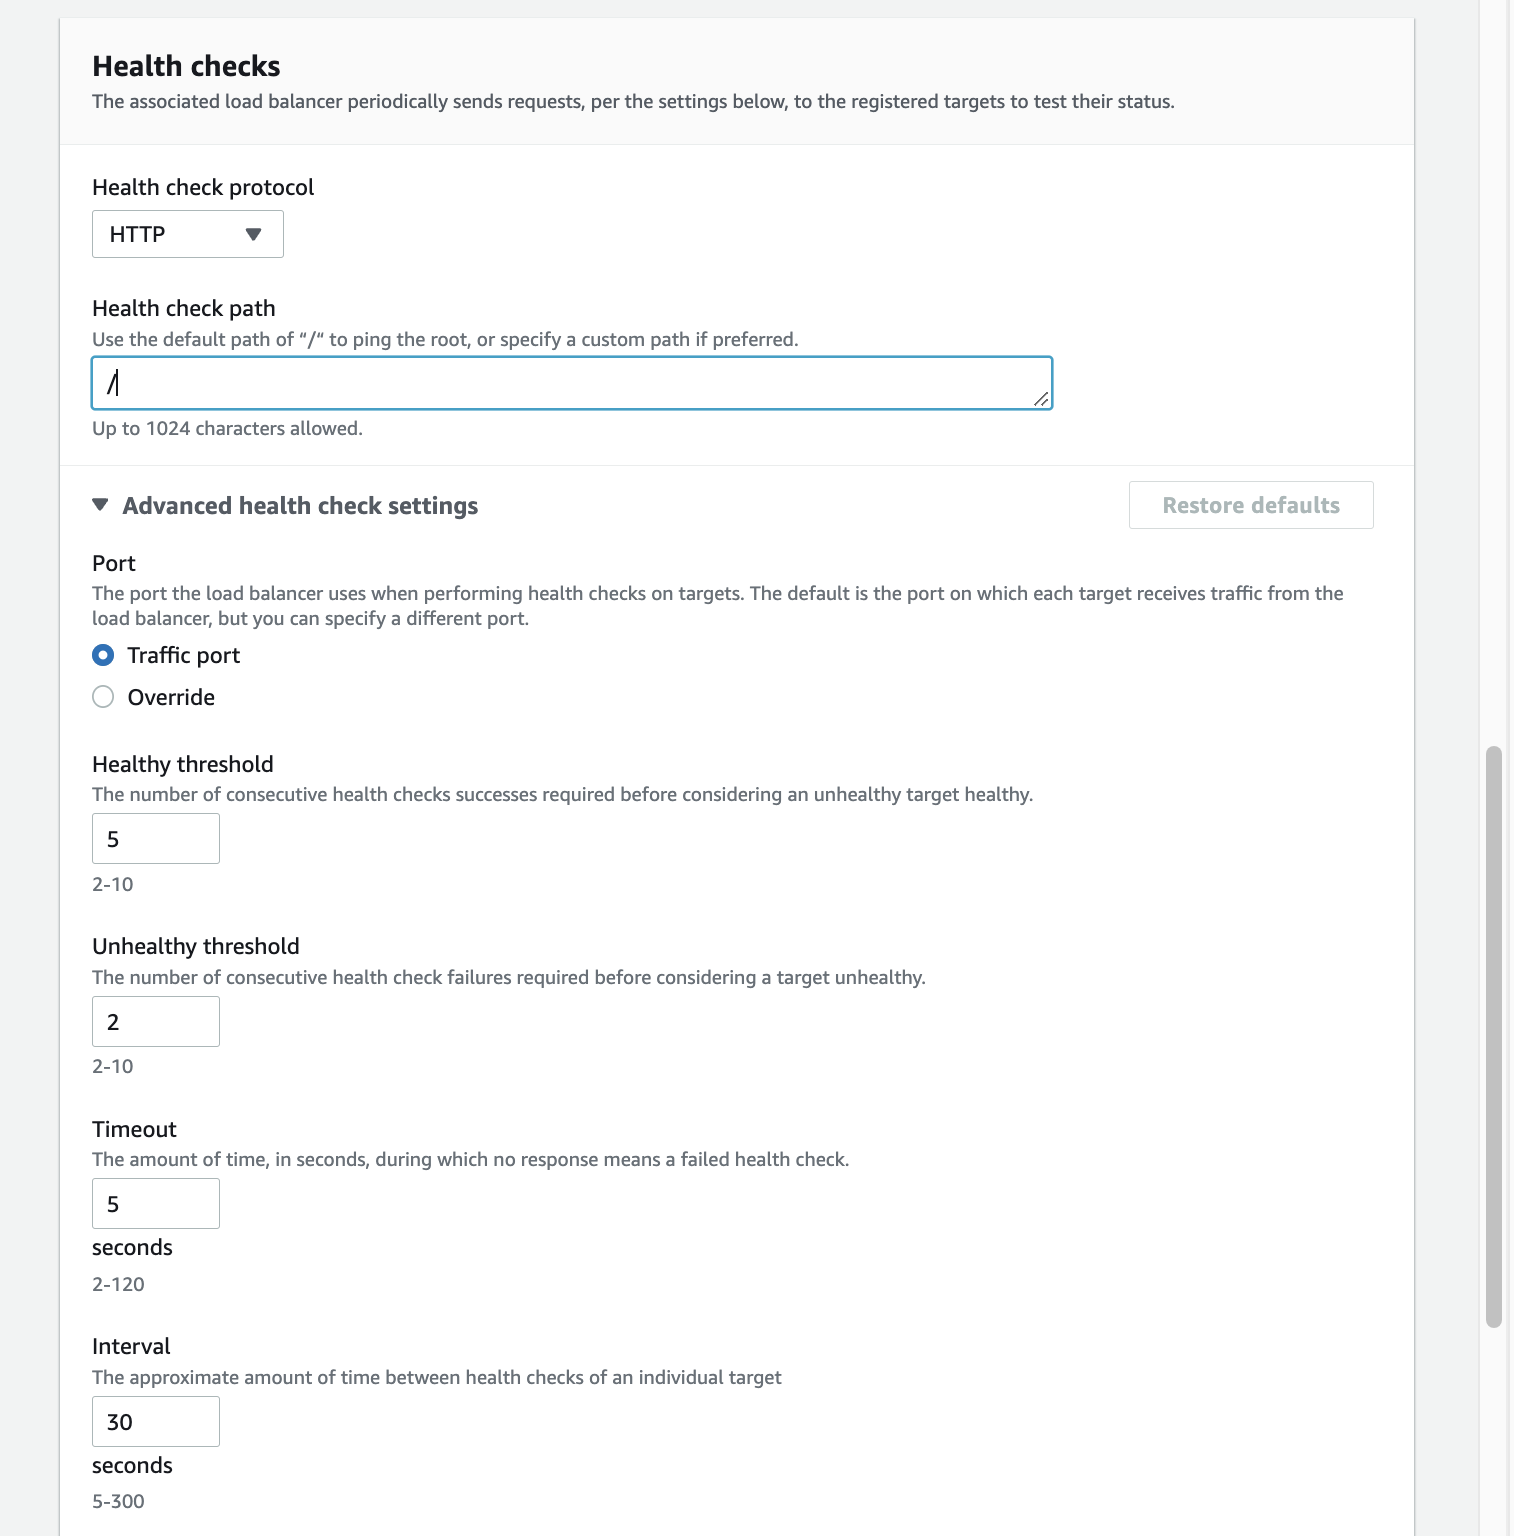
- 왜? 죽은 서버에는 트래픽 보내지 않도록 !
- 다시 원래로 돌아와
- target group이 생겨있다.

- target group이 생겨있다.

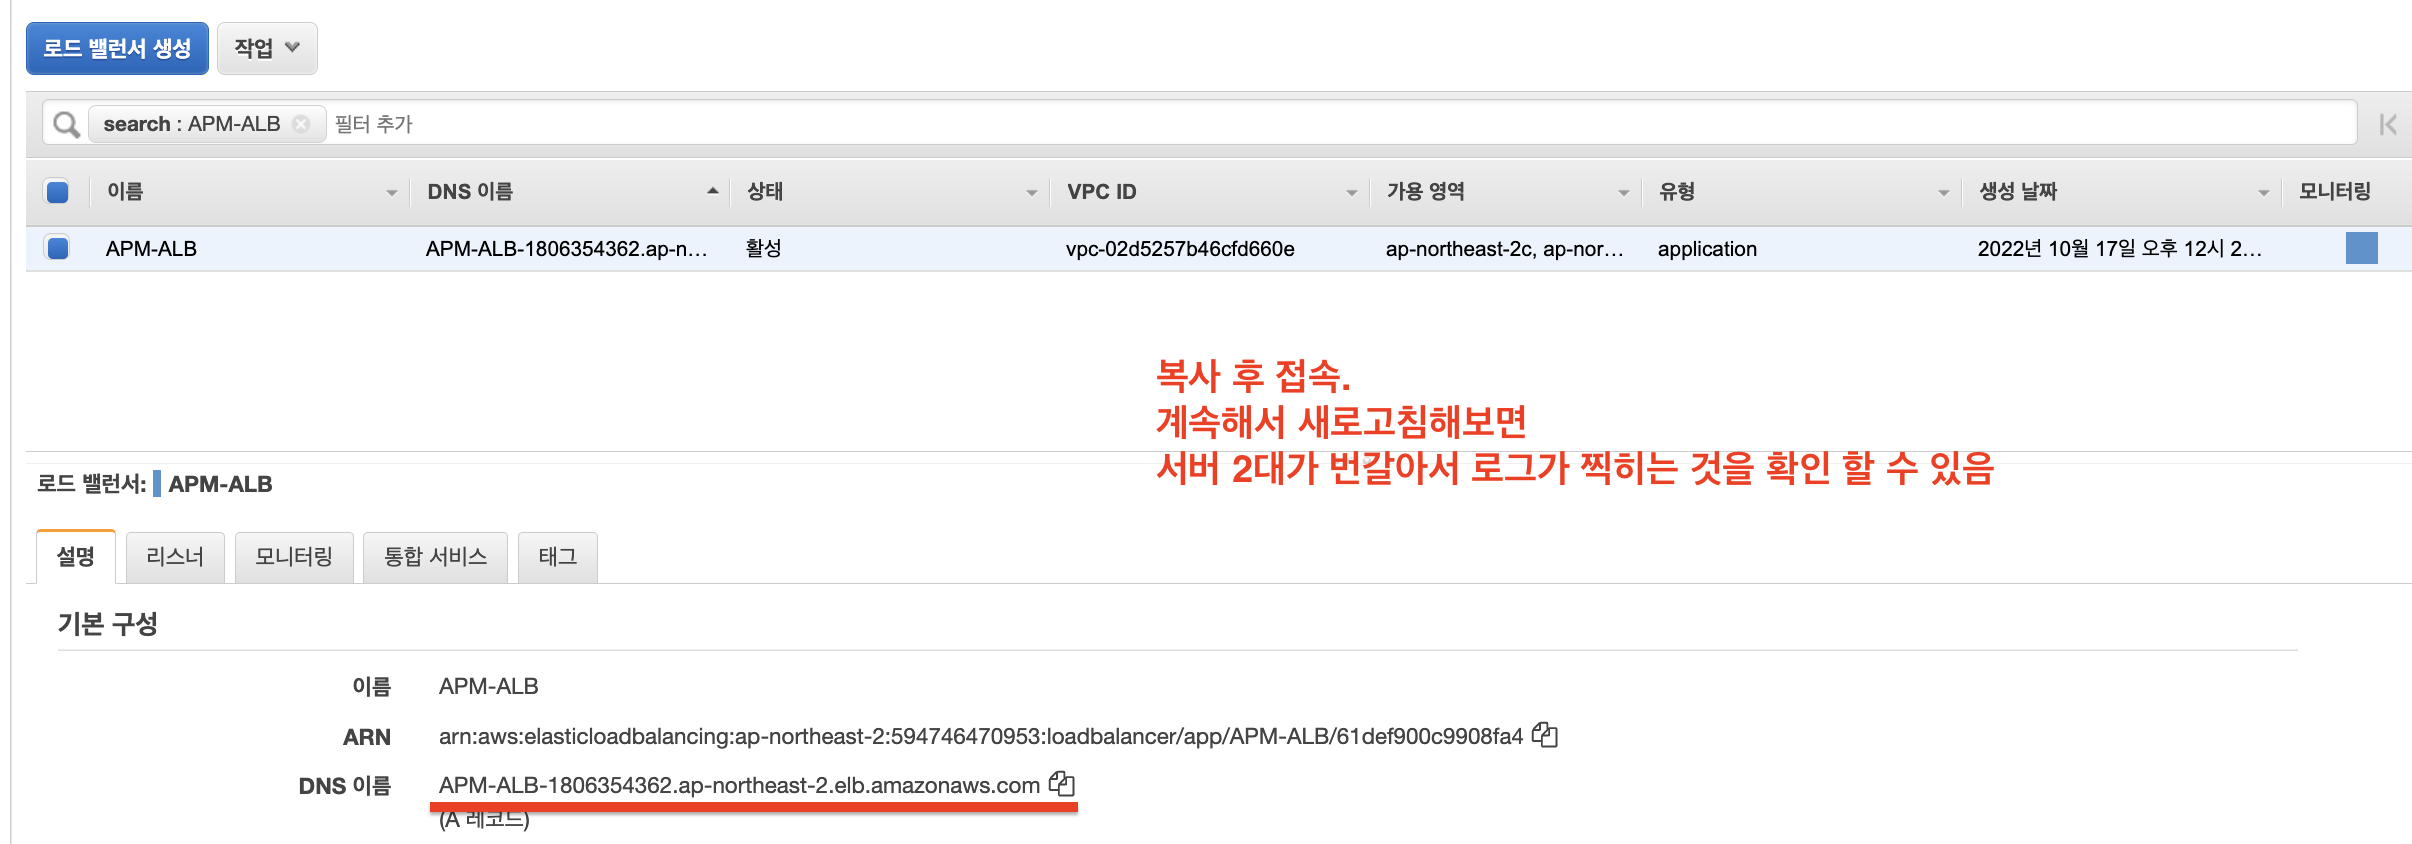
- LB가 활성화 상태가 될 때까지 기다린다..


그 다음 register pending target
auto-scaling 그룹 하단 > 편집
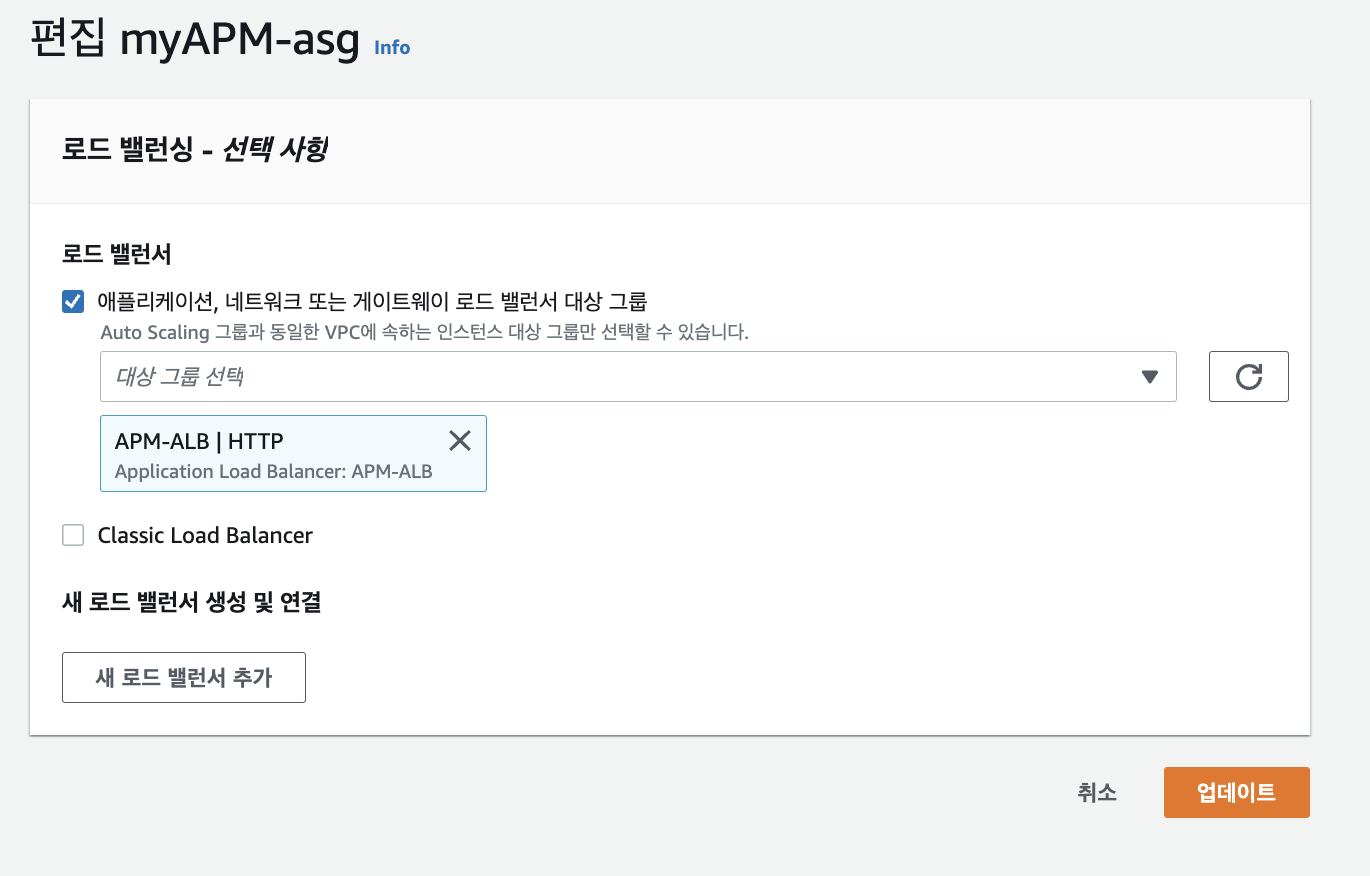
-
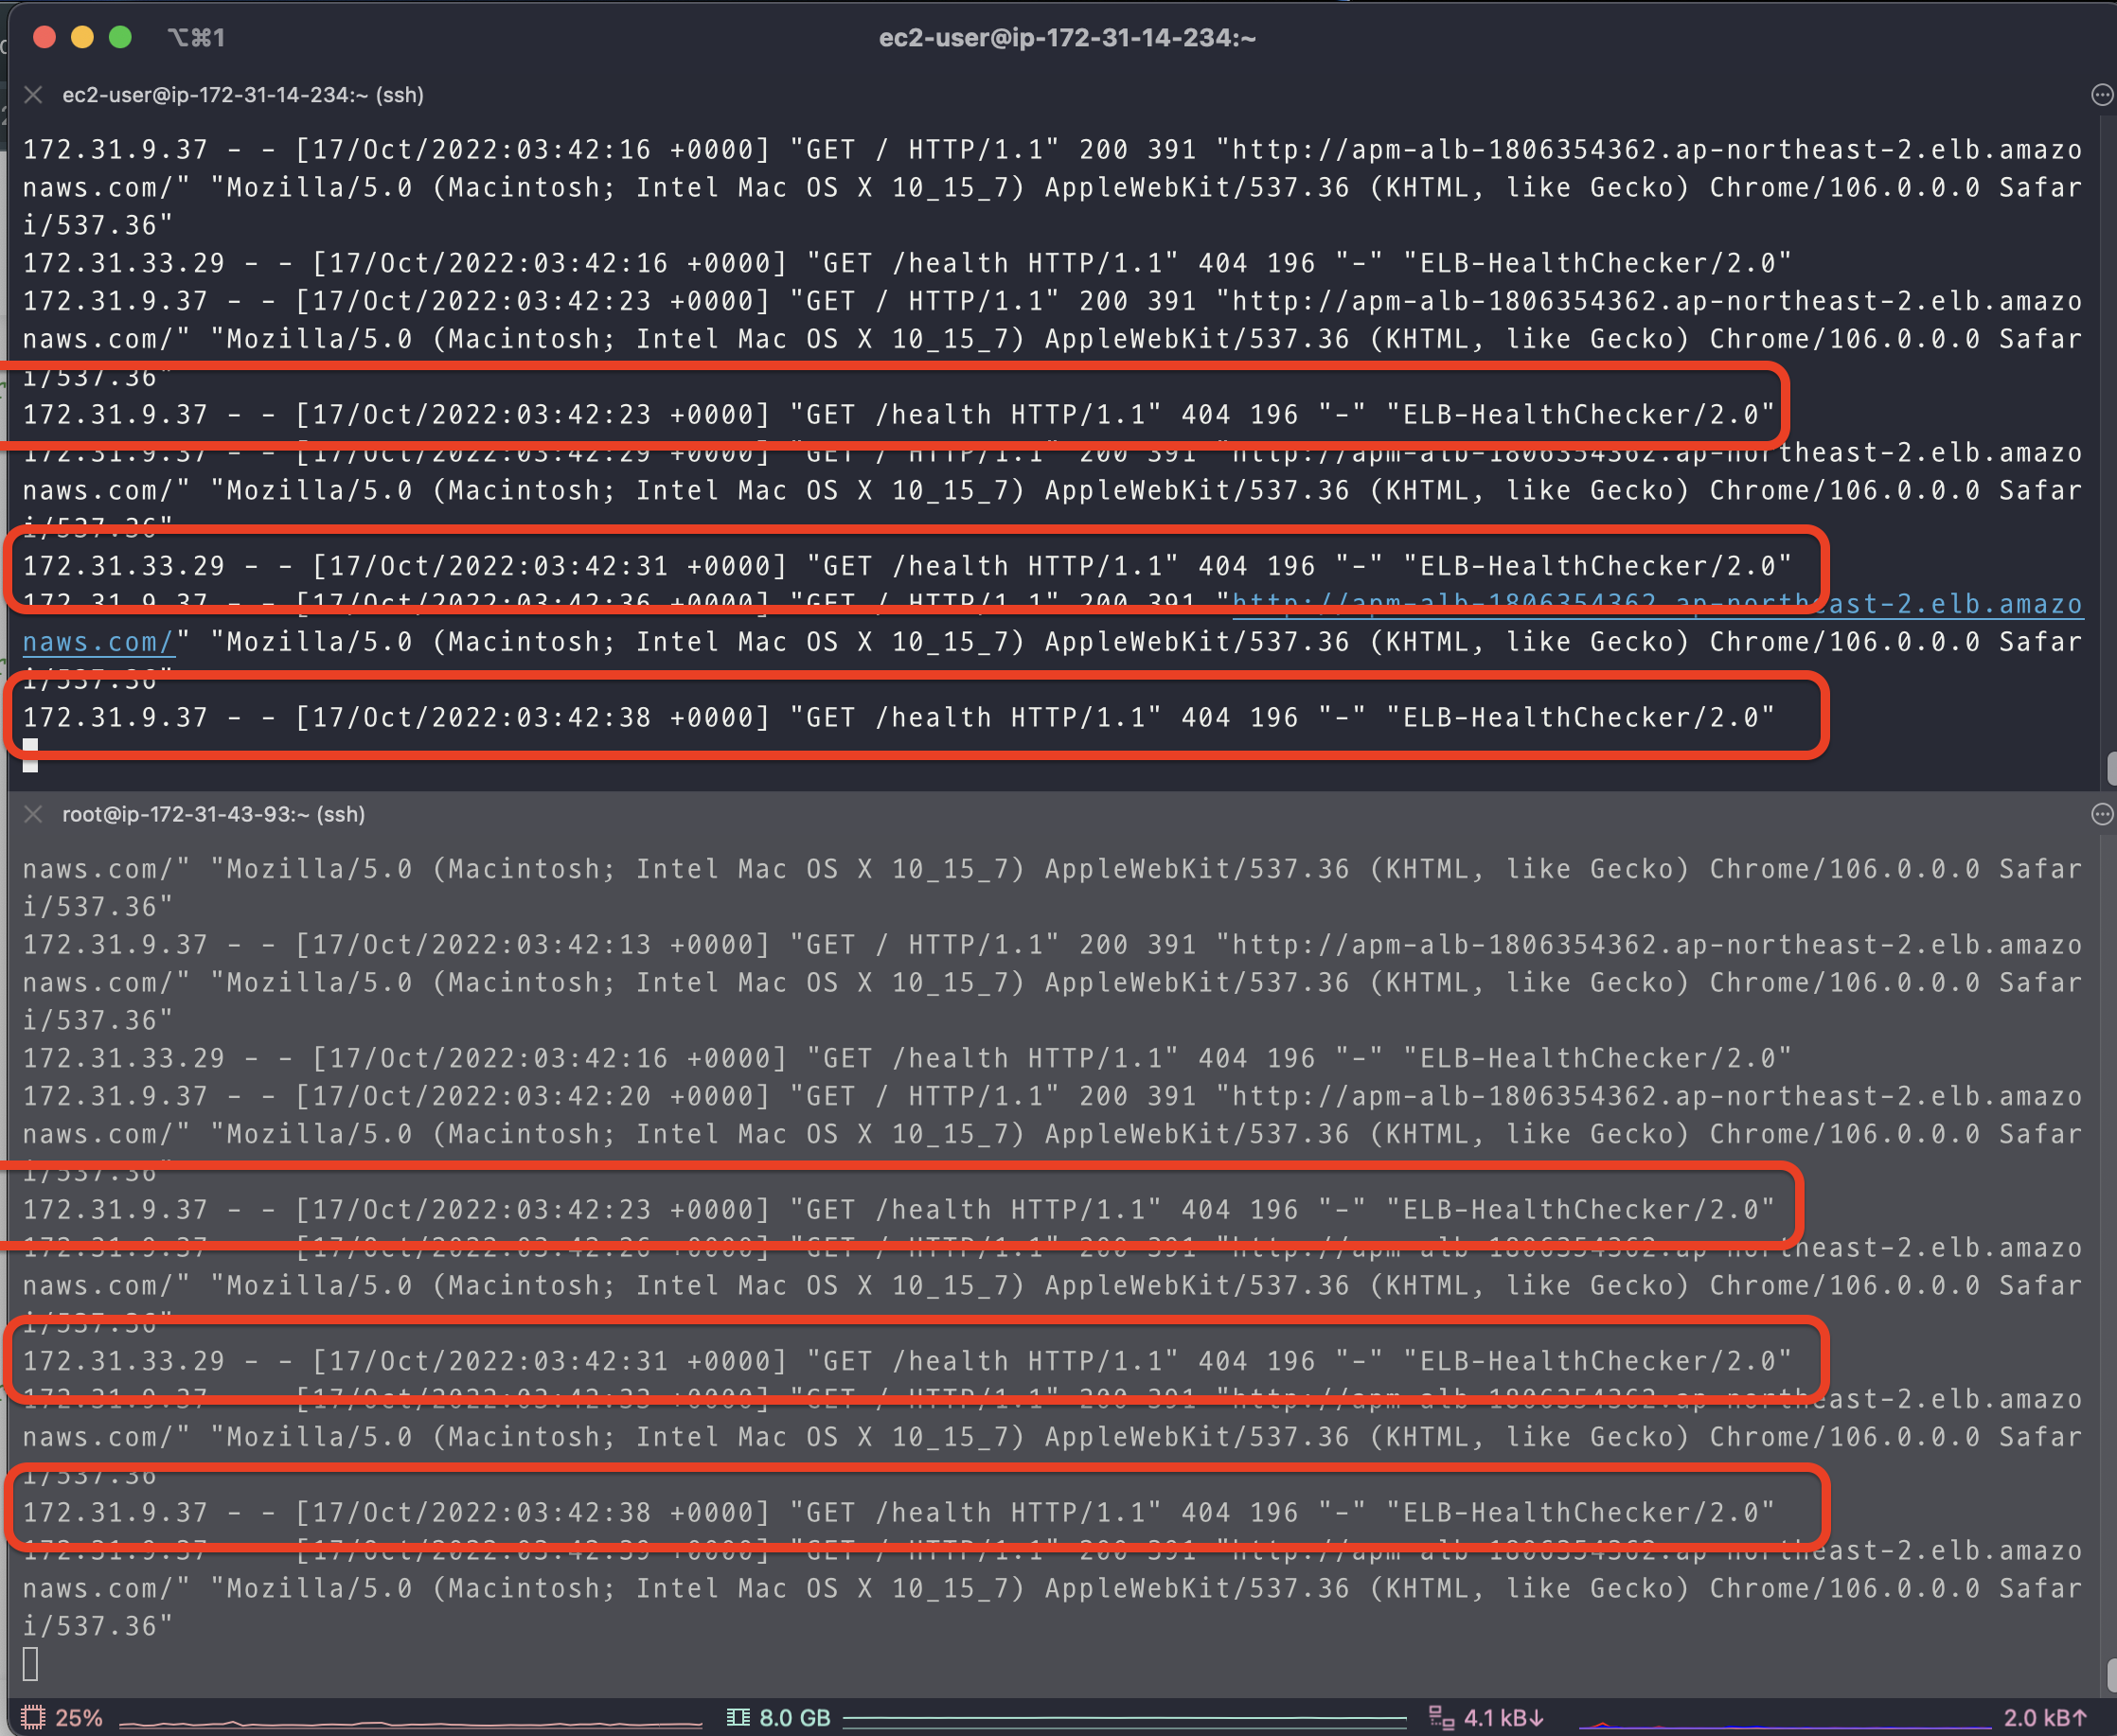
번갈아서 로그가 쌓이는 중 ..

-
헬스체크 편집
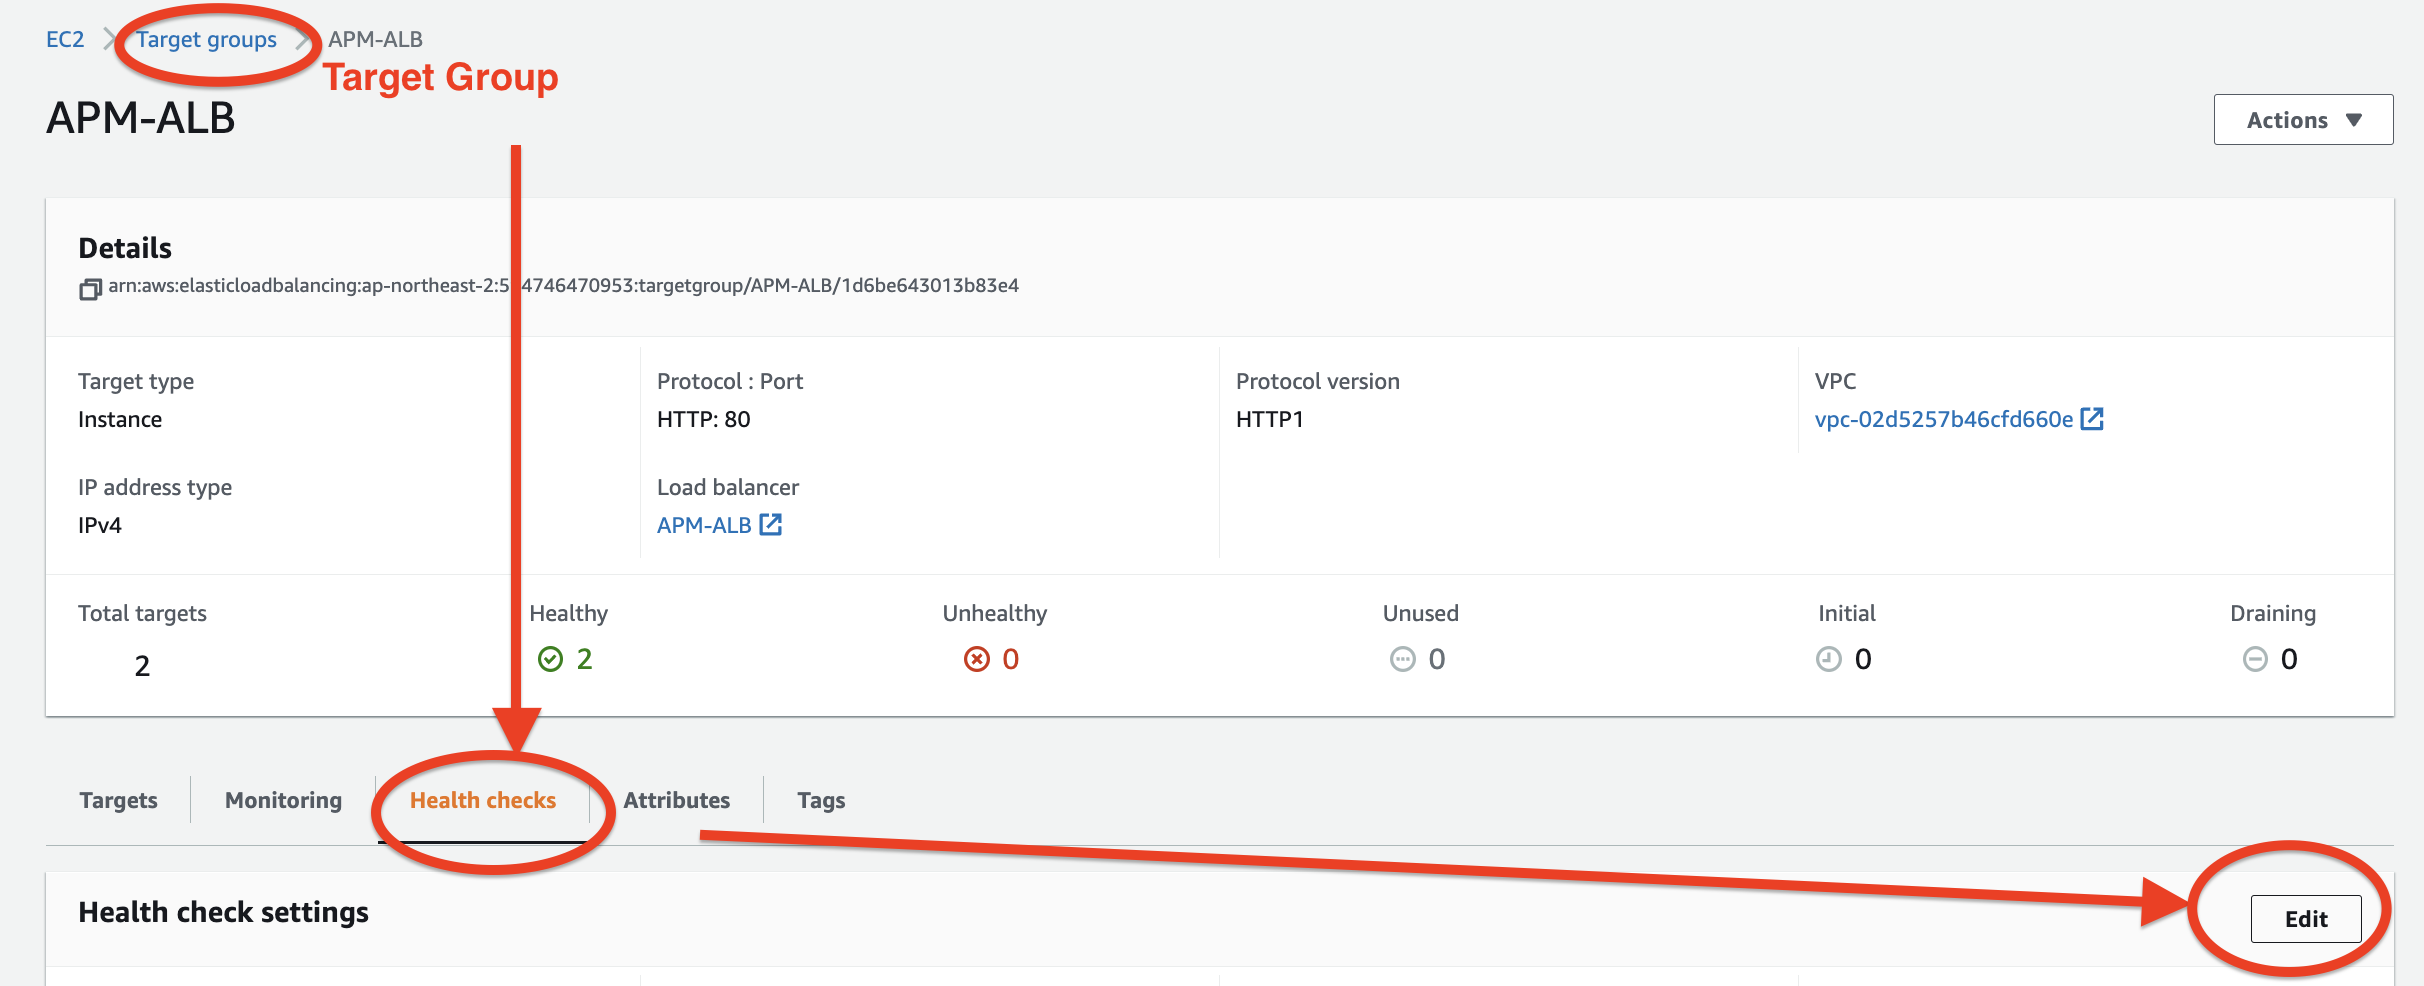
- 경로 및 시간 바꿔서 로그 확인해보기
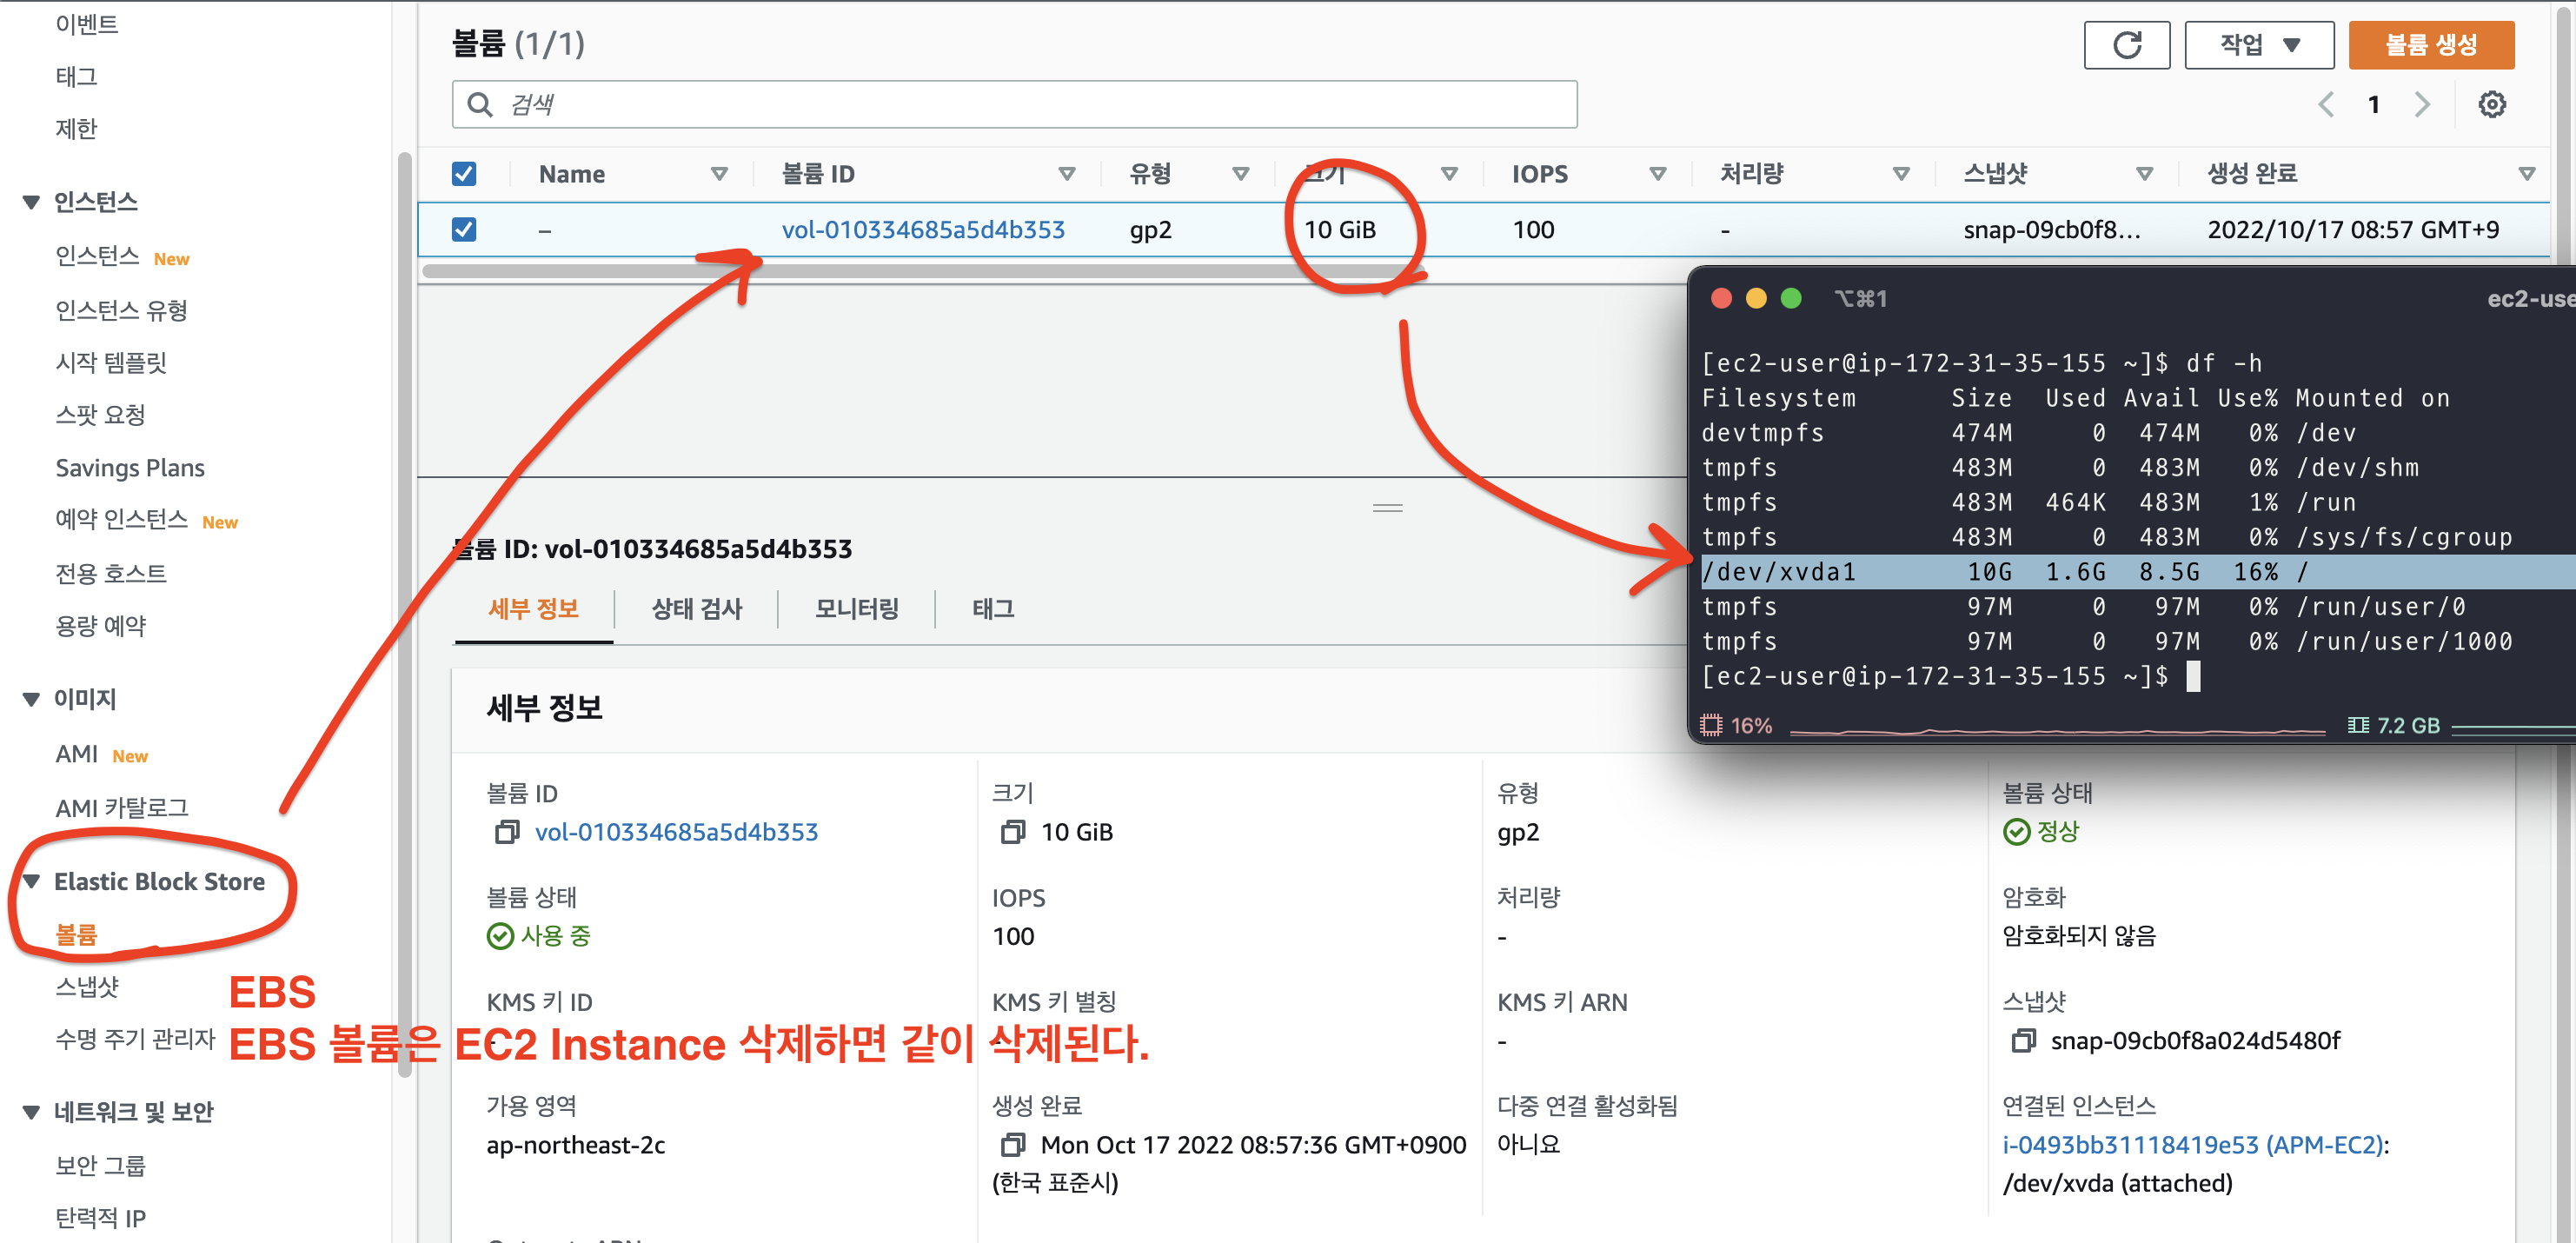
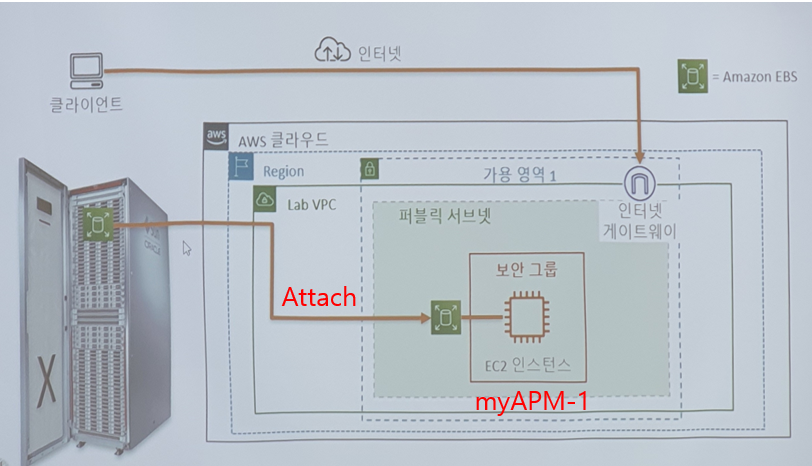
- EC2의 보호와 관리를 위해 EBS와 같은 볼륨이 필요하다.

- ephemeral Disk
- 가상의 임시영역
- 이건 왜 휘발성이야? 인스턴스와 라이프사이클이 같기 떄문이다.
프로비전은 돈을 안 냄 ! 쓴만큼만 냄
EBS
- EBS 볼륨 조회

xx 백화점은 10년동안 거래 데이터 보관
-> why? 분석.
결론: 저장의 목적은 분석이다.
Glacier: 자주 access하지 않는 데이터
storage gateway: 데이터 이전할 때 사용

스냅샷 이미지는 s3에 보관되어 있다.
disk = block device
[ec2-user@ip-172-31-14-234 ~]$ sudo fdisk -l
Disk /dev/xvda: 10 GiB, 10737418240 bytes, 20971520 sectors
Units: sectors of 1 * 512 = 512 bytes
Sector size (logical/physical): 512 bytes / 512 bytes
I/O size (minimum/optimal): 512 bytes / 512 bytes
Disklabel type: gpt
Disk identifier: 7F24463C-2CA8-4011-B531-E8704FF21B48

Device       Start      End  Sectors Size Type
/dev/xvda1    4096 20971486 20967391  10G Linux filesystem
/dev/xvda128  2048     4095     2048   1M BIOS boot

Partition table entries are not in disk order.


Disk /dev/xvdf: 10 GiB, 10737418240 bytes, 20971520 sectors
Units: sectors of 1 * 512 = 512 bytes
Sector size (logical/physical): 512 bytes / 512 bytes
I/O size (minimum/optimal): 512 bytes / 512 bytes


[ec2-user@ip-172-31-14-234 ~]$ lsblk
NAME    MAJ:MIN RM SIZE RO TYPE MOUNTPOINT
xvda    202:0    0  10G  0 disk
└─xvda1 202:1    0  10G  0 part /
xvdf    202:80   0  10G  0 disk ⭐ 좀 전에 볼륨 attach한 거


⭐ data라고 나오면 아직 file system..?
파티션 안했어?
[ec2-user@ip-172-31-14-234 ~]$ sudo file -s /dev/xvdf
/dev/xvdf: data


[ec2-user@ip-172-31-14-234 ~]$ sudo fdisk /dev/xvdf

Welcome to fdisk (util-linux 2.30.2).
Changes will remain in memory only, until you decide to write them.
Be careful before using the write command.

Device does not contain a recognized partition table.
Created a new DOS disklabel with disk identifier 0xbb31dfc1.

Command (m for help): n
Partition type
   p   primary (0 primary, 0 extended, 4 free)
   e   extended (container for logical partitions)
Select (default p): p
Partition number (1-4, default 1):
First sector (2048-20971519, default 2048):
Last sector, +sectors or +size{K,M,G,T,P} (2048-20971519, default 20971519):

Created a new partition 1 of type 'Linux' and of size 10 GiB.

Command (m for help): w
The partition table has been altered.
Calling ioctl() to re-read partition table.
Syncing disks.

[ec2-user@ip-172-31-14-234 ~]$ sudo fdisk -l
Disk /dev/xvdf: 10 GiB, 10737418240 bytes, 20971520 sectors
Units: sectors of 1 * 512 = 512 bytes
Sector size (logical/physical): 512 bytes / 512 bytes
I/O size (minimum/optimal): 512 bytes / 512 bytes
Disklabel type: dos
Disk identifier: 0xbb31dfc1

Device     Boot Start      End  Sectors Size Id Type
 ⭐ /dev/xvdf1       2048 20971519 20969472  10G 83 Linux  ⭐ 1이라는 숫자 붙었다


[ec2-user@ip-172-31-14-234 ~]$ lsblk
NAME    MAJ:MIN RM SIZE RO TYPE MOUNTPOINT
xvda    202:0    0  10G  0 disk
└─xvda1 202:1    0  10G  0 part /
xvdf    202:80   0  10G  0 disk
└─xvdf1 202:81   0  10G  0 part

[ec2-user@ip-172-31-14-234 ~]$ sudo mkfs.xfs /dev/xvdf1
meta-data=/dev/xvdf1             isize=512    agcount=4, agsize=655296 blks
         =                       sectsz=512   attr=2, projid32bit=1
         =                       crc=1        finobt=1, sparse=0
data     =                       bsize=4096   blocks=2621184, imaxpct=25
         =                       sunit=0      swidth=0 blks
naming   =version 2              bsize=4096   ascii-ci=0 ftype=1
log      =internal log           bsize=4096   blocks=2560, version=2
         =                       sectsz=512   sunit=0 blks, lazy-count=1
realtime =none                   extsz=4096   blocks=0, rtextents=0

## 아직도 여기 안들어와 /.
[ec2-user@ip-172-31-14-234 ~]$ df -h
Filesystem      Size  Used Avail Use% Mounted on
devtmpfs        474M     0  474M   0% /dev
tmpfs           483M     0  483M   0% /dev/shm
tmpfs           483M  424K  482M   1% /run
tmpfs           483M     0  483M   0% /sys/fs/cgroup
/dev/xvda1       10G  2.2G  7.9G  22% /
tmpfs            97M     0   97M   0% /run/user/1000

[ec2-user@ip-172-31-14-234 ~]$ mkdir DATA
[ec2-user@ip-172-31-14-234 ~]$ cd DATA/
[ec2-user@ip-172-31-14-234 DATA]$ pwd
/home/ec2-user/DATA
[ec2-user@ip-172-31-14-234 DATA]$ sudo mount /dev/xvdf1 /home/ec2-user/DATA
[ec2-user@ip-172-31-14-234 DATA]$ df -h
Filesystem      Size  Used Avail Use% Mounted on
devtmpfs        474M     0  474M   0% /dev
tmpfs           483M     0  483M   0% /dev/shm
tmpfs           483M  424K  482M   1% /run
tmpfs           483M     0  483M   0% /sys/fs/cgroup
/dev/xvda1       10G  2.2G  7.9G  22% /
tmpfs            97M     0   97M   0% /run/user/1000
⭐ /dev/xvdf1       10G   43M   10G   1% /home/ec2-user/DATA⭐ 잘 붙었다.
파티셔닝을 해야대 : sudo fdisk /dev/xvdf -> n p w
fstab..? 에 붙어야 영속적으로 사용가능
지금은 instance 끄면 볼륨 떨어짐
-> sudo mount /dev/xcdf1 /home/ec2-user/DATA 해줘야한다.
볼륨 생성 -> 가용영역 지정 -> 볼륨 연결
sudo fdisk -l
Disk /dev/xvdf: 10 GiB, 10737418240 bytes, 20971520 sectors
Units: sectors of 1 * 512 = 512 bytes
Sector size (logical/physical): 512 bytes / 512 bytes
I/O size (minimum/optimal): 512 bytes / 512 bytes

sudo fdisk /dev/xvdf 후
$ sudo fdisk -l
Disk /dev/xvdf: 10 GiB, 10737418240 bytes, 20971520 sectors
Units: sectors of 1 * 512 = 512 bytes
Sector size (logical/physical): 512 bytes / 512 bytes
I/O size (minimum/optimal): 512 bytes / 512 bytes
Disklabel type: dos
Disk identifier: 0x0ebf9b43

Device     Boot Start      End  Sectors Size Id Type
/dev/xvdf1       2048 20971519 20969472  10G 83 Linux

👻 파일 시스템 설정 전이라 에러남
[ec2-user@ip-172-31-43-93 DATA]$ sudo mount /dev/xvdf1 /home/ec2-user/DATA
mount: /home/ec2-user/DATA: wrong fs type, bad option, bad superblock on /dev/xvdf1, missing codepage or helper program, or other error.

👻 파일시스템 설정
[ec2-user@ip-172-31-43-93 DATA]$ sudo mkfs.xfs /dev/xvdf1
meta-data=/dev/xvdf1             isize=512    agcount=4, agsize=655296 blks
         =                       sectsz=512   attr=2, projid32bit=1
         =                       crc=1        finobt=1, sparse=0
data     =                       bsize=4096   blocks=2621184, imaxpct=25
         =                       sunit=0      swidth=0 blks
naming   =version 2              bsize=4096   ascii-ci=0 ftype=1
log      =internal log           bsize=4096   blocks=2560, version=2
         =                       sectsz=512   sunit=0 blks, lazy-count=1
realtime =none                   extsz=4096   blocks=0, rtextents=0

👻 마운트
[ec2-user@ip-172-31-43-93 DATA]$ sudo mount /dev/xvdf1 /home/ec2-user/DATA

[ec2-user@ip-172-31-43-93 DATA]$ lsblk
NAME    MAJ:MIN RM SIZE RO TYPE MOUNTPOINT
xvda    202:0    0  10G  0 disk
└─xvda1 202:1    0  10G  0 part /
xvdf    202:80   0  10G  0 disk
└─xvdf1 202:81   0  10G  0 part /home/ec2-user/DATA

[ec2-user@ip-172-31-43-93 DATA]$ df -h
Filesystem      Size  Used Avail Use% Mounted on
devtmpfs        474M     0  474M   0% /dev
tmpfs           483M     0  483M   0% /dev/shm
tmpfs           483M  424K  482M   1% /run
tmpfs           483M     0  483M   0% /sys/fs/cgroup
/dev/xvda1       10G  2.2G  7.9G  22% /
tmpfs            97M     0   97M   0% /run/user/1000
/dev/xvdf1       10G   43M   10G   1% /home/ec2-user/DATA

[ec2-user@ip-172-31-43-93 DATA]$ sudo umount /dev/xvdf1
[ec2-user@ip-172-31-43-93 DATA]$ df -h
Filesystem      Size  Used Avail Use% Mounted on
devtmpfs        474M     0  474M   0% /dev
tmpfs           483M     0  483M   0% /dev/shm
tmpfs           483M  424K  482M   1% /run
tmpfs           483M     0  483M   0% /sys/fs/cgroup
/dev/xvda1       10G  2.2G  7.9G  22% /

볼륨은 외장하드 같은 거라 mount/umount해도 데이터 사라지지 않음
실습
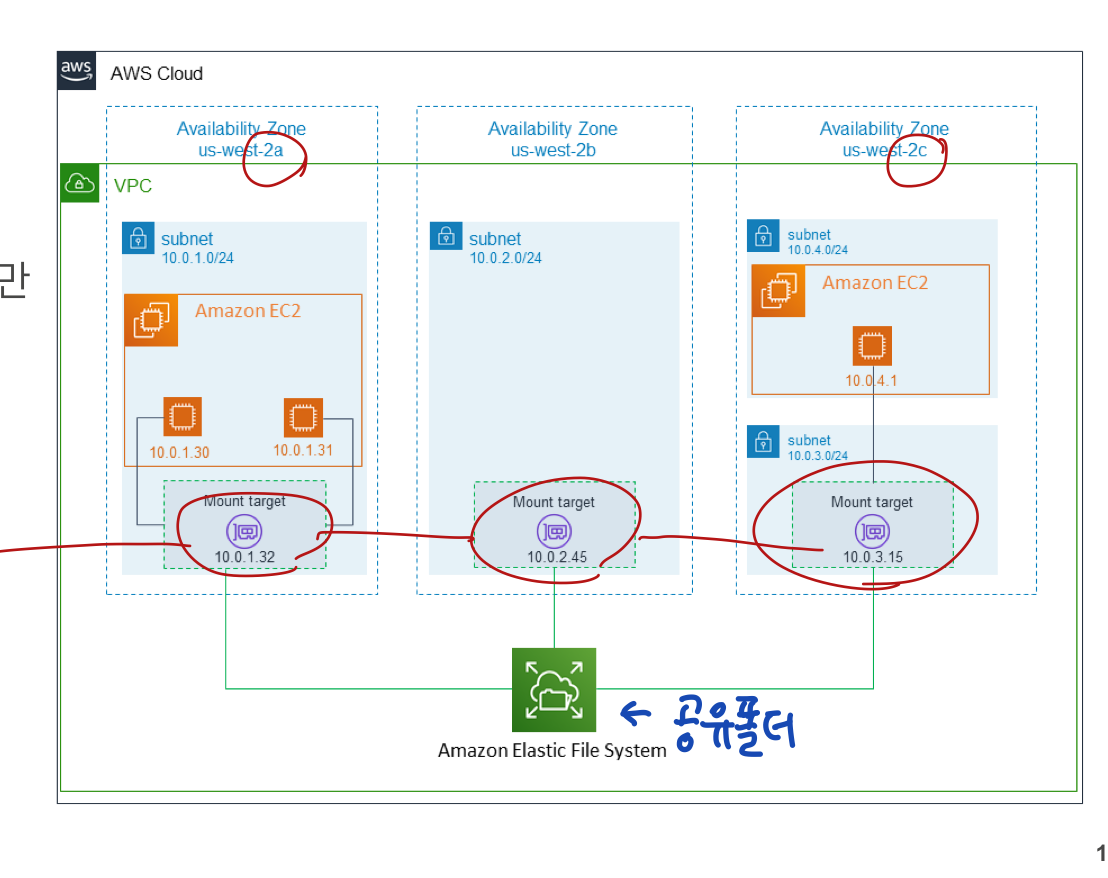
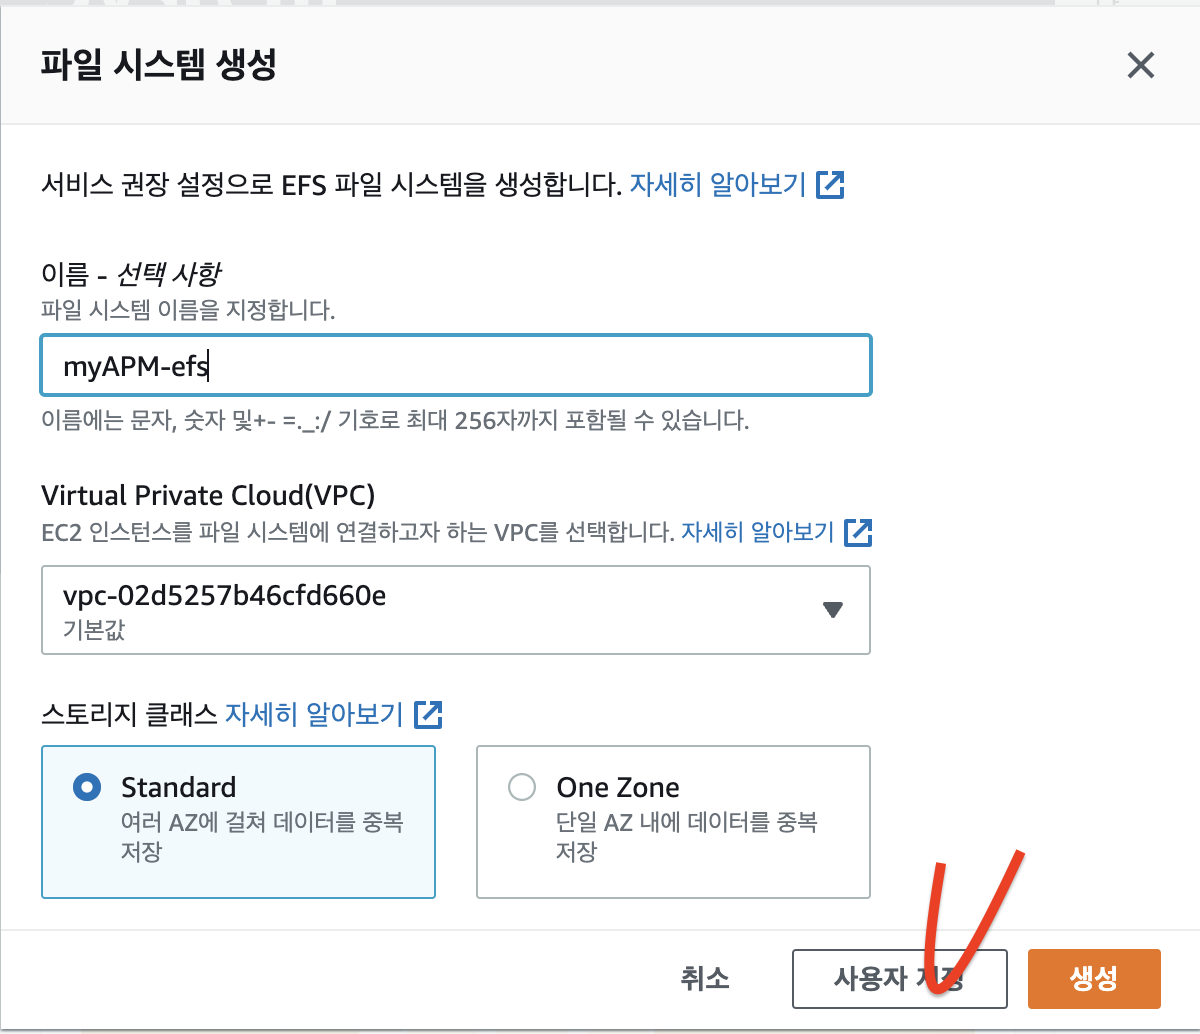
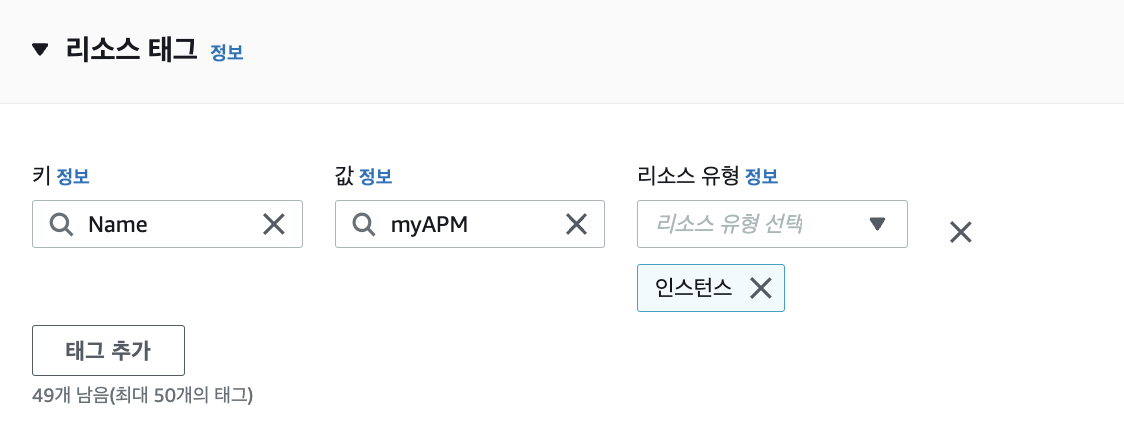
암호화 빼고, 태그 Name, myAPM 하고 다음
우리가 사용하는 a,c 만 남기고 삭제

3단계. 우리는 연습이라 아무것도 적용 안하고 다음으로 넘기겠다.
생성하고..
만든 것 확인

둘 다 사용가능이면 OK

연결을 눌러줍니다

그럼 이런 창이 뜸
⭐ 근데 이 전에 ! NFS의 포트 (2049)를 보안 그룹에서 열어줘야한다 !


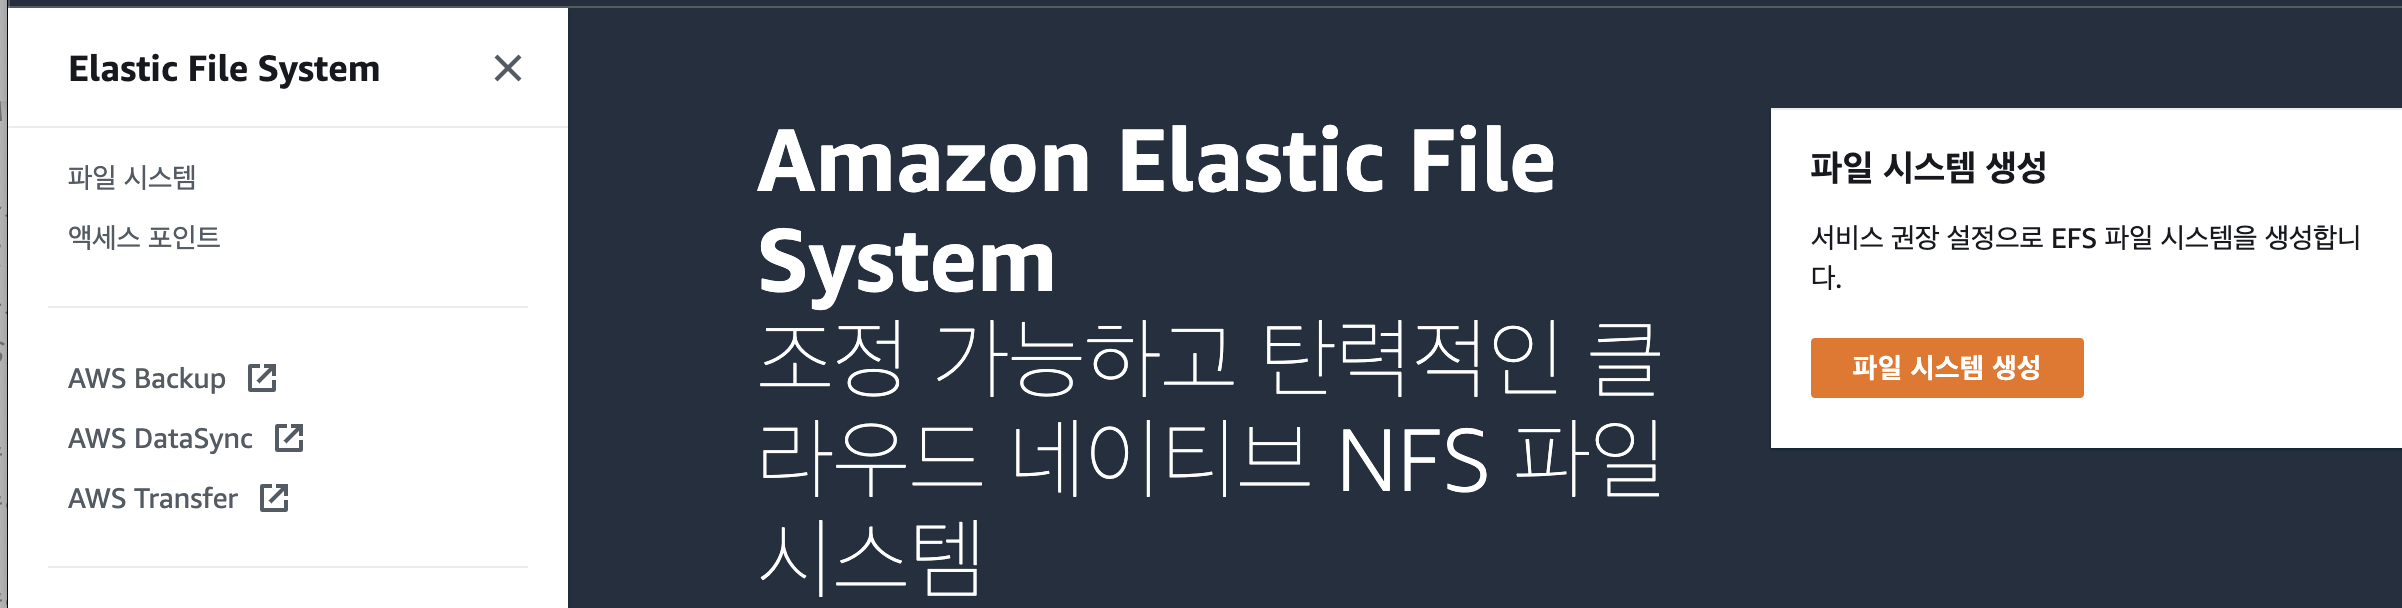
sudo yum -y install amazon-efs-utils

sudo mount -t efs -o tls fs-019b5231cf01eebb4:/ efs
제거 순서
메모장
⭐ 📘 📗 💭 🤔 📕 📔 🐳 ✍ 🥳 ⭐ 🐣 👻
LB group = target group ?
- 인스턴스 중지됨 -> ip 사라진다.

VPN
soft limit(default): 5개
요청하면 hard limit 값 바꿔준다.
/20 -> 4000개

라우팅 테이블은 서브넷에 붙어?
 -> 이게몬데
정책 상 스냅샷은 한 개 씩은 있어얗마
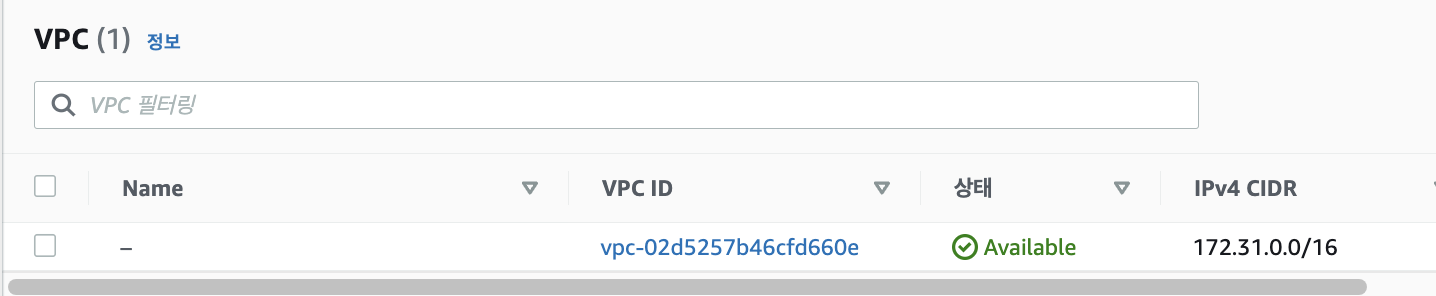
VPC 생성방법 2가지
1) 콘솔에서 직접 만들기
2) yaml 코드를 cloud formation에 집어넣어서 만들기
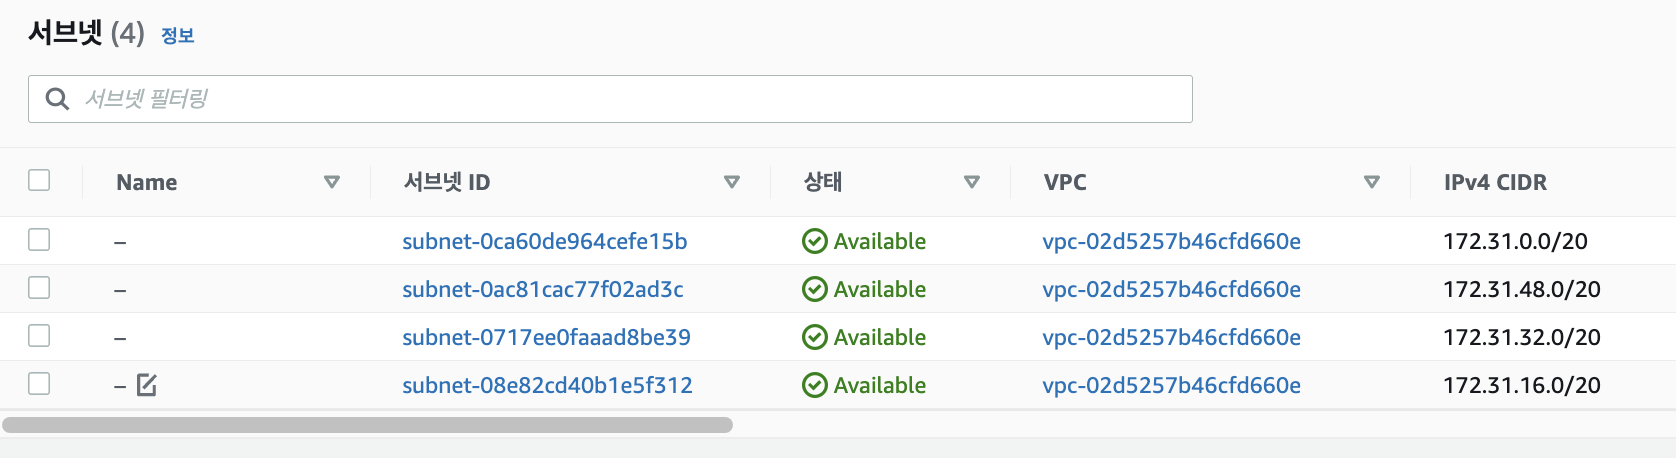
172.31.0.0/20 이거를 아래 사이트에 넣고 정보 보기
https://www.ipaddressguide.com/cidr
first IP : network ip
last IP : broadcast ip
aws에서 인스턴스 만들면 내역 5개 항상 뺴야됨(맨앞,맨뒤, aws에서 예약한 3개)
It's "Beige Mellow" that makes you feel at ease. We hope you have a wonderful day as well.