🐳 쿠버네티스
for Microservice
설치 3번할거임
vm에 4대를 올림. 최소용량 => 100GB, ubuntu, 다다음주 월요일 발표
OS세팅 -> 도커(container engine=dockerd, containerd,runC) 설치 -> 쿠버네티스 설치
왜 도커 먼저 설치? 쿠버네티스는 도커 엔진이없다. ! ~ ~ 그냥 관리도구라고?🤔
-> 쿠버네티스 버전 1.24 ~ 도커엔진에 contianerd, cri-o 로 바꿀거다~라고 해서 회사들이 이러지도 못하고 저러지도 못하는 중 인데
하튼 우리는 1.24 버전으로 세팅을 할 예정이다.
구글 GKE 는 이전 버전 ~
nexus와 동등한 프로그램 harbor.. nexus가 모다냐
🤔 파드는 컨테이너의 호스트 🤔
🤔 파드 속의 컨테이너는 IP가 있 없? 🤔
📅 교육 일정
⭐ 쿠버네티스 아키텍쳐 중요하다.

🌐 YAML 파일 작성할 때 도움되는 사이트
- 들여쓰기 잘 했는지
http://www.yamllint.com/
https://codebeautify.org/yaml-validator
https://onlineyamltools.com/validate-yaml
🐳 왜 쿠버네티스 사용
- 컨테이너화(Pod)된 워크로드와 서비스를 관리하기 위한 이식성이 있고, 확장가능한 오픈소스 플랫폼
- 이식하다 : 카카오에서도 쓸 수 있고 네이버에서도 쓸 수 있다. 내부 서비스는 똑같다.! 다만 카카오에서의 툴? 네이버에서 다루는 툴만 다룰 뿐 ~~
🐳 쿠버네티스는 PaaS, Docker도 PaaS
- 이식하다 : 카카오에서도 쓸 수 있고 네이버에서도 쓸 수 있다. 내부 서비스는 똑같다.! 다만 카카오에서의 툴? 네이버에서 다루는 툴만 다룰 뿐 ~~
- CNCF(Cloud Native Compouting Foundation) : https://www.cncf.io/ : 여기들어가면 우리가 배웠던거 슬쩍 슬쩍 지나간다.

-
지속적인 배포가 가능한 컨테이너를 마이크로서비스로 DevOps
-
쿠버네티스는 선언적 구성(YAML)과 자동화(Automation) 처리가 용이함.
- 우리는 yaml 코드 작성해서 던지면 쿠버네티스가 알아서 자동화
-
제한 없는 인프라 프레임워크 == 이게바로 클라우드 네이티브
- e.g. aws ec2
- 제한없이 컨테이너에 핵심 기능을 제공하여 인프라 종속을 제거
- ⭐ 쿠버 왜 사용 ! Desired state management : https://tech.ktcloud.com/68 ⭐
✍ Kube-proxy는 노드마다 한 개씩 올라가있다. : kube는 Service 라는 object를 이용해 외부접근
-
모듈화 : Service의 또 다른 기능
-
대규모 소프트웨어 배포 및 업데이트
- docker swarm에서 무중단 업데이트 가능하게 하는 것 -> rolling update
- kube는 상태 비저장(Stateless)이 기본, 컨테이너는 상태 비저장(Stateless)
- 근데 Stateful Pod도 만들 수 있음. -> Statefule object 구현 가능
- rolling-update, 🤔roll-out으로 버전 업데이트도 쉽게 가능
-
Cloud Native App의 기반 마련 (EKS, AKS, GKE) : 어던 클라우드든 쿠버네티스 운영은 같다.
- 우리는 이 중 EKS와 GKE를 쓸거다 ~
-
Serverless computing
- 우리는 MSA도 지향해야하지만, Serverless도 지향해야됨
- Serverless : 서버 구성 없이도 , 컨테이너도 없어! 코드만 있으면 됨
-
Desired state management : 내가 원하는대로 !
- 사용자가 정의한 구성(yaml)에 맞춰 사용자가 원하는 상태로 동작하도록 유지해주는 것
📕 쿠버네티스 설치
-
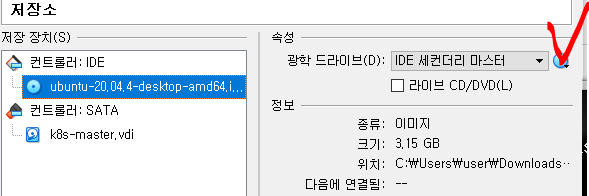
ubuntu 설치(폴더 미리 생성)

-
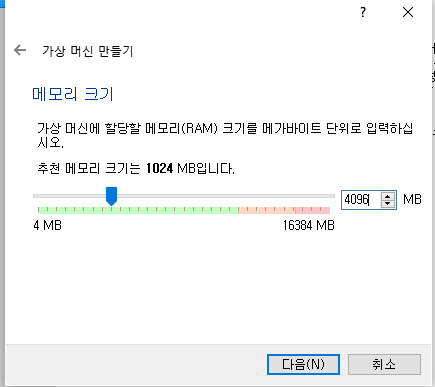
메모리 4GB 선택 -> 쿠버네티스 최소 사양 (cpu 2개, 메모리 4GB)

3. 동적할당 100GB

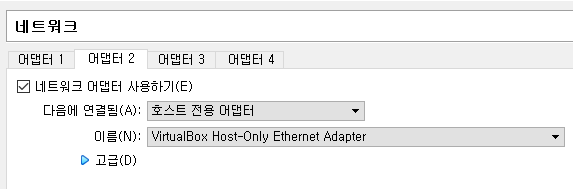
- 설정 오디오 USB 빼, 네트워크1: NAT, 네트워크2: 호스트전용

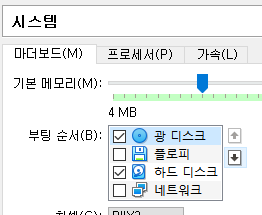
- 부팅
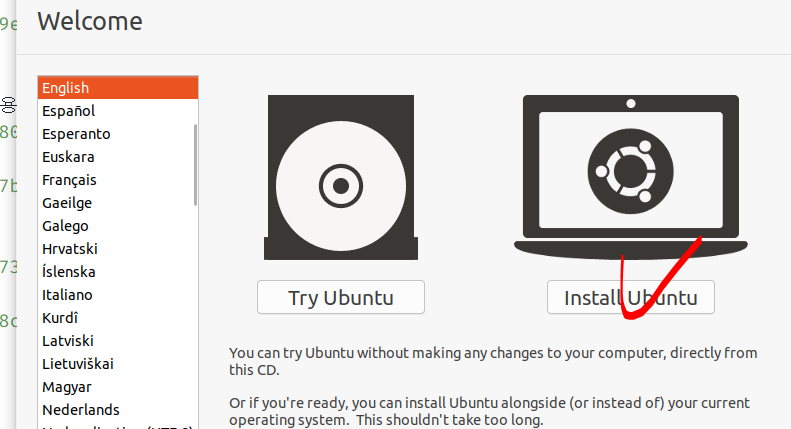
업데이트 안할거임

something else로 파티션 잡을거임

new partiton table > continue > freespace 두번 클릭


📕 설치
- OS 환경 구성 (ubuntu)
- 보안구성해제 -> firewall-cmd / Selinux
- swap 해제? kubernetes는 swap을 사용하지 않는다. 🤔 왜 ? container = process -> pod?🤔
- network forward 설정
- docker install -> containerd (cri-o) -> 1.24.5~ 이후 버전
- kubernetes tool
- kubeadm : bootstrap > init (초기화) -> workder node JOIN -> kubeadm의 upgrade 이용하면 됨 ?
- kubectl : CLI
- kubelet : process(daemon)
- CNI -> calico plugin -> cluster network (L3)
- dashboard -> PKI 인증서 -> windows에서 certmgr.msc 검색하면 인증서 나옴
- prometheus (metric 모니터링), & grafana(워커노드에 빨대 꽂아놓기)
📗 1. OS 환경 세팅
하나하나 왜 이렇게 세팅해야되는지 고민해봐라
- 보안구성해제(방화벽끄기)
yji@k8s-master:~$ sudo systemctl daemon-reload

yji@k8s-master:~$ sudo systemctl disable firewalld.service

yji@k8s-master:~$ sudo systemctl stop firewalld.service

yji@k8s-master:~$ sudo firewall-cmd --reload
FirewallD is not running
- swap 영역제거
sudo swapoff -a
sudo vi /etc/fstab -
> swap 라인에 주석처리하기 - 시간동기화
sudo apt -y install ntp
sudo systemctl daemon-reload
sudo systemctl enable ntp
sudo systemctl restart ntp
sudo systemctl status ntp
sudo ntpq -p


yji@k8s-master:~$ sudo ntpq -p
     remote           refid      st t when poll reach   delay   offset  jitter
==============================================================================
 0.ubuntu.pool.n .POOL.          16 p    -   64    0    0.000    0.000   0.000
 1.ubuntu.pool.n .POOL.          16 p    -   64    0    0.000    0.000   0.000
 2.ubuntu.pool.n .POOL.          16 p    -   64    0    0.000    0.000   0.000
 3.ubuntu.pool.n .POOL.          16 p    -   64    0    0.000    0.000   0.000
 ntp.ubuntu.com  .POOL.          16 p    -   64    0    0.000    0.000   0.000
 185.125.190.56  48.134.154.62    2 u    -   64    1  368.657  -72.384   0.000
- 포트포워딩 확인
sudo su -
cat /proc/sys/net/ipv4/ip_forward
0 ⭐  패킷 포워딩 못 하는 상태 !
## 그니까 1로 바꿔주자

echo '1' > /proc/sys/net/ipv4/ip_forward
cat /proc/sys/net/ipv4/ip_forward

root@k8s-master:~# cat /proc/sys/net/ipv4/ip_forward
1 ⭐ 1로 잘 바뀌어 있다.
📗 2. docker install
필요한 패키지 설치
# 1.
sudo apt -y install \
apt-transport-https \
ca-certificates \
curl \
software-properties-common

# 2.
curl -fsSL https://download.docker.com/linux/ubuntu/gpg | sudo apt-key --keyring /etc/apt/trusted.gpg.d/docker.gpg add -

# 3.
sudo add-apt-repository "deb [arch=amd64] https://download.docker.com/linux/ubuntu/$(lsb_release -cs) stable"

# 4.
tail /etc/apt/sources.list


deb [arch=amd64] https://download.docker.com/linux/ubuntu focal stable
# deb-src [arch=amd64] https://download.docker.com/linux/ubuntu focal stable


# 5.
sudo apt -y update

apt-cache policy docker-ce

sudo apt-get -y install docker-ce

sudo docker version

sudo docker info | grep -i cgroup
 Cgroup Driver: cgroupfs
 Cgroup Version: 1
  💭💭 cgroupfs
    : 자원할당 -> 제한 -> request & limit
    : kube는 cgroup을 사용하지않고, 상위 process " systemd"를 사용해야한다.
그니까 croupfs는 kube가 안받아주니까 이걸 systemd로 바꾸자


sudo vi /etc/docker/daemon.json
{
  "exec-opts": ["native.cgroupdriver=systemd⭐⭐ systemd로 바꿔줘 "],
  "log-driver": "json-file",
  "log-opts": {
    "max-size": "100m"
  },
  "storage-driver": "overlay2",
  "storage-opts": [
    "overlay2.override_kernel_check=true"
  ]
}

# 위의 파일 적용하기 위해 도커 내렸다가 올리기
# docker를 서비스로 등록하기
sudo mkdir -p /etc/systemd/system/docker.service.d
sudo systemctl daemon-reload
sudo systemctl enable docker
sudo systemctl restart docker
sudo systemctl status docker


## 🥳 systemd로 바뀌어 있으면 성공
sudo docker info | grep -i cgroup

root@k8s-master:~# sudo docker info | grep -i cgroup
 Cgroup Driver: systemd
 Cgroup Version: 1
- 복제 * 3
- k8s-node1 / k8s-node2 / k8s-node3
- KUBERNETS TOOL
- From kubernetes repo.
## 키 받아오기
root@k8s-master:~# curl -s https://packages.cloud.google.com/apt/doc/apt-key.gpg | sudo apt-key add -
OK
## repository 등록
cat <<EOF | sudo tee /etc/apt/sources.list.d/kubernetes.list
deb https://apt.kubernetes.io/ kubernetes-xenial main
EOF
##
sudo apt -y update
### 🐳 이제 3대 도구 설치
# docker 버전 확인 -> 카카오는 1.19.~?
root@k8s-master:~# sudo apt-cache policy kubeadm | grep Candidate
Candidate: 1.25.2-00
# 우리는 1.24.5 버전을 설치해보자
✍ 1.24.5-00
1 Major
24 Minor
5 patchset
root@k8s-master:~# sudo apt -y install kubeadm=1.24.5-00 kubelet=1.24.5-00 kubectl=1.24.5-00
🤔 도구 버전이 쿠버네티스 버전이 된다 .
🤔 그럼 도구 버전이 a, b, c로 찢어지면?
sudo apt list | grep kubernetes
kubeadm/kubernetes-xenial 1.25.2-00 amd64 [upgradable from: ⭐1.24.5-00]
kubectl/kubernetes-xenial 1.25.2-00 amd64 [upgradable from: ⭐1.24.5-00]
kubelet/kubernetes-xenial 1.25.2-00 amd64 [upgradable from: ⭐1.24.5-00]
⭐kubelet은 죽으면 안된다 ! ⭐
## kubelet 항상 살아있게 하기
sudo systemctl daemon-reload
sudo systemctl enable --now kubelet
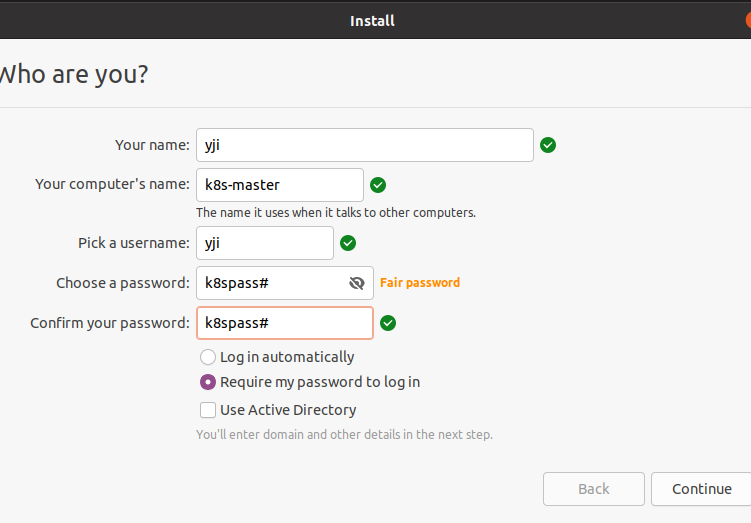
192.168.56.100 k8s-master
192.168.56.101 k8s-node1
192.168.56.102 k8s-node2
192.168.56.103 k8s-node3노드 복제
IP 및 hostname 변경
##  버전 확인
yji@k8s-master:~$  kubectl version
Kustomize Version: v4.5.4

yji@k8s-master:~$ kubelet --version
Kubernetes v1.24.5

yji@k8s-master:~$ kubeadm version
kubeadm version: &version.Info{Major:"1", Minor:"24", GitVersion:"v1.24.5", GitCommit:"e979822c185a14537054f15808a118d7fcce1d6e", GitTreeState:"clean", BuildDate:"2022-09-14T16:41:02Z", GoVersion:"go1.18.6", Compiler:"gc", Platform:"linux/amd64"}

## 뭘 배제하고 써야해서 이름 변경해줘 (노드 3개 모두)
yji@k8s-master:~$ cd /etc/containerd/
yji@k8s-master:/etc/containerd$ ls
config.toml

yji@k8s-master:/etc/containerd$ sudo mv config.toml config.toml.org

yji@k8s-master:/etc/containerd$ ls
config.toml.org

## containerd 재시작
sudo systemctl restart containerd.service
sudo systemctl restart kubelet- ⭐ join 키 복사해놓기 !
yji@k8s-master:~$ sudo kubeadm init --pod-network-cidr=10.96.0.0/12 --apiserver-advertise-address=192.168.56.100
I0929 14:05:30.660903    4120 version.go:255] remote version is much newer: v1.25.2; falling back to: stable-1.24
[init] Using Kubernetes version: v1.24.6
[preflight] Running pre-flight checks
[preflight] Pulling images required for setting up a Kubernetes cluster
[preflight] This might take a minute or two, depending on the speed of your internet connection
[preflight] You can also perform this action in beforehand using 'kubeadm config images pull'


[certs] Using certificateDir folder "/etc/kubernetes/pki"
[certs] Generating "ca" certificate and key
[certs] Generating "apiserver" certificate and key
[certs] apiserver serving cert is signed for DNS names [k8s-master kubernetes kubernetes.default kubernetes.default.svc kubernetes.default.svc.cluster.local] and IPs [10.96.0.1 192.168.56.100]
[certs] Generating "apiserver-kubelet-client" certificate and key
[certs] Generating "front-proxy-ca" certificate and key
[certs] Generating "front-proxy-client" certificate and key
[certs] Generating "etcd/ca" certificate and key
[certs] Generating "etcd/server" certificate and key
[certs] etcd/server serving cert is signed for DNS names [k8s-master localhost] and IPs [192.168.56.100 127.0.0.1 ::1]
[certs] Generating "etcd/peer" certificate and key
[certs] etcd/peer serving cert is signed for DNS names [k8s-master localhost] and IPs [192.168.56.100 127.0.0.1 ::1]
[certs] Generating "etcd/healthcheck-client" certificate and key
[certs] Generating "apiserver-etcd-client" certificate and key
[certs] Generating "sa" key and public key
[kubeconfig] Using kubeconfig folder "/etc/kubernetes"
[kubeconfig] Writing "admin.conf" kubeconfig file
[kubeconfig] Writing "kubelet.conf" kubeconfig file
[kubeconfig] Writing "controller-manager.conf" kubeconfig file
[kubeconfig] Writing "scheduler.conf" kubeconfig file
[kubelet-start] Writing kubelet environment file with flags to file "/var/lib/kubelet/kubeadm-flags.env"
[kubelet-start] Writing kubelet configuration to file "/var/lib/kubelet/config.yaml"
[kubelet-start] Starting the kubelet
[control-plane] Using manifest folder "/etc/kubernetes/manifests"
[control-plane] Creating static Pod manifest for "kube-apiserver"
[control-plane] Creating static Pod manifest for "kube-controller-manager"
[control-plane] Creating static Pod manifest for "kube-scheduler"
[etcd] Creating static Pod manifest for local etcd in "/etc/kubernetes/manifests"
[wait-control-plane] Waiting for the kubelet to boot up the control plane as static Pods from directory "/etc/kubernetes/manifests". This can take up to 4m0s
[apiclient] All control plane components are healthy after 17.505233 seconds
[upload-config] Storing the configuration used in ConfigMap "kubeadm-config" in the "kube-system" Namespace
[kubelet] Creating a ConfigMap "kubelet-config" in namespace kube-system with the configuration for the kubelets in the cluster
[upload-certs] Skipping phase. Please see --upload-certs
[mark-control-plane] Marking the node k8s-master as control-plane by adding the labels: [node-role.kubernetes.io/control-plane node.kubernetes.io/exclude-from-external-load-balancers]
[mark-control-plane] Marking the node k8s-master as control-plane by adding the taints [node-role.kubernetes.io/master:NoSchedule node-role.kubernetes.io/control-plane:NoSchedule]
[bootstrap-token] Using token: ne514e.3whbjkumumnv549t
[bootstrap-token] Configuring bootstrap tokens, cluster-info ConfigMap, RBAC Roles
[bootstrap-token] Configured RBAC rules to allow Node Bootstrap tokens to get nodes
[bootstrap-token] Configured RBAC rules to allow Node Bootstrap tokens to post CSRs in order for nodes to get long term certificate credentials
[bootstrap-token] Configured RBAC rules to allow the csrapprover controller automatically approve CSRs from a Node Bootstrap Token
[bootstrap-token] Configured RBAC rules to allow certificate rotation for all node client certificates in the cluster
[bootstrap-token] Creating the "cluster-info" ConfigMap in the "kube-public" namespace
[kubelet-finalize] Updating "/etc/kubernetes/kubelet.conf" to point to a rotatable kubelet client certificate and key
[addons] Applied essential addon: CoreDNS
[addons] Applied essential addon: kube-proxy

Your Kubernetes control-plane has initialized successfully!

To start using your cluster, you need to run the following as a regular user:
⭐
  mkdir -p $HOME/.kube
  sudo cp -i /etc/kubernetes/admin.conf $HOME/.kube/config
  sudo chown $(id -u):$(id -g) $HOME/.kube/config
⭐
Alternatively, if you are the root user, you can run:

  export KUBECONFIG=/etc/kubernetes/admin.conf

You should now deploy a pod network to the cluster.
Run "kubectl apply -f [podnetwork].yaml" with one of the options listed at:
  https://kubernetes.io/docs/concepts/cluster-administration/addons/

Then you can join any number of worker nodes by running the following on each as root:

kubeadm join 192.168.56.100:6443 --token ne514e.3whbjkumumnv549t \
        --discovery-token-ca-cert-hash sha256:cd1ee6c48f6aaf4f80df23797f77b3042df4af904a922c8ae109ac3ddc90244a
---- 여기까지 로그 ~


yji@k8s-master:~$ mkdir -p $HOME/.kube
yji@k8s-master:~$ sudo cp -i /etc/kubernetes/admin.conf $HOME/.kube/config
yji@k8s-master:~$ sudo chown $(id -u):$(id -g) $HOME/.kube/config


sudo apt -y install net-tools
sudo netstat -nlp | grep LISTEN

tcp6       0      0 :::6443                 :::*                    LISTEN      5042/kube-apiserver
tcp6       0      0 :::10250                :::*                    LISTEN      5174/kubelet
tcp6       0      0 :::10256                :::*                    LISTEN      5310/kube-proxy
tcp        0      0 192.168.56.100:2379     0.0.0.0:*               LISTEN      5025/etcd
tcp        0      0 192.168.56.100:2380     0.0.0.0:*               LISTEN      5025/etcd
tcp        0      0 127.0.0.1:10248         0.0.0.0:*               LISTEN      5174/kubelet
tcp        0      0 127.0.0.1:10249         0.0.0.0:*               LISTEN      5310/kube-proxy
tcp        0      0 127.0.0.1:10259         0.0.0.0:*               LISTEN      5011/kube-scheduler
tcp        0      0 127.0.0.1:10257         0.0.0.0:*               LISTEN      5063/kube-controlle
tcp        0      0 127.0.0.1:40045         0.0.0.0:*               LISTEN      2692/containerd


echo "source <(kubectl completion bash)" >> .bashrc


yji@k8s-master:~$ kubectl get no
NAME         STATUS     ROLES           AGE     VERSION
k8s-master   NotReady   control-plane   5m26s   v1.24.5


## 여기까지 k8s-master 셋팅완료 !

## woker1, worker2 에 join키 붙이기

## master에서 확인
⭐ 아직 NotReady 해제 안되는게 맞음
yji@k8s-master:~$ kubectl get nodes
NAME         STATUS     ROLES           AGE     VERSION
k8s-master   NotReady   control-plane   7m21s   v1.24.5
k8s-node1    NotReady   <none>          8s      v1.24.5
k8s-node2    NotReady   <none>          19s     v1.24.5


## kubelet : 쿠버네티스의 통신병 !
-> runnig 상태인지 확인해라
yji@k8s-master:~$ sudo systemctl status kubelet
● kubelet.service - kubelet: The Kubernetes Node Agent
     Loaded: loaded (/lib/systemd/system/kubelet.service; enabled; vendor prese>
    Drop-In: /etc/systemd/system/kubelet.service.d
             └─10-kubeadm.conf
     Active: active (running)

yji@k8s-master:~$ kubectl get po --all-namespaces
NAMESPACE     NAME                                 READY   STATUS    RESTARTS   AGE
kube-system   coredns-6d4b75cb6d-bppcr             0/1     ⭐ Pending 아직 NW 구성안되서 pending 상태  0          9m1s
kube-system   coredns-6d4b75cb6d-d5r65             0/1     Pending   0          9m1s
kube-system   etcd-k8s-master                      1/1     Running   0          9m18s
kube-system   kube-apiserver-k8s-master            1/1     Running   0          9m16s
kube-system   kube-controller-manager-k8s-master   1/1     Running   0          9m12s
kube-system   ⭐kube-proxy-27spc                     1/1     Running   0          2m6s
kube-system   ⭐kube-proxy-4hnhk                     1/1     Running   0          9m1s
kube-system   ⭐kube-proxy-b42z7    ✍ 노드 3대라 proxy가 3대                 1/1     Running   0          2m17s
kube-system   kube-scheduler-k8s-master            1/1     Running   0          9m12s


## ⭐각각 yaml 을 보면 kind: Pod라고 써있다 => 결국 컨테이너구나⭐
yji@k8s-master:/etc/kubernetes/manifests$ ls
etcd.yaml  kube-apiserver.yaml  kube-controller-manager.yaml  kube-scheduler.yaml
4. CNI -> calico plugin -> cluster
https://projectcalico.docs.tigera.io/about/about-calico
각 노드별로 calico 데몬이 떠서 네트워크를 연결해줌. pall로 Pending 상태였던 것들이 Running으로 바껴?
kubectl apply : 원하는 상태를 적용합니다. 보통 -f 옵션으로 파일과 함께 사용합니다.
## calico 다운로드
https://docs.projectcalico.org/manifests/calico.yaml
yji@k8s-master:~$ curl -O https://docs.projectcalico.org/manifests/calico.yaml

## calico 적용
kubectl apply -f calico.yaml

## 바로 pall 로 상태 확인하기
yji@k8s-master:~$ pall
NAMESPACE     NAME                                       READY   STATUS     RESTARTS   AGE
kube-system   calico-kube-controllers-6799f5f4b4-tr7p9   0/1     Pending    0          83s
kube-system   calico-node-2jcjw                          0/1     Init:0/3   0          83s
kube-system   calico-node-6j7hg                          0/1     Init:0/3   0          83s
kube-system   calico-node-ljj52                          0/1     Init:2/3   0          83s

yji@k8s-master:~$ pall
NAMESPACE     NAME                                       READY   STATUS              RESTARTS   AGE
kube-system   calico-kube-controllers-6799f5f4b4-tr7p9   0/1     ContainerCreating   0          2m14s
kube-system   calico-node-2jcjw                          0/1     Init:1/3            0          2m14s
kube-system   calico-node-6j7hg                          0/1     Init:1/3            0          2m14s
kube-system   calico-node-ljj52                          0/1     PodInitializing     0          2m14s
kube-system   coredns-6d4b75cb6d-bppcr                   0/1     ContainerCreating   0          24m
kube-system   coredns-6d4b75cb6d-d5r65                   0/1     ContainerCreating   0          24m

yji@k8s-master:~$ pall
NAMESPACE     NAME                                       READY   STATUS         RESTARTS   AGE
kube-system   calico-kube-controllers-6799f5f4b4-tr7p9   0/1     ErrImagePull   0          5m22s
kube-system   calico-node-2jcjw                          1/1     Running        0          5m22s
kube-system   calico-node-6j7hg                          1/1     Running        0          5m22s
kube-system   calico-node-ljj52                          1/1     Running        0          5m22s
kube-system   coredns-6d4b75cb6d-bppcr                   1/1     Running        0          27m
kube-system   coredns-6d4b75cb6d-d5r65                   1/1     Running        0          27m
kube-system   etcd-k8s-master                            1/1     Running        0          27m
5. dashboard -> PKI 인증서 -> window -certmgr.msc ... cmd
- prometheus & exporter & grafana
왜 해 => 크롬에서 접근 가능하도록 !
namespace = 영역, 대쉬보드는 자신의 namespace를 가지고있다.
->
yji@k8s-master:~$ pall
NAMESPACE              NAME                                        READY   STATUS    RESTARTS   AGE
kubernetes-dashboard   dashboard-metrics-scraper-8c47d4b5d-8xcws   1/1     Running   0          6m8s
kubernetes-dashboard kubernetes-dashboard-67bd8fc546-mq2dx 1/1 Running 0 6m9s-
rolebind -> cluster-admin의 *을 kubernetes-dashboard에 연결(rolebinding)
-
token 생성
실습 명령어
kubectl apply -f https://raw.githubusercontent.com/kubernetes/dashboard/v2.7.0/aio/deploy/recommended.yaml

pall -> 모두 running이면 OK


kubectl get clusterrole cluster-admin
여기에 대한 자세한 정보를 보고 싶으면 describe


yji@k8s-master:~$ kubectl get clusterrole cluster-admin
NAME            CREATED AT
cluster-admin   2022-09-29T05:09:38Z

yji@k8s-master:~$ kubectl get sa -n kubernetes-dashboard
NAME                   SECRETS   AGE
default                0         7m39s
kubernetes-dashboard   0         7m39s

yji@k8s-master:~/dashboard_token$ vim ClusterRoleBind.yaml

yji@k8s-master:~/dashboard_token$ kubectl create -f ClusterRoleBind.yaml
clusterrolebinding.rbac.authorization.k8s.io/kubernetes-dashboard2 created

---- 여끼까지는 dashboard token을 제공하던 1.23.x~ 버전의 이야기
이 다음부터는 1.24.x 이야기

## admin-user 계정생성 > 계정 생성 하고나서는 아무 권한 없음

##
yji@k8s-master:~/dashboard_token$ vim ClusterRoleBind-admin-user.yaml

yji@k8s-master:~/dashboard_token$ kubectl create -f ClusterRoleBind-admin-user.yaml
clusterrolebinding.rbac.authorization.k8s.io/admin-user created

vim sa-admin-user.yaml
kubectl apply -f sa-admin-user.yaml


yji@k8s-master:~/dashboard_token$ kubectl -n kubernetes-dashboard create token admin-user
eyJhbGciOiJSUzI1NiIsImtpZCI6ImNNRndlcUFXemJfWU51eWpQTGRnWUMzNlJZRm1Sa0lzVktCLVVBMjdNNlEifQ.eyJhdWQiOlsiaHR0cHM6Ly9rdWJlcm5ldGVzLmRlZmF1bHQuc3ZjLmNsdXN0ZXIubG9jYWwiXSwiZXhwIjoxNjY0NDM4MTc2LCJpYXQiOjE2NjQ0MzQ1NzYsImlzcyI6Imh0dHBzOi8va3ViZXJuZXRlcy5kZWZhdWx0LnN2Yy5jbHVzdGVyLmxvY2FsIiwia3ViZXJuZXRlcy5pbyI6eyJuYW1lc3BhY2UiOiJrdWJlcm5ldGVzLWRhc2hib2FyZCIsInNlcnZpY2VhY2NvdW50Ijp7Im5hbWUiOiJhZG1pbi11c2VyIiwidWlkIjoiMDJiOGYzZDQtNmM0MS00MDdlLTllZjUtOWExZGFhMjQ0MTQ5In19LCJuYmYiOjE2NjQ0MzQ1NzYsInN1YiI6InN5c3RlbTpzZXJ2aWNlYWNjb3VudDprdWJlcm5ldGVzLWRhc2hib2FyZDphZG1pbi11c2VyIn0.gSJuzHwKp9pooCS_8XOmAzccuI2wHTkXZ1qKEeSYIwVMHPq-k-3tNA5FQAHk10M-PvUKUW7_n4i-nOwbIlEm3h6qrL0tBP2tOKNuefZvOawlENvEPpkSsluyhxs7IFjLcEHbGZTeY5IenFUjdsXIZo04ofOil1HTL2KrLosYgmmbNZpnuVaje2699o0x5kgS8QdwQ4Z7tIo_kgm7VY9HJqlouaX4oJTOkl2fBlBfmB2k-OZsovrb80zj1I7lLKCgjf3Cto0UEa6S0STE7nxIXMSa7Yh52lRo82BLBDFgWkxwr23L1qsWVSHCyhD8029-jIAUALMCOJ9E63-A2JQrnw

 📕 📕 토큰 노출되면 위험하니까 인증서를 만들자 ~

# 크롬으로 접근하기위한 clinet용 PKI 생성
grep 'client-certificate-data' ~/.kube/config | head -n 1 | awk '{print $2}' | base64 -d >> kubecfg.crt

grep 'client-key-data' ~/.kube/config | head -n 1 | awk '{print $2}' | base64 -d >> kubecfg.key

openssl pkcs12 -export -clcerts -inkey kubecfg.key -in kubecfg.crt -out kubecfg.p12 -name "kubernetes-admin"
Enter Export Password: (1234)
Verifying - Enter Export Password:

cp /etc/kubernetes/pki/ca.crt ./
yji@k8s-master:~/dashboard_token$ ls
ca.crt                           ClusterRoleBind.yaml  kubecfg.key  sa-admin-user.yaml
ClusterRoleBind-admin-user.yaml  kubecfg.crt           kubecfg.p12


---- winSCP로 C:\k8s\dashboard_token 으로 ca.crt, kubecfg.p12 복사
PS C:\k8s\dashboard_token> certutil.exe -addstore "Root" ca.crt
Root "신뢰할 수 있는 루트 인증 기관"
서명이 공개 키와 일치합니다.
"kubernetes" 인증서가 저장소에 추가되었습니다.
CertUtil: -addstore 명령이 성공적으로 완료되었습니다.

PS C:\k8s\dashboard_token> certutil.exe -p 1234 -user -importPFX .\kubecfg.p12
"kubernetes-admin" 인증서가 저장소에 추가되었습니다.

CertUtil: -importPFX 명령이 성공적으로 완료되었습니다.
-
dashboard
- 관리도구
- 모니터링 (sa)
1.23.x ~ dashboard token 제공
1.24.x ~ dashboard token 직접 생성해서 사용
# ClusterRoleBind.yaml
apiVersion: rbac.authorization.k8s.io/v1
kind: ClusterRoleBinding
metadata:
  name: kubernetes-dashboard2
  labels:
    k8s-app: kubernetes-dashboard
roleRef: ⭐ 연결
  apiGroup: rbac.authorization.k8s.io
  kind: ClusterRole
  name: ⭐cluster-admin 이걸로
subjects:
- kind:  ServiceAccount
  name: ⭐ kubernetes-dashboard 애를
  namespace: kubernetes-dashboard

## ClusterRoleBind-admin-user.yaml
apiVersion: rbac.authorization.k8s.io/v1
kind: ClusterRoleBinding
metadata:
  name: admin-user
roleRef: ⭐ binding 시켜라
  apiGroup: rbac.authorization.k8s.io
  kind: ClusterRole
  name: cluster-admin ⭐이 권한을
subjects:
- kind: ServiceAccount
  name: ⭐ admin-user 애한테
  namespace: kubernetes-dashboard
GCP
kubernetes Engine API

gcloud components update
✍ 메모장
📘 📗 💭 🤔 📕 📔 🐳 ⭐ ✍
알아오기
-
파드 속의 컨테이너는 IP가 있 없? -> 없 !
-
우리 저번에 nexus 해봤응게 harbor도 해봐라 .- > 이력서에 한 줄 쓸 수 있을 정도의 어쩌구
-
metric 수집 :프로메테우스(= aws ecs)
- 오픈 소스 기반의 모니터링 시스템이다. ELK 와 같은 로깅이 아니라, 대상 시스템으로 부터 각종 모니터링 지표를 수집하여 저장하고 검색할 수 있는 시스템이다.
-
로그 수집에 대한 분석 : 엘라스틱서치
10.96.0.0/12 -> 12는 백만개
파드는 ip를 갖게됨.
service와 파드는 거의 한 몸
service cidr
kubectl get po --all-namespaces == kubectl get po -A = 우리는 pall로 별칭 등록
kubectl get no == kubectl get nodes
// join 실패 시 모든 노드(mastser 포함)에서 아래 명령 수행
sudo kubeadm reset
sudo systemctl restart kubelet