입력 폼 처리
  @GetMapping("/add")
    public String addForm(Model model)
    {
        model.addAttribute("item", new Item());
        //아이템 객체가 넘어감
        return "form/addForm";
    }
item 빈 껍데기를 넘겨준다
 <form action="item.html" th:action th:object="${item}" method="post">
        <div>
            <label for="itemName">상품명</label>
            <input type="text" id="itemName" th:field="*{itemName}" class="form-control" placeholder="이름을 입력하세요">
        </div>
th:object 로 객체를 받는다, th:field ="*{itemName} 같은 선택 변수 식으로 끌어다 쓸수 있다. 그리고 form 태그 안에서만 쓸수 있다. id name value를 자동으로 생성해 준다
요구사항 분석
ItemType - 상품 종류
package hello.itemservice.domain.item;

public enum ItemType {

    BOOK("도서"), FOOD("음식"), ETC("기타");

    private final String description;

    ItemType(String description) {
        this.description = description;
    }

    public String getDescription() {
        return description;
    }
}
배송 방식 - DeliveryCode
package hello.itemservice.domain.item;

import lombok.AllArgsConstructor;
import lombok.Data;

/**
 * FAST : 빠른 배송
 * NORMAL : 일반 배송
 * SLOW : 느린 배송
 */

@Data
@AllArgsConstructor
public class DeliveryCode {

    private String code;
    private String displayName;
}
package hello.itemservice.domain.item;
import lombok.Data;
import java.util.List;
@Data
public class Item {
private Long id;
private String itemName;
private Integer price;
private Integer quantity;
private Boolean open; // 판매 여부
private List<String> regisons; // 등록 지역
private ItemType itemType; // 상품 종류
private String delivertyCode; // 배송 방식
public Item() {
}
public Item(String itemName, Integer price, Integer quantity) {
this.itemName = itemName;
this.price = price;
this.quantity = quantity;
}
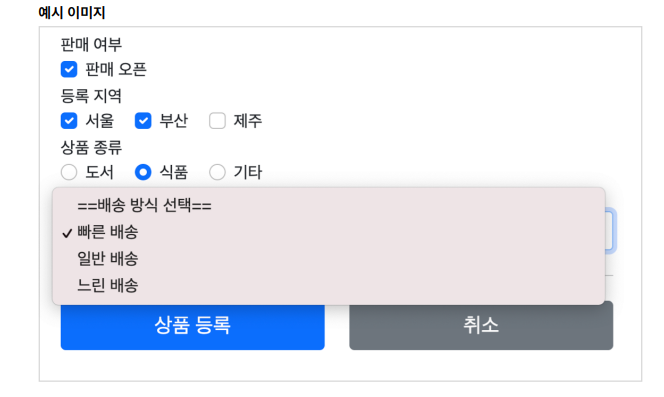
}HTML 단일 체크박스
addform 추가
     <hr class="my-4">

        <!-- single checkbox -->
        <div>판매 여부</div>
        <div>
            <div class = "form-check">
                <input type = "checkbox" id = "open" name = "open" class = "form-check-input">
                <label for = "open" class = "form-check-label">판매 오픈</label>
            </div>
        </div>
formcontroller
 @PostMapping("/add")
    public String addItem(@ModelAttribute Item item, RedirectAttributes redirectAttributes) {
        log.info("item.oepn={}", item.getOpen());
		...
		}
체크를 안했을때 null로 넘어온다
해결방법
<input type = "checkbox" id = "open" name = "open" class = "form-check-input">
<input type="hidden" name="_open" value="on"/>
체크박스 인식을 위해 히든 필드를 넣어준다. 그럼 스프링이 체크박스에 체크가 안돼있어도 false를 넣어준다
타임리프로 바꾸기
<input type="checkbox" id="open" th:field="*{open}" class="form-check-input">타임리프를 사용하면 체크 박스의 히든 필드와 관련된 부분까지 바꿔준다.
멀티 체크박스
@ModelAttribute의 특별한 사용법
@ModelAttribute("regions")
    public Map<String,String> regions() {
        Map<String, String> regions = new LinkedHashMap<>();
        regions.put("SEOUL","서울");
        regions.put("BUSAN","부산");
        regions.put("JEJU","제주");
        return regions;
    }
등록 폼, 상세화면, 등에서 계속 불러와야 되므로 @ModelAttribute를 사용해서 regions에서 반환한 값이 자동으로 모델에 담기게 된다.
멀티 체크박스
addform에 추가
<!-- multi checkbox -->
<div>
 <div>등록 지역</div>
 <div th:each="region : ${regions}" class="form-check form-check-inline">
 <input type="checkbox" th:field="*{regions}" th:value="${region.key}"
class="form-check-input">
 <label th:for="${#ids.prev('regions')}"
 th:text="${region.value}" class="form-check-label">서울</label>
 </div>
</div>
th:for="${#ids.prev('regions')}" 부분의 멀티 체크박스는 같은 이름의 여러 체크박스를 만들 수 있다. 그런데 문제는 이렇게 반복해서 HTML 태그를 생성할 때, 생성된 HTML 태그 속성에서 name 은 같아도 되지만, id 는 모두 달라야 한다. 따라서 타임리프는 체크박스를 each루프 안에서 반복해서 만들 때 임의로 1,2,3 숫자를 뒤에 붙여준다.
라디오 버튼
 @ModelAttribute("itemTypes")
    public ItemType[] itemTypes(){
        return ItemType.values();
} <!-- radio button -->
<div>
<div>상품 종류</div>
<div th:each="type : ${itemTypes}" class="form-check form-check-inline">
<input type="radio" th:field="*{itemType}" th:value="${type.name()}" class="form-check-input">
<label th:for="${#ids.prev('itemType')}" th:text="${type.description}" class="form-check-label">
BOOK
</label>
</div>
</div>멀티 체크박스와 비슷하다
ItemType.values() 를 사용하면 해당 ENUM의 모든 정보를 배열로 반환한다. 예) [BOOK, FOOD,
ETC]
선택하지 않으면 아무 값도 넘어가지 않는다.
셀렉트 박스
 @ModelAttribute("deliveryCodes")
    public List<DeliveryCode> deliveryCodes() {
        List<DeliveryCode> deliveryCodes = new ArrayList<>();
        deliveryCodes.add(new DeliveryCode("FAST","빠른 배송"));
        deliveryCodes.add(new DeliveryCode("NORMAL","일반 배송"));
        deliveryCodes.add(new DeliveryCode("SLOW","느린 배송"));

        return deliveryCodes;
    }
<!-- SELECT -->
<div>
<div>배송 방식</div>
<select th:field="*{deliveryCode}" class="form-select">
<option value="">==배송 방식 선택==</option>
<option th:each="deliveryCode : ${deliveryCodes}" th:value="$
{deliveryCode.code}"
th:text="${deliveryCode.displayName}">FAST</option>
</select>
</div>
<hr class="my-4">