내가 보려고 쓰는 Flutter Widget 일기
출처1 : https://api.flutter.dev/flutter/material/Drawer-class.html
출처2 : https://api.flutter.dev/flutter/material/Scaffold/drawer.html
Drawer
그냥 말그대로 서랍
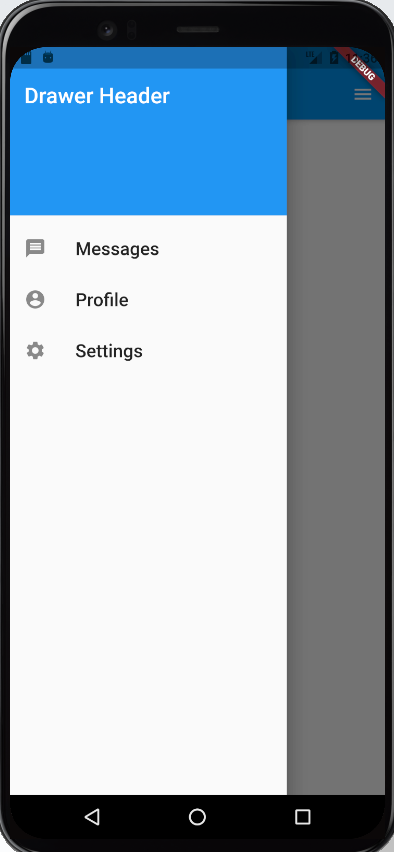
Scaffold 끝 부분에서 수평으로 꺼낼 수 있는 서랍! 네비게이션 링크를 보여준다. == 화면 전환에 용이
Scaffold.drawer 속성에서 사용된다. drawer 클래스의 자식 요소는 주로 ListView! ListView의 첫번째 자식 요소로는 요건 DrawerHeader가 사용된다. 현재 사용자에 대한 상태 정보를 보여줄 수 있다. 서랍의 나머지 요소들은 ListTile 로 구성된다. 맨 마지막엔 가끔 AboutListTile을 넣어주기도 한다.
Scaffold.drawer에 Drawer를 지정해주면 AppBar 영역에 적절한 아이콘이 알아서 생긴다. 아이콘 따로 만들어줄 필요 없음!
코드 예시로 알아보자
import 'package:flutter/material.dart';
void main() => runApp(const MyApp());
/// This is the main application widget.
class MyApp extends StatelessWidget {
const MyApp({Key key}) : super(key: key);
static const String _title = 'Flutter Code Sample';
Widget build(BuildContext context) {
return const MaterialApp(
title: _title,
home: ExpandedWidget(),
);
}
}
/// This is the stateless widget that the main application instantiates.
class ExpandedWidget extends StatelessWidget {
const ExpandedWidget({Key key}) : super(key: key);
Widget build(BuildContext context) {
return Scaffold(
appBar: AppBar(
title: const Text('Test Drawer'),
),
drawer: Drawer(
child: ListView(
padding: EdgeInsets.zero,
children: const <Widget>[
DrawerHeader(
decoration: BoxDecoration(
color: Colors.blue,
),
child: Text(
'Drawer Header',
style: TextStyle(
color: Colors.white,
fontSize: 24,
),
),
),
ListTile(
leading: Icon(Icons.message),
title: Text('Messages', style: TextStyle(fontSize: 20),),
),
ListTile(
leading: Icon(Icons.account_circle),
title: Text('Profile', style: TextStyle(fontSize: 20),),
),
ListTile(
leading: Icon(Icons.settings),
title: Text('Settings', style: TextStyle(fontSize: 20),),
),
],
),
),
endDrawer: Drawer(
child: ListView(
padding: EdgeInsets.zero,
children: const <Widget>[
DrawerHeader(
decoration: BoxDecoration(
color: Colors.blue,
),
child: Text(
'Drawer Header',
style: TextStyle(
color: Colors.white,
fontSize: 24,
),
),
),
ListTile(
leading: Icon(Icons.message),
title: Text('Messages', style: TextStyle(fontSize: 20),),
),
ListTile(
leading: Icon(Icons.account_circle),
title: Text('Profile', style: TextStyle(fontSize: 20),),
),
ListTile(
leading: Icon(Icons.settings),
title: Text('Settings', style: TextStyle(fontSize: 20),),
),
],
),
),
);
}
}

endDrawer 속성도 똑같은 디자인으로 해줬기 때문에, 앱바 오른쪽 버튼을 누르면 똑같이 나온다. Navigation Link 설정은 Navigation을 배우고 나서 해보도록 할까...
오늘의 일기는 여기까지!
