
Owner別 파일 위치
- Owner:
rootservice/timer/etc/systemd/system/<name>.<timer | service>로 파일을 만든다.
- Owner:
$USERservice/timer$HOME/.config/systemd/user/<name>.<timer | service>로 파일 만든다.
Service (ssh.service)
ssh.service를 살벼 보면서, service 제작법을 본다.
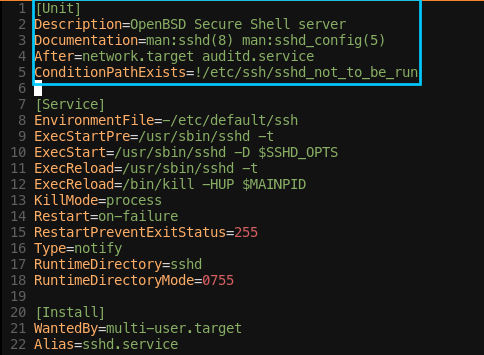
1-1.ssh.service의 위치는/usr/lib/systemd/system/ssh.service에 있다.

[Unit]
- [Unit] 섹션: 설명/의존성 정의
- Default로
Requires,Wants를 가진 유닛을 활성화하면, systemd는 첫 번째 유닛과 동시에 이들 모든 종속성들을 활성화한다. - 하지만 아래의
ssh.service와 같이multi-user.target다음에 시작되도록 설정된 것도 있다. 이럴 경우는After를 사용한다.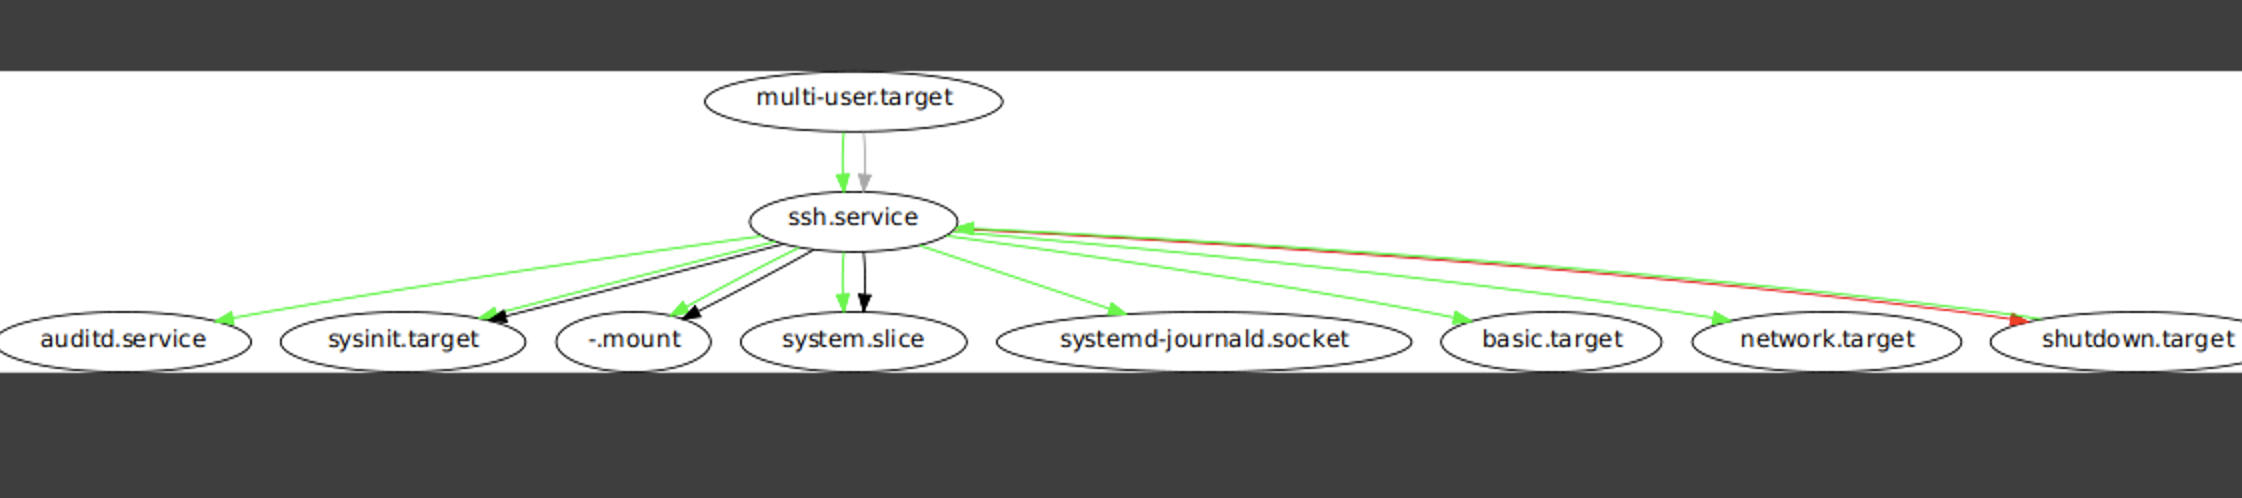
Description
- [Unit]
- Description : "유닛에 대한 상세 설명"
After
- [Unit]
- After : 지금 현재 Unit이 실행 이전에 pre executed Unit/환경/service 의 순서 목록
- 즉, 여기서 명시한 것 이후로 지금의 Unit을 실행하세요
- ssh.service 의 경우
network.target,auditd.service가 실행되어야한다.

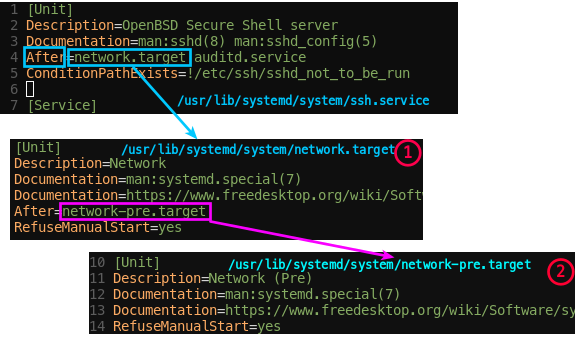
- network.target ? network.target
.wantswants가 아니므로, 디렉터리가 아님 그냥 파일임/usr/lib/systemd/system/network.target

- 얘는 또,
After=network-pre.target
- network-pre.target ?
/usr/lib/systemd/system/network-pre.target에 존재하나.

- apt-daily.service의 경우

Before
- [Unit]
- Before : 현재 Unit은
Before에 명시된 Unit '이전에' 실행된다.
- Before : 현재 Unit은
- e.g.,
- 현재 유닛: foo.target
- Before=bar.target
- 1) foo.target 실행
- 2) bar.target 실행
ConditionPathExists
- [Unit]
- ConditionPathExists : 제시된 경로의 파일이 있어야 '참' 조건

- ConditionPathExists : 제시된 경로의 파일이 있어야 '참' 조건
- ssh.service의 경우
!/etc/ssh/sshd_not_to_be_run이 되어 있음!때문에, 여기에/etc/ssh/sshd_not_to_be_run파일이 없어야 실행되는 조건

- 조건부 종속성이 거짓이면, 현재 유닛은 활성화 되지 않는다.
ConditionPathisDirectory
- [Unit]
- ConditionPathisDirectory : 제시된 경로가 디렉토리 이면, '참' 조건
- e.g.
- ConditionPathisDirectory=/home/myuser/a_service
- 조건부 종속성이 거짓이면, 현재 유닛은 활성화 되지 않는다.
ConditionFileNotEmpty
- [Unit]
- ConditionFileNotEmpty : 제시된 경로가 '파일' && 크기가 != 0 이면, '참'인 조건
- 조건부 종속성이 거짓이면, 현재 유닛은 활성화 되지 않는다.
Requires
Requires는 의존 관계(强)Requires에 설정된 Unit의 목록이 하나라도 시작되지 않으면, 이 Unit은 실행되지 않는다.- 실행 중인 Unit과 의존 관계에 있는 Unit목록을
Requires에 설정한다.
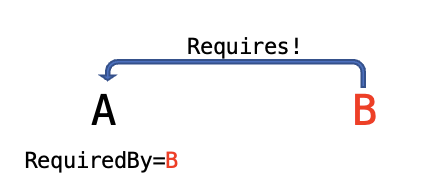 A을 B의
A을 B의 Requires종속성을 갖게할 시,- A의 유닛설정에서
RequiredBy=B로 할 것 - B의 유닛설정에서
Requires를 추가할 필요 X
- A의 유닛설정에서
Wants
Wants는 의존 관계(弱)Wants는 의존관계는 있지만 설령 서비스가 시작되지 않더라도, 현재 실행되는 Unit 서비스 실행에 영향 XRequires보다는 약하다.
 A을 B의
A을 B의 Wants종속성을 갖게할 시,- A의 유닛설정에서
WantedBy=B로 할 것 - B의 유닛설정에서
Wants를 추가할 필요 X
- A의 유닛설정에서
Requisite
- 이미 활성화된 유닛
- 현재 유닛을 실행하기 전,
Requisite의 유닛의 '상태'를 점검한다. Requisite의 유닛이 활성화되어 있지 않으면, 현재 유닛을 활성화 X
- 현재 유닛을 실행하기 전,
Conflicts
- 부정적 디펜던시
Conflicts의 유닛을 비활성화 시킨다.- 두 개의 서로 상충되는 유닛의 경우, 동시 활성화는 실패한다.
[Service]
- [Service] 섹션: 이 Unit이
XXX.service이므로, [Service] 섹션이 있어야한다.- 예:
XXX.socket이라면, [Socket] 섹션이 있어야한다.
- 예:
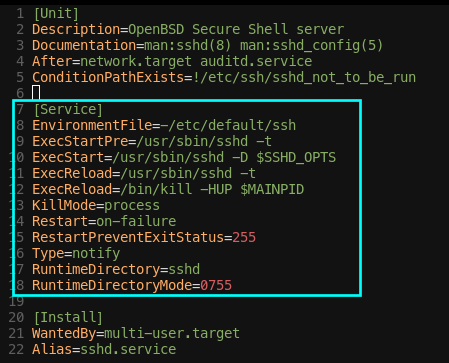
- ssh.service(
/usr/lib/systemd/system/ssh.service)의 [Service] 섹션
Type
- [Service]
- Type : Unit Process가 시작되는 유형으로 ExecStart에 영향을 준다.
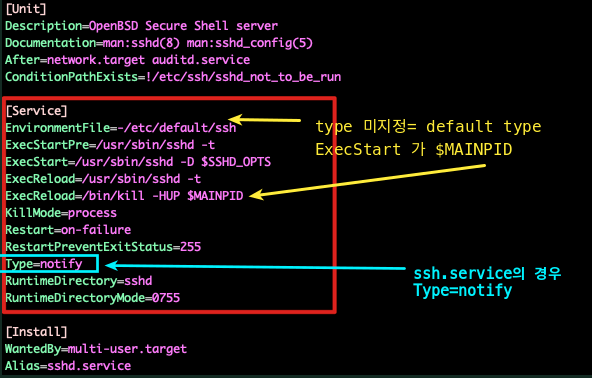
- Type : Unit Process가 시작되는 유형으로 ExecStart에 영향을 준다.
| Type 값 | 설명 |
|---|---|
| simple | Default. 프로세스가 실행할 때 ExecStart에 있는 값이 main 프로세스라는 것 의미 즉, fork 되지 않는다. |
| forking | ExecStart에서 시작된 프로세스는 서비스의 주요 프로세스가 되는 하위 프로세스를 생성한다. 부모 프로세스는 시작이 완료되면 종료된다. 즉, 서비스는 fork되고, systemd는 처음 서비스 프로세스가 종료될 것으로 기대한다. 종료가 되자마자 systemd는 해당 서비스가 준비가 된 것으로 추정한다. |
| oneshot | simple과 유사하지만, '서비스 프로세스가 멈출 때' 사실상, 그 프로세스는 완전히 종료한다. 이런 Type을 위해, RemainAfterExit=yes 라는 옵션을 두어 프로세스가 종료되더라도 systemd가 여전히 서비스가 활성화된 것으로 간주할 수 있다. |
| dbus | simple과 유사하지만, 결과 단위는 main 프로세스가 D-Bus라는 이름을 얻은 후에야 시작 서비스가 준비되면 D-bus(Desktop Bus)에 자신을 등록한다. |
| notify | (지연 역할) simple과 유사하지만, 서비스가 준비 되면, sd_notify()함수를 통해 systemd에 맞게 메시지가 통지되고 시작된다. |
| idle | simple과 유사하지만, 이진 바이너리의 실제 실행은 모든 프로세스 작업이 끝날 때까지 지연됨으로써, 상태 출력을 서비스의 쉘 출력과 혼용되지 않게 도와준다. 즉, 활성화된 작업이 없을 때까지 systemd가 서비스를 시작하지 않도록 지시하는 것이다. 시스템을 계속 로딩하거나 서비스가 다른 서비스의 출력에 방해하는 일이 없도록 다른 서비스들이 시작할 때까지 서비스의 시작을 지연시키는 개념이다. 한번 서비스가 시작되면 서비스를 시작한 systemd 작업은 종료된다는 점에 유의한다. |
EnvironmentFile
- [Service]
- EnvironmentFile : 서비스 환경 설정 파일 지정
- ssh.service의 경우
EnvironmentFile=-/etc/default/ssh가 있다.
/etc/default/ssh파일- openssh-server의 기본 셋팅 파일.
/etc/init.d/ssh가/bin/sh에 의해 sourced된다.

- openssh-server의 기본 셋팅 파일.
User
- [Service]
- User : 프로세스를 실행하는 사용자 명지정
ExecStartPre
- [Service]
- ExecStartPre : 시작 전 실행해야할 것
- ssh.service의 경우
ExecStartPre=/usr/sbin/sshd -t가 있다.
ExecStart
- [Service]
- ExecStart : 실행할 명령 / 바이너리 / 스크립트이 위치한 절대 경로
- 만약 파이썬 스크립트라고 하면 아래와같이 절대 경로로 지정해야한다.
ExecStart=/usr/bin/python /home/pi/bin/myexec.pyExecStop
- [Service]
- ExecStop : Unit이 중지될 때 필요한 명령이나 스크립트
ExecReload
-
[Service]
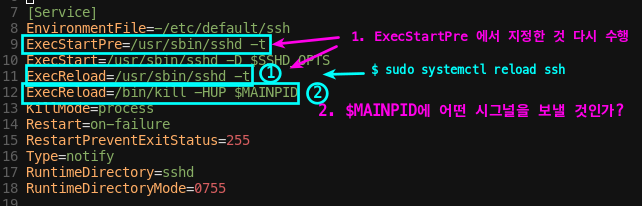
- ExecReload :
$ sudo systemctl reload할 때, 실행하는 것 - 보통,
ExecStartPre에서 지정한 동작을 다시 수행케 하고,$MAINPID에HUP시그널을 보낸다.
- ExecReload :
-
ssh.service의 경우
systemctl 명령어 참고
service 파일을 수정하면 systemctl restartsystemctl reload를 해야하기 때문!!!
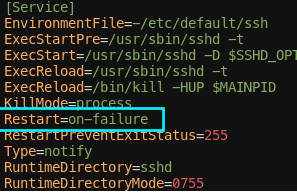
Restart
- [Service]
- Restart :
$ sudo systemctl restart할 때, 하는 동작
- Restart :
| Restart=Value | Description |
|---|---|
Restart=on-failure | Unit 프로세스가 어떤 문제로 exit != 0으로 종료/중지 될 경우 -> 그 서비스를 다시 시작하라는 의미 |
Restart=on-success | Unit 프로세스가 exit == 0 인 경우 -> 다시 그 서비스 시작하라는 의미 |
- ssh.service의 경우
RestartSec
- [Service]
- RestartSec : 서비스 다시 시작전에 이 서비스를 몇 초(sec) Sleep할 것인지 결정
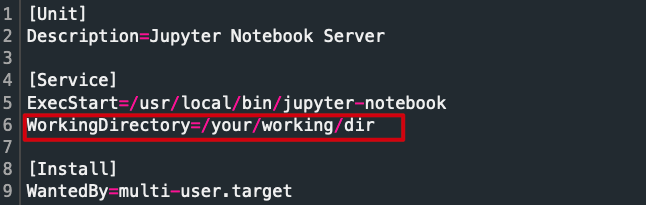
WorkingDirectory
- [Service]
- WorkingDirectory : 프로세스의 작업 디렉토리
- 서비스로 등록한 어플리케이션을 이 디렉토리에서 실행 시킨다.
- 서비스로 등록한 어플리케이션을 이 디렉토리에서 실행 시킨다.
- WorkingDirectory : 프로세스의 작업 디렉토리
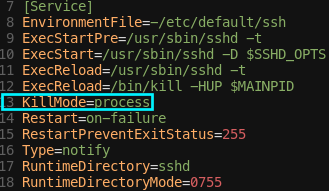
KillMode
-
[Service]
- KillMode : 이 Unit의 프로세스가 어떻게 중지되는지 결정!
KillMode=Process는 주 프로세스만 중지하라는 의미
- KillMode : 이 Unit의 프로세스가 어떻게 중지되는지 결정!
-
ssh.service의 경우
[Mount]
- Mount를 할 수도 있다.
- Mount 섹션은 해당 유닛에 대하여 마운트 유닛으로써의 정보를 설명하고 있다.
- 파일 시스템 유형에서 마운트 옵션에 대한 세부사항들도 제공한다.
- (fedora 기준)
/usr/lib/systemd/system의 유닛 파일/media.mount를 보면/mediatmpfs파일 시스템을 나타낸다.- 이는 이동식 미디어를 마운트하는 '컨테이너 디렉토리'이다.
[Unit]
Description=Media Directory
Before=local-fs.target

[Mount]
What=tmpfs
Where=/media
Type=tmpfs
Options=mode=755,nosuid,nodev,noexec
What
- [Mount]
- What : 변수, device, UUID를 식별한다.
/media.mount에서What은tmpfs라고 되어 있는데, 이는 파일 시스템이 아직, 'device file'을 갖고있지 않기 때문이다.
[Install]
- [Install] 섹션
- 서비스 소속 Target Unit설정 및 부팅 시 Unit이 enable, disable 을 위한 섹션
$ sudo systemctl enable,$ sudo systemctl disable과 관련
- WantedBy, RequireBy 등의 종속성 옵션등을 취함
- 일반적으로 운영시, systemd는
[Install]섹션을 무시한다. - 활성화 시,
[Install]섹션을 읽는다.- 예를들어,
sshd.service유닛을 가동하면, systemd는multi-user.target의WantedBy종속성을 본다. - systemd는 다음과 같이 시스템 설정 디렉토리(
/etc/systemd/system)에서multi-user.target.wants/sshd/service경로의 심볼릭 링크를 만든다.
- 예를들어,
- ssh.service의 경우
WantedBy
- [Install]
- WantedBy : Unit이 어떻게 활성화(enable)될 것인지에 대한 부분
$ sudo systemctl enable명령어로 Unit을 enable할 때, 등록에 필요한 유닛을 지정한다.- Dependency Check라 생각
/etc/systemd/system/지명.target.wants에 들어간다.- 부팅 시, 속한 .wants에 따라 실행되게한다.
- WantedBy : Unit이 어떻게 활성화(enable)될 것인지에 대한 부분
default.target
WantedBy=default.targetAlias에 등록한 이름으로 링크 파일 생성 X
- User session의 main target이고, default로 시작된다.
- nomal user session을 구성하는 Various services는 이 타겟으로 be pulled 된다.
- 아래의 multi-user.target 과 비교해보면 차이를 알 수 있다.
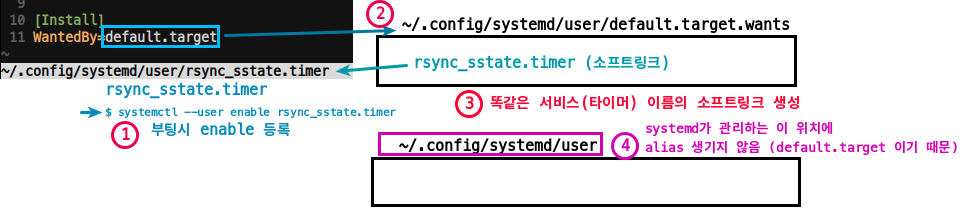
- 위 예제는
systemd --user로 작성된 서비스/타이머를 대상으로 한 것 systemd --system으로 작성한 서비스도 똑같다.
2-1. service:/etc/systemd/system/rsync_sstate.service,WantedBy=defulat.target
2-2.$ sudo systemctl enable rsync_sstate.service
2-3./etc/systemd/ssytem/default.target.wants에 rsync_sstate.service 심볼릭 링크 생성됨
multi-user.target
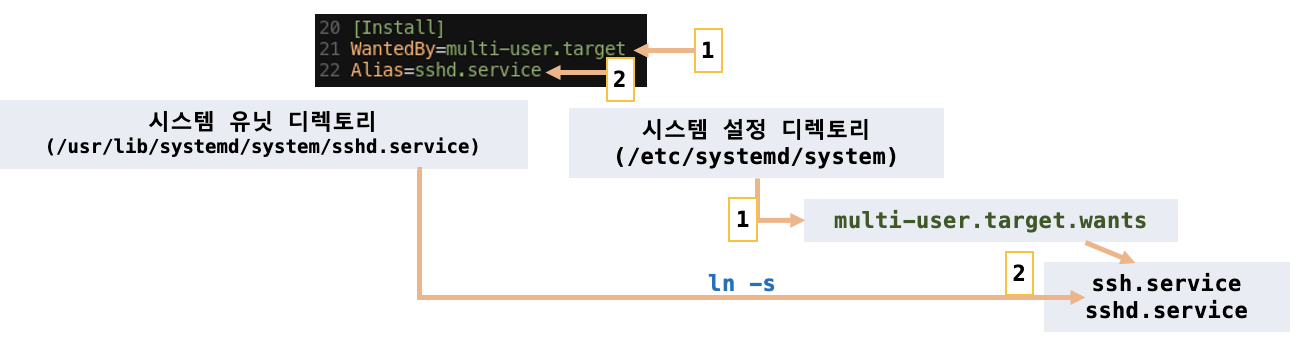
- 실제
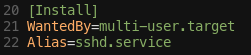
ssh.service의 위치:/usr/lib/systemd/system/ssh.service ssh.service에서 [Install] 내용

- 다음 그림과 같이
3-1./etc/systemd/system/multi-user.target.wants/에 ssh.service 소프트링크 생성
3-2./etc/systemd/system/에systemd가 알아먹을 수 있게,Alias=sshd.service대로
sshd.service 가 생성되어, sshd라는 이름으로도 접근 할 수 있는 것임

- 실제
multi-user.target.wants내용
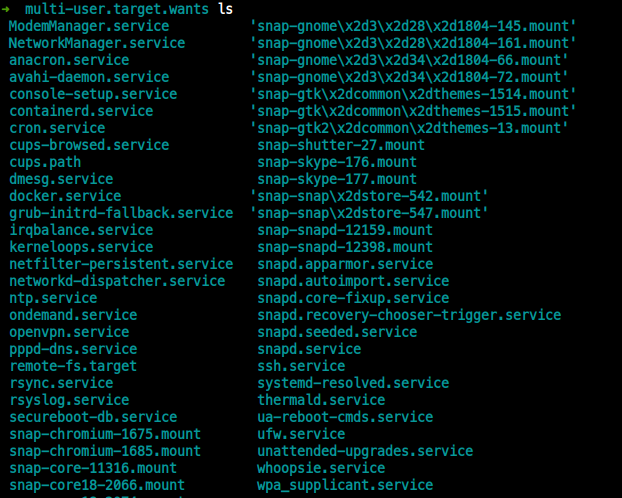
ssh.service는 multi-user.target.wants내 서비스들과 WantedBy 관계를 맺는 것
Alias
- [Install]
- Alias: Unit alias 이름 지정
$ sudo systemctl enable 'alias'접근 가능- alias 이름은 Unit 파일 확장자를 가지고 있어야한다.
- service, socket, mount, swap 등.
- e.g.
- 서비스 이름: httpd.service시,
Alias=[Alias Name].service
- 서비스 이름: httpd.service시,
- 위 WantedBy를 보는게 이해가 더 빠름
RequiredBy
- [Install]
- RequiredBy: 반드시 필요한 의존 관계를 맺는 Unit의 이름을 지정한다.
변수와 옵션
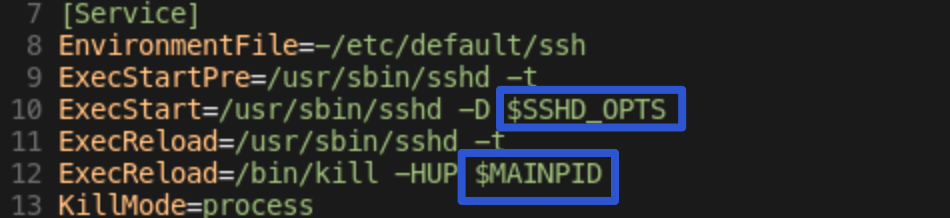
- ssh.service 파일을 보면,
$OPTIONS,$MAINPID등이 있다.$OPTIONS:systemctl로 유닛을 활성화시킬 때,sshd로 전송할 수 있는 옵션들$MAINPID: 서비스에 대한 프로세스를 추적한 것
- specifier
%n: 현재의 유닛 명- 유닛 명은 몇 가지 흥미로운 specifier을 포함할 수 있다. tty1, tty2 등에서 동작하는
getty프로세스 처럼, 한 가지 서비스에 대해 여러 개의 복사본을 생성하기 위해, 하나의 유닛 파일을 매개변수화할 수 있다. - 이 specifier를 사용하기 위헤 유닛명의 끝에
@표시를 넣는다. getty의 경우,getty@.service라는 이름의 유닛 파일을 생성한다.- 이 유닛 파일이
getty@tty1과getty@tty2처럼, 유닛들을 참조할 수 있게 해준다.
- 이 유닛 파일이
@다음에 무엇이 오든지 instance로 불린다. 그리고 유닛 파일을 처리할 때, systemd는%Ispecifier를 인스턴스로 확장한다. 이것이 systemd를 실행하는 대부분의 배포판에 포함되어 있는getty@.service유닛 파일과 함께 동작하는 것을 볼 수 있다.
- 유닛 명은 몇 가지 흥미로운 specifier을 포함할 수 있다. tty1, tty2 등에서 동작하는
%H: 현재의 호스트 명
실전 예제
$HOME/workspace/systemd_service/helloworld/helloworld.sh스크립트 제작
# ==== helloworld.sh ==== #
#!/bin/bash
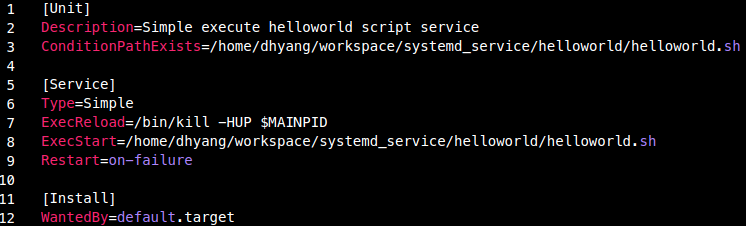
echo "Hello World!"/etc/systemd/system/exec_helloworld.service제작

- 실행
$ sudo systemctl exec_helloworld.service- log 조회
4-1. $ sudo systemctl exec_helloworld.service 로 조희
$ sudo systemctl exec_helloworld.service
● exec_helloworld.service - Simple execute helloworld script service
     Loaded: loaded (/etc/systemd/system/exec_helloworld.service; disabled; vendor preset: enabled)
     Active: inactive (dead)


 7월 23 16:55:22 dhyang systemd[1]: Started Simple execute helloworld script service.
 7월 23 16:55:22 dhyang helloworld.sh[1051298]: Hello World!
 7월 23 16:55:22 dhyang systemd[1]: exec_helloworld.service: Succeeded.
pid: 1051298로helloworld.sh가 실행되어Hello World!를stdout으로 출력
4-2. $ journalctl -r -u exec_hellowrold.service로 조희
➜  default.target.wants journalctl -r -u exec_helloworld.service
-- Logs begin at Wed 2021-06-02 16:36:14 KST, end at Fri 2021-07-23 17:35:40 KST. --
 7월 23 17:34:54 dhyang systemd[1]: /etc/systemd/system/exec_helloworld.service:6: Failed to parse service type, ignoring: Simple
 7월 23 16:55:23 dhyang systemd[1]: /etc/systemd/system/exec_helloworld.service:6: Failed to parse service type, ignoring: Simple
 7월 23 16:55:22 dhyang systemd[1]: exec_helloworld.service: Succeeded.
 7월 23 16:55:22 dhyang helloworld.sh[1051298]: Hello World!
 7월 23 16:55:22 dhyang systemd[1]: Started Simple execute helloworld script service.
 7월 23 16:55:22 dhyang systemd[1]: /etc/systemd/system/exec_helloworld.service:6: Failed to parse service type, ignoring: Simple
 7월 23 16:55:11 dhyang systemd[1]: /etc/systemd/system/exec_helloworld.service:6: Failed to parse service type, ignoring: Simple
 7월 23 16:55:02 dhyang systemd[1]: /etc/systemd/system/exec_helloworld.service:6: Failed to parse service type, ignoring: Simple
 7월 23 16:54:58 dhyang systemd[1]: /etc/systemd/system/exec_helloworld.service:6: Failed to parse service type, ignoring: Simple
 7월 23 16:53:53 dhyang systemd[1]: /etc/systemd/system/exec_helloworld.service:6: Failed to parse service type, ignoring: Simple
 7월 23 16:53:36 dhyang systemd[1]: exec_helloworld.service: Succeeded.
 7월 23 16:53:36 dhyang helloworld.sh[1044548]: Hello World!
 7월 23 16:53:36 dhyang systemd[1]: Started Simple execute helloworld script service.
 7월 23 16:53:36 dhyang systemd[1]: /etc/systemd/system/exec_helloworld.service:6: Failed to parse service type, ignoring: Simple
 7월 23 16:53:33 dhyang systemd[1]: /etc/systemd/system/exec_helloworld.service:6: Failed to parse service type, ignoring: Simple
 7월 23 16:53:33 dhyang systemd[1]: /etc/systemd/system/exec_helloworld.service:6: Failed to parse service type, ignoring: Simple
예제 2. test2에서 Wants=test1
test1.target
- 위치:
/etc/systemd/system - 파일명:
test1.target /etc/systemd/system/test1.target

test2.target
- 위치:
/etc/systemd/system - 파일명:
test2.target /etc/systemd/system/test2.target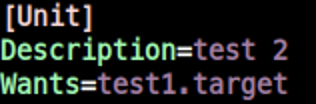
Wants종속성에test1.target을 걸어둔다.
test2 활성화(start)
$ sudo systemctl start test2.target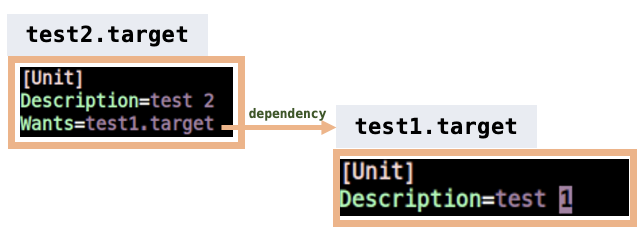
test2.target의Wants에 의해 systemd는test1.target을 활성화한다.
- 유닛이
[Install]섹션을 갖고 있다면, 이를 활성화시키기 전에 유닛을 "이용 가능하게" 한다.
$ sudo systemctl enable <unit>$ system sudo systemctl status test1.target
● test1.target - test 1
Loaded: loaded (/etc/systemd/system/test1.target; static; vendor preset: enabled)
Active: active since Mon 2021-09-27 14:43:09 KST; 15s ago
Sep 27 14:43:09 ubuntu-linux-20-04-desktop systemd[1]: Reached target test 1.
$ system sudo systemctl status test2.target
● test2.target - test 2
Loaded: loaded (/etc/systemd/system/test2.target; static; vendor preset: enabled)
Active: active since Mon 2021-09-27 14:43:09 KST; 20s ago
Sep 27 14:43:09 ubuntu-linux-20-04-desktop systemd[1]: Reached target test 2.
예제 3. test1에서 WantedBy=test2
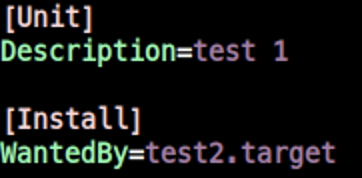
test1.target
- 위치:
/etc/systemd/system - 파일명:
test1.target /etc/systemd/system/test1.target
test2.target
- 위치:
/etc/systemd/system - 파일명:
test2.target /etc/systemd/system/test2.target
test1 활성화(enable)
- test1.target 에서
[Install]부분에 등록시켰기 때문에systemctl enable해야 이 명령이 먹힌다.
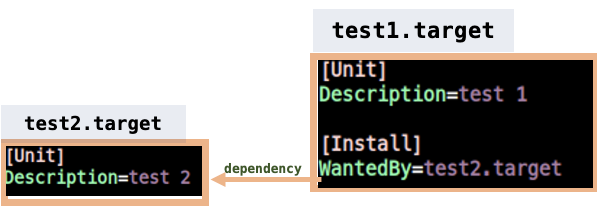
$ sudo systemctl enable test1.target- 결과
/etc/systemd/system/에 'test2.target.wants' 에 symlink test1.target 생성
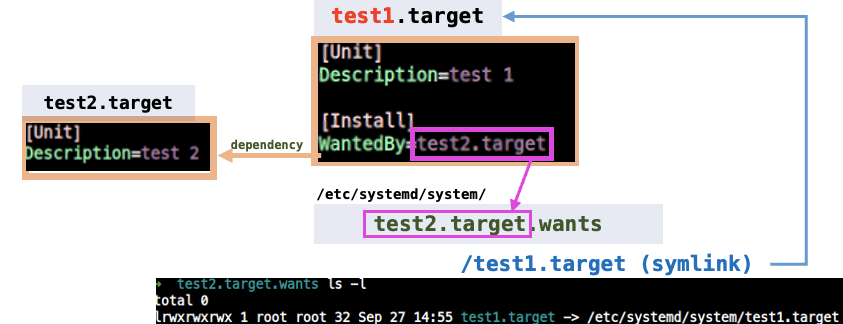
- enable 한 것 이기 때문에, active되지는 않음 (위에는 아예 start를 한 것)
$ sudo systemctl status test1.target
● test1.target - test 1
     Loaded: loaded (/etc/systemd/system/test1.target; enabled; vendor preset: >
     Active: inactive (dead)

Sep 27 15:05:37 ubuntu-linux-20-04-desktop systemd[1]: Reached target test 1.

$ sudo systemctl status test2.target
● test2.target - test 2
     Loaded: loaded (/etc/systemd/system/test2.target; static; vendor preset: >
     Active: inactive (dead)
- test1.target에 의해, test2.target에 로드는 되었음

pllpokko@alumni.kaist.ac.kr