본 포스팅은 Cloudneta@net의 Ansible 스터디 산출물임을 밝힌다.
Ansible을 통해 네트워크 IP, 호스트명, NFS 서버, DB 어플리케이션 설치와 같은 환경설정을 자동화 할 수 있다.
실습 환경은 Ansible 시스템 구축 자동화 포스팅을 참조하자.
hostname 설정하기
관리하는 VM이 여러대이고, 각각 고유의 hostname을 세팅해줘야할 때 Ansible을 사용하면, 편리하다.
ansible.cfg, inventory 파일 작성
#
mkdir ~/ansible-project/chapter_10.2
cd ~/ansible-project/chapter_10.2

# ansible.cfg, inventory 파일 작성
cat <<EOT> ansible.cfg
[defaults]
inventory = ./inventory
remote_user = ansible
ask_pass = false
inject_facts_as_vars = false
roles_path = ./roles

[privilege_escalation]
become = true
become_method = sudo
become_user = root
become_ask_pass = false
EOT

cat <<EOT> inventory
[tnode]
tnode1
tnode2
tnode3
EOT
host명 변수지정
touch ~/ansible-project/chapter_10.2/vars_hosts_info.yml

tnodes:
  - hostname: tnode1
    fqdn: tnode1.local
    net_ip: 10.10.1.11
  - hostname: tnode2
    fqdn: tnode2.local
    net_ip: 10.10.1.12
  - hostname: tnode3
    fqdn: tnode3.local
    net_ip: 10.10.1.13
playbook 작성
- regexp 는 /etc/hosts 에서 해당 값(여기서는 ip)가 있을 경우 대체(기본값 수정,
state=present)하거나 혹은 삭제(state=absent).- 매칭되는 것이 없다면 line(내용)을 추가
touch ~/ansible-project/chapter_10.2/set_hostname.yml

---
- hosts: tnode
  tasks:
  - name: Set hostname from inventory
    ansible.builtin.hostname:
      name: "{{ inventory_hostname }}"

- hosts: all
  vars_files: vars_hosts_info.yml

  tasks:
  - name: Add host ip to hosts
    ansible.builtin.lineinfile:
      path: /etc/hosts
      line: "{{ item.net_ip }}  {{ item.hostname }} {{ item.fqdn }}"
      regexp: "^{{ item.net_ip }}"
    loop: "{{ tnodes }}"
playbook 실행
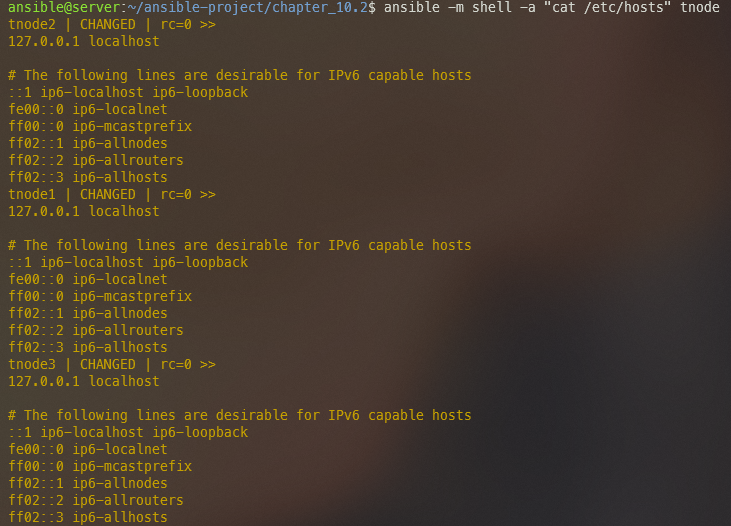
ansible -m shell -a "cat /etc/hosts" tnode

# 문법 체크
ansible-playbook --syntax-check set_hostname.yml

# 플레이북 실행
ansible-playbook set_hostname.yml
...

# 확인
ansible -m shell -a "hostname" tnode
ansible -m shell -a "cat /etc/hosts | grep tnode" tnode

# tnode1에서 다른 노드 통신 확인
ssh tnode1 ping -c 1 tnode2
ssh tnode1 ping -c 1 tnode3.local
playbook 실행 전
playbook 실행 후
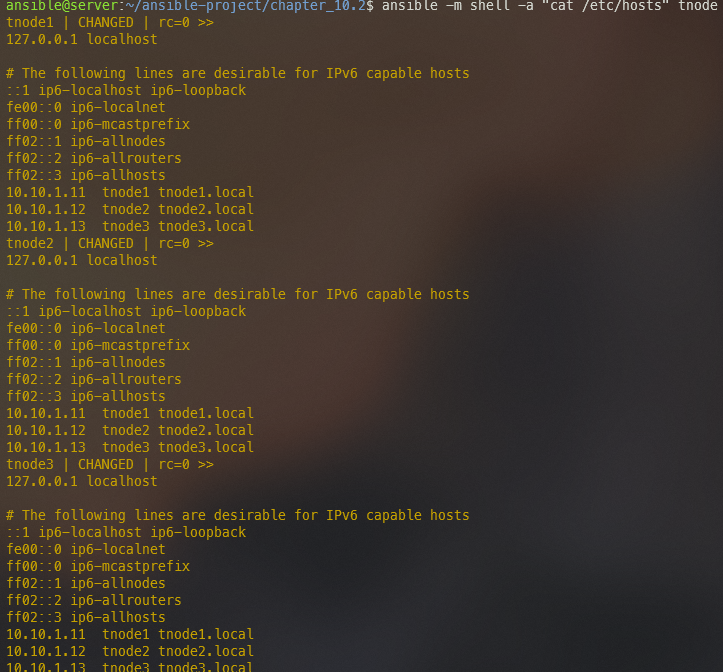
Ansible을 활용하면, 변수파일 값 변경을 통해 각 tnode의 hostname, hosts file을 좀 더 편하게 세팅할 수 있다. Ansible의 특징 그대로, 각 tnode 접근 없이 가능한 방법이다.
도전과제
file과 lineinfile 모듈을 활용하여 /tmp/test.txt 파일을 생성하고 hello 문자열을 추가하는 playbook 작성.
도전과제는 요즘 유행하는 ChatGPT를 활용해보자. Terraform과 Ansible 문법이 익숙하지 않으면 문법이나 필요한 모듈들을 검색하고 한땀한땀 짜야하는데, ChatGPT를 활용하면 엄청 편리하다.
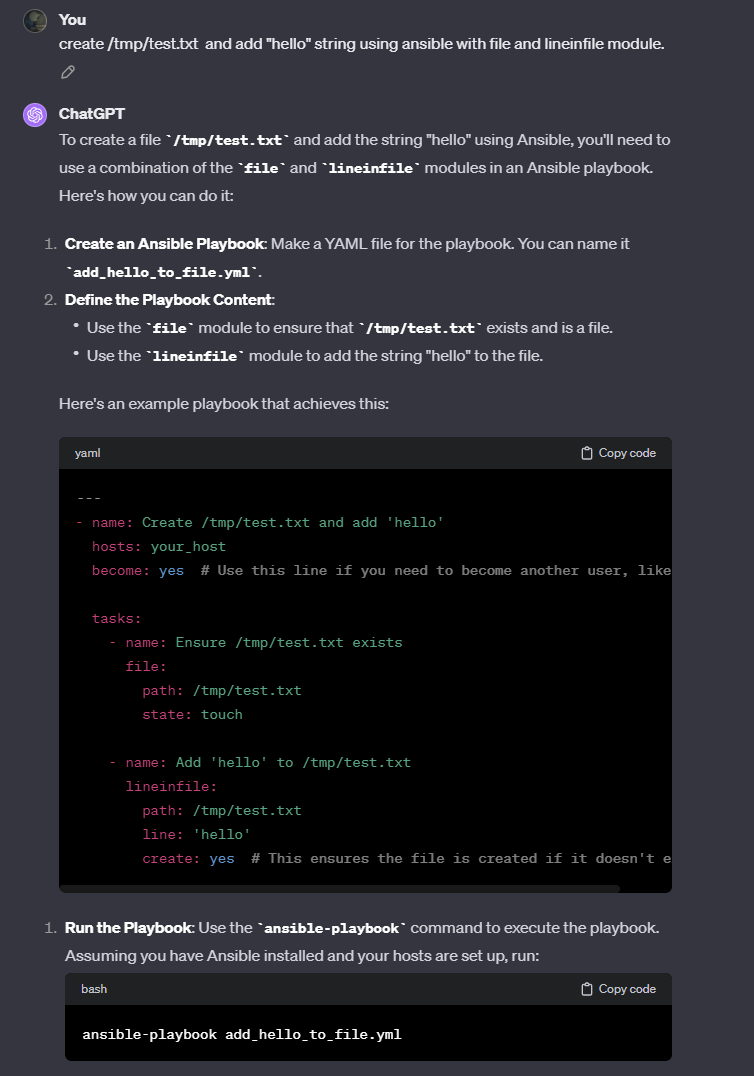
바로 코드를 짜주었다. 코드를 잠깐 보면, /tmp/test.txt 파일을 생성해주고, hello 스트링을 주입한다. create: yes 같은 옵션도 추가해주고, 내가 직접 코드를 생성한 것보다 훨~씬 빠르고 정확한 것 같다.
$vi add_hello_to_file.yml

---
- name: Create /tmp/test.txt and add 'hello'
  hosts: tnode
  become: yes  # Use this line if you need to become another user, like root

  tasks:
    - name: Ensure /tmp/test.txt exists
      file:
        path: /tmp/test.txt
        state: touch

    - name: Add 'hello' to /tmp/test.txt
      lineinfile:
        path: /tmp/test.txt
        line: 'hello'
        create: yes  # This ensures the file is created if it doesn't exist
playbook 실행!
ansible-playbook add_hello_to_file.yml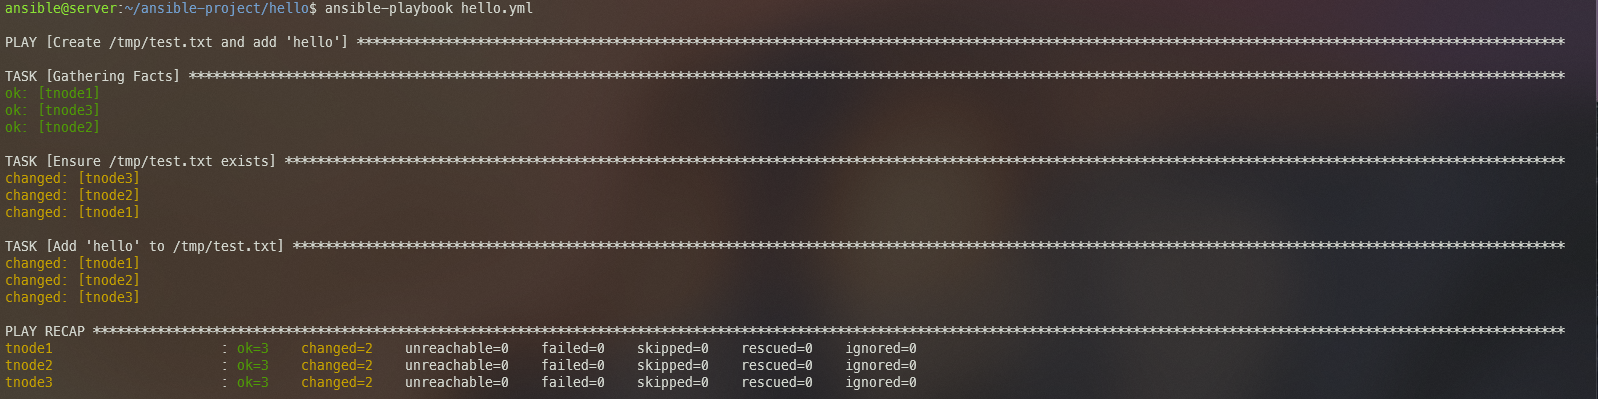
결과확인
ansible -m shell -a "cat /tmp/test.txt" tnode

이제 ChatGPT는 선택이 아닌 필수인 것으로..
네트워크 IP 설정하기
실습 내용은 아래와 같다.
- OS가 우분투일 경우에는 netplan 파일을 이용하여 IP를 설정한다
- netplan은 파일이므로 사전에 netplan 파일 구조를 확인하고 jinja2 템플릿으로 작성한다.
- OS가 CentOS/레드햇일 경우에는 nmcli 모듈을 사용하여 IP를 설정한다.
community.general.**nmcli**모듈 - https://docs.ansible.com/ansible/latest/collections/community/general/nmcli_module.html- 예제에서는 ethernet 타입의 네트워크 IP를 설정한다.
- IP 설정 관련 정보는 메인 플레이북에서 변수로 정의한다.
- 변수로 정의한 네트워크 인터페이스가 실제 호스트에 존재하는지 앤서블 팩트를 통해 확인한다.
서버를 세팅할 때 각 OS별로 별도의 네트워크 설정 시스템으로 IP를 설정한다고 한다. (처음 알았다 -_-;)
이러한 작업들을 Ansible을 통해 자동화 해주는 것이 이번 실습의 핵심이다.
Playbook 만들기
#
mkdir ~/ansible-project/chapter_10.1
cd ~/ansible-project/chapter_10.1

# ansible.cfg, inventory 파일 작성
cat <<EOT> ansible.cfg
[defaults]
inventory = ./inventory
remote_user = ansible
ask_pass = false
inject_facts_as_vars = false
roles_path = ./roles

[privilege_escalation]
become = true
become_method = sudo
become_user = root
become_ask_pass = false
EOT

cat <<EOT> inventory
[tnode]
tnode1
tnode2
tnode3
EOT
롤 생성
#
ansible-galaxy role init --init-path ./roles myrole.nmcli
ansible-galaxy role init --init-path ./roles myrole.netplan

# 확인
ansible-galaxy role list
tree roles -L 2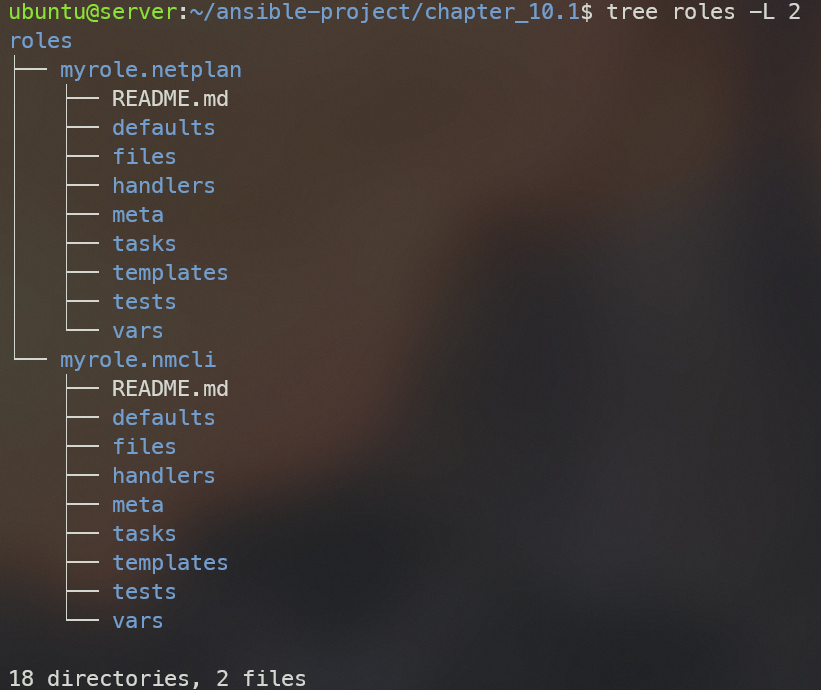
myrole.nmcli에 태스크 파일 작성
~/chapter_10.1/roles/myrole.nmcli/tasks/main.yml
---
# tasks file for myrole.nmcli

- name: Setup nic ip
  community.general.nmcli:
    type: ethernet
    conn_name: "{{ item.con_name }}"
    ip4: "{{ item.ip_addr }}"
    gw4: "{{ item.ip_gw }}"
    dns4: "{{ item.ip_dns }}"
    state: present
  loop: "{{ net_info }}"
  when: net_info[0].con_name in ansible_facts.interfaces
myrole.netplan 에 Jinna2 템플릿 파일 작성
touch ~/ansible-project/chapter_10.1/roles/myrole.netplan/templates/01-netplan-ansible.yaml.j2

# This is the network config written by 'ansible'
network:
  version: 2
  ethernets:
{% for item in net_info %}
    {{ item.con_name }}:
      dhcp4: no
      dhcp6: no
      addresses: [{{ item.ip_addr }}]
      gateway4: {{ item.ip_gw }}
      nameservers:
        addresses: [{{ item.ip_dns }}]
{% endfor %}
- Jinja2 템플릿을 이용하여 외부로부터 받은 배열형 변수를 for 문으로 하나씩 꺼내 사용할 수 있습니다.
- Jinja2 템플릿에서 제어문이나 반복문을 사용할 때는 다음과 같이 {% ~ %}를 이용합니다.
myrole.netplan 에 태스크 파일 & 핸들러 작성
~/chapter_10.1/roles/myrole.netplan/tasks/main.yml
---
# tasks file for myrole.netplan

- name: Copy netplan file
  ansible.builtin.template:
    src: 01-netplan-ansible.yaml.j2
    dest: /etc/netplan/01-netplan-ansible.yaml
  when: net_info[0].con_name in ansible_facts.interfaces
  notify: Netplan apply

~/chapter_10.1/roles/myrole.netplan/handlers/main.yml

---
# handlers file for myrole.netplan

- name: Netplan apply
  ansible.builtin.command: netplan apply
Playbook 작성
cd ~/ansible-project/chapter_10.1
touch set_ip.yml

---

- hosts: tnode1
  vars:
    fedora_os:
      - CentOS
      - RedHat
    net_info:
      - con_name: ens5
        ip_addr: 10.10.1.11/24
        ip_gw: 10.10.1.1
        ip_dns: 127.0.0.53

  tasks:
  - name: Include role in CentOS and RedHat
    ansible.builtin.include_role:
      name: myrole.nmcli
    when: ansible_facts.distribution in fedora_os

  - name: Include role in Ubuntu
    ansible.builtin.include_role:
      name: myrole.netplan
    when: ansible_facts.distribution == "Ubuntu"

- hosts: tnode2
  vars:
    fedora_os:
      - CentOS
      - RedHat
    net_info:
      - con_name: ens7
        ip_addr: 10.10.1.12/24
        ip_gw: 10.10.1.1
        ip_dns: 127.0.0.53

  tasks:
  - name: Include role in CentOS and RedHat
    ansible.builtin.include_role:
      name: myrole.nmcli
    when: ansible_facts.distribution in fedora_os

  - name: Include role in Ubuntu
    ansible.builtin.include_role:
      name: myrole.netplan
    when: ansible_facts.distribution == "Ubuntu"
playbook 실행
# 실행 전 tnode1 정보 확인
ssh tnode1 ls /etc/netplan
ssh tnode1 cat /etc/netplan/01-netplan-ansible.yaml
ssh tnode1 ip -br -c addr
ssh tnode1 ip -c route
ssh tnode1 nslookup blog.cloudneta.net
# 문법 체크
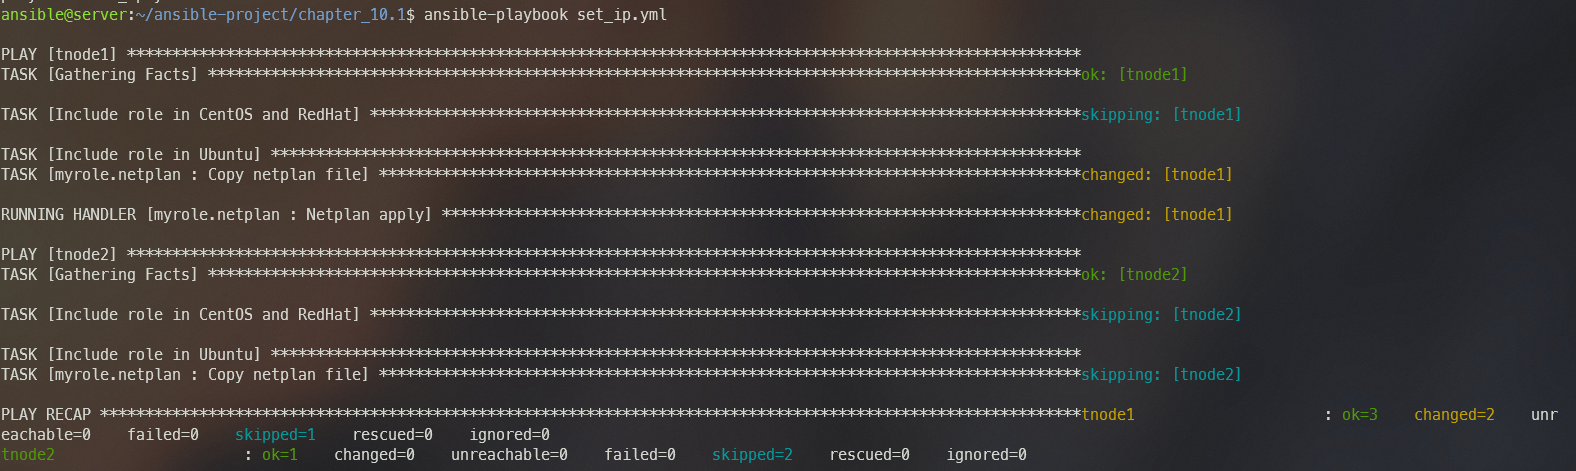
ansible-playbook --syntax-check set_ip.yml
# 플레이북 실행 : 우분투 OS로 롤 호출 되지만, tnode2는 enp7 NIC가 없어서 Setup nic ip 태스크가 실행되지는 않는다
ansible-playbook set_ip.yml
...
# 실행 후 tnode1 정보 확인
ssh tnode1 ls /etc/netplan
ssh tnode1 cat /etc/netplan/01-netplan-ansible.yaml
ssh tnode1 ip -br -c addr
ssh tnode1 ip -c route
ssh tnode1 nslookup blog.cloudneta.net