이번 포스팅에서는 Ansible 보안설정과 모니터링 자동화에 대해 다룬다.
보안설정
Ansible로 Linux 서버들의 패스워드, 디렉토리 권한, 사설인증서 생성 등의 보안설정을 할 수 있는데, 기타 서버관리와 마찬가지로, Ansible을 사용하면 공통적인 설정들을 중앙에서 관리하게 되므로 편리하다.
환경설정
이전 포스팅과 마찬가지로 CloudNet@에서 제공해준 CF를 사용하여 설정한다. 이후 세팅들은 기존 포스팅을 참조하면된다.
# YAML 파일 다운로드
curl -O https://s3.ap-northeast-2.amazonaws.com/cloudformation.cloudneta.net/Ansible/a101-2w.yaml

# CloudFormation 스택 배포
# aws cloudformation deploy --template-file a101-1w.yaml --stack-name mylab --parameter-overrides KeyName=<My SSH Keyname> SgIngressSshCidr=<My Home Public IP Address>/32 --region ap-northeast-2
예시) aws cloudformation deploy --template-file a101-2w.yaml --stack-name mylab --parameter-overrides KeyName=kp-gasida SgIngressSshCidr=$(curl -s ipinfo.io/ip)/32 --region ap-northeast-2 --capabilities CAPABILITY_NAMED_IAM

## Tip. 인스턴스 타입 변경 : MyInstanceType=t3.xlarge
예시) aws cloudformation deploy --template-file a101-2w.yaml --stack-name mylab --parameter-overrides KeyName=kp-gasida SgIngressSshCidr=$(curl -s ipinfo.io/ip)/32 --region ap-northeast-2 --capabilities CAPABILITY_NAMED_IAM MyInstanceType=t3.xlarge

# CloudFormation 스택 배포 완료 후 작업용 EC2 IP 출력
aws cloudformation describe-stacks --stack-name mylab --query 'Stacks[*].Outputs[0].OutputValue' --output text --region ap-northeast-2

# Ansible Server EC2 SSH 접속
ssh -i ~/.ssh/kp-gasida.pem ubuntu@$(aws cloudformation describe-stacks --stack-name mylab --query 'Stacks[*].Outputs[0].OutputValue' --output text --region ap-northeast-2)
패스워드 변경 주기 설정
- 패스워드 변경 주기를 설정할 대상 호스트는 인벤토리를 통해 설정.
- 패스워드 변경 주기를 설정할 사용자 계정 정보와 최대 변경일은 변수를 통해 별도의 파일로 정의.
- 패스워드 변경 주기 설정은
ansible.builtin.**user**모듈을 이용.
프로젝트 디렉터리 생성 및 ansible.cfg, inventory 파일 작성
#
mkdir ~/my-ansible/chapter_11.1
cd ~/my-ansible/chapter_11.1

# ansible.cfg, inventory 파일 작성
cat <<EOT> ansible.cfg
[defaults]
inventory = ./inventory
remote_user = ubuntu
ask_pass = false

[privilege_escalation]
become = true
become_method = sudo
become_user = root
become_ask_pass = false
EOT

cat <<EOT> inventory
[tnode]
tnode1
tnode2
tnode3
EOT
변수파일 작성
~/my-ansible/chapter_11.1/vars_maxdays.yml
- 패스워드 설정 주기의 값을 세팅하는 변수 파일을 작성한다.
---

Userinfo:
  - username: ansible
    maxdays: 90
  - username: stack
    maxdays: 90
메인 플레이북 작성
~/my-ansible/chapter_11.1/set_chage_password.yml
- 변수파일에 설정된 값을 통해 적용될 서버들의 패스워드 세팅을 적용한다.
---

- hosts: tnode
  vars_files: vars_maxdays.yml

  tasks:
    - name: Change Password Maxdays
      ansible.builtin.user:
        name: "{{ item.username }}"
        password_expire_max: "{{ item.maxdays }}"
      loop: "{{ Userinfo }}"
playbook 실행
# 이전설정 확인
for i in {1..3}; do echo ">> tnode$i <<"; ssh tnode$i sudo chage -l ansible; echo; done
위 화면과 같이 Password expires가 never인 상태이다.
# 실행
ansible-playbook set_chage_password.yml

# 적용 후 확인
for i in {1..3}; do echo ">> tnode$i <<"; ssh tnode$i sudo chage -l ansible; echo; done
적용 후 Password expires값이 세팅되었고, 90일의 password 변경주기가 세팅되었다. (stack 계정도 마찬가지로 확인된다.)
패스워드 생성 법칙 적용
- 패스워드 세팅 시 대문자, 글자수, 특수문자등의 규칙을 세팅해줄 수 있다. libpam-pwquality 패키지를 사용해야한다.
- /etc/security/pwquality.conf 파일로 세팅
- Jinja2 템플릿 방식으로 구현
- 변수 vars_pw_rule.yml 에 정의
- 최소 패스워드 길이 설정 minlen
- 최소 숫자 개수 설정 dcredit
- 최소 대문자 개수 설정 ucredit
- 최소 소문자 개수 설정 lcredit
- 최소 특수문자 개수 설정 ocredit
- root 계정에서도 해당 패스워드 룰을 설정할 수 있는 enforce_for_root
- Jinja2 템플릿 파일 pwqulity.conf.j2 아래 내용 포함
- minlen, dcredit, ucredit, lcredit, orcedit, enforce_for_root
- minclass : 최소 문자클래스 개수
- maxrepeat : 최대 연속 동일 문자 수
- maxclassrepeat : 동일 글래스의 최대 연속 문자 수
프로젝트 디렉터리 생성 및 ansible.cfg, inventory 파일 작성
#
mkdir ~/my-ansible/chapter_11.2
cd ~/my-ansible/chapter_11.2

# ansible.cfg, inventory 파일 작성
cat <<EOT> ansible.cfg
[defaults]
inventory = ./inventory
remote_user = ubuntu
ask_pass = false

[privilege_escalation]
become = true
become_method = sudo
become_user = root
become_ask_pass = false
EOT

cat <<EOT> inventory
[tnode]
tnode1
tnode2
tnode3
EOT
변수값 설정
~/my-ansible/chapter_11.2/vars_pw_rule.yml
---

minlen: 8
dcredit: -1
ucredit: -1
lcredit: -1
ocredit: -1
enforce_for_root: false
Jinja 템플릿 파일 작성
{% ~ %}사이에 제어문 구문 위치{% if **minlen** is **defined** %}구문 : minlen 이라는 변수가 정의되면 아래 문장을 삽입하라’ 는 의미- 아래 템플릿에는
{% if **변수** is **defined** %}~{% **endif** %}구문을 사용하여 파라미터와 관련된 변수가 선언되면 해당 파라미터를 삽입
~/my-ansible/chapter_11.2/pwquality.conf.j2
# Created by ansible

{% if minlen is defined %}
# Minimum acceptable size for the new password
minlen = {{ minlen }}
{% endif %}

{% if dcredit is defined %}
# The maximum credit for having digits in the new password
dcredit = {{ dcredit }}
{% endif %}

{% if ucredit is defined %}
# The maximum credit for having uppercase characters in the new password
ucredit = {{ ucredit }}
{% endif %}

{% if lcredit is defined %}
# The maximum credit for having lowercase characters in the new password
lcredit = {{ lcredit }}
{% endif %}

{% if ocredit is defined %}
# The maximum credit for having other characters in the new password
ocredit = {{ ocredit }}
{% endif %}

{% if minclass is defined %}
# The minimum number of required classes of characters for the new password
minclass = {{ minclass }}
{% endif %}

{% if maxrepeat is defined %}
# The maximum number of allowed consecutive same characters in the new password
maxrepeat = {{ maxrepeat}}
{% endif %}

{% if maxclassrepeat is defined %}
# The maximum number of allowed consecutive characters of the same class in the new password
maxclassrepeat = {{ maxclassreapt }}
{% endif %}

{% if retry is defined %}
# Prompt user at most N times before returning with error
retry = {{ retry }}
{% endif %}

{% if enforce_for_root is defined %}
# Enforces pwquality checks on the root user password.
enforce_for_root
{% endif %}
메인 플레이북 작성
- libpam-pwquality 패키지 설치
- pwquality.conf 파일 백업, 복사
~/my-ansible/chapter_11.2/set_password_rule.yml
---

- hosts: tnode
  vars_files: vars_pw_rule.yml

  tasks:
    - name: Install libpam-pwquality
      ansible.builtin.apt:
        name: libpam-pwquality
        state: present
      when: ansible_facts.os_family == "Debian"

    - name: Backup pwquality.conf
      ansible.builtin.copy:
        src: /etc/security/pwquality.conf
        dest: /etc/security/pwquality.conf.bak
        remote_src: yes

    - name: Copy pwquality.conf.j2 at /etc/security
      ansible.builtin.template:
        src: pwquality.conf.j2
        dest: /etc/security/pwquality.conf
        mode: '0644'
playbook 실행
# 실행
ansible-playbook set_password_rule.yml

# 확인
for i in {1..3}; do echo ">> tnode$i <<"; ssh tnode$i sudo ls -l /etc/security; echo; done
for i in {1..3}; do echo ">> tnode$i <<"; ssh tnode$i sudo cat /etc/security/pwquality.conf; echo; done

# 확인 : ansible 계정에 패스워드를 조건이 불충분하도록 입력 시도
ssh tnode2
-----------------
sudo su - ansible
whoami
pwd
passwd ansible
Changing password for ansible.
Current password: ansiblePw1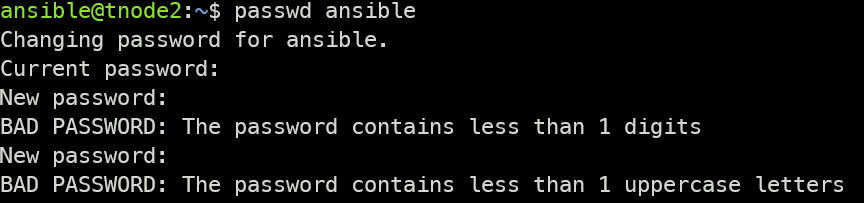
디렉터리 및 파일 접근 권한 변경
- Sticky bit 설정 파일은 리눅스에서 파일 소유자나 그룹 소유자만 해당 파일을 읽고 쓰고 삭제할 수 있도록 권한을 부여한 것을 의미.
- 파일 소유자나 그룹이 아닌 다른 사람에게 권한을 부여하면 Sticky bit 라고 함.
- World Writable 파일은 모든 사용자에게 파일을 읽고 쓸 수 있는 권한이 부여된 파일.
- Sticky bit 와 World writable 설정파을은 중요하므로 리눅스 보안에서 체크가 필요.
프로젝트 디렉터리 생성 및 ansible.cfg, inventory 파일 작성
#
mkdir ~/my-ansible/chapter_11.3
cd ~/my-ansible/chapter_11.3

# ansible.cfg, inventory 파일 작성
cat <<EOT> ansible.cfg
[defaults]
inventory = ./inventory
remote_user = ubuntu
ask_pass = false

[privilege_escalation]
become = true
become_method = sudo
become_user = root
become_ask_pass = false
EOT

cat <<EOT> inventory
[tnode]
tnode1
tnode2
tnode3
EOT
태스크 파일 작성
- Sticky bit 파일 검색 명령어:
find / -xdev -perm -04000 -o -perm -02000 -o -perm -01000 - World Writable 파일 검색 명령어:
find / -xdev -type f -perm -2
~/my-ansible/chapter_11.3/set_sticky_writable_files.yml
---

- hosts: tnode

  tasks:
  - name: Find Sticky bit files
    ansible.builtin.shell: |
      find / -xdev -perm -04000 -o -perm -02000 -o -perm 01000 \
      | grep -e 'dump$' \
             -e 'lp*-lpd$' \
             -e 'newgrp$' \
             -e 'restore$' \
             -e 'at$' \
             -e 'traceroute$' | xargs ls
    register: sfile_list

  - name: Find World Writable files
    ansible.builtin.shell: |
      find / -xdev -perm -2 -ls \
      | grep -v 'l..........' | awk '{print $NF}'
    register: wfile_list

  - name: Print Sticky bit files
    ansible.builtin.debug:
      msg: "{{ sfile_list.stdout_lines }}"

  - name: Print World Writable files
    ansible.builtin.debug:
      msg: "{{ wfile_list.stdout_lines }}"

  - name: Set Sticky bit files
    ansible.builtin.file:
      path: "{{ item }}"
      mode: "u-s,g-s,o-s"
    loop: "{{ sfile_list.stdout_lines }}"

  - name: Set World Writable files
    ansible.builtin.file:
      path: "{{ item }}"
      mode: "o-w"
    loop: "{{ wfile_list.stdout_lines }}"
playbook 실행
# 문법 체크
ansible-playbook --syntax-check set_sticky_writable_files.yml
# 시뮬레이션
ansible-playbook --check set_sticky_writable_files.yml
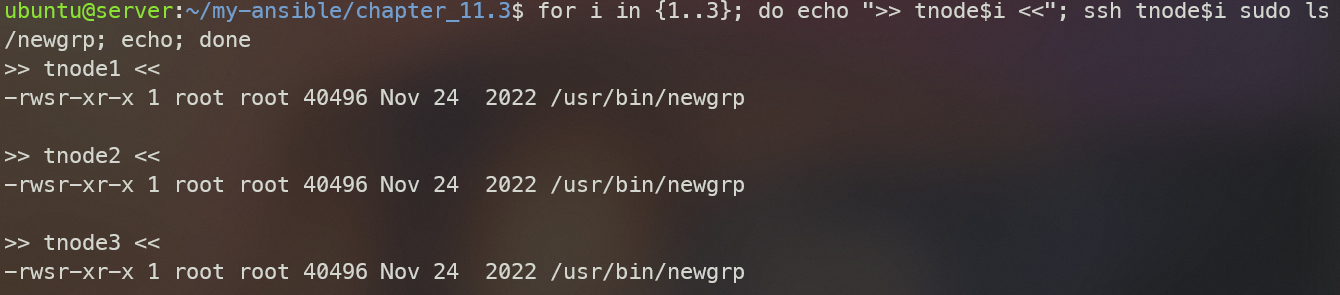
# (예시) 확인
for i in {1..3}; do echo ">> tnode$i <<"; ssh tnode$i sudo ls -al /usr/bin/newgrp; echo; done # -rwsr-xr-x
for i in {1..3}; do echo ">> tnode$i <<"; ssh tnode$i sudo ls -al /var/crash; echo; done # drwxrwxrwt
# 실행
ansible-playbook set_sticky_writable_files.yml
# (예시) 변경 확인
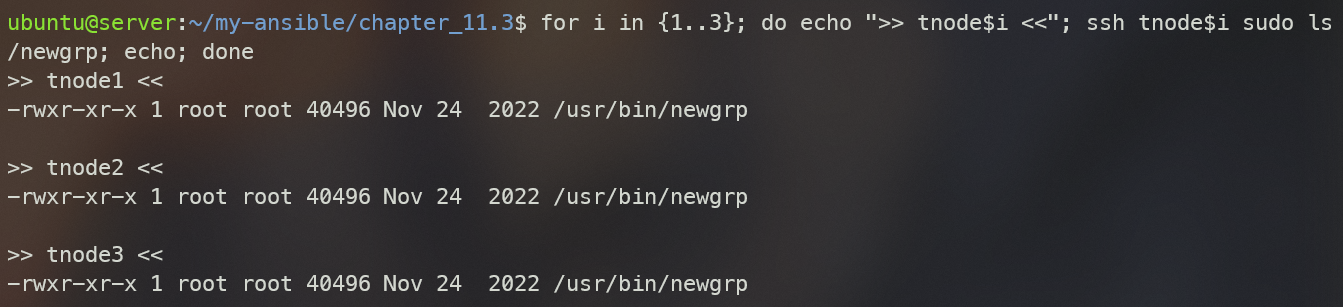
for i in {1..3}; do echo ">> tnode$i <<"; ssh tnode$i sudo ls -al /usr/bin/newgrp; echo; done # -rwxr-xr-x
for i in {1..3}; do echo ">> tnode$i <<"; ssh tnode$i sudo ls -al /var/crash; echo; done # drwxrwxr-t
# 한번 더 실행
ansible-playbook set_sticky_writable_files.ymlsticky bit before (s가 sticky bit를 의미함)
sticky bit after (s는 사라짐)
사설인증서 생성
- 사설 인증서에는 자체 서명된 인증 기관용 인증서와 해당 인증서를 이용해 만든 클라이언트 인증 키가 있다.
- 인증서를 만들 때는 CSR Certificate Signing Request 이라는 인증 서명 요청.
- CSR을 통해 인증 기관용 인증서와 클라이언트 인증 키를 생성.
프로젝트 디렉터리 생성 및 ansible.cfg, inventory 파일 작성
#
mkdir ~/my-ansible/chapter_11.4
cd ~/my-ansible/chapter_11.4

# ansible.cfg, inventory 파일 작성
cat <<EOT> ansible.cfg
[defaults]
inventory = ./inventory
remote_user = ubuntu
ask_pass = false
roles_path = ./roles

[privilege_escalation]
become = true
become_method = sudo
become_user = root
become_ask_pass = false
EOT

cat <<EOT> inventory
[rootCA]
tnode1

[tnode]
tnode2
tnode3
EOT
롤 생성 : myrole.rootCA, myrole.serverKey
#
ansible-galaxy role init --init-path ./roles myrole.rootCA
ansible-galaxy role init --init-path ./roles myrole.serverKey

# 확인
ansible-galaxy role list
tree roles -L 2
myrole.rootCA 에 태스크 파일 작성: 플레이북은 community.crypto 라는 컨텐츠 컬렉션을 사용 - Link
- 앤서블에서 개인 키를 만들때는
community.crypto.**openssl_privatekey**모듈을 사용 - Link - CSR을 만들 때는
community.crypto.**openssl_csr_pipe**모듈을 사용 - Link - CSR을 이용하여 인증서를 생성할 때는
community.crypto.**x509_certificate**모듈을 사용 - Link
~/my-ansible/chapter_11.4/roles/myrole.rootCA/tasks/main.yml
---
# tasks file for myrole.rootCA

- name: Create new private key for rootCA
  community.crypto.openssl_privatekey:
    path: "{{ ca_privatekey_path }}"

- name: Create CSR for new certificate rootCA
  community.crypto.openssl_csr_pipe:
    privatekey_path: "{{ ca_privatekey_path }}"
    country_name: "{{ country_name }}"
    organization_name: "{{ orgarnization_name }}"
    common_name: "{{ ca_common_name }}"
  register: csr

- name: Create Self-signed new certificate rootCA
  community.crypto.x509_certificate:
    path: "{{ ca_certificate_path }}"
    privatekey_path: "{{ ca_privatekey_path }}"
    csr_content: "{{ csr.csr }}"
    selfsigned_not_after: "{{ certificate_days }}"
    provider: selfsigned
    state: present
myrole.serverKey 에 태스크 파일 작성
- myrole.rootCA 태스크와 비슷하지만, rootCA로부터 발급받는 인증서를 생성할 때 provider가 사전에 생성된 CA 파일을 이용(ownca)를 사용.
- 사전에 생성된 rootC의 개인 키와 인증서는 ownca 로 시작되는 파라미터를 사용.
~/my-ansible/chapter_11.4/roles/myrole.serverKey/tasks/main.yml
---
# tasks file for myrole.serverKey

- name: Create new private key for server key
  community.crypto.openssl_privatekey:
    path: "{{ server_privatekey_path }}"

- name: Create CSR for new server key
  community.crypto.openssl_csr_pipe:
    privatekey_path: "{{ server_privatekey_path }}"
    country_name: "{{ country_name }}"
    organization_name: "{{ orgarnization_name }}"
    common_name: "{{ server_common_name }}"
  register: csr

- name: Create Self-signed server key from rootCA
  community.crypto.x509_certificate:
    path: "{{ server_certificate_path }}"
    privatekey_path: "{{ server_privatekey_path }}"
    csr_content: "{{ csr.csr }}"
    ownca_path: "{{ ca_certificate_path }}"
    ownca_privatekey_path: "{{ ca_privatekey_path }}"
    ownca_not_after: "{{ certificate_days }}"
    provider: ownca
    state: present
playbook 작성
- become를 false로 설정하여 root가 아닌 ubuntu 계정에서 실행.
- pre_tasks 섹션을 통해 롤이 실행되기 전에 인증서를 생성하고 보관할 디렉터리를 먼저 생성.
touch ~/my-ansible/chapter_11.4/make_certification.yml~/my-ansible/chapter_11.1/make_certification.yml
---

- hosts: rootCA
  become: false
  vars_files: vars_ssltls.yml

  pre_tasks:
    - name: Make ssl & tls directory
      ansible.builtin.file:
        path: "{{ ssl_tls_path }}"
        state: directory

  roles:
    - role: myrole.rootCA
    - role: myrole.serverKey
playbook 실행
# 실행
ansible-playbook make_certification.yml

# 확인
for i in {1..3}; do echo ">> tnode$i <<"; ssh tnode$i ls -l ~/tls; echo; done
모니터링
- 팩트는 관리 노드에서 시스템과 관련된 정보(아래 예시)들을 찾아 변수로 제공 → 인프라 정보 파악 및 로그로 저장
- 호스트 이름
- 커널 버전
- 네트워크 인터페이스 이름
- 네트워크 인터페이스 IP 주소
- 운영체제 버전
- CPU 개수
- 사용 가능한 메모리
- 스토리지 장치의 크기 및 여유 공간
- 추출한 내용은 ansible.builtin.shell 모듈을 이용하여 /var/log/daily_check 디렉터리에 저장
프로젝트 디렉터리 생성 및 ansible.cfg, inventory 파일 작성
#
mkdir ~/my-ansible/chapter_12.1
cd ~/my-ansible/chapter_12.1

# ansible.cfg, inventory 파일 작성
cat <<EOT> ansible.cfg
[defaults]
inventory = ./inventory
remote_user = ubuntu
ask_pass = false

[privilege_escalation]
become = true
become_method = sudo
become_user = root
become_ask_pass = false
EOT

cat <<EOT> inventory
[tnode]
tnode1
tnode2
tnode3
EOT
playbook 파일 작성 : debug과 facts 수집 후 file 에 저장
~/my-ansible/chapter_12.1/monitoring_facts.yml
---

- hosts: tnode
  vars:
    log_directory: /var/log/daily_check

  tasks:
    - name: Print system info
      ansible.builtin.debug:
        msg:
        - "################ Start #####################"
        - "Date: {{ ansible_facts.date_time.date }} {{ ansible_facts.date_time.time }}"
        - "HostName: {{ ansible_facts.hostname }}"
        - "OS: {{ ansible_facts.distribution }}"
        - "OS Version: {{ ansible_facts.distribution_version }}"
        - "OS Kernel: {{ ansible_facts.kernel }}"
        - "CPU Cores: {{ ansible_facts.processor_vcpus }}"
        - "Memory: {{ ansible_facts.memory_mb.real }}"
        - "Interfaces: {{ ansible_facts.interfaces }}"
        - "IPv4: {{ ansible_facts.all_ipv4_addresses }}"
        - "Devices: {{ ansible_facts.mounts }}"
        - "################# End #######################"
      register: result

    - name: Create log directory
      ansible.builtin.file:
        path: "{{ log_directory }}"
        state: directory

    - name: Print logs to log file
      ansible.builtin.shell: |
        echo "{{ item }}" >> "{{ log_directory }}"/system_info.logs
      loop: "{{ result.msg }}"
playbook 실행
# 실행
ansible-playbook monitoring_facts.yml
# 확인
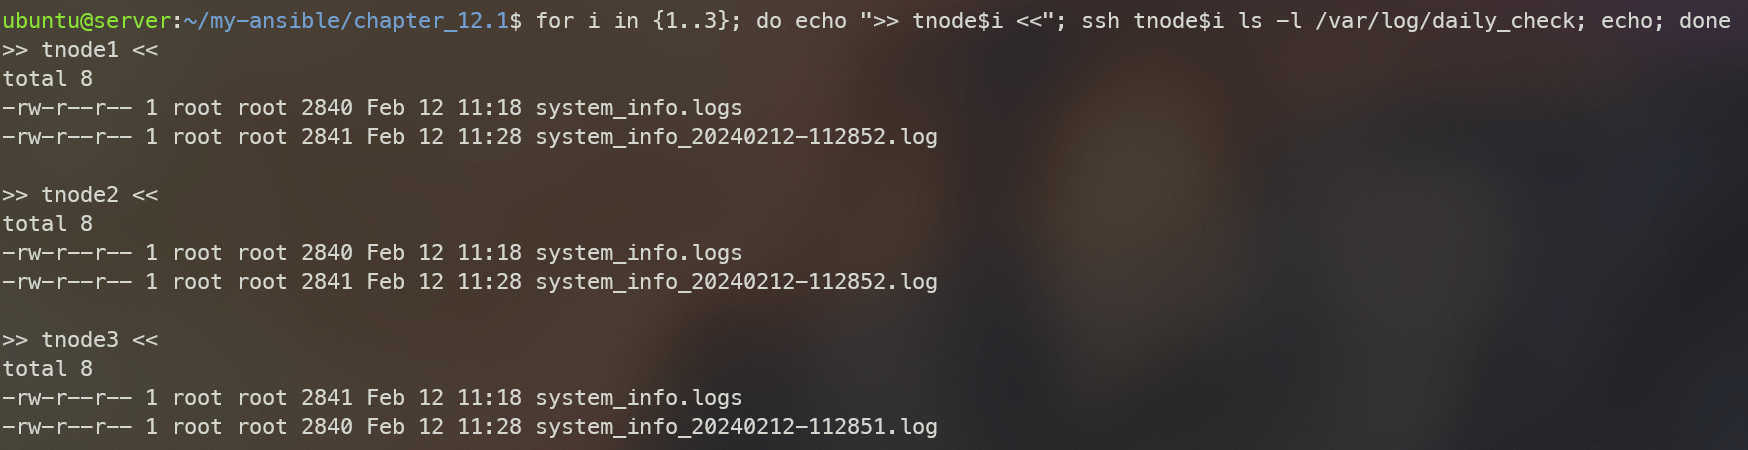
for i in {1..3}; do echo ">> tnode$i <<"; ssh tnode$i ls -l /var/log/daily_check; echo; done
ssh tnode1 sudo cat /var/log/daily_check/system_info.logs
ansible-playbook monitoring_facts.yml
ssh tnode1 sudo cat /var/log/daily_check/system_info.logs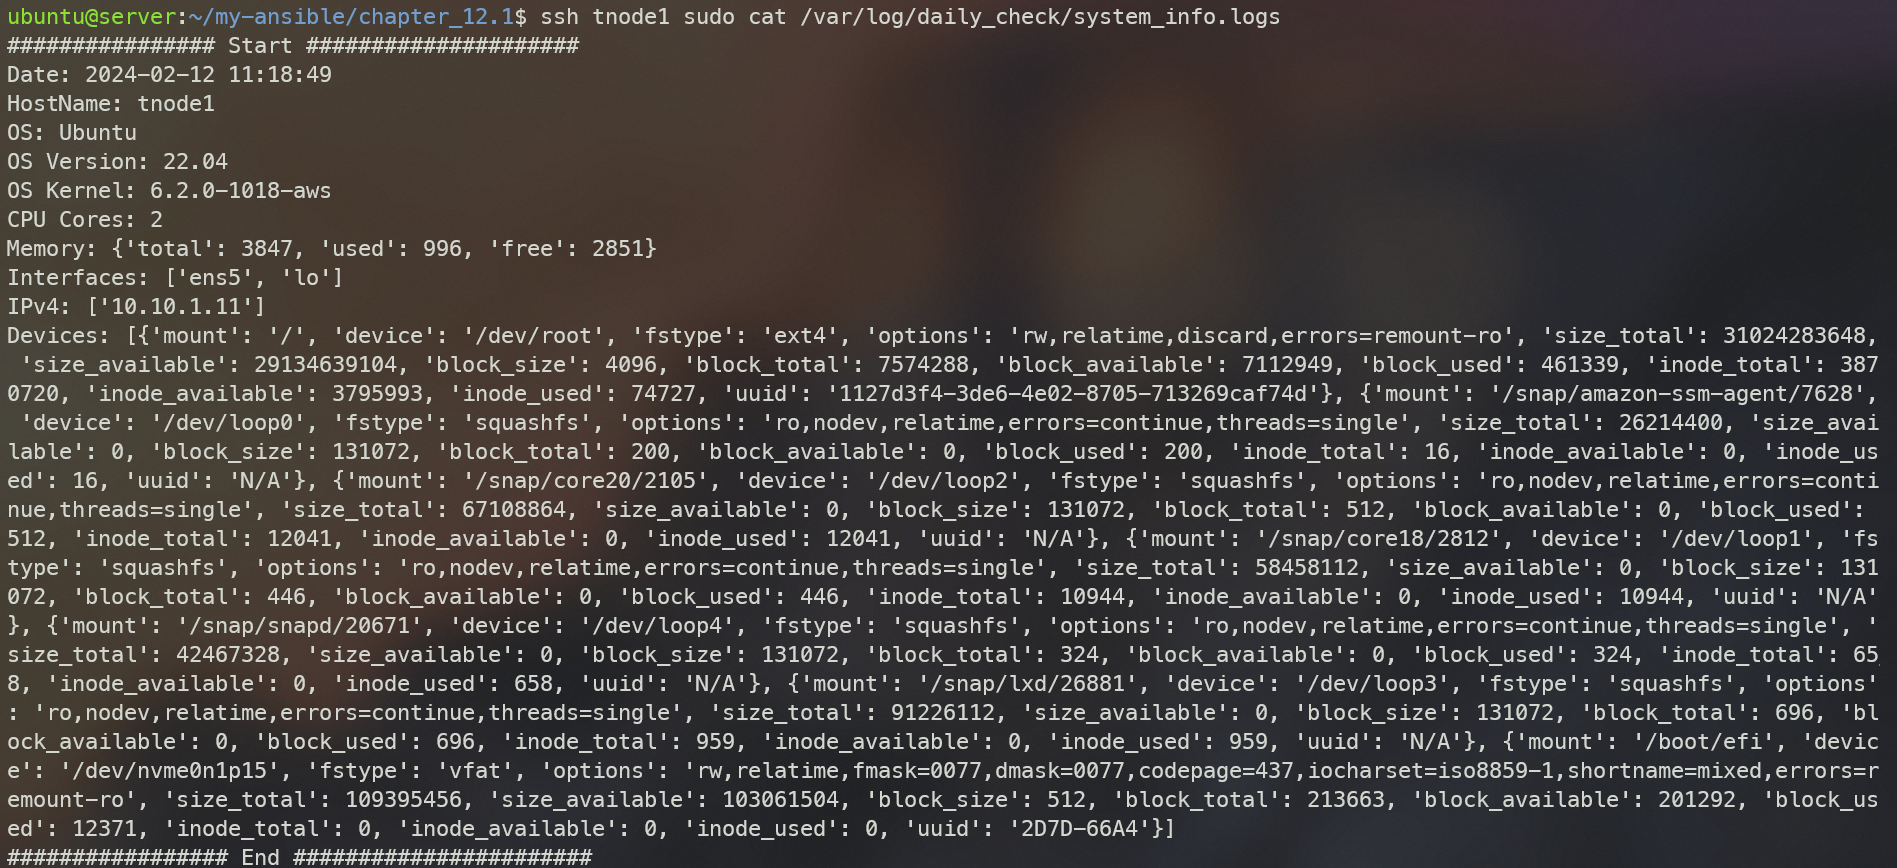
도전과제
12.1 수집 결과를 날짜와 시간이 포함된 log 파일 이름으로 저장되게 하고, Crontab을 활용하여 30분 마다 반복 실행 될 수 있게 설정해보자
~/my-ansible/chapter_12.1/monitoring_facts_challange.yml
- hosts: tnode
  vars:
    log_directory: /var/log/daily_check
    current_time: "{{ ansible_date_time.year }}{{ ansible_date_time.month }}{{ ansible_date_time.day }}-{{ ansible_date_time.hour }}{{ ansible_date_time.minute }}{{ ansible_date_time.second }}"

  tasks:
    - name: Print system info
      ansible.builtin.debug:
        msg:
        - "################ Start #####################"
        - "Date: {{ ansible_facts.date_time.date }} {{ ansible_facts.date_time.time }}"
        - "HostName: {{ ansible_facts.hostname }}"
        - "OS: {{ ansible_facts.distribution }}"
        - "OS Version: {{ ansible_facts.distribution_version }}"
        - "OS Kernel: {{ ansible_facts.kernel }}"
        - "CPU Cores: {{ ansible_facts.processor_vcpus }}"
        - "Memory: {{ ansible_facts.memory_mb.real }}"
        - "Interfaces: {{ ansible_facts.interfaces }}"
        - "IPv4: {{ ansible_facts.all_ipv4_addresses }}"
        - "Devices: {{ ansible_facts.mounts }}"
        - "################# End #######################"
      register: result

    - name: Create log directory
      ansible.builtin.file:
        path: "{{ log_directory }}"
        state: directory

    - name: Print logs to log file with date and time
      ansible.builtin.shell: |
        echo "{{ item }}" >> "{{ log_directory }}/system_info_{{ current_time }}.log"
      loop: "{{ result.msg }}"
crontab 적용
crontab -e
*/30 * * * * ansible-playbook /path/to/your_playbook.yml
확인
# 확인
for i in {1..3}; do echo ">> tnode$i <<"; ssh tnode$i ls -l /var/log/daily_check; echo; done