
이번 포스팅에서는 Ansible의 시스템 구축 자동화에 대해 다뤄 보겠다. 본 포스팅은 Cloud@net 스터디의 결과물임을 밝힌다.
Ansible을 통해서 EC2의 시스템 구축을 자동화 할 수 있는데, 이번 포스팅에서는 사용자계정 생성, SSH 키 생성 및 복사, NTP 서버 설치 및 설정을 실습해 보겠다.
먼저 실습을 위해 아래 CF를 통해 환경 세팅을 해주자.
1. 환경설정
| Node | OS | NIC IP | Account |
|---|---|---|---|
| Server | ubuntu | 10.10.1.10 | id: root 또는 ubunt / pw: qwe123 |
| tnode1 | ubuntu | 10.10.1.11 | id: root 또는 ubunt / pw: qwe123 |
| tnode2 | ubuntu | 10.10.1.12 | id: root 또는 ubunt / pw: qwe123 |
| tnode3 | ubuntu | 10.10.1.13 | id: root 또는 ubunt / pw: qwe123 |
# YAML 파일 다운로드
curl -O https://s3.ap-northeast-2.amazonaws.com/cloudformation.cloudneta.net/Ansible/a101-2w.yaml

# CloudFormation 스택 배포
# aws cloudformation deploy --template-file a101-1w.yaml --stack-name mylab --parameter-overrides KeyName=<My SSH Keyname> SgIngressSshCidr=<My Home Public IP Address>/32 --region ap-northeast-2
예시) aws cloudformation deploy --template-file a101-2w.yaml --stack-name mylab --parameter-overrides KeyName=kp-gasida SgIngressSshCidr=$(curl -s ipinfo.io/ip)/32 --region ap-northeast-2 --capabilities CAPABILITY_NAMED_IAM

## Tip. 인스턴스 타입 변경 : MyInstanceType=t3.xlarge
예시) aws cloudformation deploy --template-file a101-2w.yaml --stack-name mylab --parameter-overrides KeyName=kp-gasida SgIngressSshCidr=$(curl -s ipinfo.io/ip)/32 --region ap-northeast-2 --capabilities CAPABILITY_NAMED_IAM MyInstanceType=t3.xlarge

# CloudFormation 스택 배포 완료 후 작업용 EC2 IP 출력
aws cloudformation describe-stacks --stack-name mylab --query 'Stacks[*].Outputs[0].OutputValue' --output text --region ap-northeast-2

# Ansible Server EC2 SSH 접속
ssh -i ~/.ssh/kp-gasida.pem ubuntu@$(aws cloudformation describe-stacks --stack-name mylab --query 'Stacks[*].Outputs[0].OutputValue' --output text --region ap-northeast-2)
CF로 세팅을 하면, ubuntu/qwe123 계정이 생성된다.
앤서블 접근을 위한 SSH 인증 구성 및 확인
ssh-keygen -t rsa -N "" -f /home/ubuntu/.ssh/id_rsa
tree ~/.ssh
# 공개 키를 관리 노드에 복사 : yes -> 암호(qwe123) 입력
for i in {1..3}; do ssh-copy-id ubuntu@tnode$i; done
# 복사 확인
for i in {1..3}; do echo ">> tnode$i <<"; ssh tnode$i cat ~/.ssh/authorized_keys; echo; done#
grep 'PermitRootLogin yes' /etc/ssh/sshd_config
# AWS EC2에 root로 ssh 접속을 위해서 파일 삭제 : rm -rf /root/.ssh/authorized_keys
sudo ls /root/.ssh#
sudo su -
#
for i in {1..3}; do ssh tnode$i hostname; done
#
exit
whoamiAnsible을 사용하기 위해서 각 노드들의 root 권한을 가진 계정으로 접속이 되어야 하므로, ssh 키 복사를 통해서 세팅을 해준다.
2. 사용자 계정 생성하기
- 계정/PW Vault 로 암호화
- ansible.builtin.user 모듈 사용
ansible.cfg, inventory 파일 생성
#
mkdir ~/my-ansible/chapter_09.1
cd ~/my-ansible/chapter_09.1

# ansible.cfg, inventory 파일 작성
cat <<EOT > ansible.cfg
[defaults]
inventory = ./inventory
remote_user = ubuntu
ask_pass = false

[privilege_escalation]
become = true
become_method = sudo
become_user = root
become_ask_pass = false
EOT

cat <<EOT> inventory
tnode1
tnode2
tnode3
EOT
Vault를 사용하여 계정정보 변수파일 생성
계정과, 비밀번호가 있는 파일임으로 Vault로 암호화 한다.
# vault 암호는 편하게 입력
ansible-vault create vars/secret.yml
New Vault password: qwe123
Confirm New Vault password: qwe123

## 에디터 창으로 전환 : (아래 내용 복붙) user_info 변수에 userid와 userpw가 같이 있는 사전형 변수를 정의
---

user_info:
  - userid: "ansible"
    userpw: "ansiblePw1"
  - userid: "stack"
    userpw: "stackPw1"
~
~
:wq

# 변수 파일 확인
ls -l vars/secret.yml
cat vars/secret.yml
playbook 작성
---

- hosts: all

  # vault로 사용자 계정 관련 변수가 정의된 파일을 임포트하여 사용
  vars_files:
    - vars/secret.yml

  tasks:
  # loop 문을 사용하여 user_info의 userid와 userpw 사용
  - name: Create user
    ansible.builtin.user:
      name: "{{ item.userid }}"
      password: "{{ item.userpw | password_hash('sha512', 'mysecret') }}"
      state: present
      shell: /bin/bash
    loop: "{{ user_info }}"
문법체크
# 에러 메시지 없이 플레이북 이름만 출력되면 문법 정상!
ansible-playbook --syntax-check create_user.yml
...

# 실패! > 다시 실행
ansible-playbook --ask-vault-pass --syntax-check create_user.yml
Vault password: qwe123

playbook: create_user.yml
play! (위에서 생성한 Vault 비밀번호 입력)
ansible-playbook --ask-vault-pass create_user.yml

확인
ansible -m shell -a "tail -n 3 /etc/passwd" all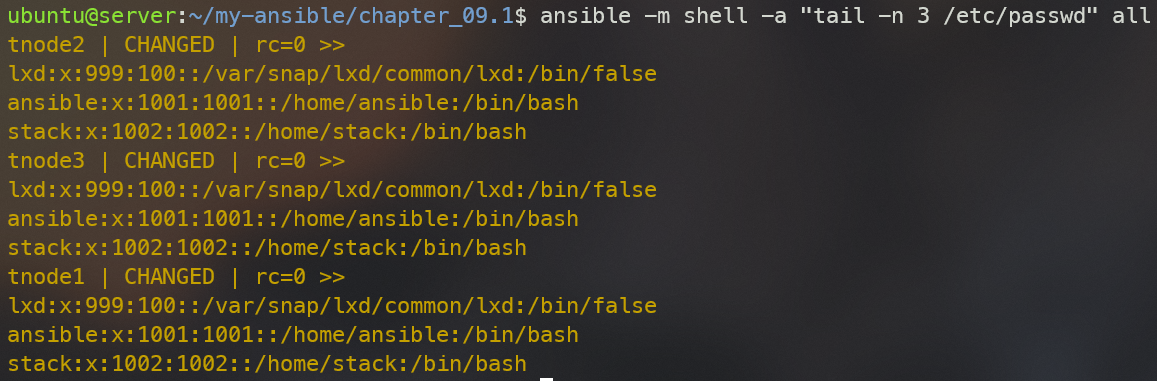
tnode1,2,3 모두 ansible, stack 계정이 생성된 것을 확인할 수 있다.
3. SSH 키 생성 및 복사하기
- 사용자 아이디는 외부변수로 받음
- ansible-server에서 ansible 계정을 만들고, SSH 키 생성
- ansible-server에서 각 tnode에 퍼블릭 키 복사
- ansible.builtin.user 모듈: 계정생성
- ansible.posix.authorized_key 모듈: 키 복사
ansible.cfg, inventory 파일 생성
#
mkdir ~/my-ansible/chapter_09.2
cd ~/my-ansible/chapter_09.2

# ansible.cfg, inventory 파일 작성
cp ~/my-ansible/ansible.cfg ./

# inventory 파일 수정
cat <<EOT> inventory
[tnode]
tnode1
tnode2
tnode3
EOT

# lookup 플러그인
ansible-doc -l -t lookup
playbook 작성
- localhost (ansible-server)에서 ssh키가 생성되고, 공개키는 각 tnode로 복사.
- lookup 함수를 통해 외부소스(파일, DB, key/value stores, APIs 등) 검색
---

- hosts: localhost
  tasks:
  - name : Create ssh key
    ansible.builtin.user:
      name: "{{ userid }}"
      generate_ssh_key: true
      ssh_key_bits: 2048
      ssh_key_file: /home/{{ userid }}/.ssh/id_rsa
      shell: /bin/bash

- hosts: tnode
  tasks:
  - name: Copy SSH Pub key
    ansible.posix.authorized_key:
      user: "{{ userid }}"
      state: present
      key: "{{ lookup('file', '/home/{{ userid }}/.ssh/id_rsa.pub') }}"
play!
# 문법 체크
ansible-playbook --syntax-check create_sshkey.yml

# 실행 : 외부 변수(-e)로 userid 정의하고 전달 실행 >> 실패!
ansible-playbook -e userid=ansible create_sshkey.yml
ansible-playbook -e userid=ansible create_sshkey.yml -vvvvv

#
ls -l /home/ansible/.ssh/id_rsa.pub
sudo ls -l /home/ansible/.ssh/id_rsa.pub
ansible-server에서 ubuntu계정으로 playbook 사용 시 권한에러가 나므로, root로 바꿔준다.
ansible.cfg
[defaults]
inventory = ./inventory
remote_user = root
inject_facts_as_vars = false
확인
# ansible 계정 전환
sudo su - ansible

# bash
echo $SHELL
whoami
pwd

#
ls -al
ls -l .ssh
total 8
-rw------- 1 ansible ansible 1856 Jan  5 05:57 id_rsa
-rw-r--r-- 1 ansible ansible  417 Jan  5 05:57 id_rsa.pub

# tnode SSH 접속 테스트
for i in {1..3}; do echo ">> tnode$i <<"; ssh tnode$i hostname; echo; done

# 대상 노드에 정보 확인
for i in {1..3}; do echo ">> tnode$i <<"; ssh tnode$i tree /home/ansible/.ssh; echo; done
for i in {1..3}; do echo ">> tnode$i <<"; ssh tnode$i cat /home/ansible/.ssh/authorized_keys; echo; done

# ubuntu로 복귀
exit
whoami
pwd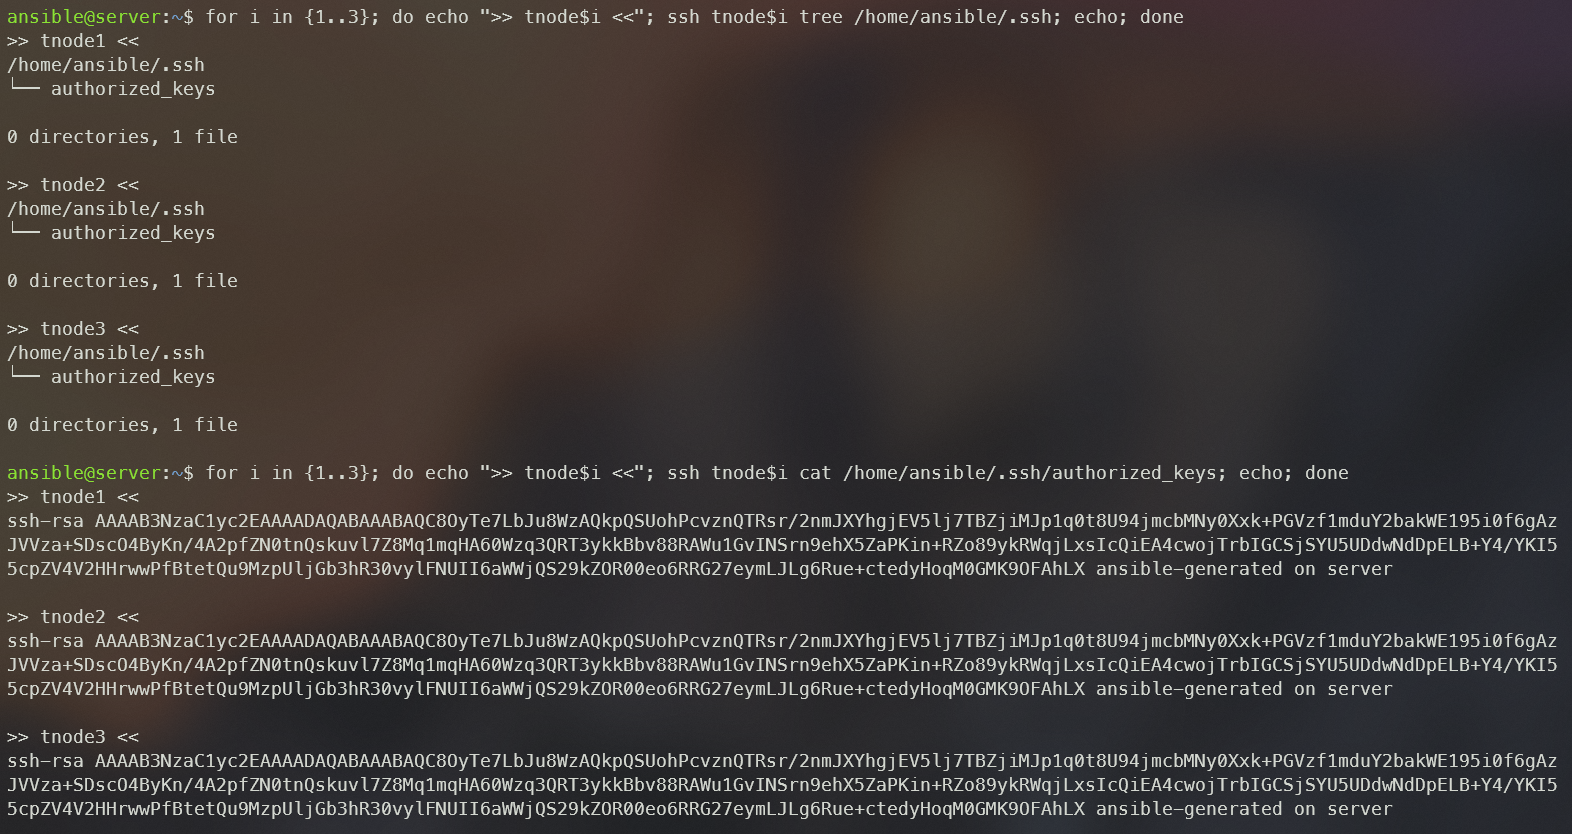
tnode 관리 노드에 ansible 계정에 패스워드 입력 없이 sudo 권한 줄 수 있게 설정
~/my-ansible/chapter_09.2/sudo-ansible.yml
---
- hosts: all

  tasks:
  - name: Create file
    ansible.builtin.file:
      path: /etc/sudoers.d/ansible
      mode: '0600'
      state: touch

  - name: Edit file
    ansible.builtin.lineinfile:
      path: /etc/sudoers.d/ansible
      line: ansible ALL=(root) NOPASSWD:ALL
play!
sudo ansible-playbook sudo-ansible.yml --ask-pass
SSH password: qwe123
확인
# ansible 계정 전환 후 tnode1 접속 후 확인
sudo su - ansible
ssh tnode1
----------
whoami
sudo cat /etc/sudoers.d/ansible
exit
----------
sudo 권한 세팅은 NTP 서버 설정때 필요하다.
3. NTP 서버 설치하기
- NTP 서버 주소는 메인 플레이북에서 정의.
- 운영체제가 Ubuntu면 apt 모듈을 사용하여 chrony를 설치.
- 운영체제가 CentOS/레드햇이면 dnf 모듈을 사용하여 chrony를 설치.
- Jinja2 템플릿 방식의 chrony.conf 파일을 대상 호스트로 복사.
- 설정 파일이 복사되면 chrony 서비스를 재시작.
- 다음에도 사용할 수 있도록 롤을 이용하여 설계 및 작성.
# root 계정으로 ansible-server 접속
su - ansible -c 'mkdir -p ~/ansible-project/chapter_09.3'
ls -l /home/ansible/

# ansible 계정 전환
su - ansible
whoami
cd
pwd

# 프로젝트 디렉터리로 이동
cd ~/ansible-project/chapter_09.3
pwd
/home/ansible/ansible-project/chapter_09.3
ansible.cfg, inventory 파일 생성 : remote_user 는 ansible 로 설정
cat <<EOT > ansible.cfg
[defaults]
inventory = ./inventory
remote_user = ansible
ask_pass = false
roles_path = ./roles

[privilege_escalation]
become = true
become_method = sudo
become_user = root
become_ask_pass = false
EOT

cat <<EOT > inventory
[tnode]
tnode1
tnode2
tnode3
EOT
role 생성
# --init-path 옵션으로 롤 생성 경로를 ./roles로 설정
ansible-galaxy role init --init-path ./roles myrole.chrony

# 확인
tree roles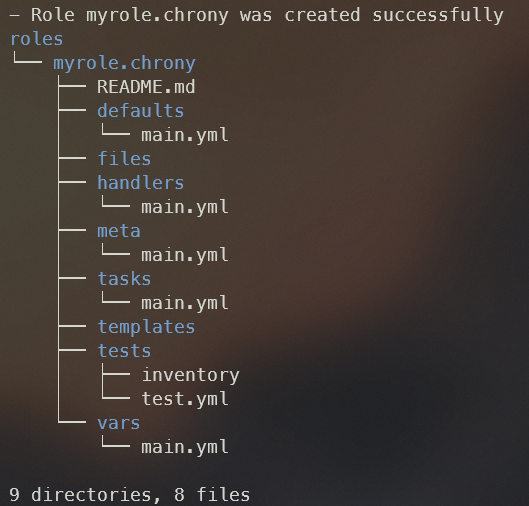
role 디렉터리에 vars/main.yml 수정
---
# vars file for myrole.chrony

package_name : chrony
service_name : chronyd
fedora_os:
 - RedHat
 - CentOS
chrony.conf.j2 파일을 생성
touch ~/ansible-project/chapter_09.3/roles/myrole.chrony/templates/chrony.conf.j2

pool {{ ntp_server }}
driftfile /var/lib/chrony/drift
makestep 1.0 3
rtcsync
allow 10.10.0.0/16
local stratum 10
keyfile /etc/chrony.keys
leapsectz right/UTC
logdir /var/log/chrony
핸들러에는 chrony 서비스를 재시작하는 태스크 추가
chapter_09.3/roles/myrole.chrony/handlers/main.yml
---
# handlers file for myrole.chrony

- name: Restart chrony
  ansible.builtin.service:
    name: "{{ service_name }}"
    state: restarted
main task
- ansible_facts.distribution 팩트 변수를 이용하여 다른 파일에서 태스크를 포함 시킴
- 운영체제에 맞는 chrony 환경 설정 파일 설정 복사 → 복사 후 notify로 ‘Restart chrony’ 핸들러 호출
chapter_09.3/roles/myrole.chrony/tasks/main.yml
---
# tasks file for myrole.chrony

- name: Import playbook
  ansible.builtin.include_tasks:
    file: "{{ ansible_facts.distribution }}.yml"

- name: Copy chrony config file when Ubuntu
  ansible.builtin.template:
    src: chrony.conf.j2
    dest: /etc/chrony/chrony.conf
  notify: "Restart chrony"
  when: ansible_facts.distribution == "Ubuntu"

- name: Copy chrony config file when Other OS
  ansible.builtin.template:
    src: chrony.conf.j2
    dest: /etc/chrony.conf
  notify: "Restart chrony"
  when: ansible_facts.distribution in fedora_os
각 OS에 맞는 task 작성
touch ~/ansible-project/chapter_09.3/roles/myrole.chrony/tasks/RedHat.yml

---

- name: Install chrony using dnf
  ansible.builtin.dnf:
    name: "{{ package_name }}"
    state: latest

touch ~/ansible-project/chapter_09.3/roles/myrole.chrony/tasks/CentOS.yml
---

- name: Install chrony using dnf
  ansible.builtin.dnf:
    name: "{{ package_name }}"
    state: latest
touch ~/ansible-project/chapter_09.3/roles/myrole.chrony/tasks/Ubuntu.yml
---

- name: Install chrony using apt
  ansible.builtin.apt:
    name: "{{ package_name }}"
    state: latest

touch ~/ansible-project/chapter_09.3/install_ntp.yml
---

- hosts: tnode
  roles:
    - role: myrole.chrony
      ntp_server: 0.kr.pool.ntp.org
play!
# 문법 체크
ansible-playbook --syntax-check install_ntp.yml

# 플레이북 실행 : when문을 통해 해당 운영체제에 따라 특정 태스크만 실행됨
ansible-playbook install_ntp.yml
PLAY [tnode] ******************************************************************************************************************************************************************

TASK [Gathering Facts] ********************************************************************************************************************************************************
ok: [tnode2-ubuntu.local]
ok: [tnode1-ubuntu.local]
ok: [tnode3-ubuntu.local]

TASK [myrole.chrony : Import playbook] ****************************************************************************************************************************************
included: /home/ansible/ansible-project/chapter_09.3/roles/myrole.chrony/tasks/Ubuntu.yml for tnode1-ubuntu.local, tnode2-ubuntu.local, tnode3-ubuntu.local

TASK [myrole.chrony : Install chrony using apt] *******************************************************************************************************************************
changed: [tnode1-ubuntu.local]
changed: [tnode2-ubuntu.local]
changed: [tnode3-ubuntu.local]

TASK [myrole.chrony : Copy chrony config file when Ubuntu] ********************************************************************************************************************
changed: [tnode3-ubuntu.local]
changed: [tnode1-ubuntu.local]
changed: [tnode2-ubuntu.local]

TASK [myrole.chrony : Copy chrony config file when Other OS] ******************************************************************************************************************
skipping: [tnode1-ubuntu.local]
skipping: [tnode2-ubuntu.local]
skipping: [tnode3-ubuntu.local]

RUNNING HANDLER [myrole.chrony : Restart chrony] ******************************************************************************************************************************
changed: [tnode1-ubuntu.local]
changed: [tnode2-ubuntu.local]
changed: [tnode3-ubuntu.local]

PLAY RECAP ********************************************************************************************************************************************************************
tnode1-ubuntu.local        : ok=5    changed=3    unreachable=0    failed=0    skipped=1    rescued=0    ignored=0
tnode2-ubuntu.local        : ok=5    changed=3    unreachable=0    failed=0    skipped=1    rescued=0    ignored=0
tnode3-ubuntu.local        : ok=5    changed=3    unreachable=0    failed=0    skipped=1    rescued=0    ignored=0
확인
#
ansible -m shell -a "cat /etc/chrony/chrony.conf" tnode1
ansible -m shell -a "systemctl status chrony" tnode1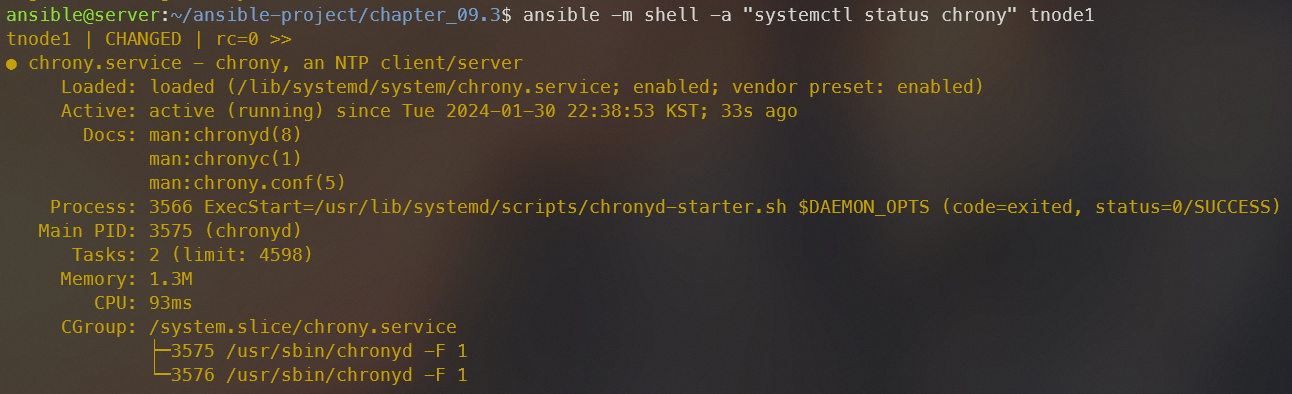
이번포스팅에서는 Ansible을 통한 시스템 구축에 대해 실습해 보았다. tomcat, apache 설치와 같은 작업도 Ansible을 통해 할 수 있다. 한 번 세팅해두면 여러 VM에 세팅이 가능한게 장점인 것 같다. 보통 VMSS를 사용할 때 이미지를 만들어주는 Packer를 사용하는데, 차이점에 대해 좀 고민해 봐야겠다.