Material Design
머터리얼 디자인의 컴포넌트를 플러터에서 제공한다.
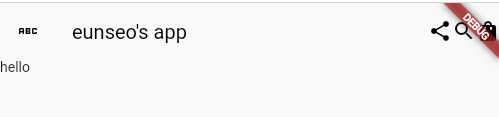
AppBar
import 'package:flutter/material.dart';
void main() {
runApp(const MyApp());
}
class MyApp extends StatelessWidget {
const MyApp({super.key});
// This widget is the root of your application.
Widget build(BuildContext context) {
return MaterialApp(
home: Scaffold(
appBar: AppBar(
backgroundColor: Colors.transparent, //그림자가 있어서 회색으로 나옴
elevation: 0, //그림자를 없앰
foregroundColor: Colors.black, //글자 색
title: const Text("eunseo's app"),
centerTitle: false,
leading: const Icon(Icons.abc),
actions: const [
Icon(Icons.share),
Icon(Icons.search),
Icon(Icons.shopping_bag),
], //trailing이 아님. List형태로 받기 위함.
),
body: const Text('hello'),
),
);
}
}
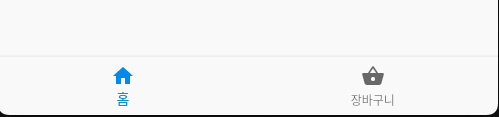
BottomNavigationBar
items를 가지며, BottomNavigationBarItem을 List로 가진다.
아이템이 두개 미만일 경우 에러가 발생한다.
import 'package:flutter/material.dart';
void main() {
runApp(const MyApp());
}
class MyApp extends StatelessWidget {
const MyApp({super.key});
// This widget is the root of your application.
Widget build(BuildContext context) {
return MaterialApp(
home: Scaffold(
appBar: AppBar( ...생략 ),
body: const Text('hello'),
bottomNavigationBar: BottomNavigationBar(
items: const [
BottomNavigationBarItem(
icon: Icon(Icons.home), //아이템을 두개이상 넣어야한다.
label: '홈',
),
BottomNavigationBarItem(
icon: Icon(Icons.shopping_basket),
label: '장바구니',
),
],
),
),
);
}
}
FloatingActionButton
하단에 떠있는 스크롤을 해도 따라다니는 버튼.
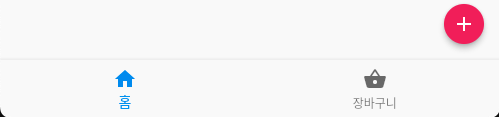
floatingActionButton: FloatingActionButton(
  onPressed: () => {}, //function
  backgroundColor: Colors.pink,
  mini: true, //버튼 작게. 기본적으로 크게 되어있음
  child: const Icon(
    Icons.add,
  ),
),
Custom
드디어 커스텀 위젯이다. 복붙을 하면서 얼마나 이게 쓰고싶었는지 모른다..^^
유지보수, 관리에 용이하고 코드도 많이 줄어 내 손목도 지킬 수 있다.
- 파일명은 UpperCamelCase로 한다.
- 매개변수로 전달할 데이터 타입을 명확히 한다.
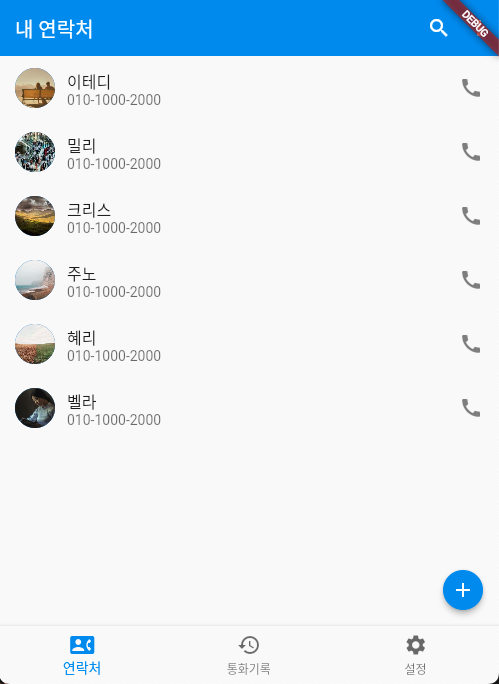
Custom된 ContactTile 위젯
import 'package:flutter/material.dart';
class ContactTile extends StatelessWidget {
const ContactTile(
{super.key,
required this.name,
required this.phone,
required this.imgUrl});
// 매개변수 정의
final String name;
final String phone;
final String imgUrl;
Widget build(BuildContext context) {
return ListTile(
leading: CircleAvatar(
backgroundImage: NetworkImage(imgUrl),
),
title: Text(name),
subtitle: Text(phone),
trailing: const Icon(Icons.call),
);
}
}
커스텀 위젯 사용법
import 'package:assignment1/ContactTile.dart';
ContactTile(
  name: '이테디',
  phone: '010-1000-2000',
  imgUrl: "https://picsum.photos/100/100",
),
커스텀 위젯을 import하고(사용시 자동으로 import된다.)
이렇게 매개변수만 전달하면 된다.
본 후기는 유데미-스나이퍼팩토리 9주 완성 프로젝트캠프 학습 일지 후기로 작성 되었습니다.

주니어 플러터 개발자의 고군분투기