
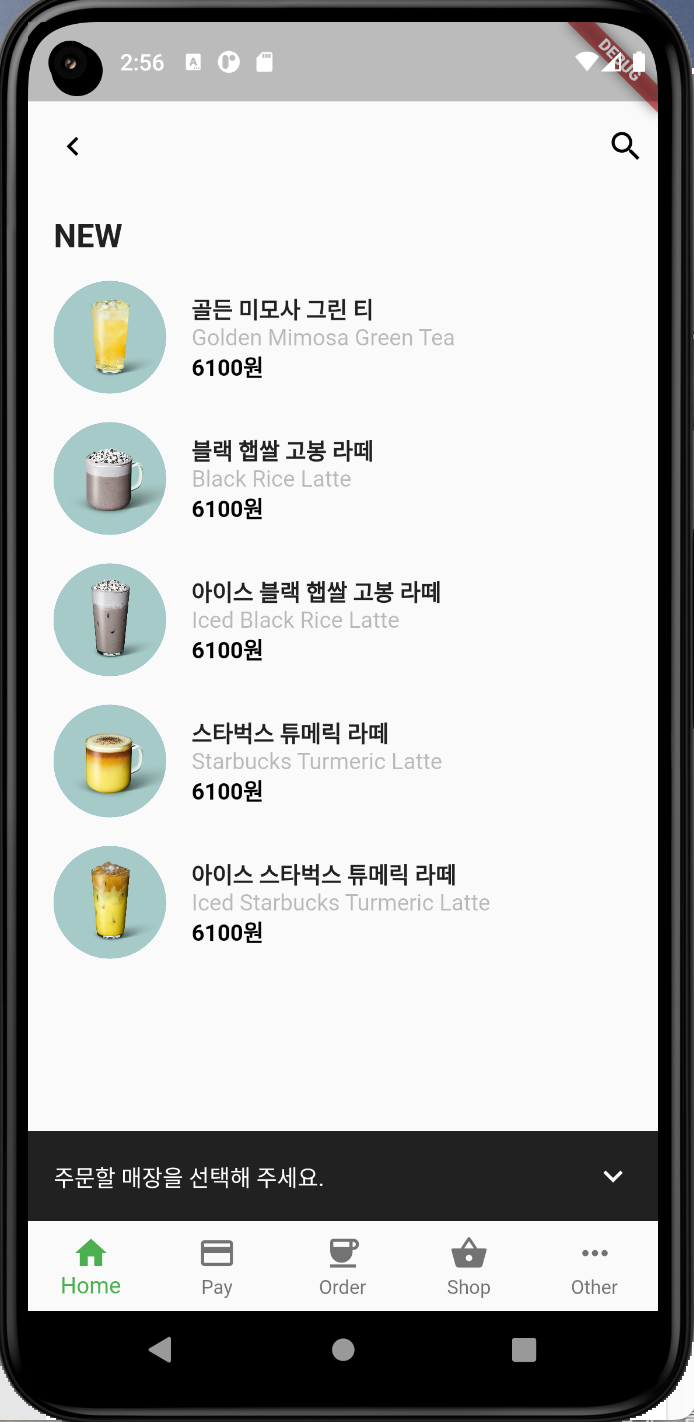
과제0: 스타벅스 앱 화면 만들기
요구사항
음료 이미지는 CircleAvatar를 사용하며 48의 반지름크기를 갖는다.
음료 영문명의 font size는 14pt이며 회색으로 w200의 굵기를 가진다.
음료의 정보를 보여주는 위젯을 만들고, 이름은 DrinkTile로 한다.
데이터
골든 미모사 그린 티, Golden Mimosa Green Tea
블랙 햅쌀 고봉 라떼, Black Rice Latte
아이스 블랙 햅쌀 고봉 라떼, Iced Black Rice Latte
스타벅스 튜메릭 라떼, Starbucks Turmeric Latte
아이스 스타벅스 튜메릭 라떼, Iced Starbucks Turmeric Latte
구조 파악
AppBar
일단 Appbar에 text가 없이, icon이 2개다.
머터리얼 디자인 아이콘
- Icons.navigate_before
- Icons.search
body
ListView로 스크롤 가능하도록 해야할 것 같다.
ListTile로 각 메뉴들을 나타내면 될 것 같고(커스텀)
주문할 매장 선택하는 부분은... floatBtn을 활용할 수 있는 방법이 있지 않을까?
bottomNavigationBar
BottomNavigationBarItem이 5개.
- Icons.home, label: "Home"
- Icons.credit_card, label: "Pay"
- Icons.coffee, label: "Order"
- Icons.shopping_cart, label: "Shop"
- Icons.more_horiz, label: "Other"
ListTile로 하려다 문제가 발생했다.
이미지를 leading에 CircleAvater로 줬는데, 이미지 크기가 조절이 안됐다.
이미지 크기는 커지는데, 동그라미가 안커짐...
ListTile 대신 Row로 만들어야 할 듯.
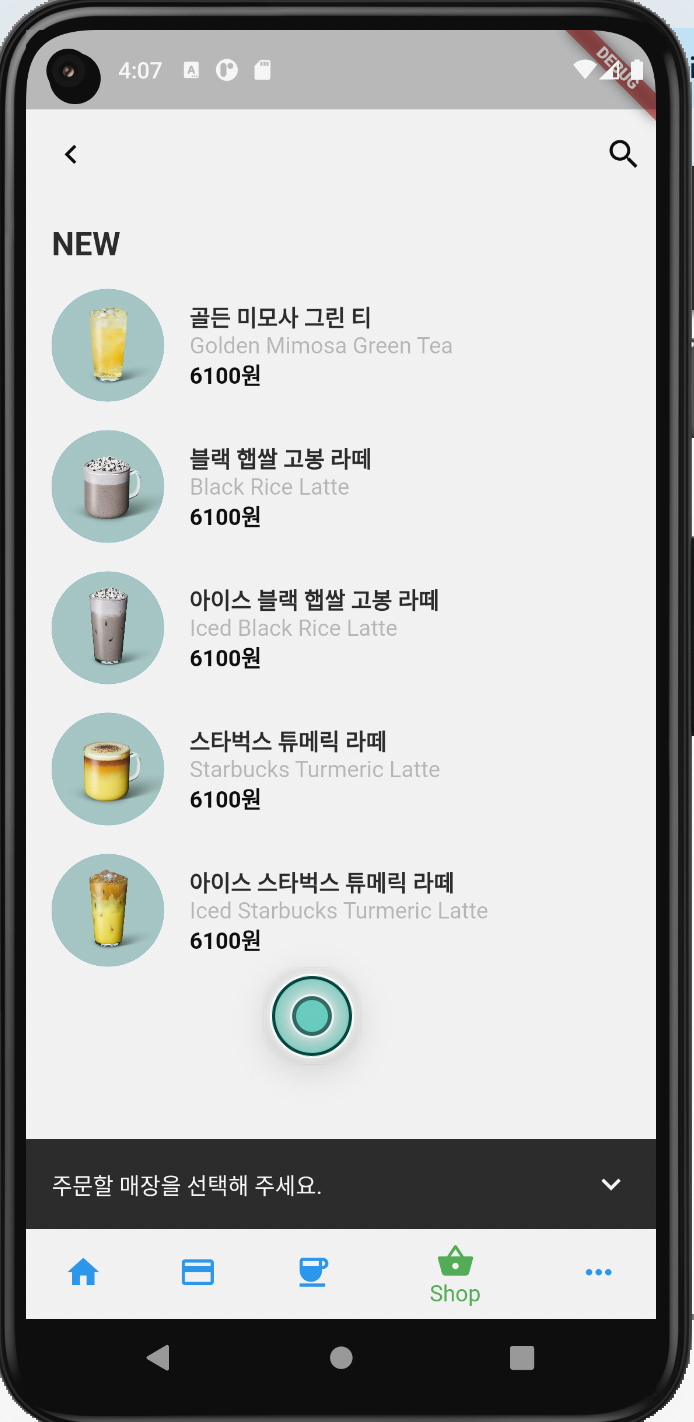
BottomNavigationBarItem이 3개를 넘어가니까 스타일링이 변했다.
화면에 안보여서 뭔가 했더니 투명해짐.
type: BottomNavigationBarType.fixed 추가해 해결.
bottomSheet
참고할만한 게 있을까 싶어서 머터리얼 디자인 컴포넌트를 살펴봤다.
그리고 Sheet: bottom을 발견.
플러터에서 후딱 sheet를 써보니 bottomSheet라는 게 있다.
DrinkTile
처음엔 그냥 name, url 이런식으로 변수명을 짓는 실수를.. 했다.
나는 모 drinkTile이라는 객체 내에서 생성되는 변수니까 괜찮을 줄 알았지?
그런데 예약어라서 에러가 났다. 이름짓기 조심할것!
import 'package:flutter/material.dart';
class DrinkTile extends StatelessWidget {
const DrinkTile(
{super.key,
required this.enName,
required this.price,
required this.korName,
required this.drinkUrl});
final String korName;
final String enName;
final String price;
final String drinkUrl;
Widget build(BuildContext context) {
return Padding(
padding: const EdgeInsets.only(top: 8, bottom: 8),
child: Row(
children: [
CircleAvatar(
backgroundImage: AssetImage(drinkUrl),
radius: 35,
),
Padding(
padding: const EdgeInsets.fromLTRB(16, 8, 8, 8),
child: Column(
crossAxisAlignment: CrossAxisAlignment.start,
children: [
Text(
korName,
style: const TextStyle(fontWeight: FontWeight.bold),
),
Text(
enName,
style: const TextStyle(color: Colors.black26),
),
Text(
price,
style: const TextStyle(
color: Colors.black, fontWeight: FontWeight.bold),
),
],
),
),
],
),
);
}
}
drinkTile 사용법
DrinkTile(
  korName: '골든 미모사 그린 티',
  enName: 'Golden Mimosa Green Tea',
  price: "6100원",
  drinkUrl: 'assets/item_drink1.jpeg',
),
BottomSheet
text + icon 조합이므로 ListTile 위젯을 사용했다.
bottomSheet: const ListTile(
  tileColor: Colors.black87,
  textColor: Colors.white,
  title: Text(
    "주문할 매장을 선택해 주세요.",
    style: TextStyle(fontSize: 14),
  ),
  trailing: Icon(
    Icons.expand_more,
    color: Colors.white,
  ),
),
스타벅스 완성!
과제 풀이
- assets 등록할때 폴더만 해도 폴더 아래 이미지들이 모두 등록된다.
- price를 int로 한다. 달러 사인을 통해 변수를 사용할 수 있다.
.toString으로 타입을 변환시키는 방법도 있다.
Text(
  '$price원',
  style: ...
)- currentIndex로 현재 활성화된 인덱스를 조정할 수 있다.
BottomNavigationBar(
  currentIndex: 2,
)- padding 좌우나 상하만 주는 방법
symmetric
vertical 혹은 horizontal
Padding(
  padding: EdgeInsects.symmetric(horizontal: 16),
)- 간격 조절하기
- Spacer(): 띄운다. 꽉 채운다.
- Expanded():
- mainAxisAlignment - spaceBetween: 가장 많이 쓰는 방법.
퀴즈
Quiz. BottomNavigationBar 위젯을 활용하여 다음과 같은 UI를 구성하려고 할 때 items가 3개를 넘으면 구현이 되지 않는 이유를 적고 어떻게 해결하였는지 제출하세요.
이 위젯의 타입을 따로 지정하지 않으면 항목이 4개 미만인 경우 자동으로 BottomNavigationBarType.fixed로 설정되고, 그렇지 않은 경우 BottomNavigationBarType.shifting으로 설정된다.
후자의 경우 selectedItemColor가 null이면 모든 항목이 흰색으로 렌더링된다.
이 위젯을 사용하려면 item을 2개이상 5개 이하로 사용하는 것을 권장한다.
selectedItemColor만 설정하고 fixed하지 않았을때는 선택된 아이템만 지정된 색으로 나오고, 나머지는 흰색으로 보인다.
플러터 문서
The bottom navigation bar's type changes how its items are displayed. If not specified, then it's automatically set to BottomNavigationBarType.fixed when there are less than four items, and BottomNavigationBarType.shifting otherwise.
BottomNavigationBarType.fixed
너비가 고정된 네비게이션 바.
BottomNavigationBarType.shifting
너비가 고정되지 않고 탭 하면 위치 및 크기가 변화되는 네비게이션 바.
bakcgroundColor와 unSelectedItemColor를 설정해주지 않으면 흰색으로 나온다.
shifting일때는 선택되지 않은 상태일 때 label이 안나오다가, 선택하면 label이 슝 하고 나오면서 아이템이 움직인다.
BottomNavigationBar(
  type: BottomNavigationBarType.shifting,
  selectedItemColor: Colors.green,
  unselectedItemColor: Colors.blue,
  currentIndex: 3,
  items: const [
    BottomNavigationBarItem(
    icon: Icon(Icons.home),
    label: 'Home',
  ),
  BottomNavigationBarItem(
    icon: Icon(Icons.credit_card),
    label: 'Pay',
  ),
  BottomNavigationBarItem(
    icon: Icon(Icons.coffee),
    label: 'Order',
  ),
  BottomNavigationBarItem(
    icon: Icon(Icons.shopping_basket),
    label: 'Shop',
  ),
  ..생략
  ],
),
과제1
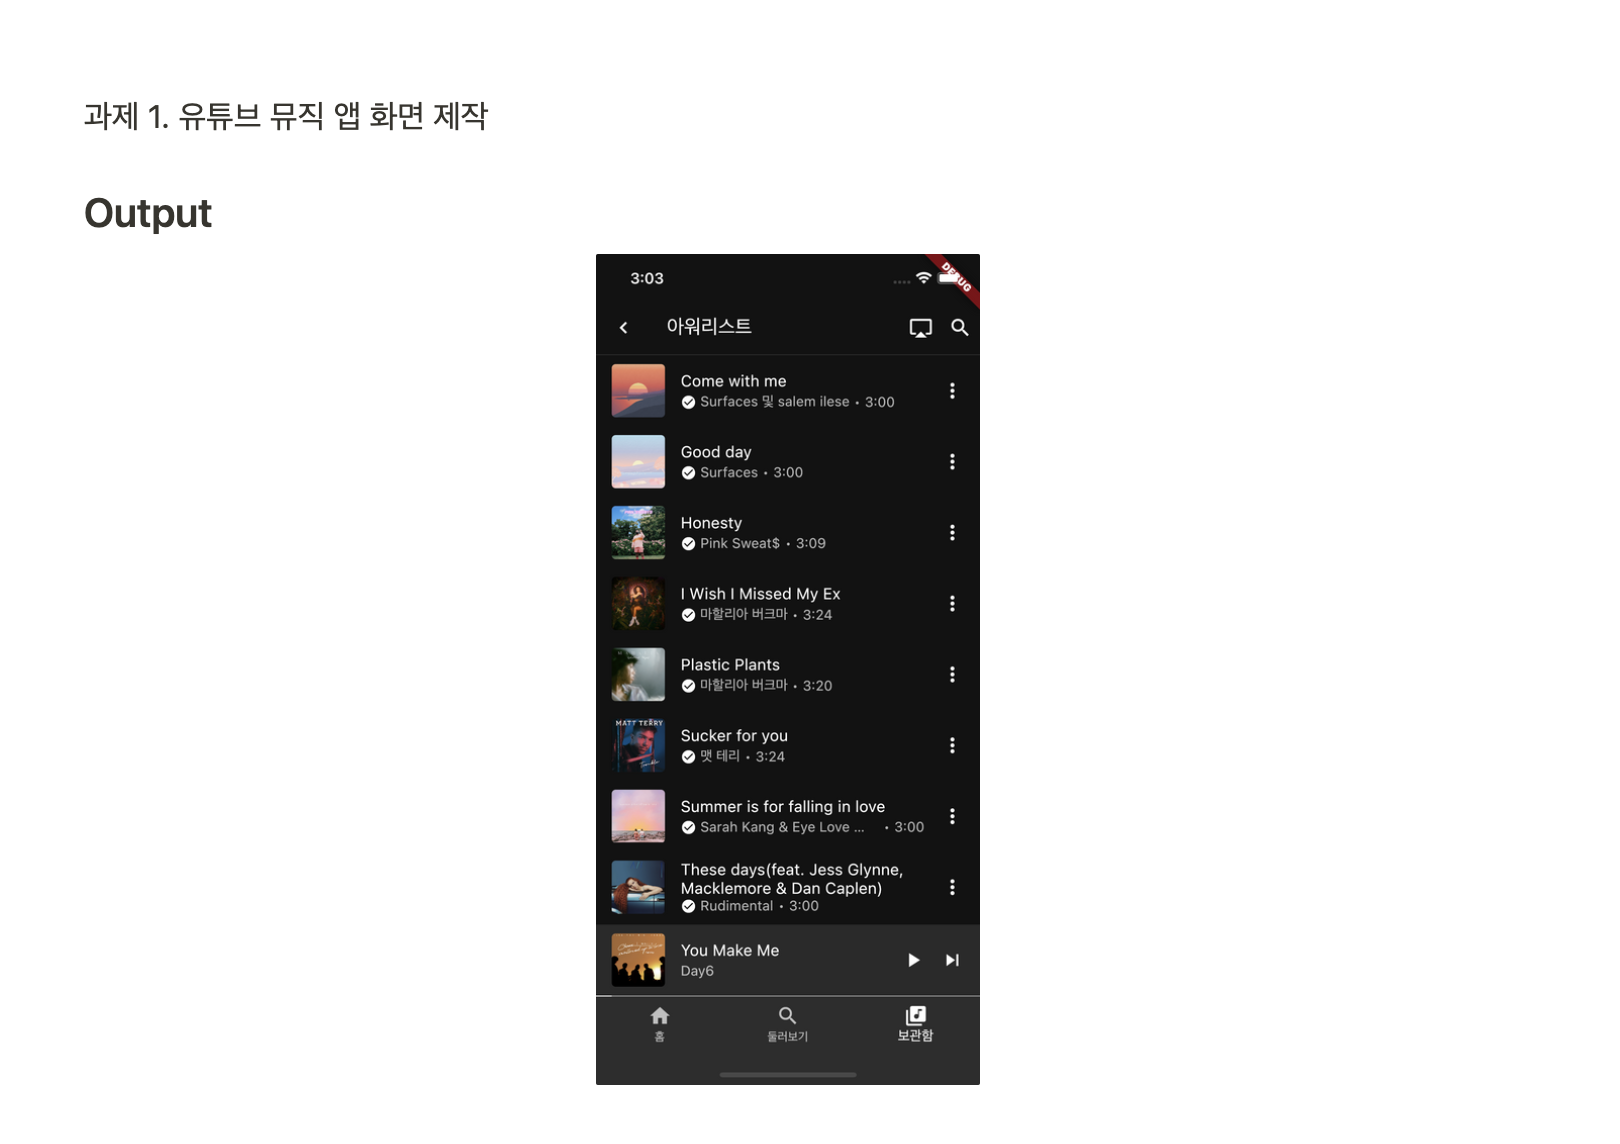
요구사항
- 음악명은 최대 2줄까지만 가능하다.
- 가수명과 플레이시간은 최대 1줄까지만 가능하며 필요한 경우 가수명을 줄인다.
- 음악의 정보를 보여주는 위젯을 만들고, 이름은 MusicTile로 한다.
데이터
Come with me - Surfaces 및 salem ilese
Good day - Surfaces
Honesty - Pink Sweat$
I Wish I Missed My Ex - 마할리아 버크마
Plastic Plants - 마할리아 버크마
Sucker for you - 맷 테리
Summer is for falling in love - Sarah Kang & Eye Love Brandon
These days(feat. Jess Glynne, Macklemore & Dan Caplen) - Rudimental
You Make Me - DAY6
Zombie Pop - DRP IAN
구조 파악
AppBar
Icon, Text, Icon, Icon
body
1. MusicTile
ListTile 쓰고,
leading: Image(songTitle),
subtitle: Icon + Text(time)
- 시간은 타입이 어떻게 될 것인가? 그리고 시간 표현은 어떻게 할 것인가?
trailing: Icon(Icons.more_vert),
2. bottomSheet
- ListTile을 쓸 것인가 고민해봐야 할 것 같다.
일단 구조가
[  Col < Row < Image,
		       Col < Text(songTitle), Text(singer),
               Col < Icon(Icons.play_arrow), Icon(Icons.skip_next),
       < 여기에 라인을 넣을 예정.
]- 라인을 어떻게 만들 것인가?
borderBottom을 하는 건 어떨지?
투명도를 가진 height 1px width: 100% 인 위젯을 하나 만들고
그 안에 컬러가 white인 height 1px의 위젯을 만들면 될까?? 🤔
bottomNavigationBar
BottomNavigationBarItem * 3개!
코드
Theme
거의 시작과 동시에 theme먼저 찾아봤다.
매 위젯에 컬러와 백그라운드를 줄 수는 없지
theme: ThemeData(

        brightness: Brightness.dark,
        primaryColor: Colors.black,
        textTheme: const TextTheme(
          bodyMedium: TextStyle(
            color: Colors.white,
          ),
        ),
      ),
구글링해서 위와같이 적었는데, 과제풀이 강의를 들으니...^^ 저거 한줄로 끝나더라. 그런데 이상하게도 body에는 색이 black이 되지 않아서 MusicTile에 따로 컬러를 주었다.
colorScheme: const ColorScheme.dark(),Appbar
앱바를 잘 보면 border bottom이 있다.
방법이 두가지 있는데, bottom 속성을 사용하는것과 shape 속성을 사용하는 것이다.
bottom
AppBar(
// 방법1
  bottom: PreferredSize(
    preferredSize: const Size.fromHeight(1),
    child: Container(
      color: Colors.white,
      height: 1,
    ),
  ),
...생략
shape
AppBar(
// 방법2
  shape: const Border(
    bottom: BorderSide(
    color: Colors.white24,
    width: 1,
  ),
),
그 외
MusicTile
Flexible
가수명이 제일 중요한 요소기 때문에 길면 긴대로 공간을 최대한 차지해야 한다.
필자는 Text에 overflow를 줬지만... 기대한대로 작동하지 않았다.
Flexible을 감싸서 이 위젯이 유동적으로 작동해야 함을 명시해야 한다.
기본적으로 위젯들은 최대한의 공간을 차지하려고 하기 때문.
이 위젯은 부모위젯이 Row라 가로로 계쏙 확장하려고 한다.
mainAxisSize도 그처럼 최소한의 공간, 즉 컨텐츠만큼의 공간을 차지하도록 하는 요소이다.
class MusicTile extends StatelessWidget {
const MusicTile({
super.key,
required this.albumCover,
required this.songTitle,
required this.artist,
required this.duration,
});
final String albumCover;
final String songTitle;
final String artist;
final String duration;
Widget build(BuildContext context) {
return ListTile(
tileColor: Colors.black54,
leading: ClipRRect(
borderRadius: BorderRadius.circular(8),
child: Image.asset(
albumCover,
),
),
title: Text(
songTitle,
maxLines: 2,
overflow: TextOverflow.ellipsis,
style: const TextStyle(
fontSize: 18,
),
),
subtitle: Row(
children: [
const Icon(
Icons.check_circle,
size: 16,
),
const SizedBox(width: 4),
Flexible(
child: Text(
artist,
maxLines: 1,
overflow: TextOverflow.ellipsis,
),
),
const SizedBox(width: 4),
const Icon(
Icons.fiber_manual_record,
size: 5,
),
const SizedBox(width: 4),
Text(duration),
],
),
trailing: const Icon(Icons.more_vert),
);
}
}bottomSheet
* 컨텐츠만큼의 크기만큼 공간 차지하도록 하기:
mainAxisSize: MainAxisSize.min
Column(
          mainAxisSize: MainAxisSize.min,
          children: [
          // 재생중인 노래
            ListTile(
              tileColor: const Color(0xff2a2a2a),
              leading: ClipRRect(
                borderRadius: BorderRadius.circular(8),
                child: Image.asset("assets/music_you_make_me.png"),
              ),
              title: const Text(
                "You Make Me",
                maxLines: 2,
                overflow: TextOverflow.ellipsis,
                style: TextStyle(
                  fontSize: 18,
                ),
              ),
              subtitle: const Row(
                children: [
                  Flexible(
                    child: Text(
                      "Day6",
                      maxLines: 1,
                      overflow: TextOverflow.ellipsis,
                    ),
                  ),
                  SizedBox(width: 4),
                ],
              ),
              trailing: const Row(
                mainAxisSize: MainAxisSize.min,
                children: [
                  Icon(
                    Icons.play_arrow,
                  ),
                  Icon(
                    Icons.skip_next,
                  ),
                ],
              ),
            ),
            // 재생바
            Container(
              height: 1,
              color: Colors.white24,
              alignment: Alignment.centerLeft,
              child: Container(
                width: 14,
                color: Colors.white,
              ),
            ),
          ],
        ),
구현 화면

후기
아 강의 다듣고 과제 다 하는데 정규 시간보다 한시간이 더 걸렸다.
오늘 공부하기 싫다고 다른 팀원분이랑 멘토님들이랑 놀긴 했는데... 휴
낼은 더 어렵다는데 농땡이피지 말아야겠다....
본 후기는 유데미-스나이퍼팩토리 9주 완성 프로젝트캠프 학습 일지 후기로 작성 되었습니다.