위젯의 속성
- 위젯에 원하는 설정을 할 수 있는 특수한 값.
- 위젯마다 사용 속성이 다르다.
- 자식위젯은 일반적으로 child(children을 받기도 함)
- 속성마다 데이터타입이 다르다.
위젯이라는 개념에 대해서 좀 생소하기도 하고 첫날에는(오늘은 둘째날) 어질어질했다.
플러터 === 위젯 이라고 해도 무방할 정도로 위젯이라는 개념은 플러터에서 가장 핵심이다.
그런데 위젯 == 컴포넌트 라고 생각하니까 좀 이해가 됨.
핵심 기능을 잘 쪼개서 객체화가 아주 잘 된 컴포넌트랄까?
근데 이제 css가 아니라 컴포넌트로 css, 레이아웃을 다 짜야한다는거?
오늘 배운 위젯들은 거의 레이아웃을 위한 위젯들이었다.
Column, Row, Container, SizedBox, Padding.
ListTile은 위에서 좀 더 나아가서 title, subtitle 같은 요소들도 함께 스타일링이 이미 되어있다.
그럼 이제 아래서 자세히 알아보자.
오늘의 위젯
Column, Row
각각 세로, 가로로 자식들을 나열한다.(스크롤x)
childeren을 갖는다.(type: List<Widget>)
Column(
  children: [
    Text(),
    Text(),
  ],
),
Padding
간격을 띄울 때 사용.
Padding(
child: Text(),
padding: EdgeInsects.all(8),
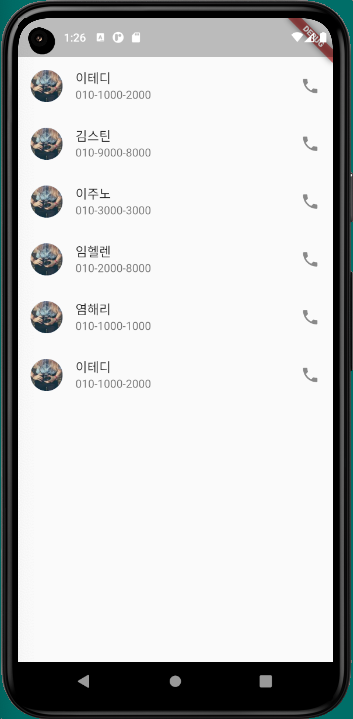
),ListTile
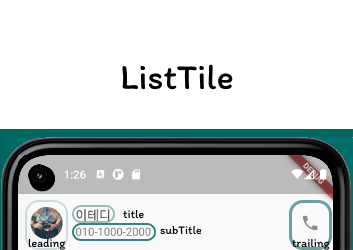
구글 머터리얼 디자인의 ListTile을 표현한, 이미 디자인된 위젯이다.
(라는데 머터리얼 디자인 doc에서 ListTile을 발견할 수 없었다. 스펙을 보니 Lists로 바뀐 것 같다.)
속성: title, subTitle, leading, trailing
ListTile(
  title: Text("이테디"),
  subtitle: Text("010-1000-2000"),
  leading: CircleAvatar(
  backgroundImage:
  NetworkImage("https://picsum.photos/100/100")),
  trailing: Icon(Icons.phone),
  ),
SizedBox
자식위젯 크기를 설정한다.
Container✨
자식위젯 크기를 설정한다. + 꾸미기
너무너무 중요함!!
Container(
  width: <int>
  height: <int>
  alignment:
  margin: EdgeInsets.all(16),
  padding: EdgeInsets.all(16),
  decoration: BoxDecoration(
  	//여기서 꾸미기 사용.
    color:
    border: Border.all(),
    borderRadious: BorderRadious.circular(16),
    gradient: LinearGradient(
      begin: Alignment.topLeft,
      ned: Alignment.bottomRight,
      colors: [ // 여기에 컬러 나열
      ],
    ),
    boxShadow(
      color:
      blurRadious: <int>
      spreadRadious: <int>
      offset: offset(x, y) //double
    ),
  ),
),
이미지
이미지는 widget 방식, 그리고 provider 방식으로 나뉜다.
widget은 child로서 이미지를 제공하고(위젯이니 단일로도 사용 가능),
provider는 하나의 속성으로서 종속되어 이미지를 사용하는 것 처럼 보인다.
//widget
Image(
  image: NetworkImage('https://flutter.github.io/assets-for-api-docs/assets/widgets/owl.jpg'),
)
Image.network(
  src(<string>)
)
//provider
CircleAvatar(
  backgroundImage: NetworkIage(<string>),
),- network: cdn 방식으로 이미지 가져올때
- asset: pubspec.yaml에서 등록된 로컬에 있는 이미지를 가져올 때.
flutter:
  assets:
- icons/heart.png //이런식으로 등록한다. 경로를 정확히 해야 함.- 그 외: memory, file..
플러터 폴더 구조
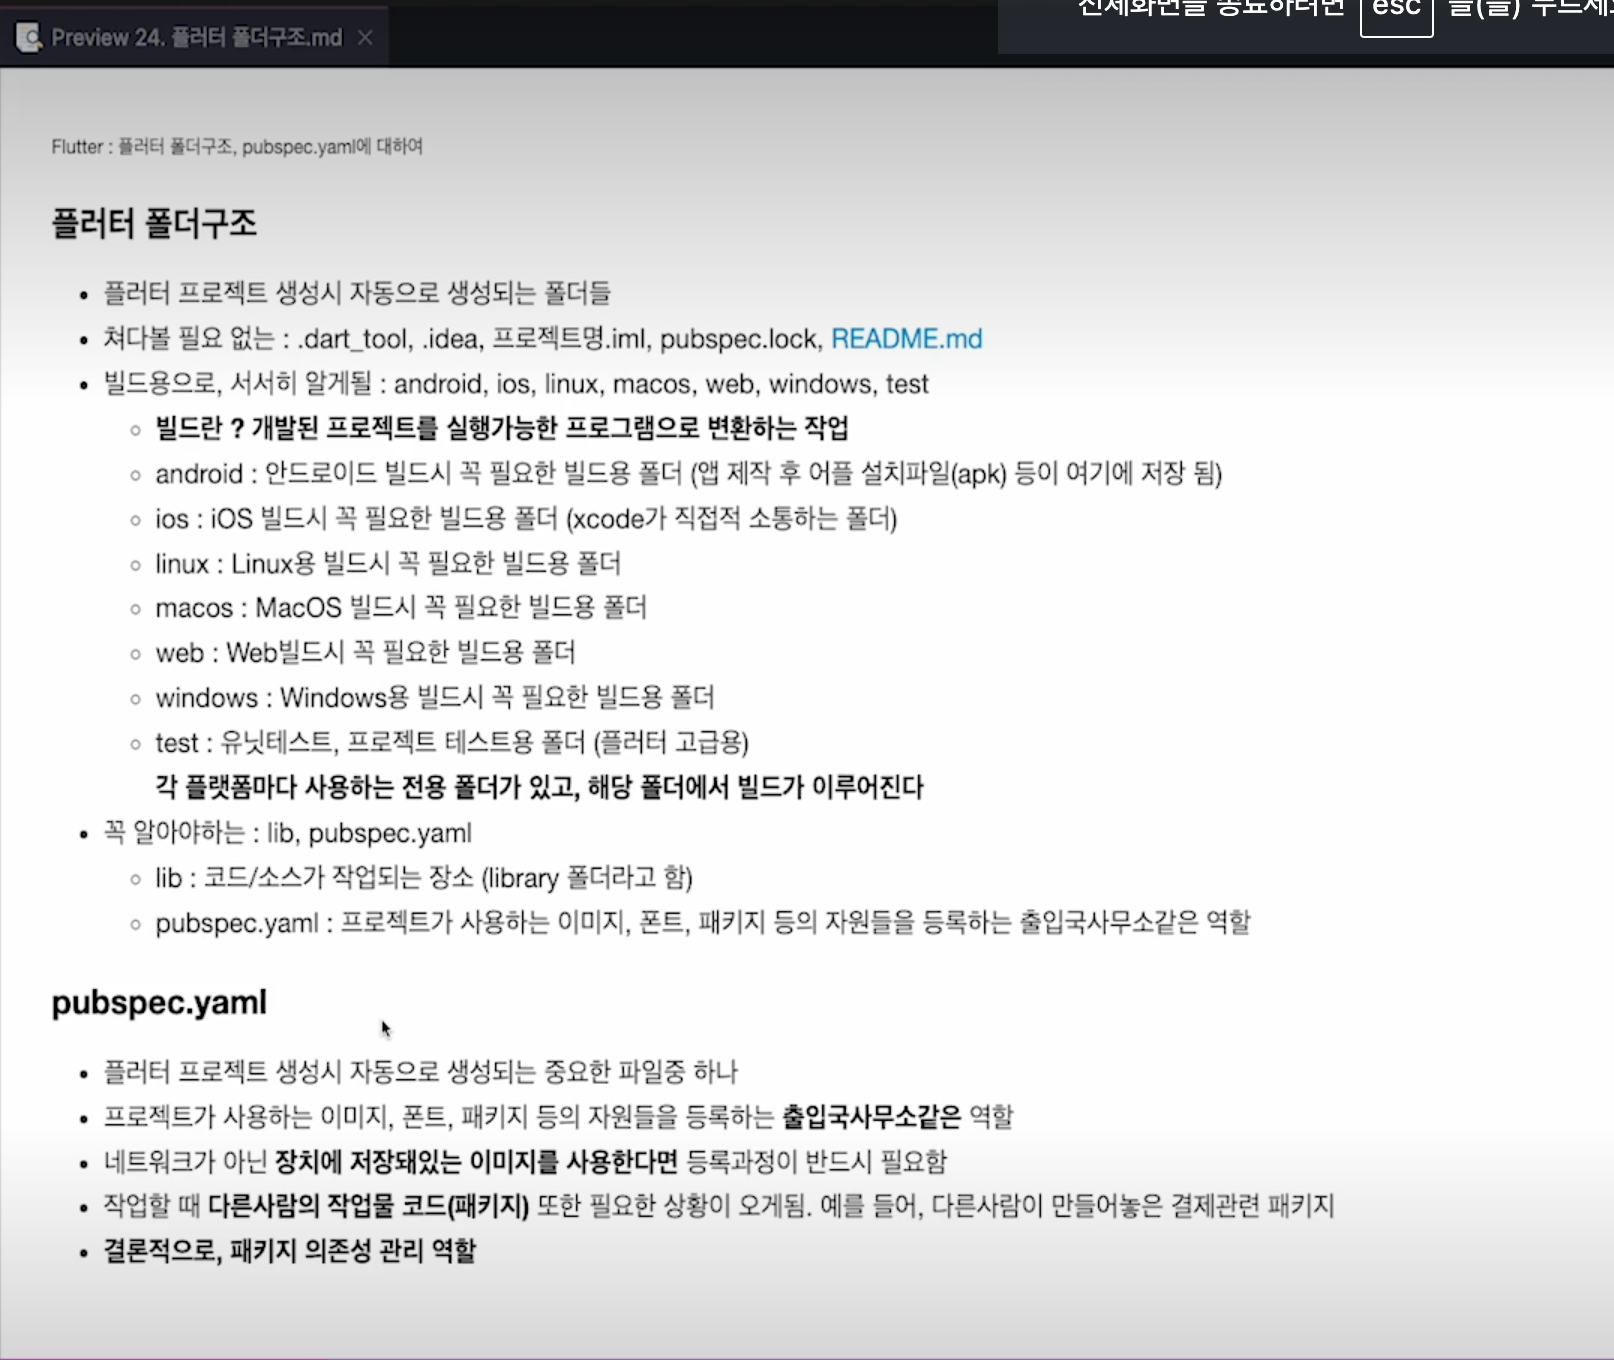
플러터 어플을 생성하면 굉장히 많은 폴더들이 자동으로 생성된다.
필자는 아직 lib만 팜...^^
과제0
1. CircleAvatar
이미지를 위젯이 아니라 provider 형태로 전달해야한다.
CircleAvatar(
  backgroundImage: NetworkIage(<string>),
),- ClipOvar
ClipOvar(
  child: Image.network(<string>),
),- ClipRRect
ClipRRect(
  borderRadious: BorderRadious.circular(99),
  child: Image.network(<string>),
),- Container
- borderRadious를 주고 overflow를 깎는다.
Container(
  decoration: BoxDecoration(
    borderRadious: BorderRadious.circular(99),
  ),
  clipBehavior: Clip.antiAlias,
  child: Image.network(<string>),
),- shape로 circle을 준다.
Container(
  decoration: BoxDecoration(
    shape: BoxShape.circle,
  ),
  clipBehavior: Clip.antiAlias,
  child: Image.network(<string>),
),
내 과제0 코드
이미지를 어떻게하면 동그랗게 만들 수 있을까? 해서 가장 먼저 시도한 건 container로 이미지를 감싸는 것이었다. 그런데, borderRadius가 안먹었다. (ㅠㅠ)
그래서 구글찬스를 써서 쓰게 된 방법이, ClipRRect였다.
child: Column(
	children: const [
	ListTile(
	title: Text("이테디"),
	subtitle: Text("010-1000-2000"),
	leading: ClipRRect(
	  borderRadius: BorderRadius.circular(50),
	  child: Image.network("https://picsum.photos/100/100"),
      ),
	trailing: Icon(Icons.phone),
	),
	...생략
  ],
),
과제1: 왜 에러가 나는 걸까?
ListView(
	children: [
		Text('안녕 난 1번 ListView의 자식이다'),
		Text('나도! 1번 ListView의 자식이야'),
		ListView(
			children: [
				Text('난 2번의 자식임'),
				Text('나도 2번의 자식임'),
			]
		),
		Text('난 멀리 떨어져있지만 1번의 자식이야'),
	]
)
내 생각엔,
SizedBox(
 height: 20,
  child: SingleChildScrollView(
   child: Column(
    children: [
     Text('난 2번의 자식임'),
     Text('나도 2번의 자식임'),
   ],
  ),
 ),
),
ListView는 children이 화면을 벗어났을때 스크롤 할 수 있도록 하는거니까, 이걸 중첩해서 사용하게 된다면 충돌이 나거나 무시될 수밖에 없을 것 같았다. ListView 내에 ListView가 또 있다면 1번 ListView는 화면 높이를 기준으로 측정이 된다 했을때 2번 ListView는 무엇을 기준으로 해서 스크롤을 만들어야 할지가 문제가 될 것.
이 퀴즈에 있는 코드를 의도한대로 나타내고싶다면 container나 sizedBox로 감싸서 height을 준 뒤 구현해야 할 것 같다. 물론 더 좋은 방법이 있겠지만 지금 플러터를 잘 모르는 나에게는 이정도가 가장 먼저 떠오르는 해결방안이었다.
멘토님이 그렇다면 shrinkWrap: true를 주는 건 어떻겠냐고 물어보셨다.
세상에.
shrinkWrap을 쓰니까 ListView가 컨텐츠만큼만 자리를 차지하게 되면서 제대로 작동을 한다.
그래서 제출과제를 해보면서 PageView에도 같은게 있겠거니 해서 써보니 오류가 발생.
여쭤봤지만 박스로 감싸서 Height을 주는 게 최선인 것 같다고 하셨다. 😭
플러터를 하다보니 %도 안쓰고 단위도 되게 모호해보여서 감이 아직 잘 안잡힌다.
레이아웃 잡을때 flex 쓰고싶다...!!
과제2
요구사항
과제 1. 아래의 이미지와 동일한 결과물을 만들고, 이를 만들기 위한 전체 코드를 작성하세요.
- 3가지 이상의 기분을 담고있는 위젯을 페이징이 가능하게 만드세요. (gradient, radius 필수)
- ListTile 위젯을 사용하지 않고, 동일한 결과물을 만드세요.
- 위와 아래를 구분하는 구분선은 Divider 위젯입니다.
// 사용 예시
Column(
	children: [
		Text('제목'),
		Divider(),
		Text('내용'),
	]
)
디바이더를 기준으로 기분/유저(ListTile)로 나누었다.
기분 섹션에서는 세개의 페이지가 캐러셀처럼 옆으로 스와이프되는 형식,
유저 섹션에서는 ListTile을 쓰지 않고 ListTile을 구현하는 게 문제였다.
내 코드1: 기분
- 패딩:
EdgeInsets.fromLTRB(40, 8, 40, 8)이렇게 적용해주었다. - 박스 item
Container(
  width: 300,
  height: 200,
  alignment: Alignment.center,
  decoration: const BoxDecoration(
  color: Colors.white,
  borderRadius: BorderRadius.all(Radius.circular(8)),
  gradient: LinearGradient(
    begin: Alignment.centerLeft,
    end: Alignment.centerRight,
    colors: [
      Colors.orange,
      Colors.yellow,
      ],
    ),
  ),
  child: const Text(
    "행복함",
    style: TextStyle(
      fontSize: 20,
      color: Colors.white,
      ),
    ),
),- 박스 item list 레이아웃:
PageView
PageView에는 컨텐츠만큼만 자리를 차지할 수 있는 속성이 없어서 SizedBox로 height을 고정시켰다.
child: PageView(
  scrollDirection: Axis.horizontal, // 가로정렬
  children: [ 박스 3개 ],
)
기분 파트 전체 코드
Column(
        mainAxisAlignment: MainAxisAlignment.center, // 전체 위젯을 화면 한가운데 두기 위함.
        children: [
          // 기분
          Column(
            children: [
              const Text(
                "오늘 하루는",
                style: TextStyle(
                  fontSize: 30,
                  fontWeight: FontWeight.bold,
                ),
              ),
              const Text(
                '어땠나요?',
                style: TextStyle(
                  fontSize: 20,
                ),
              ),
              Padding(
                padding: const EdgeInsets.fromLTRB(40, 8, 40, 8),
                child: SizedBox(
                  height: 200,
                  child: PageView(
                    scrollDirection: Axis.horizontal,
                    children: [
                      Container(
                        width: 300,
                        height: 200,
                        alignment: Alignment.center,
                        decoration: const BoxDecoration(
                          color: Colors.white,
                          borderRadius: BorderRadius.all(Radius.circular(8)),
                          gradient: LinearGradient(
                            begin: Alignment.centerLeft,
                            end: Alignment.centerRight,
                            colors: [
                              Colors.orange,
                              Colors.yellow,
                            ],
                          ),
                        ),
                        child: const Text(
                          "행복함",
                          style: TextStyle(
                            fontSize: 20,
                            color: Colors.white,
                          ),
                        ),
                      ),
                      Container(
                        width: 300,
                        height: 200,
                        alignment: Alignment.center,
                        decoration: const BoxDecoration(
                          color: Colors.white,
                          borderRadius: BorderRadius.all(Radius.circular(8)),
                          gradient: LinearGradient(
                            begin: Alignment.centerLeft,
                            end: Alignment.centerRight,
                            colors: [
                              Colors.black,
                              Colors.black12,
                            ],
                          ),
                        ),
                        child: const Text(
                          "우울함",
                          style: TextStyle(
                            fontSize: 20,
                            color: Colors.white,
                          ),
                        ),
                      ),
                      Container(
                        width: 300,
                        height: 200,
                        alignment: Alignment.center,
                        decoration: const BoxDecoration(
                          color: Colors.white,
                          borderRadius: BorderRadius.all(Radius.circular(8)),
                          gradient: LinearGradient(
                            begin: Alignment.centerLeft,
                            end: Alignment.centerRight,
                            colors: [
                              Colors.blue,
                              Colors.green,
                            ],
                          ),
                        ),
                        child: const Text(
                          "상쾌함",
                          style: TextStyle(
                            fontSize: 20,
                            color: Colors.white,
                          ),
                        ),
                      ),
                    ],
                  ),
                ),
              ),
            ],
          ),
        ],
      ),
내 코드2: 유저
- 이미지가 역시나 문제였다. unsplash에서 이미지를 가져왔는데, 일단 너무 커서 container로 감싸 width, height을 고정시킴. 근데 동그랗게 보이지 않았다. 가로세로 비율이 1:1이 아니라서 문제인 것 같았다. 새로운 이미지를 찾기보다 그냥 백그라운드 이미지를 주었다.
아마 css에서 이미지 크기를 contain이나 cover로 하는 것처럼 플러터에도 그런 속성이 있지 않을까?(찾아보기!!)
이번에는 컨테이너에 clipBehavior로 Clip.antiAlias를 주고, shape를 circle로 주어서 해결했다. - 레이아웃: 이미지와 유저정보 부분을 한 Row로 묶었다. 그리고 spaceBetween을 주어서 아이콘과 유저정보를 띄웠다.
Container(
        margin: const EdgeInsets.only(top: 8),
        padding: const EdgeInsets.all(16),
        decoration: const BoxDecoration(
          color: Colors.blue,
        ),
        child: Row(
          mainAxisAlignment: MainAxisAlignment.spaceBetween,
          children: [
            Row(
              children: [
                Container(
                  width: 60,
                  height: 60,
                  decoration: const BoxDecoration(
                    shape: BoxShape.circle,
                    color: Colors.white,
                  ),
                  clipBehavior: Clip.antiAlias,
                  child: Image.network(
                      "https://images.unsplash.com/photo-1509909756405-be0199881695?ixlib=rb-4.0.3&ixid=M3wxMjA3fDB8MHxwaG90by1wYWdlfHx8fGVufDB8fHx8fA%3D%3D&auto=format&fit=crop&w=2940&q=80"),
                ),
                const Padding(
                  padding: EdgeInsets.fromLTRB(16, 0, 16, 0),
                  child: Column(
                    children: [
                      Text(
                        "라이언",
                        style: TextStyle(
                          fontSize: 20,
                          color: Colors.white,
                        ),
                      ),
                      Text(
                        "게임개발",
                        style: TextStyle(
                          fontSize: 14,
                          color: Colors.white,
                        ),
                      ),
                      Text(
                        "C#, Unity",
                        style: TextStyle(
                          fontSize: 14,
                          color: Colors.white,
                        ),
                      ),
                    ],
                  ),
                ),
              ],
            ),
            const Icon(
              Icons.add,
              color: Colors.white,
            ),
          ],
        ),
      ),
본 후기는 유데미-스나이퍼팩토리 9주 완성 프로젝트캠프 학습 일지 후기로 작성 되었습니다.