
💡Keyword
README.md파일에 대하여.gitignore- 브랜치 생성, 이동, 병합
- Git flow
- Git command - Rename, Undo, Ustaging, Edit commit, Reset commit, Revert commit
1. README.md
- 프로젝트와 Repository를 설명하는 문서
README.md 내용
- Project Name
제목, 라이브 샘플(링크) - Installation(How to start)
설치 방법, 실행 방법 - 언어 버전
어떤 언어의 어떤 버전에서 동작하는지 - More Information
- Contributing
- License
2. .gitignore
자동화 Tool: www.gitignore.io
- 숨김 파일
ls -a로 파일 목록에서 확인 가능- 프로젝트를 시작하자마자(저장소 복제) 세팅해야 하는 일
.gitignore 파일
$ vi .gitignore# Custom
keyfile.pem
crendentials/**
secrets.*
*.java파일 생성
실습에 필요한 파일들을 생성
$ touch app.js
$ touch keyfile.pem
$ mkdir credentials
$ touch credentials/index.html
$ touch secrets.css
$ touch server.java
$ touch index.html
상태 확인
.gitignore의 규칙에 부합하는 파일들은 Git이 추적하지 않는 것을 알 수 있음
$ git status
On branch main
Your branch is up to date with 'origin/main'.

Untracked files:
  (use "git add <file>..." to include in what will be committed)
        .gitignore
        app.js
        index.html

nothing added to commit but untracked files present (use "git add" to track)
💡 tip:
.gitignore의 prefix는conf
3. 브랜치(Branch)
분기점을 생성하여 독립적으로 코드를 변경할 수 있도록 도와주는 모델
Branch 생성
브랜치 생성
$ git branch {브랜치명}
$ git branch
* main
  print-hello
브랜치 이동
$ git switch print-hello파일 생성 및 편집 / commit
hello.py을 생성하고, print('hello')를 입력 후, 저장
$ touch hello.py
$ vi hello.pycommit하기
$ python3 hello.py
$ git status
$ git add hello.py
$ git status
$ git commmit
👉 print-hello 브랜치에서 작업했으므로 main 브랜치에는 hello.py가 존재하지 않음
Branch 병합
main 브랜치로 이동 후, print-hello와 병합
$ git merge print-hello브랜치 삭제
print-hello 브랜치 삭제
$ git branch -D print-hello💡 tip: 브랜치의 라이프사이클이 다하면 바로 제거하는 것이 좋음
브랜치 생성 후 파일 편집
repeat-hello 브랜치 생성
$ git branch repeat-hellohello.py를 다음과 같이 수정 후 commit
magic_num = 3

if magic_num%3==0:
    print('hello')

feat: Print hello if magic_num is times of 3
브랜치 이동 후 파일 편집
repeat-hello 브랜치 이동
$ git switch repeat-hellohello.py를 다음과 같이 수정 후 commit
$ cat hello.py
for _ in range(1,10+1):
    print 'hello'
브랜치 병합
main 브랜치로 이동하여 merge
$ git switch main
$ git merge repeat-hello
이때, main, repeat-hello 두 브랜치에서 변화가 있었는데 병합 시 어떤 결과가 있을까?
❗ Merge conflict
Auto-merging hello.py
CONFLICT (content): Merge conflict in hello.py
Automatic merge failed; fix conflicts and then commit the result.
다음 이미지와 같이 hello.py에 main 브랜치와 repeat-hello 브랜치에서 편집한 코드가 모두 있음
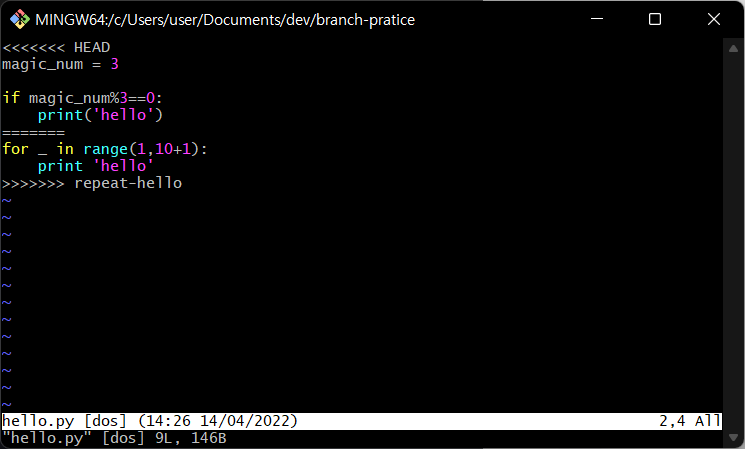
👉 선택 / 재조립이 필요함
두 가지의 코드를 적절히 섞어서 다음처럼 재조립 후 commit
$ cat hello.py
for i in range(1,10+1):
    if i%3==0:
        print('hello')
Push
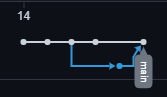
local main->remote main
$ git push origin mainGit에서 repeat-hello 브랜치는 인식하지 못하므로 다음 이미지의 Network에 나타나지 않음(따라서 repeat-hello 브랜치에서 push해야 Git이 인식할 수 있음!)
생성하면서 Push하기
-u: upstreamset(없으면 만들면 되고 같은 브랜치니까 싱크를 맞춰주세요~)
remote에 새로운 브랜치를 push할 때엔 -u를 붙여야 함
$ git push -u origin repeat-hello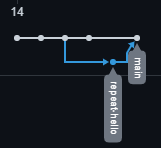
4. Branching Models
- 👍git flow
- (hotfix)-
main-(release)-develop-feature - pros: 가장 많이 적용, 각 단계가 명확히 구분
- cons: 복잡...
- (hotfix)-
- github flow
main-feature
- gitlab flow
Git flow
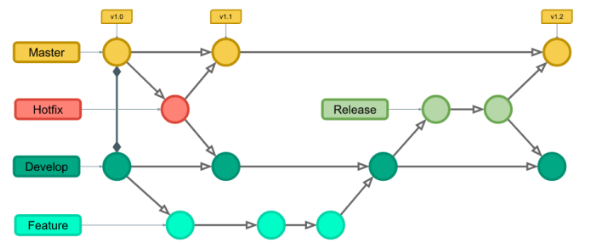
- Master
- Hotfix
- Develop
- Feature
- Release
ref: https://danielkummer.github.io/git-flow-cheatsheet/index.ko_KR.html
초기화(init)
main 브랜치만 있는 채로 진행
기본 설정 그대로 진행(모두 Enter)
$ git flow init새 기능(feature) 시작하기
$ git flow feature start print-worldhello.py 파일을 다음과 같이 수정 후 commit
for i in range(1,10+1):
    if i%3==0:
        print('{} hello'.format(i))
    elif i%5==0:
        print({} 'world'.format(i))
기능(feature) 완료
이동해서 merge하고 삭제까지 자동으로 해주어 편리함
$ git flow feature finish print-worldSummary of actions:
- The feature branch 'feature/print-world' was merged into 'develop'
- Feature branch 'feature/print-world' has been locally deleted
- You are now on branch 'develop'릴리즈(release) 시작
$ git flow release start v0.1릴리즈(release) 완료
$ git flow release finish v0.1Summary of actions:
- Release branch 'release/v0.1' has been merged into 'main'
- The release was tagged 'v0.1'
- Release tag 'v0.1' has been back-merged into 'develop'
- Release branch 'release/v0.1' has been locally deleted
- You are now on branch 'develop'💡 버전 넘버
- 마이너 체인지: 기능의 변화(새로운 기능 추가, 삭제)가 있을 때 뒤에 있는 숫자를 바꿈(
v0.n)- 메이저 체인지: 이전 버전에 존재하지 않는 아예 새로운 기능이 들어오는 등.. 앞에 있는 숫자를 바꿈(
vn.0)
Push
push를 해야 Git이 작업한 상황을 알 수 있음
$ git push -u origin develop
$ git switch main
$ git push origin main
$ git tag
$ git push --tags
5. Git Command
Rename
이름, 위치 바꾸는 것 모두 Rename
레포지토리 상에서 mv를 명령어를 사용해 Git이 알고 있는 이름이나 위치를 그냥 변경하면 삭제로 인식
❌ 나쁜 예
$ mv hello.py helloworld.py⭕ 좋은 예
$ git mv hello.py helloworld.py💡 tip: 단순하게 파일명 수정은 prefix가
fix
Undo
working directory 상에서 변경사항을 취소하는 작업
수정한 파일 상태가 이전으로 되돌아감(커밋 단위로, 최신의 커밋으로 돌아가는 것만 지원)
$ git restore {파일명.확장자}Unstaging
add를 취소하는 작업
HEAD 최신를 의미
$ git reset HEAD {파일명.확장자}Edit commit
커밋 메시지를 수정하는 작업
$ git commit --amendReset commit
커밋을 취소하는 작업
- ❌ Reset
- 커밋을 삭제한 후, remote에 강제 push
- 협업 시 다른 사람의 repo에 파일이 살아있는 경우가 있음
- 크리티컬한 경우가 아닌 이상 지양하는 것이 좋음
- ⭕ Revert
- 커밋을 순서대로 거슬러 올라가 해당 커밋 push
- 커밋을 순서대로 거슬러 올라가 해당 커밋 push
Revert commit
--no-commit 되돌린 마지막 상태를 한 번에 commit
.. 순차적으로
$ git revert --no-commit HEAD~3..💡 tip:
revert는 왜 하게 되었는지commit시 메시지(이유)를 꼭 작성해야 함
오늘의 한마디...👏
3일 동안 깃을 배우면서 실무에 어떤 식으로 적용할 수 있는지 감이 잡히지 않아 어렵고 힘들게만 느껴졌다.🥲 오늘 드디어!! 깃을 마무리 하면서 조원들과 팀장, 팀원 역할을 나누어서 직접 차근차근 해나가는 시간을 가졌다. 팀단위 깃 사용법을 익힐 수 있었고, 대단한 건 아니지만..ㅎㅎ 괜시리 뿌듯하고 즐거웠다. 특히나 우리 조가 모두 오프라인으로 나와서 함께 강의를 들어서 문제가 발생할 때마다 같이 고민하고 해결할 수 있다는 점이 정말 좋았다.
참고