
💡 Keyword
- Git bash의 이해 - Command, Vim
- Git commit, push
- Hexo를 이용한 GitHub blog 생성
시작 전 QnA
- 프로그래밍할 때 중요한 것은 재미, 흥미를 잃지 않도록 유지하는 것이 중요
- 프론트엔드와 같이 배우면 좋은 백엔드 언어로는
Node.js와MongoDB가 있음
1. Git
Git이란?
- 버전 관리 도구
- VCS(Version Control System) == SCM(Source Code Management) < SCM(Software Configuration Management: 형상관리)
Git의 장점
- 히스토리가 남아있어 파일 단위로 관리가 아닌 라인 단위로 관리가 가능
- 소스코드 주고받기 없이 동시작업이 가능해져 생산성 증가
- 수정내용은
commmit단위로 관리, 배포 뿐 아니라 원하는 시점으로Checkout가능 - 새로운 기능 추가는
Branch로 개발하여 편안한 실험이 가능하며, 성공적으로 개발이 완료되면Merge하여 반영 - 인터넷이 연결되지 않아도 개발할 수 있음
Git objects
- Blob: 파일 하나의 내용에 대한 정보
- Tree: Blob이나 subtree의 메타데이터(디렉토리 위치, 속성, 이름 등)
- Commit: 커밋 순간의 스냅샷
들어가기 전...
- Kernel
하드웨어와 응용프로그램을 이어주는 운영체제의 핵심 시스템소프트웨어 - Shell
운영체제의 커널과 사용자를 이어주는 소프트웨어
- CLI(Command Line Interface)
사용자가 키보드를 통해 명령으로 시스템과 통신 - GUI(Graphic User Interface)
이미지, 아이콘 등이 포함된 그래픽을 사용하여 사용자가 시스템과 상호 작용
Git 설치
Windows의 경우 공식 홈페이지보다 아래 링크의 Git을 쓰는 것이 좋다.
👉 https://gitforwindows.org/
Git Bash에서 다음 명령어로 Git 버전을 확인할 수 있다.
$ git --versionGit Bash - Command
$: 쉘 프로그램이 사용자의 명령을 받을 준비가 되어있다는 의미~: 현재 로그인한 사용자의 최상위 폴더를 의미(특별한 권한 없이 모든 작업을 수행할 수 있는 공간)
디렉터리 목록
ls
list segment, 존재하는 파일 목록ls -a
숨김처리된 파일들까지 모두 나타냄ls -l
파일들의 상세정보까지 표현ls -al
여러 플래그를 동시에 세움, 콤비네이션이 가능
디렉터리 이동
cd {폴더명}
내려간다cd ..
올라간다, 상위 디렉터리로 이동cd .
현재 디렉터리cd
현재 로그인한 최상단 디렉터리로 이동
디렉터리 생성
mkdir {디렉터리명}
make directory
파일 생성
touch {파일명.확장자}
파일 이동
mv {파일명.확장자} {디렉터리명}
move- e.g.
mv ../server.js ./
현재 디렉터리로 상위 디렉터리에 있는server.js이동
파일 복사
cp {파일명.확장자} {디렉터리명}- e.g.
cp hello.md ./hello-copy.md
hello-copy라는 이름으로hello를 현재 디렉터리에 복사
와일드카드(*)
- e.g.
mv ../server.* ./
server라는 파일명을 가진 파일을 현재 디렉터리로 이동 - e.g.
rm server.*
server라는 파일명을 가진 파일을 모두 삭제
파일 삭제
rm
remove, 논리적인 삭제 하드디스크에 접근할 수 있는 방법을 없애는 것
디렉터리 삭제
rm -r {디렉터리명}
디렉터리 안에 있는 파일들과 디렉터리를 삭제
만일,-r로 삭제되지 않는다면-rf
이름 변경
mv {현재파일명.확장자} {새파일명.확장자}
💡 tip
- 파일/폴더명을 모두 타이핑하지 않고 몇 글자를 타이핑한 뒤
Tab을 누르면 자동완성됨 - 방향 키(위, 아래)로 이전 입력한 명령어들로 이동 가능
&&를 사용해 여러 명령어를 한 번에 입력 가능- ' '(띄어쓰기)를 구분자(delimeter)라고 한다.
Git Bash - vim
마우스 사용이 되지 않아 키보드로 모든 일을 수행해야 한다.
파일 열기
vim {파일명.확장자}
파일 수정
i: 끼워넣기o: 라인을 열고 끼워넣기
파일 저장 및 나가기
:w: 저장하기:q: 나가기:wq: 저장하고 나가기:q!: 저장하지 않고 나가기
파일 내용 출력
cat {파일명.확장자}
💡 tip: .swp(스왑파일).
Vim작업 중 저장되지 않은 채로 종료되면 임시 파일이 생기는데, 이를 삭제하고 재진행 하는 것이 좋음
Git
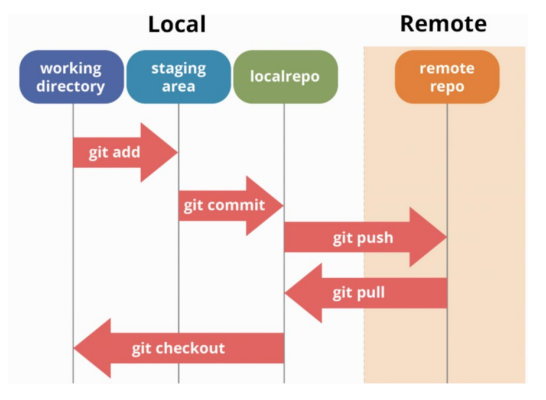
- Remote: 원격 저장소
git add해서 stage에 올리고, 그에 대한 메시지를 작성하는 것이git commit
Git 기본 설정
$ git config --global user.name "git 유저네임"
$ git config --global user.email "git 가입 시 사용한 이메일"
$ git config --global core.editor "vim"
$ git config --global core.pager "cat"
2. GitHub
저장소 복제
GitHub이라는 원격 저장소에서 Local로 저장소를 복제
$ git clone https://github.com/jytrack64/first-repo.gitCommit
❗ 초반에는 git status를 생활화하기
$ git status
On branch main
Your branch is up to date with 'origin/main'.

Changes not staged for commit:
  (use "git add <file>..." to update what will be committed)
  (use "git restore <file>..." to discard changes in working directory)
        modified:   README.md

no changes added to commit (use "git add" and/or "git commit -a")
$ git remote
origin
$ git add README.md
$ git commitgit commit -m 사용하지 않기
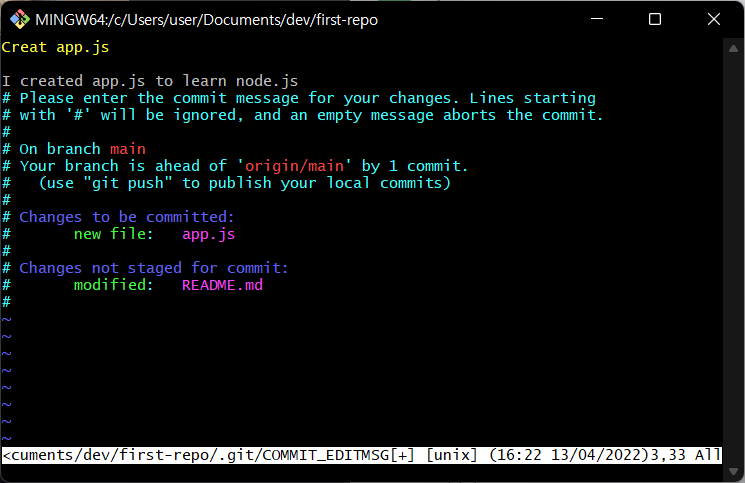
Merge시 기본적으로 존재하는 메시지가 있는 경우가 있는데,-m를 사용하게 되면 override의 가능성이 존재- 오타 발생 시 수정이 어려워 비효율적임
👉 따라서 Vim으로 작성하는 것을 권장
commit 시 제목과 내용 구분 할 것(첫 째줄: 제목, 줄 바꿈 두 번: 내용)
Vim에서 메시지를 작성하지 않고 나오거나 저장하지 않으면 commit이 되지 않음
작업 단위
commit 메시지를 잘 남기는 것도 중요하지만, 작업 단위를 잘 나누는 것 또한 정말 중요하다. 작업 단위를 제대로 구분하지 않는다면 파일의 히스토리를 남기기가 어려워진다.
- 독립적인 작업 / 종속적인 작업
독립적인 작업인 경우에는 단위를 나누어야 한다. 일반적으로는 시간순으로commit한다.
Conventional Commits
ref: https://www.conventionalcommits.org/ko/v1.0.0/
commit의 제목은commit(작업 단위)을 설명하는 문장이 아닌 구나 절로 완성- 영어로 작성, 띄어쓰기 신경쓰기, 단위 단위로 대문자(
importanceofcapitalize/Importance of Capitalize) - prefix 꼭 달기
feat: 기능 개발 관련fix: 오류 개선 혹은 버그 패치docs: 문서화 작업test: test 관련conf: 환경설정 관련build: 빌드 관련ci: Continuous Integration 관련refactor: 개선
💡 혼동 주의
fix: 안 되던 걸 고쳐서 잘 되게 만든 것refactor: 잘 동작은 하고 있었으나 효율이 떨어지는 코드를 수정한 것, 코드 품질 개선
Push
orgin이라는 별칭을 가진 main branch에 commit을 push하는 것
$ git push origin main3. GitHub 블로그(Hexo)
GitHub 저장소를 활용해 정적인 사이트 호스팅이 가능하다.
👉 username.github.io
Hexo를 이용해 서버 연결 후 localhost:4000로 접속
$ hexo
$ hexo init blog
$ cd blog
$ npm install
$ hexo generate
$ hexo serverNode.js, React, Hexo 작업 시 모두 움직이지 않고, package.json이 있는 곳에서 작업해야 함
글 생성
$ hexo new post "My first hexo blog"
INFO  Validating config
INFO  Created: ~\Documents\dev\blog\source\_posts\My-first-hexo-blog.md
글 수정
$ vi source/_posts/My-first-hexo-blog.md
$ hexo clean && hexo generate
Github 새 저장소 생성
저장소 이름은 username.github.io
vi _config.yml 명령어 입력 후, config.yml에서 title, author, deploy(type, repo, branch) 부분 수정 후 저장
# Site
title: JYTrack
subtitle: ''
description: ''
keywords:
author: Ji-yeon
language: en
timezone: ''

# URL
## Set your site url here. For example, if you use GitHub Page, set url as 'https://username.github.io/project'
url: https://jytrack64.github.io

.
.
.

# Deployment
## Docs: https://hexo.io/docs/one-command-deployment
deploy:
  type: git
  repo: https://github.com/jytrack64/jytrack64.github.io.git
  branch: main
$ npm install hexo-deployer-git --save테마 적용
테마를 설치한 후,
$ npm install hexo-theme-next --save
$ vi _config.yml_config.yml에서 theme를 'next'로 수정한다.
# Extensions
## Plugins: https://hexo.io/plugins/
## Themes: https://hexo.io/themes/
theme: next
💡 tip: Ctrl + Shift + R(캐시 파일 삭제 후 페이지 새로고침)
정적 파일 생성
$ hexo clean && hexo generate배포
배포까지 마치면 hexo server로 서버를 실행하지 않고도 GitHub 주소(https://jytrack64.github.io)로 블로그를 접속할 수 있다!
$ hexo deployGit을 이용한 TIL
ref: https://github.com/wayhome25
- 새 디렉토리에 새 파일을 추가하지 않으면 업데이트되지 않는다. 즉, 빈 디렉토리는 tracking 하지 않는다!
- 파일 이름 규칙으로 날짜를 앞에 fix하기