
📌 학습한 내용
전체 코드 : 💾
DOM 객체
: 문서 객체 모델(The Document Object Model)로 XML이나 HTML 문서에 접근하기 위한 일종의 인터페이스. 문서 내의 모든 요소를 정의하고, 각각의 요소에 접근하는 방법을 제공.
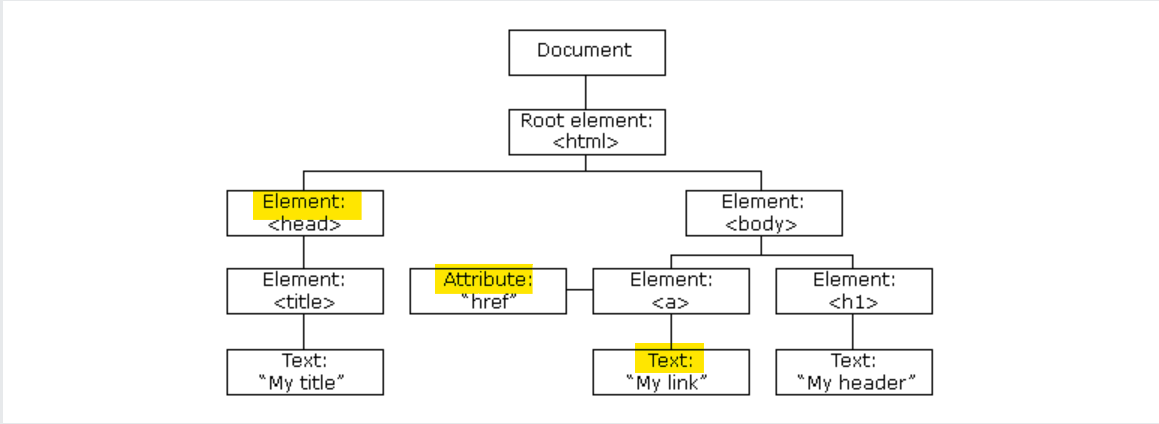
(이미지 출처 : https://www.w3schools.com/js/js_htmldom.asp)
-
element(html태그), text(html태그 사이에 들어가는 글자 정보), attribute(html태그의 속성)
-
새로운 html 태그를 생성해서 html에 문서에 삽입 가능
-
기존 html 문서 안에 있는 태그를 JS로 삭제 가능
-
기존 html 태그 안에 새로운 속성 할당 가능
-
css변경/제거 가능
-
html 태그에 이벤트 추가 가능
html에 접근하는 법
getElement*
-
document.getElementsByTagName(태그);
: 태그를 기준으로 html 정보를 가져올 때(정보에 접근) 사용되는 메서드 -> 유사 배열 형태로 반환 (HTMLCollection = 유사배열 : 배열과 유사한 형태, 배열에 존재하는 메서드들 중에서 일부 메서드는 활용 불가) -
document.getElementsByClassName(class);
: class를 기준으로 html 정보를 가져올 때 -> 유사 배열 형태로 반환
-> 특정 섹션 내부에 있는 class에 접근 하는 방법
var services = document.getElementById("services");
var serviceContainer = services.getElementsByClassName("container");

console.log(container);
document.getElementById(id);
: id를 기준으로 html 정보를 가져올 때 -> 해당 id를 가진 하나의 영역 반환
querySelector*
-
document.querySelector("태그/#id/.class")
: css에서 html에 접근하는 방식과 동일하게 js에서 접근 가능 (getElement* 보다 간편) -
가장 먼저 나오는 태그/class만 하나만 반환
-
특정 섹션 내부에 있는 class에 접근 하는 방법
var servicesContainer = document.querySelector("#services .container");
console.log(servicesContainer);-
html에 문서에 접근하는 속도
getElement*>querySelector*
편의성getElement*<querySelector* -
querySelectorAll(): 해당되는 모든 태그, class 객체 모두 반환
-> 유사 배열 형태로 반환(NodeList)
-> 반복문과 결합하여 일괄적인 디자인 적용이 가능
for(var i = 0; i < container.length; i++) {
	// console.log(container[i]);  // 각각의 container에 접근
	container[i].style.backgroundColor = "yellow"
}
html 컨텐츠 정보 변경 및 추가
innerHTML, outerHtml
: 태그가 포함된 형태(작동하는 형태)로 전달
-
element.innerHTML: 요소 안에 있는 내용물을 문자열 형태로 반환 -
element.outerHTML: 자기 자신을 포함해 요소 안에 있는 내용물을 문자열 형태로 반환
👉 특정 영역에 접근할 수 있으면 변경도 가능하다.
- 요소 안의 내용물을 모두 지우고 새로운 데이터를 삽입 가능
var header = document.querySelector(".masthead");
//console.log(header.innerHTML);
//console.log(header.outerHTML);

header.innerHTML = "<h1>Hello World</h1>"
textContent, innerText
: 순수 글자 정보만 기입(태그도 단순 글자 정보로 인식)
-
element.textContent: element 내부에 작성된 텍스트(html에 작성된 그 상태)에 접근, 변경 가능 -
element.innerText: css가 적용된 형태로 element 내부에 작성된 텍스트를 반환
html 태그 작성 및 삽입
html 태그 생성
createElement()
: 생성할 태그를 인수로 받는다. 코드상으로만 존재하는 상태(삽입 전)
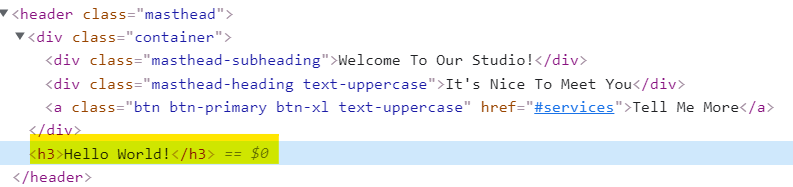
var h3Test = document.createElement("h3");
h3Test.textContent = "Helow World!";
html 태그 삽입
appendChild()
: 자식 태그를 추가함, 부모.appendChild(삽입할 태그)
var masthead = document.querySelector('.masthead');
masthead.appendChild(h3Test);- 삽입되는 태그는 부모 태그 내에서 가장 뒤쪽에 삽입이 된다.
👉 appendChild() 사용 시 주의점
: 공통된 형제를 갖고 있는 영역에 동시에 appendChild()를 적용할 경우, 마지막 자식에게만 적용이 된다.
var subHeading = document.querySelector('.masthead-subheading');
var heading = document.querySelector('.masthead-heading');
var btn = document.querySelector('.masthead .btn');

subHeading.appendChild(h3Test);
heading.appendChild(h3Test);
btn.appendChild(h3Test);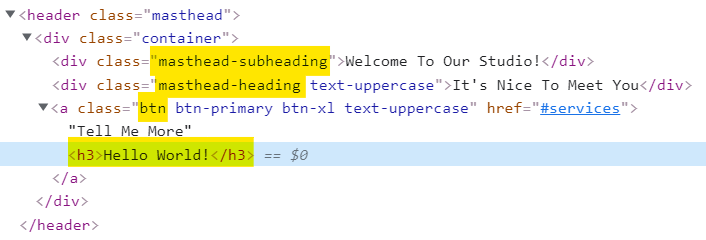
insertAdjacentHTML()
: 원하는 위치에 태그 삽입 가능
element.insertAdjacentHTML('position', text);
: 어떤 태그를 기준으로.inserAdjacentHTML(어느 위치에 삽입, 삽입되는 값)- position에 들어 갈 수 있는 값 :
<!-- beforebegin - element의 열린태그 앞 -->
<p>
<!-- afterbegin - element의 열린태그, 닫힌태그 사이 -->
foo
<!-- beforeend - element의 닫힌태그 앞 -->
</p>
<!-- afterend - element 뒤에 -->
(참고 사이트 : https://developer.mozilla.org/ko/docs/Web/API/Element/insertAdjacentHTML)
html 태그 삭제
removeChild()
: 부모를 기준으로(경유해서) 태그 삭제, 삭제할 태그의 부모.removeChild(삭제할 태그)
.parentElement: 해당 태그의 부모 태그 반환
var headContainer = document.querySelector(".masthead .container"); // 부모 태그
var heading = document.querySelector(".masthead-heading"); // 삭제할 태그

// headContainer.removeChild(heading); -> 부모를 경유해서 삭제
heading.parentElement.removeChild(heading);
// 위와 같은 의미
remove()
: 부모 태그 호출 필요없이, 해당 요소 바로 삭제
heading.remove();html 자식 요소 선택
-
부모.firstElementChild: 부모 요소의 여러 자식 요소 중에서 가장 처음에 나오는 요소를 반환 -
부모.lastElementChild: 부모 요소의 여러 자식 요소 중에서 가장 마지막에 나오는 요소를 반환
css 제어(적용)
style.css속성
-
css 속성은 camel case로 작성
-
JS로 css 적용 시, style 속성을 이용해 태그에 직접적으로 할당이 되므로, 캐스케이딩으로 인해 css에 적용한 속성값 보다 우선순위가 높아짐
heading.style.color = "red";
heading.style.backgroundCoor = "greenyellow";
heading.style.fontSize = "25px";
style.cssText
- 오타 발생시 찾기 어려움
heading.style.cssText = "color : red; background-color: greenyellow; font-size: 25px";setAttribute()
- JS에서 html의 태그 속성을 attrubute라고 칭함
element.setAttribute("추가할 속성", "속성값");
heading.setAttribute("id", "test");
heading.setAttribute("style", "color : red; background-color: greenyellow; font-size: 25px");- 새로운 id를 추가한 후, 해당 id를
querySelector이용해 디자인을 적용할 수 있다.
heading.setAttribute("id","heading-test");
document.querySelector("#heading-test").style.backgroundColor = "greenyellow";
css class 접근
className
-
해당 요소에 있는 모든 클래스 자체를 하나의 긴 문자열로 가져옴
-
개별 클래스에 접근하기 위해
split()메서드 사용 필요 -
.split(): 전달된 인수를 기준으로 규칙을 만들고, 규칙하에 글자를 잘라내고 배열 형태로 바꿀 때 사용.
var heading = document.querySelector(".masthead-heading");
var headingClass = heading.className;
var HeadingArr = headingClass.split(" "); // 공백 기준

console.log(HeadingArr);
console.log(HeadingArr[0]);
console.log(HeadingArr[1]);
- 새로운 클래스 추가 가능 -> 단, 기존 클래스들은 삭제됨
heading.className = "test";
heading.className = "masthead-heading text-uppercase test" // 기존 클래스를 함께 넣어줘야 유지됨
classList
-
DOMTokenList라는 유사 배열 형태로 반환 -
split()메서드를 사용할 필요 x -
개별 클래스에 접근하기 위해 인덱스로 접근하는 방식은 동일
var heading = document.querySelector(".masthead-heading");
var headingClass = heading.classList;

console.log(headingClass);
class 추가, 삭제
-
classList.add(): 기존 클래스는 유지한 상태로 인수에 받은 새로운 클래스를 추가함 (여러 개 동시에 가능) -
classList.remove(): 기존 클래스 삭제 -
classList.toggle(): 선택한 요소에 인수에 해당하는 클래스가 없을 경우 추가, 있을 경우 삭제
heading.classList.add("test", "test2", "test3");
heading.classList.remove("text-uppercase");
heading.classList.toggle("test");
contains()
: 해당 영역에 인자로 받은 클래스의 유무를 확인, true/false로 반환
console.log(heading.classList.contains("text-uppercase")); // trueEventListener()
addEventListener()
-
element.addEventListener("이벤트의 종류", "호출할 함수"): 인수에 지정한 이벤트가 대상에 전달될 때마다 호출할 함수를 설정- 이벤트의 종류
: click, submit, keyup/keydown(키보드 입력시 상태값 인식) 등 - 참고 사이트 : https://www.w3schools.com/jsref/dom_obj_event.asp
- 이벤트의 종류
// 1. 콜백 함수
var heading = document.querySelector(".masthead-heading");
heading.addEventListener("click", function() {
	console.log("Click");
})

// 2. 생성한 함수
var heading = document.querySelector(".masthead-heading");
function test() {
	console.log("클릭");
}
heading.addEventListener("click", test); // 두 번째 인수로 함수명만 전달해줘야 함 (콜백함수)
removeEventListener()
: add로 추가한 이벤트를 제거할 때 사용
removeEventListener()를 활용하기 위해서는addEventListener()의 상태값과 동일하게 적용되어 있어야 한다. 단, 함수는 참조형 데이터 타입이기 때문에 값이 동일해도 주소값이 다르면 다른 객체로 취급된다. 따라서 별도의 함수를 생성(위의 2번 방법)해서 그 함수명만 각각 두 번째 인수로 전달해야 한다.
heading.addEventListener("click", function test() {
	console.log("클릭");
});
heading.removeEventListener("click", function test() {
	console.log("클릭");
});

// => removeEventListener가 제대로 작동하지 x,
// 콜백 함수는 같더라도 저장된 주소값이 다름

function test() {
	console.log("클릭");
}
heading.addEventListener("click", test);
heading.removeEventListener("click", test);
해당 코드 : 💾
preventDefault
: html 태그가 가지고 있는 본연의 기능을 막아줌
-> 원래 해당 태그가 갖고 있는 이벤트에 접근해야 함
- 콜백함수의 매개변수로 'e(이벤트 객체)' 전달
<body>
	<a id="btn" href="#box2">Box2</a>
	<div id="box1" style="width: 100%; height: 800px; background: pink;"></div>
	<div id="box2" style="width: 100%; height: 800px; background: yellow;"></div>
	<script src="main.js"></script>
</body>
var btn = document.querySelector("#btn");
btn.addEventListener("click", function(e) {
// console.log(e);
e.preventDefault();
});📌 학습내용 중 어려웠던 점
-
appendChild()와removeChild(),eventListener()적용 도중 Uncaught TypeError: Cannot read property 'appendChild' of null 에러가 계속해서 발생 -
일지를 작성하던 중, 인수와 인자의 차이가 헷갈렸다.
📌 해결방법
-
대게는 ;이 빠진 경우였고, 오타가 없을 때 에러가 났을 경우는 다시 작성하니 해결되었다.
-
따로 서칭을 해본 결과 인수는 argument, 인자는 parameter라고 칭한다.
인수는 전달인자라고도 하며 매개변수와 달리 고정되어 있지 않고, 호출할 때마다 수시로 변하는 값(Value)이기 때문에 변수가 아닌 값(Value)으로 정의한다.
인자는 함수 내부에 있는 인자로써, 특정한 값으로 정해져 있는 것이 아니라, 함수가 호출하면서 건네준 argument의 값이변수(Variable)에 담기게 된다. 들어오는 인자가 매개체 역할을 하기 때문에 매개변수라고도 한다.
( 참고 사이트 : https://velog.io/@colki/JS-parameter-%EC%99%80-argument-%EC%9D%98-%EC%B0%A8%EC%9D%B4-%EC%9D%B8%EC%88%98-%EC%9D%B8%EC%9E%90 )
📌 학습소감
여태껏 해왔던 자바스크립트 문법과 실습을 하면서 '그냥 이런게 있구나' 하고 넘어갔던 부분들에 대해서 확실히 짚고 넘어갔다. 확실히 메서드 하나하나의 기능을 알고 사용하니 훨씬 이해가 잘 됐다. 😋