요소 배치 스타일:
블럭요소: 한 행으로 영역 차지, 줄바꿈 자동(div,p,pre,h~...)
인라인 요소: 내용부분만 영역 차지, 옆으로 배치(span, label,input,img...)
*요소영역 = content + padding + border
요소바깥영역 = margin
*고정크기(px)
가변크기(%)
- display: 화면 배치 방법 변경
   선택자 {
        display: inline|block|inline-block;
    }
<div class="displt inline lavender" >다섯번째</div>
    <br>
    <b>display: inline만 하면 width와 height 속성은 적용X</b>

<div class="displt inline-block lavender" >다섯번째</div>
    <b>display: inline-block 하면 width와 height 속성은 적용됨</b>

<!--기존의 인라인 요소인 span => 블럭 요소로 바꾸기-->
    <span class="displt block red"> 첫번째</span>
배치 관련 스타일:
position: relative(상대위치)|absolute(절대위치)
<link href="resources/CSS/14.style.CSS" rel="stylesheet">

<div class="outer"><!--relative스타일 부여-->
        <div class="positioning ye" id="first">첫번째 자식</div>
 		<div class="positioning yg" id="second">두번째 자식</div>
        <div class="positioning oran" id="third">세번째 자식</div>

<h3>position: fixed(고정위치)</h3>
    <div class="positioning yg" id="fixed">첫번째 자식</div>
z-index: 요소들의 순서 바꾸기
<div class="outer">
        <div class="z-index ye" id="z1">첫번째 자식</div>
  		<div class="z-index yg" id="z2">두번째 자식</div>
        <div class="z-index oran" id="z3">세번째 자식</div>
visibility: 특정 요소가 공간을 차지하지만 보이거나 안 보이게 함
<div class="vis ye">첫번째</div>
<div class="vis yg" style="visibility: hidden;">두번째</div>
<div class="vis oran">세번째</div>
float: 페이지내의 요소들을 왼쪽 또는 오른쪽으로 배치하는 속성
<div class="float-test">요소1</div>
<div class="float-test">요소2</div>
<div class="float-test">요소3</div>
flex:
기본축을 기준으로 정렬
*부모요소: flex-container
-display: flex
-flex-direction: row(기본값)|column|row-reverse|column-reverse
-justify-content: 메인축정렬
-align-items: 크로스축 정렬
-flex-wrap: 줄바꿈 여부 확인
-align-content: 여러줄인 경우 크로스 축 설정
*자식요소(정렬의 주체): flex-item
-flex-grow: 빈 여백을 아이템들의 비율대로 늘어나면서 레이아웃 영역을 채움
-flex-shrink: 범위보다 넘친 아이템 영역을 분배하여 레이아웃 영역 안에 배치
-flex-basis: 아이템의 크기를 직접 설정
*웹에서 F12의 style탭에서 시각화도구로 스타일 적용가능
<style>
        ul{
            padding: 0;
            list-style: none;
            border: 2px solid;
            height: 300px;
            display: flex;/*row가 기본값*/
            /* flex-direction: column-reverse;*/
        }
        li{
            width: 100px;
            height: 100px;
            background-color: bisque;
            border: 2px solid;
            margin: 5px;
            text-align: center;
            line-height: 100px;
        }
    </style>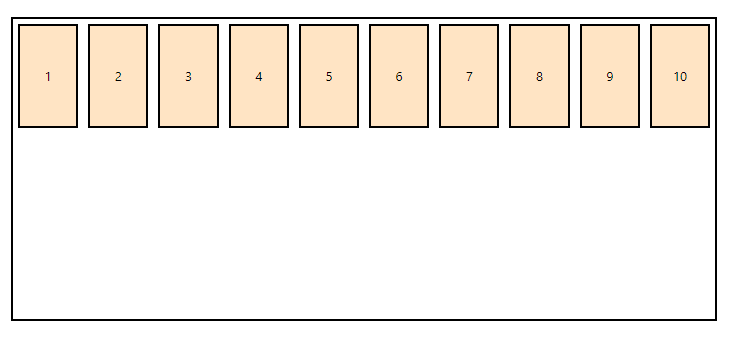
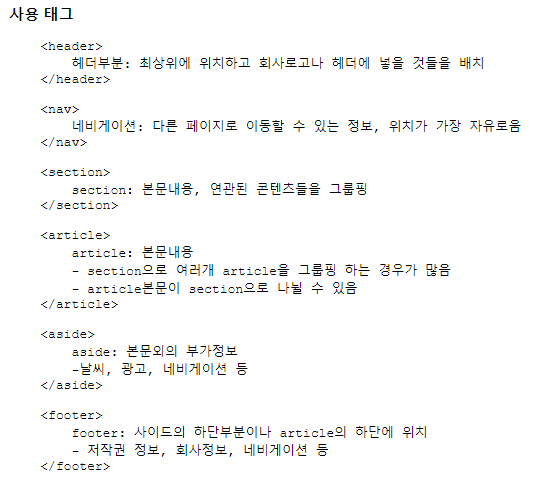
시맨틱(semantic) 태그:
의미가 있는 태그
-html4버전에서는 div태그의 id등을 통해 내용 구분
스크린리더는 영역별로 접근 불가했음
-html5버전에서는 태그의 이름으로 태그의 내용 유추
스크린리더가 영역별로 접근 가능
웹 접근성 향상을 위한 태그
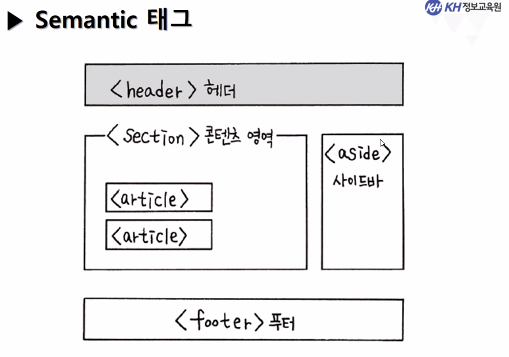
사이드바는 있을 수도, 없을수도, 좌/우/하 어디에 있든 상관x
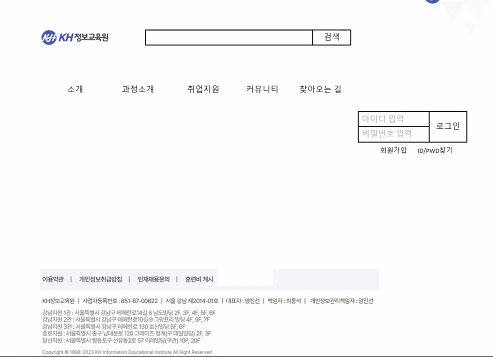
*연습문제*
밑의 홈페이지를 구현하시오
footer의 배경색은 따로 준 것이 아님.
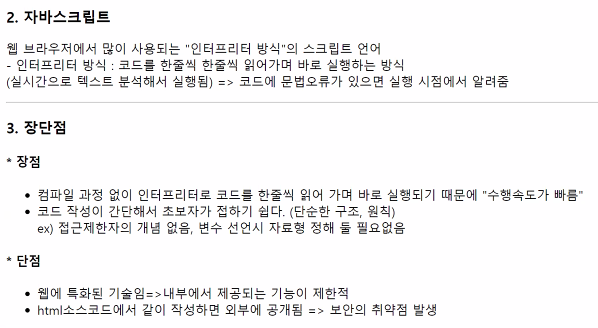
자바스크립트(javascript):
자바스크립트 사용법:
- inline(인라인): 태그 내에 간단 소스코드를 작성해 실행
<태그 on이벤트명 ="해당요소 이벤트 발생시 실행할 코드;">
 <!--소스코드가 소량일 경우 사용-->
    <button onclick="window.alert('알림창출력 버튼 클릭!');">알림창 출력</button>
<button onclick="console.log('콘솔창에 출력하는 버튼 클릭');">콘솔 출력</button>- internal(내부): html문서 내에 소스코드를 작성해 실행
 <button id="btn">알림창 출력</button>
    <button onclick="btnClick();">콘솔 출력</button> <!--속성값 스크립트로 만들것임-->

    <script>
        // 자바랑 주석 방법 똑같음

        //이벤트를 부여하고자 하는 요소 선택하여 변수에 담기
        var btn = document.getElementById("btn"); //자료형 무조건 var
        console.log(btn);
        btn.onclick = function() {
            window.alert("internal 방식 버튼 클릭");
        }
        function btnClick() {
            console.log("internal 방식 콘솔 출력");
        }
</script>- external(외부): 별도의 .js파일로 소스코드를 작성해 실행
<button onclick="test();">알림창 출력</button>function test() {
window.alert("별도로 작성된 js파일");
}자바 스트립트에서의 데이터 입출력:
-
window: 자바스크립트 내장 객체로 브라우저 창이 열릴 때마다 하나씩 생성되는 객체
브라우저 창에 존재하는 모든 요소들의 최상위 객체(생략도 가능)[window.]alert("알림창에 출력할 문구");
-
document: 웹 문서마다 하나씩 만들어지는 객체(html 문서에 대한 정보들을 가짐)
[window.]console.log("콘솔창에 출력할 문구");
-
document.write("화면상에 출력할 문구")
<button onclick="documentWrite();">화면상에 출력</button>

    <script>
        function documentWrite() {
            //document.write("문서에 출력하기");
            //document.write("<b>안녕</b><br><h2>반가워요</h2>");
            //문구에 html태그도 기능함
            var table1 = "<table border='1'>";
                table1 += "<tr>"; //첫번째 행이 됨
                table1 += "     <td>요소1</td>";
                table1 += "     <td>요소2</td>";
                table1 += "</tr>";
                table1 += "</table>";
            document.write(table1);
        }
</script>- 선택한 요소.innerHTML|innerText = "요소에 출력할 문구";
자바스크립트에서 어떤 요소(element)안의 값(content)을 가지고 오거나 변경할 때 innerHTML,innerText라는 속성에 접근
<div class="area" id="area1">
        자바스크립트에서 어떤 요소(element)안의 값(content)을 가지고 오거나
        변경할 때<b>innerHTML,innerText</b>라는 속성에 접근
    </div>

    <button onclick="tagValue();">확인</button>

    <script>
        function tagValue() {
            //위의 div요소를 가져와서 값을 확인/변경

            //div요소 객체 얻어와 변수에 저장
            var divEl = document.getElementById("area1");

            console.log(divEl);
            console.dir(divEl);
            //console.dir: 해당 값의 디렉토리 구조를 보조자 할 때 사용(속성들의 정보)

            //선택된 요소의 속성에 접근(.을 통해)
            console.log(divEl.id); //id: 해당 요소의 id속성 값을 가져옴
            console.log(divEl.className); //className: 해당 요소의 class 속성 값을 가져옴

            console.log(divEl.innerHTML); //innerHTML: 요소의 content안의 html태그까지 다 가져옴
            console.log(divEl.innerText); //innerText: 요소의 content안의 text만 가져옴

            //해당 요소의 속성값을 변경: 속성에 접근 후 대입을 통해 변경
            divEl.innerHTML = "<b>innerHTML로 속성값 변경함</b>";
            divEl.innerText ="<b>innerText로 속성값 변경~~~~~~~~~~</b>";
      		//태그까지 text로 인식하여 출력됨
            divEl.style.backgroundColor = "royalblue";
            divEl.style.color = "white";
        }
    </script>