텍스트 스타일:
font~가 아닌 text~~ 으로 시작되는 것들
color: 텍스트의 색상 지정
선택자 {
color: 색상명|16진수|rgb(x,x,x)|rgba(x,x,x,x)|hsl(x,x,x)|hsla(x,x,x,x)
}
text-decoration: 텍스트에 줄을 긋거나 없앨 때 사용
선택자 {
text-decoration: none|underline|overline|line-through;
}
text-transform: 영문의 대소문자 변환시 사용
선택자 {
text-transform: uppercase|lowercase|capitalize;
}
text-shadow: 텍스트에 그림자 효과
선택자 {
text-shadow:가로거리(x) 세로거리(y) [번짐정도 색상];
}
text-align: 텍스트 정렬
선택자 {
text-align: left(기본값)|right|justify|center;
}
★line-height: 줄간격 조절
선택자 {
line-height: nomal|px|em|%
}
목록 관련 스타일:
list~로 시작되는 것들
list-style-type: 블릿기호 변경
list-style-image: 블릿기호를 이미지로
list-stylr-position: 블릿기호의 위치를 조정
- 순서가 없는 목록(ul)
선택자 {
list-style-type: disc(기본값)|circle|square|none;
}
<style>
        ul{
            list-style-type: circle;
            list-style-type: square;
            list-style-type: none;
            list-style-image: url(resources/CSS/icon.png);
}- 순서가 있는 목록(ol)
선택자 {
list-style-type: decimal(기본값)|decimal-leading-zero(숫자 앞에 0);
list-style-type: lower-alpha|upper-alpha(알파벳 순서);
list-style-type: lower-roman|upper-roman(로마자 순서);
}
ol{
            list-style-type: decimal-leading-zero; /* 숫자 앞에 0이 붙음 */
            list-style-position: inside; /* 리스트가 안으로 더 들어감*/
        }
    </style>
영역 관련 스타일:
<!DOCTYPE html>
<html lang="en">
<head>
    <meta charset="UTF-8">
    <meta http-equiv="X-UA-Compatible" content="IE=edge">
    <meta name="viewport" content="width=device-width, initial-scale=1.0">
    <title>영역 관련 스타일</title>
    <style>
        .test{
            width: 100px;
            height: 100px;
            background-color: antiquewhite;
            border: 10px solid black;
        }
        #test1 {
            padding: 100px;
        }
        #test2 {
            padding-top: 100px;
            padding-right: 50px;
            padding-bottom: 30px;
            padding-left: 20px;
        }
        #test3 { /* 시계 방향으로 상-우-하-좌 */
            padding: 100px 50px 30px 20px;
            padding: 100px 50px;
        }
        #test4 {
            margin: 50px;

        }
        #test5{
            margin-top: 50px;
            margin-left: 50px;
        }
        #test6{
            margin: 50px 30px 20px 10px;
            margin: 50px 30px;
            margin:auto; /*좌우를 기준으로 가운데 배치*/
        }
    </style>
</head>
<body>
    <h1>여백 및 간격 관련 스타일</h1>

    <h2>요소영역 = content + padding(안쪽여백) + boder</h2>

    <h4>div</h4>
    <div class="test">기준</div>

    <h3>padding</h3>
    <p>내용물영역(content)과 테두리영역(border)사이의 거리(여백)를 조절하는 스타일</p>

    <!--div.test#test${콘텐츠 영역}*3-->
    <div class="test" id="test1">콘텐츠 영역</div><br>
    <div class="test" id="test2">콘텐츠 영역</div><br>
    <div class="test" id="test3">콘텐츠 영역</div>

    <h3>margin</h3>
    <p>타 요소들 사이의 간격(바깥 간격)을 조정</p>

    <div class="test" id="test4">콘텐츠 영역</div><br>
    <div class="test" id="test5">콘텐츠 영역</div><br>
    <div class="test" id="test6">콘텐츠 영역</div>

</body>
</html>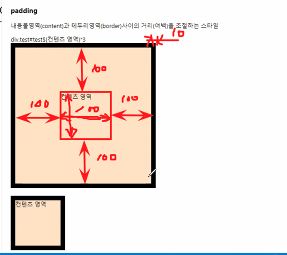
여백을 준 만큼 늘어남
테이블 관련 스타일:
VScode 11.테이블관련스타일 파일 참고★주의할 점★ align은 form에서는 안 되고 테이블에서 정렬가능한 속성 !
<style>
        table {
            border: 1px solid #000;
            border-spacing: 20px 10px;
            border-collapse: collapse; /*표 테두리+셀 테두리*/
        }
        th, td{
            border: 1px solid #000;
            /* width: 150px;
            height: 50px; */
            text-align: center;
            vertical-align: middle; /*테이블에서만 사용가능*/

            /*35행의 영문이 길면 줄바꿈없이 너비가 늘어남*/
            word-break: break-all; /*공백이 없어도 끊어서 줄바꿈함 */
        }
        .bdT{
            border-top: 2px solid skyblue;
        }
        thead, tfoot{
            background-color: bisque;
        }
        tbody{
            background-color: beige;
        }
    </style>
배경 관련 스타일:
VScode 12.배경관련스타일 파일 참고- background-color: 배경색 지정
background-clip: 배경을 적용시키고자 하는 범위를 지정할 때 사용
선택자 {
background-clip: border-box(기본값)|padding-box|content-box
}
배경 이미지 테스트
선택자{
background-image: url("이미지 경로");
background-repeat : repeat|repeat-x|repeat-y|no-repeat;
background-size: auto|contain|cover|px px|% %;
background-position: 좌/우/중 상/하/중|px px|% %;
background-attachment: scroll|fixed;
}
<style>
        body{
            background-color: aquamarine;
            background-color: rgba(10, 84, 25, 0.3);
        }
        #div-bg{
            background-color: aliceblue;
            padding: 20px;
            border: 30px solid blanchedalmond;
            width: 50%; /*내용만 50% */
            box-sizing: border-box; /* content-box: 기본값 */
        }
        .div-test{
            margin: 30px;
            background-color: coral;
            border: 10px dashed;
            padding: 20px;
        }
        #div1 {background-clip: border-box;}
        #div2 {background-clip: padding-box;}
        #div3 {background-clip: content-box;}

        #bg-img{
            border: 1px solid;
            width: 70%;
            height: 800px;
            background-image: url(resources/CSS/img1.jpg);
            background-repeat: no-repeat;
            background-size: auto; /*기본값: 원래 이미지 사이즈*/
            background-size: contain;/*이미지 전체가 보이게*/
            background-size: cover;/*이미지 확대하여 가득차게*/
            background-size: 100px 100px;/*가로 세로 길이*/
            background-size: 60%;

            background-position: left top; /*기본값*/
            background-position: center bottom;
            background-position: 20% 30%;

            background-attachment: scroll; /*기본값*/
            background-attachment: fixed;
        }
    </style>