참고
1) 이벤트 참고
- W3Schools JS Events
- W3Schools HTML DOM Events
- W3Schools HTML DOM Events 2
- W3Schools jQuery Events 1
- W3Schools jQuery Events 2
2) file api참고
- ??
200925
JS HTML 이벤트
- 마우스를 클릭하거나, 키보드의 키를 누르거나, HTML요소를 선택하거나 여러 경우에 대한 이벤트가 존재함
- onload: 객체 로드시
- 웹페이지의 모든 컨텐츠가 완전히 로드된 후 수행.
- 스크립트를 수행하기 위해 가장 자주 사용하는 이벤트임
- onclick: 마우스로 요소 클릭시
- ondbclick: 연속 클릭
- onmouseover: 마우스를 요소 위에 올릴 시
- onmousemove: 요소위에서 움직이는 경우
- onmouseout : 요소 위에 있다 벗어난 경우
- onkeydown: 키보드의 키를 눌렀을때 발생(누르고 있을때 한번만 실행)
- onkeypress: 키보드의 키를 눌렀을때 발생(누르고 있으면 계속 실행)
- onkeyup: 키를 눌렀다가 뗏을때 발생
- down -> press -> up 순서로 (세가지 다 input에서 자주쓰임)
- onfocus: 요소에 입력커서가 왔을 때 발생 (포커스를 받았을때) ★★
- onfocus, onblur 텍스트박스에 주로쓰임
- 콤보박스, 라디오버튼에도 쓰인다.
- onblur: 입력커서가 요소에서 나갔을 때 발생(포커스를 잃었을때) ★★
- 아이디를 대문자만 입력을 받아야되는데 사용자가 대소문자 구분하지않고 입력하고 넘어갔을때 포커스가 없어지면 자동으로 대문자로 변경해줌
- onchange: 요소의 값이 변경되었을 때 발생
- 주소 선택시 대전 누르고 나서 그다음에 중구,서구,동구 이렇게 나오는거 (콤보박스)
HTML 요소에 이벤트 할당하는 방법
- HTML 태그에서 이벤트 할당
<button>클릭</button>
- 스크립트에서 요소에 이벤트 할당
document.getElementById("myBtn").onclick = proc; // 수행될 함수명만
- 스크립트에서 요소에 EventListener를 추가해서 이벤트 할당
document.getElementById("myBtn").addEventListner("click",proc);- removeEventListener() 메서드를 사용해서 이벤트 제거 가능
DRAG & DROP
- 윈도우에서 아주 많이 사용하는 사용자 인터페이스 중 하나
- 객체를 마우스를 끌어서 다른 애플리케이션에 놓는것
추가 설명
- 드래그 되는 요소의 draggable 속성을 true로 설정
- dragstart: dataTransfer 객체에 setData()호출 데이터 설정필요
- drag: 드래그 도중 계속 발생, 특별히 처리할 내용 없음
- dragenter
- 드래그 중 새로운 요소 안으로 들어가면 발생.
- 새로운 요소가 타겟 요소인지 검사해서 타겟 요소이면 drop 이벤트 처리
- dragleave: 드래그 중 요소를 빠져 나가면 발생. 특별히 처리할 내용 없음.
- dragover: 드래그 도중 마우스가 다른 요소 위에 있을 때 발생. 만약 타겟 요소에서 dragover 이벤트가 발생하면 드롭 허용
- drop
- 마우스 버튼을 놓았을 때. 반드시 처리해야함★
- dataTransfer객체에서 getData() 메서드를 이용해 필요한 데이터를 꺼내야함
File API 나중에 다시 하기로함
201005
jQuery 이벤트
$("p").on("click",function(e) { // function안 매개변수 e: event 객체
  var eventType = e.type;
});- jQuery의 이벤트에는 기존 자바스크립트의 이벤트가 모두 존재
- jQuery로 이벤트를 연결하는 가장 기본적인 방법은 on()메서드
- jQuery가 스스로 event객체를 정형화하므로 jQuery의 이벤트 객체는 모든 브라우저가 같은 방법으로 사용하고 같은 속성을 갖음
이벤트 객체
- 모든 이벤트의 정보를 event객체로 제공
속성
- type: 이벤트 종류 (ex: click)
- target: 이벤트가 발생한 객체 (element)
- pageX, pageY: 문서의 좌상단을 기준으로 한 마우스 좌표
- screenX, screenY: 화면상의 좌표
- 팝업을 띄울 때 모니터 중간에 띄우고 싶다던지, 영역 중간에 띄우고 싶을때 page, screen 주로 씀
- button: 눌러진 마우스 버튼
- (0: 왼쪽 버튼, 1: 휠(중간)버튼, 2: 오른쪽 버튼)
메서드
마우스 이벤트 메서드
- click / dblclick
- mousedown
- mouseup
- mouseenter
- mouseleave
- hover: mouse enter와 leave의 조합
$(selector).hover(inFunction, outFunction)
- mousemove
- mouseout
- mouseover
201005Ex01_MouseEvent.html
mousedown 예제
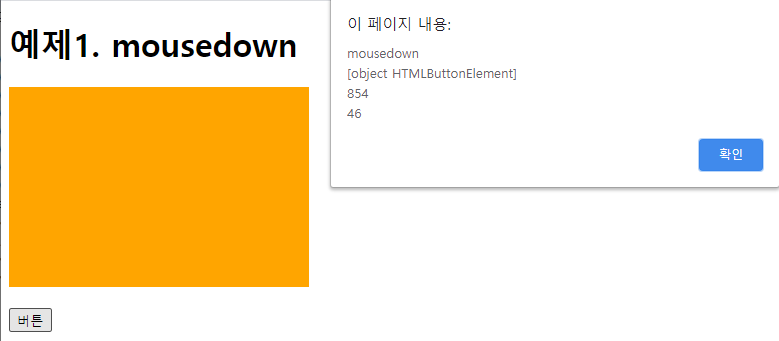
$("#ex1bt").mousedown(function(e) {
  let type = e.type;
  let target = e.target;
  let screenX = e.screenX;
  let pageX = e.pageX;
  alert(type+"\n"+target+"\n"+screenX+"\n"+pageX);
});
</script><h1>예제1. mousedown</h1>
<div id="ex1" style="width:300px;height:200px;background-color:orange;"></div>
<br>
<button id="ex1bt">버튼</button>mousemove 예제
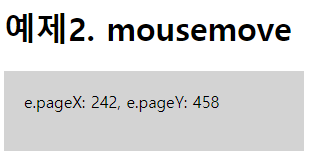
$("#ex2").mousemove(function(e){
  $("#ex2").html("e.pageX: "+e.pageX+", e.pageY: "+e.pageY);
});<h1>예제2. mousemove</h1>
<div id="ex2" style="width:260px;height:40px;background-color:lightgray;padding:20px;" ></div>mouseover
// 모두 사라질때 나타나게 하기 위해서 document ready때는 사라지도록
$("ex3bt").hide();

$(document).ready(function() {
  // mouseover 전 이미지담을 변수
  let orgSrc = "";
  let chgSrc = "../../images/food/apple.png";

  // 1. 마우스를 이미지 위에 올리면 다른 이미지로 변경 mouseover
  $("#ex3 > img").mouseover(function() {
    orgSrc = $(this).attr("src");
    $(this).attr("src",chgSrc);
  });
  // 2. 마우스가 이미지 위에서 나가면 원래 이미지로 돌아옴 mouseout
  $("#ex3 > img").mouseout(function() {
    $(this).attr("src",orgSrc);
  });
  // 3. 이미지를 더블 클릭하면 이미지가 사라짐 dblclick
  $("#ex3 > img").dblclick(function() {
    $(this).hide();
    // 4. 이미지가 모두 사라지면 이미지 하단에 [보이기] button이 나타남
    if($("img:visible").length == 0) {
      $("#ex3bt").show();
    }
  });
  // 5. 보이기 누르면 다시 다 보임
  $("#ex3bt").click(function(){
    $("#ex3 > img").show();
    $(this).hide();
  });
});<h1>예제3. mouseover</h1>
<div id="ex3">
<img src="../../images/food/burger.png" alt="버거" />
<img src="../../images/food/burrito.jpg" alt="부리또" />
<img src="../../images/food/lunchbox.png" alt="도시락" />
</div>
<button id="ex3bt">보이기</button>기타 이벤트 메서드
- keypress
- keydown
- keyup
- submit
- change: 입력 요소의 정보가 변경 되었을 때
- focus / blur: 입력 요소가 포커스를 얻었을 때 / 잃었을 때
- resize: DOM 사이즈가 변경되었을 때
- on: 선택한 요소에 여러 이벤트를 넣을 때 사용
$("p").on({click:~~~, dblclick:~~~, enter:~~~});$("p").on({ mouseenter : function(){ $(this).css("background-color","gray"); } , mouseleave : function(){ $(this).css("background-color","blue"); } , click : function(){ $(this).css("background-color","yellow"); } });
이벤트 객체 메서드
event.preventDefault()
- 요소의 기본 작업이 발생하지 않도록 함
- 예)
- 제출 버튼이 양식을 제출하지 못하도록
- a태그를 클릭해도 링크 페이지로 이동하지 않도록
$('a').click(function(event){
  event.preventDefault();
}

$('a').click(function(event){
  return false;
}
event.stopPropagation()
- 부모 요소에 대한 이벤트 버블링을 중지하여 부모 이벤트 처리기가 실행되지 않음
- stopPropagation 참고
201005Ex02_EventMethod.html
preventDefault() 예제
$(document).ready(function(){
  $("#ex1a").click(function(e){
    var age = prompt("몇살이시죠","숫자만 입력하세용!");
    if(age<15) e.preventDefault();
  });
}); //doc ready<h3>프롬프트로 나이 입력받아 15살 이상만 네이버로 이동하도록</h3>
<p id="ex1p"><a id="ex1a" href="http://www.naver.com">네이버</a>이동</p>stopPropagation() 예제1
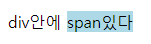
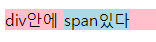
$(document).ready(function(){
  $("#ex2span").click(function(e){
    $(this).css("background-color","lightblue");
    e.stopPropagation();
  });

  $("#ex2div").click(function(){
    $(this).css("background-color","pink");
  };
});<div id="ex2div">div안에
<span id="ex2span">span있다</span>
</div>stopPropagation() 예제2
$(document).ready(function() {
  // 1. bt 클릭 시 sp과 dv에 배경색
  $("#ex3bt").click(function(e) {
    $("#ex3sp").css("background-color","yellow");
    $("#ex3dv").css("background-color","pink");
    e.stopPropagation();
  });
  // 2. sp 클릭 시 sp 테두리
  $("#ex3sp").click(function(e) {
    $(this).css("border", "3px solid red");
    e.stopPropagation();
  });
  // 3. dv 클릭 시 dv안에 hello~ 글자 추가
  $("#ex3dv").click(function(){
    $(this).append("<div>Hello~</div>");
  });
}); // doc ready<div id="ex3dv" style="width:200px;height:200px;overflow:auto">
<span id="ex3sp" style="display:inline-block;width:100px;height:100px;">
<button id="ex3bt">클릭</button>
</span>
</div>이벤트 연결 메서드
- Event: 웹 페이지에서 발생하는 사용자의 동작들
- Event Handler: 이벤트를 처리하는 것
- Event Binding: 특정 요소에 이벤트 핸들러를 연결하는 것
- 이벤트 연결:
$(selector).on(...)- 옛날: bind, live, delegate (중요x)
- 이벤트 제거:
$(selector).off(...)- 옛날: unbind, die, undelegate (중요x)
on, one, off
$(selector).on(event, childSelector, data, function, map)- 선택된 요소와 하위 요소에 한 개 이상의 이벤트를 바인딩
- 현재 로드 된 요소 및 스크립트로 생성될 새로운 요소에도 적용됨
- 필수값: event, function
$(selector).one(event, data, function)- 선택된 요소와 하위 요소에 한개 이상의 이벤트를 바인딩.
- 이벤트가 한번만 수행되고 제거됨
- 필수값: event, function
$(selector).off(event, selector, function(eventObj), map)- 선택된 요소에 on메소드로 연결된 이벤트를 제거
- 필수값: event
201005Ex03_EventBinding
// p요소에 마우스를 올리면 intro라는 스타일이 적용되고, 마우스를 벗어나면 적용됐던 스타일이 사라진다.
  $("#ex1p").on("mouseover mouseout", function(){
    $(this).toggleClass("intro");
  });
  /*
  $("#ex1p").on({
    mouseover : function() {
      $(this).attr("class","intro");
    }
    , mouseout : function() {
      $(this).attr("class","");
    }
  });
*/<head>
<style>
.intro {
font-size: 150%;
color: red;
}
</style>
</head>
<body>
<p id="ex1p">Move the mouse pointer over this paragraph.</p>
</body>trigger, triggerHandler
- trigger vs. triggerHandler
$(selector).trigger(event, eventObj, param1, param2,...)- 이벤트의 기본 동작을 발생시킴
- 선택된 모든 요소에 동작
- 필수값: event
$(selector).triggerHandler(event, param1, param2,...)- 함수만 실행시키고, 이벤트의 기본 동작은 발생시키지 않음
- 선택된 첫번째 요소에만 동작
- 버블링 되지 않음
- 필수값: event
201005Ex04_Trigger.html
trigger
$(document).ready(function() {
  // 버튼을 누름으로써 ex1p의 trigger가 실행됨
  // trigger의 이벤트는 myOwnEvent이고, 매개변수로 Chichi를 넘겨줌
  $("#ex1bt").click(function() {
    $("#ex1p").trigger("myOwnEvent",["Chichi"]);
  });

  // bt눌림 -> trigger 실행 -> trigger가 myOwnEvent를 실행시킴
  $("#ex1p").on("myOwnEvent",function(){
    $(this).text(name + "! What a beautiful name!").show();
  });
}); // doc ready<button id="ex1bt">trigger</button>
<p id="ex1p"></p>trigger vs. triggerHandler
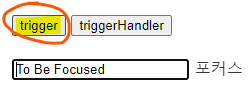
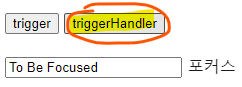
$(document).ready(function() {
  $("#ex2bt1").click(function() {
    $("#ex2in").trigger("focus"); // input 박스의 focus도 실행됨
  });
  $("#ex2bt2").click(function() {
    $("#ex2in").triggerHandler("focus"); // 코드는 수행되나 input의 focus는 실행안됨
  });
  $("#ex2in").focus(function() {
    $("<span>포커스</span>").appendTo("body").fadeOut(1000);
  });
}); // doc ready<button id="ex2bt1">trigger</button>
<button id="ex2bt2">triggerHandler</button><br><br>
<input id="ex2in" type="text" value="To Be Focused"/>
갈 길이 멀다