참고
https://www.w3schools.com/jquery/jquery_ref_html.asp
get / set 주요 메서드
- 컨텐츠 확인 및 변경 메소드
- 파라미터 X -> Get
- 파라미터 O -> Set
- 컨텐츠 반환 시, 선택된 요소가 여러개라면 첫번째 요소의 내용만 반환
- 컨텐츠 변경 시, 선택된 요소가 여러개라면 모든 요소에 적용
text() / text(str)
- text(): html 코드 제외한 텍스트 내용 반환
html() / html(str)
- html: innerHTML 기능과 동일
- html(): html 코드 포함
val() / val(str)
- 양식 필드(form fields)의 값(value 속성의 값)을 반환하거나 str로 설정
예제: 201006Ex01
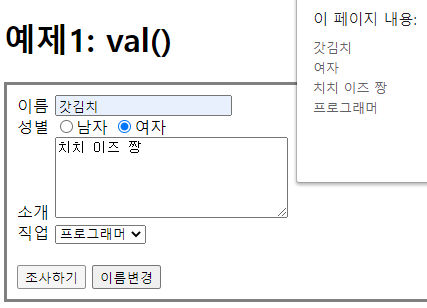
JS
$(document).ready(function() {
  $(":submit").click(function() {
    var name = $("#name").val();
    var gender = $("input[name='gender']:checked").val();
    var intro = $("#intro").val();
    var job = $("#job").val();
    alert(name+"\n"+gender+"\n"+intro+"\n"+job);
  });
});
html
<div class="container">
  <form action="">
    <label for="name">이름</label>
    <input type="text" id="name" name="name"/>
    <br> <!-- input타입의 value = db로 들어가는 데이터 -->
    성별 <input type="radio" id="male" name="gender" value="남자"/><label for="male">남자</label>
    <input type="radio" id="female" name="gender" value="여자"/><label for="female">여자</label>
    <br>
    <label for="intro">소개</label>
    <textarea name="intro" id="intro" cols="30" rows="5"></textarea>
    <br>
    <label for="job">직업</label>
    <select name="job" id="job">
      <option value="프로그래머">프로그래머</option>
      <option value="공주">공주</option>
      <option value="왕자">왕자</option>
    </select>
    <br><br>
    <input type="submit" value="조사하기"/>
    <input type="button" value="이름변경"/>
  </form>
</div>
attr()
- 속성 확인 및 변경 메서드
$(selector).attr(attribute)- get:
$("a").attr("href"); - set:
$("a").attr("href","http://naver.com);
- get:
$(selector).attr({attribute: value, attribute: value})- ``$("#img1").attr({"src":"sam.jpg", "width":"10px"});
$(selector).attr(attribute, function(index, currentvalue))- 기존값을 새로 셋팅할때
$("#img1").attr("width", function (idx, orgVal) { return orgVal - 50;});- 이미지 실제width를 몰라도 셋팅가능
- 이미지 여러개를 50씩 줄일수도 있음
예제: 201006Ex01
attr() 버튼 누르면 src의 링크를 가져와서 title에 추가
js
$(document).ready(function() {
  for(var i = i; i < 6; i++){
    var img = $("img:nth-child("+i+")");
    var imgSrc = img.attr("src");
    var imgSrcArr = imgSrc.split("/");
    img.attr("title",imgSrcArr[imgSrcArr.length-1]);
  }
});
html
<div class="container">
  <img src="../../images/가위_우.png" title="" alt="가우" />
  <img src="../../images/바위_우.png" title="" alt="바우" />
  <img src="../../images/보_우.png"  title="" alt="보우" />
  <img src="../../images/가위_좌.png" title="" alt="가좌" />
  <img src="../../images/바위_좌.png" title="" alt="바좌" />
  <br><br>
  <button id="ex2bt">눌러보셈요</button>
</div>
prop()
- 속성 확인 및 변경 메서드
$(selector).prop(property)- get:
$("#chk1").prop("checked"); - set:
$("#chk1").prop("checked", true);
- get:
$(selector).prop({property: value, property: value})$("#chk1").prop({"checked": true, "disabled": true});
$(selector).prop(property, function(index, currentValue))- ``$("#img1").prop("width",function(idx, orgVal) { return orgVal - 50; });
$(selector).removePorp(property)- prop()으로 설정한 속성 제거시 사용
예제: 201007Ex02


js
// 1. '전체선택' 클릭 시: 우측 1~3번 체크 박스 선택
$("#chksAll").click(function() {
  //전체선택
  if($(this).prop("checked")){
    $(":checkbox","#fm2").not(":checked").each(function() {
      $(this).prop("checked", true);
    });
  //전체선택 해제
  }else {
    $(":checkbox","#fm2").each(function() {
      $(this).prop("checked", false);
    });
  }
});

// 2. 1~3의 모든 체크박스 전부 선택되었을때 '전체선택' 체크
//	  1~3의 체크박스 중 하나라도 선택이 되지 않았을 때 '전체선택' 해제
$("[name='chksSub']","#fm2").click(function() {
  // '전체선택' 제외한 체크박스의 갯수
  var lengthAll = $("[name='chksSub']","#fm2").length;
  // '전체선택' 제외한 "체크된" 체크박스의 갯수
  var lengthChk = $("[name='chksSub']:checked","#fm2").length;

  if (lengthAll == lengthChk) { // 전체가 체크되어있으니
    $("#chksAll").prop("checked",true); // 전체 체크박스를 true로
  } else {								// 하나라도 체크가 안됨 = 전체선택이 아님
    $("#chksAll").prop("checked",false);// 전체 체크박스를 false로
  }
});
html
<form action="" id="fm2">
  체크박스(전체/해제) :
  <br>
  <input type="checkbox" id="chksAll"/>전체선택
  <input type="checkbox" name="chksSub" id="chks1" value="하나"/><label for="chks1">1</label>
  <input type="checkbox" name="chksSub" id="chks2" value="둘"/><label for="chks2">2</label>
  <input type="checkbox" name="chksSub" id="chks3" value="셋"/><label for="chks3">3</label>
</form>
attr() vs. prop()
- attr()와의 비교
- attr() vs. prop()
- 공통점
- 선택한 요소의 속성 및 값을 설정 or 반환
- get: 선택된 요소가 여러개라면 첫번째 요소만
- set: 여러개라면 모든 요소에
- 차이점
- attr(): 요소의 속성이나 정보 컨트롤 (id, class, src, style, width등)
- prop(): 요소가 가지는 실제적인 상태(checked, selected, disabled, readonly, multiple...) true/false로 get하고 set
기타참고: disabled readonly selected checked..
- readonly: 수정불가 / 서버전송 가능
- disabled: 수정불가 / 서버전송 불가
- selected
- checked
요소 추가 메소드
자식 요소 (하위 레벨)로 추가하는 메서드
$(selector).append(content)- 선택한 요소의 내부의 마지막 위치에 content를 추가
$(content).appendTo(selector)- append와 동일: content를 selector 내부의 마지막 위치에 추가
- content가 이미 본문에 존재하는 경우: 기존의 위치에서는 삭제되고 추가됨 이동효과
$(selector).prepend(content)- append와 동일. 단, 내부의 처음 위치에 추가
$(content).prependTo(selector)- appendTo와 동일. content가 본문에 이미 존재하면, 기존 위치에서 삭제되고 추가됨
형제 요소 (같은 레벨)로 추가하는 메서드
$(selector).after(content)- 선택한 요소 뒤에 content를 형제 레벨로 추가
$(content).insertAfter(selector)- appendTo같은 느낌
$(selector).before(content)$(content).insertBefore(selector)
예제: 201006Ex03
js
$(document).ready(function() {
  var imgRootPath = "../../images/";
  $("p").click(function() { // 이벤트 바인딩
    // 1. img 객체 생성
    var img = $("<img>");

    // 2. img 속성 추가
    img.attr("src",imgRootPath+$(this).attr("title")+".jpg");

    // 1,2
    /*
	var img = $("<img>", {
		"src" : imgRoothPath+$(this).attr("title"),
		"height" : "100px",
		"width" : "100px"
	});
	*/

    // 3. p에 img 객체 추가
    $(this).append(img);
  });
});
html
<head>
  <style>
    p { /* p의 전체 영역아닌 글자 클릭시에만 이미지뜨게하려고 */
      display: inline;
    }

    li {
      margin: 10px 0px;
    }
  </style>
</head>
<body>
  <ul>
    <li>
      <!-- 타이틀명을 이미지 파일명으로 설정 -->
      <p title="Tulips">튤립</p>
    </li>
    <li>
      <p title="Chrysanthemum">국화</p>
    </li>
    <li>
      <p title="Koala">코알라</p>
    </li>
    <li>
      <p title="Hydrangeas">수국</p>
    </li>
  </ul>
</body>
요소 삭제 및 복사 메서드
삭제 메서드
$(selector).empty()- selector의 자식요소를 삭제
$(selector).remove()- selector 및 selector의 자식요소를 삭제
$(selector).remove(selector1)- selector 중에서 selector1에 해당하는 애만 삭제
$("p").remove(".test")<p>가나다라</p><p class="test">마바사</p>-> 이것만 삭제
- selector 중에서 selector1에 해당하는 애만 삭제
복사 메서드
$(selector).clone()- 선택된 요소를 복사
$(selector).clone(true|false)- default: false
- true이면 이벤트 처리기까지 복사
스타일시트(css)관련 메서드
css()
- 하나 이상의 스타일 속성을 확인하거나 변경
- get:
$(selector).css("property") - set:
$(selector).css("property", "value") $(selector).css({"property": "value", "property": "value"})$(selector).css(property, function(index,currentvalue))
class 관련 메서드
- addClass(class)
- 선택된 요소에 class를 추가
- 중복된 소스를 줄일 수 있음
- hasCalss(class)
- 선택된 요소에 지정된 클래스가 있는지 확인
- 있으면 true 반환
- removeClass(class)
- 선택한 요소에서 지정된 클래스를 삭제
- toggleClass(class)
- 선택한 요소에 클래스 이름을 추가하거나 삭제함
치수 관련 메서드
width() / height()
- only selected element
innerWidth() / innerHeight()
- includes padding
outerWidth() / outerHeight()
- includes padding, border
outerWidth(true) / outerHeight(true)
- includes padding, border and even margin
갈 길이 멀다