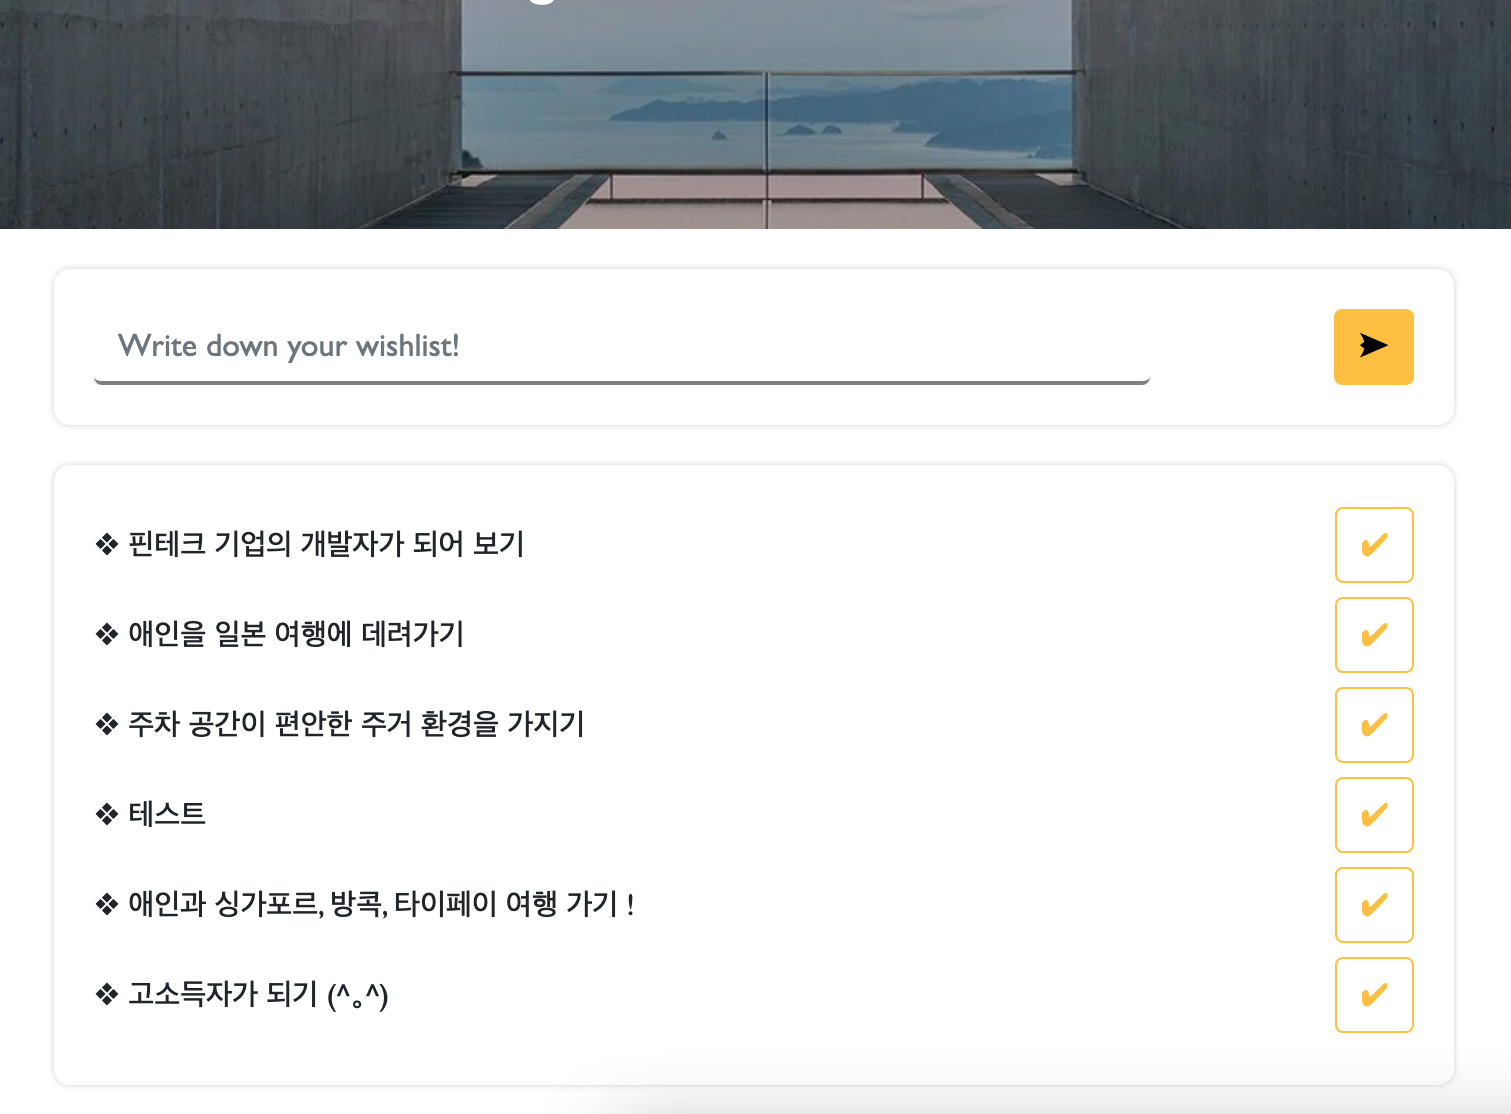
Boarding Test로 버킷 리스트의 특정 기능을 구현하는 과제를 하게 되었다.
이미 존재하는 코드 템플릿에 추가되어야 하는 기능은 아래와 같다.
- 유저가 소원을 직접 등록할 수 있어야 한다. 브라우져에서 받은 자료를 DB로 받아, fetch를
통해 html에 렌더 되고, 그게 실제 브라우져에도 보여야 한다. - 이미 등록된 유저의 버킷 리스트에 Done 버튼을 만들고, 그 버튼이 클릭되면 동시에 사라져야 한다.
- 버튼이 사라짐과 동시에 유저가 클릭한 해당 문자열에는 소원이 성취되었다는 html 변화가 적용되어야 한다.
- 다른 버킷 리스트 문자열과 서로 충돌이 있거나 혼란이 있어서는 안 된다.
그리고 내가 구현한 코드는 아래와 같다.
<!DOCTYPE html>
<html lang="en">
  <head>
    <meta charset="UTF-8" />
    <meta http-equiv="X-UA-Compatible" content="IE=edge" />
    <meta name="viewport" content="width=device-width, initial-scale=1.0" />

    <link
      href="https://cdn.jsdelivr.net/npm/bootstrap@5.0.2/dist/css/bootstrap.min.css"
      rel="stylesheet"
      integrity="sha384-EVSTQN3/azprG1Anm3QDgpJLIm9Nao0Yz1ztcQTwFspd3yD65VohhpuuCOmLASjC"
      crossorigin="anonymous"
    />
    <script src="https://ajax.googleapis.com/ajax/libs/jquery/3.5.1/jquery.min.js"></script>
    <script
      src="https://cdn.jsdelivr.net/npm/bootstrap@5.0.2/dist/js/bootstrap.bundle.min.js"
      integrity="sha384-MrcW6ZMFYlzcLA8Nl+NtUVF0sA7MsXsP1UyJoMp4YLEuNSfAP+JcXn/tWtIaxVXM"
      crossorigin="anonymous"
    ></script>

    <link
      href="https://fonts.googleapis.com/css2?family=Gowun+Dodum&display=swap"
      rel="stylesheet"
    />

    <title>:: Bucket List ::</title>

    <style>
      * {
        font-family: "Gill Sans", "Gill Sans MT", Calibri, "Trebuchet MS",
          sans-serif;
      }
      .mypic {
        width: 100%;
        height: 250px;

        background-image: linear-gradient(
            0deg,
            rgba(0, 0, 0, 0.2),
            rgba(0, 0, 0, 0.2)
          ),
          url("https://wallpapercave.com/dwp2x/wp12070996.jpg");
        background-position: center;
        background-size: cover;

        color: white;

        display: flex;
        flex-direction: column;
        align-items: center;
        justify-content: center;
      }
      .mypic > h1 {
        font-size: 30px;
      }
      .mybox {
        width: 95%;
        max-width: 700px;
        padding: 20px;
        border-radius: 8px;
        box-shadow: 0px 0px 3px 0px lightgray;
        margin: 20px auto;
      }
      .mybucket {
        display: flex;
        flex-direction: row;
        align-items: center;
        justify-content: space-between;
      }

      .mybucket > input {
        width: 80%;
        border: none;
        border-bottom: 2px solid gray;
        border-radius: ;
      }
      .mybox > li {
        display: flex;
        flex-direction: row;
        align-items: center;
        justify-content: center;

        margin-bottom: 5px;
        min-height: 40px;
      }
      .mybox > li > h2 {
        max-width: 75%;
        font-size: 15px;
        font-weight: 500;
        margin-right: auto;
        margin-bottom: 0px;
      }
      .mybox > li > h2.done {
        text-decoration: line-through;
      }
      #bucket-list button.btn-outline-danger {
        display: none;
      }
      .btn.disabled {
        opacity: 0.1; /* 투명도로 비활성화 표시 */
        pointer-events: none; /* 클릭 비활성화 */
      }
    </style>
    <script>
      $(document).ready(function () {
        show_bucket();
        // html이 완성되면 show_bucket() 을 적용. 이 경우 이 함수는 POST된 자료를
        // html로 fetch 해준 결과물이다.
      });

      function remove_button(button_id) {
        let li = $("#" + button_id).find(`[data-button-id="${button_id}"]`);
        li.remove();
      }
      // li 변수를 선언하여, 클릭하면 사라지게 되는 버튼을 능동적으로 찾을 수 있도록 하는 코드.

      function done_bucket(button_id) {
        let li = $("#bucket-list").find(`[data-button-id="${button_id}"]`);
        let bucketText = li.find("h2").text().replace("❖", "").trim();
        li.find("h2").html(`${bucketText} ✔︎ 완료`);
        // 사용자가 종결시킨 위시리스트에서 li 변수를 검색한다. 종결시킨 인덱스와, 결부된 버튼을
        // 확실히 찾기 위해서 이런 로직이 짜여지고 있다.
        // closest(), replace(), trim() 메소드에 대한 공부 필요.

        let doneButton = li.find(`[data-button-id="${button_id}"]`);
        doneButton.addClass("disabled");
        doneButton.prop("disabled", true);
        // doneButton 변수가 완료된 버튼이 가진 식별자를 즉석 검색하는 코드. 그리고
        // addClass()와 prop()을 통해, 확인된 그 식별자의 버튼에 disabled 클래스를
        // 부여하고, 차열에서 true를 적용시키고 있는 부분이다. prop()에 대해서도 공부하자.
      }
      function show_bucket() {
        fetch("/bucket")
          // @app.route POST 단을 fetch하여 작업할 준비
          .then((res) => res.json())
          .then((data) => {
            let rows = data["result"];
            // DB에 있는 나열 데이터를 rows로 선언
            $("#bucket-list").empty();
            rows.forEach((a) => {
              let bucket = a["bucket"];
              let button_id = a["button"];
              let bucket_id = a["id"];
              // forEach로 반복하여 .append 할 예정. 서버 POST 단에 있는 doc
              // doc 변수 bucket은 결국 유저가 기입한 자료를 가지고 있는 서버의 data다.

              var temp_html = `
                <li id="${bucket_id}" data-button-id="${button_id}">
                  <h2>❖ ${bucket}</h2>
                  <button data-button-id="${button_id}"token interpolation">${button_id}')" type="button" class="btn btn-outline-warning">✔︎</button>
                  <button id="remove-${button_id}"token interpolation">${button_id}')" type="button" class="btn btn-outline-danger">Remove</button>
                </li>
              `;
              $("#bucket-list").append(temp_html);
            });
          });
      }
      function save_bucket() {
        let bucket = $("#bucket").val();
        // JQuery로 자료들을 GET해서 서버에 담아준다.
        let formData = new FormData();
        formData.append("bucket_give", bucket);
        // 이 지점에서 POST의 doc로 자료를 보내주는 것임.

        fetch("/bucket", { method: "POST", body: formData })
          .then((response) => response.json())
          .then((data) => {
            alert(data["msg"]);
            window.location.reload();
          });
      }
    </script>
  </head>
  <body>
    <div class="mypic">
      <h1>Hang-Hae 99 ⟫ Bucket List</h1>
    </div>
    <div class="mybox">
      <div class="mybucket">
        <input
          id="bucket"
          class="form-control"
          type="text"
          placeholder="Write down your wishlist!"
        />
        <button onclick="save_bucket()" type="button" class="btn btn-warning">
          ➤
        </button>
      </div>
    </div>
    <div class="mybox" id="bucket-list">
      <li></li>
    </div>
  </body>
</html>
from flask import Flask, render_template, request, jsonify
app = Flask(__name__)
# 가상환경 단. python -> Flask

from pymongo import MongoClient
import certifi
import requests
import uuid
from bs4 import BeautifulSoup
# 서버 단. python -> Mongo DB

ca = certifi.where()
url = 'mongodb+srv://sparta:test@cluster0.fuzltx4.mongodb.net/?retryWrites=true&w=majority'
client = MongoClient(url, tlsCAFile=ca)
db = client.dbsparta

@app.route('/')
def home():
    return render_template('index.html')
# @app.route() : 서버 측면에서 웹과 상호작용하는 부분을 호출해주는 기능.
# ('/')는 현재 메인 페이지의 구축을 index.html에서 데려오고 있음을 설정.

@app.route("/bucket", methods=["POST"])
def bucket_post():
    bucket_receive = request.form['bucket_give']
    bucket_id = str(uuid.uuid4())
    button_id = str(uuid.uuid4())
    # uuid는 고유한 식별자를 생성하기 위해 사용되는 모듈이다. 대상의 id값이 새로 생성
    # 되는 등, 미리 지정해 코딩할 수 없는 상황에 사용되는 기능.
    doc ={
        'id': bucket_id,
        'bucket': bucket_receive,
        'button': button_id

    }
    db.bucket.insert_one(doc)
    return jsonify({'msg': '저장 완료!'})
# POST 메소드는 templates html의 /post와 연동되어, http단에 보이는 요소에 관여합니다.
# 유저가 위시리스트를 기록 -> http로 받음 -> 서버가 POST로 수신 -> /post로 html에 적용
# 결과적으로, 유저가 적은 위시리스트가 서버 단을 지나서 다시 UI에 수정됩니다.

@app.route("/bucket", methods=["GET"])
def bucket_get():
    all_buckets = list(db.bucket.find({},{'_id':False}))
    return jsonify({'result': all_buckets})
# GET은 서버 단에서, 주로 변경이 적은 요소에 관여하기 위해 작동합니다. 예제의 경우, 유저에 의해
# 추가될 수 있는 위시리스트 단은 POST가 관리하지만, 웹페이지 자체에는 http 단에서 수정할 사항
# 이 없기 때문에, 순수하게 웹페이지를 호출하기 위해 작동하고 있습니다.

if __name__ == '__main__':
    app.run('0.0.0.0', port=5000, debug=True)
그리고 차후 복습을 위해, 이번 테스트를 통과하며 처음 사용해보게 된 메소드들을 참조하려 한다.
closest()
replace()
trim()
addClass()
prop()
Frontend Engineer