1. 객체의 참조
1-1. 참조변수의 대입과 형 변환
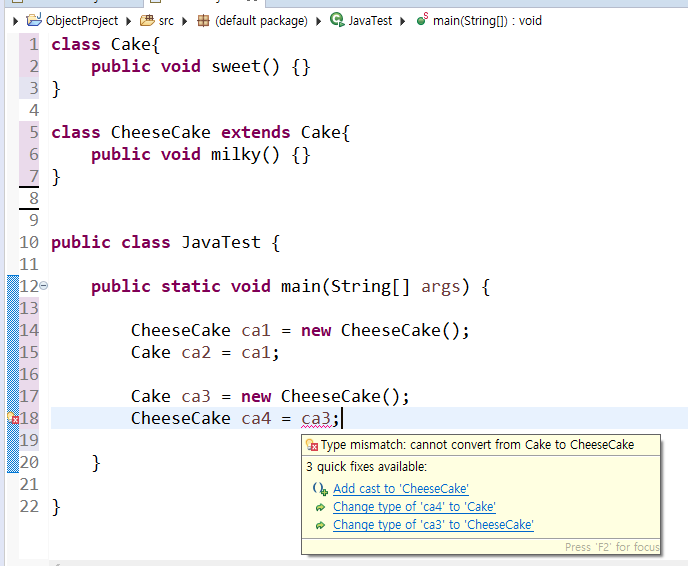
- 부모는 자식을 참조할 수 있지만, 자식은 부모를 참조할 수 없다.
- 이런 경우에는 자식으로 형 변환을 해주면 에러가 뜨지 않는다.
class Cake{
	public void sweet() {}
}

class CheeseCake extends Cake{
	public void milky() {}
}


public class JavaTest {

	public static void main(String[] args) {

		CheeseCake ca1 = new CheeseCake();
		Cake ca2 = ca1;

		Cake ca3 = new CheeseCake();
		CheeseCake ca4 = (CheeseCake)ca3;

	}

}
1-2. 배열로 만든 상속 객체
- 다형성을 적용한 객체를 배열로도 표현 가능하다.
class Cake{
	public void sweet() {}
}

class CheeseCake extends Cake{
	public void milky() {}
}


public class JavaTest {

	public static void main(String[] args) {

		Cake cake = new CheeseCake();
		CheeseCake[] cakes = new CheeseCake[10];
		Cake[] cakes2 = new CheeseCake[10];
	}

}
2. 함수의 오버라이딩
2-1. 상속 관계에서 부모 클래스와 자식 클래스 안에 동일한 함수(메소드)가 있을 때
class Cake{
	public void yummy() {
		System.out.println("Yummy Cake");
	}
}

class CheeseCake extends Cake{
	public void yummy() {
		System.out.println("Yummy Cheese Cake");
	}
}


public class JavaTest {

	public static void main(String[] args) {

		Cake cake1 = new CheeseCake();
		CheeseCake cake2 = new CheeseCake();

		cake1.yummy();
		cake2.yummy();
	}

}
[Console]
Yummy Cheese Cake
Yummy Cheese Cake
- 부모의 함수가 자식의 함수에 먹혀버렸다...!
- 오버라이딩이 된 함수를 호출하면 자식의 함수(의 주소)가 부모의 함수(의 주소)를 덮어쓰게 된다.
- 오버라이딩의 조건 : 부모-자식의 상속 관계 + 데이터 타입, 이름, 파라미터가 같은 함수 + 함수가 갖고 있는 내용은 다르다.
2-2. super()의 사용
- 자식의 함수 안에 super함수를 넣으면 부모의 함수를 호출할 수 있게 된다!
(public void yummy() 안에 super.yummy();를 넣는다.)
class Cake{
	public void yummy() {
		System.out.println("Yummy Cake");
	}
}

class CheeseCake extends Cake{
	public void yummy() {
		super.yummy();
		System.out.println("Yummy Cheese Cake");
	}
}

class StrawberryCheeseCake extends CheeseCake{
	public void yummy() {
		super.yummy();
		System.out.println("Yummy Strawberry Cheese Cake");
	}
}


public class JavaTest {

	public static void main(String[] args) {

		Cake cake1 = new StrawberryCheeseCake();
		CheeseCake cake2 = new StrawberryCheeseCake();
		StrawberryCheeseCake cake3 = new StrawberryCheeseCake();

		cake1.yummy();
		cake2.yummy();
		cake3.yummy();
	}

}
2-3. 오버로딩과 오버라이딩의 차이
- 오버로딩_Overloading : 같은 클래스 안에서 같은 이름의 함수를 다른 데이터 타입, 다른 매개변수의 모양으로 여러 개 만들 수 있다.
- 오버라이딩_Overriding : 부모와 자식 간의 상속이 이루어지고 있는 클래스 안에 같은 형태의 함수(내용물이 다름)가 있어서, 자식의 함수가 부모의 함수를 덮어쓰는 것이다.
3. 오버라이딩 예제 : 도형
- 부모 : Shape 클래스
- 자식 : Circle 클래스, Rectangle 클래스
3-1. 객체로만 만들었을 때
class Circle {
	private double radius;

	public Circle(double radius) {
		this.radius = radius;
	}

	public double getArea() {
		return radius * radius * Math.PI;
	}
}

class Rectangle {
	private double x, y;

	public Rectangle(double x, double y) {
		this.x = x;
		this.y = y;
	}

	public double getArea() {
		return x * y;
	}
}

public class JavaTest {

	public static void main(String[] args) {
		// 일반 객체 생성
		Circle circle = new Circle(10);
		System.out.println(circle.getArea());

		Rectangle rec = new Rectangle(10,20);
		System.out.println(rec.getArea());

		// circle 면적 + rec 면적
		double areas = circle.getArea() + rec.getArea();
		System.out.println("총 면적의 합 : " + areas);
        }
 }
[Console]
314.1592653589793
200.0
총 면적의 합 : 514.1592653589794
3-2. 상속을 적용했을 때
- Shape 데이터 타입으로 Circle 객체, Rectangle 객체, Triangle 객체 만들기
- Shape[]로 Circle, Rectangle, Triangle 초기화
- for문을 이용해서 shape.getArea() 더하기
- main()과 같은 클래스 안에 static 적용한 함수 만들기
class Shape { // 부모 클래스
	public double getArea() {
		return 0;
	}
}

class Circle extends Shape { // Shape로부터 상속받은 자식 클래스 1
	private double radius;

	public Circle(double radius) {
		this.radius = radius;
	}

	@Override
	public double getArea() {
		return radius * radius * Math.PI;
	}
}

class Rectangle extends Shape { // Shape로부터 상속받은 자식 클래스 2
	private double x, y;

	public Rectangle(double x, double y) {
		this.x = x;
		this.y = y;
	}

	@Override
	public double getArea() {
		return x * y;
	}
}

class Triangle extends Shape { // Shape로부터 상속받은 자식 클래스 3
	private double x, y;

	public Triangle(double x, double y) {
		this.x = x;
		this.y = y;
	}

	@Override
	public double getArea() {
		return x * y / 2;
	}
}

public class JavaTest {

	public static void main(String[] args) {

		Shape[] shapeArr = { new Circle(10), new Rectangle(10, 20), new Triangle(10, 20) };

	//	Shape circleShape = new Circle(10);
    //	Shape recShape = new Rectangle(10, 20);
    //	Shape triShape = new Triangle(10, 20);

		double sum = 0;
		for (Shape shape : shapeArr) {
			sum += shape.getArea();
		}
		System.out.println("총 면적은 " + sum);
shapeAllArea(shapeArr);

	}

	static void shapeAllArea(Shape[] shapeArr) {
		double sum = 0;
		for(Shape shape : shapeArr) {
			sum += shape.getArea();
		}

		System.out.println("총 면적은 : " + sum);

	}
}
[Console]
총 면적은 614.1592653589794 (main 함수에 print로 출력)
총 면적은 : 614.1592653589794 (shapeAllArea()로 출력)
4. 오버라이딩 예제 : 과일
class Fruit {
	void print() {
		System.out.println("나는 과일이다");
	}
}

class Grape extends Fruit {
	@Override
	void print() {
		System.out.println("나는 포도이다");
	}
}

class Apple extends Fruit {
	@Override
	void print() {
		System.out.println("나는 사과이다");
	}
}

class Pear extends Fruit {
	@Override
	void print() {
		System.out.println("나는 배이다");
	}
}

class JavaPractice {

	public static void main(String[] args) {
		Fruit fAry[] = { new Grape(), new Apple(), new Pear() };
		for (Fruit f : fAry) {
			f.print();
		}

	}
}
[Console]
나는 포도이다
나는 사과이다
나는 배이다
5. 4x4 크기의 2차원 배열 출력하기
5-1. 16개의 정수 배열로 출력하기
class JavaPractice {

	public static void main(String[] args) {
		int[] randomArr = new int[16];

		for (int i = 0; i < randomArr.length; i++) {
			randomArr[i] = (int) (Math.random() * 10 + 1);

			System.out.print(randomArr[i] + "\t");
			if ((i % 4) == 3) {
				System.out.println();
			}
		}

	}
}
5-2. 2차원 배열로 출력하기
class JavaPractice {

	public static void main(String[] args) {
		final int ROW = 4;
		final int COLUMN = 4;
		int[][] randomArr = new int[ROW][COLUMN];

		for (int i = 0; i < ROW; i++) {
			for (int j = 0; j < COLUMN; j++) {
				randomArr[i][j] = (int) (Math.random() * 10 + 1);
				System.out.print(randomArr[i][j] + "\t");
			}
			System.out.println();
		}

	}
}
5-3. 클래스로 분리한 코드
class RandomGenerator {
	private int num;

	public int getNumber() {
		num = (int) (Math.random() * 10 + 1);
		return num;
	}

	public void show() {
		System.out.println(num);
	}
}

class Array extends RandomGenerator {
	private int row;
	private int column;

	public Array(int row, int column) {
		this.row = row;
		this.column = column;
	}

	public int getArrLength() {
		return row * column;
	}

	@Override
	public void show() {
		int[][] array = new int[row][column];

		for (int i = 0; i < array.length; i++) {
			for (int j = 0; j < array[i].length; j++) {
				array[i][j] = super.getNumber();
				System.out.print(array[i][j] + "\t");
			}
			System.out.println();
		}
	}

}

class JavaPractice {

	public static void main(String[] args) {

		Array arr = new Array(4, 4);
		arr.show();

	}
}

velog, GitHub, Notion 등에 작업물을 정리하고 있습니다.