2주차 배운것
JQuery, Ajax
JQuery
- HTML의 요소들을 조작하는, 편리한 Javascript를 미리 작성해둔 것. 라이브러리!
jQuery + Javascript 이용하기
<!doctype html>
<html lang="ko">
<head>
<meta charset="UTF-8">
<title>jQuery 연습하고 가기!</title>
<!-- JQuery를 import 합니다 -->
<script src="https://ajax.googleapis.com/ajax/libs/jquery/3.4.1/jquery.min.js"></script>
<style type="text/css">
div.question-box {
margin: 10px 0 20px 0;
}
</style>
<script>
function q1() {
// 1. input-q1의 입력값을 가져온다. $('# .... ').val() 이렇게!
let value1 = $('#input-q1').val()
// 2. 만약 입력값이 빈칸이면 if(입력값=='')
if(value1 == ''){
// 3. alert('입력하세요!') 띄우기
alert('입력하세요!')
} else{
// 4. alert(입력값) 띄우기
alert(value1)
}
}
function q2() {
// 1. input-q2 값을 가져온다.
let value2 = $('#input-q2').val()
// 2. 만약 가져온 값에 @가 있으면 (includes 이용하기 - 구글링!)
if(value2.includes('@') == true){
// 3. info@gmail.com -> gmail 만 추출해서 ( .split('@') 을 이용하자!)
// 4. alert(도메인 값);으로 띄우기
alert(value2.split('@')[1].split('.')[0])
} else {
// 5. 만약 이메일이 아니면 '이메일이 아닙니다.' 라는 얼럿 띄우기
alert('이메일이 아닙니다')
}
}
function q3() {
// 1. input-q3 값을 가져온다. let txt = ... q1, q2에서 했던 걸 참고!
let value3 = $('#input-q3').val()
// 2. 가져온 값을 이용해 names-q3에 붙일 태그를 만든다. (let temp_html = `<li>${txt}</li>`) 요렇게!
let temp_html = `<li>${value3}</li>`
// 3. 만들어둔 temp_html을 names-q3에 붙인다.(jQuery의 $('...').append(temp_html)을 이용하면 굿!)
$('#names-q3').append(temp_html)
}
function q3_remove() {
// 1. names-q3의 내부 태그를 모두 비운다.(jQuery의 $('....').empty()를 이용하면 굿!)
$('#names-q3').empty()
}
</script>
</head>
<body>
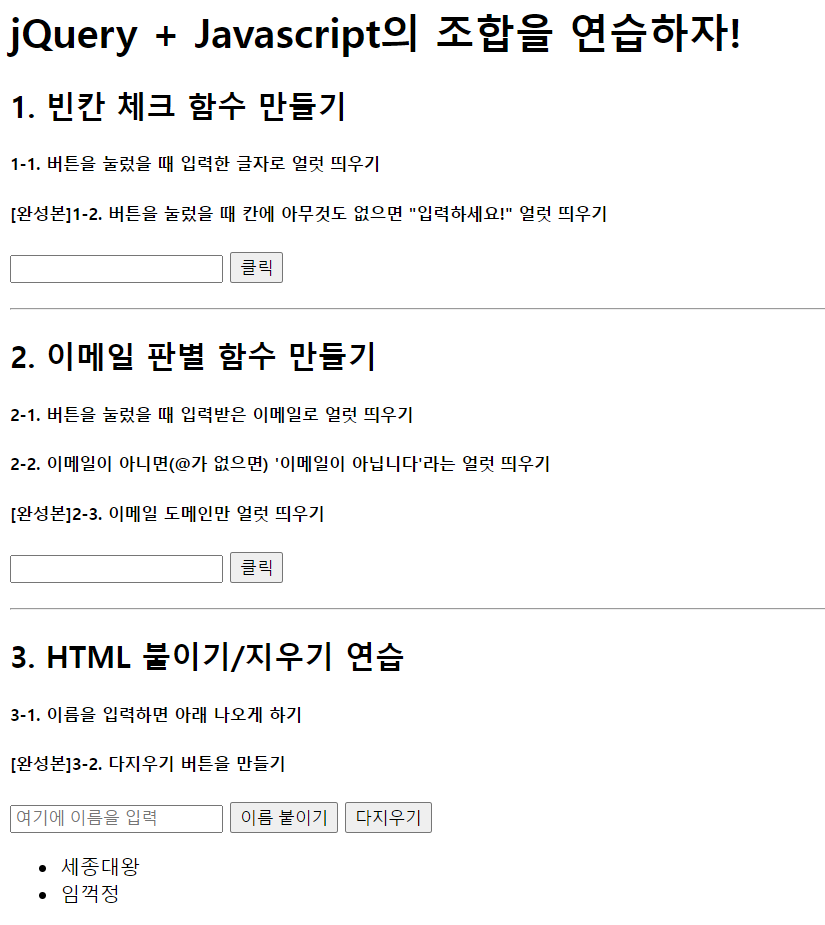
<h1>jQuery + Javascript의 조합을 연습하자!</h1>
<div class="question-box">
<h2>1. 빈칸 체크 함수 만들기</h2>
<h5>1-1. 버튼을 눌렀을 때 입력한 글자로 얼럿 띄우기</h5>
<h5>[완성본]1-2. 버튼을 눌렀을 때 칸에 아무것도 없으면 "입력하세요!" 얼럿 띄우기</h5>
<input id="input-q1" type="text" /> <button onclick="q1()">클릭</button>
</div>
<hr />
<div class="question-box">
<h2>2. 이메일 판별 함수 만들기</h2>
<h5>2-1. 버튼을 눌렀을 때 입력받은 이메일로 얼럿 띄우기</h5>
<h5>2-2. 이메일이 아니면(@가 없으면) '이메일이 아닙니다'라는 얼럿 띄우기</h5>
<h5>[완성본]2-3. 이메일 도메인만 얼럿 띄우기</h5>
<input id="input-q2" type="text" /> <button onclick="q2()">클릭</button>
</div>
<hr />
<div class="question-box">
<h2>3. HTML 붙이기/지우기 연습</h2>
<h5>3-1. 이름을 입력하면 아래 나오게 하기</h5>
<h5>[완성본]3-2. 다지우기 버튼을 만들기</h5>
<input id="input-q3" type="text" placeholder="여기에 이름을 입력" />
<button onclick="q3()">이름 붙이기</button>
<button onclick="q3_remove()">다지우기</button>
<ul id="names-q3">
<li>세종대왕</li>
<li>임꺽정</li>
</ul>
</div>
</body>
</html>Ajax
- Ajax는 jQuery를 임포트한 페이지에서만 동작 가능
jQuery + Ajax 이용하기
- 서울시 OpenAPI(실시간 따릉이 현황)을 이용하기
- 따릉이 대수가 5대 미만인 곳은 빨갛게 보여주기
<!doctype html>
<html lang="ko">
<head>
<meta charset="UTF-8">
<title>JQuery 연습하고 가기!</title>
<!-- JQuery를 import 합니다 -->
<script src="https://ajax.googleapis.com/ajax/libs/jquery/3.4.1/jquery.min.js"></script>
<style type="text/css">
div.question-box {
margin: 10px 0 20px 0;
}
table {
border: 1px solid;
border-collapse: collapse;
}
td,
th {
padding: 10px;
border: 1px solid;
}
.urgent{
color: red;
}
</style>
<script>
function q1() {
$('#names-q1').empty()
$.ajax({
type: "GET",
url: "http://spartacodingclub.shop/sparta_api/seoulbike",
data: {},
success: function (response) {
let rows = response["getStationList"]["row"]
for (let i = 0; i < rows.length; i++) {
let rack_name = rows[i]['stationName']
let rack_cnt = rows[i]['rackTotCnt']
let bike_cnt = rows[i]['parkingBikeTotCnt']
let temp_html = '';
if (bike_cnt < 5) {
temp_html = `<tr class="urgent">
<td>${rack_name}</td>
<td>${rack_cnt}</td>
<td>${bike_cnt}</td>
</tr>`
} else {
temp_html = `<tr>
<td>${rack_name}</td>
<td>${rack_cnt}</td>
<td>${bike_cnt}</td>
</tr>`
}
$('#names-q1').append(temp_html)
}
}
})
}
</script>
</head>
<body>
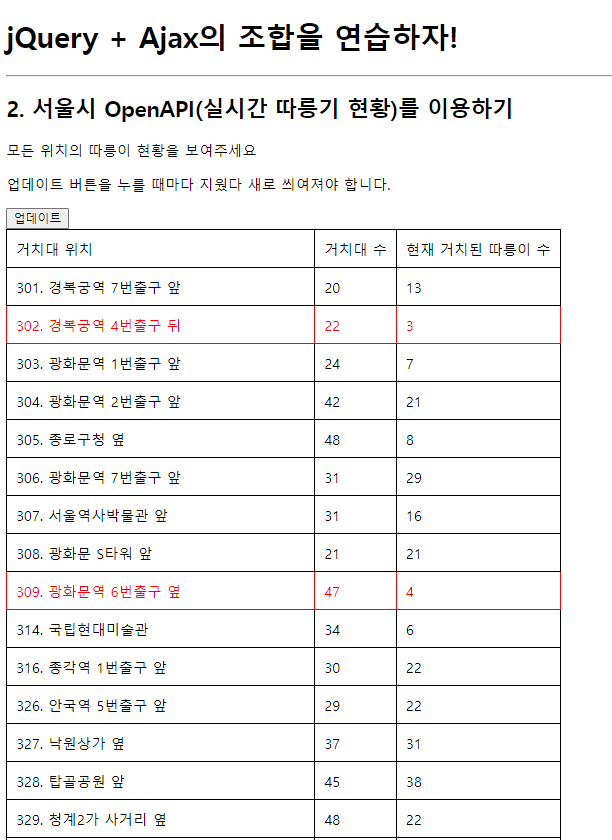
<h1>jQuery + Ajax의 조합을 연습하자!</h1>
<hr/>
<div class="question-box">
<h2>2. 서울시 OpenAPI(실시간 따릉기 현황)를 이용하기</h2>
<p>모든 위치의 따릉이 현황을 보여주세요</p>
<p>업데이트 버튼을 누를 때마다 지웠다 새로 씌여져야 합니다.</p>
<button onclick="q1()">업데이트</button>
<table>
<thead>
<tr>
<td>거치대 위치</td>
<td>거치대 수</td>
<td>현재 거치된 따릉이 수</td>
</tr>
</thead>
<tbody id="names-q1">
</tbody>
</table>
</div>
</body>
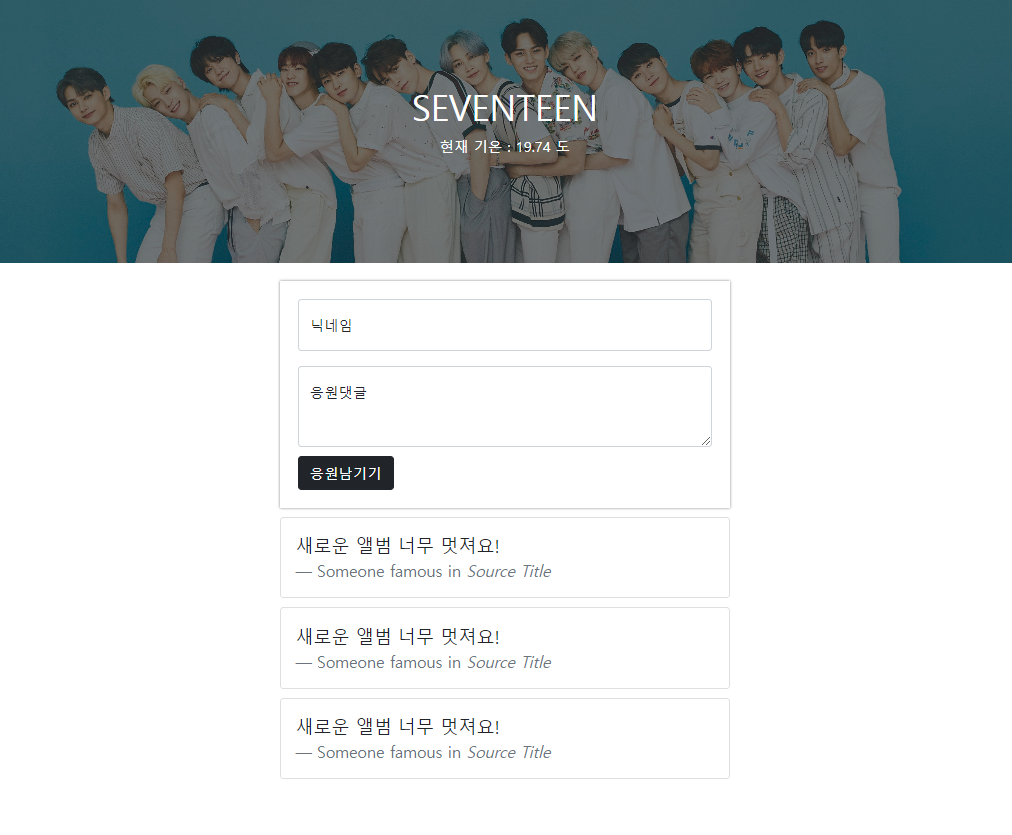
</html>2주차 숙제
1주차에 완성한 팬명록에 날씨 정보를 넣어주세요!
로딩이 완료되면,날씨API을 이용해서 날씨를 표시해주세요.
<!doctype html>
<html lang="en">
<head>
<meta charset="utf-8">
<meta name="viewport" content="width=device-width, initial-scale=1, shrink-to-fit=no">
<link href="https://cdn.jsdelivr.net/npm/bootstrap@5.0.2/dist/css/bootstrap.min.css" rel="stylesheet"
integrity="sha384-EVSTQN3/azprG1Anm3QDgpJLIm9Nao0Yz1ztcQTwFspd3yD65VohhpuuCOmLASjC" crossorigin="anonymous">
<script src="https://ajax.googleapis.com/ajax/libs/jquery/3.5.1/jquery.min.js"></script>
<script src="https://cdn.jsdelivr.net/npm/bootstrap@5.0.2/dist/js/bootstrap.bundle.min.js"
integrity="sha384-MrcW6ZMFYlzcLA8Nl+NtUVF0sA7MsXsP1UyJoMp4YLEuNSfAP+JcXn/tWtIaxVXM"
crossorigin="anonymous"></script>
<title>스파르타코딩클럽 | 부트스트랩 연습하기</title>
<style>
* {
font-family: 'Gowun Dodum', sans-serif;
}
.mytitle {
height: 300px;
width: 100%;
background-position: center;
background-image: linear-gradient(0deg, rgba(0, 0, 0, 0.5), rgba(0, 0, 0, 0.5)), url("https://stringfixer.com/files/194118326.jpg");
background-size: cover;
color: white;
display: flex;
flex-direction: column;
align-items: center;
justify-content: center;
}
.mypost {
max-width: 500px;
width: 95%;
margin: 20px auto 0px auto;
box-shadow: 0px 0px 3px 0px gray;
padding: 20px;
}
.mypost > button {
margin-top: 10px;
}
.mycard {
width: 95%;
max-width: 500px;
margin: auto;
}
.mycard > .card {
margin-top: 10px;
margin-bottom: 10px;
}
</style>
<script>
$(document).ready(function () {
$.ajax({
type: "GET",
url: "http://spartacodingclub.shop/sparta_api/weather/seoul",
data: {},
success: function (response) {
$("#temp").text(response['temp'])
}
})
});
</script>
</head>
<body>
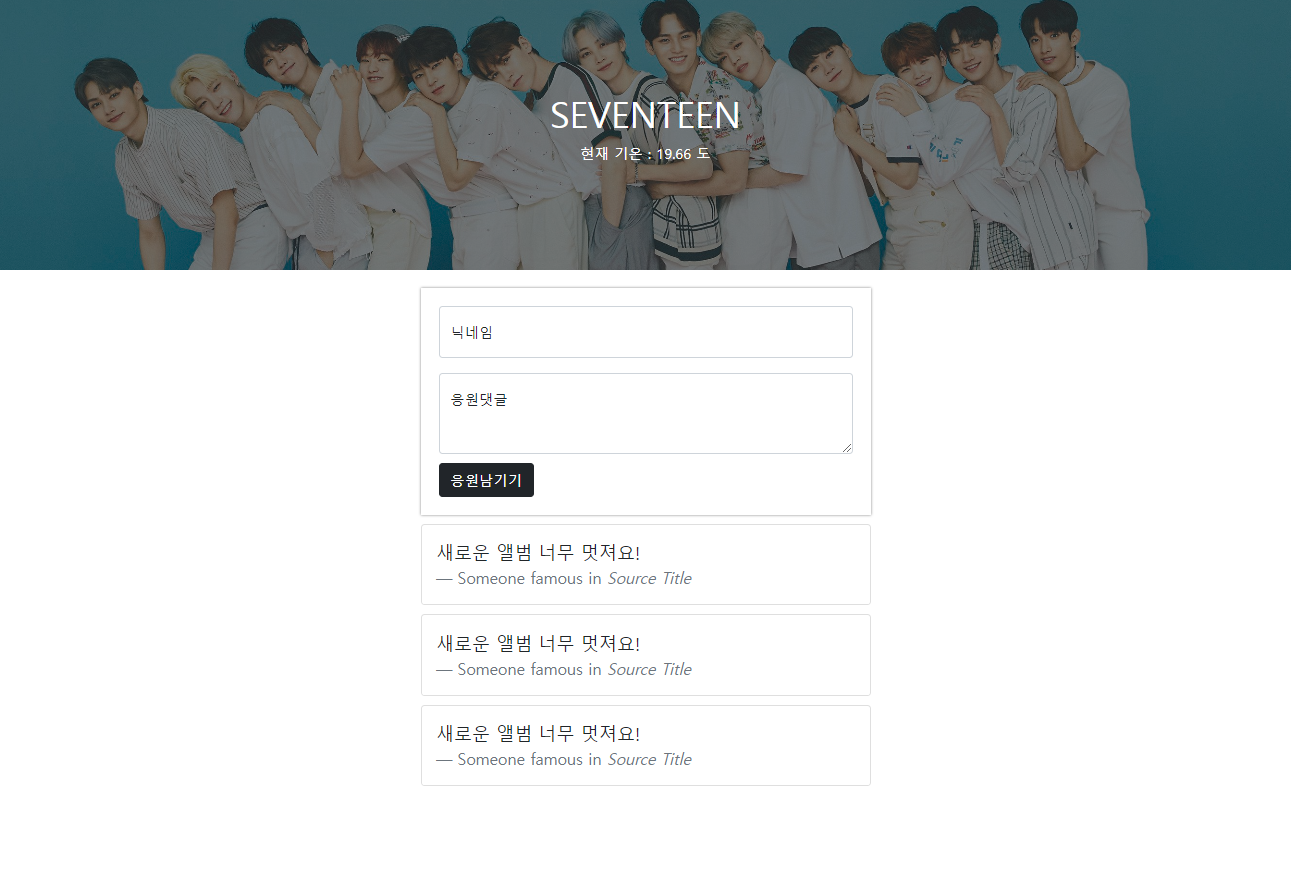
<div class="mytitle">
<h1> SEVENTEEN </h1>
<p> 현재 기온 : <span id="temp"> 00.0 </span> 도 </p>
</div>
<div class="mypost">
<div class="form-floating mb-3">
<input type="email" class="form-control" id="floatingInput" placeholder="name@example.com">
<label for="floatingInput">닉네임</label>
</div>
<div class="form-floating">
<textarea class="form-control" placeholder="Leave a comment here" id="floatingTextarea"
style="height: 90px"></textarea>
<label for="floatingTextarea">응원댓글</label>
</div>
<button type="button" class="btn btn-dark">응원남기기</button>
</div>
</div>
<div class="mycard">
<div class="card">
<div class="card-body">
<blockquote class="blockquote mb-0">
<p>새로운 앨범 너무 멋져요!</p>
<footer class="blockquote-footer">Someone famous in <cite title="Source Title">Source Title</cite>
</footer>
</blockquote>
</div>
</div>
<div class="card">
<div class="card-body">
<blockquote class="blockquote mb-0">
<p>새로운 앨범 너무 멋져요!</p>
<footer class="blockquote-footer">Someone famous in <cite title="Source Title">Source Title</cite>
</footer>
</blockquote>
</div>
</div>
<div class="card">
<div class="card-body">
<blockquote class="blockquote mb-0">
<p>새로운 앨범 너무 멋져요!</p>
<footer class="blockquote-footer">Someone famous in <cite title="Source Title">Source Title</cite>
</footer>
</blockquote>
</div>
</div>
</div>
</body>
</html>
2주차 회고
정보처리기사 공부할 때 글로만 봤던 jQuery와 Ajax를 실제로 이용해 보니 이해가 바로 되었다. 이런 걸 보고 백문이 불여일견이라고,,, 점점 더 재밌어지기 시작했다. 한번 듣고 실습해 본 거라 완벽하지는 않지만 계속해서 찾아보고 사용해 보면서 익숙해져야겠다!

🐶🦶📏