4주차 숙제 리뷰
1. 퀴즈 리뷰
- 하나의 dag는 다수의 x로 구성된다 - task
- 매일동작하는 dag start_date가 2021-02-05일 때 첫 실행날짜느? 2021-02-06. start_date는 가져와야하는 데이터의 날짜를 의미함
- 이 때 execution_date로 들어오는 날짜는? 2021-02-05
- "30 * * * *"일 때 dag의 올바른 설명은? 매일 30분마다 한번씩 실행된다
- "0 * * * *"로 설정된 dag이 start_date가 "2021-02-04 00:00:00"일 때 이 dag의 첫 번째 실행 날짜와 시간은? 매시간 도는 dag이고, 2021-02-04 01:00:00
- catchup : start_date와 현재 날짜 사이에 실행이 안 된 run이 있을 경우 이를 실행한다. 이는 catchup이라는 파라미터에 결졍된다. 기본 True이고, false이면 과거 실행이 안 된 run을 무시한다.
2.
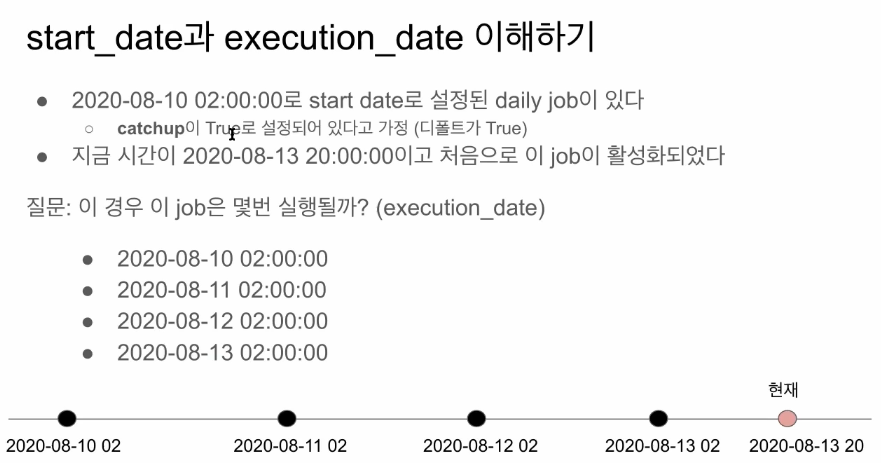
- 2020-08-10 02:00:00로 start date로 설정된 daily job이 있다
- catchup이 True로 설정되어 있다고 가정 (디폴트가 True)
- 지금 시간이 2020-08-13 20:00:00이고 처음으로 이 job이 활성화되었다
- 질문: 이 경우 이 job은 몇번 실행될까? (execution_date) → 3번??? 왜?
- 2020-08-10 02:00:00
- 2020-08-11 02:00:00
- 2020-08-12 02:00:00
- 2020-08-13 02:00:00
- “주기”를 아는 것이 중요
- start_date에서 “주기”만큼 더한 시간이 첫 번째 execution_date가 되는 것임
- 예를 들어, daily job 이다 = “start date에서 하루 지난 시점을 execution_date로 삼겠다”는 의미
- 따라서 위의 문제에서는 daily job이므로 “주기”가 “하루”라는 의미이고, 현재 8월 13일 8시 일 때 지금까지 이 dag는 11일 02시, 12일 02시, 13일 02시 까지 총 3번 실행되었을 것임
- start_date는 가져올 데이터의 날짜
3. 코드 리뷰
-
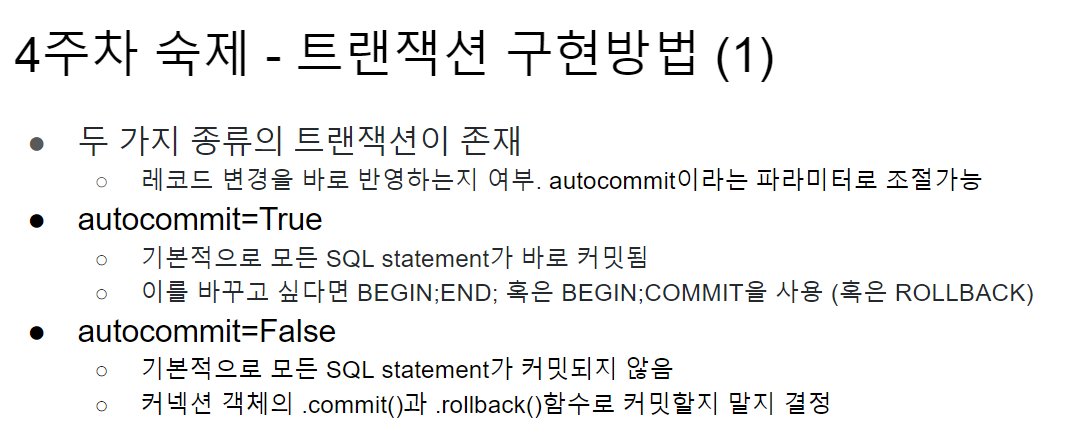
autocommit 의미
- true해서 바로 반영해서 변화시킬거냐, false일 때는 임시테이블에 저장되므로 반영되지 않음.
-
부분적으로 성공하는 것이 없도록 하는 것이 포인트!
-
autocommit이 true일 경우
- begin과 end로 트랜잭션 만들어서 처리. begin과 end사이에 에러가 발생하면 다시 원래대로 돌아감.
- true인데 트랜잭션 안 쓰면, 바로바로 반영되니까 주의해야함
-
delete from vs truncate
- 기능은 유사함. 테이블의 레코드를 날린다.
- 차이점 truncate : 모든 레코드 삭제, delete from : where사용해서 조건별로 삭제
- delete from 으로 안전하게 가자
- 다만 truncate는 트랜잭션 안에서 사용해도 바로 그 테이블의 레코드를 전체 삭제해버림!
-
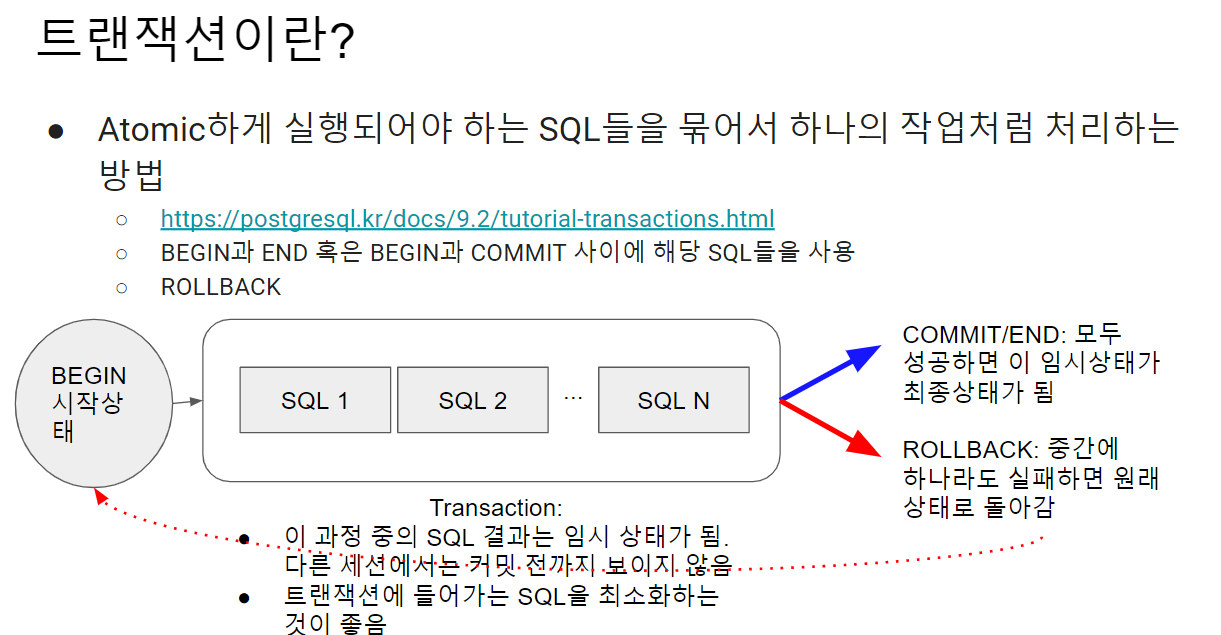
트랜잭션이란?
-
트랜잭션은 다수의 sql을 묶어서 하나처럼 사용하는 것임
-
rollback 안 해도 마치 rollback한 것 같은 효과
-
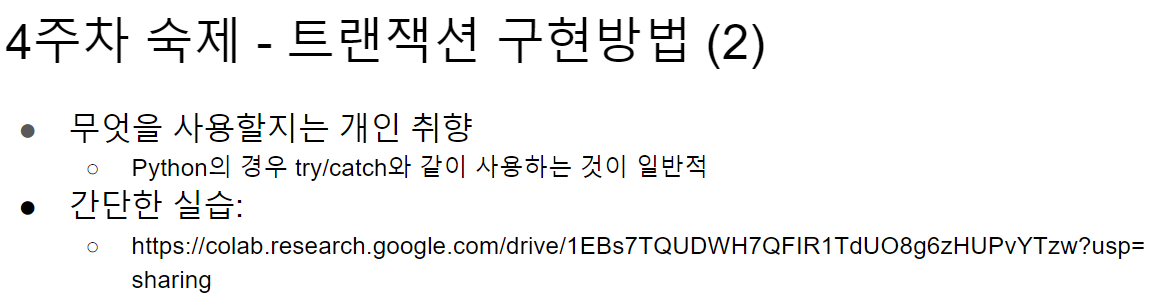
트랜잭션 구현방법
-
autocommit 이 true이든, false이든 python try/except로 컨트롤 가능하다
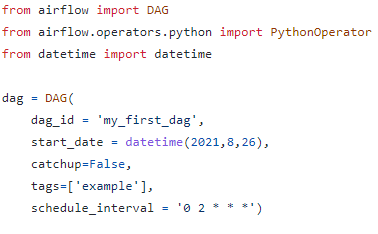
간단한 Airflow 잡 실행하기
- dag에 tag를 붙여서 쉽게 필터링이 가능하도록 만든다
tags = ['example']
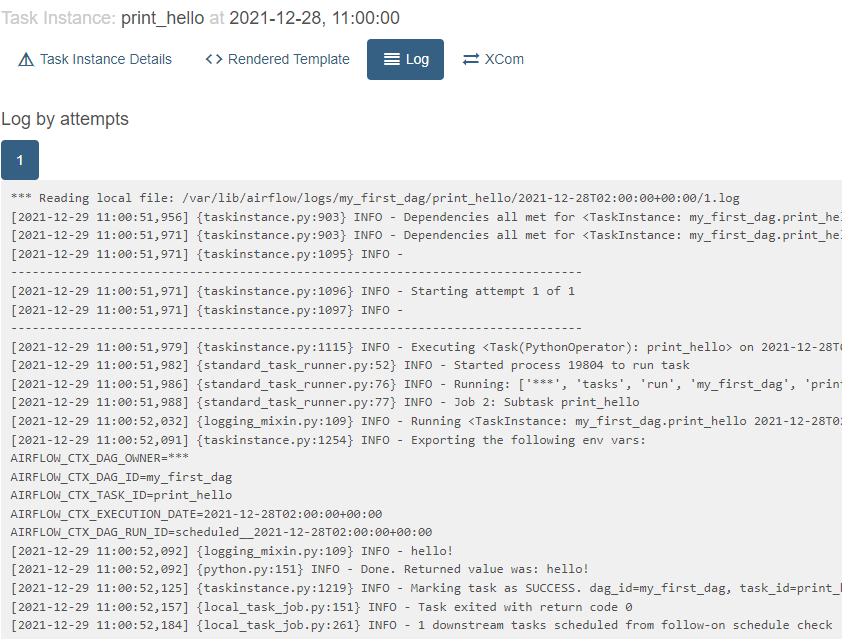
- 실행 후 로그 확인방법 실행한 task(초록색 네모)를 클릭한 후
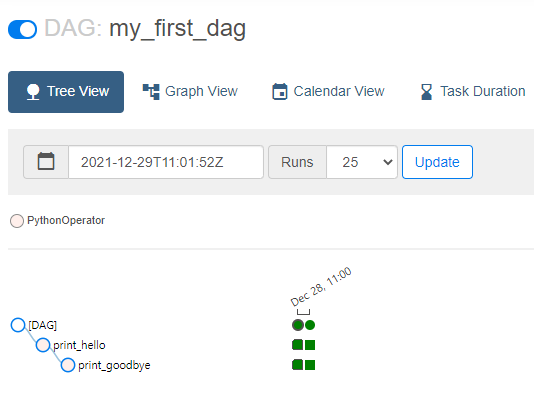
Log 버튼을 누르면 실행한 task의 로그가 출력됨
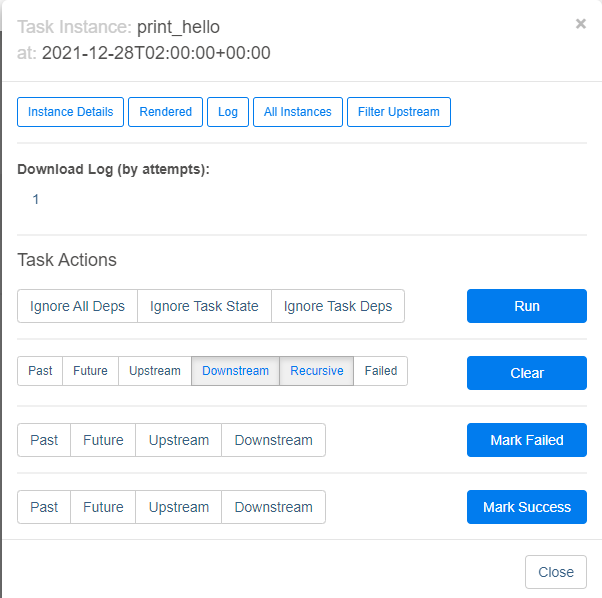
- 실패한 task에 대해 clear버튼을 클릭해주면 그 시점에서부터 재실행된다!
만약 어떤 작업에서 실패 발생하고 에러 잡히면 다시 이 웹ui에서 clear버튼으로 재시작하면 됨

How to Trigger a DAG - 터미널에서 실행
- 현재 보유한 dag리스트 출력
airflow dags list- 특정 dag의 task 리스트 출력
airflow tasks list [dag이름]- 터미널에서 task 실행 명령어
airflow tasks test [DAG이름] [Task이름] [날짜]test : 아무데도 기록이 남지 않음
run : 메타db에 기록이 남음
- 터미널에서 dag 실행 명령어
airflow dags **test** [DAG이름] [날짜]예시1) airflow dags test MySQL_to_Redshift_v3 2019-12-08
- 이 dag의 맨 처음부터 끝까지 실행
예시2) airflow dags backfill MySQL_to_Redshift_v3 -s 2019-01-01 -e 2019-12-31
- backfill 명령어
- -s : start_date, -e : end_date
- 아무 코드 수정 없이 이 명령어로 백필 실행이 가능함
Airflow Operators, Variables and Connections
Important DAG parameters (not task parameters)
dag선언시 추가로 넣을 수 있는 파라미터 목록
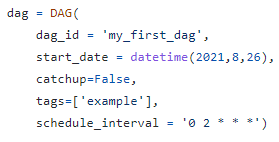
- max_active_runs : 동시에 몇 개 dag 실행 가능?
- 설치된 서버의 cpu가 몇 개냐에 따라 달라진다. cpu가 2개면 이 값을 100을 줘도 2개만 돈다.
- concurrency: tasks that can run in parallel
- 동시에 실행 가능한 task의 숫자를 의미함. 이 값도 물론 서버의 cpu에 따라 달라짐
- task 의존도에 따라서도 달라질 수 있음
- catchup: whether to backfill past runs
- False : backfill을 실행하지 않음.
- True : backfill 실행. full refresh일 경우 TRUE일 이유가 없음.
이 값들을 파라미터로 추가할 수 있는데, 만약 추가하지 않을 경우 airflow.cfg파일에 선언된 값을 가져와서 사용함
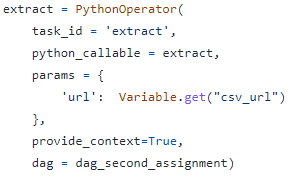
Operators - PythonOperator
- task = operator object, 아주 다양한 operator가 존재함
- PythonOperator가 가장 많이 사용됨
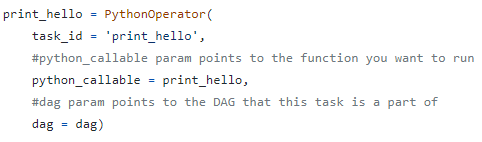
- python_callable : 이 이름으로 선언된 함수를 사용하겠다는 의미
- 여기서부터는 이제 python 코딩임
- 파라미터도 받아서 실행시킬 수 있음 → params라는 dict를 사용해서
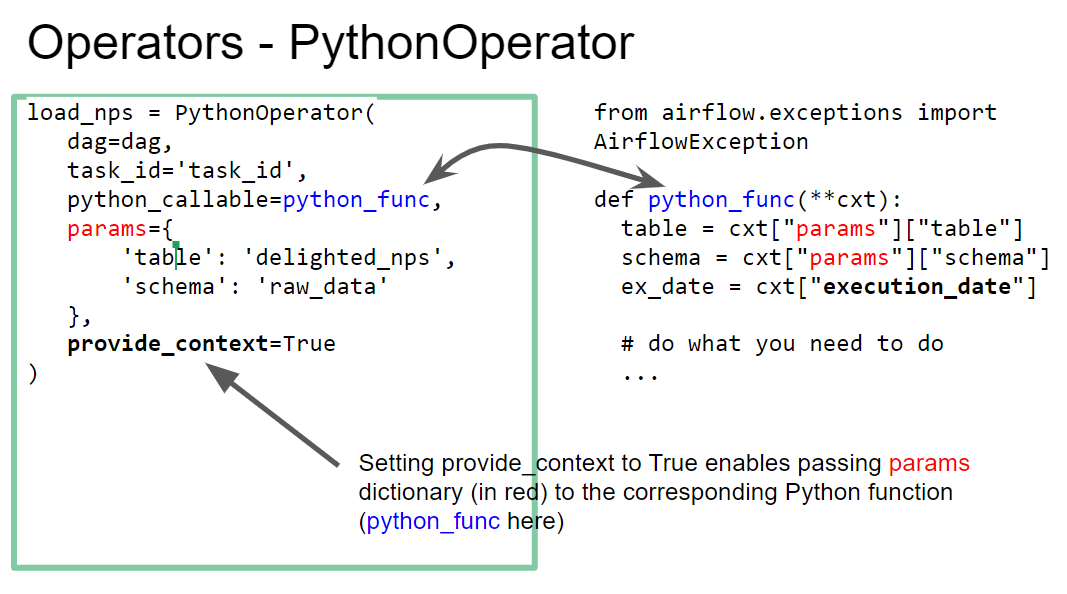
- cxt를 통해 airflow의 다양한 시스템변수에 접근할 수 있게됨
- cxt["execution_date"] → 미리 선언한 execution_date변수의 값을 파라미터로 가져와서 사용
Name Gender DAG 개선하기
- incremental update일 경우에만 catchup을 true로 쓰고, 그 외에 전체 읽어올 때는 catchup이 true일 이유가 없다.
- task는 너무 크지 않게 구성하는 것이 좋다.
하나의 task가 너무 커져버리면 중간에 실패했을 경우 처음부터 다시 해야되니까.
task를 잘게잘게 작은 단위로 나누는 것이 좋아보인다.
그런데 이것도 또 너무 작게하면 안된다... 허.. - DE는 기본적으로 소프트웨어엔지니어임. 파이썬 코딩 잘 해야함
- V1 → V2
- 하드코딩되어있던 url을 param dict로 받아오도록 수정함
- context를 사용하여 param으로 넘겨받은 값을 읽어와서 dag를 실행시킴
- V2 → V3
- ETL을 각각 task로 분리하여 3개의 task를 생성
- 각 task에 의존도를 걸어놓음 (e >> t >> l)
- extract에서는 url을 저장된 시스템변수를 읽어오도록 수정
- load에서는 스키마,테이블 이름을 param으로 받아서 실행하도록 수정
- V3 → V4
- get_redshift_connection함수에서 Connection을 사용함
- redshift는 postgres기반으로 만들어졌기 때문에, PostgresHook을 사용함
- postgres_conn_id는 redshift_dev_db를 입력하여 Connections에 미리 등록해놓은 커넥션 정보를 불러옴
- 이럴 경우 기본적으로 autocommit=False로 return됨 → delete해도 commit하기 전까지는 반영되지 않는다는 의미
Xcom
- 매번 함수 실행시 메타DB에 데이터가 저장되는데, 이 메타DB를 검색해서 리턴값을 가져옴
- 1번 task에서 return한 값을 2번 task에서 사용할 때, xcom을 사용할 수 있음
- 이 XCOM덕분에 하나의 TASK를 3개의 TASK로 쪼갤 수 있음
- 그러나 return값이 너무 클 경우 이 xcom은 동작하지 않음
- 만약 이럴 경우, s3같은 스토리지에 1번 task가 return한 데이터를 저장해놓고 그 링크를 2번 task에 넘겨주는 방식이 일반적임

- 예를 들어, 위의 xcom_pull() 코드는 “extract”라는 task의 return값을 읽어온다는 의미임
Connections and Variables
-
redshift 연결정보 변수를 의미함
-
안전하게 관리하기 위해 코드와 분리시킨다
- 또는 자주 변경되는 변수를 하드코딩하지 않고 환경변수로 저장하여 사용하는 방법임
-
Connections
- This is used to store some connection related info such as hostname, port number, and access credential
- Postgres connection or Redshift connection info can be stored here
-
Variables
- Used to store API keys or some configuration info
- Use “access” or “secret” in the name if you want its value to be encrypted
- We will practice this
-
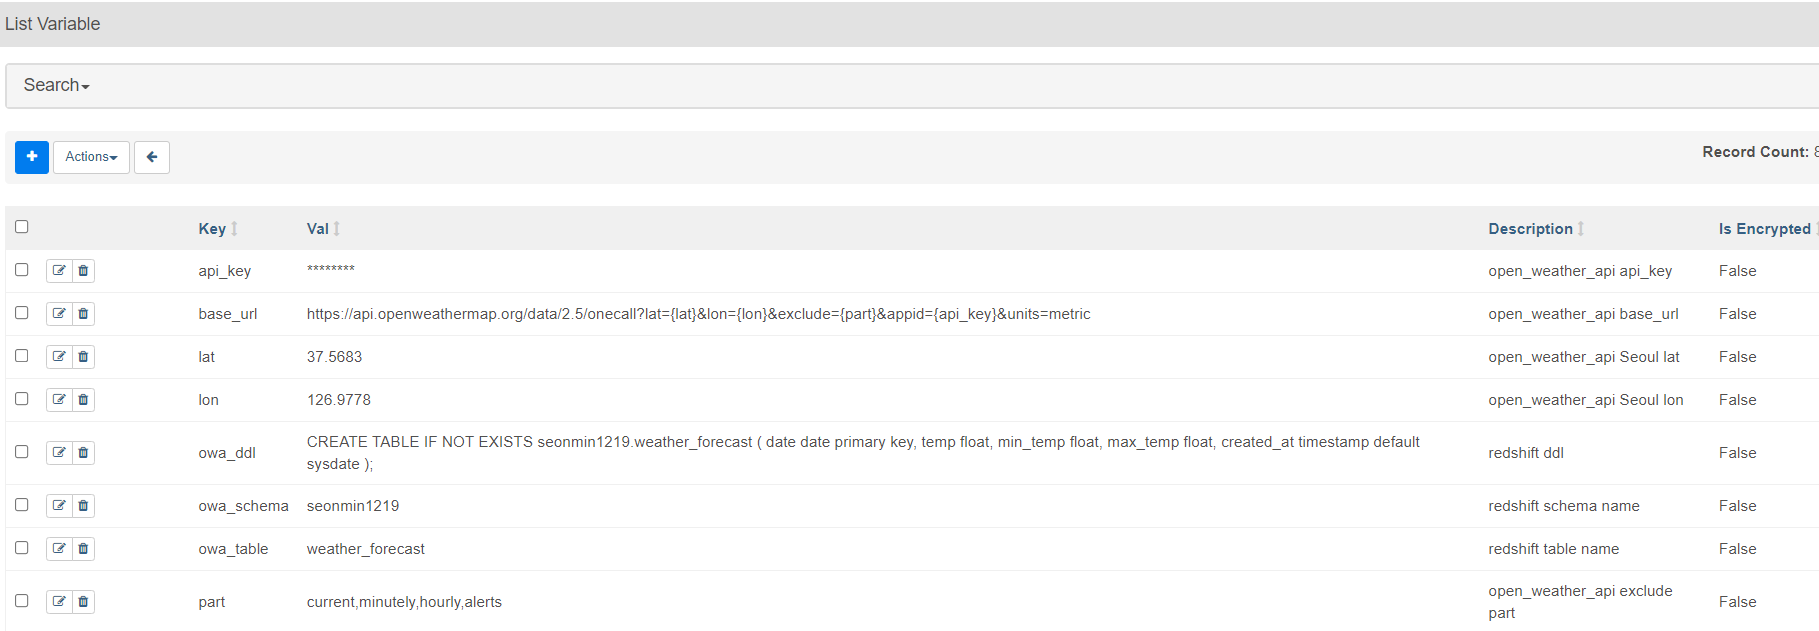
Variable
- web ui에서 설정가능함 admin-variable
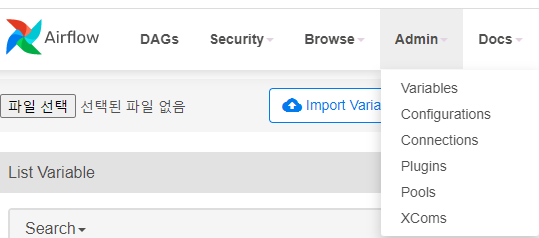
- import Variable을 사용하여 dag 코드에서 읽어올 수 있음
- 코드에서 get하는 법 : Variable.get(”variable이름”)
- 코드에서 set하는 법 : Variable.set(”variable이름”, “variable값”)
- web ui에서 설정가능함 admin-variable
-
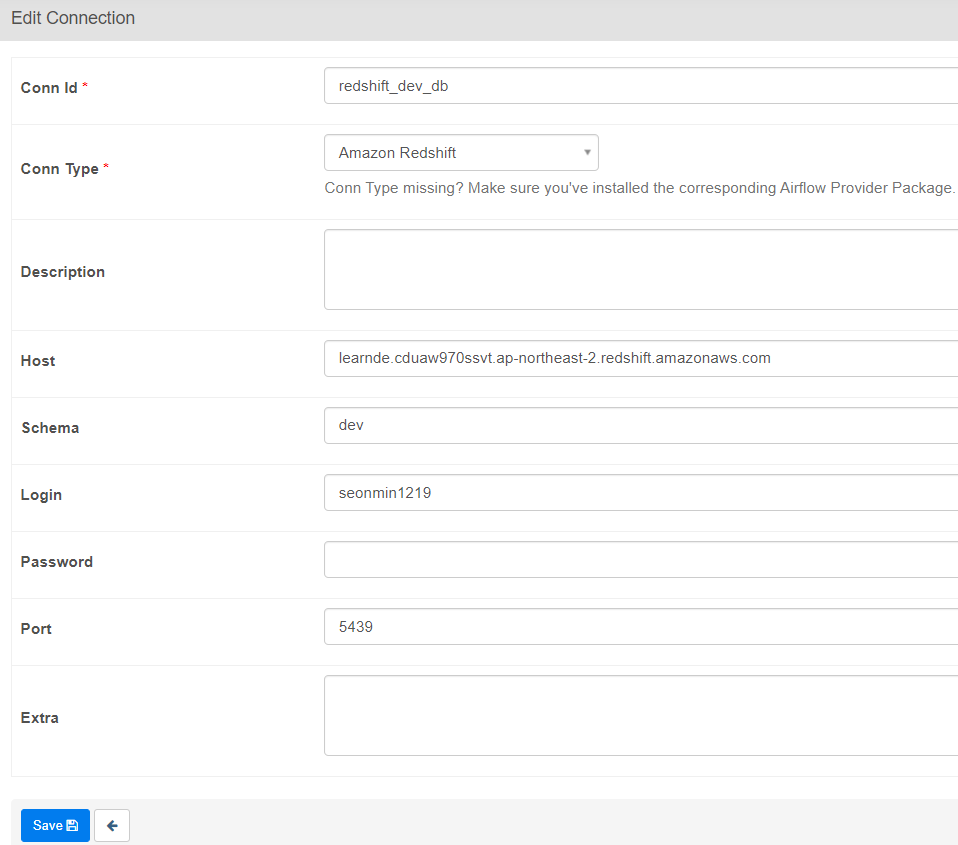
Connections
- web ui에서 설정 가능함
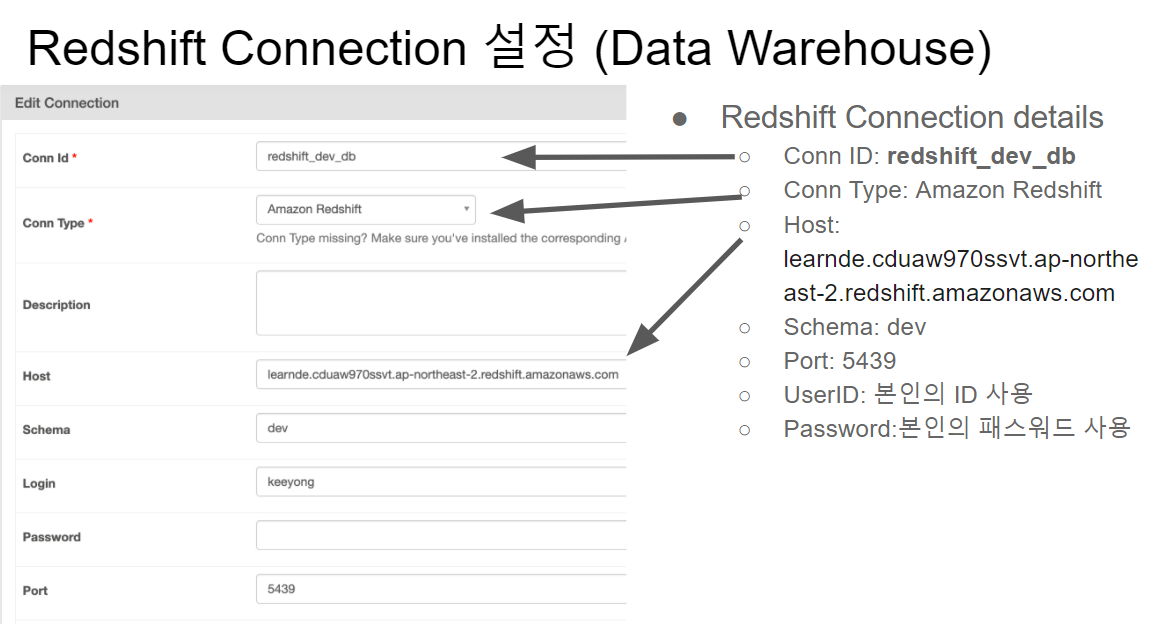
- 레드시프트 dev db를 등록해놓았고 이것을 코드에서 이렇게 불러서 사용 가능함

- web ui에서 설정 가능함
실습시 가능한 Airflow 에러
- web에서 11시 방향 상단 화면의 DAGs를 클릭하면 어떤 에러가 존재하는지 확인할 수 있음
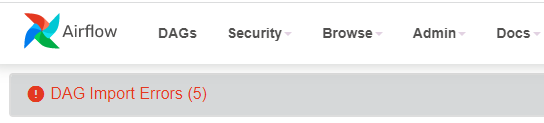
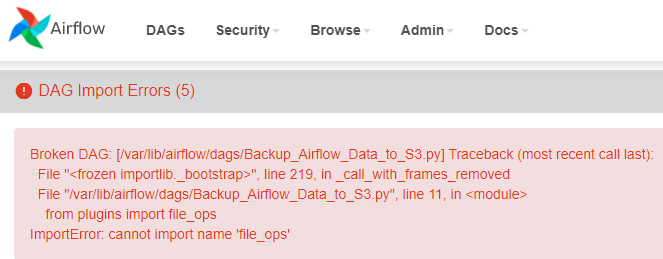
- 주로 variable, connection이 등록되지 않았다는 에러가 많음
- 에러 해결해도 즉시 없어지지는 않음 → airflow는 default 5분마다 에러체크를하기 때문임
Open Weather DAG 구현하기
지금까지는 간단한 dag였고,, 현장에서는 api로 데이터 불러오고, db에 저장하는 것이 훨씬 일반적이다.
무료버전의 날씨 api를 사용해서 데이터를 받아오고, dw에 적재한다
만드려는 DAG: 서울 7일 낮/최소/최대 온도 읽기
- One-Call API는 결과를 JSON 형태로 리턴해줌
- 이를 읽어들이려면 requests.get 결과의 text를 JSON으로 변환해 주어야함
- 아니면 requests.get 결과 오브젝트가 제공해주는 .json()이란 함수 사용
- f = requests.get(link)
- f_js = f.json()
- full refresh 하게 → 멱등성 보장. 트랜잭션 사용하기.
- airflow connection을 사용하면 → autocommit=False라는 점 주의하기
Primary Key Uniqueness 보장하기 : Upsert
upsert = intert + update
대부분의 DW는 upsert를 지원하지 않음, pk를 보장하지 않기 때문에 upsert를 지원하지 않음
즉 upsert사용 = pk 유일성을 보장해준다는 의미임
Primary Key 유지 방법 (1)
window함수의 row_number를 사용해서 pk처럼 구별한다.
CREATE TABLE keeyong.weather_forecast (
    date date primary key,
    temp float,
    min_temp float,
    max_temp float,
    created_date timestamp default GETDATE()
);
예를 들어, 이 테이블에서 pk처럼 유일한 식별자 or upsert를 찾을 경우
1) date 컬럼을 기준으로 partition처리(같은 date끼리 group by하듯이 묶음)
2) 그리고 row_number를 사용하여 일련번호 붙이는데, 이럴 경우 timestamp인 created_date컬럼을 기준으로 가장 최근의 데이터를 1번부터 붙임
3) 그래서 생성된 일련번호 1인 것들만 가져와서 새로운 테이블을 만듦
Primary Key 유지 방법 (2)
- 임시 테이블(스테이징 테이블)을 만들고 거기로 현재 모든 레코드를 복사(incremental update경우)
- 임시 테이블에 새로 데이터소스에서 읽어들인 레코드들을 복사
- 이 때 중복 존재 가능
- 중복을 걸러주는 SQL 작성:
- ROW_NUMBER를 이용해서 primary key로 partition을 잡고 적당한 다른 필드(보통 타임스탬프 필드)로 ordering을 수행하고 1인 데이터들만 골라다가 primary key별로 하나의 레코드를 잡아냄
- 위의 SQL을 바탕으로 최종 원본 테이블로 복사 (Swap)
- 이때 원래 원본 테이블을 DROP하고
- 임시 temp 테이블을 원본 테이블로 바꿔주어야 함 (ALTER TABLE)
Primary Key 유지 방법 (3)
-
새 테이블 생성 - CTAS
CREATE TABLE keeyong.temp_weather_forecast AS SELECT * FROM keeyong.weather_forecast;- 원래 테이블의 내용을 temp_weather_forecast로 복사
-
DAG는 임시 테이블(스테이징 테이블)에 레코드를 추가
- 이때 중복 데이터가 들어갈 수 있음
-
원본 테이블 삭제 DELETE FROM keeyong.weather_forecast;
-
최신데이터만 골라서 기존 테이블에 적재
INSERT INTO keeyong.weather_forecast
     SELECT *,
            ROW_NUMBER() OVER (PARTITION BY date ORDER BY created_date DESC) seq
       FROM keeyong.temp_weather_forecast
      WHERE seq = 1;
위의 코드는 매번 새로 덮어쓰는 형식의 업데이트를 가정
- 여기서 3,4번의 과정에서만 트랜잭션을 걸어도 됨
5주차 숙제
숙제1
- Transaction 실습 따라하기
- Name Gender 실습 따라하기
- 스키마를 자신의 스키마로 꼭 변경하기
- Data-engineering-batch6 repo의 dags 폴더를 본인 Airflow 서버의 dags 폴더로 복사해야함
- 이 링크를 참조
- git pull
숙제2

- dag 생성

- connections 생성
admin > connections
- variables 생성
admin > variables
- dag 작성
- 코드
from airflow import DAG
from airflow.operators.python import PythonOperator
from airflow.models import Variable
from airflow.hooks.postgres_hook import PostgresHook

from datetime import datetime
from datetime import timedelta
import time
import requests
import logging
import psycopg2
import pprint

def get_Redshift_connection():
    hook = PostgresHook(postgres_conn_id='redshift_dev_db') # connections에 미리 등록해놓음

    return hook.get_conn().cursor()

def extract(**context):
    base_url = context["params"]["base_url"]
    lat = context["params"]["lat"]
    lon = context["params"]["lon"]
    part = context["params"]["part"]
    api_key = context["params"]["api_key"]

    task_instance = context['task_instance']
    execution_date = context['execution_date']

    logging.info(execution_date)

    link = base_url.format(lat=lat, lon=lon, part=part, api_key=api_key)

    res = requests.get(link)
    result = res.json()

    return result

def transform(**context):
    lines = []
    data = context["task_instance"].xcom_pull(key="return_value", task_ids="extract")

    for day in data["daily"]:
        # pprint(day) # 하루 데이터
        # print(time.strftime("%Y/%m/%d", time.localtime(day['dt'])))  # 날짜
        # pprint(day['temp']['day'])  # 낮 온도
        # pprint(day['temp']['min'])  # 최저 온도
        # pprint(day['temp']['max'])  # 최고 온도

        date = str(time.strftime("%Y/%m/%d", time.localtime(day['dt'])))
        temp = str(day['temp']['day'])
        min_temp = str(day['temp']['min'])
        max_temp = str(day['temp']['max'])

        lines.append(','.join([date, temp, min_temp, max_temp]))

    return lines

def load(**context):
    schema = context["params"]["owa_schema"]
    table = context["params"]["owa_table"]
    ddl = context["params"]["owa_ddl"]

    cur = get_Redshift_connection()
    lines = context["task_instance"].xcom_pull(key="return_value", task_ids="transform")
    lines = iter(lines)
    next(lines)
    sql = "BEGIN; DELETE FROM {schema}.{table}; {ddl};".format(schema=schema, table=table, ddl=ddl)
    for line in lines:
        if line != "":
            (date, temp, min_temp, max_temp) = line.split(",")
            logging.info(f"{date} - {temp} - {min_temp} - {max_temp}")
            sql += f"""INSERT INTO {schema}.{table} VALUES ('{date}', '{temp}', '{min_temp}' , '{max_temp}', default);"""
    sql += "END;"
    logging.info(sql)
    cur.execute(sql)

dag_open_weather_api = DAG(
    dag_id='dag_open_weather_api',
    start_date=datetime(2021, 12, 1),  # 날짜가 미래인 경우 실행이 안됨
    schedule_interval='1 * * * *',  # 적당히 조절
    max_active_runs=1,
    catchup=False,
    default_args={
        'retries': 1,
        'retry_delay': timedelta(minutes=3),
    }
)

extract = PythonOperator(
    task_id='extract',
    python_callable=extract,
    params={
        'base_url': Variable.get("base_url"),
        'lat': Variable.get("lat"),
        'lon': Variable.get("lon"),
        'part': Variable.get("part"),
        'api_key': Variable.get("api_key")
    },
    provide_context=True,
    dag=dag_open_weather_api)

transform = PythonOperator(
    task_id='transform',
    python_callable=transform,
    params={
    },
    provide_context=True,
    dag=dag_open_weather_api)

load = PythonOperator(
    task_id='load',
    python_callable=load,
    params={
        'owa_schema': Variable.get("owa_schema"),
        'owa_table': Variable.get("owa_table"),
        'owa_ddl' : Variable.get("owa_ddl")
    },
    provide_context=True,
    dag=dag_open_weather_api)

extract >> transform >> load

"""
<Connections>
Conn Id : redshift_dev_db
Conn Type : Amazon Redshift
Host : learnde ~~ redshift.amazonaws.com
Port : 5439

<Variables>
(key, val)
api_key, ********(open_weather_api key)
base_url, https://api.openweathermap.org/data/2.5/onecall?lat={lat}&lon={lon}&exclude={part}&appid={api_key}&units=metric
lat, 37.5683
lon, 126.9778
owa_ddl, CREATE TABLE IF NOT EXISTS seonmin1219.weather_forecast ( date date primary key, temp float, min_temp float, max_temp float, created_at timestamp default sysdate );
owa_schema, seonmin1219
owa_table, weather_forecast
part, current,minutely,hourly,alerts

"""
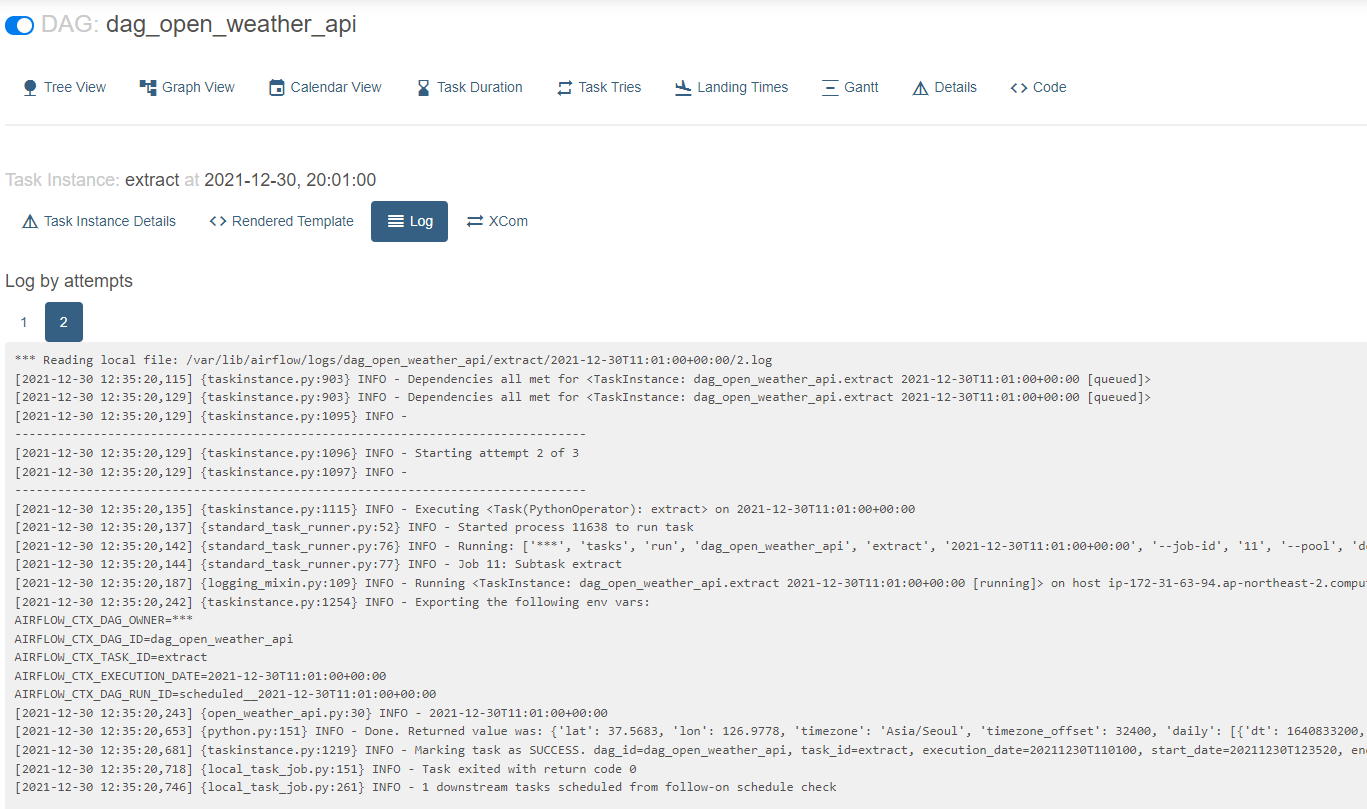
- 실행 확인
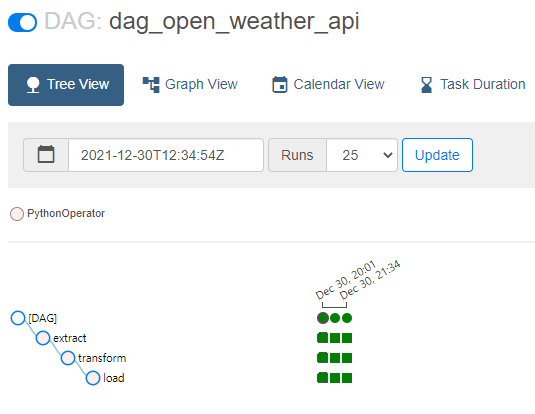
- extract 로그
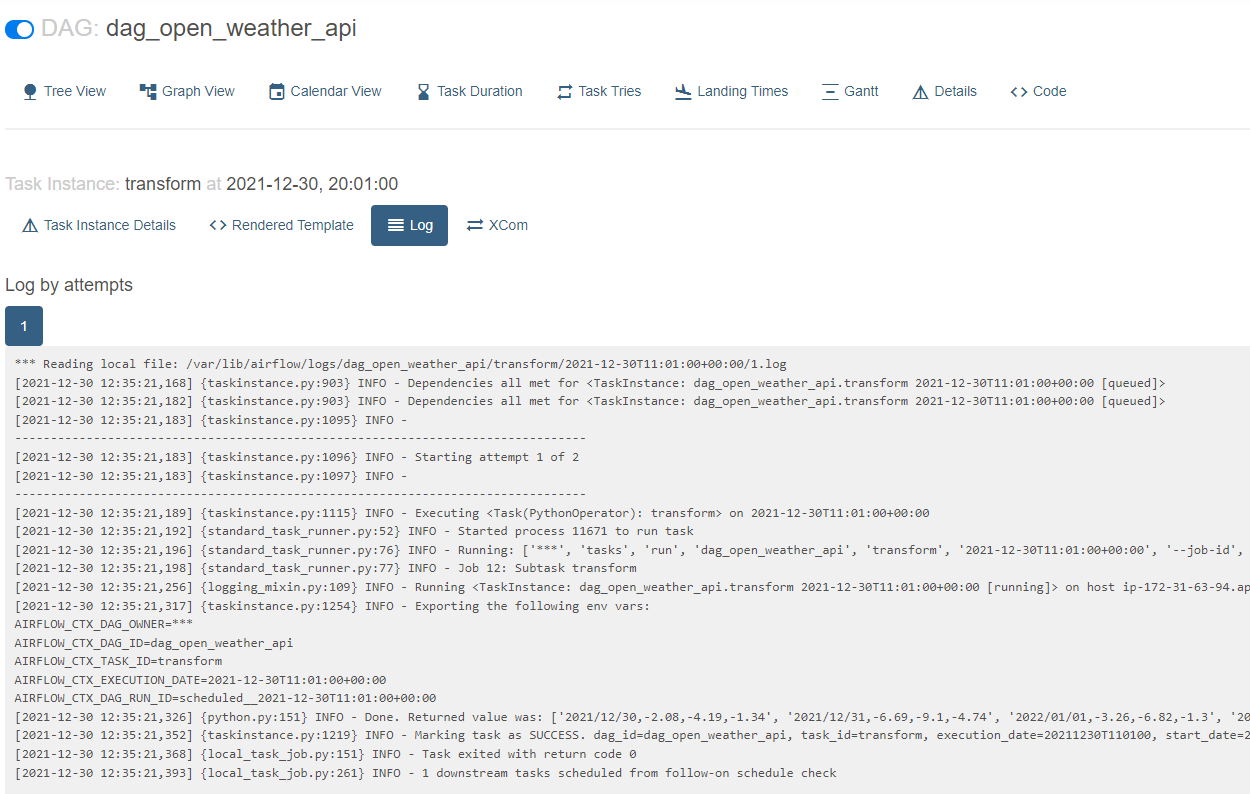
- transform 로그
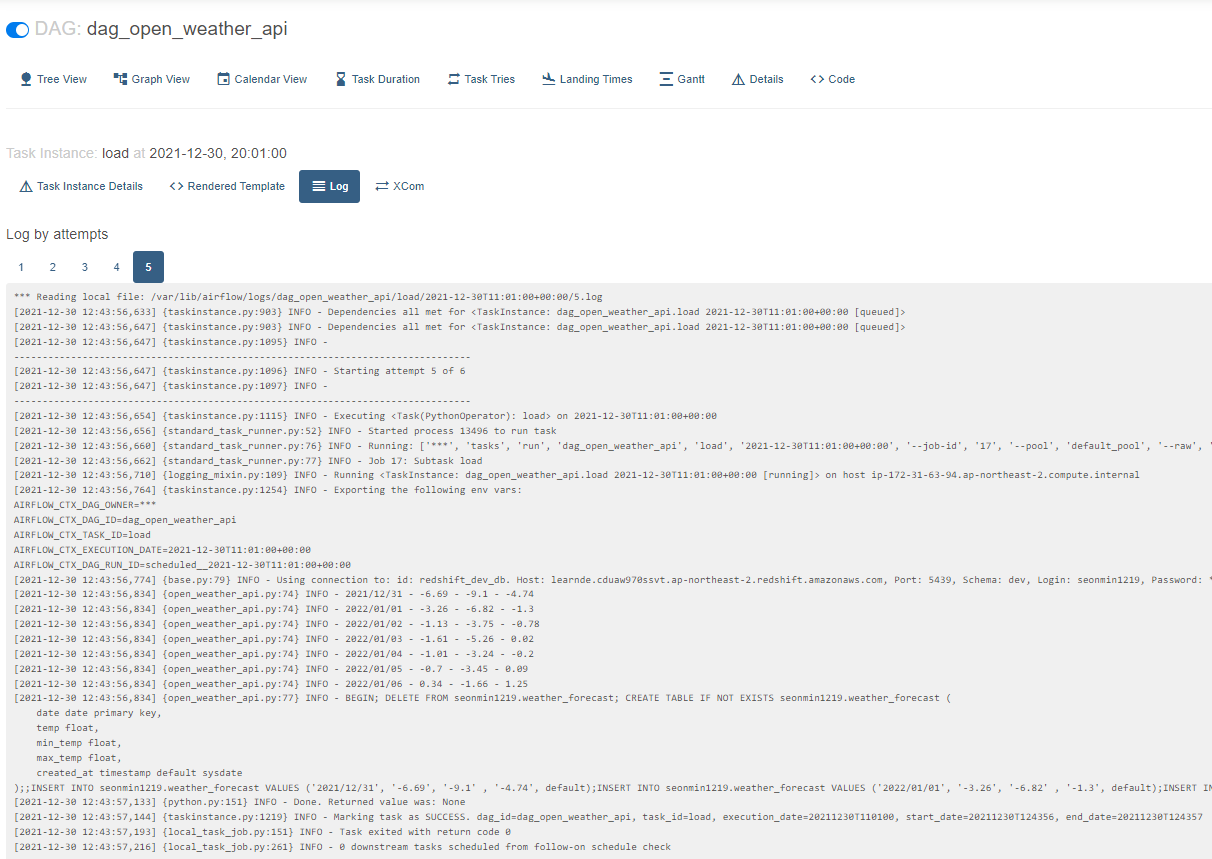
- load 로그
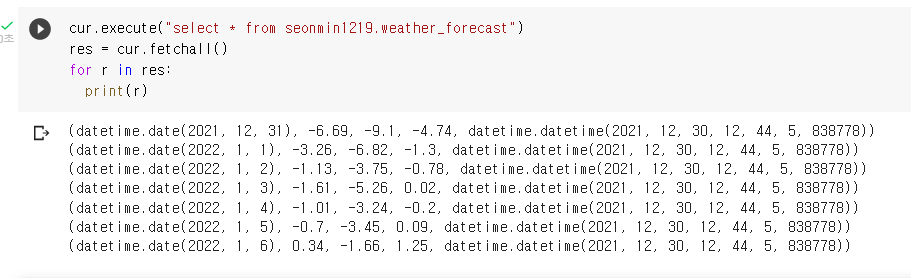
- 결과 확인
숙제3
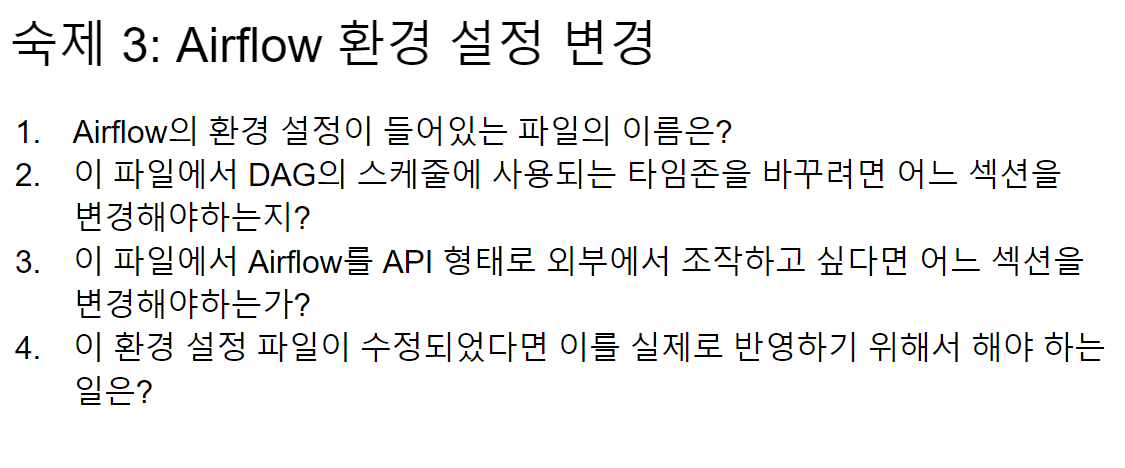
airflow api를 호출해서 환경 설정 파일을 변경할 수 있음
다음 주
가상의 production mysql db를 생성하고, redshift dw에서 이 mysql db로 데이터를 옮기는 작업을 할 예정.
질의응답
Q. sql 문자열이 너무 길어지는 부분에서는 리스크가 없나요?
A. 네 있습니다. 너무 길어지지 않게 주의해주세요
Q. 선생님
일전 질문에서 nifi 는 etl 개발에 초점이 맞춰져 있고 airflow 는 관리에 초점이 맞춰져 있다고 하셨었는데
혹시 airflow 에서도 nifi 와 같이 etl 을 개발할 수 있을까요?
A. airflow는 etl개발, etl관리 둘 다 가능하다.
