언제까지 Spring Cloud Sleuth에 머물꺼니!! 이제Micrometer Tracing를 사용해보자

MSA와 K8S 환경에서는 여러 서비스와 각 Pod들이 서로 호출 또는 이벤트 발행/구독을 통해서 동작하게 된다. 이러한 환경에서 특정 요청을 추적하기 위해서 OpenTracing 이 존재하며 Spirng에서는 Spring Cloud Sleuth를 활용하면 Trace와 Span를 통해 추적를 할 수 있도록 했다.
하지만 현재 Spring Cloud Sleuth 문서를 확인하면 3.1.x 버전을 마지막으로 Micrometer Tracing으로 전환된다고 한다.
해당 글은 OpenTracing등 개념에 대한 글이 아닌 Spring에서 Micrometer Tracing를 Opentelemetry 버전으로 Spring Boot 프로젝트에 직접 적용하는 방법에 대한 내용을 다루며 Opentelemetry Java Agent에 대한 내용은 아니다.
나는 Spring Cloud Sleuth와 Brave를 Spring Boot 2.x.x 버전에 적용하였던 경험이 있었다. 해당 버전은 제공된 클래스, AOP, BeanPostProcessor 등을 통해 Bean으로 관리하며 Trace, Span의 전파를 하였었다.
이번 프로젝트에서는 Spring Boot 3.2 이상을 사용하게 되면서 Micrometer Tracing를 적용하게 되었고 다음의 내용은 의존성과 설정들을 다루겠다.
현재 회사에서는 오픈 소스 기반의 Grafana를 사용하고 있으며 현재는 Metric 정보를 Prometheous를 사용하고 있지만 추후 확장성을 위해서 Trace에 관해서는 Opentelemetry를 선택하였다.
기본 설정
//build.gradle
implementation 'io.micrometer:micrometer-tracing-bridge-otel'
# application.yml
management:
tracing:
enabled: true
logging:
pattern:
console: '%clr(%d{yyyy-MM-dd HH:mm:ss.SSS}){faint} [%-0.32X{traceId:-},%-0.16X{spanId:-}] %clr(${LOG_LEVEL_PATTERN:-%5p}) %clr(${PID:- }){magenta} %clr(---){faint} %clr([%15.15t]){faint} %clr(%-40.40logger{39}){cyan} %clr(:){faint} %m%n${LOG_EXCEPTION_CONVERSION_WORD:%wEx}'
위와 같이 micrometer 의존성을 추가하면 기본적인 Tracing이 적용된다.
logging.pattern.console에 traceId와 spanId를 추가하여 확인해보면 다음과 같이 traceId와 spanId가 연결되는 것이 확인 가능하다.
@RestController
@Slf4j
@RequiredArgsConstructor
public class TracingController {

    private final RestClient.Builder builder;

    @GetMapping("/hello")
    public String hello() {
        log.info("hello");
        builder.baseUrl("http://localhost:8080").build().get().uri("/world").retrieve().toEntity(new ParameterizedTypeReference<String>() {
        });
        return "Hello World";
    }

    @GetMapping("/world")
    public String world() {
        log.info("world");
        return "World";
    }
}2025-03-06 12:58:50.920 [d61cd865e19fefdc17bcafe17bf8ed72,ff2db9fa8b2c5934] - INFO 20388 --- [nio-8080-exec-1] TracingController : hello
2025-03-06 12:58:51.062 [d61cd865e19fefdc17bcafe17bf8ed72,f51f25cc23363c21] - INFO 20388 --- [nio-8080-exec-2] TracingController : world위와 같이 시작 요청 /hello에 대해서 traceId가 d61cd865e19fefdc17bcafe17bf8ed72이 발번되고 해당 Trace에서 발생되는 요청 /world에 대해서 traceId는 공유되며 spanId는 새로 생성된 것을 확인 할 수 있다.
Servlet Filter
그렇다면 어떻게 micrometer는 요청 받은 trace,span를 관리하는 것일까?라는 궁금증이 들었다. 사실 ServletFilter로 구현되어 있을 것이라고는 예상했었다.
spring-boot-actuator-autoconfigure에서 WebMvcObservationAutoConfiguration를 통해서 ServletFilter가 추가되고 있다.
	@Bean
	@ConditionalOnMissingFilterBean
	public FilterRegistrationBean<ServerHttpObservationFilter> webMvcObservationFilter(ObservationRegistry registry,
			ObjectProvider<ServerRequestObservationConvention> customConvention,
			ObservationProperties observationProperties) {
		String name = observationProperties.getHttp().getServer().getRequests().getName();
		ServerRequestObservationConvention convention = customConvention
			.getIfAvailable(() -> new DefaultServerRequestObservationConvention(name));
		ServerHttpObservationFilter filter = new ServerHttpObservationFilter(registry, convention);
		FilterRegistrationBean<ServerHttpObservationFilter> registration = new FilterRegistrationBean<>(filter);
		registration.setOrder(Ordered.HIGHEST_PRECEDENCE + 1);
		registration.setDispatcherTypes(DispatcherType.REQUEST, DispatcherType.ASYNC);
return registration;ServerHttpObservationFilter.createOrFetchObservation를 통해서 W3CTraceContextPropagator.extracImpl에서 HttpHeader.traceparent의 값의 유무를 통해 trace,span를 유지하고 진행시킨다.
public class ServerHttpObservationFilter extends OncePerRequestFilter {
    ...
	@Override
	@SuppressWarnings("try")
	protected void doFilterInternal(HttpServletRequest request, HttpServletResponse response, FilterChain filterChain)
			throws ServletException, IOException {

		Observation observation = createOrFetchObservation(request, response);
		try (Observation.Scope scope = observation.openScope()) {
			onScopeOpened(scope, request, response);
			filterChain.doFilter(request, response);
		}
		...
	}
    ...
	private Observation createOrFetchObservation(HttpServletRequest request, HttpServletResponse response) {
		Observation observation = (Observation) request.getAttribute(CURRENT_OBSERVATION_ATTRIBUTE);
		if (observation == null) {
			ServerRequestObservationContext context = new ServerRequestObservationContext(request, response);
			observation = ServerHttpObservationDocumentation.HTTP_SERVLET_SERVER_REQUESTS.observation(this.observationConvention,
					DEFAULT_OBSERVATION_CONVENTION, () -> context, this.observationRegistry).start();
			request.setAttribute(CURRENT_OBSERVATION_ATTRIBUTE, observation);
			if (!observation.isNoop()) {
				request.setAttribute(CURRENT_OBSERVATION_CONTEXT_ATTRIBUTE, observation.getContext());
			}
		}
		return observation;
	}
    ...
}
RestClient
모놀리식 구조의 프로젝트에서는 traceId와 spanId 없이도 로그를 활용하여 충분히 추적이 가능 할 수 있다. 하지만 MSA 구조에서는 서로 통신이 일어날 수 밖에 없으며 해당 요청들이 어떤 요청인지 식별하기 위해서는 traceId가 필수적인 요소 이다.
sleuth에서는 위에서 언급했던것 처럼 제공된 클래스, AOP, BeanPostProcessor을 통해서 trace를 전파하였는데 현재 Spring Framework6에서는 각 클래스에 observationRegistry, observationConvention이 추가되었고 해당 설정을 통해 trace를 추적 및 전파하게 된다.
현재 프로젝트에서는 RestClient를 사용하고 있고 Spring Boot에서 어떻게 기본적으로 설정하고 있는지 확인해보겠다.
@AutoConfiguration(after = { ObservationAutoConfiguration.class, CompositeMeterRegistryAutoConfiguration.class,
		RestTemplateAutoConfiguration.class, WebClientAutoConfiguration.class, RestClientAutoConfiguration.class })
@ConditionalOnClass(Observation.class)
@ConditionalOnBean(ObservationRegistry.class)
@Import({ RestTemplateObservationConfiguration.class, WebClientObservationConfiguration.class,
		RestClientObservationConfiguration.class })
@EnableConfigurationProperties({ MetricsProperties.class, ObservationProperties.class })
public class HttpClientObservationsAutoConfiguration {
	...
}HttpClientObservationsAutoConfiguration에 선언된 @Import를 통해서 RestTemplate, RestClient, WebClient들의 observation 설정이 추가된다.
@Configuration(proxyBeanMethods = false)
@ConditionalOnClass(RestClient.class)
@ConditionalOnBean(RestClient.Builder.class)
class RestClientObservationConfiguration {

	@Bean
	RestClientCustomizer observationRestClientCustomizer(ObservationRegistry observationRegistry,
			ObjectProvider<ClientRequestObservationConvention> customConvention,
			ObservationProperties observationProperties) {
		...
		return new ObservationRestClientCustomizer(observationRegistry, observationConvention);
	}
}
public class ObservationRestClientCustomizer implements RestClientCustomizer {
...
@Overrid
public void customize(Builder restClientBuilder) {
restClientBuilder.observationRegistry(this.observationRegistry);
restClientBuilder.observationConvention(this.observationConvention);
}
}final class DefaultRestClient implements RestClient {
...
private <T> @Nullable T exchangeInternal(ExchangeFunction<T> exchangeFunction, boolean close) {
...
ClientRequestObservationContext observationContext = new ClientRequestObservationContext(clientRequest);
observationContext.setUriTemplate((String) attributes.get(URI_TEMPLATE_ATTRIBUTE));
observation = ClientHttpObservationDocumentation.HTTP_CLIENT_EXCHANGES.observation(observationConvention,
DEFAULT_OBSERVATION_CONVENTION, () -> observationContext, observationRegistry).start();
...
}
}RestClientObservationConfiguration를 통해서 ObservationRestClientCustomizer를 Bean으로 생성하며 ObservationRestClientCustomizer.customize메소드를 통해서 observation설정이 이루어지게 되며 DefaultRestClient.exchangeInternal를 메소드에서 trace가 전파된다.
KafkaTemplate
KafkaTemplate에도 observationEnabled라는 속성을 통해서 trace 전파를 설정 할 수 있다.
spring:
  kafka:
    template:
      observation-enabled: true
    ...
@AutoConfiguration
@ConditionalOnClass(KafkaTemplate.class)
@EnableConfigurationProperties(KafkaProperties.class)
@Import({ KafkaAnnotationDrivenConfiguration.class, KafkaStreamsAnnotationDrivenConfiguration.class })
public class KafkaAutoConfiguration {
...
@Bean
@ConditionalOnMissingBean(KafkaTemplate.class)
public KafkaTemplate<?, ?> kafkaTemplate(ProducerFactory<Object, Object> kafkaProducerFactory,
ProducerListener<Object, Object> kafkaProducerListener,
ObjectProvider<RecordMessageConverter> messageConverter) {
PropertyMapper map = PropertyMapper.get().alwaysApplyingWhenNonNull();
KafkaTemplate<Object, Object> kafkaTemplate = new KafkaTemplate<>(kafkaProducerFactory);
messageConverter.ifUnique(kafkaTemplate::setMessageConverter);
map.from(kafkaProducerListener).to(kafkaTemplate::setProducerListener);
map.from(this.properties.getTemplate().getDefaultTopic()).to(kafkaTemplate::setDefaultTopic);
map.from(this.properties.getTemplate().getTransactionIdPrefix()).to(kafkaTemplate::setTransactionIdPrefix);
map.from(this.properties.getTemplate().isObservationEnabled()).to(kafkaTemplate::setObservationEnabled);
return kafkaTemplate;
}
...
}public class KafkaTemplate<K, V> implements KafkaOperations<K, V>, ApplicationContextAware, BeanNameAware,
ApplicationListener<ContextStoppedEvent>, DisposableBean, SmartInitializingSingleton {
...
@Override
public void afterSingletonsInstantiated() {
if (this.observationEnabled && this.applicationContext != null) {
if (this.observationRegistry.isNoop()) {
this.observationRegistry = this.applicationContext.getBeanProvider(ObservationRegistry.class)
.getIfUnique(() -> this.observationRegistry);
}
...
}
private CompletableFuture<SendResult<K, V>> observeSend(final ProducerRecord<K, V> producerRecord) {
Observation observation = KafkaTemplateObservation.TEMPLATE_OBSERVATION.observation(
this.observationConvention, DefaultKafkaTemplateObservationConvention.INSTANCE,
() -> new KafkaRecordSenderContext(producerRecord, this.beanName, this::clusterId),
this.observationRegistry);
observation.start();
...
}
...
}KafkaAutoConfiguration.kafkaTemplate를 통해서 application.yml의 spring.kafka.template.observationEnabled의 값에 따라 설정되며 KafkaTemplate.afterSingletonsInstantiated 메소드를 통해서 observationRegistry를 설정하며 KafkaTemplate.observeSend를 통해서 trace를 이어서 추적하게 된다.
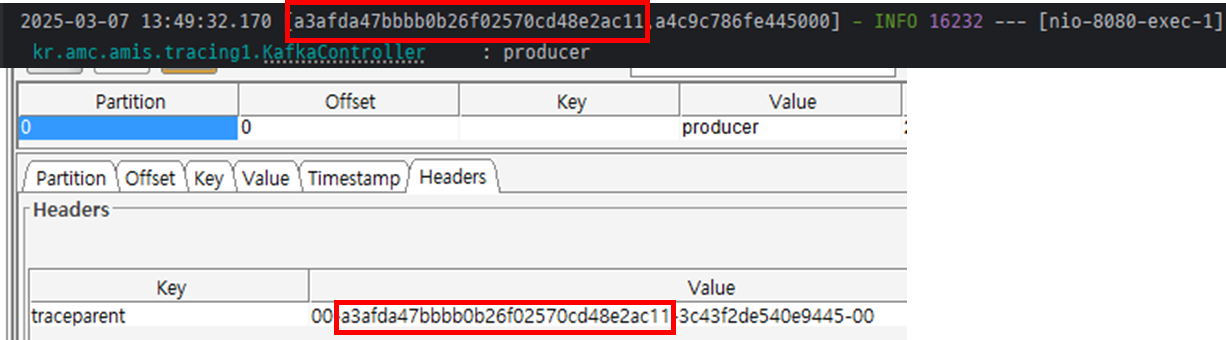
이렇게 생성된 KafkaTemplate를 통해서 간단하게 발행 테스트를 하면 아래와 같이 Kafka Header에 현재 trace 정보가 traceparent라는 Key로 전달된것을 확인 할 수 있다.
@Slf4j
@RestController
@RequiredArgsConstructor
public class KafkaController {
    private final KafkaTemplate kafkaTemplate;

    @GetMapping("/producer")
    public String producer() {
        log.info("producer");
        kafkaTemplate.send("topic", "producer");
        return "producer";
    }
}
@EventListner
Annotation를 활용하여 구독하는 방식에서도 observationEnabled 속성을 통하여 trace를 전파 받을 수 있다.
spring:
  kafka:
    listener:
      observation-enabled: true
@AutoConfiguration
@ConditionalOnClass(KafkaTemplate.class)
@EnableConfigurationProperties(KafkaProperties.class)
@Import({ KafkaAnnotationDrivenConfiguration.class, KafkaStreamsAnnotationDrivenConfiguration.class })
@ImportRuntimeHints(KafkaAutoConfiguration.KafkaRuntimeHints.class)
public class KafkaAutoConfiguration {
...
@Bean
@ConditionalOnMissingBean(ConsumerFactory.class)
DefaultKafkaConsumerFactory<?, ?> kafkaConsumerFactory(KafkaConnectionDetails connectionDetails,
ObjectProvider<DefaultKafkaConsumerFactoryCustomizer> customizers) {
Map<String, Object> properties = this.properties.buildConsumerProperties();
applyKafkaConnectionDetailsForConsumer(properties, connectionDetails);
DefaultKafkaConsumerFactory<Object, Object> factory = new DefaultKafkaConsumerFactory<>(properties);
customizers.orderedStream().forEach((customizer) -> customizer.customize(factory));
return factory;
}
...
}@Configuration(proxyBeanMethods = false)
@ConditionalOnClass(EnableKafka.class)
class KafkaAnnotationDrivenConfiguration {
@Bean
@ConditionalOnMissingBean(name = "kafkaListenerContainerFactory")
ConcurrentKafkaListenerContainerFactory<?, ?> kafkaListenerContainerFactory(
ConcurrentKafkaListenerContainerFactoryConfigurer configurer,
ObjectProvider<ConsumerFactory<Object, Object>> kafkaConsumerFactory,
ObjectProvider<ContainerCustomizer<Object, Object, ConcurrentMessageListenerContainer<Object, Object>>> kafkaContainerCustomizer) {
ConcurrentKafkaListenerContainerFactory<Object, Object> factory = new ConcurrentKafkaListenerContainerFactory<>();
configurer.configure(factory, kafkaConsumerFactory
.getIfAvailable(() -> new DefaultKafkaConsumerFactory<>(this.properties.buildConsumerProperties())));
kafkaContainerCustomizer.ifAvailable(factory::setContainerCustomizer);
return factory;
}
}public class KafkaMessageListenerContainer<K, V> // NOSONAR line count
extends AbstractMessageListenerContainer<K, V> implements ConsumerPauseResumeEventPublisher {
...
@Override
protected void doStart() {
...
ListenerType listenerType = determineListenerType(listener);
ObservationRegistry observationRegistry = containerProperties.getObservationRegistry();
if (observationRegistry.isNoop()) {
ApplicationContext applicationContext = getApplicationContext();
if (applicationContext != null && containerProperties.isObservationEnabled()) {
ObservationRegistry reg = applicationContext.getBeanProvider(ObservationRegistry.class)
.getIfUnique();
if (reg != null) {
observationRegistry = reg;
}
}
}
this.listenerConsumer = new ListenerConsumer(listener, listenerType, observationRegistry);
...
}
....
private final class ListenerConsumer implements SchedulingAwareRunnable, ConsumerSeekCallback {
@Nullable
private RuntimeException doInvokeRecordListener(final ConsumerRecord<K, V> cRecord, // NOSONAR
Iterator<ConsumerRecord<K, V>> iterator) {
Object sample = startMicrometerSample();
Observation observation = KafkaListenerObservation.LISTENER_OBSERVATION.observation(
this.containerProperties.getObservationConvention(),
DefaultKafkaListenerObservationConvention.INSTANCE,
() -> new KafkaRecordReceiverContext(cRecord, getListenerId(), getClientId(), this.consumerGroupId,
this::clusterId),
this.observationRegistry);
observation.start();
Observation.Scope observationScope = observation.openScope();
...
}
...
}
...
}KafkaAutoConfiguration.kafkaListenerContainerFactory와 KafkaAnnotationDrivenConfiguration.kafkaListenerContainerFactory를 거쳐서 생성되는 KafkaMessageListenerContainer에서 KafkaMessageListenerContainer.doStart를 통해서 application.yml에 선언된 spring.kafka.istener.observation-enabled 값의 여부에 따라서 해당 KafkaMessageListenerContainer의 trace 여부가 결정되고 KafkaMessageListenerContainer.ListenerConsumer.doInvokeRecordListener 메소드에서 trace를 진행한다.
이렇게 생성된 @KafkaListener는 trace를 관리하기 하며 다음의 간단한 예제를 통해 정상적으로 trace되는 것을 확인 할 수 있다.
@Slf4j
@RestController
@RequiredArgsConstructor
public class KafkaController {
    private final KafkaTemplate kafkaTemplate;

    @GetMapping("/producer")
    public String producer() {
        log.info("producer");
        kafkaTemplate.send("topic", "producer");
        return "producer";
    }

    @KafkaListener(topicPattern = ".*")
    public void eventListener(ConsumerRecord<byte[], String> record) {
        log.info("consumer");
    }
}
@Async & @EventListener
현재 Trace 정보를 관리하는 Observation.Context는 ThreadLocal로 관리되어 @Async 또는 SimpleApplicationEventMulticaster가 SimpleAsyncTaskExecutor으로 동작하는 경우에는 문서와 같이 설정을 해야 Async Thread에서도 동일한 Context를 공유할 수 있다.
다음 예제는 문서 경우를 제외하고 ThreadPoolTaskExecutor를 활용한 @Async의 동작의 결과이다.
@Configuration
public class TracingConfig {
    @Bean
    public ThreadPoolTaskExecutorCustomizer threadPoolTaskExecutorCustomizer() {
        return builder -> builder.setTaskDecorator(new ContextPropagatingTaskDecorator());
    }
}
@RestController
@Slf4j
@RequiredArgsConstructor
public class TracingController {
private final ApplicationEventPublisher applicationEventPublisher;
private final AsyncService asyncService;
@GetMapping("/hello")
public String hello() {
log.info("hello");
asyncService.test();
return "Hello World";
}
@Async
@EventListener
public void onTraceEvent(TraceEvent event) {
log.info("onTraceEvent");
}
}@Slf4j
@Service
@EnableAsync
@RequiredArgsConstructor
public class AsyncService {
private final ApplicationEventPublisher applicationEventPublisher;
@Async
public void test() {
log.info("async-test");
applicationEventPublisher.publishEvent(new TraceEvent());
}
}
이번 글에서는 기본적인 Spring Boot + Micrometer 적용에 대한 내용과 Spring에서의 Observation에 관하여 알아보았다. 다음 글에서는 프로젝트에서 적용할 법한 Opentelemetry 관련한 설정들에 관하여 다루어 보겠다.
