서버 개발자 관점에서 Distributed Tracing를 위한 Opentelemetry Tracing 활용기!!!

저번글에서는 Spring Boot에서 직접 Micrometer를 활용하여 Opentelemetry Tracing를 적용하고 어떠한 형태로 Spring Framework에서 Observation이 관리되는지 알아보았다.
이번 글에서는 전적으로 서버 개발자 관점에서 운영시 장애를 빠르게 파악하기 위해서 적용한 설정들에 대해서 작성해보겠다.
해당 글은 전적으로 Distributed Tracing에 관한 내용만을 다루고 있다.
Distributed Tracing
이전 글까지는 단순 Console 로그를 통해서만 traceId와 spanId가 전파되는 것을 확인하였다. 이전까지는 단일 서버만 활용하여 테스트를 진행하였지만 실제 MSA에서는 여러 서버와 POD들이 존재하기에 복잡해진다.
여러 서버와 POD의 통합된 로그를 분석하여 서버들간 흐름을 파악할 수 있지만 쉽지 않기에 zipkin, jaeger, tempo등을 활용하여 UI로 분석이 가능하다. 현재 프로젝트에서는 Grafana Stack를 사용하기 있기에 tempo를 사용하여 Distributed tracing를 확인하고 있다.
예제에서는 jaeger를 사용하여 Distributed Tracing를 확인해보도록 하겠다.
Observability
Observability는 보통 Metrics, Traces, Logs로 구성된다.
현재 프로젝트는 위에서 이야기한대로 Grafana Stack를 사용중이며 Metric 정보는 Prometheus가 Application를 직접 Polling하여 조회하고 있으며 Application에서는 의존성에 io.micrometer:micrometer-registry-prometheus를 추가하고 appliation.yml에 설정이 필요하다. 이렇게 수집된 Metric 정보는 Grafna를 통해서 DashBoard를 구성하여 UI로 확인이 가능하다.
Log 정보는 Promtail이 Container Log를 Loki로 전송하여 Grafana Loki를 통해서 여러 Pod들의 통합된 로그를 확인 할 수 있다.
위와 같이 Metric은 Application를 Polling하는 방식이며 Log는 Container 레벨에서 직접 전송하고 있기는 구조였다.
위와 같은 구조만을 활용하고 있던 구조에서 이번 프로젝트에서 Observability의 마지막 Traces를 위해서 Grafana Stack에서 Tempo를 적용하게 되었다.
Exporter
우선은 기본적으로 Opentelemetry Tracing를 통해서 관리하고 있는 Observation를 Tempo로 전송을 해야했으며 이를 Exporter라고 부른다.
이전 글에서 언급했듯이 현재 프로젝트에서 Opentelemetry Collector 사용을 염두하고 있기 때문에 OTLP를 선택하였다.
우선은 OtlpTracingConfigurations를 확인해보면 OtlpGrpcSpanExporter, OtlpHttpSpanExporter를 필요로 하기 때문에 io.opentelemetry:opentelemetry-exporter-otlp 의존성을 추가해야 한다.
그리고 @ConditionalOnEnabledTracing를 확인하면 @OnEnabledTracingCondition을 통해서 Bean를 생성하고 있기 때문에 application.yml에 management.otlp.tracing.export.enabled=true 설정이 필요하다.
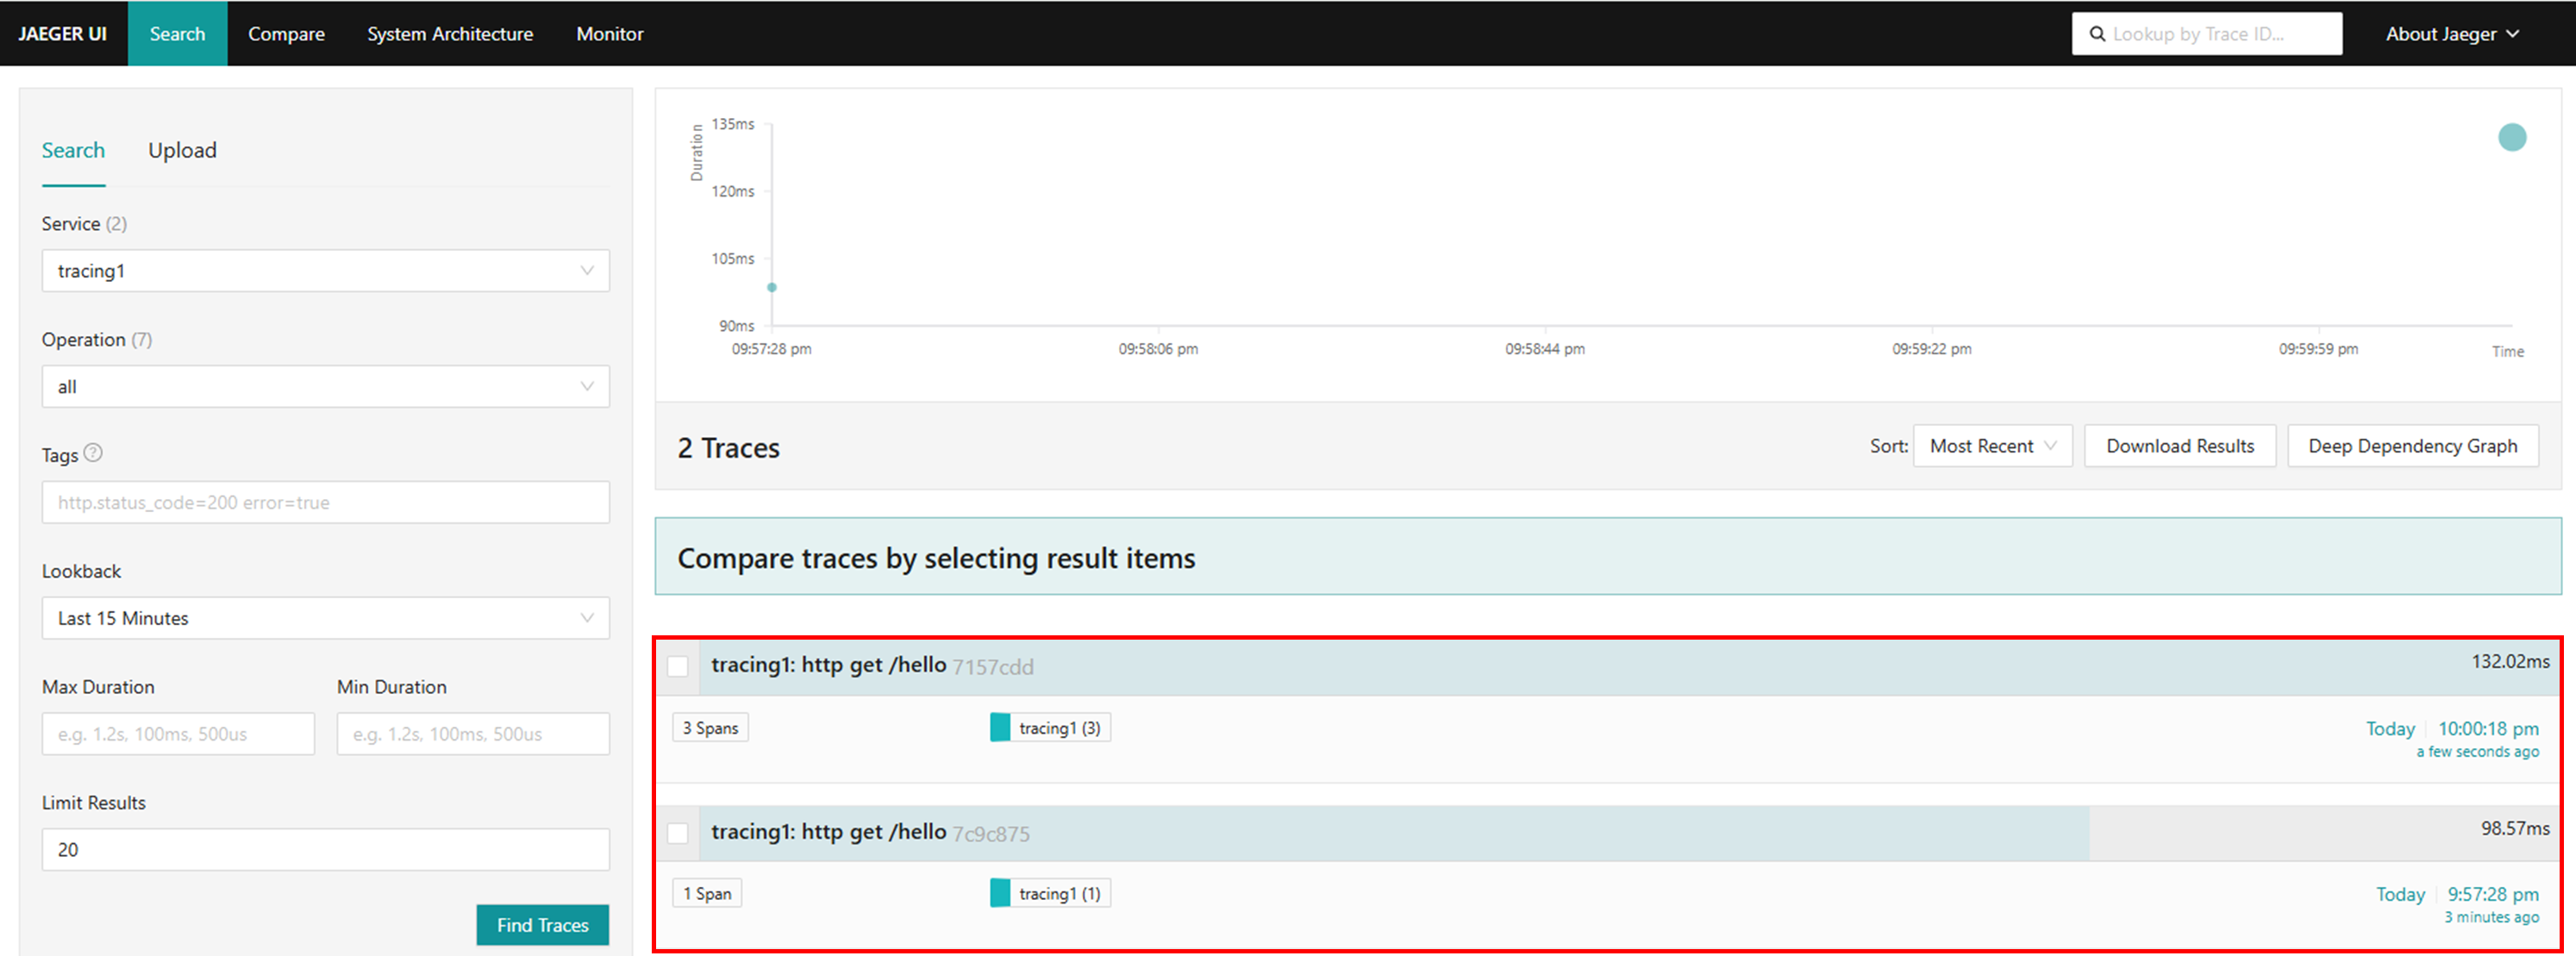
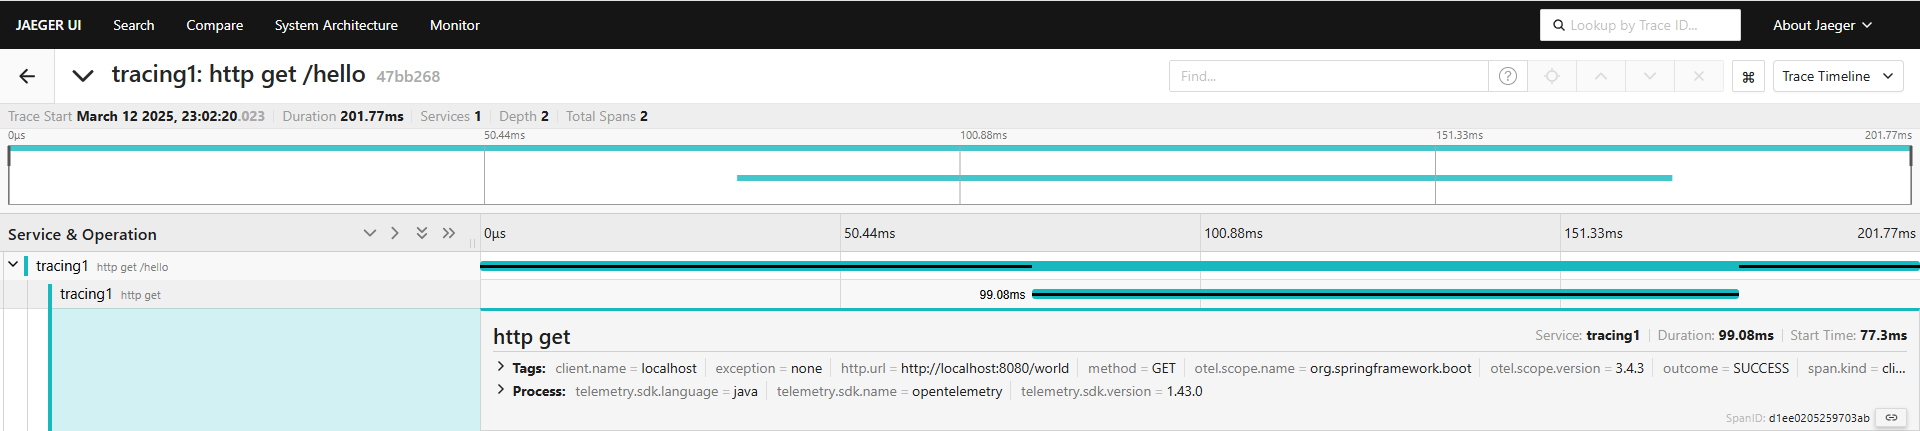
이렇게 설정한 이후에 로컬에서 테스트하기 위해서 jaeger를 통해서 확인해보면 다음과 같이 Distributed Tracing이 되는 것을 확인 할 수 있다.
@RestController
@Slf4j
@RequiredArgsConstructor
public class TracingController {

    private final RestClient.Builder builder;

    @GetMapping("/hello")
    public String hello() {
        log.info("hello");
        builder.baseUrl("http://localhost:8080").build().get().uri("/world").retrieve().toEntity(new ParameterizedTypeReference<String>() {
        });
        return "Hello World";
    }

    @GetMapping("/world")
    public String world() {
        log.info("world");
        return "World";
    }
}
Tag
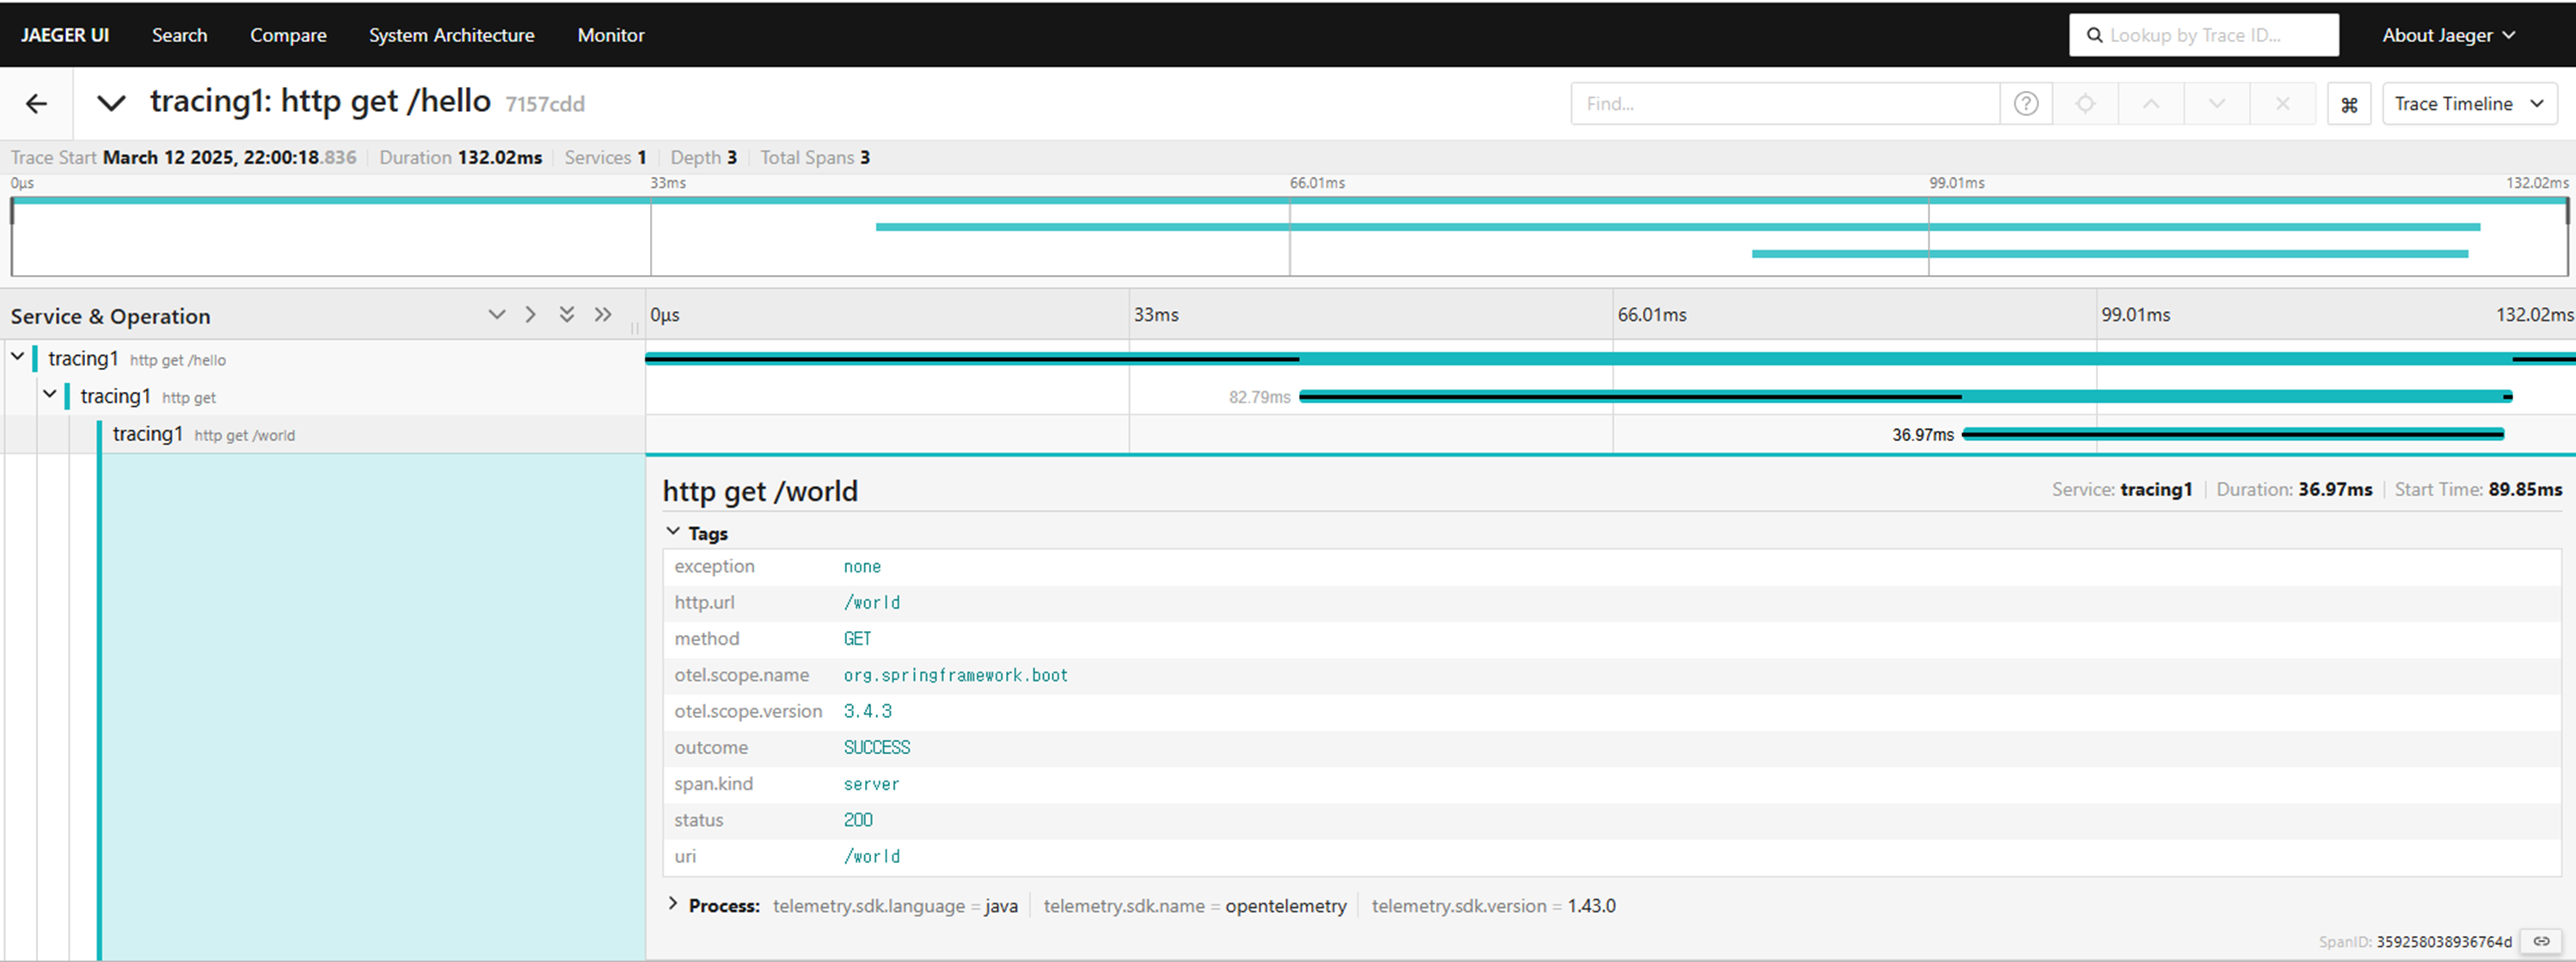
Span 정보를 확인해보면 Tags라는 속성들이 존재하는것을 확인 할 수 있으며 Tag 속성으로 조회가 가능하다. 이를 활용하여 다양한 검색들을 할 수 있기 때문에 Tag를 추가하도록 하였다.
우선 기본적인 Tags들은 ObservationConvention의 구현체로 설정되게 되며 해당 예시는 DefaultServerRequestObservationConvention에 해당된다. 이를 활용하여 DefaultServerRequestObservationConvention를 상속하여 getLowCardinalityKeyValues, getHighCardinalityKeyValues에 추가할 Tag를 정의하는 방식이 있다.
public class ExtendedServerRequestObservationConvention extends DefaultServerRequestObservationConvention {
    public ExtendedServerRequestObservationConvention(String name) {
        super(name);
    }

    @Override
    public KeyValues getLowCardinalityKeyValues(ServerRequestObservationContext context) {
        return KeyValues.of(this.exception(context), this.method(context), this.outcome(context), this.status(context), this.uri(context), KeyValue.of("TEST", "TEST"));
    }

    @Override
    public KeyValues getHighCardinalityKeyValues(ServerRequestObservationContext context) {
        return super.getHighCardinalityKeyValues(context);
    }
}
@Configuration
public class TracingConfig {
@Bean
FilterRegistrationBean<ServerHttpObservationFilter> webMvcObservationFilter(ObservationRegistry registry,
ObjectProvider<ServerRequestObservationConvention> customConvention,
ObservationProperties observationProperties) {
String name = observationProperties.getHttp().getServer().getRequests().getName();
ServerRequestObservationConvention convention = customConvention
.getIfAvailable(() -> new ExtendedServerRequestObservationConvention(name));
ServerHttpObservationFilter filter = new ServerHttpObservationFilter(registry, convention);
return filterRegistration(filter);
}
}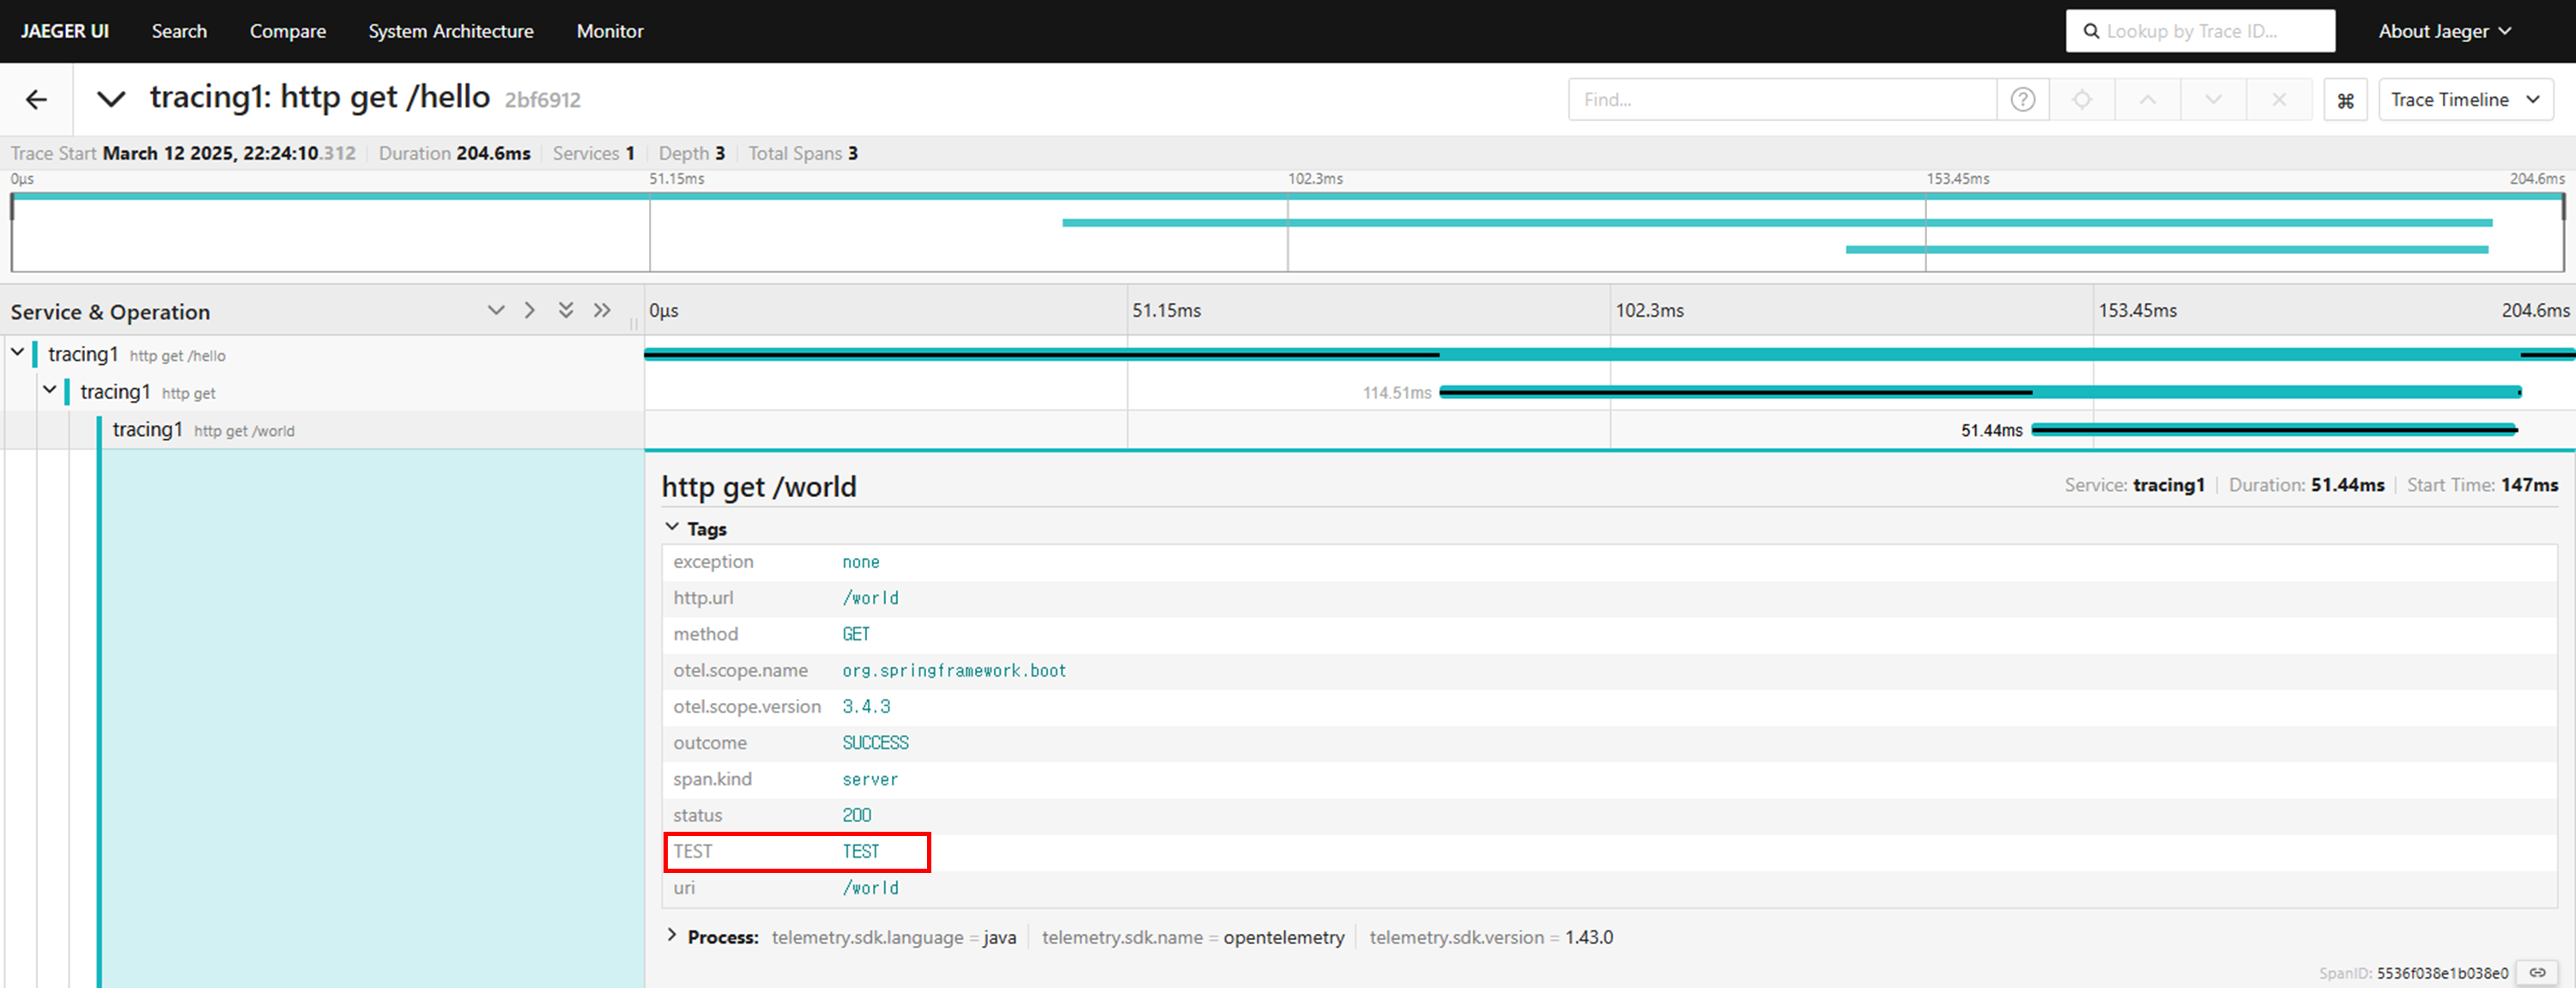
위와 같이 추가하고 싶은 방식의 ObservationConvention를 상속하거나 구현하여 추가가 가능하다.
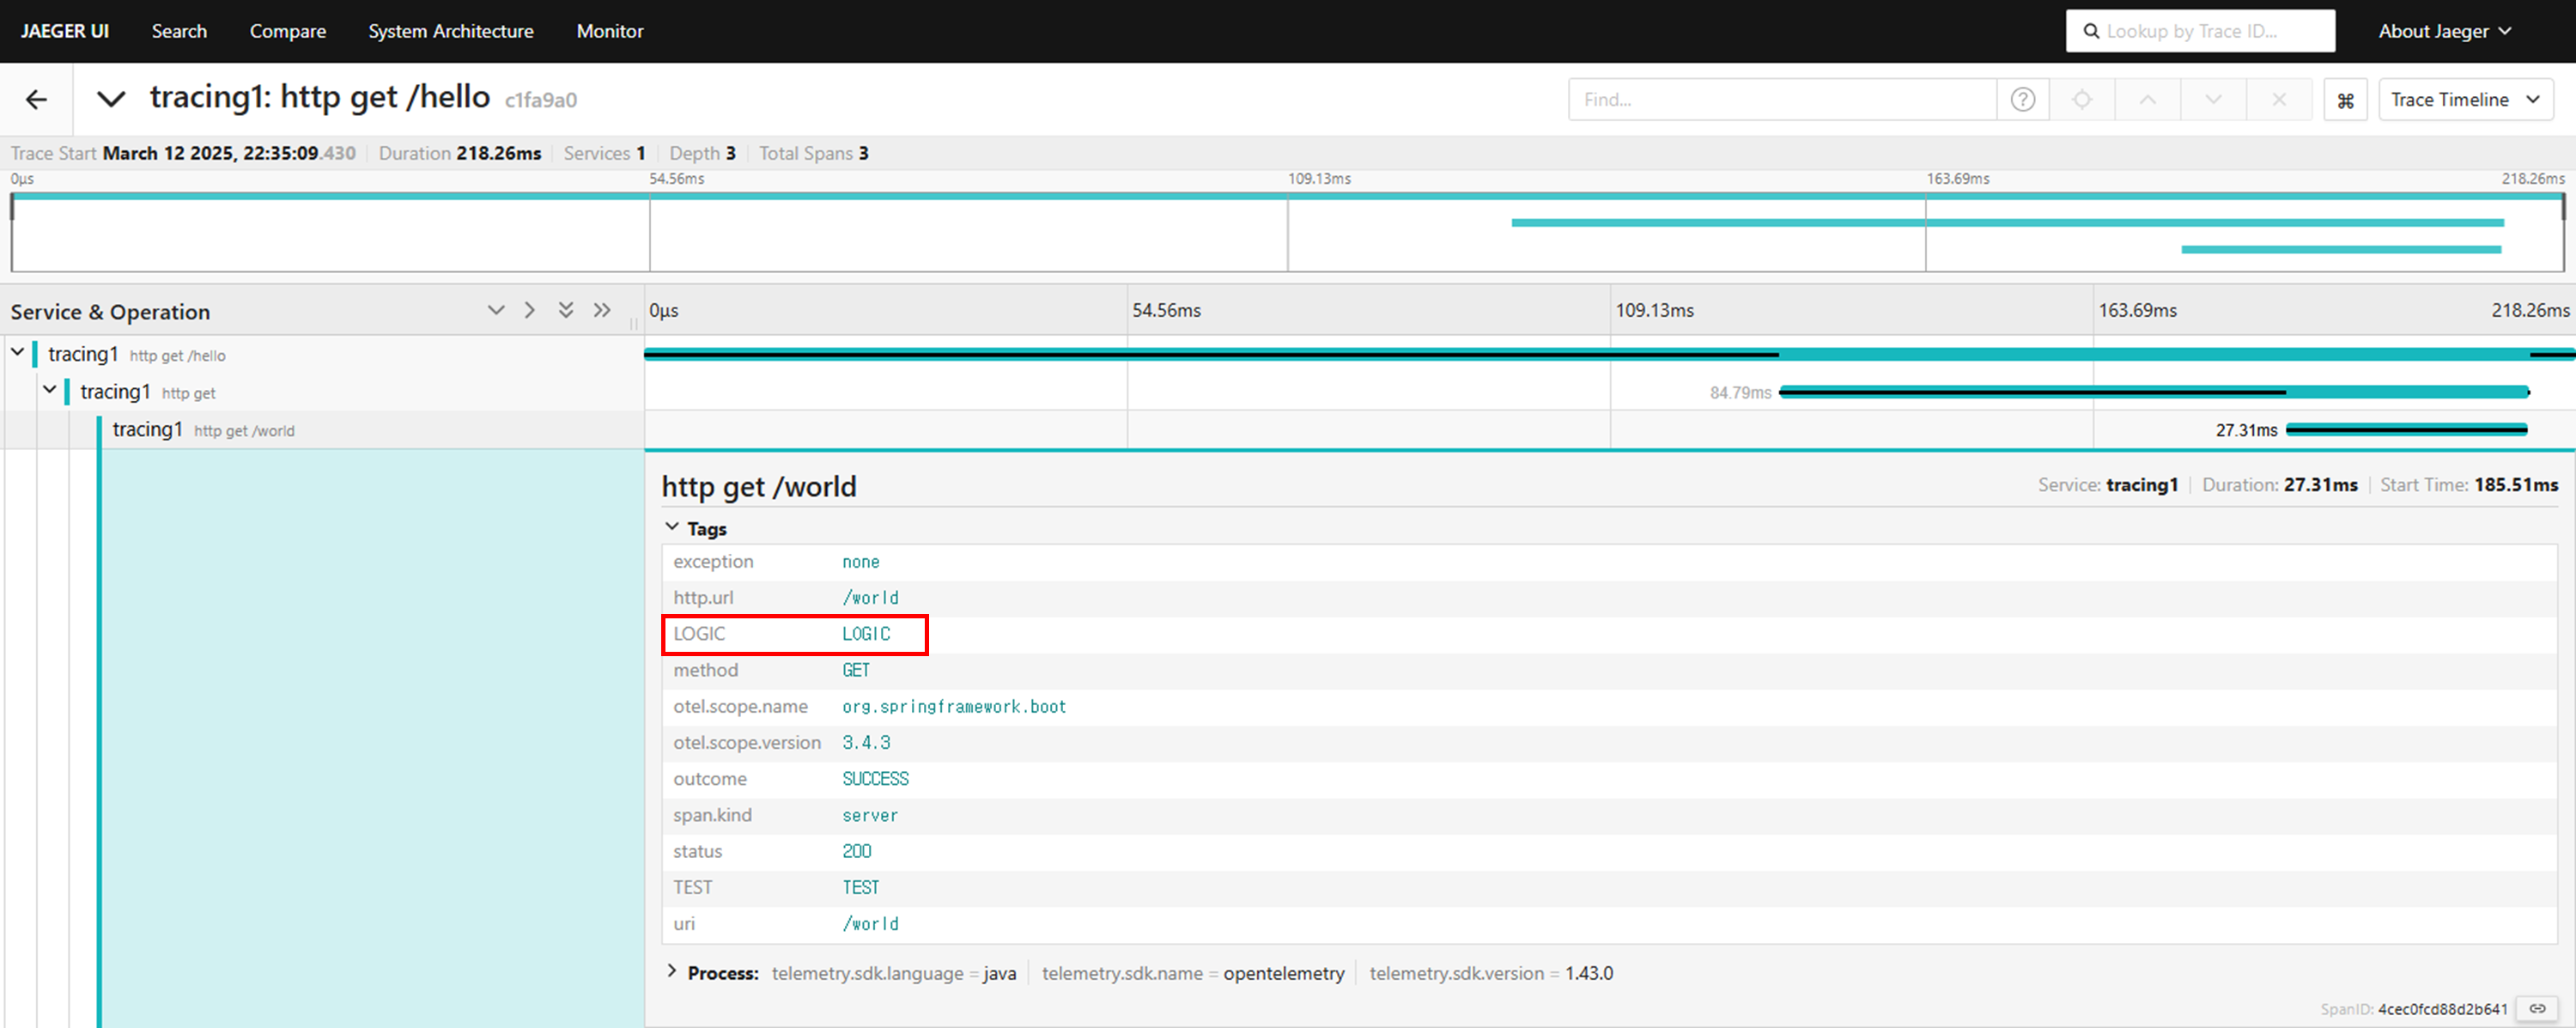
ObservationConvention에서는 로직 중간에 동적인 데이터를 Tag로 추가하기가 어려운 부분이 존재한다. 이 경우에는 ObservationRegistry를 활용하여 현재 Observation에 직접 Tag 추가가 가능하다.
@RestController
@Slf4j
@RequiredArgsConstructor
public class TracingController {

    private final RestClient.Builder builder;
    private final Optional<ObservationRegistry> observationRegistry;

    @GetMapping("/hello")
    public String hello() {
        log.info("hello");
        builder.baseUrl("http://localhost:8080").build().get().uri("/world").retrieve().toEntity(new ParameterizedTypeReference<String>() {
        });
        return "Hello World";
    }

    @GetMapping("/world")
    public String world() {
        log.info("world");
        observationRegistry.ifPresent(registry -> Optional.ofNullable(registry.getCurrentObservation()).ifPresent(observation -> observation.lowCardinalityKeyValue("LOGIC", "LOGIC")));
        return "World";
    }

    @Async
    @EventListener
    public void onTraceEvent(TraceEvent event) {
        log.info("onTraceEvent");
    }
}
Filter
특정 URI, Class, Method등을 Observation 제외하고 싶은 경우에는 ObservationPredicate 를 활용하여 Bean으로 등록하면 제외가 가능하다.
다음 예제는 요청 받은 /world에 대해서 Observation를 제외하는 경우로 /hello 로직에서 요청한 /world는 Observation이 정상적으로 이루어지지만 요청 받은 /world에 대해서는 제외된 것을 확인 할 수 있다.
@Configuration
public class TracingConfig {
    @Bean
    public ObservationPredicate observationPredicate() {
        List<String> paths = List.of("/actuator/**", "/world");
        PathMatcher pathMatcher = new AntPathMatcher("/");
        return (name, context) -> {
            if (context instanceof ServerRequestObservationContext) {
                return !paths.stream().anyMatch(path -> pathMatcher.match(path, ((ServerRequestObservationContext) context).getCarrier().getRequestURI()));
            } else {
                return !name.startsWith("spring.security");
            }
        };
    }
}
nextSpan
기본적인 Span 정책으로는 로직의 Method는 nextSpan이 발생하지 않는다. 하지만 상황에 따라 Method 단위로 Span를 생성하게 되면 분석하는데 도움이 된다.
Tracer를 통해서 nextSpan를 생성할 수 있다.
다음의 예제는 Pointcut를 활용하여 Span를 생성하는 로직이다. @Aspect를 활용하여 구현해도 되며 해당 로직은 Pointcut를 동적으로 설정하기위한 예제로 클래스명이 *Controller, *Service인 경우에 nextSpan를 수행하는 로직이다.
@Configuration
public class TracingConfig {

    @Bean
    public HttpClientRestClientCustomizer httpClientRestClientCustomizer() {
        return new HttpClientRestClientCustomizer();
    }

    @Bean
    public ThreadPoolTaskExecutorCustomizer threadPoolTaskExecutorCustomizer() {
        return builder -> builder.setTaskDecorator(new ContextPropagatingTaskDecorator());
    }

    @Bean
    public MethodTracingInterceptor methodTracingInterceptor(Tracer tracer) {
        return new MethodTracingInterceptor(tracer);
    }

    @Bean
    public DefaultPointcutAdvisor MethodTracingAdvisor(
            MethodTracingInterceptor methodTracingInterceptor
    ) {
        List<String> includes = List.of("*Controller", "*Service");

        String include = "(" + includes.stream().map(value -> "execution(* io.velog.." + value + ".*(..))").collect(Collectors.joining(" || ")) + ")";

        List<String> excludes = List.of("*Repository");
        String exclude = "(" + excludes.stream().map(value -> "!execution(* io.velog.." + value + ".*(..))").collect(Collectors.joining(" || ")) + ")";


        AspectJExpressionPointcut expressionPointcut = new AspectJExpressionPointcut();
        expressionPointcut.setExpression(include + " && " + exclude);
        return new DefaultPointcutAdvisor(expressionPointcut, methodTracingInterceptor);
    }
}
@Slf4j
@RequiredArgsConstructor
public class MethodTracingInterceptor implements MethodInterceptor {
private final Tracer tracer;
@Override
public Object invoke(MethodInvocation invocation) throws Throwable {
Method method = invocation.getMethod();
Span span = tracer.nextSpan();
String classPostfix;
String classSimpleName = method.getDeclaringClass().getSimpleName();
if (classSimpleName.endsWith("Service")) {
classPostfix = "Service";
} else if (classSimpleName.endsWith("Controller")) {
classPostfix = "Controller";
} else {
classPostfix = "None";
}
span.name(classPostfix + " " + method.getName());
span.start();
try (Tracer.SpanInScope ignored = tracer.withSpan(span)) {
before(method, span);
return invocation.proceed();
} catch (Exception ex) {
span.error(ex);
throw ex;
} finally {
span.end();
}
}
private void before(Method method, Span span) {
addTags(method, span);
}
void addTags(Method method, Span span) {
span.tag("current.class", method.getDeclaringClass().getSimpleName());
span.tag("current.method", method.getName());
}
}@RestController
@Slf4j
@RequiredArgsConstructor
public class TracingController {
private final RestClient.Builder builder;
private final AsyncService asyncService;
@GetMapping("/hello")
public String hello() {
log.info("hello");
asyncService.test();
builder.baseUrl("http://localhost:8080").build().get().uri("/world").retrieve().toEntity(new ParameterizedTypeReference<String>() {
});
return "Hello World";
}
@GetMapping("/world")
public String world() {
log.info("world");
return "World";
}
@Async
@EventListener
public void onTraceEvent(TraceEvent event) {
log.info("onTraceEvent");
}
}@Slf4j
@Service
@EnableAsync
@RequiredArgsConstructor
public class AsyncService {
private final ApplicationEventPublisher applicationEventPublisher;
@Async
public void test() {
log.info("async-test");
applicationEventPublisher.publishEvent(new TraceEvent());
}
}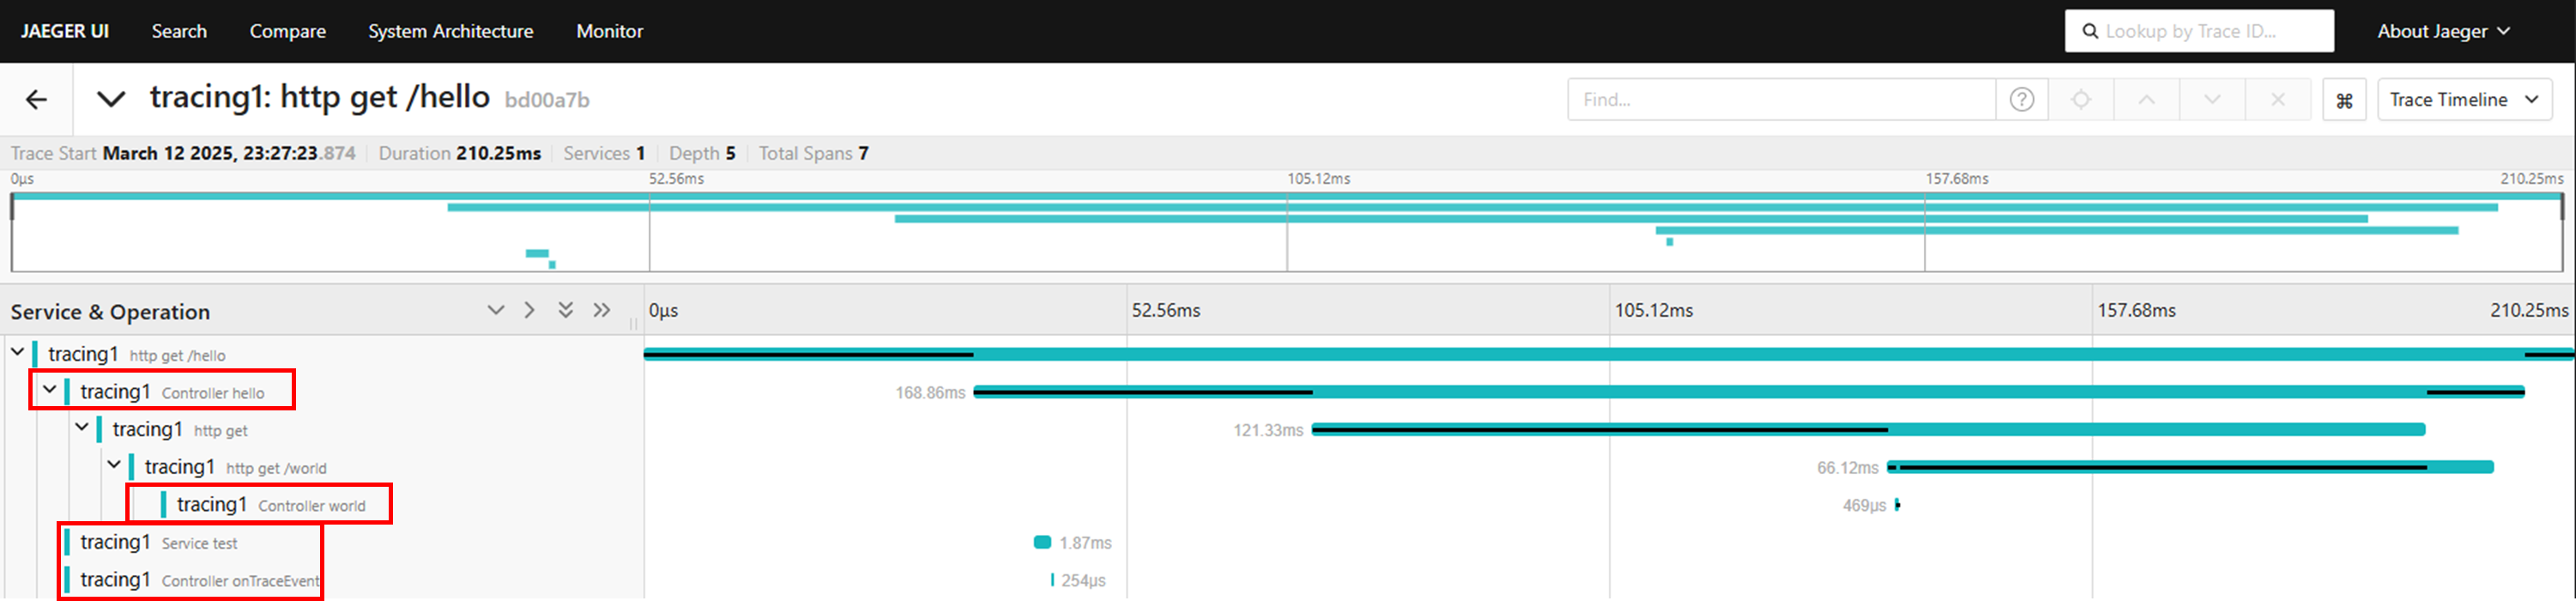
위의 사진과 같이 *Controller, *Service에 해당하는 메소드의 Span이 추가된것이 확인 가능하다
이와 같이 운영시 Tag에 화면명, 유저 등 속성을 추가하여 빠르게 식별 할 수 있을 것이며 Method 단위로 Span를 생성한다면 Exception이 발생한 로직이나 Slow Method 식별이 쉽게 될 수 있다. 다음 글에서는 위와 같이 설정하였을때 발생한 문제점과 우려? 사항에 대해서 작성할 예정이다.
