🍀 서울시청 클론 코딩
파일 구조/명
- index.html : 마크업
- assets/css/common.css : 공통소스 + bgiurl
- assets/css/layout.css : @import + header + footer
- assets/css/main.css : main(container)
- assets/css/reset.css : 기본 리셋
- assets/img : 사용 이미지
- assets/js/script.js : 스크립트
🍀 개념
🔹wai-aria
Web Accessibility Initiative – Accessible Rich Internet Applications
페이지를 새로고침 하지 않아도 페이지 영역에 역할, 속성, 상태 정보 추가
컨텐츠 내용이나 구조가 바뀌는 상황에서 페이지 전환 상태를 wai-area로 알려줄 수 있다 (새로고침 및 링크이동x)
- 동적 컨텐츠에 원활하게 접근
- 페이지 접근성 높임
🔸주의할 점
1. 태그 중복 선언 x
<!-- O -->
<input type="checkbox">
<button>버튼</button>
<fieldset>...</fieldset>
<ul>...</ul>
<!-- X (중복선언) -->
<input type="checkbox" role="checkbox">
<button role="button">버튼</button>
<fieldset role="group">...</fieldset>
<ul role="list">...</ul>
이미 태그가 role의 역할을 하고 있기 때문에, 따로 role을 선언해주지 않아도 된다.
2. 잘못된 ARIA 선언 X
<button role="heading">버튼</button>button 역할의 태그에 healing이라는 역할을 사용한 잘못된 ARIA를 선언하게 되면, 접근성 오류 발생
🔸서울시청 프로젝트 내 WAI-AREA
<div class="btn-controller">
	<div class="fraction"></div>
	<a href="" class="btn-nav prev" role="btn">이전</a>
	<a href="" class="btn-nav autoplay" role="btn">재생/정지</a>
	<a href="" class="btn-nav next" role="btn">다음</a>
 </div>
각각의 네비게이션 버튼을 a태그로 매겨주고, role='btn'을 설정했다.
<div class="fraction"></div>
                                    <!-- 버튼 -->
                                    <button class="btn-nav prev"><span class="blind">이전</span></button>
                                    <button class="btn-nav autoplay"><span class="blind">정지/재생</span></button>
                                    <button class="btn-nav next"><span class="blind">다음</span></button>
                                </div>
role:'btn'은 버튼의 역할을 하기 때문에 위와 같이 button태그를 사용한다면 안 써줘도 된다.
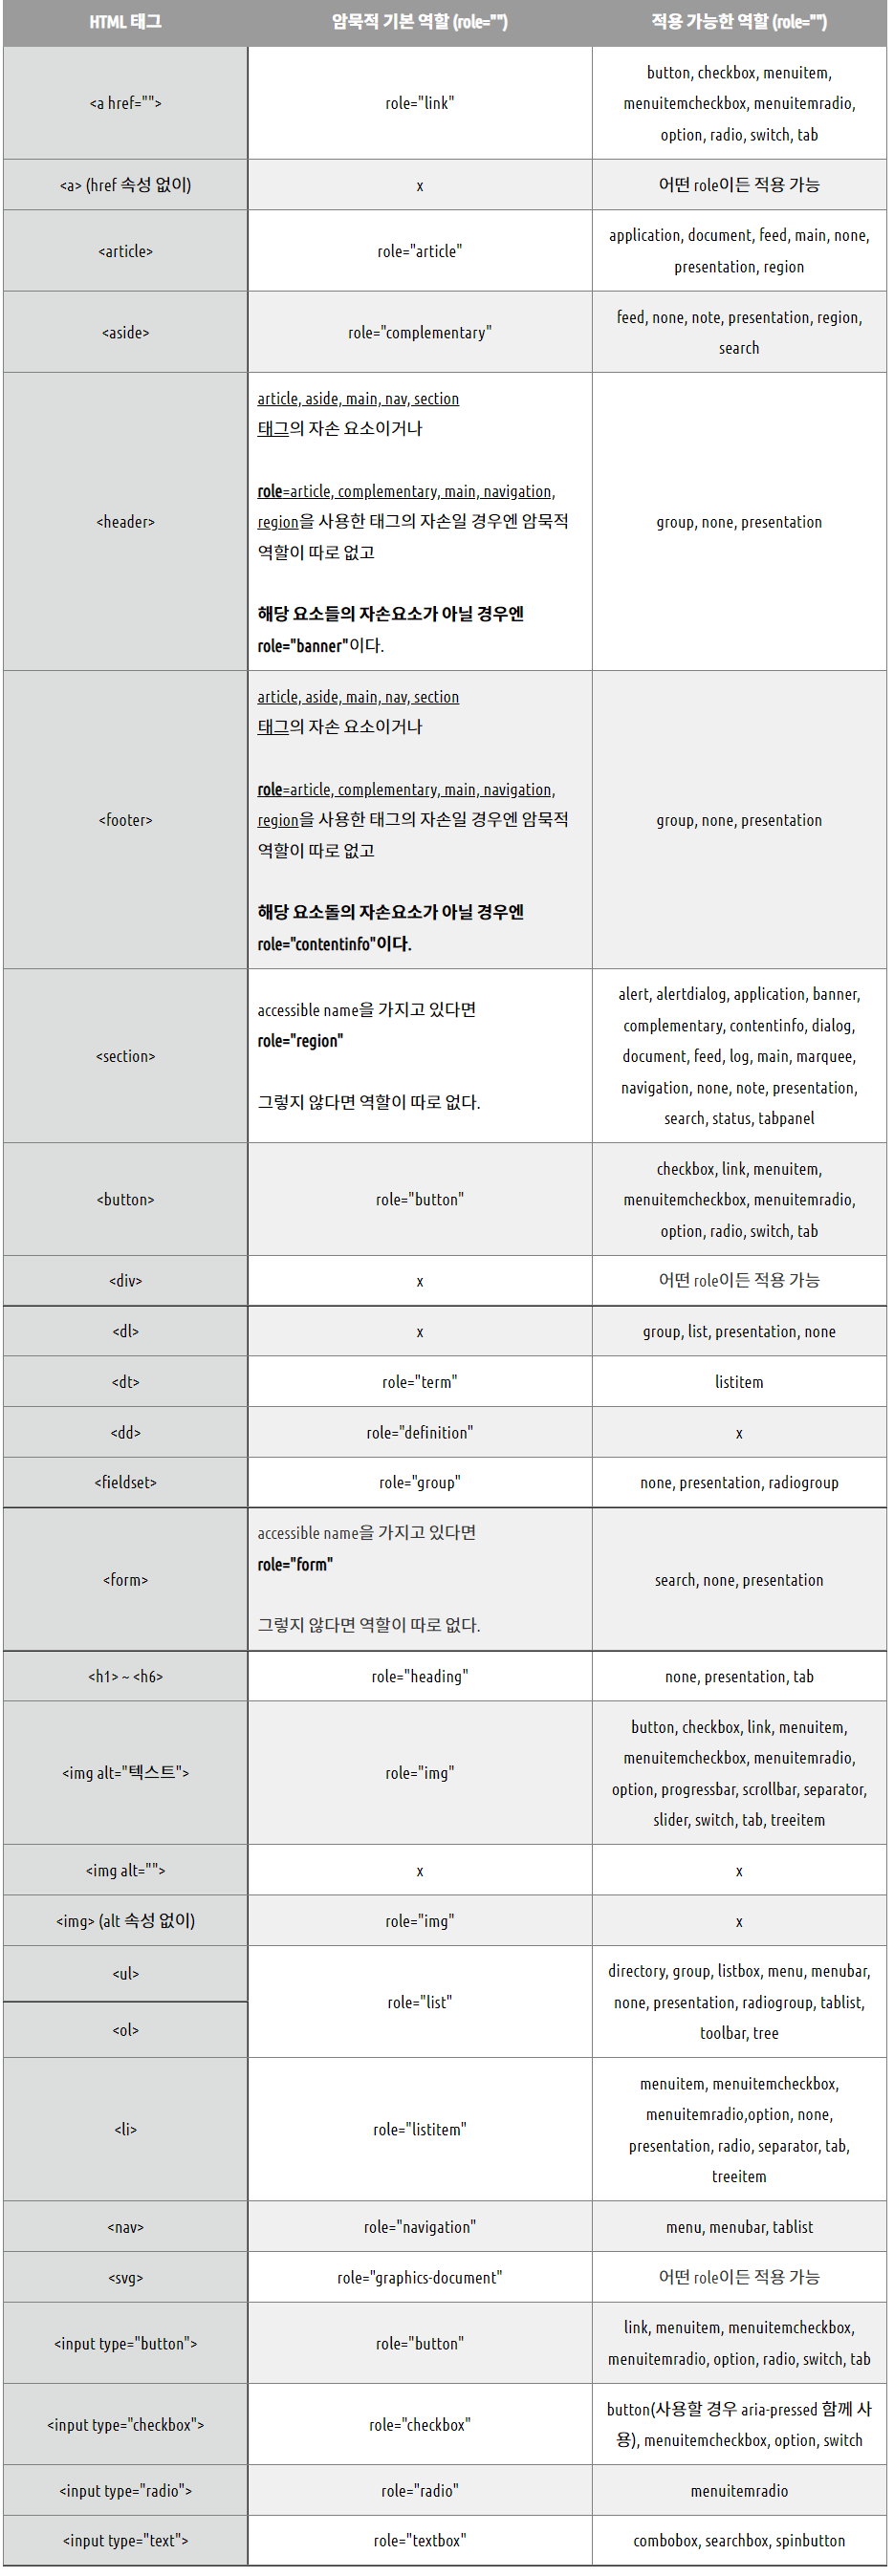
🔸각 태그 role(역할)
🔹swiper
유사한 요소를 Swiper Demos에서 찾아서 core로 script를 복사한 후 변수명을 수정해준다
기본 레이아웃
1. css
<link rel="stylesheet" href="https://unpkg.com/swiper/swiper-bundle.min.css">2.html
<div class="swiper-container">
    <div class="swiper-wrapper">
        <div class="swiper-slide">Slide 1</div>
        <div class="swiper-slide">Slide 2</div>
        <div class="swiper-slide">Slide 3</div>
        ...
    </div>
</div>
각 태그에 swiper-container > swiper-wrapper > swiper-slide 구조의 class명 지정
- 슬라이드가 여러개일시 "swiper-container 특정클래스명추가"
- swiper-slide가 슬라이드의 내용
3. js
<script src="https://cdn.jsdelivr.net/npm/swiper/swiper-bundle.min.js"></script>- const,var 둘 다 사용가능
- 복사한 swiper에서 작성한 변수명으로 변경
- class가 겹치는 것을 예방하기 위해 부모와 함께 작성 (ex) .sc-move .swiper
🔸head 순서
<link rel="stylesheet" href="https://cdn.jsdelivr.net/npm/swiper/swiper-bundle.min.css">
<link rel="stylesheet" href="./assets/css/layout.css">
<link rel="stylesheet" href="./assets/css/main.css">
가장 아래에 있을수록 힘이 강해지기 때문에
- css는 항상 위로 불러오기
- 내가 작성한 코드를 아래쪽에 지정
🔸skip 바로가기
<a href="#main">
<main class="container" id="#main">
wrapper 안에 a태그로 #id를 매겨준 후, 바로가기로 이동 할 곳에 id 지정
🔸id
<button class="btn-lang" id="btnLang">GO</button>- 고유한 식별 목적
- 페이지안에서 중복으로 사용할 수 없으며, 주로 스크립트에서 다루기 위해 지정
- 중간텍스트 대문자로 사용
🔸name
<select name="trans" id="select-trans">- 페이지 영역에서 중복 사용 가능
- 값을 서버로 보내기 위해 필요한 속성
🔸article 태그
페이지와 완전히 독립적으로 구성할 수 있는 요소를 정의할 때 사용
영역을 떼서 다른 곳에 붙여도 상관 없는 것들을 주로 article 태그로 작성한다
🔸img와 bgurl의 차이?
수시로 바뀌는 이미지는 빠른 수정을 위해 마크업에 img로 넣어주는 것이 좋다.
(ex) 날씨에 따른 날씨 이미지 / 배너 등
자주 바뀌지 않거나 고정된 이미지는 bgurl로 줘도 된다.
bgurl : 꾸밈을 위해 사용한 이미지
img : 정보제공을 위한 이미지
🔸검색창
- form get : 주소창 보안X 검색한 것이 주소값으로 따라나옴
- fieldset : 관련 폼 요소끼리 그룹화 (전체 영역 태그)
- input type=text : 검색창을 만들어주는 태그
- input placeholder="텍스트" : 입력 필드 안에 "텍스트" 안내 문구 추가
- legend : 폼 기능에 대한 제목 지정
- button : 페이지 안에서 작동되는 버튼 (새 링크X)
🔸target='_blank'
target='_blank' : 새탭 띄워 링크 이동하기
a태그에 작성
🔸제목-메인-버튼 배치 구성
전체보기 등 바로가기 링크는 항상 구조 마지막에 작성한다.
title -> 본문 -> btnlink 순서로 마크업 작성
<section class="sc-service">
	<h2 class="h2-title">주요 서비스</h2>
	<ul class="sort-list"></ul>
	<a href="" class="link-zip">전체누리집</a>
</section>
🔸footeter-h3
header, main의 제목은 h2로 작성하지만, footer의 제목은 h3을 메인으로 작성한다.
🔹css
🔸속성 정리
- box-sizing borderbox; - 박스의 크기를 테두리를 기준으로 크기를 정함
- cursor: pointer; - 손가락 모양(클릭) 마우스 커서의 모양 변경
- transform-origin: center center; - 중앙을 기준으로 transform
🔸sc-visual 메인슬라이드
메인슬라이드를 por로 기준점을 잡고
공통 전체와 공통 버튼에서 poa로 visual-news visual-citizen 두개를 겹친다/* 메인슬라이드 */ .sc-visual { width: 770px; position: relative; } /* 주요뉴스/시민참여 공통 전체 */ .sc-visual .group-visual { position: absolute; right: 0; width: 690px; height: 100%; } /* 주요뉴스/시민참여 공통 버튼 */ .sc-visual .visual-area{ position: absolute; top: 0; left: -80px; height: 50%; width: 80px; background-color: #d2e1e9; color: #333; font-weight: 600; text-align: center; }
[ visual-news가 active 활성화 되었을 때 ]
[ visual-citizen이 active 활성화 되었을 때 ]
🔸fraction
.sc-visual .move-btn .fraction{position: absolute;
    top: 50%;
    bottom: auto;
    left: auto;
    right: 80px;
    transform: translateY(-50%);
    width: auto;
    font-size: 13px;
    color: #fff;
    }
fraction은 swiper소스에서 w100%가 적용되어있기 때문에, 제거해주기 위해 width auto를 설정해준다.
🔸sc-move active
.sc-visual .group-visual.active {
      z-index: 2;
  }
.sc-visual .group-visual.active .visual-area{
    background-color: #0158a8;
    color: #fff;
}
주요뉴스/시민참여 버튼을 클릭했을 때, active를 부여한다
단, visual-area(공통 버튼)이 아닌, group-visual(공통 전체)에 매겨야 한다.
부모에서 active를 컨트롤 해야 함!
🔸sc-move 이동배너
.sc-move .swiper-slide a{display: block;}각각의 슬라이드를 a태그 db로 감싸줘야 효과를 부여할 수 있다
a를 감싸줘서 효과를 줄 수 있다
🔸sc-related btn
.sc-related .related-list .btn-more .btn-txt{
    position: relative;
    padding-right: 20px;
    font-size: 14px;}
각각 related list 버튼
a태그 btnmore에서 버튼 모양을 만들면, 정확한 범위가 잡히지 않기 때문에 span태그 btntxt로 범위를 감싸준다
🔸sc-related flex
.sc-related .tab-area{
    display: none;
    position: absolute;
    bottom: 47px;
    left: 0;
    width: 100%;
    padding: 10px 20px 20px;
    background: #fff;
    border: 1px solid #d0d0d0;
    box-sizing: border-box;
    z-index: 10;
}
.sc-related .tab-area .tab-list{
    display: flex;
    flex-wrap: wrap;
}
display flex를 적용해야하지만, tab-area에 flex를 주기 어렵다.
ul에 부모 div tab-area를 줘서, ul tab-list을 감싸준다.
div에 조건을 주고, ul에 flex를 부여한다
🔸transform: rotate(45deg);
버튼의 방향을 시계방향으로 45도 회전한다.
rotate는 회전한다는 의미
rotate(45deg) : 시계방향으로 45도 회전
rotateX(45deg) : X축을 기준으로 45도 회전
rotateY(45deg) : Y축을 기준으로 45도 회전
🔹js
🔸스크립트 주석 기본
/**
 * 스크립트 제목
 *
 * @version 1.0.0
 * @since 2022-08-16
 * @author YenaRyu
 */
🔸length
동일한 의미를 가짐
this의 부모(group-visual) 중 주요뉴스(visual-news)를 클릭했다면, 시민참여(visual-citizen)를 정지(stop)하라if($(this).parents('.group-visual').hasClass('visual-news')){ visualCitizen.autoplay.stop()if($(this).parents('.group-visual').length){ visualCitizen.autoplay.stop()length : 태그의 갯수
visual-news가 선택되었기때문에 visual-citizen 태그의 갯수가 없다
length:0이기 때문에, else로 빠져 citizen이 정지된다.
🔸swiper demos Pagination에서 가져오기
var swiper = new Swiper(".mySwiper", { pagination: { el: ".swiper-pagination", type: "fraction", }, navigation: { nextEl: ".swiper-button-next", prevEl: ".swiper-button-prev", }, });pagination의 스크립트를 복사해 응용한다.
pagination: { el: ".sc-move .fraction", type : "fraction", },
- 분수 형태의 pagination의 type은 fraction
- clickable: true : 클릭했을때 필요한 페이지로 넘어가게
🔸swiper demos Navigation에서 가져오기
var swiper = new Swiper(".mySwiper", { navigation: { nextEl: ".sc-move .next", prevEl: ".sc-move .prev", }, });navigation의 스크립트를 복사해 응용한다
navigation: { nextEl: ".sc-move .next", prevEl: ".sc-move .prev", },내가 작성한 클래스명에 맞게 수정
🔸swiper demos Autoplay에서 가져오기
var swiper = new Swiper(".mySwiper", { spaceBetween: 30, centeredSlides: true, autoplay: { delay: 2500, disableOnInteraction: false, }, pagination: { el: ".swiper-pagination", clickable: true, }, navigation: { nextEl: ".swiper-button-next", prevEl: ".swiper-button-prev", }, });autoplay의 스크립트를 복사해 필요한 부분을 응용한다.
autoplay: { delay: 2000, //2초로 이동 disableOnInteraction: false, }스와이퍼 이동하는 시간(초)에 맞게 값을 수정한다
🔸메인슬라이드active
- visualarea을 눌렀을 때, 나(visual-area)의 부모(group-visual)에 active 클래스를 주면, 나머지 group-visual에서는 active클래스를 빼라
- 시민참여는 autoplay버튼이 디폴트값으로 stop (왜냐면 시작시 주요뉴스가 active상태니까)
- 화면 정지 후 다른 group-visual로 이동했다와도 그대로 정지상태여야함
- 시민참여를 누른 경우, 시민참여가 active를 가지고 있지 않기(stop)때문에, 재생(start)됨
- 시민참여가 재생(active = start)되었기때문에, 주요뉴스는 정지(stop) (항상 반대되는 것은 정지된다)
- 주요뉴스가 정지(active없음)되어있기때문에, 시민참여에서 주요뉴스로 다시 이동했을 때 주요뉴스가 다시 재생(start)된다
- 주요뉴스가 재생(start)되었고 + 부모(group-visual) 중 주요뉴스를 클릭했다면 시민참여는 정지(stop)
$('.visual-area').click(function(e){
e.preventDefault();
$(this).parents('.group-visual').addClass('active').siblings().removeClass('active')
if($(this).parents('.group-visual').hasClass('visual-news')){
      visualCitizen.autoplay.stop()
if(!$('.visual-news .autoplay').hasClass('active')){
visualNews.autoplay.start()
}
}else{
visualNews.autoplay.stop()
if(!$('.visual-citizen .autoplay').hasClass('active')){
visualCitizen.autoplay.start()
}
}
});
visualCitizen.autoplay.stop()🔸버튼 active
1. active가 아니면 재생
active를 가지고 있지 않다면, autoplay를 눌렀을 때 정지+재생이미지(active)
 if (!$(this).hasClass('active')) {
    moveBanner.autoplay.stop();
    $(this).addClass('active');
2. active가되면 정지
active를 가지고 있다면, autoplay를 눌렀을 때 재생+정지 이미지(remove active)
  } else {
    moveBanner.autoplay.start();
    $(this).removeClass('active');
  }
})
🔸slideup down
- btn-more 박스를 눌렀을 때, active를 갖고 있는지 확인
- slideDown으로 클릭시 열리게 (각각 열기)
- active가 없는 상태라 닫혀있기때문에, slidedown으로 tab-area를 열어줌
- tab-area를 열어줬기때문에, active클래스를 추가해서 배경색+아이콘 변화
- slideDown된 btn-more을 다시 클릭했을때 slideUp으로 닫히게 (같은 것을 2번 누른경우 닫히게)
- 한번 더 클릭했을 때, active가 있기때문에 slideup으로 닫아줌
- 닫아주면서 active 제거로 배경색+아이콘 원상복귀
- slideDown된 상태로, 다른 btn-more 클릭 시 slideUp으로 닫기 (전체 닫기)
- 다른 btn-more클릭 시 현재 열려있는거 모두 slideUp으로 닫기
- 닫아주면서 active 제거로 배경색+아이콘 원상복귀
$('.btn-more').click(function(e){

  if($(this).hasClass('active')){

    $(this).removeClass('active');
    $(this).siblings('.tab-area').slideUp();

  }else{
    $('.btn-more').removeClass('active');
    $('.tab-area').slideUp();

    $(this).addClass('active');
    $(this).siblings('.tab-area').slideDown();
  }
🔸keyevent
- keycode===9 : tab키를 의미(모든 키보드는 넘버링이 있다)
- e.shiftkey : shift키
- ! : 부정의 의미. !로 shift를 부정해준다
if(e.keyCode === 9 && !e.shiftKey)
🍀 회고
🔹문제상황 해결방안
시안의 마크업과 다른 경우, 공백 임의로 정하기
로고 / 서울소식+로그인 으로 나뉘기때문에,
시안에서 서울소식과 로그인 사이의 공백을 구할 수 없다 (float로 구성되어 있음)
나는 flex를 사용하여, 전체에서 df jcsb를 해줬기 때문에 로고와 사이공백을 해결할 수 없음
헤더+서울소식로 구성하여, 로그인으로 헤더와 서울소식사이에 ml을 주고, jcsb로 간격부여하는 방법으로 시도함
btn-search돋보기의 위치
btn-search에 poa top0right0을 주지 않으면, searcharea w460을 따라가 돋보기의 위치가 정중앙에 위치한다
poa, t0 r0을 무조건 부여해야 한다.
.search-area{display: flex;
    width: 460px;
    border: 3px solid #2292e9;
    position: absolute;
    left: 50%; top: 40px;
    margin-left: -245px;
    margin-top: 0;
    border-style: border-box;
    padding: 0 10px;
    line-height: 38px;
    font-size: 16px;
    font-family: 'Nanum Gothic', sans-serif;
}

.search-area .btn-search{
    background-position: -32px -97px;
    display: inline-block;
    width: 36px; height: 36px;
    position: absolute;
    right: 0;
    top: 0;
}