(구현에 성공한 영상)
구현 과정
원본 사이트에서 CSS를 확인해보니 스크롤 위치에 따라 3가지 속성이 변동되었다. (position, top, bottom)
섹션 위쪽
position: absolute
top: 0
bottom: unset
섹션 중간
position: fixed
top: 0
bottom: 0
섹션 아래쪽
position: absolute
top: unset
bottom: 0
3가지 CSS를 적절한 조건으로 분기하여 섹션 내 스크롤 위치에 따라 알맞은 CSS를 적용하는 것이 관건이었다.
분기에 필요한 정보를 entry 객체에서 가져오기 위해 console에 찍어보았다.
1번째 시도
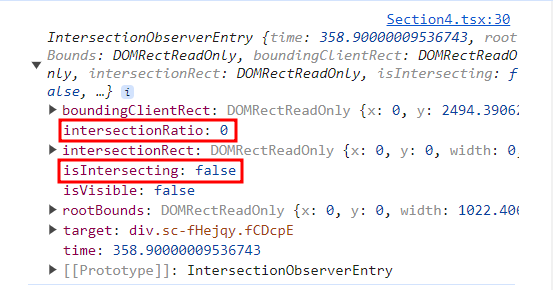
처음에는 isIntersecting과 intersectionRatio 2가지를 활용하여 분기를 했다.
isIntersecting은 boolean이고 intersectionRatio는 0부터 1 사이 number여서 intersectionRatio를 0 -> 0.3 -> 0.8 정도로 나누면 isIntersecting과 섞어서 3가지 분기를 할 수 있을 것 같았다.
useEffect(() => {
    if (!containerRef.current) return;

    const callback = (entries: IntersectionObserverEntry[]) => {
      entries.forEach((entry) => {
        if (
          !entry.isIntersecting && // false
          entry.intersectionRatio < 0.5 // 섹션 윗쪽이 보일 때
        ) {
          setStyleNumber('1');
        } else if (
          entry.isIntersecting && // true
          entry.intersectionRatio === 0.5 // threshold가 0.5일 때
        ) {
          setStyleNumber('2');
        } else if (
          !entry.isIntersecting && // false
          entry.intersectionRatio > 0.5 // 섹션 아래쪽만 보일 때
        ) {
          setStyleNumber('3');
        }
      });
    };

    ...

  }, []);
하지만 실제로는 예상과 달리 2가지 분기만 적용되었다.
intersectionRatio가 '화면에 교차되는 지점'이 아니라 '비율'이라는 점을 간과했던 것이다.
스크롤이 요소의 절반을 넘어가면 값이 1을 향해 증가할 거라 생각했지만 실제로는 화면에 보이는 면적이 다시 줄어들면서 다시 0에 가까워졌다.
3가지의 분기를 하려면 또 다른 기준이 필요했다.
2번째 시도
entry 객체에서 boundingClientRect와 intersectionRect 속성을 추가로 발견했다.
둘의 차이는 다음과 같다. (참고: Heropy님 사이트)
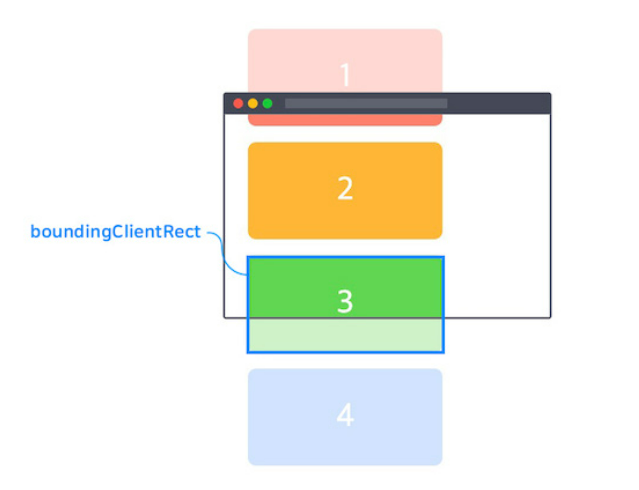

boundingClientRect는 관찰 대상인 요소 사각형 전체를 뜻하고 intersectionRect는 관찰 대상 사각형 중 화면과 교차되는 영역을 가리키는 개념이다.
또 둘 다 top, left, bottom, right, x, y라는 6개의 속성도 가지고 있다.
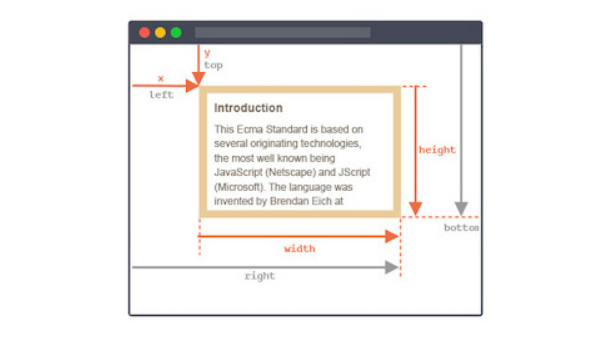
위 내용은 DOMRectReadOnly 인터페이스의 개념이다.
x와 left 및 y와 top이 각각 같다는 걸 알 수 있다. (MDN에도 나와 있음)
이제 스크롤 위치에 따라 각각의 boundingClientRect와 intersectionRect의 6가지 값이 어떻게 찍히는지 확인하기 위해 교차 전 - 교차 중 - 교차 후 - (스크롤을 다시 올리면서) - 교차 중 - 교차 전으로 총 5가지 위치의 entry 객체 상태를 확인했다.
이 중에서 '변하는 값'도 있고 '변하지 않는 값'도 있었는데 스크롤 위치마다 다른 CSS를 주려면 '변하는 값'을 활용해야 했기 때문에 변하는 값 중에서 값이 상대적으로 크게 변했던 boundingClientRect의 bottom을 최종적으로 분기 조건에 추가했다.
수정한 코드
useEffect(() => {
    if (!containerRef.current) return;

    const callback = (entries: IntersectionObserverEntry[]) => {
      entries.forEach((entry) => {
        if (
          !entry.isIntersecting &&
          entry.intersectionRatio < 0.5 &&
          entry.boundingClientRect.bottom > 750 // *
        ) {
          setStyleNumber('1');
        } else if (
          entry.isIntersecting &&
          entry.intersectionRatio === 0.5 &&
          entry.boundingClientRect.bottom < 750 // *
        ) {
          setStyleNumber('2');
        } else if (
          !entry.isIntersecting &&
          entry.intersectionRatio < 0.5 &&
          entry.boundingClientRect.bottom < 750 // *
        ) {
          setStyleNumber('3');
        }
      });
    };

    ...

  }, []);
문제점 확인
위 방법으로 '기능'이 동작하는 코드에는 성공했다 👏👏
하지만 같은 코드를 다른 섹션에도 적용하려고 했더니 (위의 '750'과 같은) 절대 값을 매번 줘야 하는 확장성이 없는 코드였다.
만약 실제와 달리 CSS가 필요한 섹션이 하나뿐이라고 해도 사용자가 보는 기기의 크기가 달라지거나 화면 사이즈를 조절하여 반응형이 적용될 경우 위 코드는 바로 사용할 수 없게 되었다.
다른 방법을 추가로 찾아보았다.
3번째 방법 (성공)
화면 사이즈와 같은 외부 요건에 영향을 받지 않는 확실한 기준점을 찾기 위해 entry 객체 속성을 다시 확인했다.
위에서 설명했던 두 가지 Rect의 속성 중 스크롤에 따라 '변동'되는 값들은 각각 다음과 같았다.
- boundingClientRect의 top과 bottom
- intersectionRect의 bottom
스크롤을 하다가 이 중에서 boundingClientRect의 top이 섹션 위쪽에서 0보다 작아지는 것을 발견했다.
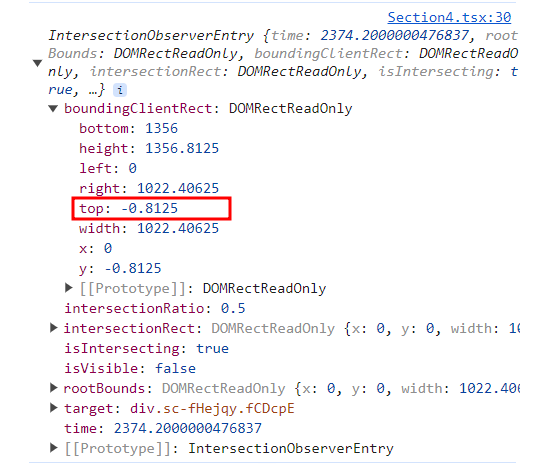
내가 생각해본 top이 음수가 되는 이유
스크롤을 내림에 따라 요소의 top 지점이 화면 뷰포트의 바깥으로 벗어나면서 top은 음수가 된다.
스크롤을 더 아래로 내려도 top은 여전히 음수인데, 타겟 섹션이 위로 이동하는 한 boundingClientRect의 top은 계속해서 뷰포트의 위쪽에 있을 것이기 때문이다.
이걸 활용해서 3번째 분기 조건을 추가할 수 있었다.
[ 수정하기 전 ]
- 1번과 3번이 똑같아져서 3가지 분기가 안 됨
- 섹션의 위쪽만 보일 때
- isIntersecting = false
- intersectionRatio < 0.5
- 섹션이 완전히 교차할 때
- isIntersecting = true
- intersectionRatio === 0.5
- 섹션의 아래쪽만 보일 때
- isIntersecting = false
- intersectionRatio < 0.5
[ 수정 후 ]
- boundingClientRect.top 조건을 추가하여 3가지 분기가 가능해짐
- 섹션의 위쪽만 보일 때
- isIntersecting = false
- intersectionRatio < 0.5
- boundingClientRect.top > 0
- 섹션이 교차할 때
- isIntersecting = true
- intersectionRatio === 0.5
- boundingClientRect.top < 0
- 섹션의 아래쪽만 보일 때
- isIntersecting = false
- intersectionRatio < 0.5
- boundingClientRect.top < 0
구현 완료
스크롤을 내리면 중간쯤 뒤의 영상 배경이 멈춰서고 스크롤을 더 내리면 움직였다가 다시 올리면 중간쯤에 또 멈춰선다.
즉, 3가지 CSS가 모두 잘 적용되었다.
최종 코드
// src/components/Technology/Section4

export const Section4 = () => {
  const containerRef = useRef<HTMLDivElement | null>(null);
  const [styleNumber, setStyleNumber] = useState('1');

  useEffect(() => {
    if (!containerRef.current) return;

    const callback = (entries: IntersectionObserverEntry[]) => {
      entries.forEach((entry) => {
        if (
          !entry.isIntersecting &&
          entry.intersectionRatio < 0.5 &&
          entry.boundingClientRect.top > 0
        ) {
          setStyleNumber('1');
        } else if (
          entry.isIntersecting &&
          entry.intersectionRatio === 0.5 &&
          entry.boundingClientRect.top < 0
        ) {
          setStyleNumber('2');
        } else if (
          !entry.isIntersecting &&
          entry.intersectionRatio < 0.5 &&
          entry.boundingClientRect.top < 0
        ) {
          setStyleNumber('3');
        }
      });
    };

    const option = {
      root: null,
      rootMargin: '0px',
      threshold: 0.5,
    };

    const observer = new IntersectionObserver(callback, option);

    observer.observe(containerRef.current);

    return () => {
      observer.disconnect();
    };
  }, []);

  return (
    <Container ref={containerRef}>
      <BackgroundVideo
        className={
          styleNumber === '1'
            ? 'before'
            : styleNumber === '2'
            ? 'fixed'
            : 'after'
        }
      >
        <VideoContainer loop playsInline autoPlay>
          <source src={VIDEO_SOURCE} type={VIDEO_TYPE}></source>
        </VideoContainer>
      </BackgroundVideo>

	  {/* 영상 위 텍스트 */}
      <TextContainer>
        ...
      </TextContainer>
    </Container>
  );
};

const Container = styled.div`
  position: relative;
  width: 100%;
  height: 200vh;
  background-color: rgb(18, 20, 23);
`;

const BackgroundVideo = styled.div`
  position: relative;
  width: 100%;
  height: auto;

  &.before {
    position: absolute;
    top: 0;
    bottom: unset;
  }

  &.fixed {
    position: fixed;
    top: 0;
    bottom: unset;
  }

  &.after {
    position: absolute;
    top: unset;
    bottom: 0;
  }
  ...
`;
리팩토링 🛠️
다음 날 코드를 보니 다음처럼 리팩토링할 부분이 보였다.
-
styleNumber 1, 2, 3 대신 더 의미 있는 클래스명 추가 ('beforeIntersect' 등)
-
if문을 간소화 하다보니 없어도 될 조건 발견 (애초에 intersectionRatio를 사용할 필요가 없었음)
-
중첩된 if문 중 바깥쪽 if문의 가독성에 좋지 않은 else문을 제거하고 조건 2가지를 따로 부여 (isIntersecting 부분)
이후 Observer 로직은 커스텀 훅으로 추가 분리했다.
리팩토링 코드
// src/components/Technology/Section4

export const Section4 = () => {
  const containerRef = useRef<HTMLDivElement | null>(null);
  const [backgroundStyle, setBackgroundStyle] = useState('beforeIntersect'); // 변경

  useEffect(() => {
    if (!containerRef.current) return;

    const callback = (entries: IntersectionObserverEntry[]) => {
      entries.forEach((entry) => {
        if (isIntersecting) {
          if (boundingClientRect.top < 0) {
            setBackgroundStyle('isIntersecting');
          }
        }

        if (!isIntersecting) {
          if (boundingClientRect.top > 0) {
            setBackgroundStyle('beforeIntersect');
          } else {
            setBackgroundStyle('afterIntersect');
          }
        }
      });
    };

  ...

  }, []);

  (return문)
`;