MNIST dataset은 사람의 손글씨(숫자 0~9)의 이미지를 가지고 있는 dataset이다.
아래 그림처럼 생겼다.

이 데이터의 정보는 아래와 같다
- 28x28 gray scale image → width, height 모두 28픽셀
- Training data: 60000개
- Test data: 10000개
데이터 가져오기
이 데이터를 다운받기 위해서는 공홈에 들어가서 압축 파일을 다운받고, 파일을 풀어서 raw data를 읽어와야 하지만 torchvision에서는 클래스로 쉽게 사용할 수 있게 제공한다.
torchvision.datasets.MNIST 로 접근할 수 있다.
# torchvision이 제공하는 MNIST dataset 가져오기
from torchvision.datasets import MNIST
import matplotlib.pyplot as plt

# 실행하면 MNIST dataset이 download된 후에 load
train_ds = MNIST(root='.', train=True, download=True)
img, label = train_ds[0] # first sample
# NOTE: img에는 28x28 PIL.Image object -> 학습에 쓸 수 없는 형태

# 가져온 sample visualization
fig, ax = plt.subplots(figsize=(4, 4))
ax.imshow(img, cmap='gray')  # gray scale이라서
ax.set_title(f"Class {label}") # label -> title
ax.axis('off')
plt.show()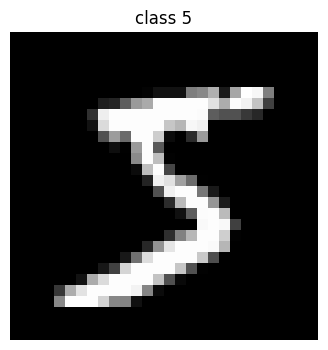
데이터를 가져온 후, 첫번째 샘플을 가져온 다음에 시각화하는 코드이다.
Image Transform 사용하기
from torchvision.datasets import MNIST
from torchvision.transforms import Compose, Resize, ToTensor

# Resize: 28x28 -> 1x32x32 (앞의 1은 흑백. color channel == 1)
# ToTensor: PIL.Image object -> torch.Tensor
# Compose: Resize, ToTensor를 묶어주는 역할
img_transform = Compose([Resize([32, 32]), ToTensor()])

train_ds = MNIST(root='.', train=True, download=True, transform=img_transform)
img, label = train_ds[0] # img에는 PIL.Image object -> 학습에 쓸 수 없는 형태
print(f"type: {type(img)}") # class
print(f"shape: {img.shape}") # image shape
print(f"dtype: {img.dtype}") # element들의 data type
print(f"max / min: {img.max()} / {img.min()}") # max, min
print(f"label: {label}")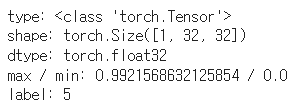
위의 출력결과로 알 수 있는 것은 다음과 같다
- 사진의 shape는 torch.Size([1, 32, 32])
- elements의 data type는 torch.float32
- 해당 사진의 라벨은 5라고 되어있다.
DataLoader
from torch.utils.data import DataLoader

from torchvision.datasets import MNIST
from torchvision.transforms import Compose, Resize, ToTensor

BATCH_SIZE = 16
img_transform = Compose([Resize([32, 32]), ToTensor()])

train_ds = MNIST(root='.', train=True, download=True, transform=img_transform)
train_loader = DataLoader(dataset=train_ds, batch_size=BATCH_SIZE, shuffle=True)

for imgs, labels in train_loader:
    print(imgs.shape)
    print(labels.shape)

    break
여기서는 batch_size를 16이라고 정했다. 즉 한 번에 처리할 데이터의 양을 의미한다.
그리고 Compose함수를 통해서 이미지 크기를 [32,32]로 바꾸고 텐서로 변환하는 전처리를 진행한다.
앞에서 같은 방법으로, 하지만 방금 위에서 정의한 대로 이미지를 변환하여 가져온다.
변환한 이미지의 크기와 해당 배치의 레이블 크기를 출력한다.
Tensor의 개념
스칼라
import numpy as np

data = np.array(3)
print(data) # 3
print(data.ndim) # 0 -> 0차 텐서
print(data.shape) # 스칼라의 shape -> ()
벡터
data = np.array([1, 2, 3])
print(data) # [1 2 3]
print(data.ndim) # 1 -> 1차 텐서
print(data.shape) # 벡터 shape -> (3,)
행렬
data = np.array([[1, 2, 3],
                 [4, 5, 6],
                 [7, 8, 9],
                 [10, 11, 12]])
print(data) #
print(data.ndim) # 2 -> 2차 텐서
print(data.shape) # (4, 3)
3차 텐서
data = np.random.randint(0, 10, (3, 4, 5))
print(data)
print(data.ndim) # 3 -> 3차 텐서
print(data.shape) # (3, 4, 5)
Reshape
12개의 원소를 가지는 벡터의 reshape
import numpy as np

data = np.arange(12)
print(data.shape)
print(data, '\n')

print(data.reshape(3, 4))
print(data.reshape(4, 3))
reshape에서의 -1
data = np.arange(12)

print(data.reshape(3, -1)) # (3, 4)
print(data.reshape(4, -1)) # (4, 3)
print(data.reshape(6, -1)) # (6, 2)
차원을 알아서 채워준다.
차원 추가하기
print(data.reshape(1, -1)) # row vector
print(data.reshape(-1, 1)) # column vector
row_vec = data.reshape(1, -1)
col_vec = data.reshape(-1, 1)
print(row_vec.shape)
print(row_vec, '\n')
print(col_vec.shape)
print(col_vec, '\n')Image flatten
import numpy as np

img = np.random.randn(28, 28)
print(img.shape) # (28, 28)
print(img.reshape(1, -1).shape) # (1, 784)
16장의 이미지
import numpy as np

imgs = np.random.randn(16, 1, 28, 28)
print(imgs.shape)

imgs = imgs.reshape(imgs.shape[0], -1)
print(imgs.shape)
Image reshape 연습
from torch.utils.data import DataLoader

from torchvision.datasets import MNIST
from torchvision.transforms import ToTensor

BATCH_SIZE = 16

train_ds = MNIST(root='.', train=True, download=True, transform=ToTensor())
train_loader = DataLoader(dataset=train_ds, batch_size=BATCH_SIZE, shuffle=True)

for imgs, labels in train_loader:
    imgs = imgs.reshape(imgs.shape[0], -1)
    print(imgs.shape)
    print(labels.shape)

    break
뜬금없지만 세계여행이 꿈입니다.