WebSocket
웹소켓은 웹브라우저와 서버 간의 양방향으로 송신과 수신할 수 있는 지속적인 연결을 의미한다. 한 번 웹소켓 연결이 되면 이 연결은 클라이언트나 서버가 연결을 끊기 전까지 계속 열려있다. 웹소켓은 실시간 채팅을 할 때 주로 사용한다.
STOMP
STOMP(simple text oriented message protocol)는 클라이언트와 서버가 서로 통신하는 데 있어 메시지의 형식, 유형, 내용 등을 정의해주는 프로토콜이라고 할 수 있다. STOMP를 사용하게 되면 단순한 Binary, Text가 아닌 규격을 갖춘 메시지를 보낼 수 있다. STOMP의 형식은 command, header:value, body로 구성되어 있다. command는 subscribe와 send가 있다. subscribe의 경우 구독할 주소를 헤더에 명시해야 하고 send의 경우 보내는 주소 이외의 메시지 타입과 바디를 명시해야 한다.
- 메시지 수신을 위한 구독 예시
SUBSCRIBE
destination:/subscribe/chat/room/5- 메시지 전송 예시
SEND
content-type:application/json
destination:/publish/chat

{"chatRoomId":5,"type":"MESSAGE","writer":"clientB"}
Spring STOMP
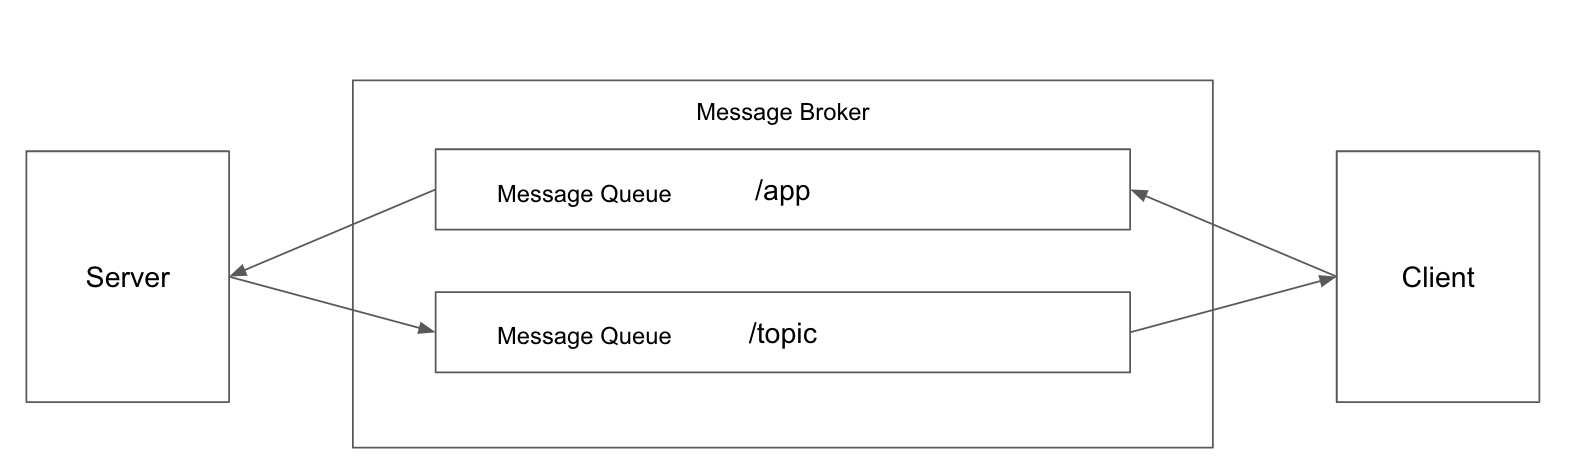
스프링에서는 MessageBrokerConfigurer를 오버라이딩을 통해 웹소켓 설정을 할 수 있다.
@Configuration
@EnableWebSocketMessageBroker
public class WebSocketConfig extends AbstractWebSocketMessageBrokerConfigurer {

    @Override
    public void configureMessageBroker(MessageBrokerRegistry config) {
        config.enableSimpleBroker("/topic");
        config.setApplicationDestinationPrefixes("/app");
    }

    @Override
    public void registerStompEndpoints(StompEndpointRegistry registry) {
         registry.addEndpoint("/chat");
         registry.addEndpoint("/chat").withSockJS();
    }
}
- @EnableWebSocketMessageBroker를 통해 웹소켓 메시지 처리를 활성화한다.
- configureMessageBroker 메소드의 MessageBrokerRegistry를 통해 인메모리 메시지 브로커를 활성화한 후 웹소켓 메시지 송수신을 위한 prefix를 등록한다. enableSimpleBroker로 등록한 prefix는 스프링 서버에서 웹소켓으로 송신할때 사용하는 주소의 prefix로 사용되고 setApplicationDestinationPrefixes로 등록한 prefix는 스프링 서버가 웹소켓으로 수신받을 때 사용하는 주소의 prefix로 사용된다.
- registerStompEndpoints 메소드의 StompEndpointRegistry를 사용해 엔드포인트를 등록해 spring의 stomp 지원을 활성화한다.
- @MessageMapping을 통해 클라이언트의 웹소켓 수신을 처리할 컨트롤러를 등록하고 @SendTo를 통해 서버의 송신 주소를 명시해서 사용한다.
@MessageMapping("/chat")
@SendTo("/topic/messages")
public OutputMessage send(Message message) throws Exception {
    String time = new SimpleDateFormat("HH:mm").format(new Date());
    return new OutputMessage(message.getFrom(), message.getText(), time);
}- 클라이언트는 stomp 엔드포인트를 통해 웹소켓 연결 설정한 후 등록한 구독하여 메시지를 수신하고 등록한 주소로 메시지를 송신할 수 있다.
function connect() {
 	var socket = new SockJS('/chat');
    stompClient = Stomp.over(socket);
    stompClient.connect({}, function(frame) {
    	setConnected(true);
        console.log('Connected: ' + frame);
        stompClient.subscribe('/topic/messages', (messageOutput) => {
           showMessageOutput(JSON.parse(messageOutput.body));
        };
     });
}

function sendMessage() {
	stompClient.send("/app/chat", {}, JSON.stringify({'text':'message'}));
}
ㅇㅅㅇ
좋은 정보 얻어갑니다, 감사합니다.