Gasida-서종호님과악분일상-최성욱님Jerry-이정훈님의 노고에 다시한번 🙇 감사드립니다.
📌 Review
5주차의 주제는 EKS Autoscaling 입니다.
K8s에서 파드의 HPA(수평확장), VPA(수직확장), CA(클러스터 오토스케일러), Karpenter에 대해 스터디 하였습니다.
특히 EKS를 궁극적으로 사용하고자 했었던 1차 목표인 Karpenter를 사용해보며 자동으로 파드를 관리하는것에 그치지 않고, 노드 역시 관리할 수 있으며 그 확장 속도에 다시한번 감탄하게 되었습니다.
경험 공유 및 이번 주차 스터디를 진행하며 Nodeless Concept에 대해서 관심을 가지게 되어 [eks]Nodeless Concept로 정리하였습니다.

🎤 Speech
5주차는 정태환님, 한승호님의 경험 및 기술 공유를 발표하셨습니다.
정태환님은 쿠버네티스의 중요한 리소스를 Fargate에 배포하여, Nodeless 컨셉에 대해 경험한 내용을 주제로 공유해주셨습니다. 중요 리소스를 Fargate로 운영하고, Karpenter를 이용하여 배포하고자 하는 서비스를 자동으로 관리하는 방법에 대해서 자세하게 알려주셔서 많은 것을 배울 수 있었습니다.
한승호님은 EKS 운영 사례(관측 시스템 구성과 운영 팁)내용을 주제로 경험을 공유해주셨습니다. 특히 EKS 업그레이드 관련 팁이나, Datree-메니페이스 파일 업그레이드 호환 확인하는 도구 등 사용 사례를 알려주셨습니다.
두분께 다시한번 감사드립니다.
📌 Summary
-
쿠버네티스 Autoscaling에 대해 이해합니다.
-
파드의 수직 확장, 수평 확장에 대해 이해합니다.
-
CA와 Kapenter를 직접 실습하여 사용해보고 장단점을 확인합니다.
📌 Study
👉 Step 00. 실습 환경 배포
이번주차에서는 oneclick4.yaml을 통해 배포하였으며, kube-ops-view를 이용하여 파드 및 서비스가 배포되는 것을 UI를 통해 확인하였습니다.
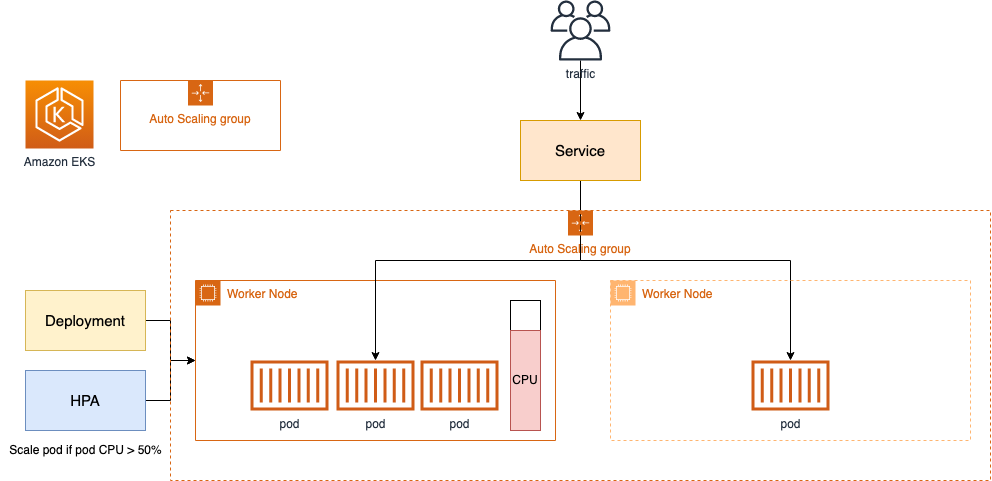
👉 Step 01. HPA - Horizontal Pod Autoscaler
HorizontalPodAutoscaler (줄여서 HPA)는 워크로드 리소스(예 :전개또는 스테이트풀셋), 수요에 맞게 워크로드를 자동으로 확장하는 것을 목표로 합니다.
수평적 확장은 증가된 로드에 대한 대응이 더 많은 것을 배포하는 것을 의미합니다. 포드. 이는 Kubernetes의 경우 워크로드에 대해 이미 실행 중인 Pod에 더 많은 리소스(예: 메모리 또는 CPU)를 할당하는 것을 의미하는 수직 확장(Scale up)과 다릅니다.
📕 실습
php-apache 서버의 이미지를 이용하여 HPA 기능을 확인합니다.
# Run and expose php-apache server
curl -s -O https://raw.githubusercontent.com/kubernetes/website/main/content/en/examples/application/php-apache.yaml
cat php-apache.yaml | yh
kubectl apply -f php-apache.yaml

# 확인
kubectl exec -it deploy/php-apache -- cat /var/www/html/index.php
...

# 모니터링 : 터미널2개 사용
watch -d 'kubectl get hpa,pod;echo;kubectl top pod;echo;kubectl top node'
kubectl exec -it deploy/php-apache -- top

# 접속
PODIP=$(kubectl get pod -l run=php-apache -o jsonpath={.items[0].status.podIP})
curl -s $PODIP; echo
HPA 생성 및 부하 발생 후 오토 스케일링 테스트 : 증가 시 기본 대기 시간(30초), 감소 시 기본 대기 시간(5분) → 조정 가능
# 반복 접속 1 (파드1 IP로 접속) >> 증가 확인 후 중지
while true;do curl -s $PODIP; sleep 0.5; done

# 반복 접속 2 (서비스명 도메인으로 접속) >> 증가 확인(몇개까지 증가되는가? 그 이유는?) 후 중지 >> 중지 5분 후 파드 갯수 감소 확인
# Run this in a separate terminal
# so that the load generation continues and you can carry on with the rest of the steps
kubectl run -i --tty load-generator --rm --image=busybox:1.28 --restart=Never -- /bin/sh -c "while sleep 0.01; do wget -q -O- http://php-apache; done"
✅ 결과
파드의 Scale(in/out)에 대해서 시간이 오래 걸렸습니다. 또한, HPA만으로는 노드를 관리할 수 없기에 수평확장이 현재 배포된 노드의 자원에 종속되는 것이 한계점으로 다가왔습니다.
Grafana(17125)

👉 Step 02. KEDA - Kubernetes based Event Driven Autoscaler
기존의 HPA(Horizontal Pod Autoscaler)는 리소스(CPU, Memory) 메트릭을 기반으로 스케일 여부를 결정하게 됩니다.
반면에 KEDA는 특정 이벤트를 기반으로 스케일 여부를 결정할 수 있습니다.
예를 들어 airflow는 metadb를 통해 현재 실행 중이거나 대기 중인 task가 얼마나 존재하는지 알 수 있습니다.
이러한 이벤트를 활용하여 worker의 scale을 결정한다면 queue에 task가 많이 추가되는 시점에 더 빠르게 확장할 수 있습니다.

출처 - https://keda.sh/docs/2.10/concepts/
📕 실습
KEDA with Helm : 특정 이벤트(cron 등)기반의 파드 오토 스케일링
# KEDA 설치
cat <<EOT > keda-values.yaml
metricsServer:
useHostNetwork: true
prometheus:
metricServer:
enabled: true
port: 9022
portName: metrics
path: /metrics
serviceMonitor:
# Enables ServiceMonitor creation for the Prometheus Operator
enabled: true
podMonitor:
# Enables PodMonitor creation for the Prometheus Operator
enabled: true
operator:
enabled: true
port: 8080
serviceMonitor:
# Enables ServiceMonitor creation for the Prometheus Operator
enabled: true
podMonitor:
# Enables PodMonitor creation for the Prometheus Operator
enabled: true
webhooks:
enabled: true
port: 8080
serviceMonitor:
# Enables ServiceMonitor creation for the Prometheus webhooks
enabled: true
EOT
kubectl create namespace keda
helm repo add kedacore https://kedacore.github.io/charts
helm install keda kedacore/keda --version 2.10.2 --namespace keda -f keda-values.yaml
# KEDA 설치 확인
kubectl get-all -n keda
kubectl get all -n keda
kubectl get crd | grep keda
# keda 네임스페이스에 디플로이먼트 생성
kubectl apply -f php-apache.yaml -n keda
kubectl get pod -n keda
# ScaledObject 정책 생성 : cron
cat <<EOT > keda-cron.yaml
apiVersion: keda.sh/v1alpha1
kind: ScaledObject
metadata:
name: php-apache-cron-scaled
spec:
minReplicaCount: 0
maxReplicaCount: 2
pollingInterval: 30
cooldownPeriod: 300
scaleTargetRef:
apiVersion: apps/v1
kind: Deployment
name: php-apache
triggers:
- type: cron
metadata:
timezone: Asia/Seoul
start: 00,15,30,45 * * * *
end: 05,20,35,50 * * * *
desiredReplicas: "1"
EOT
kubectl apply -f keda-cron.yaml -n keda
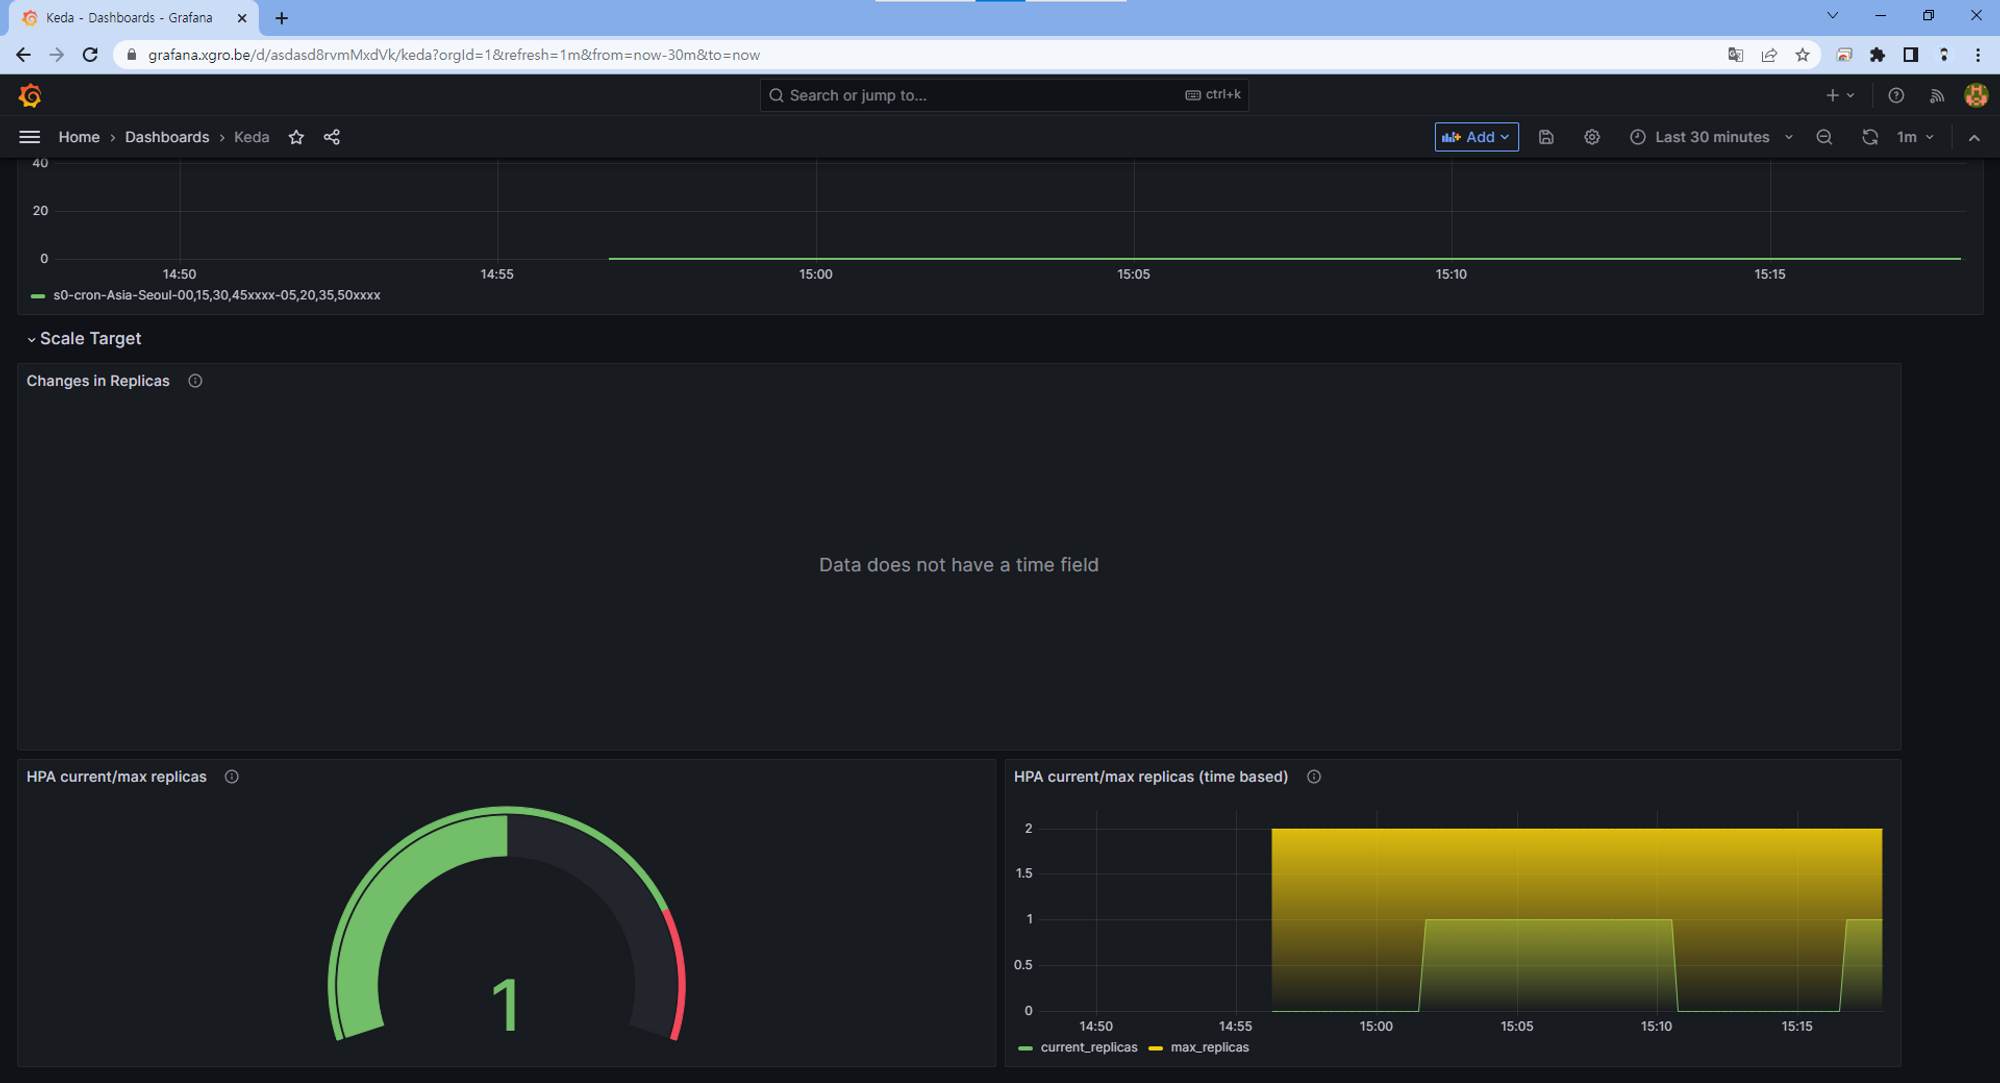
# 그라파나 대시보드 추가
# 모니터링
watch -d 'kubectl get ScaledObject,hpa,pod -n keda'
kubectl get ScaledObject -w
# 확인
kubectl get ScaledObject,hpa,pod -n keda
kubectl get hpa -o jsonpath={.items[0].spec} -n keda | jq
...
"metrics": [
{
"external": {
"metric": {
"name": "s0-cron-Asia-Seoul-00,15,30,45xxxx-05,20,35,50xxxx",
"selector": {
"matchLabels": {
"scaledobject.keda.sh/name": "php-apache-cron-scaled"
}
}
},
"target": {
"averageValue": "1",
"type": "AverageValue"
}
},
"type": "External"
}
# KEDA 및 deployment 등 삭제
kubectl delete -f keda-cron.yaml -n keda && kubectl delete deploy php-apache -n keda && helm uninstall keda -n keda
kubectl delete namespace keda✅ 결과
HPA의 단순 메트릭 지표를 통한 수평확장이 아닌, Event를 기반으로 파드를 관리할 수 있는 기능을 확인하였습니다.
kube-ops-view

Grafana
👉 Step 03. VPA - Vertical Pod Autoscaler
VPA(Vertical Pod Autoscaler)는 사용자가 포드의 컨테이너에 대한 최신 리소스 제한 및 요청을 설정할 필요가 없도록 합니다.
구성되면 사용량에 따라 자동으로 요청을 설정하므로 노드에 적절한 스케줄링을 허용하여 각 포드에 적절한 리소스 양을 사용할 수 있습니다.
초기 컨테이너 구성에 지정된 제한과 요청 사이의 비율을 유지합니다.
리소스를 과도하게 요청하는 포드를 축소하고 시간 경과에 따라 리소스를 덜 요청하는 포드를 확장할 수 있습니다.
📕 실습
# 코드 다운로드
it clone https://github.com/kubernetes/autoscaler.git
cd ~/autoscaler/vertical-pod-autoscaler/
tree hack

# 배포 과정에서 에러 발생 : 방안1 openssl 버전 1.1.1 up, 방안2 브랜치08에서 작업
ERROR: Failed to create CA certificate for self-signing. If the error is "unknown option -addext", update your openssl version or deploy VPA from the vpa-release-0.8 branch.

# 프로메테우스 임시 파일 시스템 사용으로 재시작 시 저장 메트릭과 대시보드 정보가 다 삭제되어서 스터디 시간 실습 시나리오는 비추천
helm upgrade kube-prometheus-stack prometheus-community/kube-prometheus-stack --reuse-values --set prometheusOperator.verticalPodAutoscaler.enabled=true -n monitoring

# openssl 버전 확인
openssl version
OpenSSL 1.0.2k-fips  26 Jan 2017

# openssl 1.1.1 이상 버전 확인
yum install openssl11 -y
openssl11 version
OpenSSL 1.1.1g FIPS  21 Apr 2020

# 스크립트파일내에 openssl11 수정
sed -i 's/openssl/openssl11/g' ~/autoscaler/vertical-pod-autoscaler/pkg/admission-controller/gencerts.sh

# Deploy the Vertical Pod Autoscaler to your cluster with the following command.
watch -d kubectl get pod -n kube-system
cat hack/vpa-up.sh
./hack/vpa-up.sh
kubectl get crd | grep autoscaling
공식 예제를 실행하여 파드의 Requests 리소스가 확장하는것을 확인합니다.
# 모니터링
watch -d kubectl top pod
# 공식 예제 배포
cd ~/autoscaler/vertical-pod-autoscaler/
cat examples/hamster.yaml | yh
kubectl apply -f examples/hamster.yaml && kubectl get vpa -w
# 파드 리소스 Requestes 확인
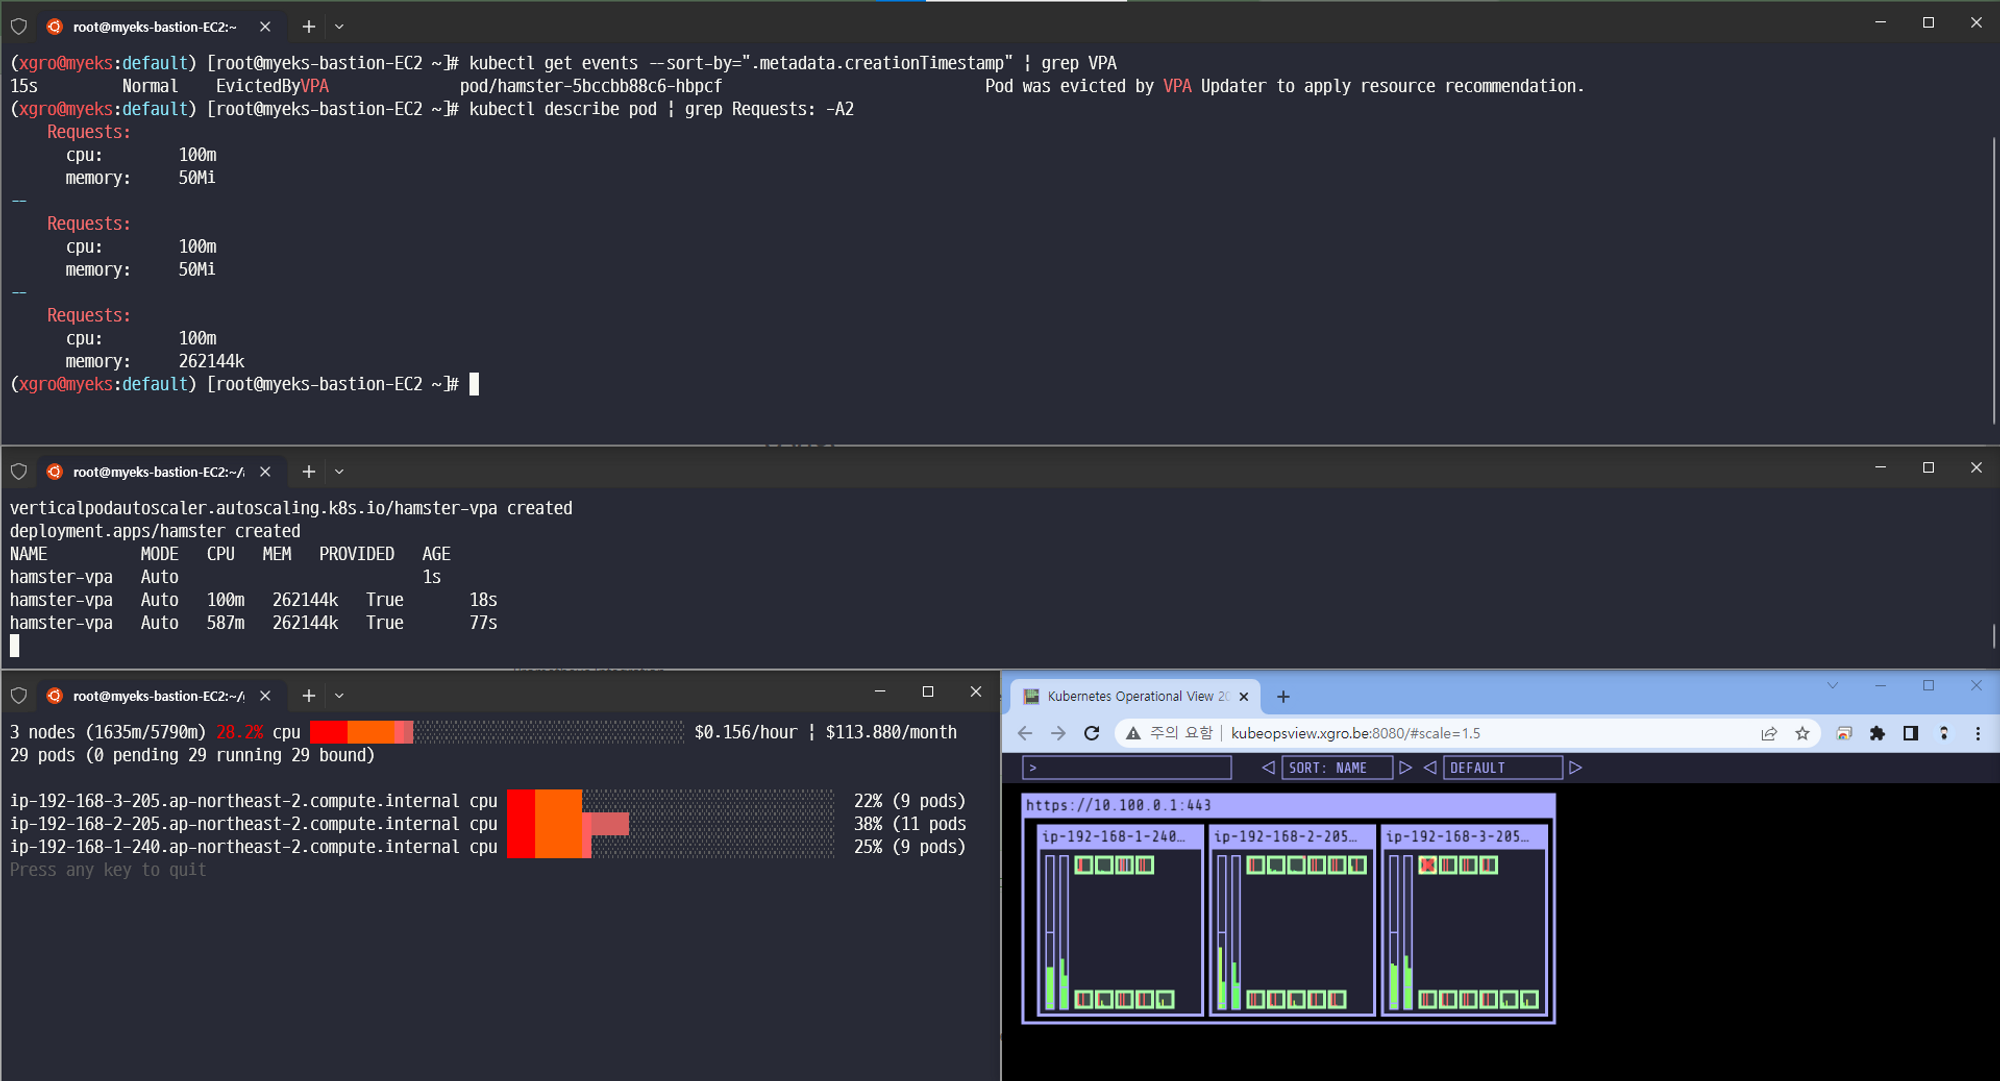
kubectl describe pod | grep Requests: -A2
Requests:
cpu: 100m
memory: 50Mi
--
Requests:
cpu: 587m
memory: 262144k
--
Requests:
cpu: 587m
memory: 262144k
# VPA에 의해 기존 파드 삭제되고 신규 파드가 생성됨
kubectl get events --sort-by=".metadata.creationTimestamp" | grep VPA
2m16s Normal EvictedByVPA pod/hamster-5bccbb88c6-s6jkp Pod was evicted by VPA Updater to apply resource recommendation.
76s Normal EvictedByVPA pod/hamster-5bccbb88c6-jc6gq
✅ 결과
VPA를 이용하여 파드가 자동으로 수직확장하는 것을 확인하였습니다. HPA와 동시에 사용할 수 없으며, 이를 이용하여 파드에 할당해야하는 최적의 리소스를 찾을 수 있었습니다.
kube-ops-view
Appendix. KRR
프로메테우스 기반 쿠버네티스 리소스 추천 서비스입니다.
Prometheus-based Kubernetes Resource Recommendations - 링크 & Youtube - 링크
Difference with Kubernetes VPA
Feature 🛠️ Robusta KRR 🚀 Kubernetes VPA 🌐 Resource Recommendations 💡 ✅ CPU/Memory requests and limits ✅ CPU/Memory requests and limits Installation Location 🌍 ✅ Not required to be installed inside the cluster, can be used on your own device, connected to a cluster ❌ Must be installed inside the cluster Workload Configuration 🔧 ✅ No need to configure a VPA object for each workload ❌ Requires VPA object configuration for each workload Immediate Results ⚡ ✅ Gets results immediately (given Prometheus is running) ❌ Requires time to gather data and provide recommendations Reporting 📊 ✅ Detailed CLI Report, web UI in https://home.robusta.dev/ ❌ Not supported Extensibility 🔧 ✅ Add your own strategies with few lines of Python ⚠️ Limited extensibility Custom Metrics 📏 🔄 Support in future versions ❌ Not supported Custom Resources 🎛️ 🔄 Support in future versions (e.g., GPU) ❌ Not supported Explainability 📖 🔄 Support in future versions (Robusta will send you additional graphs) ❌ Not supported Autoscaling 🔀 🔄 Support in future versions ✅ Automatic application of recommendations
👉 Step 04. CA - Cluster Autoscaler
Cluster Autoscaler(CA)는 pending 상태인 파드가 존재할 경우, 워커 노드를 스케일 아웃합니다.
특정 시간을 간격으로 사용률을 확인하여 스케일 인/아웃을 수행합니다.
AWS에서는 Auto Scaling Group을 사용하여 Cluster Autoscaler를 적용합니다.
📕 실습
Cluster Autoscaler(CA) 설정
# EKS 노드에 이미 아래 tag가 들어가 있음
# k8s.io/cluster-autoscaler/enabled : true
# k8s.io/cluster-autoscaler/myeks : owned
aws ec2 describe-instances  --filters Name=tag:Name,Values=$CLUSTER_NAME-ng1-Node --query "Reservations[*].Instances[*].Tags[*]" --output yaml | yh
...
- Key: k8s.io/cluster-autoscaler/myeks
      Value: owned
- Key: k8s.io/cluster-autoscaler/enabled
      Value: 'true'
...
# 현재 autoscaling(ASG) 정보 확인
# aws autoscaling describe-auto-scaling-groups --query "AutoScalingGroups[? Tags[? (Key=='eks:cluster-name') && Value=='클러스터이름']].[AutoScalingGroupName, MinSize, MaxSize,DesiredCapacity]" --output table
aws autoscaling describe-auto-scaling-groups \
    --query "AutoScalingGroups[? Tags[? (Key=='eks:cluster-name') && Value=='myeks']].[AutoScalingGroupName, MinSize, MaxSize,DesiredCapacity]" \
    --output table
-----------------------------------------------------------------
|                   DescribeAutoScalingGroups                   |
+------------------------------------------------+----+----+----+
|  eks-ng1-44c41109-daa3-134c-df0e-0f28c823cb47  |  3 |  3 |  3 |
+------------------------------------------------+----+----+----+

# MaxSize 6개로 수정
export ASG_NAME=$(aws autoscaling describe-auto-scaling-groups --query "AutoScalingGroups[? Tags[? (Key=='eks:cluster-name') && Value=='myeks']].AutoScalingGroupName" --output text)
aws autoscaling update-auto-scaling-group --auto-scaling-group-name ${ASG_NAME} --min-size 3 --desired-capacity 3 --max-size 6

# 확인
aws autoscaling describe-auto-scaling-groups --query "AutoScalingGroups[? Tags[? (Key=='eks:cluster-name') && Value=='myeks']].[AutoScalingGroupName, MinSize, MaxSize,DesiredCapacity]" --output table
-----------------------------------------------------------------
|                   DescribeAutoScalingGroups                   |
+------------------------------------------------+----+----+----+
|  eks-ng1-c2c41e26-6213-a429-9a58-02374389d5c3  |  3 |  6 |  3 |
+------------------------------------------------+----+----+----+
# 배포 : Deploy the Cluster Autoscaler (CA)
curl -s -O https://raw.githubusercontent.com/kubernetes/autoscaler/master/cluster-autoscaler/cloudprovider/aws/examples/cluster-autoscaler-autodiscover.yaml
sed -i "s/<YOUR CLUSTER NAME>/$CLUSTER_NAME/g" cluster-autoscaler-autodiscover.yaml
kubectl apply -f cluster-autoscaler-autodiscover.yaml

# 확인
kubectl get pod -n kube-system | grep cluster-autoscaler
kubectl describe deployments.apps -n kube-system cluster-autoscaler

# (옵션) cluster-autoscaler 파드가 동작하는 워커 노드가 퇴출(evict) 되지 않게 설정
kubectl -n kube-system annotate deployment.apps/cluster-autoscaler cluster-autoscaler.kubernetes.io/safe-to-evict="false"
SCALE A CLUSTER WITH Cluster Autoscaler(CA)
# 모니터링
kubectl get nodes -w
while true; do kubectl get node; echo "------------------------------" ; date ; sleep 1; done
while true; do aws ec2 describe-instances --query "Reservations[*].Instances[*].{PrivateIPAdd:PrivateIpAddress,InstanceName:Tags[?Key=='Name']|[0].Value,Status:State.Name}" --filters Name=instance-state-name,Values=running --output text ; echo "------------------------------"; date; sleep 1; done

# Deploy a Sample App
# We will deploy an sample nginx application as a ReplicaSet of 1 Pod
cat <<EoF> nginx.yaml
apiVersion: apps/v1
kind: Deployment
metadata:
  name: nginx-to-scaleout
spec:
  replicas: 1
  selector:
    matchLabels:
      app: nginx
  template:
    metadata:
      labels:
        service: nginx
        app: nginx
    spec:
      containers:
      - image: nginx
        name: nginx-to-scaleout
        resources:
          limits:
            cpu: 500m
            memory: 512Mi
          requests:
            cpu: 500m
            memory: 512Mi
EoF

kubectl apply -f nginx.yaml
kubectl get deployment/nginx-to-scaleout

# Scale our ReplicaSet
# Let’s scale out the replicaset to 15
kubectl scale --replicas=15 deployment/nginx-to-scaleout && date

# 확인
kubectl get pods -l app=nginx -o wide --watch
kubectl -n kube-system logs -f deployment/cluster-autoscaler

# 노드 자동 증가 확인
kubectl get nodes
aws autoscaling describe-auto-scaling-groups \
    --query "AutoScalingGroups[? Tags[? (Key=='eks:cluster-name') && Value=='myeks']].[AutoScalingGroupName, MinSize, MaxSize,DesiredCapacity]" \
    --output table

./eks-node-viewer
42 pods (0 pending 42 running 42 bound)
ip-192-168-3-196.ap-northeast-2.compute.internal cpu ███████████████████████████████████ 100% (10 pods) t3.medium/$0.0520 On-Demand
ip-192-168-1-91.ap-northeast-2.compute.internal  cpu ███████████████████████████████░░░░  89% (9 pods)  t3.medium/$0.0520 On-Demand
ip-192-168-2-185.ap-northeast-2.compute.internal cpu █████████████████████████████████░░  95% (11 pods) t3.medium/$0.0520 On-Demand
ip-192-168-2-87.ap-northeast-2.compute.internal  cpu █████████████████████████████░░░░░░  84% (6 pods)  t3.medium/$0.0520 On-Demand
ip-192-168-3-15.ap-northeast-2.compute.internal  cpu █████████████████████████████░░░░░░  84% (6 pods)  t3.medium/$0.0520 On-Demand

# 디플로이먼트 삭제
kubectl delete -f nginx.yaml && date

# 노드 갯수 축소 : 기본은 10분 후 scale down 됨, 물론 아래 flag 로 시간 수정 가능 >> 그러니 디플로이먼트 삭제 후 10분 기다리고 나서 보자!
# By default, cluster autoscaler will wait 10 minutes between scale down operations,
# you can adjust this using the --scale-down-delay-after-add, --scale-down-delay-after-delete,
# and --scale-down-delay-after-failure flag.
# E.g. --scale-down-delay-after-add=5m to decrease the scale down delay to 5 minutes after a node has been added.

# 터미널1
watch -d kubectl get node
✅ 결과
CA를 이용하여 파드가 아닌, 노드를 확장하는 기능을 실습하였습니다. 일정한 간격으로 상태를 체크하여 Scale-in/out 하기에, 프로덕트 레벨에 적용하여 인프라를 관리하기엔 부족하다는 것을 체험하였습니다.
kube-ops-view

Scale-in에 많은 시간이 소요됩니다.

CA 문제점
CA는 프로덕트 환경에 적용하기에 아래와 같은 문제점을 지니고 있습니다.
하나의 자원에 대해 두군데 (AWS ASG vs AWS EKS)에서 각자의 방식으로 관리 ⇒ 관리 정보가 서로 동기화되지 않아 다양한 문제 발생
ASG에만 의존하고 노드 생성/삭제 등에 직접 관여 하지 않습니다.
EKS에서 노드를 삭제 해도 인스턴스는 삭제 안됨
노드 축소 될 때 특정 노드가 축소 되도록 하기 매우 어려움 : pod 배포가 가장 작은 노드 먼저, 또는 이미 드레인 된 노드 먼저 축소됩니다.
특정 노드를 삭제 하면서 동시에 노드 개수를 줄이기 어려움 : 줄일때 삭제 정책 옵션이 다양하지 않습니다.
정책 미지원 시 삭제 방식(예시) : 100대 중 미삭제 EC2 보호 설정 후 삭제 될 ec2의 파드를 이주 후 scaling 조절로 삭제 후 원복합니다.
특정 노드를 삭제하면서 동시에 노드 개수를 줄이기 어렵습니다.
폴링 방식이기에 너무 자주 확장 여유를 확인 하면 API 제한에 도달할 수 있습니다.
(중요)스케일링 속도가 매우 느림
Cluster Autoscaler 는 쿠버네티스 클러스터 자체의 오토 스케일링을 의미하며, 수요에 따라 워커 노드를 자동으로 추가하는 기능
언뜻 보기에 클러스터 전체나 각 노드의 부하 평균이 높아졌을 때 확장으로 보인다 → 함정! 🚧
Pending 상태의 파드가 생기는 타이밍에 처음으로 Cluster Autoscaler 이 동작한다
즉, Request 와 Limits 를 적절하게 설정하지 않은 상태에서는 실제 노드의 부하 평균이 낮은 상황에서도 스케일 아웃이 되거나, 부하 평균이 높은 상황임에도 스케일 아웃이 되지 않는다!
기본적으로 리소스에 의한 스케줄링은 Requests(최소)를 기준으로 이루어진다. 다시 말해 Requests 를 초과하여 할당한 경우에는 최소 리소스 요청만으로 리소스가 꽉 차 버려서 신규 노드를 추가해야만 한다. 이때 실제 컨테이너 프로세스가 사용하는 리소스 사용량은 고려되지 않는다.
반대로 Request 를 낮게 설정한 상태에서 Limit 차이가 나는 상황을 생각해보자. 각 컨테이너는 Limits 로 할당된 리소스를 최대로 사용한다. 그래서 실제 리소스 사용량이 높아졌더라도 Requests 합계로 보면 아직 스케줄링이 가능하기 때문에 클러스터가 스케일 아웃하지 않는 상황이 발생한다.
여기서는 CPU 리소스 할당을 예로 설명했지만 메모리의 경우도 마찬가지다.
👉 Step 05. CPA - Cluster Proportional Autoscaler
노드 수 증가에 비례하여 성능 처리가 필요한 애플리케이션(컨테이너/파드)를 수평으로 자동 확장하는 기능을 수행합니다. ex. coredns - Github Workshop
📕 실습
#
helm repo add cluster-proportional-autoscaler https://kubernetes-sigs.github.io/cluster-proportional-autoscaler

# CPA규칙을 설정하고 helm차트를 릴리즈 필요
helm upgrade --install cluster-proportional-autoscaler cluster-proportional-autoscaler/cluster-proportional-autoscaler

# nginx 디플로이먼트 배포
cat <<EOT > cpa-nginx.yaml
apiVersion: apps/v1
kind: Deployment
metadata:
  name: nginx-deployment
spec:
  replicas: 1
  selector:
    matchLabels:
      app: nginx
  template:
    metadata:
      labels:
        app: nginx
    spec:
      containers:
      - name: nginx
        image: nginx:latest
        resources:
          limits:
            cpu: "100m"
            memory: "64Mi"
          requests:
            cpu: "100m"
            memory: "64Mi"
        ports:
        - containerPort: 80
EOT
kubectl apply -f cpa-nginx.yaml

# CPA 규칙 설정
cat <<EOF > cpa-values.yaml
config:
  ladder:
    nodesToReplicas:
      - [1, 1]
      - [2, 2]
      - [3, 3]
      - [4, 3]
      - [5, 5]
options:
  namespace: default
  target: "deployment/nginx-deployment"
EOF

# 모니터링
watch -d kubectl get pod

# helm 업그레이드
helm upgrade --install cluster-proportional-autoscaler -f cpa-values.yaml cluster-proportional-autoscaler/cluster-proportional-autoscaler

# 노드 5개로 증가
export ASG_NAME=$(aws autoscaling describe-auto-scaling-groups --query "AutoScalingGroups[? Tags[? (Key=='eks:cluster-name') && Value=='myeks']].AutoScalingGroupName" --output text)
aws autoscaling update-auto-scaling-group --auto-scaling-group-name ${ASG_NAME} --min-size 5 --desired-capacity 5 --max-size 5
aws autoscaling describe-auto-scaling-groups --query "AutoScalingGroups[? Tags[? (Key=='eks:cluster-name') && Value=='myeks']].[AutoScalingGroupName, MinSize, MaxSize,DesiredCapacity]" --output table

# 노드 4개로 축소
aws autoscaling update-auto-scaling-group --auto-scaling-group-name ${ASG_NAME} --min-size 4 --desired-capacity 4 --max-size 4
aws autoscaling describe-auto-scaling-groups --query "AutoScalingGroups[? Tags[? (Key=='eks:cluster-name') && Value=='myeks']].[AutoScalingGroupName, MinSize, MaxSize,DesiredCapacity]" --output table
✅ 결과
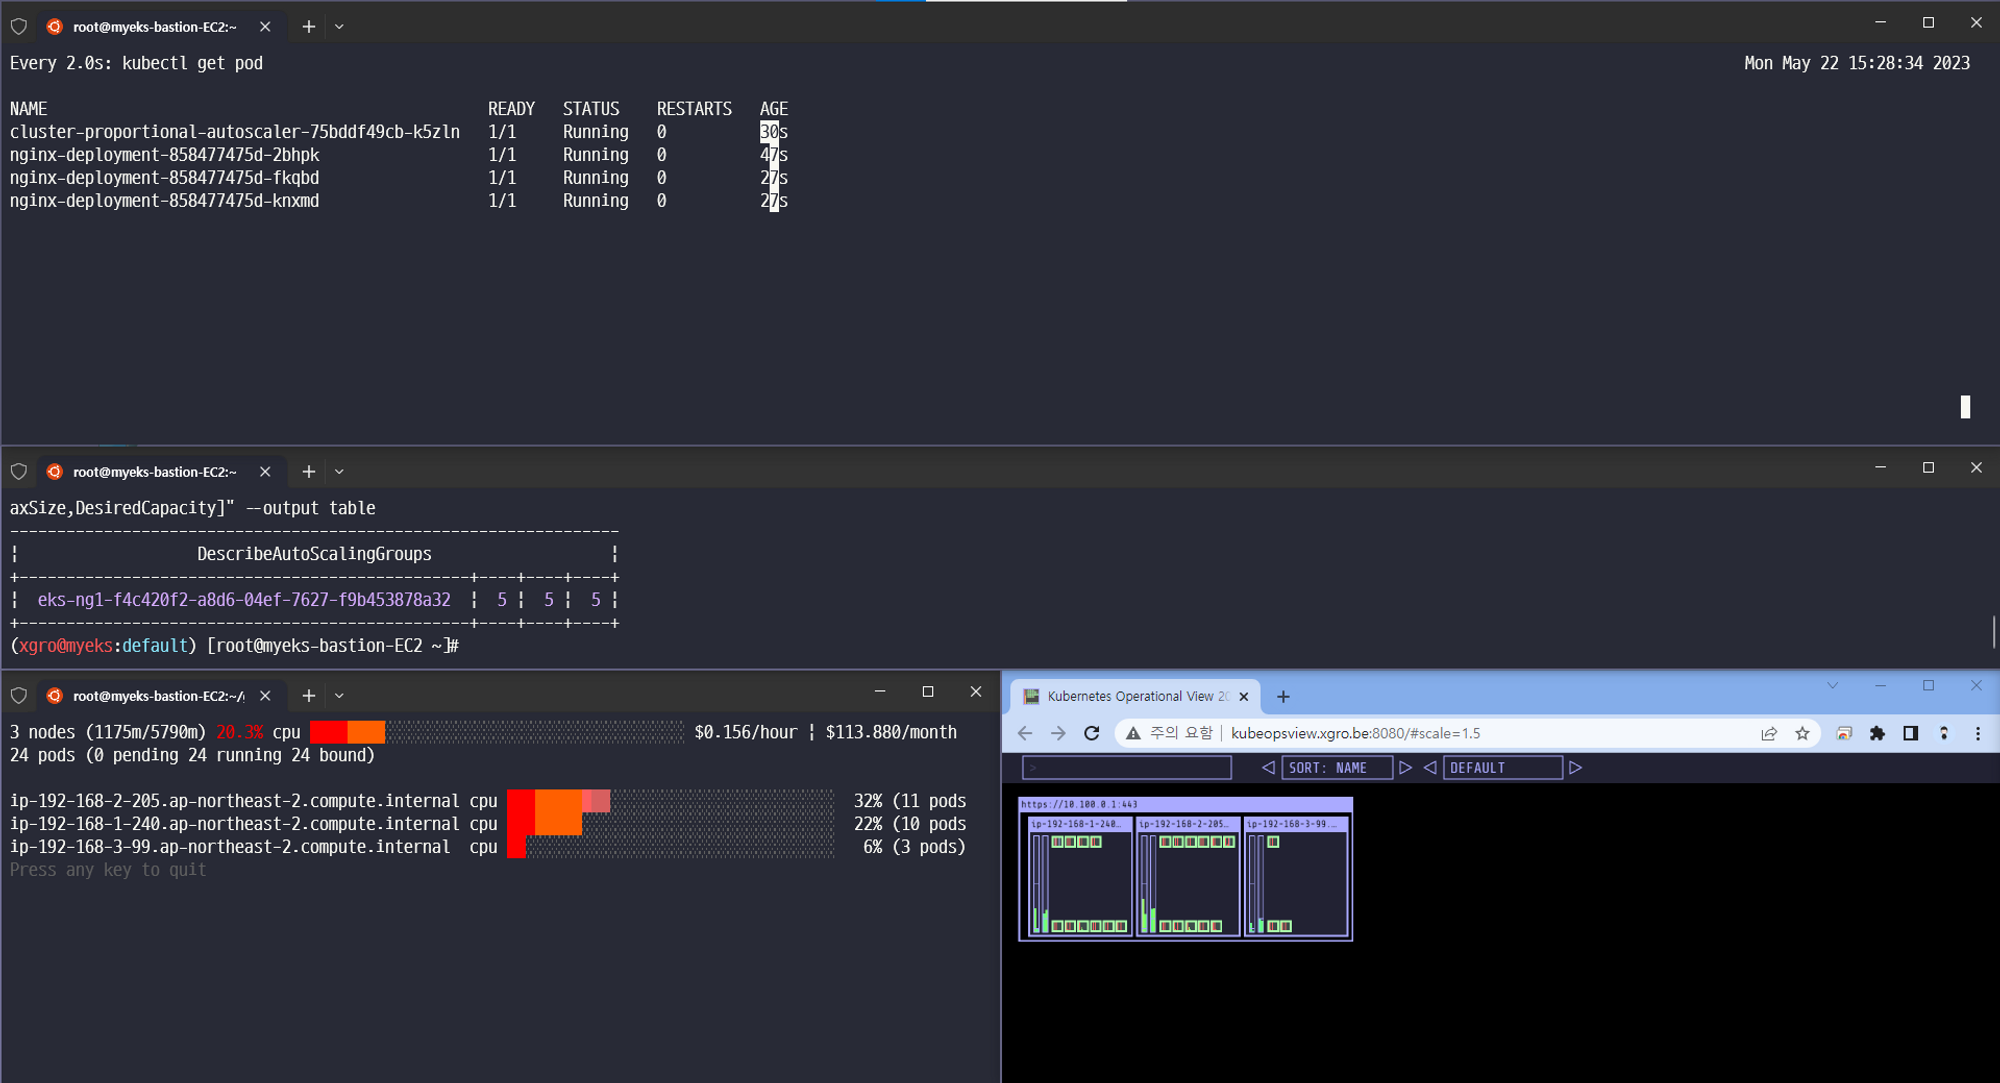
마치 DaemonSet과 유사하게 동작하는 것처럼 보이나, DaemonSet은 모든 노드에 일정하게 배포되는 것과 달리, CPA는 설정한 값에 비례하여 그 개수만큼만 배포되었습니다.
CPA를 아래 규칙으로 배포한 결과입니다.
CPA 규칙
# CPA 규칙 설정
cat <<EOF > cpa-values.yaml
config:
  ladder:
    nodesToReplicas:
      - [1, 1]
      - [2, 2]
      - [3, 3]
      - [4, 3]
      - [5, 5]
options:
  namespace: default
  target: "deployment/nginx-deployment"
EOF
3개
결과 - nginx 파드가 3개 배포됨
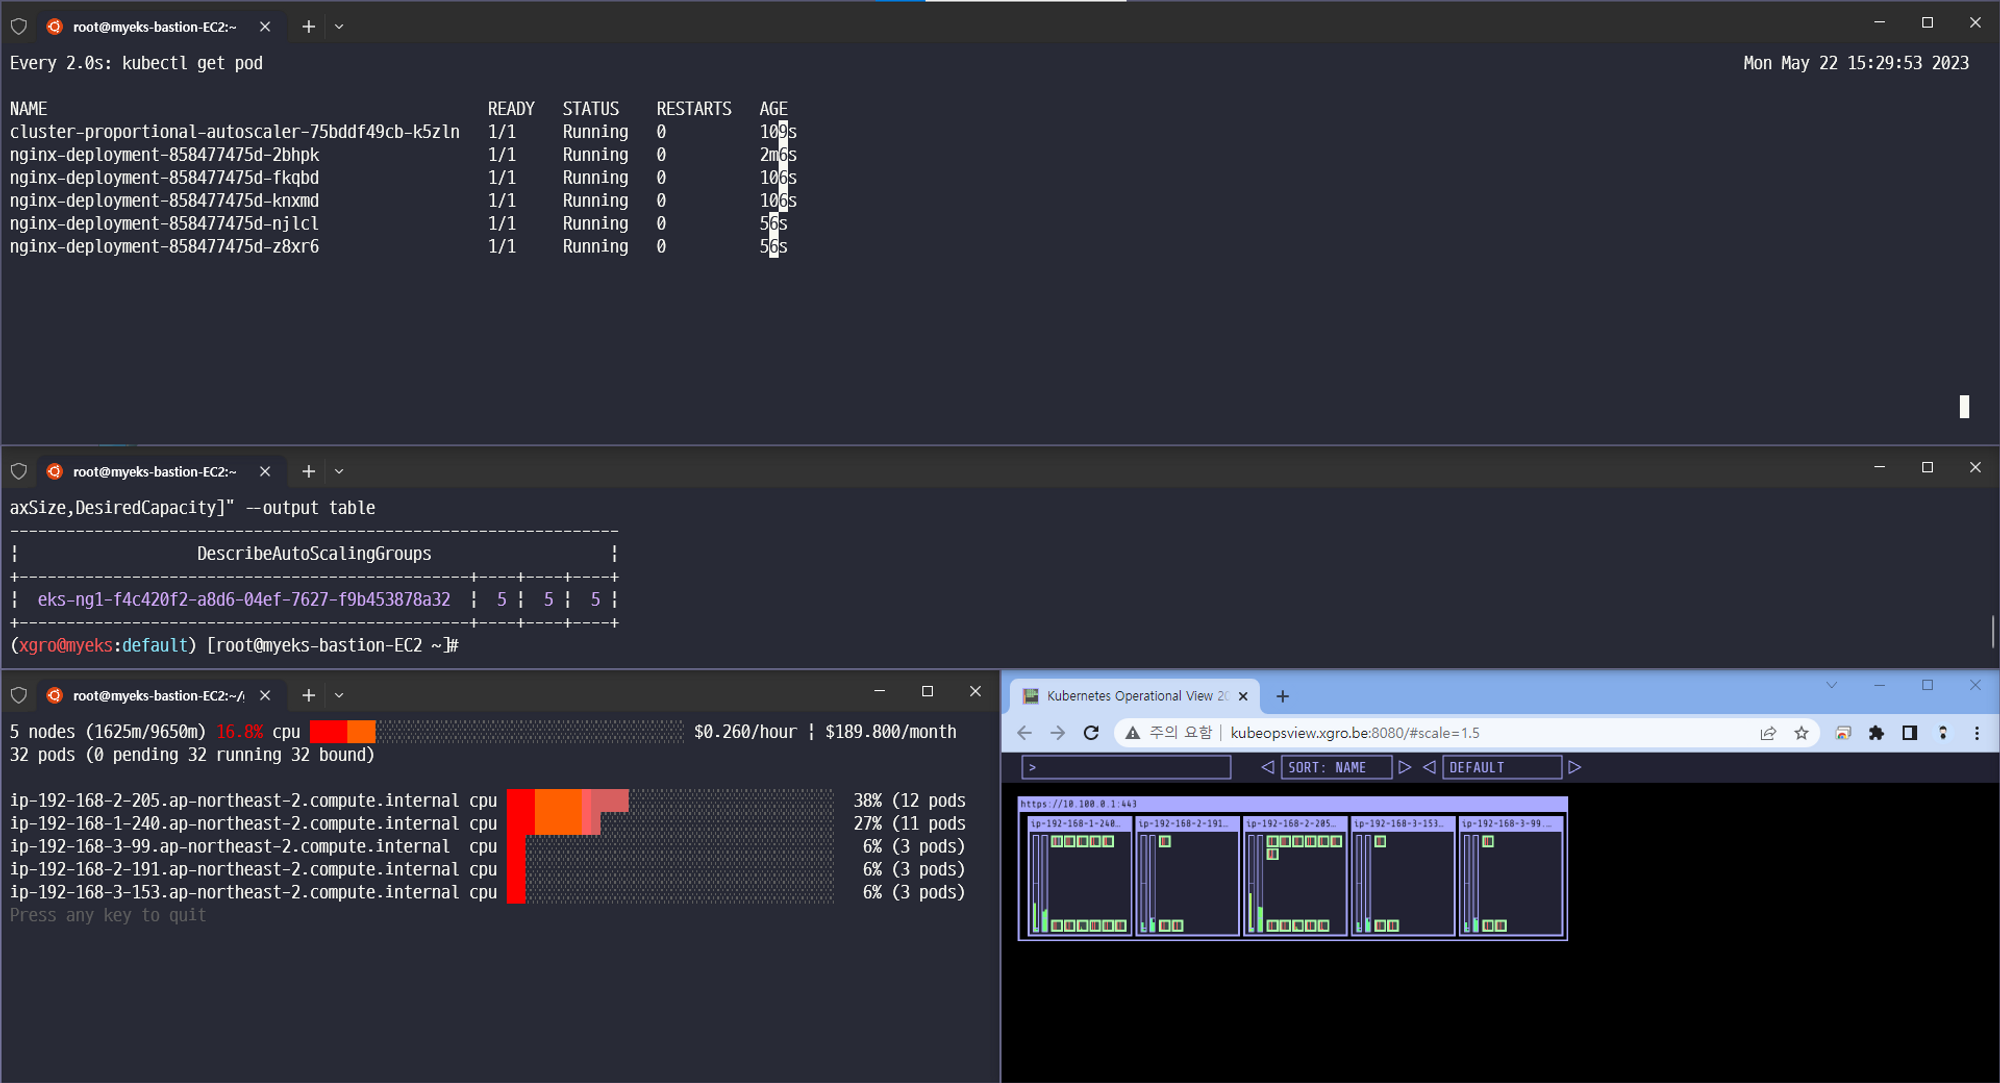
5개
결과 - nginx 파드가 5개 배포됨
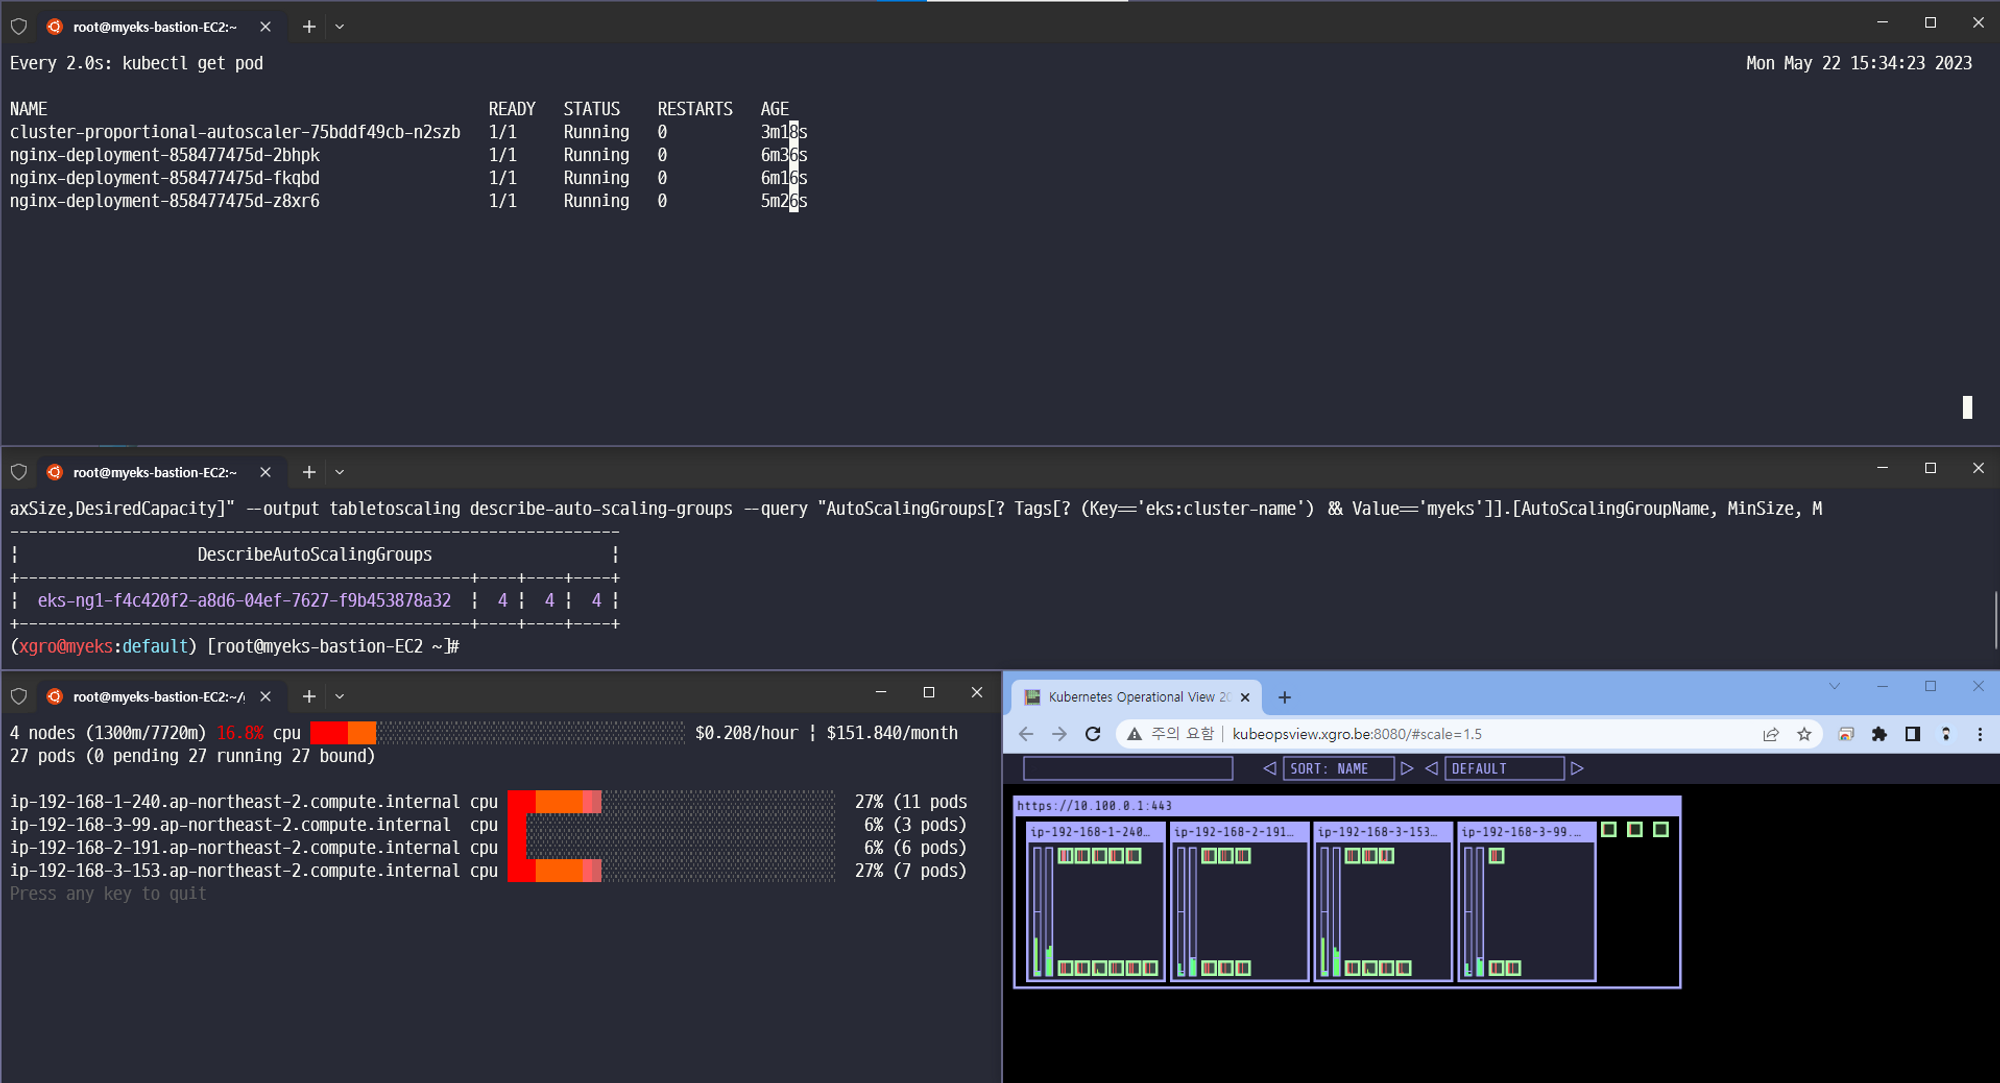
4개
결과 - nginx 파드가 3개 배포됨
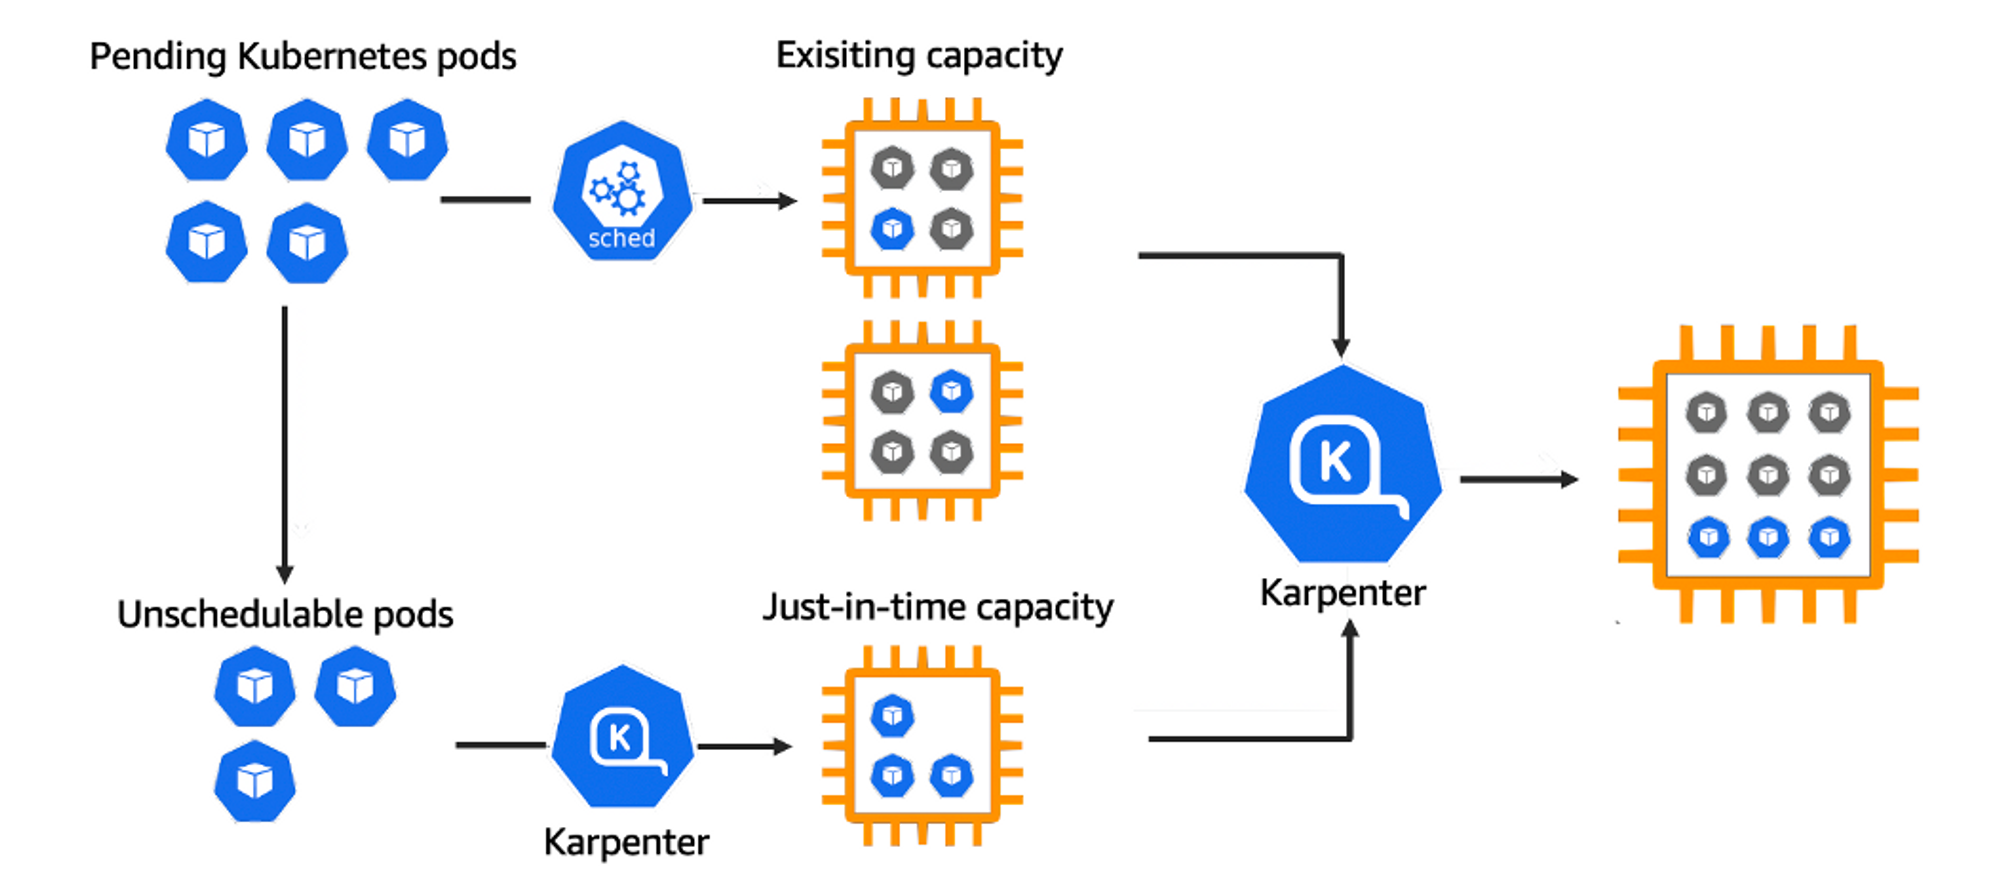
👉 Step 06. Karpenter : K8S Native AutoScaler & Fargate
Karpenter는 Kubernetes 클러스터를 확장하는 데 사용되는 노드 수명 주기 관리 솔루션입니다.
Karpenter를 사용하여 온디맨드 및 스팟 인스턴스를 혼합하여 배포하여 group-less의 오토스케일의 장점을 사용할 수 있습니다.
EC2 스팟 인스턴스를 사용하면 비용 및 규모에 대한 최적화를 설계할 수 있습니다.
📕 실습
# 환경변수 정보 확인
export | egrep 'ACCOUNT|AWS_|CLUSTER' | egrep -v 'SECRET|KEY'

# 환경변수 설정
export KARPENTER_VERSION=v0.27.5
export TEMPOUT=$(mktemp)
echo $KARPENTER_VERSION $CLUSTER_NAME $AWS_DEFAULT_REGION $AWS_ACCOUNT_ID $TEMPOUT

# CloudFormation 스택으로 IAM Policy, Role, EC2 Instance Profile 생성 : 3분 정도 소요
curl -fsSL https://karpenter.sh/"${KARPENTER_VERSION}"/getting-started/getting-started-with-karpenter/cloudformation.yaml  > $TEMPOUT \
&& aws cloudformation deploy \
  --stack-name "Karpenter-${CLUSTER_NAME}" \
  --template-file "${TEMPOUT}" \
  --capabilities CAPABILITY_NAMED_IAM \
  --parameter-overrides "ClusterName=${CLUSTER_NAME}"

# 클러스터 생성 : myeks2 EKS 클러스터 생성 19분 정도 소요
eksctl create cluster -f - <<EOF
---
apiVersion: eksctl.io/v1alpha5
kind: ClusterConfig
metadata:
  name: ${CLUSTER_NAME}
  region: ${AWS_DEFAULT_REGION}
  version: "1.24"
  tags:
    karpenter.sh/discovery: ${CLUSTER_NAME}

iam:
  withOIDC: true
  serviceAccounts:
  - metadata:
      name: karpenter
      namespace: karpenter
    roleName: ${CLUSTER_NAME}-karpenter
    attachPolicyARNs:
    - arn:aws:iam::${AWS_ACCOUNT_ID}:policy/KarpenterControllerPolicy-${CLUSTER_NAME}
    roleOnly: true

iamIdentityMappings:
- arn: "arn:aws:iam::${AWS_ACCOUNT_ID}:role/KarpenterNodeRole-${CLUSTER_NAME}"
  username: system:node:{{EC2PrivateDNSName}}
  groups:
  - system:bootstrappers
  - system:nodes

managedNodeGroups:
- instanceType: m5.large
  amiFamily: AmazonLinux2
  name: ${CLUSTER_NAME}-ng
  desiredCapacity: 2
  minSize: 1
  maxSize: 10
  iam:
    withAddonPolicies:
      externalDNS: true

## Optionally run on fargate
# fargateProfiles:
# - name: karpenter
#  selectors:
#  - namespace: karpenter
EOF

# eks 배포 확인
eksctl get cluster
eksctl get nodegroup --cluster $CLUSTER_NAME
eksctl get iamidentitymapping --cluster $CLUSTER_NAME
eksctl get iamserviceaccount --cluster $CLUSTER_NAME
eksctl get addon --cluster $CLUSTER_NAME

# [터미널1] eks-node-viewer
cd ~/go/bin && ./eks-node-viewer

# k8s 확인
kubectl cluster-info
kubectl get node --label-columns=node.kubernetes.io/instance-type,eks.amazonaws.com/capacityType,topology.kubernetes.io/zone
kubectl get pod -n kube-system -owide
kubectl describe cm -n kube-system aws-auth
...
mapRoles:
----
- groups:
  - system:bootstrappers
  - system:nodes
  rolearn: arn:aws:iam::911283464785:role/KarpenterNodeRole-myeks2
  username: system:node:{{EC2PrivateDNSName}}
- groups:
  - system:bootstrappers
  - system:nodes
  rolearn: arn:aws:iam::911283464785:role/eksctl-myeks2-nodegroup-myeks2-ng-NodeInstanceRole-1KDXF4FLKKX1B
  username: system:node:{{EC2PrivateDNSName}}
...

# 카펜터 설치를 위한 환경 변수 설정 및 확인
export CLUSTER_ENDPOINT="$(aws eks describe-cluster --name ${CLUSTER_NAME} --query "cluster.endpoint" --output text)"
export KARPENTER_IAM_ROLE_ARN="arn:aws:iam::${AWS_ACCOUNT_ID}:role/${CLUSTER_NAME}-karpenter"
echo $CLUSTER_ENDPOINT $KARPENTER_IAM_ROLE_ARN

# EC2 Spot Fleet 사용을 위한 service-linked-role 생성 확인 : 만들어있는것을 확인하는 거라 아래 에러 출력이 정상!
# If the role has already been successfully created, you will see:
# An error occurred (InvalidInput) when calling the CreateServiceLinkedRole operation: Service role name AWSServiceRoleForEC2Spot has been taken in this account, please try a different suffix.
aws iam create-service-linked-role --aws-service-name spot.amazonaws.com || true

# docker logout : Logout of docker to perform an unauthenticated pull against the public ECR
docker logout public.ecr.aws

# karpenter 설치
helm upgrade --install karpenter oci://public.ecr.aws/karpenter/karpenter --version ${KARPENTER_VERSION} --namespace karpenter --create-namespace \
  --set serviceAccount.annotations."eks\.amazonaws\.com/role-arn"=${KARPENTER_IAM_ROLE_ARN} \
  --set settings.aws.clusterName=${CLUSTER_NAME} \
  --set settings.aws.defaultInstanceProfile=KarpenterNodeInstanceProfile-${CLUSTER_NAME} \
  --set settings.aws.interruptionQueueName=${CLUSTER_NAME} \
  --set controller.resources.requests.cpu=1 \
  --set controller.resources.requests.memory=1Gi \
  --set controller.resources.limits.cpu=1 \
  --set controller.resources.limits.memory=1Gi \
  --wait

# 확인
kubectl get-all -n karpenter
kubectl get all -n karpenter
kubectl get cm -n karpenter karpenter-global-settings -o jsonpath={.data} | jq
kubectl get crd | grep karpenter
Create Provisioner
cat <<EOF | kubectl apply -f -
apiVersion: karpenter.sh/v1alpha5
kind: Provisioner
metadata:
  name: default
spec:
  requirements:
    - key: karpenter.sh/capacity-type
      operator: In
      values: ["spot"]
  limits:
    resources:
      cpu: 1000
  providerRef:
    name: default
  ttlSecondsAfterEmpty: 30
---
apiVersion: karpenter.k8s.aws/v1alpha1
kind: AWSNodeTemplate
metadata:
  name: default
spec:
  subnetSelector:
    karpenter.sh/discovery: ${CLUSTER_NAME}
  securityGroupSelector:
    karpenter.sh/discovery: ${CLUSTER_NAME}
EOF

# 확인
kubectl get awsnodetemplates,provisioners
✅ 결과
카펜터의 놀라운 기능을 확인할 수 있었습니다.
-
Scale-in/out 확장 속도
-
Consolidation 기능 (불필요한 노드 크기를 자동으로 조절하여 배포)
-
Spot 인스턴스에 파드를 배포
Scale 12 확장
Scale 5 축소

Scale 1 축소
📌 Reference
- 리눅서의 기술술 블로그 - https://linuxer.name/
- 김태민님의 기술 블로그 - https://kubetm.github.io/k8s/08-intermediate-controller/hpa/
- 악분일상님의 기술 블로그 - https://malwareanalysis.tistory.com/604