
ch12. 서버 간 통신
MSA(마이크로 서비스 아키텍처)
현재 개발의 트렌드는 단연 MSA다. 이전에도 설명한 적이 있는 MSA는 비즈니스를 작은 단위로 쪼개 만드는 것을 말한다.
그렇다면 지금에 이르러서 다시 이야기를 꺼낸 이유는, 앞에서도 이야기한 부분이지만,
작은 서비스들로 나누어 놓은 것이 어떻게 거대한 하나의 서비스를 이루느냐가
이번 장에서 다루어진다.
서버 간 통신을 통해, MSA는 진정한 API로서 가치를 지닌다. 그렇다면, 구체적으로 어떤 것이 있는지 알아 보자.
크게 2가지를 다룬다. RestTemplate과 WebClient다.
RestTemplate
RestTemplate은 스프링에서 HTTP 통신 기능을 손쉽게 사용할 수 있게 설계된 템플릿이다.
HTTP 서버와의 통신을 단순화한 이 템플릿을 이용하면 RESTful 원칙을 따르는
서비스를 편리하게 만들 수 있다.
RestTemplate은 기본적으로 동기 방식으로 처리.
비동기 방식을 사용하고 싶으면, AsyncRestTemplate을 사용하면 된다.
다만, 현업에서 RestTemplate이 많이 쓰이긴 하지만,
지원 중단된 상태(deprecated)라, 향후 빈번하게 쓰이게 될 WebClient도 함께 알아둬야 한다.
기본기를 다진다는 생각으로 학습을 하고,
일을 할 때, 사용된 것들을 리팩토링 할 수 있다는 점을 고려해 학습하면 될 것 같다.
RestTemplate의 5가지 특징.
- HTTP 프로토콜의 메서드에 맞는 여러 메서드 제공
- RESTful 형식을 갖춘 템플릿
- HTTP 요청 후, JSON, XML 문자열 등의 다양한 형식으로 응답을 받을 수 있다.
- 블로킹(blocking) I/O 기반의 동기 방식을 사용.
- 다른 API 호출시 HTTP 헤더에 다양한 값을 설정.
RestTemplate의 대표적인 메서드
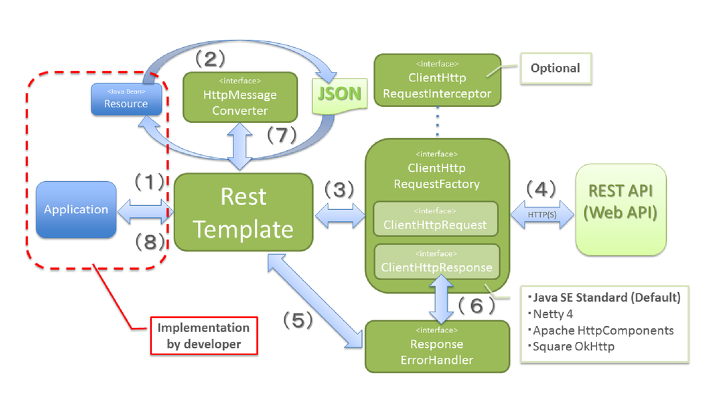
메서드를 알아보기 전에, 위의 그림은 RestTemplate의 동작 원리를 나타낸 것이다.
| 메서드 | HTTP 형태 | 설명 |
|---|---|---|
| getForObject | GET | 주어진 URL 주소로 HTTP GET 메서드로 객체로 결과 반환 |
| getForEntity | GET | 주어진 URL 주소로 HTTP GET 메서드로 결과 ResponseEntity로 반환 |
| postForLocation | POST | POST 요청을 보내고 결과로 헤더에 저장된 URI를 결과로 반환 |
| postForObject | POST | POST 요청을 보내고 객체로 결과를 반환 |
| postForEntity | POST | POST 요청을 보내고 결과 ResponseEntity로 반환 |
| delete | DELETE | 주어진 URL 주소로 HTTP DELETE 메서드를 실행 |
| headForHeaders | HEADER | 헤더의 모든 정보를 얻을 수 있으면 HTTP HEAD 메서드를 사용 |
| put | PUT | 주어진 URL 주소로 HTTP PUT 메서드를 실행 |
| patchForObject | PATCH | PATCH 형식으로 요청한 결과를 객체로 반환 |
| optionsForAllow | OPTIONS | 주어진 URL 주소에서 지원하는 HTTP 메서드를 조회 |
| exchange | any | HTTP 헤더를 새로 만들 수 있고 어떤 HTTP 메서드도 사용가능 |
| execute | any | Request/Response 콜백을 수정 |
RestTemplate 사용(GET/POST/Custom)
RestTemplate는 별도의 유틸리티 클래스 생성하거나, 서비스나 비즈니스 계층에서 구현
RestTemplate는
spring-boot-starter-web 모듈에 포함돼 있는 기능이다.
그래서 별도의 의존성 추가할 필요가 없다.
GET 형식의 RestTemplate 작성하기
public class RestTemplateService {

    public String getName(){
        URI uri = UriComponentsBuilder
                .fromUriString("http://localhost:9090")
                .path("/api/v1/crud-api")
                .encode()
                .build()
                .toUri();

        RestTemplate restTemplate = new RestTemplate();
        ResponseEntity<String> responseEntity = restTemplate.getForEntity(uri, String.class);

        return responseEntity.getBody();
    }

    public String getNameWithPathVariable(){
        URI uri = UriComponentsBuilder
                .fromUriString("http://localhost:9090")
                .path("/api/v1/crud-api/{name}")
                .encode()
                .build()
                .expand("Flature") // 복수의 값을 넣어야 할 경우 ,를 추가하여 구분
                .toUri();

        RestTemplate restTemplate = new RestTemplate();
        ResponseEntity<String> responseEntity = restTemplate.getForEntity(uri, String.class);

        return responseEntity.getBody();
    }

    public String getNameWithParameter(){
        URI uri = UriComponentsBuilder
                .fromUriString("http://localhost:9090")
                .path("/api/v1/crud-api/param")
                .queryParam("name", "Flature")
                .encode()
                .build()
                .toUri();

        RestTemplate restTemplate = new RestTemplate();
        ResponseEntity<String> responseEntity = restTemplate.getForEntity(uri, String.class);

        return responseEntity.getBody();
    }
}
RestTemplate 생성 시 보통 UriComponenetsBuilder 사용
-> 파라미터를 연결해 URI 생성
fromUriString 에 호출부 URL 입력
path() 메서드에 세부 경로 입력
encode() 에 인코딩 문자셋 설정 디폴트 값 UTF-8
build를 통해 빌더 생성 종료하고 UriComponent 타입이 리턴
-> 이것을 toURI 메서드를 통해 URI 타입으로 리턴
생성한 uri는 외부 API를 요청에 사용
-> getForEntity() 의 파라미터로 사용
path()내 중괄호로 변수명 입력 후,
expand()에 순서대로 값 입력(여러개 나열해 사용 가능)
queyrParam()메서드를 통해 (키,값) 형식으로 파라미터 추가 가능
POST 형식의 RestTemplate 작성
public ResponseEntity<MemberDto> postwithParamAndBody(){
        URI uri = UriComponentsBuilder
                .fromUriString("http://localhost:9090")
                .path("/api/v1/crud-api")
                .queryParam("name", "Flature")
                .queryParam("email", "flature@wikibooks.co.kr")
                .queryParam("organization", "WikiBooks")
                .encode()
                .build()
                .toUri();

        MemberDto memberDto = new MemberDto();
        memberDto.setName("flature!!");
        memberDto.setEmail("flature@gmail.com");
        memberDto.setOrganization("Around Hub Studio");

        RestTemplate restTemplate = new RestTemplate();
        ResponseEntity<MemberDto> responseEntity = restTemplate.postForEntity(
                uri, memberDto, MemberDto.class
        );

        return responseEntity;
    }

    public ResponseEntity<MemberDto> postWithHeader(){
        URI uri = UriComponentsBuilder
                .fromUriString("http://localhost:9090")
                .path("/api/v1/crud-api/add-header")
                .encode()
                .build()
                .toUri();

        MemberDto memberDto = new MemberDto();
        memberDto.setName("flature");
        memberDto.setEmail("flature@wikibooks.co.kr");
        memberDto.setOrganization("Around Hub Studio");

        RequestEntity<MemberDto> requestEntity = RequestEntity
                .post(uri)
                .header("my-header", "wikibooks API")
                .body(memberDto);

        RestTemplate restTemplate = new RestTemplate();
        ResponseEntity<MemberDto> responseEntity = restTemplate.exchange(
                requestEntity, MemberDto.class
        );

        return responseEntity;
    }
첫 메서드
public ResponseEntity<MemberDto> postwithParamAndBody()는 외부 API에 요청 Body값과 파라미터 값을 담음
두번째 메서드
public ResponseEntity<MemberDto> postWithHeader()는
헤더를 추가하는 메서드 예제
-> 대부분의 외부 API는 토큰키를 받아 서비스 접근을 인증하는 방식
-> 이때 토큰값을 보통 헤더에 담음
헤더 설정을 위해선 보통 RequestEntity를 정의해서 사용하는 방법이 많이 쓰임.
post()로 URI 설정
header() 메서드에서 키 이름과 값을 설정
exchange() 메서드는 모든 형식의 HTTP 요청 생성 가능
-> post() 메서드 대신 다른 형식의 메서드로 정의만 하면
exchange() 메서드로 쉽게 사용할 수 있기에 대부분 사용
위의 작성된 서비스를 확인하기 위한 Swagger config 설정과
Controller를 작성해 보자!
Swagger 설정
@Configuration
@EnableSwagger2
public class SwaggerConfiguration {

    @Bean
    public Docket api(){
        return new Docket(DocumentationType.SWAGGER_2)
                .apiInfo(apiInfo())
                .select()
                .apis(RequestHandlerSelectors.basePackage("com.springboot.rest"))
                .paths(PathSelectors.any())
                .build();
    }

    private ApiInfo apiInfo(){
        return new ApiInfoBuilder()
                .title("Spring Boot Open API Test with Swagger")
                .description("설명 부분")
                .version("1.0.0")
                .build();
    }
}
컨트롤러 작성
@RestController
@RequestMapping("/rest-template")
public class RestTemplateController {

    private final RestTemplateService restTemplateService;

    public RestTemplateController(RestTemplateService restTemplateService){
        this.restTemplateService = restTemplateService;
    }

    @GetMapping
    public String getName(){
        return restTemplateService.getName();
    }

    @GetMapping("/path-variable")
    public String getNameWithPathVariable(){
        return restTemplateService.getNameWithPathVariable();
    }

    @GetMapping("/parameter")
    public String getNameWithParameter(){
        return restTemplateService.getNameWithParameter();
    }

    @PostMapping
    public ResponseEntity<MemberDto> postDto(){
        return restTemplateService.postWithParamAndBody();
    }

    @PostMapping("/header")
    public ResponseEntity<MemberDto> postWithHeader(){
        return restTemplateService.postWithHeader();
    }
}
위와 같은 방식으로 작성하면,
서비스를 swagger를 통해서 확인할 수 있는데
문제는 이 책의 경우 swagger2로 작성되었다는 점이다.
swagger 3가 2와 차이가 좀 커서... 모두 다 적용하기 위해서는
따로 학습을 해야 한다.
RestTemplatedml 커스텀 설정
왜 이러한 것을 만드는지를 먼저 생각해 보자.
RestTemplate은 HTTPClient를 추상화하고 있다.
즉 완전히 일치하지 않는데, HTTPClient와 가장 큰 차이는
커넥션 풀(Connection Pool)이라고 한다.
이 기능이 없으면 매번 호출할 때 마다,
포트를 열어 커넥션을 생성하는데, TIME_VAIT 상태가 된
소켓을 다시 사용하려고 접근한다면 재사용할 수 없다고 한다.
(이해가 적확하게 된 게 아니어서 옮기듯 적었습니다 ㅠ)
위와 같은 상황을 없애기 위해서 커스텀해 사용하는 것으로
아래오하 같은 의존성 추가가 필요하다.
Maven
<dependency>
	 <groupId>org.apache.httpcomponents</groupId>
	 <artifactId>httpclient</artifactId>
</dependency>
Gradle
compile 'org.apache.httpcomponents:httpclient'서비스에 아래와 같은, 메서드를 추가해 주자.
    public RestTemplate restTemplate() {
        HttpComponentsClientHttpRequestFactory factory = new HttpComponentsClientHttpRequestFactory();

        HttpClient client = HttpClientBuilder.create()
            .setMaxConnTotal(500)
            .setMaxConnPerRoute(500)
            .build();

        CloseableHttpClient httpClient = HttpClients.custom()
            .setMaxConnTotal(500)
            .setMaxConnPerRoute(500)
            .build();

        factory.setHttpClient(httpClient);
        factory.setConnectTimeout(2000);
        factory.setReadTimeout(5000);

        RestTemplate restTemplate = new RestTemplate(factory);

        return restTemplate;
    }
ClientHttpRequestFactory는 함수형 interface
대표적인 구현체는 SimpleHttpRequestFactory와 HttpComponentsClientHttpRequestFactory
별도의 구현체를 설정해서 전달하지 않으면
HttpAccessor에 구현되어 있는 내용에 의해 SimpleClientHttpRequestFactory 사용
HttpComponentsClientHttpRequestFactory로 객체를 생성 ClientHttpRequestFactory로 사용해 Timeout 설정 가능
또한 커넥션 풀을 설정하기 위해 HttpClient를 HttpComponentsClientHttpRequestFactory에 설정 가능
Http Client 생성 방법
1. HttpClientBuilder.create()
2. HttpClients.custom()
setHttpClient인자로 전달해서 설정 가능
이 경우 factory 객체를 RestTemplate로 초기화하며 인자로 전달
WebClient
일반적으로 실제 운영환경에 적용되는 애플리케이션은 정식 버전
출시된 스프링 부트 버전보다 낮아 RestTemplate을 많이 쓰지만
최신 버전의 경우 WebClient만 사용이 가능
(RestTemplate)지원 중단
Spring WebFlux는 HTTP 요청을 수행하는 클라이언트로
WebClient 제공
WebClient는 리액터 기반으로 동작하는 API
리액터 기반
스레드와 동시성 문제를 벗어나 비동기 형식으로 사용 가능WebClient는 6가지 특징.
- 논블로킹 I/O 지원
- 리액티브 스트림의 백 프래셔 지원
- 적은 하드웨어 리소스로 동시성을 지원
- 함수형 API 지원
- 동기, 비동기 상호작용 지원
- 스트리밍 지원
WebClient를 사용하려면 WebFlux 모듈에 대한 의존성 추가
Maven
			<dependency>
            <groupId>org.springframework.boot</groupId>
            <artifactId>spring-boot-starter-webflux</artifactId>
            </dependency>
Gradle
implementation group: 'org.springframework.boot', name: 'spring-boot-starter-webflux'WebClient 구현
크게 2가지 방법이 있다.
create() 메서드를 이용한 생성
builder() 메서드를 이용한 생성
WebClient를 활용한 GET 요청 예제
@Service
public class WebClientService {
    public String getName() {
        WebClient webClient = WebClient.builder()
                .baseUrl("http://localhost:9090")
                .defaultHeader(HttpHeaders.CONTENT_TYPE, MediaType.APPLICATION_JSON_VALUE)
                .build();

        return webClient.get()
                .uri("/api/v1/crud-api")
                .retrieve()
                .bodyToMono(String.class)
                .block();
    }

    public String getNameWithPathVariable(){
        WebClient webClient = WebClient.create("http://localhost:9090");

        ResponseEntity<String> responseEntity = webClient.get()
                .uri(uriBuilder -> uriBuilder.path("/api/v1/crud-api/{name}")
                        .build("Flature"))
                .retrieve().toEntity(String.class).block();

        return responseEntity.getBody();
    }

    public String getNameWithParameter(){
        WebClient webClient = WebClient.create("http://localhost:9090");

        return webClient.get().uri(uriBuilder -> uriBuilder.path("/api/v1/crud-api")
                .queryParam("name", "Flature")
                .build())
                .exchangeToMono(clientResponse -> {
                    if(clientResponse.statusCode().equals(HttpStatus.OK)){
                        return clientResponse.bodyToMono(String.class);
                    } else{
                        return clientResponse.createException().flatMap(Mono::error);
                    }
                })
                .block();
    }
}
첫메서드
public String getName()는 builder()를 활용
다른 두 메서드
public String getNameWithPathVariable()
public String getNameWithParameter()는 create() 방식 활용
WebClient는 우선 객체를 생성한 후 요청을 전달하는 방식으로 전달
이후 재사용하는 방식으로 구현하는게 좋음
builder() 사용 시 확장할 수 있는 메서드
- defaultHeader() : WebClient의 기본 헤더 설정
- defaultCookie() : WebClient의 기본 쿠키 설정
- defaultVariable() : WebClient의 기본 URI 확장값 설정
- filter() : WebClient에서 발생하는 요청에 대한 필터 설정
일단 빌드된 WebClient는 변경은 불가, 복사는 가능
아래와 같은 방식으로 가능.
WebClient webClient = WebClient.create("http://localhost:9090");
WebClient clone = webClient.mutate().build();
첫 메서드(public String getName())
WebClient는 HTTP 메서드를 get,post 등의 명확한 메서드로 설정 가능
URI 확장을 위해 uri() 메서드 사용 가능
retrieve() 메서드는 요청에 대한 응답을 받았을 때 그 값을 추출하는 방법
bodyToMono() 메서드를 통해 리턴 타입을 설정해 문자열 객체로 받아옴
Mono는 리액티브 스트림에 대한 선행이 필요한 개념 Flux와 비교됨
Publisher의 구현체이다.
block()은 기본적으로 논블로킹으로 작동하는 WebClient를 블로킹 구조로 바꾸기 위해 사용
두번째 메서드( public String getNameWithPathVariable())
PathVariable 값을 추가해 요청을 보냄
uri() 메서드 내부에 uriBuilder를 사용해 path를 설정
build() 메서드에 추가 값을 넣는 것으로 PathVariable 추가 가능
ResponseEntity<String> responseEntity1 = webClient.get()
	.uri("/api/v1/crud-api/{name}", "Flature")
    .retrieve()
    .toEntity(String.class)
    .block()
위와 같이도 작성 가능
세번째 메서드( public String getNameWithParameter())
쿼리 파라미터를 함께 전달하는 역할
쿼리 파라미터 요청을 담기 위해
uriBuilder를 사용
queryParam() 메서드를 사용해 값 전달
retrieve 메서드 대신 exchange() 사용
응답 결과 코드에 따라 다르게 응답 설정 가능
위 코드는 if문을 통해 상황에 따라
결과값을 다르게 전달할 수 있게 구성됨
POST 요청 예제
public ResponseEntity<MemberDto> postParamAndBody(){
        WebClient webClient = WebClient.builder()
                .baseUrl("http://localhost:9090")
                .defaultHeader(HttpHeaders.CONTENT_TYPE, MediaType.APPLICATION_JSON_VALUE)
                .build();

        MemberDto memberDto = new MemberDto();
        memberDto.setName("flature!!");
        memberDto.setEmail("flature@gmail.com");
        memberDto.setOrganization("Around Hub Studio");

        return webClient.post().uri(uriBuilder -> uriBuilder.path("/api/v1/crud-api")
                .queryParam("name", "Flature")
                .queryParam("email", "flature@wikibooks.co.kr")
                .queryParam("organization", "Wikibooks")
                .build())
                .bodyValue(memberDto)
                .retrieve()
                .toEntity(MemberDto.class)
                .block();
    }

    public ResponseEntity<MemberDto> postWithHeader(){
        WebClient webClient = WebClient.builder()
                .baseUrl("http://localhost:9090")
                .defaultHeader(HttpHeaders.CONTENT_TYPE, MediaType.APPLICATION_JSON_VALUE)
                .build();

        MemberDto memberDto = new MemberDto();
        memberDto.setName("flature!!");
        memberDto.setEmail("flature@gmail.com");
        memberDto.setOrganization("Around Hub Studio");

        return webClient
                .post()
                .uri(uriBuilder -> uriBuilder.path("/api/v1/crud-api/add-header")
                        .build())
                .bodyValue(memberDto)
                .header("my-header", "Wikibooks API")
                .retrieve()
                .toEntity(MemberDto.class)
                .block();
    }
GET 요청을 만드는 방법과 다르지 않음.
주요하게 살펴 볼 가치가 있는
HTTP 바디 값을 담는 방법과,
커스텀 헤더를 추가하는 방법을 살펴 볼 필요가 있다.
uriBuilder로 path와 parameter를 설정
그 후 bodyValue를 통해 HTTP 바디 값을 설정 함
바디는 일반적으로 데이터 객체(DTO, VO)를 파라미터로 전달
header() 메서드를 사용해 헤더에 값을 추가
일반적으로 인증된 토큰값 담아 전달