목표
자바의 예외 처리에 대해 학습하세요.
학습할 것
- 자바에서 예외 처리 방법 (try, catch, throw, throws, finally)
- 자바가 제공하는 예외 계층 구조
- Exception과 Error의 차이는?
- RuntimeException과 RE가 아닌 것의 차이는?
- 커스텀한 예외 만드는 방법
들어가며
자바는 에러의 발생시점에 따라 컴파일 에러, 런타임 에러, 논리적 에러가 존재한다. 이 중에서 런타임 에러는 컴파일 이후 *.class 파일의 실행 도중에 발생하는 잠재적인 오류다.
실행 시 발생할 수 있는 프로그램 오류는 에러와 예외 두가지로 구분된다.
- 에러: OutOfMemory, StackOverflowError와 같이 일단 발생하면 복구할 수 없는 심각한 오류
- 예외: 발생하더라도 수습될 수 있는 비교적 덜 심각한 오류
즉 예외는 발생하더라도 프로그래머의 예외를 처리하는 코드가 작성되어 있다면, 프로그램의 비정상적인 종료를 막을 수 있다.
만약 특정 예외가 발생될 수 있는 코드라면 다음 중 하나로 처리해주어야 한다.
- try statement로 묶어주기
- 메소드에 예외를 나열하는 throws를 이용해 예외 던져주기
자바에서 예외 처리 방법
자바에서 예외를 처리하는 방법에 대해 알아보자
예외처리는 프로그램 실행 시 발생할 수 있는 예외에 대비한 코드를 작성하여 프로그램의 비정상적인 종료를 막고, 정상적인 실행상태를 유지한다.
다음 코드를 예제로 예외처리하는 방법을 알아본다.
// Note: This class will not compile yet.
import java.io.*;
import java.util.List;
import java.util.ArrayList;

public class ListOfNumbers {

    private List<Integer> list;
    private static final int SIZE = 10;

    public ListOfNumbers () {
        list = new ArrayList<Integer>(SIZE);
        for (int i = 0; i < SIZE; i++) {
            list.add(new Integer(i));
        }
    }

    public void writeList() {
		// The FileWriter 생성자는 반드시 잡아야 하는 예외인 IOException을 던집니다.
        PrintWriter out = new PrintWriter(new FileWriter("OutFile.txt"));

        for (int i = 0; i < SIZE; i++) {
            // get(int) 메서드는 IndexOutOfBoundsException을 발생시키며, 이는 반드시 잡아야 합니다.
            out.println("Value at: " + i + " = " + list.get(i));
        }
        out.close();
    }
}
try block
try {
    code
}
catch and finally blocks . . .
예외가 발생할 수 있는 코드를 try 블록안에 둔다.
만약 try 블록 내에서 예외가 발생하면 해당 예외에 해당되는 Exception Handler가 예외가 처리된다.
Exception Handler와 try 블록을 연결하기 위해서는 try 다음 블록에 catch 블록이 나타나야 한다.
초기 코드 예제에서 writeList() 메소드는 IOException과 IndexOutOfBoundException을 발생시킬 수 있다. 따라서 다음과 같이 try 블록으로 예외 발생 가능 코드를 묶어줄 수 있다.
public void writeList() {
    PrintWriter out = null;
    try {
        System.out.println("Entered try statement");
        FileWriter f = new FileWriter("OutFile.txt");
        out = new PrintWriter(f);
        for (int i = 0; i < SIZE; i++) {
            out.println("Value at: " + i + " = " + list.get(i));
        }
    }
    catch and finally blocks  . . .
}
각각의 예외 발생 코드 별개의 try 블록으로 묶어서 각각 Exception Handler와 연결할 수 있고, 위의 예시처럼 여러 예외 발생 코드를 하나의 try 블록으로 묶고 여러 Exception Handler에 연결할 수 도 있다.
catch block
try 블록이 끝나고 하나 이상의 catch 블록을 연결해 Exception Handler와 try 블록을 이어줄 수 있다. try와 catch 블록 사이엔 다른 어떤 코드도 와선 안된다.
try {

} catch (ExceptionType name) {

} catch (ExceptionType name) {

}
각 catch 블록은 인수로 표시된 예외를 처리하는 Exception Handler이다.
예외 유형(인수 유형)은 처리기가 처리할 수 있는 예외 유형이어야 하고, Throwable 클래스를 상속받는 예외 클래스여야 한다.
try 블록으로 묶은 writeList() 메소드를 각 예외 처리기로 연결하면 다음과 같다.
try {
    // 기존 코드
} catch (IndexOutOfBoundsException e) {
    System.err.println("IndexOutOfBoundsException: " + e.getMessage());
} catch (IOException e) {
    System.err.println("Caught IOException: " + e.getMessage());
}
현재는 단순히 에러를 콘솔에 출력하고 있지만, 예외 처리기는 더 많은것을 할 수 있다. (오류 복구, 사용자에게 결정 요청, Chained Exception를 통한 상위 처리기로의 오류 전달 등)
혹은 하나의 catch 블록에서 둘 이상의 예외를 잡을 수 있다.
try {
    // 기존 코드
    } catch (IndexOutOfBoundsException | IOException e) {
        if (e instanceof IndexOutOfBoundsException) {
            System.err.println("IndexOutOfBoundsException: " + e.getMessage());
        } else {
            System.err.println("Caught IOException: " + e.getMessage());
        }
}
catch 블록에서 블록이 처리할 예외를 |로 구분하여 작성한다.
하나의
catch 블록이 둘 이상의 예외를 처리하면 해당 참조변수는 임시적으로 final로 취급된다.
finally block
finally 블록은 항상 try 블록이 종료될 때 실행된다.
따라서 예기치 못한 상황이 발생해도 반드시 finally 블록이 실행된다.
이런 특성 때문에 예외 처리 이상으로 유용한 점이 존재하는데 프로그래머의 코드에서 실수로 break, continue, return에 의해 우회되는 상황을 피할 수 있다.
위에서 작성한 writeList() 메서드는 약 3가지의 방법 중 하나로 종료될 수 있다.
new FileWriter()의 실패-> IOException 발생list.get(i)의 실패-> IndexOutOfBoundsException 발생모든 예외상황 성공 및 try 블록 정상 종료
위 3가지의 상황이 발생해도 모두 finally 블록을 거치기 때문에 이를 고려하여 finally 블록을 작성해야 한다.
finally {
	// PrintWriter가 열려있다면
	if (out != null) {
    	System.out.println("Closing PrintWriter");
        out.close();
    // PrintWriter가 열리지 않았다면
    } else {
    	System.out.println("PrintWriter not open");
    }
    // FileWriter가 열려있다면
    if (f != null) {
    	System.out.println("Closing FileWriter");
    	f.close();
    }
Java 7부터 try-with resources를 제공한다. 이는 파일을 닫거나 리소스를 복구할때 일반적인 finally 블록을 대신해 사용할 수 있고, 권장한다.
try-with resources
위에서 설명한 리소스는 프로그램이 완료된 후 닫아야 하는 인스턴스를 말한다.
try-with resources는 하나 이상의 리소스를 선언하는 try 문이며, 이를 이용하면 각 선언된 리소스는 try문이 종료되면 자동으로 닫히게 된다.
java.lang.AutoCloseable을 구현한 객체거나, 확장하여 구현한 java.io.Closeable 인터페이스를 구현한 객체들은 모두 리소스가 될 수 있다.
다음은 FileReader를 통해 파일을 읽고 해당 파일의 내용을 BufferedReader로 읽어서 반환하는 메소드에서 try-with resources를 사용한 예시이다.
static String readFirstLineFromFile(String path) throws IOException {
	try (FileReader fr = new FileReader(path);
		BufferedReader br = new BufferedReader(fr)) {

		return br.readLine();
	}
}
위에서 FileReader, BufferedReader는 모두 리소스가 되며 이러한 리소스는 try(이곳) 키워드 바로 뒤에 괄호를 통해 나타난다.
두 리소스 모두 java.lang.AutoCloseable를 구현하므로 try문의 정상 종료, 비정상 종료에 상관없이 해당 블록을 벗어나면 재정의한 AutoCloseable.close()를 호출해 자동으로 리소스를 닫는다.
이는 이전의 finally 블록을 통해 리소스를 직접 닫아주는 방식에 비해 간결하고 편리한것을 알 수 있다.
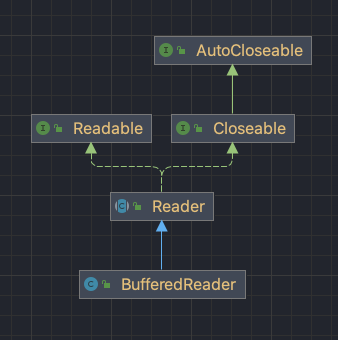

FileReader, BufferedReader의 계층 구조
이런 try-with resources구조를 사용해야 하는 이유는 메모리 누수의 방지이다.
finally 블록에서 선언한 리소스를 닫기위해 close()를 호출하면 리소스를 운영체제에 다시 릴리스한다. 그러나 GC가 리소스를 회수하기 전에 프로그램이 해당 작업을 하지 못하면 리소스를 해제할 수 있는 정보가 존재하지 않아 누수가 발생한다.
static String readFirstLineFromFileWithFinallyBlock(String path) throws IOException {

    FileReader fr = new FileReader(path);
    BufferedReader br = new BufferedReader(fr);
    try {
        return br.readLine();
    } finally {
        br.close();
        fr.close();
    }
}
위와같은 코드에서 finally 블록에서 br.close()를 실행하는데 예외가 발생하게 되면 FileReader의 메모리가 누수된다. 따라서 프로그램의 리소스를 닫기 위해서는 finally block보다 try-with resources문을 사용하는것이 좋다.
try-catch
try {
	try {} catch (Exception e) {}
} catch (Exception e) {
	try {} catch (Exception e1) {}	// 변수의 이름이 e가 되면 오류
}

try {

} catch (Exception e) {

}
또한 다음과 같이 try 혹은 catch 블럭에 또 다른 try-catch문이 포함될 수 있다.
다만 catch블럭내 또 다른 try-catch가 포함된 경우, 같은 이름의 참조변수를 사용해서는 안된다. (변수의 스코프가 겹치므로)
throws
메서드에서 예외가 발생하면 위의 방식처럼 코드 내에서 발생할 수 있는 예외를 catch 블록을 통한 Exception Handler의 연결로 직접 처리해 주었다.
하지만, 만약 ListOfNumbers 클래스가 특정 패키지의 클래스로 제공되는 것이라면 각 사용자의 요구를 예상할 수 없다. 따라서, 예외를 catch하기 보단 throws를 통해 해당 메서드를 호출한 곳으로 처리를 넘겨주는 방식이 좋을 수 있다.
public void writeList() throws IOException, IndexOutOfBoundsException {
	PrintWriter out = new PrintWriter(new FileWriter("OutFile.txt"));
	for (int i = 0; i < SIZE; i++) {
		out.println("Value at: " + i + " = " + list.get(i));
	}
	out.close();
}
위에서 IndexOutOfBoundsException은 un-checked Exception이며 throws 절에 반드시 포함되지 않아도 된다.
// writeList()를 호출한 쪽에서 예외를 처리해 줘야함
try {
	writeList();
} catch(Exception e) {
	...
}
throw
throw는 throws와는 다르다.
throw 키워드를 통해 프로그래머가 고의로 예외를 발생시킬 수 있으며 다음과 같이 이용한다.
- 연산자 new를 이용해 발생시키려는 예외 클래스의 객체 생성
- 키워드 throw를 이용해 예외를 발생시킴
throw new IOException();어떤 예외든 위와같이 할 수 있다. 이는 모든 예외 클래스가 Throwable의 하위클래스이며 이를 통해 다양한 유형의 예외 사이에서 프로그램이 구별되도록 허용한다.
chained exception
모든 예외 클래스는 Throwable 클래스를 상속받고 있고, Throwable은 원인 예외를 등록시킬 수 있는 기능을 제공해준다.
이렇게 특정 예외가 다른 예외를 발생시키는 경우를 알게 될 경우 프로그램을 만드는 프로그래머에게 큰 도움이 될 수 있다.
-
Throwable 클래스
Throwable initCause(Throwable cause): 지정한 예외를 원인 예외로 등록Throwable getCause(): 원인 예외를 반환Throwable(String message, Throwable cause): getMessage()시 반환 메시지와, 원인 예외 생성자 등록Throwable(Throwable cause): 원인 예외 등록 생성자
-
원인 예외
- 특정 예외가 다른 예외를 발생시킬 수 있는데 그 특정 예외를 원인 예외라고 함
원인 예외는 다음과 같이 등록할 수 있다.
try {

} catch(IOException e) {
	throw new SampleException("Other IOException", e);	// 원인 예외는 IOException
}
이러한 원인 예외를 등록하는 또다른 이유중 하나는 checked exception은 unchecked exception으로 바꿀 수 있도록 하기 위함도 있다.
뒤에서 설명하겠지만 checked exception은 반드시 해당 예외를 처리해주어야 하는 로직이 있어야 하는데, 이를 강제하면 해당 예외를 처리할 수 없는 상황에선 난감하다.
따라서 위의 원인 예외를 checked exception으로 두고 실제 발생 예외는 unchecked로 두어 이를 피할 수 있다.
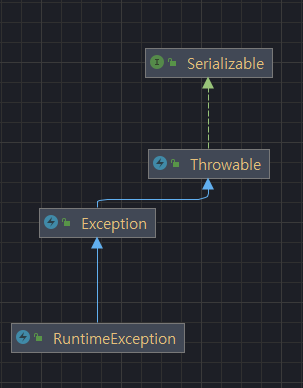
throws new RuntimeException(new IOException());자바가 제공하는 예외 계층 구조

자바의 모든 예외 및 오류 유형은 Throwable 클래스의 하위 클래스이다. 사진을 보면 java.lang.Throwable 클래스를 상속받는 java.lang.Exceptions, java.lang.Error 클래스를 확인할 수 있다.
Throwable을 상속받기 때문에 printStackTrace(), getMessage()를 할 수 있다.
Exception
Exception 클래스는 Checked Exceptions, Unchecked Exceptions를 포함하는데, 이들은 다음과 같은 예외를 포함하고 있다.
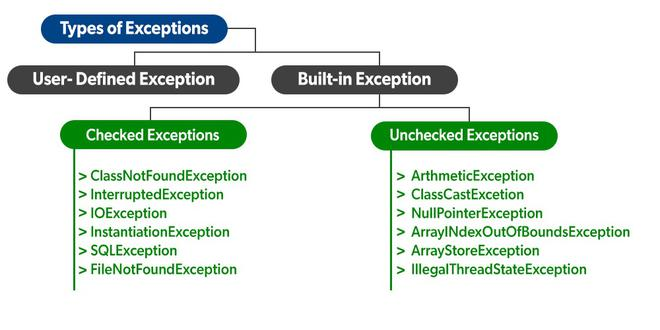
-
Checked Exception: Exception 클래스의 하위 예외 클래스들이며, 컴파일러가 컴파일 타임에 검사하는 예외, 컴파일 타임 예외라고도 함 주로, 사용자의 실수와 같은 외적인 요인에 의해 발생한다.
즉, 반드시 예외를 던지거나 직접 처리해야 한다. 이를 하지 않을시 컴파일러에서 오류를 표시합니다. -
Unchecked Exception: Exception클래스를 상속받는 RuntimeException의 하위 예외 클래스들을 Unchecked Exception이라고 한다. 이는 프로그래머의 실수에 의해 발생될 수 있는 예외들로 구성되어 있다. 따라서, Checked Exception과 달리 예외 처리를 강제하지 않는다.
Exception과 Error의 차이는?
Exception 클래스와 Error 클래스는 모두 Throwable클래스를 상속받고 있지만, 엄연히 둘을 구분하고 있다.
Error
먼저 Error는 프로그램 코드에 의해 수습될 수 없는 심각한 오류를 말한다. 예를 들어 JVM의 메모리 부족, 메모리 누수, 스택 오버플로우 오류, 라이브러리 비호환성, 무한 재귀등과 같이 복구할 수 없는 조건을 나타내며 일반적으로 프로그래머가 제어할 수 없다.
Exception
프로그램 코드에 의해서 수습될 수 있는 다소 미약한 오류를 말한다. 따라서, 프로그래머가 이에 대한 적절한 코드를 미리 작성해 놓음으로써 프로그램의 비정상적인 흐름 및 종료를 막을 수 있다.
RuntimeException과 RE가 아닌 것의 차이는?
위에서 말했듯, 자바에서 예외는 크게 Exception과 RuntimeException으로 나뉜다. 이 둘의 가장 큰 차이는 예외 처리를 강제하는지의 여부다.
Exception
Exception 클래스에 포함되는 예외인 경우 이를 checked exception이라 하며, 프로그래머는 해당 예외가 발생하는 경우 예외 처리를 강제하고 있다. 그렇지 않으면 컴파일 오류가 발생한다. 주로 외부의 영향으로 발생할 수 있는 예외들로 존재하지 않는 파일의 이름 입력, 잘못된 클래스 이름, 잘못 입력한 데이터 형식등과 같이 프로그램의 사용자들의 동작에 의해 발생하는 경우가 많다.
RuntimeException
RuntimeException 클래스는 Exception 클래스를 상속받으며, RE에 포함되는 예외들을 unchecked exception이라 한다. 이는 프로그래머의 실수에 의해 발생될 수 있는 예외들로 컴파일 타임에 해당 오류를 검출할 수 없고, 런타임시 발생되는 예외들을 말한다. 따라서 예외 처리를 강제하지 않는다. 0으로 특정 수를 나누거나, 배열의 범위를 벗어남등과 같은 상황에서 발생한다.
커스텀한 예외 만드는 방법
기존 정의 클래스 외에도 사용자 정의 예외를 만들 수 있다.
Exception 혹은 RuntimeException 클래스를 필요에 따라 선택하여 커스텀 예외 클래스를 만든다.
public class CustomException extends Exception {
    public CustomException() {
    }

    public CustomException(String message) {
        super(message);
    }

    public CustomException(String message, Throwable cause) {
        super(message, cause);
    }

    public CustomException(Throwable cause) {
        super(cause);
    }

    public CustomException(String message, Throwable cause, boolean enableSuppression, boolean writableStackTrace) {
        super(message, cause, enableSuppression, writableStackTrace);
    }
}
예외 클래스의 생성자를 선택하면 기본 생성자를 포함한 5개가 정의된것을 볼 수 있고,
모두 매개인자를 받든 받지 않든 super()를 이용해 부모(Exception)의 생성자를 호출한다.
각 매개인자의 역할은 다음과 같다.
String message: 예외의 디테일한 메시지 인자Throwable cause: 원인 예외를 등록하는 인자 chained exception에서 사용된다.boolean enableSuppression: 억제가 활성화 되어있는지 여부를 결정한다.(try-with resources문에서 suppressed사용됨)boolean writableStackTrace: 실행 stack trace를 채울지 말지 결정함 다른 생성자들은 기본적으로 실행 statck trace를 채운다.(예외가 발생하는 정확한 위치 확인시 유용함)
위와 같이 RuntimeException 혹은 Exception을 상속받아 커스텀한 예외를 만들 수 있고, 부가적으로 에러코드 저장을 위한 별도의 필드를 두어 기능을 추가할 수 도 있다.
많은 사용자들이(자바의 정석에서도 언급됨) RuntimeException을 상속받아 예외 처리를 강제하지 않게 커스텀 예외를 만들거나, 혹은 Checked Exception 마저 RuntimeException으로 감싸서 강제하지 않는 경우가 있다.
Oracle Docs를 보면 이러한 부분에 관한 논의를 작성한 글을 확인할 수 있다.
Unchecked Exceptions — The Controversy
Because the Java programming language does not require methods to catch or to specify unchecked exceptions (RuntimeException, Error, and their subclasses), programmers may be tempted to write code that throws only unchecked exceptions or to make all their exception subclasses inherit from RuntimeException. Both of these shortcuts allow programmers to write code without bothering with compiler errors and without bothering to specify or to catch any exceptions. Although this may seem convenient to the programmer, it sidesteps the intent of the catch or specify requirement and can cause problems for others using your classes.Why did the designers decide to force a method to specify all uncaught checked exceptions that can be thrown within its scope? Any Exception that can be thrown by a method is part of the method's public programming interface. Those who call a method must know about the exceptions that a method can throw so that they can decide what to do about them. These exceptions are as much a part of that method's programming interface as its parameters and return value.
The next question might be: "If it's so good to document a method's API, including the exceptions it can throw, why not specify runtime exceptions too?" Runtime exceptions represent problems that are the result of a programming problem, and as such, the API client code cannot reasonably be expected to recover from them or to handle them in any way. Such problems include arithmetic exceptions, such as dividing by zero; pointer exceptions, such as trying to access an object through a null reference; and indexing exceptions, such as attempting to access an array element through an index that is too large or too small.
Runtime exceptions can occur anywhere in a program, and in a typical one they can be very numerous. Having to add runtime exceptions in every method declaration would reduce a program's clarity. Thus, the compiler does not require that you catch or specify runtime exceptions (although you can).
One case where it is common practice to throw a RuntimeException is when the user calls a method incorrectly. For example, a method can check if one of its arguments is incorrectly null. If an argument is null, the method might throw a NullPointerException, which is an unchecked exception.
Generally speaking, do not throw a RuntimeException or create a subclass of RuntimeException simply because you don't want to be bothered with specifying the exceptions your methods can throw.
Here's the bottom line guideline: If a client can reasonably be expected to recover from an exception, make it a checked exception. If a client cannot do anything to recover from the exception, make it an unchecked exception.
Unchecked Exception을 사용하면 컴파일러 오류에 시달리지 않고, 번거롭지 않아 프로그래머에게 편리할 수 있다. 하지만, catch의 의도를 방해하거나 요구 사항을 명시하지 않는다면 해당 클래스를 사용하는 다른 사람들에게 문제를 일으킬 수 있다.
따라서 클라이언트가 예외로부터 복구될 것으로 합리적 예상이 가능하면 Unchecked Exception을 만들고 그렇지 않다면 Checked Exception을 이용하는게 바람직하다.
References