
[Spring Security] OAuth2 인증(Authentication)
앞서 다룬 내용들은 사용자의 크리덴셜(Credential)을 직접 관리하는 방식으로 로그인 인증 과정을 수행했다.
이 방법은 외부의 써드 파티 애플리케이션 API를 이용하는 기능이 추가되면 사용자의 크리덴셜을 여러개 관리해야 하고, 써드 파티 애플리케이션에서 패스워드를 변경하게 된다면 해당 애플리케이션도 추가적으로 업데이트가 이루어져야 한다는 단점이 있다.
또한, 외부의 애플리케이션에서 사용하는 크리덴셜을 직접적으로 보관하고 있다면 보안상으로 위험하다.
OAuth 2
OAuth 2
- 소셜 로그인 인증 방식을 구현한 기술
- 사용자 정보를 보유하고 있는 신뢰할 만한 써드 파티 애플리케이션(GitHub, Google, Facebook 등)에서 사용자의 인증을 대신 처리해 주고 Resource에 대한 자격 증명용 토큰을 발급한 후, Client가 해당 토큰을 이용해 써드 파티 애플리케이션의 서비스를 사용하게 해주는 방식
- 특정 애플리케이션(Client)에서 사용자의 인증을 직접 처리하는 것이 아님
OAuth 2를 사용하는 애플리케이션 유형
- 써드 파티 애플리케이션에서 제공하는 API의 직접적인 사용
- OAuth 2 인증 프로토콜을 이용해 써드 파티 애플리케이션에 대한 인증에 성공하면 써드 파티 애플리케이션에서 제공하는 API를 활용한 커스텀 서비스를 제공하는 것이다.
- 추가적인 인증 서비스 제공 용도
- 일반적으로 제공하는 아이디/패스워드 로그인 인증 이외에 OAuth 2를 이용한 로그인 인증 방법을 추가적으로 제공하는 것이다.
- 특정 서비스를 제공하는 애플리케이션에서 사용자의 크리덴셜을 남기고 싶지 않을 경우 OAuth2 로그인 인증 방법으로 로그인을 하면 되는 것
OAuth2의 동작 방식
OAuth 2 인증 컴포넌트(Component, 구성요소)들의 역할
Resource Owner
- 사용하고자 하는 Resource의 소유자를 의미 (서비스를 이용하는 사용자)
Client
- Resource Owner를 대신해 보호된 Resource에 액세스하는 애플리케이션
- 어떤 서비스를 이용하고자 하는 쪽은 Client이다
Resource Server
- Client의 요청을 수락하고 Resource Owner에게 해당하는 Resource를 제공하는 서버
Authorization Server
- Client가 Resource Server에 접근할 수 있는 권한을 부여하는 서버
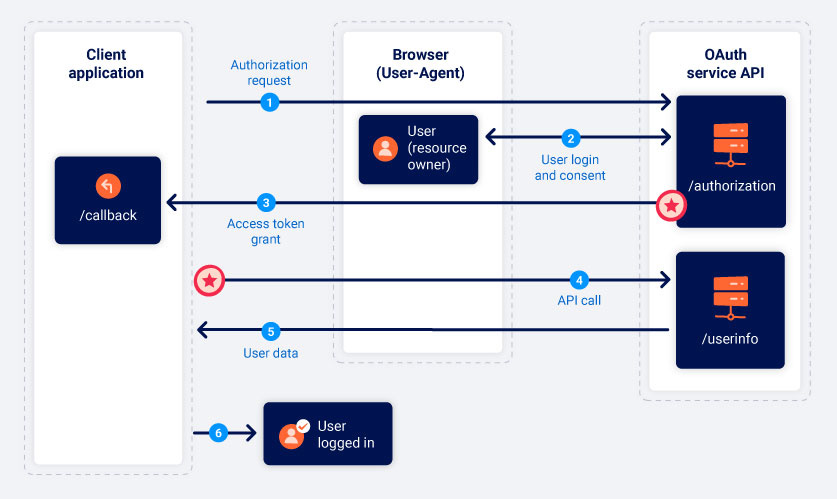
OAuth 2 컴포넌트 간의 상호 작용을 통한 인증 처리 흐름

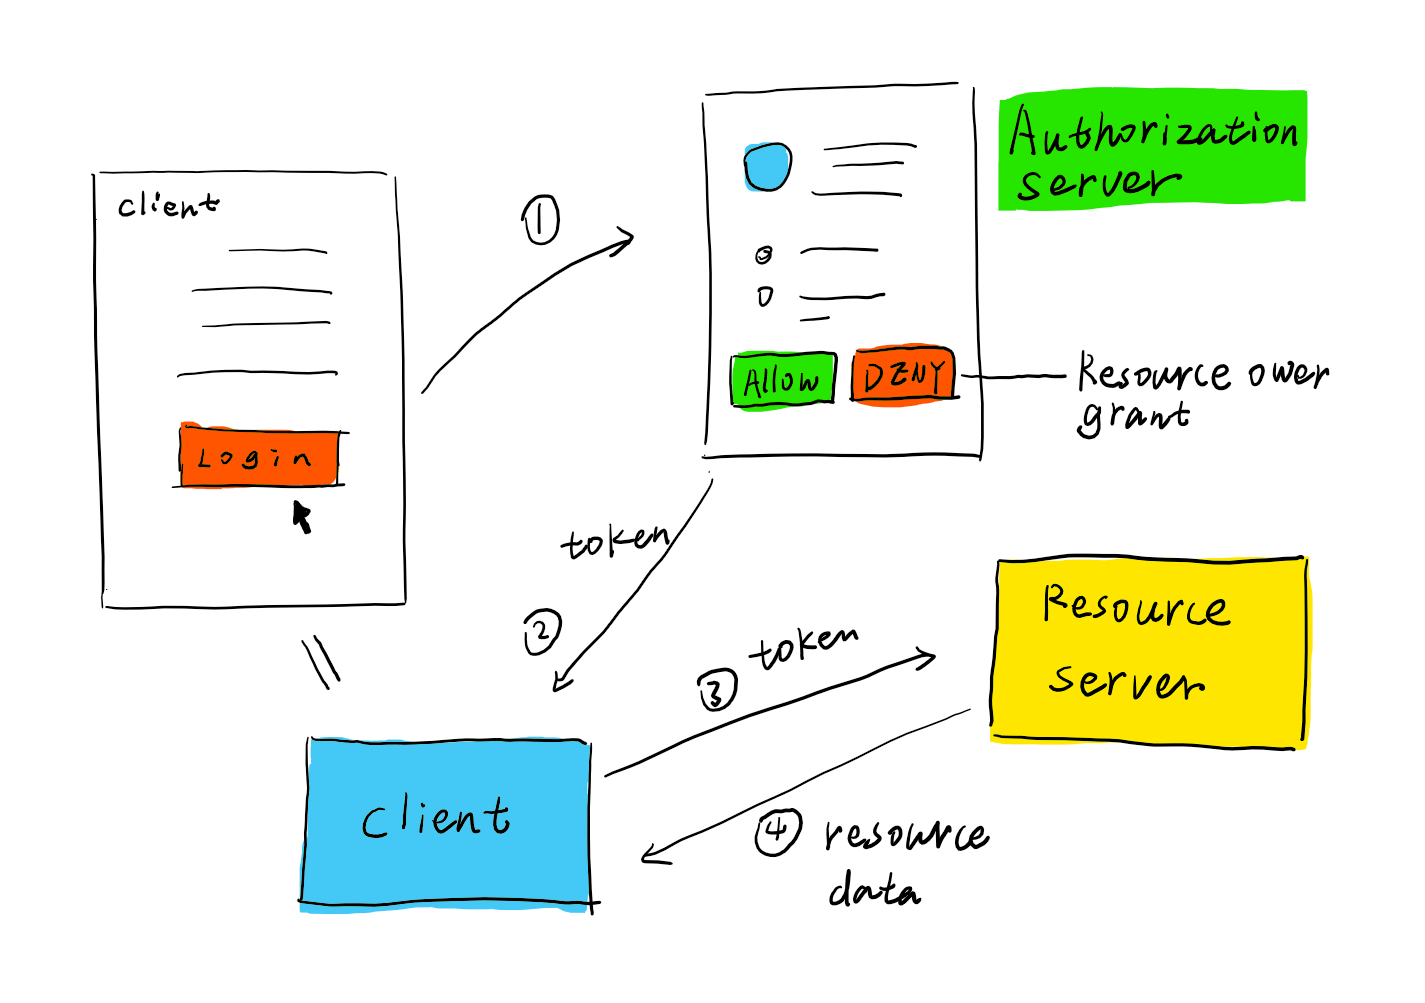
Resource Owner가 로그인을 하겠다고 버튼을 누름
-> 클라이언트가 써드 파티 애플리케이션의 로그인 페이지로 리다이렉트(Redirect) 해줌
-
Resource Owner가 로그인 인증 진행
-
로그인 성공시 Authorization Server가 Access Token을 Client에게 전송
- Client가 Access Token을 전달받으면 Resource Owner의 대리인 역할을 수행할 수 있다.
-
Resource Server에게 Resource Owner 소유의 Resource를 요청
-
Access Token을 검증 후 자격 증명되면 Resource Owner의 Resource를 Client에게 전송
OAuth 2 인증 프로토콜에서 사용되는 용어
Authorization Grant
-
Client 애플리케이션이 Access Token을 얻기 위한 Resource Owner의 권한을 표현하는 크리덴셜(Credential)을 의미
(Client가 Access Token을 얻기 위한 수단) -
Authorization Grant 타입 4가지
- Authorization Code
- 사용자가 인증 페이지에서 로그인을 하면, 인증 서버로부터 authorization code를 받아온 뒤 이를 사용하여 access token을 얻는 방식이다. - Implicit Grant Type
- 사용자가 로그인 페이지를 통해 인증을 하면, access token을 바로 받아오는 방식으로, authorization code를 받아오지 않기 때문에, 보안 측면에서 취약점이 있을 수 있다. - Client Credentials
- 클라이언트가 서버에 인증 정보를 보내고, 서버는 이를 검증하여 access token을 발급하는 방식이다. 사용자 개입 없이 클라이언트가 서버에 직접 요청을 보내는 경우에 사용된다. - Resource Owner Password Credentials
- 사용자의 아이디와 비밀번호를 클라이언트가 직접 받아와 인증 서버로 요청을 보내 access token을 발급하는 방식이다. 사용자의 인증 정보가 클라이언트에게 직접 전달되기 때문에, 보안상의 취약점이 존재할 수 있다.
- Authorization Code
Access Token
- Client가 Resource Server에 있는 보호된 Resource에 액세스하기 위해 사용하는 자격 증명용 토큰
Scope
- 주어진 액세스 토큰을 사용하여 액세스할 수 있는 Resource의 범위를 의미
Authorization Grant 유형
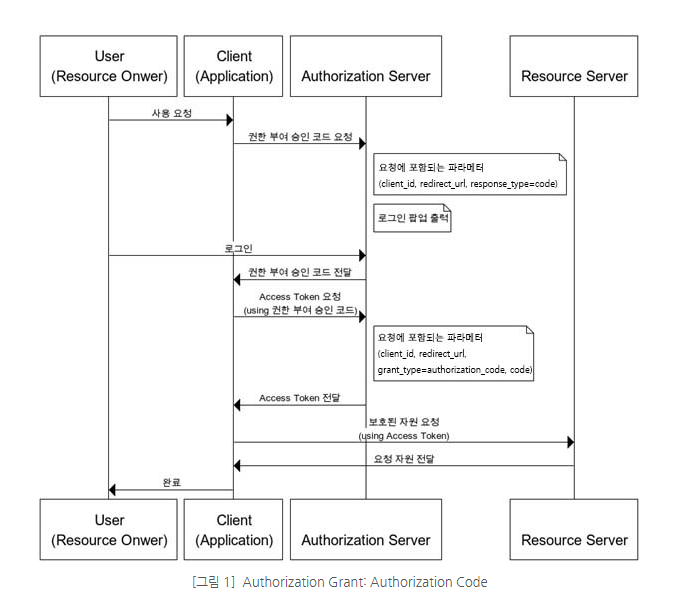
Authorization Code Grant : 권한 부여 승인 코드 방식
-
권한 부여 승인을 위해 자체 생성한 Authorization Code를 전달하는 방식으로, 가장 많이 쓰이고 기본이 되는 방식이다.
-
Refresh Token을 사용할 수 있다.
-
권한 부여 승인 요청 시 응답 타입(
response_type)을 code로 지정하여 요청한다.

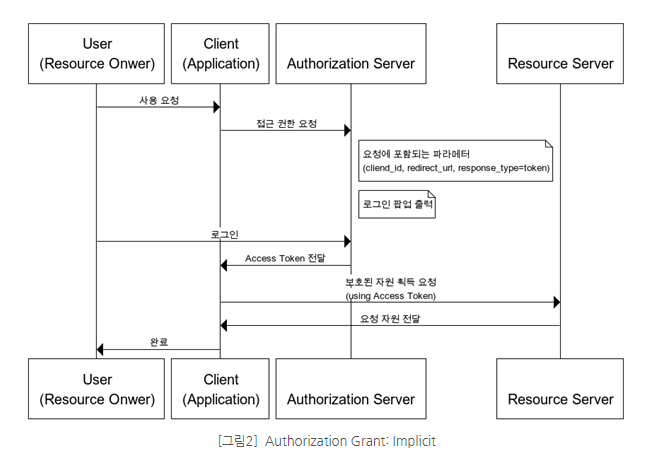
Implicit Grant : 암묵적 승인 방식
-
별도의 Authorization Code 없이 바로 Access Token을 발급하는 방식
- 자격증명을 안전하게 저장하기 힘든 Client(자바스크립트 등 스크립트 언어를 사용하는 브라우저)에게 최적화된 방식
- Refresh Token 사용이 불가능
- Authorization Server는 Client Secret을 통해 클라이언트 인증 과정을 생략
- Access Token이 URL로 전달 돼서 보안성 취약
-
권한 부여 승인 요청 시 응답 타입(response_type)을 token으로 지정하여 요청한다.
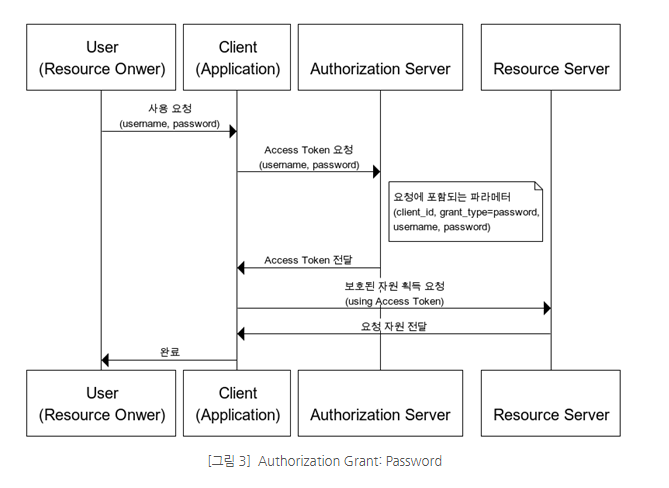
Resource Owner Password Credential Grant : 자원 소유자 자격 증명 승인 방식
-
간단하게 로그인 시 필요한 정보(username, password)로 Access Token을 발급받는 방식이다.
- 자신의 서비스에서 제공하는 애플리케이션의 경우에만 사용되는 인증 방식
- Refresh Token 사용 가능
-
ex. 네이버 계정으로 네이버 웹툰 애플리케이션에 로그인, 카카오 계정으로 카카오 지도 애플리케이션에 로그인
-
즉, Authorization Server, Resource Server, Client가 모두 같은 시스템에 속해 있을 때만 사용이 가능
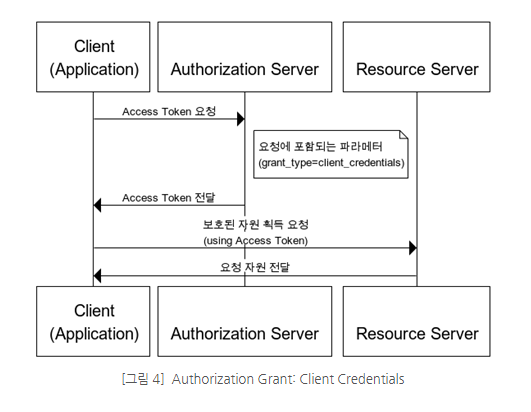
Client Credentials Grant : 클라이언트 자격 증명 승인 방식
-
클라이언트의 자격증명만으로 Access Token을 획득하는 방식
- Client 자신이 관리하는 Resource 혹은 Authorization Server에 해당 Client를 위한 제한된 Resource 접근 권한이 설정되어 있는 경우 사용할 수 있는 방식
-
자격 증명을 안전하게 보관할 수 있는 Client에서만 사용되어야 한다.
-
Refresh Token의 사용은 불가능하다.
-
같은 시스템내에서 사용자 요청 없이 내부로직에 의해 데이터 가져오는거라고 생각하면 됨
핵심 포인트
OAuth 2 인증 컴포넌트
-
Resource Owner = 사용하고자 하는 Resource의 소유자
-
Client = Resource Owner를 대신해 보호된 Resource에 액세스하는 애플리케이션
-
Resource Server = Client의 요청을 수락하고 Resource Owner에 해당하는 Resource를 제공하는 서버
-
Authorization Server는 Client가 Resource Server에 접근할 수 있는 권한을 부여하는 서버를 의미한다.
OAuth 2 인증 프로토콜의 키포인트는 어떤 Resource를 소유하고 있는 Resource Owner를 대신하는 누군가(Client)가 Resource Owner의 대리인 역할을 수행한다는 것이다.
Authorization Grant에 따른 인증 처리 방식
-
Authorization Code Grant = 권한 부여 승인 코드 방식
-
Implicit Grant = 암묵적 승인 방식
-
Resource Owner Password Credential Grant = 자원 소유자 자격 증명 승인 방식
-
Client Credentials Grant = 클라이언트 자격 증명 승인 방식
실습
구글 API 콘솔에서의 OAuth 2 설정
1. 프로젝트 만들기
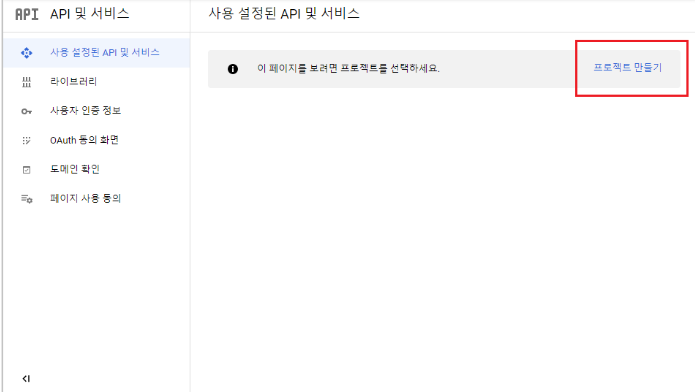
만들어지는데 1분정도 걸림
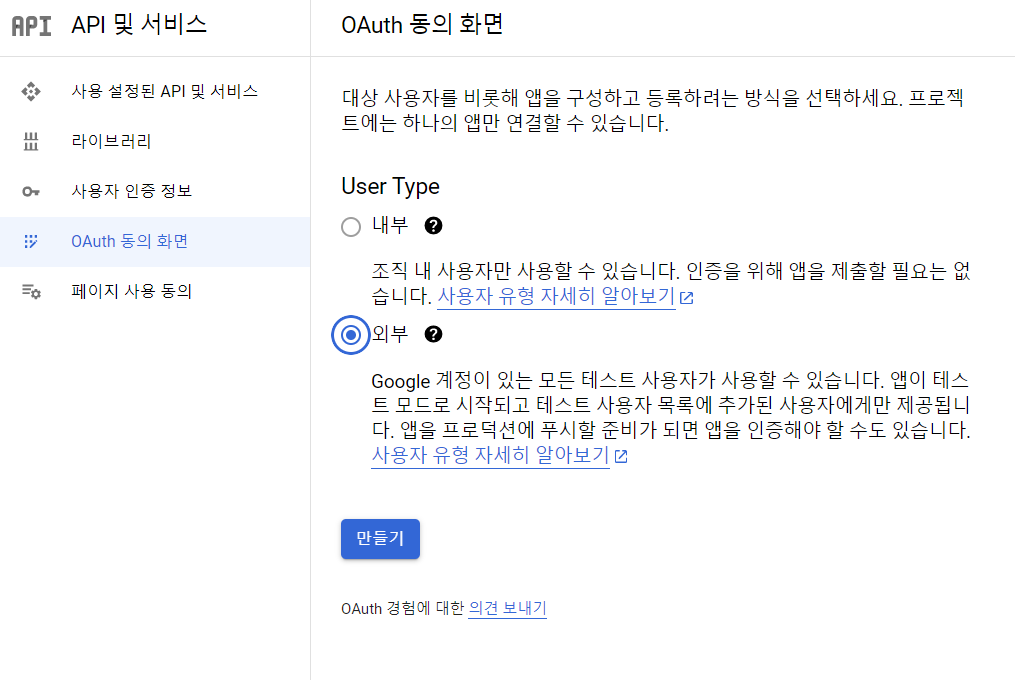
2. OAuth 동의 화면 만들기
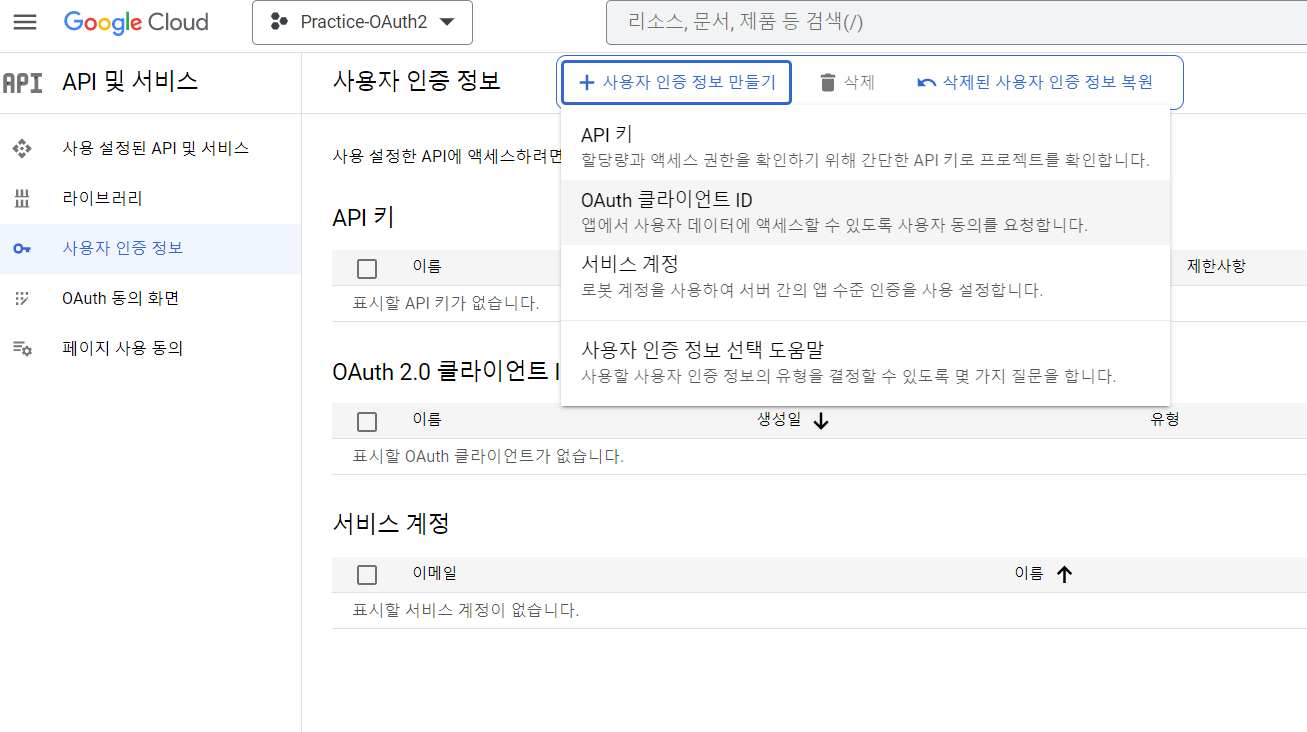
3. 사용자 인증 정보 생성
의존성 추가
dependencies {
    implementation 'org.springframework.boot:spring-boot-starter-data-jpa'
    implementation 'org.springframework.boot:spring-boot-starter-validation'
    implementation 'org.springframework.boot:spring-boot-starter-web'
    implementation 'org.springframework.boot:spring-boot-starter-thymeleaf'    // HTML 화면을 구성하기 위한 템플릿인 타임리프(Thymeleaf)를 추가
    testImplementation 'org.springframework.boot:spring-boot-starter-test'
    implementation 'org.springframework.boot:spring-boot-starter-security'     // Spring Security 추가
    implementation 'org.springframework.boot:spring-boot-starter-oauth2-client'  // 구글의 OAuth 2 시스템을 이용해 클라이언트로써의 역할을 하기 위해 추가
    compileOnly 'org.projectlombok:lombok'
    runtimeOnly 'com.h2database:h2'
    annotationProcessor 'org.projectlombok:lombok'
    implementation 'org.mapstruct:mapstruct:1.5.2.Final'
    annotationProcessor 'org.mapstruct:mapstruct-processor:1.5.2.Final'
    implementation 'org.springframework.boot:spring-boot-starter-mail'
    implementation 'com.google.code.gson:gson'
}
OAuth 2 클라이언트 등록 정보 추가
spring:
  h2:
    console:
      enabled: true
      path: /h2
  datasource:
    url: jdbc:h2:mem:test
  jpa:
    hibernate:
      ddl-auto: create  # 스키마 자동 생성
    show-sql: true      # SQL 쿼리 출력
    properties:
      hibernate:
        format_sql: true  # SQL pretty print
  sql:
    init:
      data-locations: classpath*:db/h2/data.sql
  security:
    oauth2:
      client:
        registration:
          google:
            clientId: 아이디
            clientSecret: 비번 노출안되게 조심!!!
logging:
  level:
    org:
      springframework:
        orm:
          jpa: DEBUG
server:
  servlet:
    encoding:
      force-response: true
mail:
  address:
    admin: admin@gmail.com
실습에서는 위와 같이 yml 파일에서 대충 했지만, 민감한 정보의 경우 application.yml 파일에 그대로 노출하는 것은 보안상 안좋다.
만약 실무에서 OAuth 2 클라이언트 ID와 Secret 같은 민감한 정보를 설정한다면 OS의 시스템 환경 변수에 설정하거나 또는 application.yml 파일에 구성하는 프로퍼티 정보를 애플리케이션 외부의 안전한 경로에 위치시키는 등의 방식으로 사용해야 한다.
Configuration을 통한 OAuth 2 인증 설정
build.gradle dependences {…}에 implementation 'org.springframework.boot:spring-boot-starter-oauth2-client'를 추가해 자동구성되는 부분이지만 직접 Configuration을 통해 빈등록으로 인증 설정을 해봤다.
import org.springframework.beans.factory.annotation.Value;
import org.springframework.context.annotation.Bean;
import org.springframework.context.annotation.Configuration;
import org.springframework.security.config.annotation.web.builders.HttpSecurity;
import org.springframework.security.config.oauth2.client.CommonOAuth2Provider;
import org.springframework.security.oauth2.client.registration.ClientRegistration;
import org.springframework.security.oauth2.client.registration.ClientRegistrationRepository;
import org.springframework.security.oauth2.client.registration.InMemoryClientRegistrationRepository;
import org.springframework.security.web.SecurityFilterChain;

import static org.springframework.security.config.Customizer.withDefaults;

@Configuration
public class SecurityConfiguration { // build.gradle dependences에 설정해뒀기 때문에 사실상 얜 없어도 자동구성 되는 클래스임
    @Value("${spring.security.oauth2.client.registration.google.clientId}")  // application.yml 파일에 설정되어 있는 구글의 Client ID 로드
    private String clientId;

    @Value("${spring.security.oauth2.client.registration.google.clientSecret}") // clientSecret 로드
    private String clientSecret;

    @Bean
    public SecurityFilterChain filterChain(HttpSecurity http) throws Exception {
        http
                .csrf().disable() // CSRF 보호 기능을 비활성화
                .formLogin().disable() // 폼 기반 로그인을 비활성화
                .httpBasic().disable() // HTTP Basic 인증을 비활성화
                .authorizeHttpRequests(authorize -> authorize    // HttpSecurity를 인자로 받아서, 요청에 대한 인증 및 권한 부여
                        .anyRequest().authenticated() // 모든 요청에 대해서 인증된 사용자만 접근이 가능하도록 설정
                )
                .oauth2Login(withDefaults());    // OAuth2 로그인을 활성화하고 기본값으로 설정
        return http.build();
    }

    @Bean // ClientRegistration을 저장하기 위한 Responsitory 빈등록
    public ClientRegistrationRepository clientRegistrationRepository() {
        var clientRegistration = clientRegistration();    // ClientRegistration(클라이언트 등록) 인스턴스 가져오기

        return new InMemoryClientRegistrationRepository(clientRegistration);   // ClientRegistrationRepository 인터페이스의 구현 클래스인InMemoryClientRegistrationRepository의 인스턴스를 생성
        // InMemoryClientRegistrationRepository 는 ClientRegistration 을 메모리에 저장
    }

    private ClientRegistration clientRegistration() { // ClientRegistration 인스턴스를 생성하는 메서드
        return CommonOAuth2Provider // 구글 말고도 깃헙, 페이스북 등 연결할 때 사용
                .GOOGLE
                .getBuilder("google")
                .clientId(clientId)
                .clientSecret(clientSecret)
                .build();
    }
}
무조건적인 자동 구성보다는 명시적으로 특정 설정을 선언해서 유지보수 용이하고 가독성 있는 코드를 구성하는 것 역시 중요하다.
인증 정보 확인방법
인증정보(인증된 Authentication 객체)를 확인방법은 아래와 같이 3가지 방법이 있다.
1. SecurityContext를 이용하는 방법
import org.springframework.security.core.context.SecurityContextHolder;
import org.springframework.security.oauth2.core.user.OAuth2User;
import org.springframework.stereotype.Controller;
import org.springframework.web.bind.annotation.GetMapping;

@Controller
public class HelloHomeController {
    @GetMapping("/hello-oauth2")
    public String home() {
        var oAuth2User = (OAuth2User) SecurityContextHolder.getContext().getAuthentication().getPrincipal(); //  SecurityContext에서 인증된 Authentication 객체를 통해 Principal 객체 얻기
        System.out.println(oAuth2User.getAttributes() // OAuth2User 객체에 저장되어 있는 사용자의 정보 중에서
                .get("email"));   // 사용자의 이메일 정보 얻기
        return "hello-oauth2"; // oauth2(구글) 인증 성공시에만 볼 수 있는 화면(hello-oauth2.html) 리턴
    }
}
- SecurityContext 객체를 담고 있으며, 이 SecurityContext는 인증된 사용자에 대한 정보를 담고 있는 Authentication 객체를 포함하고 있다.
- 현재 스레드에 대한 보안 관련 정보를 제공하는 데 사용되는 클래스
2. Authentication 객체를 핸들러 메서드 파라미터로 전달받는 방법
@GetMapping("/hello-oauth2")  // Authentication 객체를 핸들러 메서드 파라미터로 전달받는 방법
public String home(Authentication authentication) {
    var oAuth2User = (OAuth2User)authentication.getPrincipal();
    System.out.println(oAuth2User);
    System.out.println("User's email in Google: " + oAuth2User.getAttributes().get("email"));

    return "hello-oauth2";
}
3. OAuth2User를 파라미터로 전달받는 방법
@GetMapping("/hello-oauth2")
public String home(@AuthenticationPrincipal OAuth2User oAuth2User) {  // @AuthenticationPrincipal 애너테이션을 이용해 OAuth2User를 파라미터로 전달받는 방법
    System.out.println("User's email in Google: " + oAuth2User.getAttributes().get("email"));
    return "hello-oauth2";
}
@AuthenticationPrincipal 애너테이션을 이용해 OAuth2User 객체를 직접 전달할 수 있다.
Access Token 확인하는 방법
Authorization Server로부터 전달받은 Access Token 확인하는 방법은 아래와 같이 2가지 방법이 있다.
1. OAuth2AuthorizedClientService를 DI 받는 방법
OAuth2AuthorizedClientService인터페이스
- 권한을 부여받은 Client(
OAuth2AuthorizedClient)를 관리하는 역할
OAuth2AuthorizedClient가 Access Token을 보유하고 있음
2. OAuth2AuthorizedClient를 핸들러 메서드의 파라미터로 전달받는 방법
@RegisteredOAuth2AuthorizedClient애너테이션
- 컨트롤러 메소드의 매개 변수로 사용됨
- 인증된 사용자와 연관된
OAuth2AuthorizedClient객체를 자동으로 주입받는다.@GetMapping("/hello-oauth2") // OAuth2AuthorizedClient를 핸들러 메서드의 파라미터로 전달받는 방법 public String home(@RegisteredOAuth2AuthorizedClient("google") OAuth2AuthorizedClient authorizedClient) { OAuth2AccessToken accessToken = authorizedClient.getAccessToken(); System.out.println("Access Token Value: " + accessToken.getTokenValue()); System.out.println("Access Token Type: " + accessToken.getTokenType().getValue()); System.out.println("Access Token Scopes: " + accessToken.getScopes()); System.out.println("Access Token Issued At: " + accessToken.getIssuedAt()); System.out.println("Access Token Expires At: " + accessToken.getExpiresAt()); return "hello-oauth2"; }
하나 이상의 핸들러 메서드에서 OAuth2AuthorizedClient를 사용해야 한다면 OAuth2AuthorizedClientService를 DI 받아서 사용하는 것이 좋다.
핵심 포인트
-
spring-boot-starter-oauth2-client라이브러리 추가 후, 별도의 설정을 하지 않아도 Spring Boot의 자동 구성을 통해 OAuth2 로그인 인증 기능이 활성화된다. -
ClientRegistration은 OAuth2 시스템을 사용하는 Client 정보를 표현하는 객체다. -
Spring Security에서 제공하는
CommonOAuth2Providerenum은 내부적으로 Builder 패턴을 이용해ClientRegistration인스턴스를 제공하는 역할을 한다. -
OAuth2AuthorizedClientService는 권한을 부여받은 Client인OAuth2AuthorizedClient를 관리하는 역할을 하는 인터페이스다.OAuth2AuthorizedClientService를 이용해서OAuth2AuthorizedClient가 보유하고 있는 Access Token에 접근할 수 있다.OAuth2AuthorizedClientService의loadAuthorizedClient("google", authentication.getName())를 호출하면OAuth2AuthorizedClientRepository를 통해OAuth2AuthorizedClient객체를 로드할 수 있다.
