
JWT 인증(Authentication)
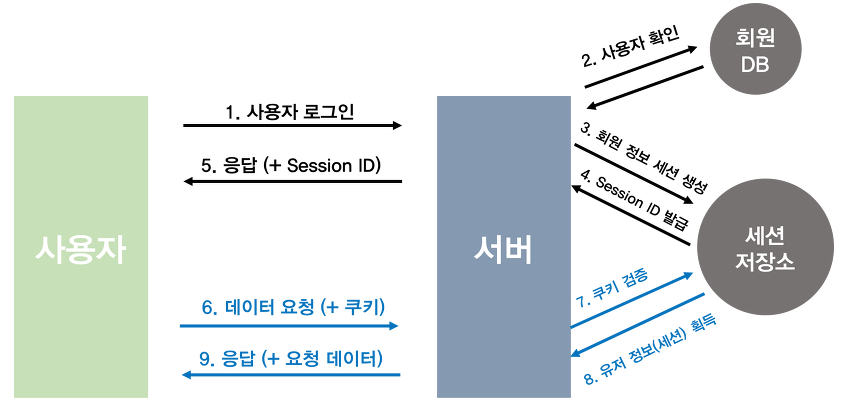
세션 기반 자격 증명 방식
- 서버 측에 인증된 사용자의 정보를 세션 형태로 세션 저장소에 저장하는 방식
세션 기반 자격 증명의 특징
-
세션은 인증된 사용자 정보를 서버 측 세션 저장소에서 관리한다.
-
생성된 사용자 세션의 고유한 ID인 세션 ID는 클라이언트의 쿠키에 저장되어 요청을 보낼 때 인증된 사용자인지를 증명하는 수단으로 사용된다.
-
클라이언트 측에서는 세션 ID만을 사용하기 때문에, 네트워크 트래픽 부담이 비교적 적다.
-
세션 정보는 서버 측에서 관리되기 때문에, 보안 측면에서 약간의 이점이 있다.
-
서버 확장성 측면에서는 세션 불일치 문제가 발생할 가능성이 있다.
-
세션 데이터 양이 증가하면 서버 부하가 증가할 수 있다.
-
SSR(Server Side Rendering) 애플리케이션에 적합한 방식이다.
세션 기반 인증 절차
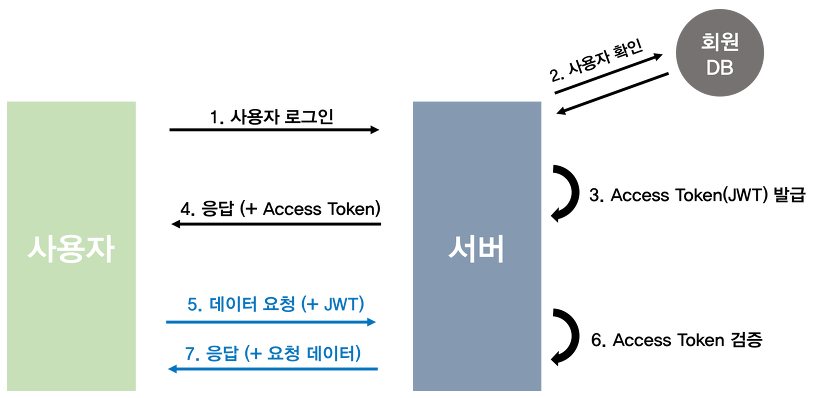
토큰 기반 인증
-
세션기반 인증방식으로 생기는 서버의 부담을 "클라이언트에게 넘겨줄순 없을까?"하는 생각에서 토큰 기반 인증이 고안되었다.
(대표적인 토큰기반 인증 = JWT) -
클라이언트 측에 인증된 사용자의 정보를 토큰 형태로 저장하는 방식
- 토큰: 인증된 사용자의 자격을 증명하는 동시에 접근 권한을 부여해 접근 권한이 부여된 특정 리소스에만 접근할 수 있게 하는 역할
토큰 기반 자격 증명의 특징
-
토큰에 포함된 인증된 사용자 정보는 서버 측에서 별도로 관리되지 않는다.
-
생성된 토큰을 헤더에 포함시켜 요청을 보낼 때, 인증된 사용자인지를 증명하는 수단으로 사용된다.
-
토큰은 인증된 사용자 정보 등을 포함하기 때문에 세션보다 비교적 많은 네트워크 트래픽을 사용한다.
-
토큰은 기본적으로 서버 측에서 관리되지 않기 때문에 보안 측면에서 약간의 불리함이 있다.
-
인증된 사용자 요청의 상태를 유지할 필요가 없기 때문에 세션 불일치와 같은 문제를 일으키지 않으므로 서버의 확장성 측면에서 이점이 있다.
-
토큰에 포함된 사용자 정보는 토큰의 특성상 암호화되어 있지 않기 때문에, 공격자가 토큰을 탈취하면 사용자 정보가 그대로 제공된다. 따라서 민감한 정보는 토큰에 포함시키지 않아야 한다.
-
토큰은 기본적으로 만료될 때까지 무효화될 수 없다.
-
CSR(Client Side Rendering) 기반 애플리케이션에 적합한 방식이다.
JWT(JSON Web Token)
JWT
- 가장 범용적으로 사용되는 토큰 인증 방식
- JSON 포맷의 토큰 정보를 인코딩 후, 인코딩된 토큰 정보를 Secret Key로 서명(Sign)한 메시지를 Web Token으로써 인증 과정에 사용
JWT의 종류
- 액세스 토큰(Access Token)
- 보호된 정보들(사용자의 이메일, 연락처, 사진 등)에 접근할 수 있는 권한 부여에 사용
- 비교적 짧은 유효 기간을 주어 탈취되더라도 오랫동안 사용할 수 없도록 한다.
- 리프레시 토큰(Refresh Token)
-
Access Token의 유효기간이 만료된다면 Refresh Token을 사용하여 새로운 Access Token을 발급받는다.
- 이때, 사용자는 다시 로그인 인증을 할 필요가 없다.
-
Refresh Token을 탈취당한다면 Access Token을 계속 발급할 수 있기 때문에 보안상의 문제가 있다.
- 사용자의 편의보다 정보를 지키는 것이 더 중요한 웹 애플리케이션은 Refresh Token을 사용하지 않는 것이 좋다.
JWT 구조

Header
- 어떤 종류의 토큰인지(지금의 경우엔 JWT), 어떤 알고리즘으로 Sign할지 정의
{
  "alg": "HS256",
  "typ": "JWT"
}
// 이 JSON 객체를 base64 방식으로 인코딩하면 JWT의 Header가 된다.
Payload
- 서버에서 활용할 수 있는 사용자의 정보와 권한을 담는 부분
- 민감한 정보(비번 등)는 담지 않는 것이 좋다.
{
  "sub": "홍길동은 잘생겼다",
  "name": "홍길동",
  "iat": 151623391
}
// 이 JSON 객체를 base64 방식으로 인코딩하면 JWT의 Payload가 된다.
Signature
-
토큰의 위변조 유무를 검증하는 데 사용
-
base64로 Header와 Payload 부분을 인코딩한 뒤 원하는 비밀 키(Secret Key)와 Header에서 지정한 알고리즘을 사용하여 Header와 Payload에 대해서 단방향 암호화를 수행
HMACSHA256(base64UrlEncode(header) + '.' + base64UrlEncode(payload), secret);토큰 기반 인증 절차
핵심 포인트
-
JWT는 일반적으로 다음과 액세스 토큰(Access Token)과 리프레시 토큰(Refresh Token)을 사용자의 자격 증명에 이용한다.
-
Access Token에는 비교적 짧은 유효 기간 을 주어 탈취되더라도 오랫동안 사용할 수 없도록 하는 것이 권장된다.
-
JWT는 Header.Payload.Signature의 구조로 이루어진다.
-
Base64로 인코딩되는 Payload는 손쉽게 디코딩이 가능하므로 민감한 정보는 포함하지 않아야 한다.
JWT의 장점과 단점
JWT를 통한 인증의 장점
-
상태를 유지하지 않고(Stateless), 확장에 용이한(Scalable) 애플리케이션을 구현하기 용이하다.
- 서버는 클라이언트에 대한 정보를 저장할 필요 없다.
- 서버 부담 down
- 토큰 검증만 함
- 클라이언트는 request를 전송할 때마다 토큰을 헤더에 포함시키기만 하면 된다.
- 세션방식은 모든 서버가 사용자의 세션 정보를 공유해야 한다.
- 여러 서버를 이용하는 서비스일 때 JWT는 효과적이다.
- 서버는 클라이언트에 대한 정보를 저장할 필요 없다.
-
클라이언트가 request를 전송할 때마다 자격 증명 정보를 전송할 필요가 없다.
- JWT의 경우 토큰이 만료되기 전까지는 한 번의 인증만 수행하면 된다.
-
인증 시스템을 다른 플랫폼으로 분리하기 용이하다.
- Github나 Google과 같은 다른 플랫폼의 자격 증명을 사용하여 사용자 자격 증명을 직접 관리하지 않아도 된다.
- 토큰 생성을 위한 서버를 생성하거나, 다른 회사에게 토큰 관련 작업을 위탁하는 등 다양한 방식으로 사용할 수 있다.
- 사용자의 인가(권한 부여) 정보를 토큰의 Payload(내용물)에 쉽게 포함시킬 수 있다.
JWT를 통한 인증의 단점
Payload를 디코딩하기 쉬워 보안이 취약하다.
- Payload는 base64로 인코딩되기 때문에 토큰을 탈취하여 디코딩하면 저장된 데이터를 확인할 수 있다.
- 따라서 Payload에 민감한 정보를 담아서는 안된다.
토큰 길이가 길어지면 네트워크 부하가 증가될 가능성이 있다.
- 토큰에 저장하는 정보의 양이 많아질수록 토큰의 길이는 길어진다.
- 따라서 request를 전송할 때마다 길이가 긴 토큰을 함께 전송하면 네트워크 부하를 일으킬 수 있다.
토큰이 자동으로 삭제되지 않는다.
- 한 번 생성된 토큰은 자동으로 삭제되지 않기 때문에 반드시 토큰 만료 시간을 설정해야 한다.
- 만료 시간을 너무 길게 설정하면 토큰이 탈취된 경우 탈취자가 해당 토큰을 계속 이용할 수 있으므로 보안에 취약해진다.
JWT 생성 및 검증 테스트
public void verifySignature(String jws, String base64EncodedSecretKey) {
        Key key = getKeyFromBase64EncodedKey(base64EncodedSecretKey);

        Jwts.parserBuilder()
                .setSigningKey(key)     // 서명에 사용된 Secret Key를 설정
                .build()
                .parseClaimsJws(jws);   //  JWT를 파싱해서 Claims를 얻어내기 // (jws)는 Signature가 포함된 JWT라는 의미
    }
// parseClaimsJws(jws)메서드 자체가 검증하는 로직이다.
// jws에서 Claims을 얻어내 base64EncodedSecretKey와 같은지 비교
Claims
- JWT의 내용(payload)에 포함된 JSON 형태의 객체
@DisplayName("throw ExpiredJwtException when jws verify")
@Test
public void verifyExpirationTest() throws InterruptedException { // 토큰 만료되고 ExpiredJwtException이 발생하는지 테스트
    String accessToken = getAccessToken(Calendar.SECOND, 1);
    assertDoesNotThrow(() -> jwtTokenizer.verifySignature(accessToken, base64EncodedSecretKey)); // 여기서는 통과

    TimeUnit.MILLISECONDS.sleep(1500);

    assertThrows(ExpiredJwtException.class, () -> jwtTokenizer.verifySignature(accessToken, base64EncodedSecretKey)); // 여기서는 1초 지났으니 토큰만료되고 실패
}
throws InterruptedException이 붙은 이유
- InterruptedException은 sleep() 메서드에서 발생할 수 있는 예외다. 이 메서드에서는 스레드를 1.5초 동안 중지한 후 ExpiredJwtException이 발생하는지 테스트하기 위해 사용되었다. 이러한 경우, 다른 스레드가 현재 실행중인 스레드를 깨울 수도 있으므로 InterruptedException을 처리해줘야 한다.
핵심 포인트
-
Plain Text 자체를 Secret Key로 사용하는 것은 권장되지 않는다.
-
jjwt 최신 버전(0.11.5)에서는 서명 과정에서 HMAC 알고리즘을 직접 지정하지 않고, 내부적으로 적절한 HMAC 알고리즘을 지정해 준다.
JWT 구현
application.yml 파일에 JWT 생성 및 검증에 사용되는 정보 추가
~~~
jwt:
  key: ${JWT_SECRET_KEY}               # 민감한 정보는 시스템 환경 변수에서 로드한다.
  access-token-expiration-minutes: 30
  refresh-token-expiration-minutes: 420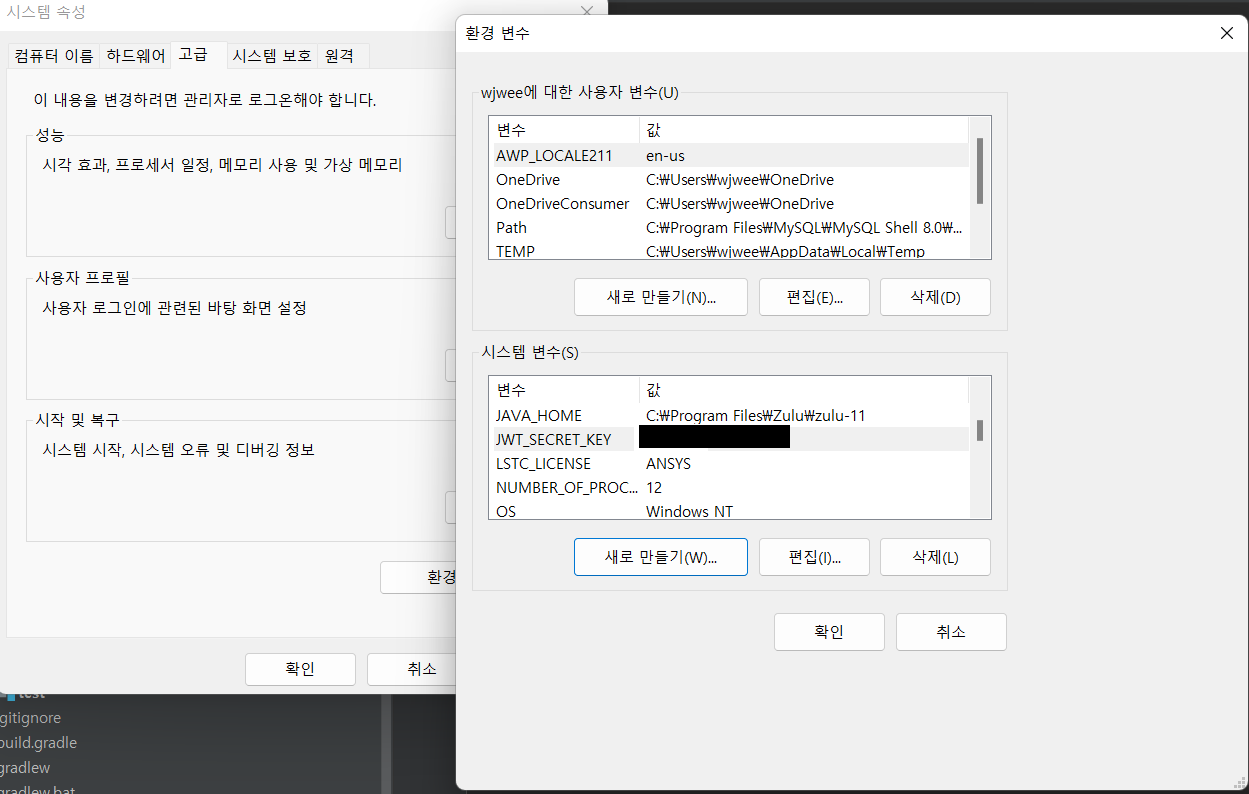
-
JWT의 서명에 사용되는 Secret Key 정보는 민감한(sensitive) 정보이므로 시스템 환경 변수의 변수로 등록
${JWT_SECRET_KEY}는 단순한 문자열이 아니라 OS의 시스템 환경 변수의 값을 읽어오는 일종의 표현식이다.
-
시스템 환경 변수에 등록한 변수를 사용할 때는 applicatioin.yml 파일의 프로퍼티 명과 동일한 문자열을 사용하지 않도록 주의해야 한다.
- 만약 같게 만들어 뒀다면 프로퍼티를 클래스의 필드에서 참조하려고 할 때 환경 변수 값으로 채워진다.
- 가급적 시스템 환경 변수의 값은 application.yml에서 먼저 로드한 뒤에 application.yml에서 일관성 있게 프로퍼티 값을 읽어오는 방식으로 사용하는 것이 좋다.
JWT 자격 증명을 위한 로그인 인증 구현
환경변수 오류
처음에는 환경변수에 null값이 들어가는 등 인식이 제대로 안되는 것 같았다.
jwt:
  key: ${JWT_SECRET_KEY}               # 민감한 정보는 시스템 환경 변수에서 로드한다.
  #key: "#{systemEnvironment['JWT_SECRET_KEY']}" # 시스템 환경 변수에서 로드하는 방법(JWT_SECRET_KEY라는 이름의 환경변수를 가져오는 것)
  access-token-expiration-minutes: 30
refresh-token-expiration-minutes: 420위와 같은 방법으로 추가해도 되긴 하는데... 시스템 환경변수 추가 후 인텔리제이 재부팅을 안해서 인식이 안됐던 것 같다.
// 추가로 발생했던 오류문
io.jsonwebtoken.security.WeakKeyException: The specified key byte array is 232 bits which is not secure enough for any JWT HMAC-SHA algorithm.
The JWT JWA Specification (RFC 7518, Section 3.2) states that keys used with HMAC-SHA algorithms MUST have a size >= 256 bits (the key size must be greater than or equal to the hash output size).
Consider using the io.jsonwebtoken.security.Keys#secretKeyFor(SignatureAlgorithm) method to create a key guaranteed to be secure enough for your preferred HMAC-SHA algorithm.
See https://tools.ietf.org/html/rfc7518#section-3.2 for more information.
환경 변수 인식 후에도 위와 같은 오류가 발생했다.
이 오류는 JWT(JSON Web Token)를 생성하는데 사용되는 Secret Key의 길이가 너무 짧아서 발생하는 오류다.
보안을 위해서 JWT JWA Specification (RFC 7518, Section 3.2)에서는 HMAC-SHA 알고리즘에 사용되는 Secret Key의 길이는 256 비트 이상이어야 한다고 규정하고 있다.
즉, 내가 환경변수 시크릿 키 길이를 너무 짧게 설정한 것이다.
로그인 인증 성공 및 실패에 따른 추가 처리
@Configuration
public class SecurityConfiguration {
    private final JwtTokenizer jwtTokenizer;

    public SecurityConfiguration(JwtTokenizer jwtTokenizer) {
        this.jwtTokenizer = jwtTokenizer;
    }
    @Bean
    public SecurityFilterChain filterChain(HttpSecurity http) throws Exception {
        http
                .headers().frameOptions().sameOrigin() // 동일 출처로부터 들어오는 request만 페이지 렌더링을 허용 (H2 웹 콘솔(개발단계용으로) 쓰기 위해 추가한거)
                .and()
                .csrf().disable()        // CSRF공격에 대한 Spring Security에 대한 설정을 비활성화
                .cors(withDefaults())    // CORS 설정 추가 (corsConfigurationSource라는 이름으로 등록된 Bean을 이용)
                .formLogin().disable()   // 폼 로그인 방식을 비활성화
                .httpBasic().disable()   // HTTP Basic 인증 방식을 비활성화
                .apply(new CustomFilterConfigurer())   // Custom Configurer 적용
                .and()
                .authorizeHttpRequests(authorize -> authorize
                        .anyRequest().permitAll()                // 모든 HTTP request 요청에 대해서 접근 허용
                );
        return http.build();
    }

    @Bean
    public PasswordEncoder passwordEncoder() {
        return PasswordEncoderFactories.createDelegatingPasswordEncoder(); // PasswordEncoder Bean 객체 생성
    }

    // CORS 정책 설정하는 방법
    @Bean
    CorsConfigurationSource corsConfigurationSource() { // CorsConfigurationSource Bean 생성을 통해 구체적인 CORS 정책을 설정
        CorsConfiguration configuration = new CorsConfiguration();
        configuration.setAllowedOrigins(Arrays.asList("*"));   // 모든 출처(Origin)에 대해 스크립트 기반의 HTTP 통신을 허용하도록 설정
        configuration.setAllowedMethods(Arrays.asList("GET","POST", "PATCH", "DELETE"));  // 파라미터로 지정한 HTTP Method에 대한 HTTP 통신을 허용

        UrlBasedCorsConfigurationSource source = new UrlBasedCorsConfigurationSource();   // CorsConfigurationSource 인터페이스의 구현 클래스인 UrlBasedCorsConfigurationSource 클래스의 객체를 생성
        source.registerCorsConfiguration("/**", configuration);      // 모든 URL에 앞에서 구성한 CORS 정책(CorsConfiguration)을 적용
        return source;
    }

    // Custom Configurer 클래스 (JwtAuthenticationFilter를 등록하는 역할)
    public class CustomFilterConfigurer extends AbstractHttpConfigurer<CustomFilterConfigurer, HttpSecurity> {  // AbstractHttpConfigurer를 상속해서 Custom Configurer를 구현할 수 있다.
        @Override
        public void configure(HttpSecurity builder) throws Exception {  // configure() 메서드를 오버라이드해서 Configuration을 커스터마이징
            AuthenticationManager authenticationManager = builder.getSharedObject(AuthenticationManager.class);  // AuthenticationManager 객체 가져오기

            JwtAuthenticationFilter jwtAuthenticationFilter = new JwtAuthenticationFilter(authenticationManager, jwtTokenizer);  // JwtAuthenticationFilter를 생성하면서 JwtAuthenticationFilter에서 사용되는 AuthenticationManager와 JwtTokenizer를 DI
            jwtAuthenticationFilter.setFilterProcessesUrl("/v11/auth/login");          // setFilterProcessesUrl() 메서드를 통해 디폴트 request URL인 “/login”을 “/v11/auth/login”으로 변경
------------------------------------------------------------------------------------------------------------------------------------------------------------------------------------------------------------------------
            jwtAuthenticationFilter.setAuthenticationSuccessHandler(new MemberAuthenticationSuccessHandler());  // 인증 성공시 수행할 작업 추가
            jwtAuthenticationFilter.setAuthenticationFailureHandler(new MemberAuthenticationFailureHandler());  // 인증 실패시 수행할 작업 추가
            // 빈등록으로 DI 안하고 new 쓴 이유는??
            // 일반적으로 인증을 위한 Security Filter마다 AuthenticationSuccessHandler와 AuthenticationFailureHandler의 구현 클래스를 각각 생성할 것이므로 new 키워드를 사용해서 객체를 생성해도 무방하다.
------------------------------------------------------------------------------------------------------------------------------------------------------------------------------------------------------------------------

            builder.addFilter(jwtAuthenticationFilter);  // addFilter() 메서드를 통해 JwtAuthenticationFilter를 Spring Security Filter Chain에 추가
        }
    }
}
핵심 포인트
-
UsernamePasswordAuthenticationFilter를 이용해서 JWT 발급 전의 로그인 인증 기능을 구현할 수 있다. -
Spring Security에서는 개발자가 직접 Custom Configurer를 구성해 Spring Security의 Configuration을 커스터마이징(customizations) 할 수 있다.
-
Username/Password 기반의 로그인 인증은
OncePerRequestFilter같은 Spring Security에서 지원하는 다른 Filter를 이용해서도 구현할 수 있으며, Controller에서 REST API 엔드포인트로 구현하는 것도 가능하다. -
Spring Security에서는 Username/Password 기반의 로그인 인증에 성공했을 때, 로그를 기록하거나 로그인에 성공한 사용자 정보를 response로 전송하는 등의 추가 처리를 할 수 있는
AuthenticationSuccessHandler를 지원하며, 로그인 인증 실패 시에도 마찬가지로 인증 실패에 대해 추가 처리를 할 수 있는AuthenticationFailureHandler를 지원한다.
JWT를 이용한 자격 증명 및 검증 구현
JWT 검증 필터 구현
-
JWT의 검증은 request 당 단 한 번만 수행하면 되기 때문에
OncePerRequestFilter를 이용해 한번만 수행하도록 한다.OncePerRequestFilter의shouldNotFilter()를 오버라이드해서 특정 조건에 부합하면(true이면) 해당 Filter의 동작을 수행하지 않고 다음 Filter로 건너뛰도록 할 수 있다.
-
JWT에서 Claims를 파싱할 수 있다는 의미는 내부적으로 서명(Signature) 검증에 성공했다는 의미다.
public Jws<Claims> getClaims(String jws, String base64EncodedSecretKey) {
    Key key = getKeyFromBase64EncodedKey(base64EncodedSecretKey); // base64로 인코딩된 Secret Key를 디코딩하여 Key 객체 얻기

    Jws<Claims> claims = Jwts.parserBuilder()// JwtParserBuilder 인스턴스를 생성해서  JWT 파싱에 필요한 설정을 지정
            .setSigningKey(key) // 서명 검증에 사용할 시크릿키를 설정
            .build() // JwtParser 객체 생성
            .parseClaimsJws(jws); //  입력으로 받은 JWT 토큰 문자열을 파싱+key와 비교해 검증
    return claims; // 클레임(토큰 데이터)을 포함하는 Jws<Claims> 객체를 반환
}- SecurityContext에
Authentication을 저장하게 되면 Spring Security의 세션 정책(Session Policy)에 따라서 세션을 생성할 수도 있고, 그렇지 않을 수도 있다.- JWT 환경에서는 세션 정책(Session Policy) 설정을 통해 세션 자체를 생성하지 않도록 설정(세션에 인증정보를 저장해둘 필요 X /요청마다 JWT 담아서 보내는 방식)
SecurityConfiguration 설정 업데이트
JwtVerificationFilter(JWT인증필터)를 사용하기 위해서는 아래와 같은 두 가지 설정을 SecurityConfigruation클래스에 추가해야 한다.
- 세션 정책 설정 추가
- stateless한 애플리케이션을 유지하기 위해 세션 유지 시간을 아주 짧게 가져가기 위한(거의 무상태) 설정을 SecurityConfigruation에 추가할 필요가 있다.
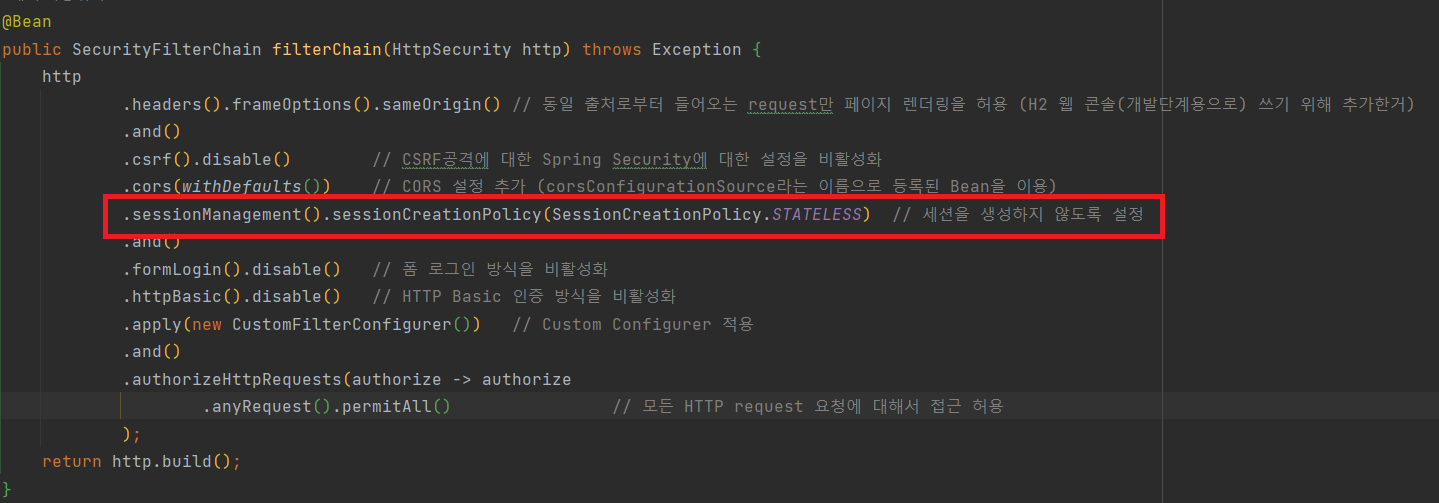
SessionCreationPolicy() 의 설정값으로는 아래와 같이 총 네 개의 값을 사용할 수 있다.
SessionCreationPolicy() 의 설정값
SessionCreationPolicy.ALWAYS
- 항상 세션을 생성
SessionCreationPolicy.NEVER
- 세션을 생성하지 않지만 만약에 이미 생성된 세션이 있다면 사용
SessionCreationPolicy.IF_REQUIRED
- 필요한 경우에만 세션을 생성
SessionCreationPolicy.STATELESS
- 세션을 생성하지 않으며, SecurityContext 정보를 얻기 위해 세션을 사용하지 않는다.
- JwtVerificationFilter 추가
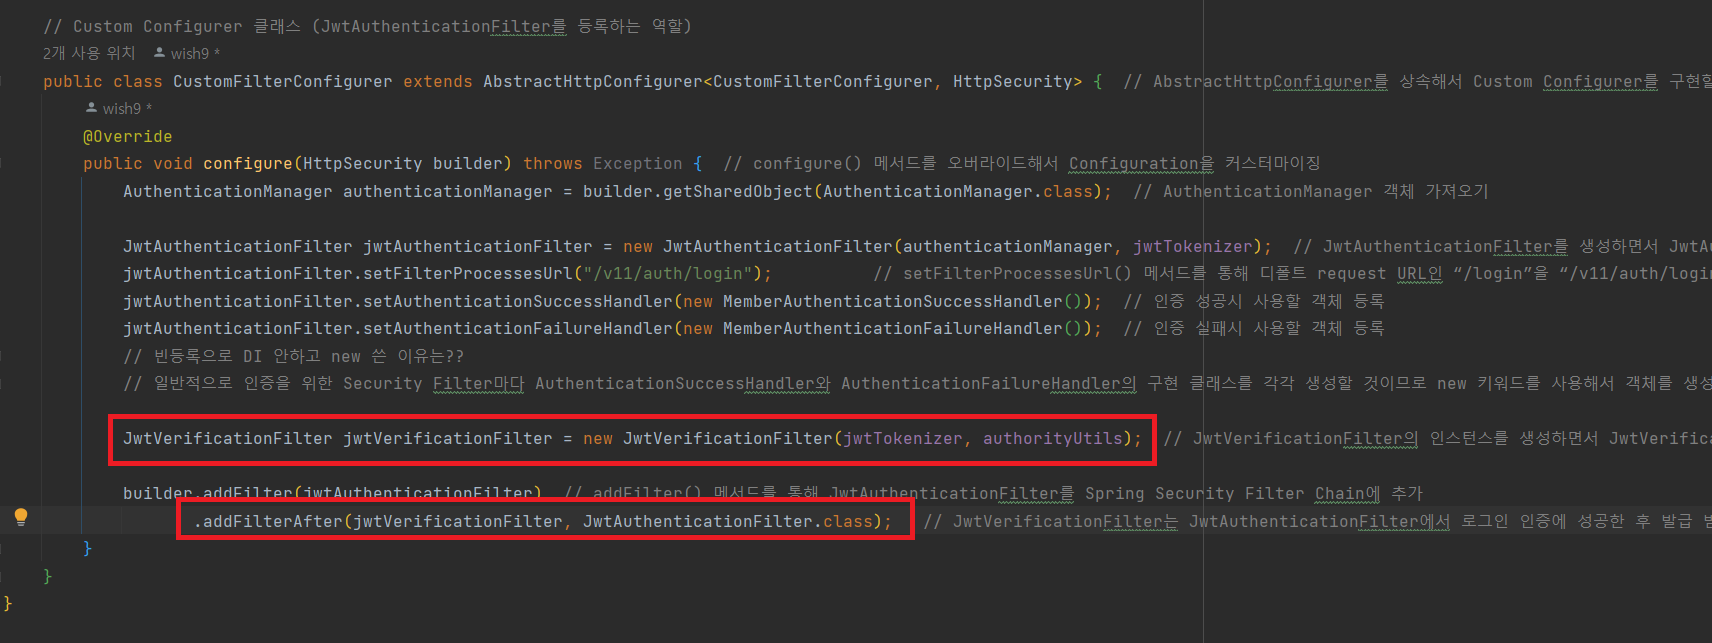
public class CustomFilterConfigurer extends AbstractHttpConfigurer<CustomFilterConfigurer, HttpSecurity> {  // AbstractHttpConfigurer를 상속해서 Custom Configurer를 구현할 수 있다.
    @Override
    public void configure(HttpSecurity builder) throws Exception {  // configure() 메서드를 오버라이드해서 Configuration을 커스터마이징
        AuthenticationManager authenticationManager = builder.getSharedObject(AuthenticationManager.class);  // AuthenticationManager 객체 가져오기

        JwtAuthenticationFilter jwtAuthenticationFilter = new JwtAuthenticationFilter(authenticationManager, jwtTokenizer);  // JwtAuthenticationFilter를 생성하면서 JwtAuthenticationFilter에서 사용되는 AuthenticationManager와 JwtTokenizer를 DI
        jwtAuthenticationFilter.setFilterProcessesUrl("/v11/auth/login");          // setFilterProcessesUrl() 메서드를 통해 디폴트 request URL인 “/login”을 “/v11/auth/login”으로 변경
        jwtAuthenticationFilter.setAuthenticationSuccessHandler(new MemberAuthenticationSuccessHandler());  // 인증 성공시 사용할 객체 등록
        jwtAuthenticationFilter.setAuthenticationFailureHandler(new MemberAuthenticationFailureHandler());  // 인증 실패시 사용할 객체 등록
        // 빈등록으로 DI 안하고 new 쓴 이유는??
        // 일반적으로 인증을 위한 Security Filter마다 AuthenticationSuccessHandler와 AuthenticationFailureHandler의 구현 클래스를 각각 생성할 것이므로 new 키워드를 사용해서 객체를 생성해도 무방하다.

        JwtVerificationFilter jwtVerificationFilter = new JwtVerificationFilter(jwtTokenizer, authorityUtils);  // JwtVerificationFilter의 인스턴스를 생성하면서 JwtVerificationFilter에서 사용되는 객체들을 생성자로 DI

        builder.addFilter(jwtAuthenticationFilter)  // addFilter() 메서드를 통해 JwtAuthenticationFilter를 Spring Security Filter Chain에 추가
               .addFilterAfter(jwtVerificationFilter, JwtAuthenticationFilter.class);   // JwtVerificationFilter는 JwtAuthenticationFilter에서 로그인 인증에 성공한 후 발급 받은 JWT가 클라이언트의 request header(Authorization 헤더)에 포함되어 있을 경우에만 동작한다.
    }
}
여기서 추가한 JwtVerificationFilter는 JwtAuthenticationFilter에서 로그인 인증에 성공한 후 발급 받은 JWT가 클라이언트의 request header(Authorization 헤더)에 포함되어 있을 경우에만 동작한다.
[JWT] 서버 측 리소스에 역할(Role) 기반 권한 적용
방법1. SecurityConfiguration에 필터로 권한 판단
// 방법1. SecurityConfiguration에 필터로 권한 판단
@Bean
public SecurityFilterChain filterChain(HttpSecurity http) throws Exception {
    http
            .headers().frameOptions().sameOrigin() // 동일 출처로부터 들어오는 request만 페이지 렌더링을 허용 (H2 웹 콘솔(개발단계용으로) 쓰기 위해 추가한거)
            .and()
            .csrf().disable()        // CSRF공격에 대한 Spring Security에 대한 설정을 비활성화
            .cors(withDefaults())    // CORS 설정 추가 (corsConfigurationSource라는 이름으로 등록된 Bean을 이용)
            .sessionManagement().sessionCreationPolicy(SessionCreationPolicy.STATELESS)  // 세션을 생성하지 않도록 설정
            .and()
            .formLogin().disable()   // 폼 로그인 방식을 비활성화
            .httpBasic().disable()   // HTTP Basic 인증 방식을 비활성화
            .apply(new CustomFilterConfigurer())   // Custom Configurer 적용
            .and()
            .authorizeHttpRequests(authorize -> authorize
//                        .anyRequest().permitAll()                // 모든 HTTP request 요청에 대해서 접근 허용
                            .antMatchers(HttpMethod.POST, "/*/members").permitAll() // 누구나 접근 가능
                            .antMatchers(HttpMethod.PATCH, "/*/members/**").hasRole("USER")  // USER권한 있눈 사용자만
                            .antMatchers(HttpMethod.GET, "/*/members").hasRole("ADMIN")
                            .antMatchers(HttpMethod.GET, "/*/members/**").hasAnyRole("USER", "ADMIN")
                            .antMatchers(HttpMethod.DELETE, "/*/members/**").hasRole("USER")
                            .antMatchers(HttpMethod.POST,"/*/coffees").hasRole("ADMIN")
                            .antMatchers(HttpMethod.PATCH,"/*/coffees/**").hasRole("ADMIN")
                            .antMatchers(HttpMethod.GET,"/*/coffees").hasAnyRole("USER", "ADMIN")
                            .antMatchers(HttpMethod.GET,"/*/coffees/**").hasAnyRole("USER", "ADMIN")
                            .antMatchers(HttpMethod.DELETE,"/*/coffees/**").hasRole("ADMIN")
                            .antMatchers(HttpMethod.POST,"/*/orders").hasAnyRole("USER", "ADMIN")
                            .antMatchers(HttpMethod.PATCH,"/*/orders/**").hasAnyRole("USER", "ADMIN")
                            .antMatchers(HttpMethod.GET,"/*/orders").hasRole("ADMIN")
                            .antMatchers(HttpMethod.GET,"/*/orders/**").hasAnyRole("USER", "ADMIN")
                            .antMatchers(HttpMethod.DELETE,"/*/orders").hasAnyRole("USER", "ADMIN")
                            .anyRequest().permitAll() // 위에 설정한 요청 외의 모든 요청 허용
            );
    return http.build();
}
방법2. @PreAuthorize 애너테이션을 이용해 service클래스의 각 메서드별로 권한 체크
주문 관련 권한 적용 중 본인이 주문한 주문내역에 대해서만 조회, 수정, 삭제가 가능하도록 로직을 추가하고 싶어 아래 방법으로 기능을 추가했다.
//방법2. @PreAuthorize 애너테이션을 이용해 service클래스의 각 메서드별로 권한 체크
//    @PreAuthorize("authentication.name == @orderRepository.findById(#order.orderId).member.username or hasRole('ADMIN')") // 이렇게 하면 예외처리 힘듬
@PreAuthorize("@orderService.isOrderOwnerOrAdmin(#order.orderId, authentication.name)")
public Order updateOrder(Order order) {
    Order findOrder = findVerifiedOrder(order.getOrderId());

    Optional.ofNullable(order.getOrderStatus())
            .ifPresent(orderStatus -> findOrder.setOrderStatus(orderStatus));
    return orderRepository.save(findOrder);
}

@PreAuthorize("@orderService.isOrderOwnerOrAdmin(#orderId, authentication.name)") // 사용자가 해당 주문의 주인인지 or 관리자인지 확인
public Order findOrder(long orderId) {
    return findVerifiedOrder(orderId);
}

public Page<Order> findOrders(int page, int size) {
    return orderRepository.findAll(PageRequest.of(page, size,
            Sort.by("orderId").descending()));
}

//    @PreAuthorize("authentication.name == @orderRepository.findById(#orderId).member.username or hasRole('ROLE_ADMIN')") // 이렇게 하면 예외처리 힘듬
@PreAuthorize("@orderService.isOrderOwnerOrAdmin(#orderId, authentication.name)")
public void cancelOrder(long orderId) {
    Order findOrder = findVerifiedOrder(orderId);
    int step = findOrder.getOrderStatus().getStepNumber();

    // OrderStatus의 step이 2 이상일 경우(ORDER_CONFIRM)에는 주문 취소가 되지 않도록한다.
    if (step >= 2) {
        throw new BusinessLogicException(ExceptionCode.CANNOT_CHANGE_ORDER);
    }
    findOrder.setOrderStatus(Order.OrderStatus.ORDER_CANCEL);
    orderRepository.save(findOrder);
}JWT 검증 테스트
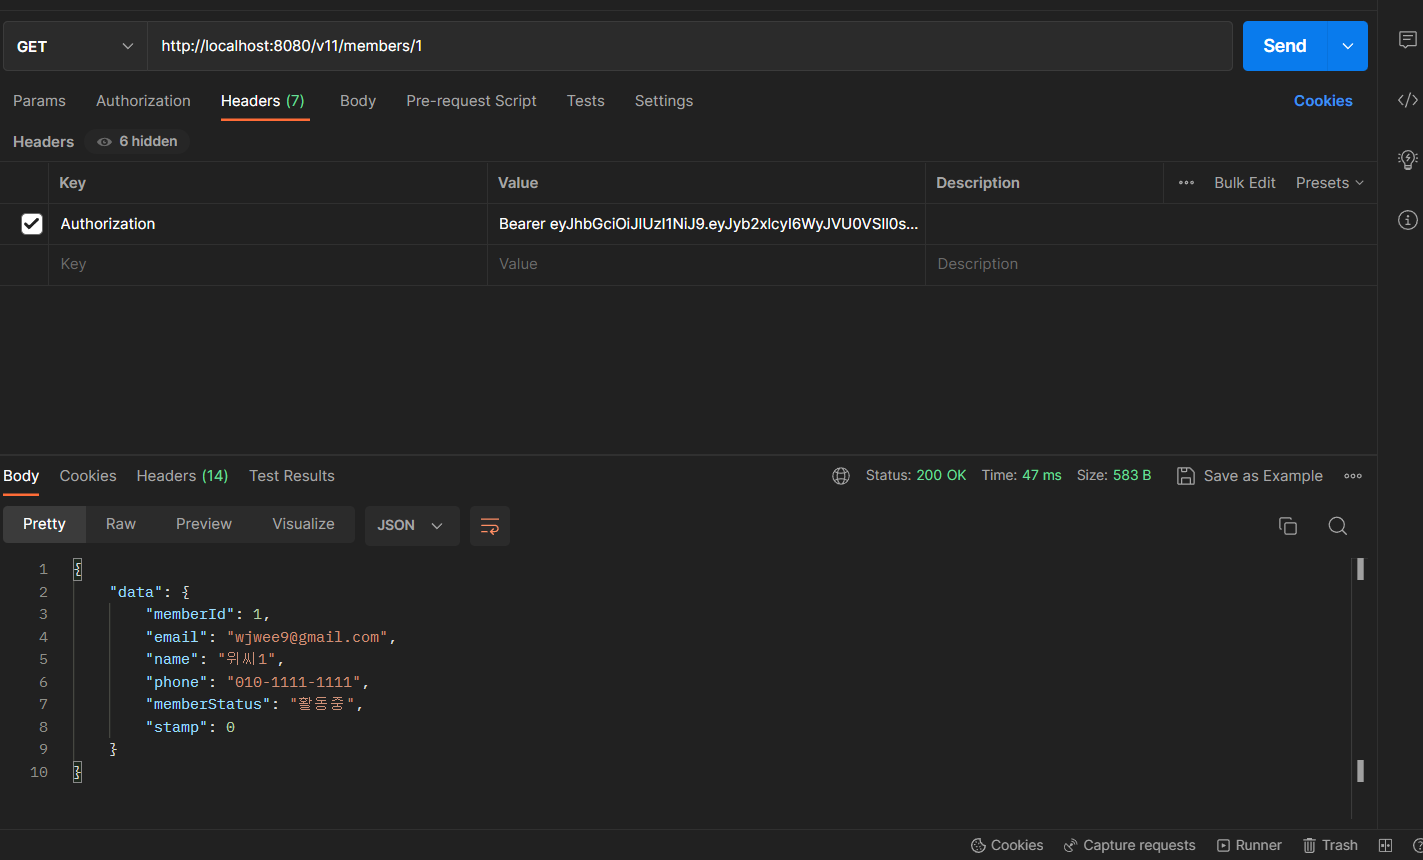
인증 성공 케이스
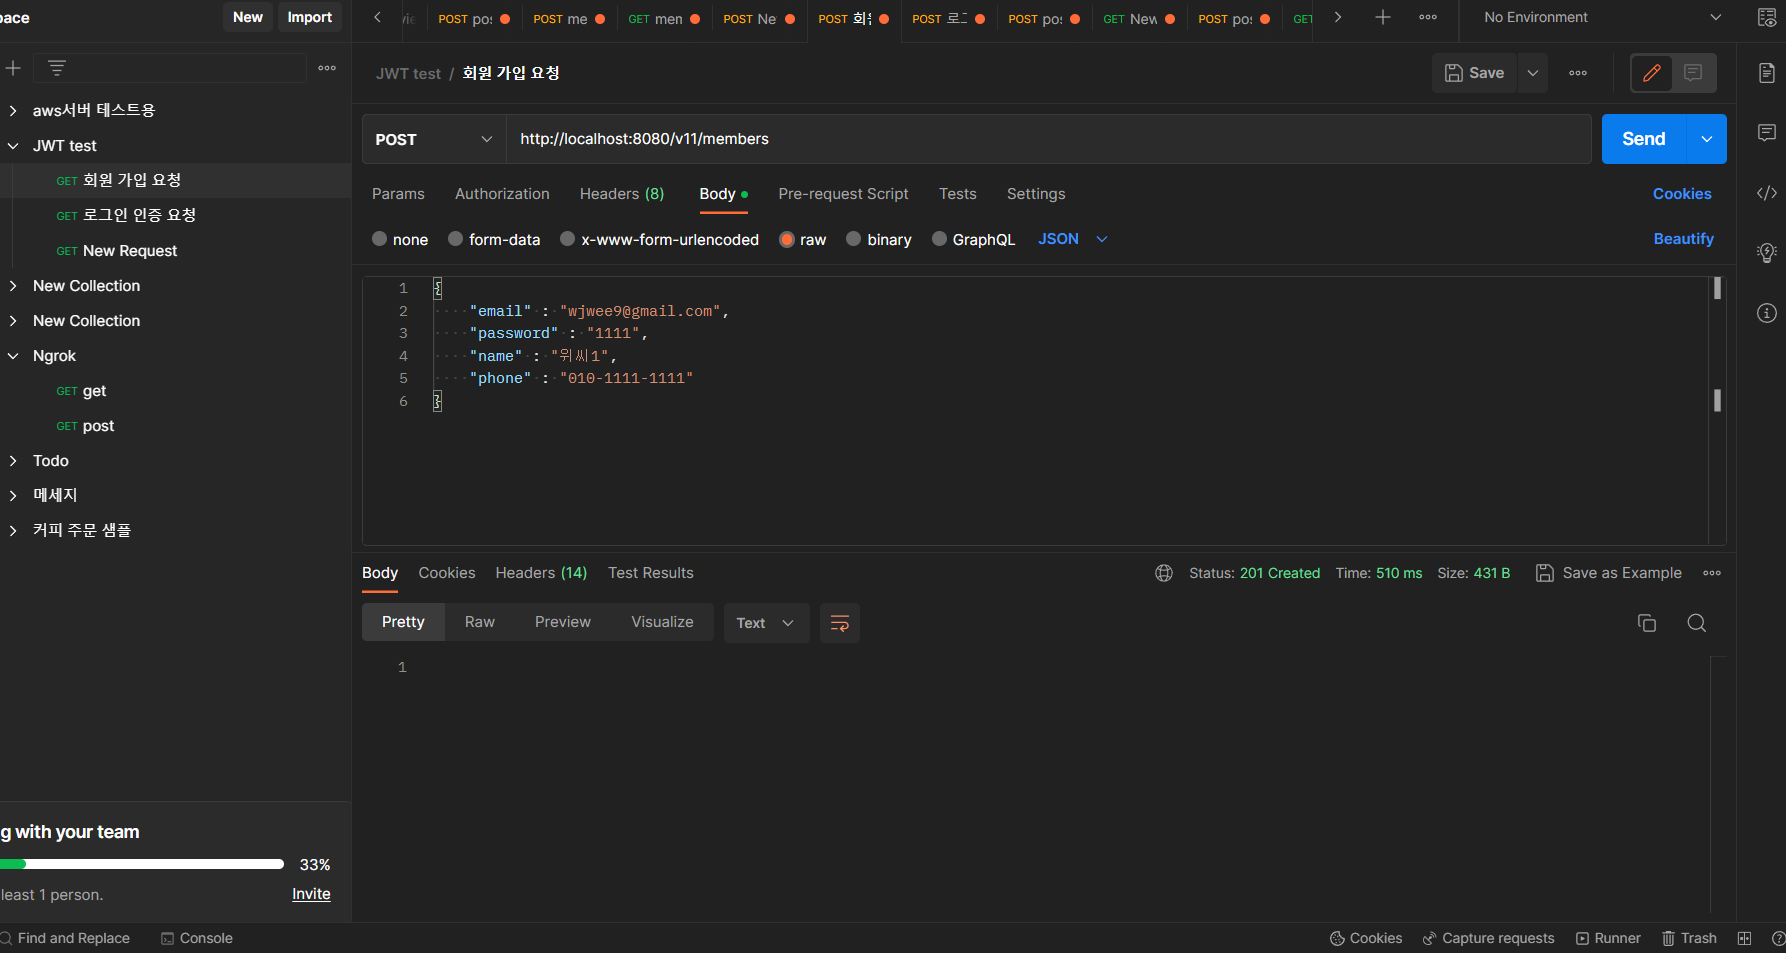
- 회원가입
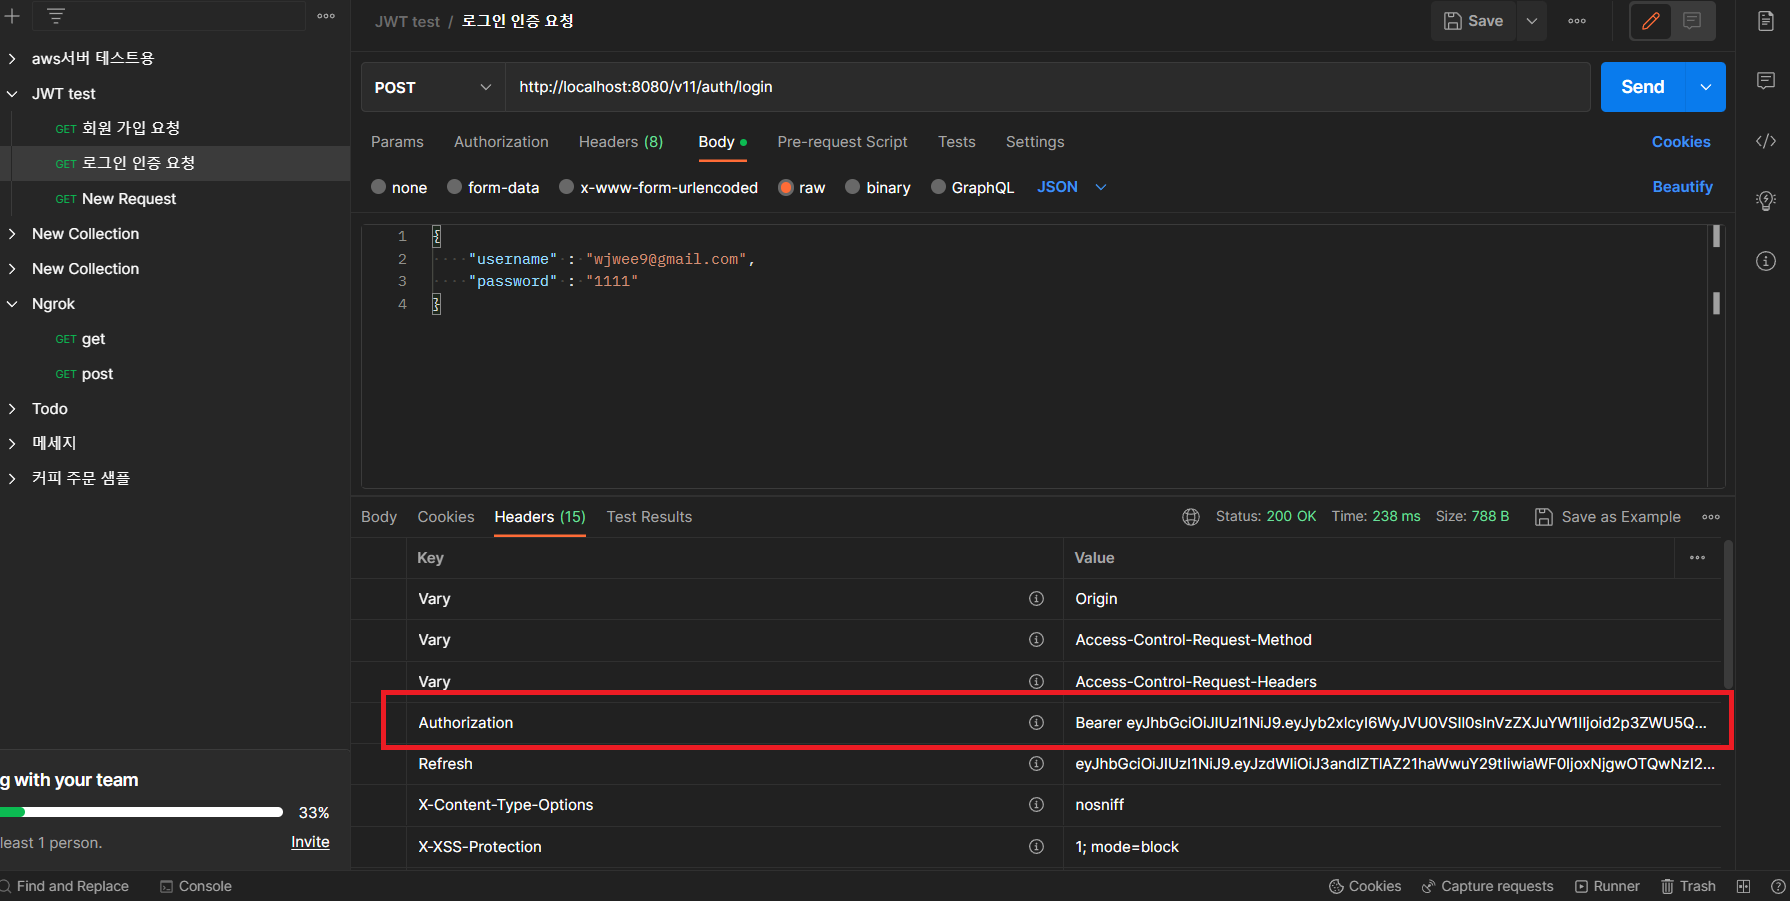
- 로그인 인증요청
- 아래와 같이 정상적으로 JWT토큰을 클라이언트가 전달받는다.
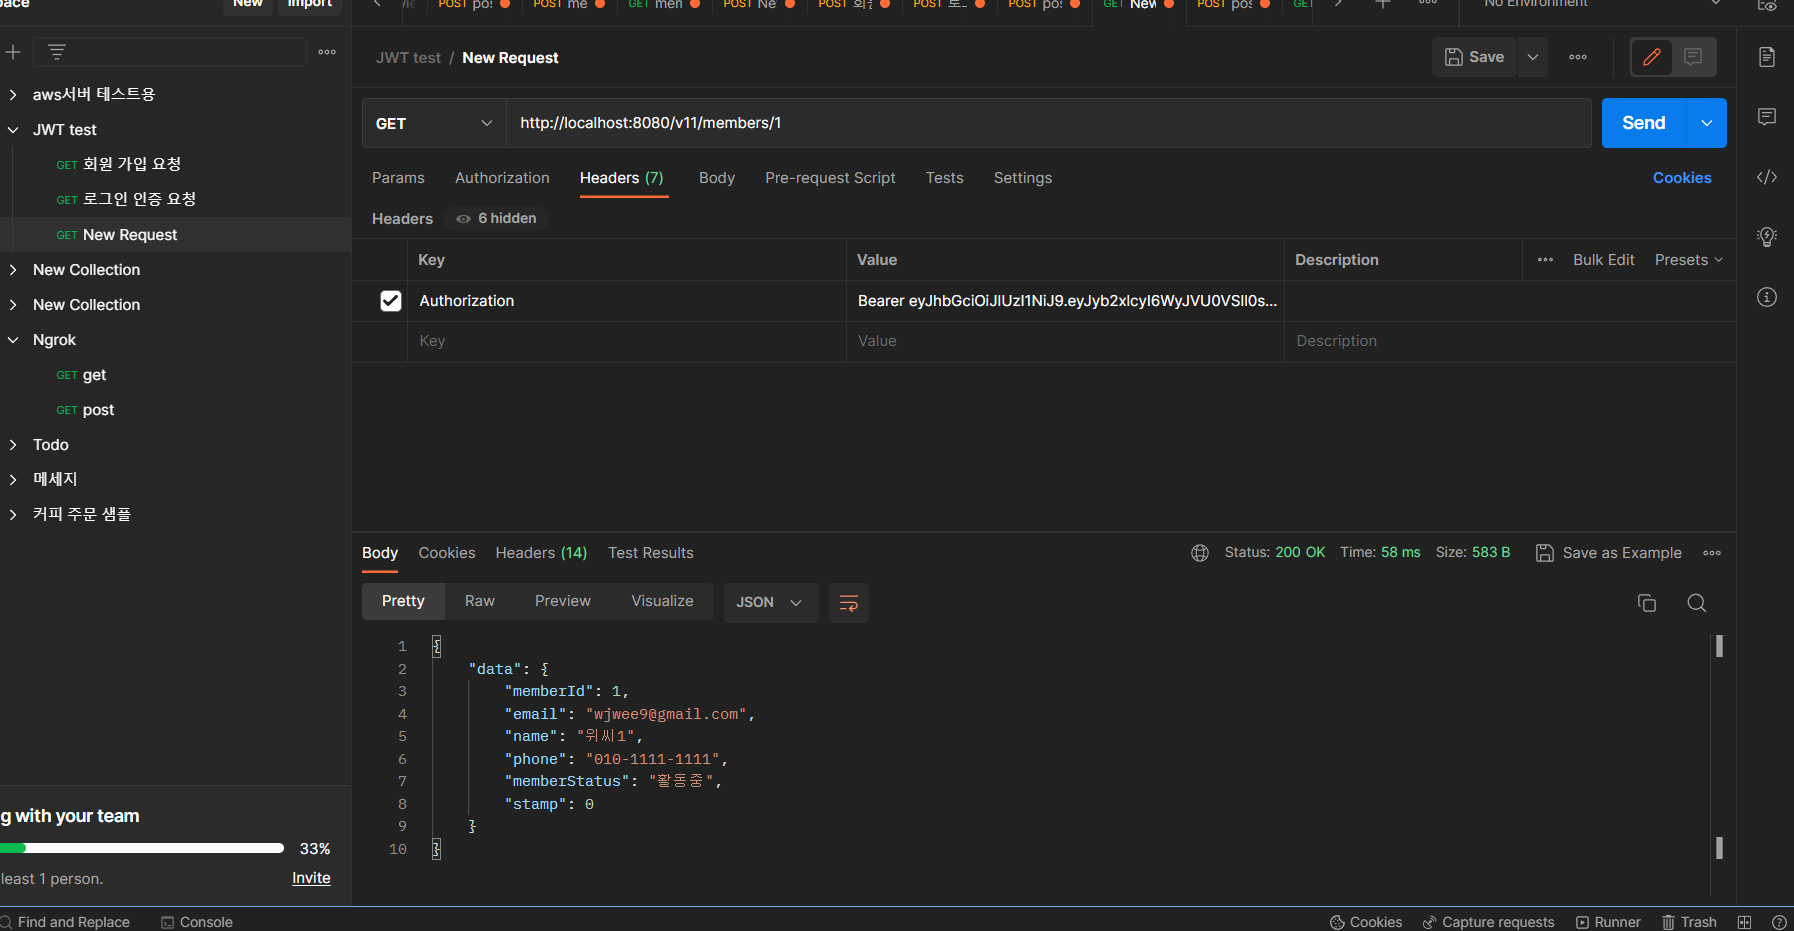
- 2번에서 전달받은 JWT를 이용해 CRUD 요청
- 아래와 같이 정상적으로 요청이 처리된다.
실패케이스
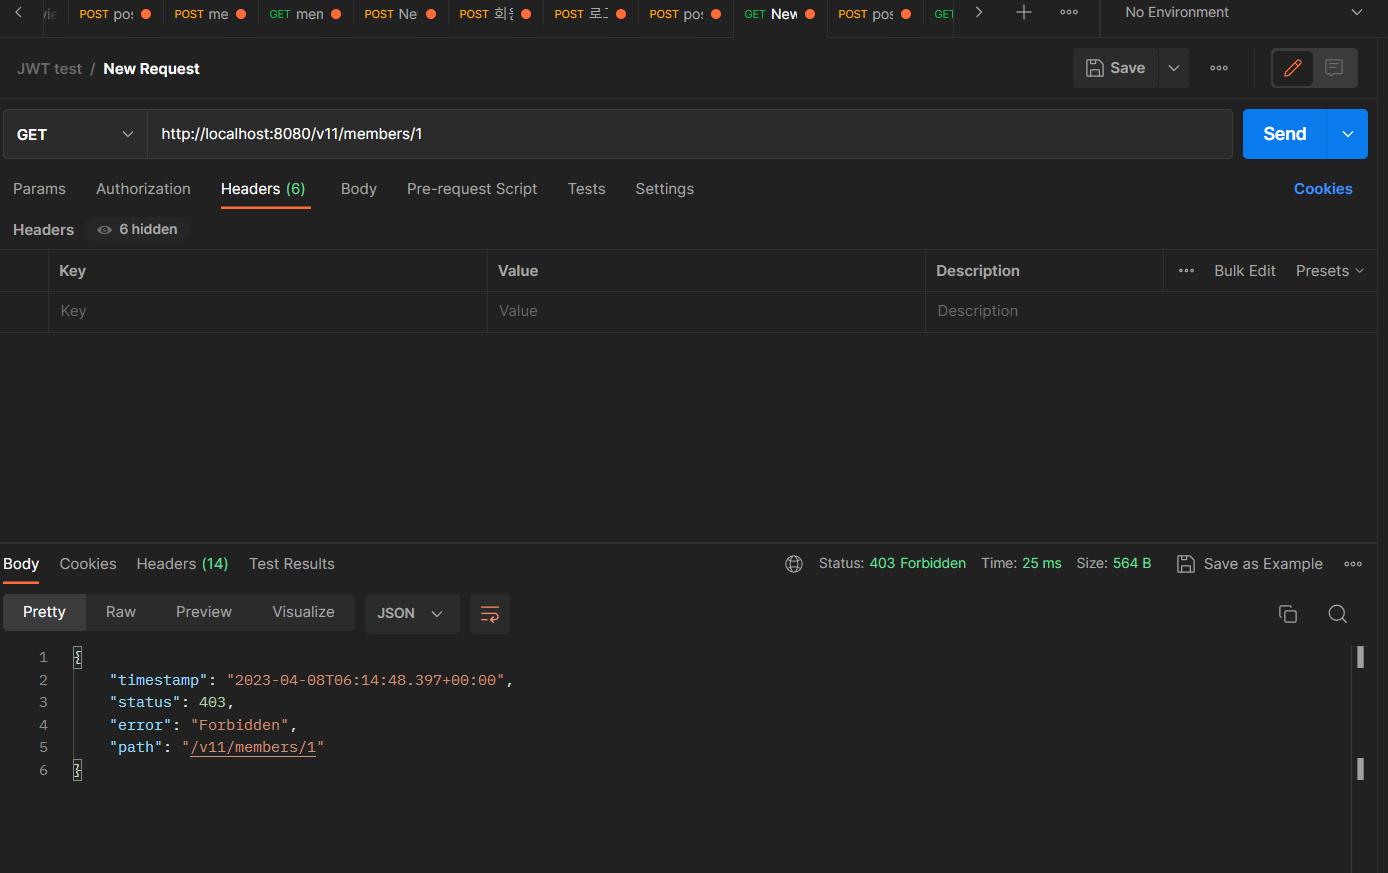
JWT를 Authorization header에 포함하지 않을 경우
JWT를 Authorization header에 포함하지 않은 채 MemberController의 getMember() 핸들러 메서드에 request를 전달하면JwtVerificationFilter를 건너뛰게 되고, 나머지 Security Filter에서 권한 체크를 하면서 적절한 권한이 부여되지 않았기 때문에 403 status가 전달된다.
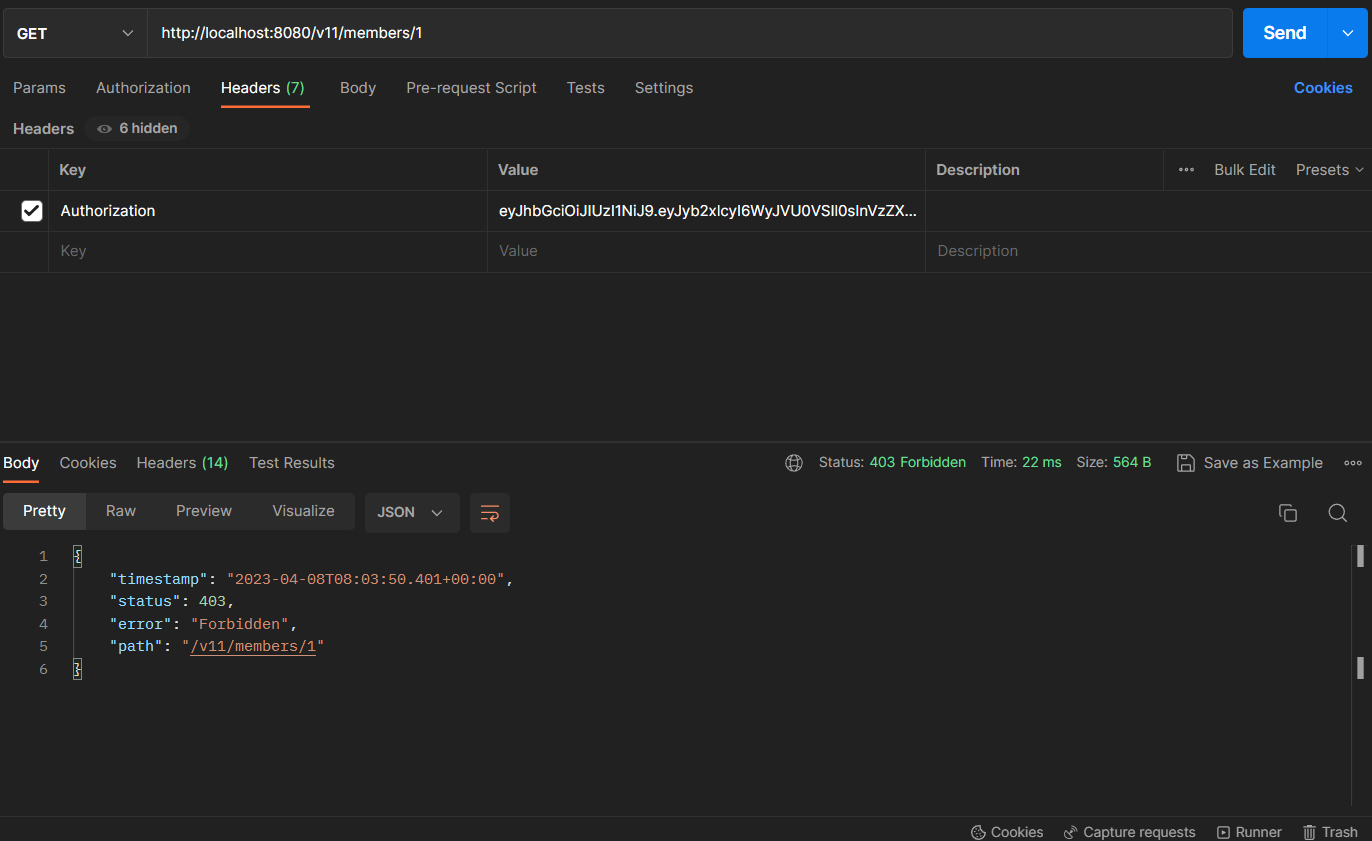
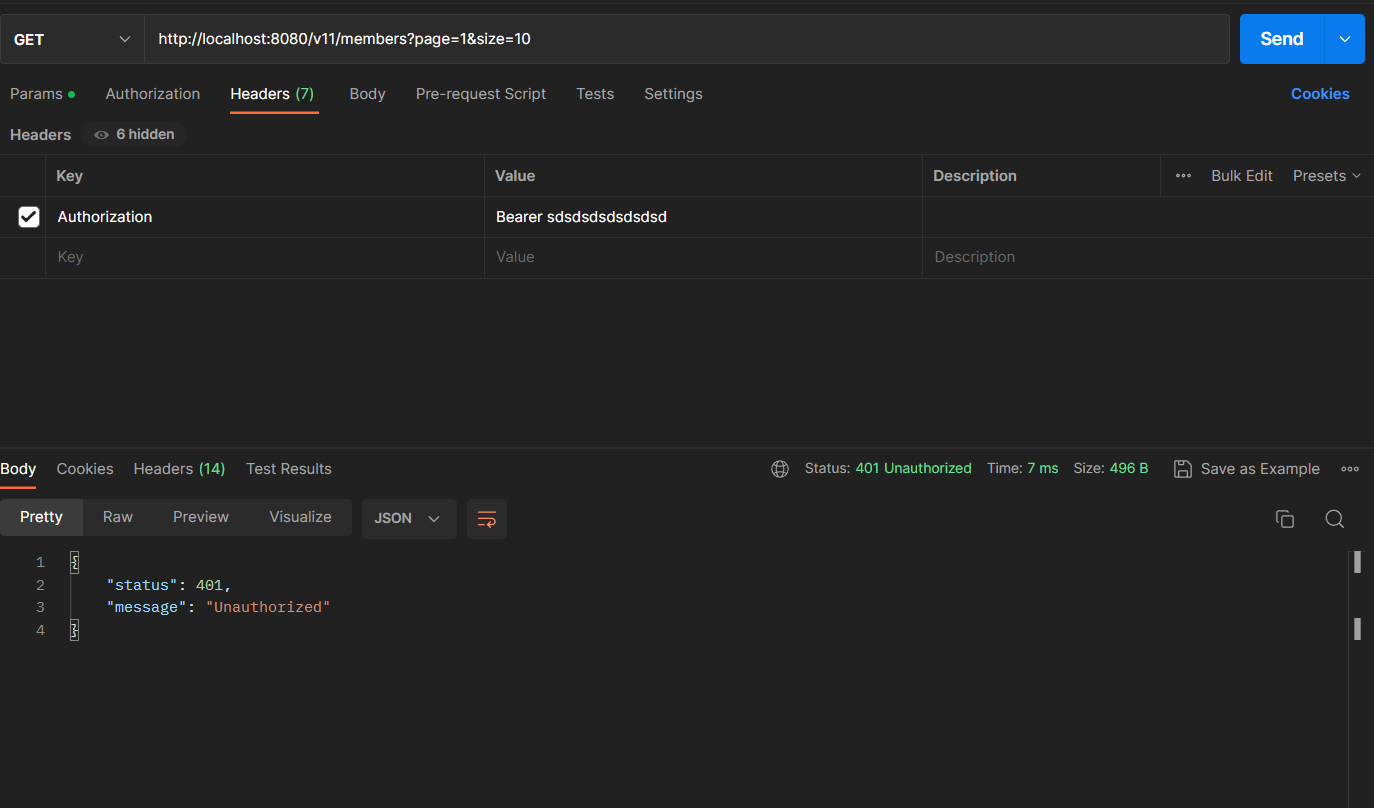
유효하지 않은 JWT를 Authorization header에 포함할 경우
접근 권한에 대한 에러를 나타내는 403 status가 발생했지만 JWT의 검증에 실패했기 때문에 자격 증명에 실패한 것과 같으므로 UNAUTHORIZED를 의미하는 401 status가 더 적절할 것 같다. 아래에서 이어서 예외처리를 해야겠다.
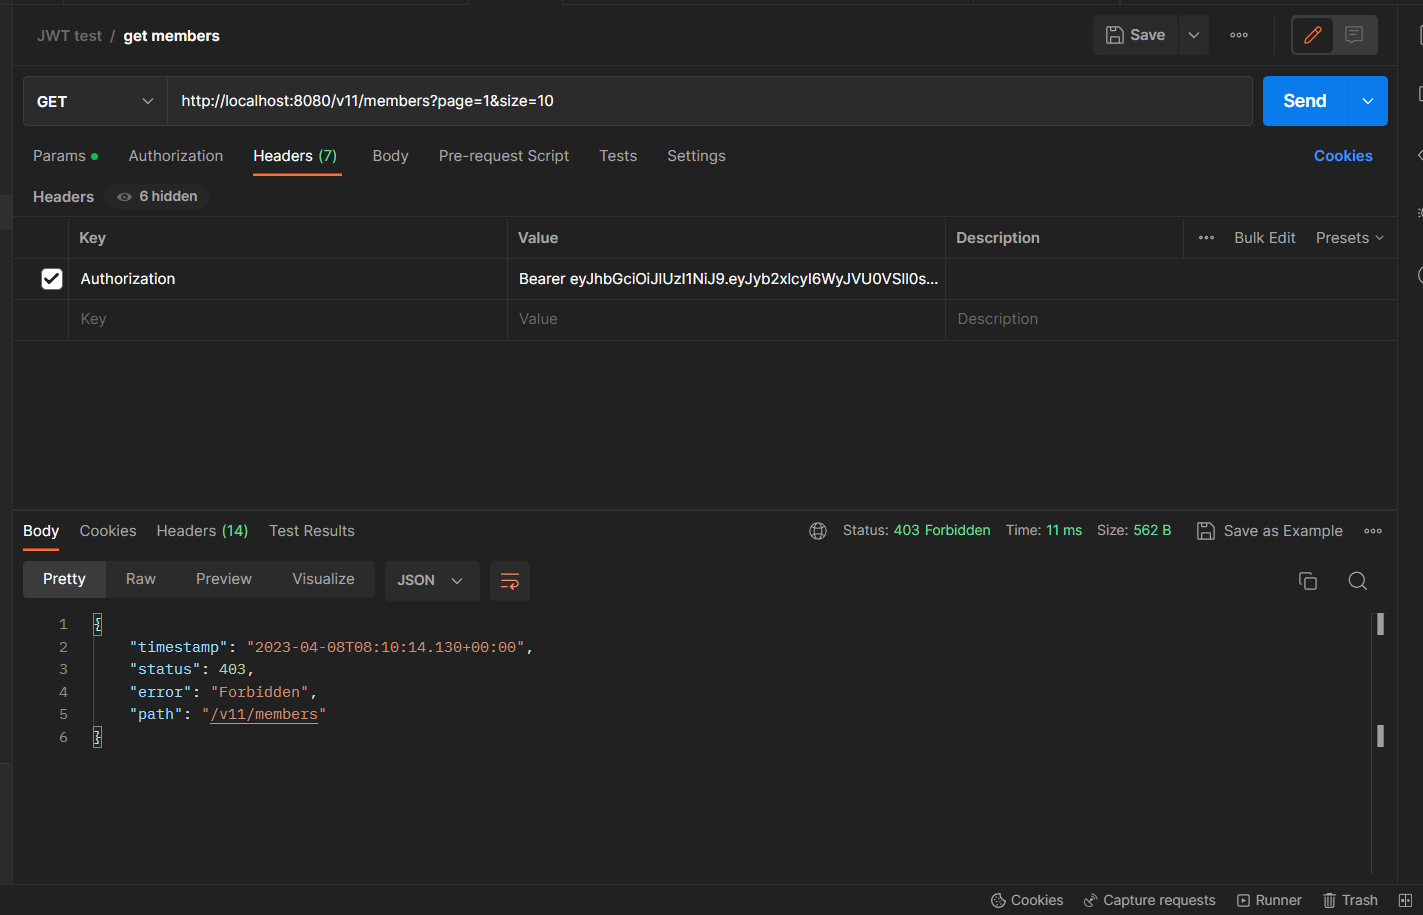
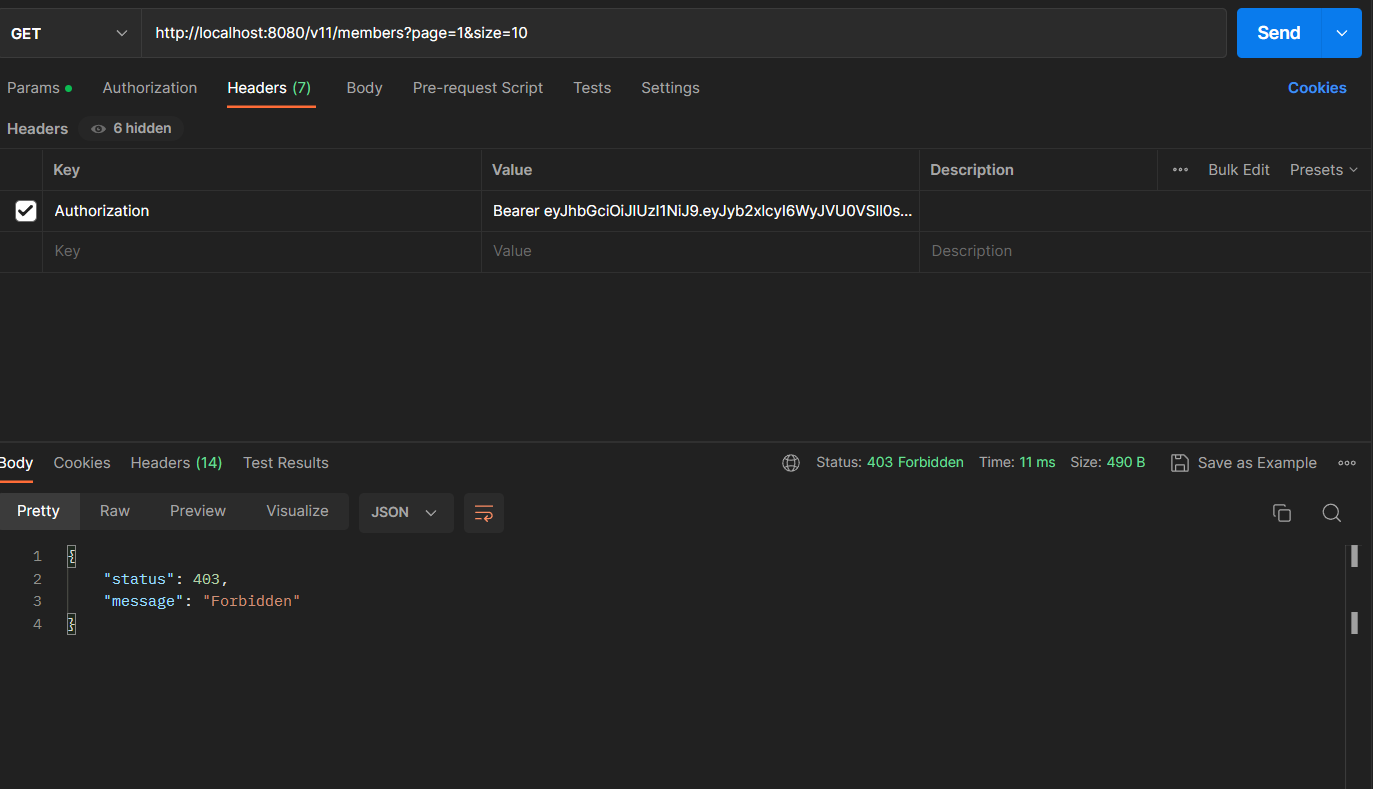
권한이 부여되지 않은 리소스에 request를 전송할 경우
ADMIN 권한에만 접근이 허용된 MemberController의 getMembers() 핸들러 메서드에 request를 전송하니JwtVerificationFilter에서 JWT의 자격 증명은 정상적으로 수행되었지만 ADMIN 권한이 없는 사용자이므로 403 status가 전달되었다.
예외 처리
1. JwtVerificationFilter에 예외 처리 로직 추가
@Override
protected void doFilterInternal(HttpServletRequest request, HttpServletResponse response, FilterChain filterChain) throws ServletException, IOException {

    try { // 예외처리 로직 추가
        Map<String, Object> claims = verifyJws(request);
        setAuthenticationToContext(claims);
    } catch (SignatureException se) { // Exception이 catch 되면
        request.setAttribute("exception", se); // 해당 Exception을 HttpServletRequest의 애트리뷰트(Attribute)로 추가
    } catch (ExpiredJwtException ee) {
        request.setAttribute("exception", ee);
    } catch (Exception e) {
        request.setAttribute("exception", e);
    }

    filterChain.doFilter(request, response);
}-
예외가 발생하게 되면 SecurityContext에 클라이언트의 인증 정보(Authentication 객체)가 저장되지 않는다.
- 인증 정보가 저장되지 않은 상태로 다음 필터 로직을 수행하다
AuthenticationException이 발생하게 될거다.
- 인증 정보가 저장되지 않은 상태로 다음 필터 로직을 수행하다
-
JwtVerificationFilter예외 처리에서는 일반적으로 알고 있는 예외 처리 방식과는 다르게 Exception을 catch한 후에 Exception을 다시 throw 한다든지 하는 처리를 하지 않고, 단순히request.setAttribute()를 설정하는 일밖에 하지 않는다.
2. AuthenticationEntryPoint 구현
- 인증오류가 발생할 때 처리해주는 핸들러
SignatureException,ExpiredJwtException등 Exception 발생으로 인해 SecurityContext에Authentication이 저장되지 않을 경우 등AuthenticationException이 발생할 때 호출되는 핸들러 같은 역할
// AuthenticationException(인증오류)이 발생할 때 호출되는 핸들러 같은 역할
@Slf4j
@Component
public class MemberAuthenticationEntryPoint implements AuthenticationEntryPoint {
    @Override // 인증 요청이 실패했을 때 호출되는 메서드
    public void commence(HttpServletRequest request, HttpServletResponse response, AuthenticationException authException) throws IOException, ServletException {
        Exception exception = (Exception) request.getAttribute("exception"); // 어떤 오류인지 exception에 할당 (필터에서 저장했던 request의 Attribute 중 exception)
        ErrorResponder.sendErrorResponse(response, HttpStatus.UNAUTHORIZED); // 클라이언트에게 401 응답 보내기

        logExceptionMessage(authException, exception); // (인증 과정에서 발생한 예외 정보 or 요청 객체에서 얻어온 예외 정보) log로 남기기
    }

    private void logExceptionMessage(AuthenticationException authException, Exception exception) {
        String message = exception != null ? exception.getMessage() : authException.getMessage(); // exception이 null이 아니면 전자, null이면 후자를 message에 할당
        log.warn("Unauthorized error happened: {}", message);
    }
}
2.1 클라이언트에서 보낼 response 생성하는 클래스 구현
// 클라이언트에게 전송할 ErrorResponse를 출력 스트림으로 생성하는 역할
public class ErrorResponder {
    public static void sendErrorResponse(HttpServletResponse response, HttpStatus status) throws IOException {
        Gson gson = new Gson();
        ErrorResponse errorResponse = ErrorResponse.of(status);
        response.setContentType(MediaType.APPLICATION_JSON_VALUE); // 응답의 컨텐츠 타입을 JSON으로 설정
        response.setStatus(status.value()); // status 작성
        response.getWriter().write(gson.toJson(errorResponse, ErrorResponse.class)); // response body 부분 작성
    }
}
3. AccessDeniedHandler 구현
- 인증에는 성공했지만 해당 리소스에 대한 권한이 없으면 호출되는 핸들러
// 인증에는 성공했지만 해당 리소스에 대한 권한이 없으면 호출되는 핸들러
@Slf4j
@Component
public class MemberAccessDeniedHandler implements AccessDeniedHandler {
    @Override
    public void handle(HttpServletRequest request, HttpServletResponse response, AccessDeniedException accessDeniedException) throws IOException, ServletException {
        ErrorResponder.sendErrorResponse(response, HttpStatus.FORBIDDEN); // 클라이언트한테 응답
        log.warn("Forbidden error happened: {}", accessDeniedException.getMessage()); // 발생한 예외 log로 남기기
    }
}
4. SecurityConfiguration에 AuthenticationEntryPoint 및 AccessDeniedHandler 추가
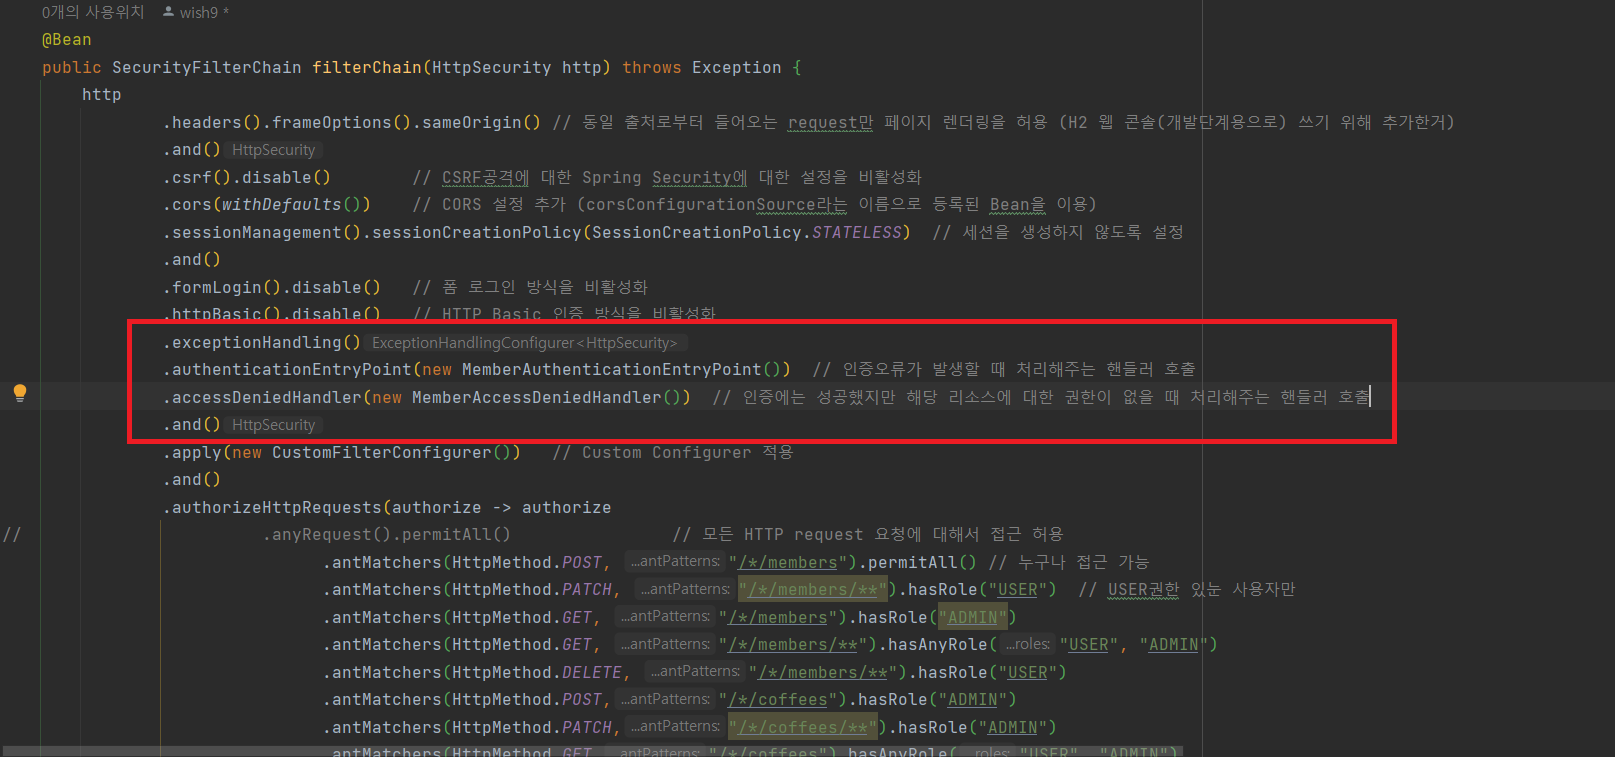
@Configuration
@EnableWebSecurity // Spring Security를 사용하기 위한 필수 설정들을 자동으로 등록
@EnableGlobalMethodSecurity(prePostEnabled = true) // 메소드 보안 기능 활성화
public class SecurityConfiguration {
    private final JwtTokenizer jwtTokenizer;
    private final CustomAuthorityUtils authorityUtils;

    public SecurityConfiguration(JwtTokenizer jwtTokenizer, CustomAuthorityUtils authorityUtils) {
        this.jwtTokenizer = jwtTokenizer;
        this.authorityUtils = authorityUtils;
    }
    @Bean
    public SecurityFilterChain filterChain(HttpSecurity http) throws Exception {
        http
                .headers().frameOptions().sameOrigin() // 동일 출처로부터 들어오는 request만 페이지 렌더링을 허용 (H2 웹 콘솔(개발단계용으로) 쓰기 위해 추가한거)
                .and()
                .csrf().disable()        // CSRF공격에 대한 Spring Security에 대한 설정을 비활성화
                .cors(withDefaults())    // CORS 설정 추가 (corsConfigurationSource라는 이름으로 등록된 Bean을 이용)
                .sessionManagement().sessionCreationPolicy(SessionCreationPolicy.STATELESS)  // 세션을 생성하지 않도록 설정
                .and()
                .formLogin().disable()   // 폼 로그인 방식을 비활성화
                .httpBasic().disable()   // HTTP Basic 인증 방식을 비활성화
------------------------------------예외처리 추가----------------------------------------------------------
                .exceptionHandling()
                .authenticationEntryPoint(new MemberAuthenticationEntryPoint())  // 인증오류가 발생할 때 처리해주는 핸들러 호출
                .accessDeniedHandler(new MemberAccessDeniedHandler())  // 인증에는 성공했지만 해당 리소스에 대한 권한이 없을 때 처리해주는 핸들러 호출
                .and()
------------------------------------예외처리 추가----------------------------------------------------------
                .apply(new CustomFilterConfigurer())   // Custom Configurer 적용
                .and()
                .authorizeHttpRequests(authorize -> authorize
//                        .anyRequest().permitAll()                // 모든 HTTP request 요청에 대해서 접근 허용
                                .antMatchers(HttpMethod.POST, "/*/members").permitAll() // 누구나 접근 가능
                                .antMatchers(HttpMethod.PATCH, "/*/members/**").hasRole("USER")  // USER권한 있눈 사용자만
                                .antMatchers(HttpMethod.GET, "/*/members").hasRole("ADMIN")
                                .antMatchers(HttpMethod.GET, "/*/members/**").hasAnyRole("USER", "ADMIN")
                                .antMatchers(HttpMethod.DELETE, "/*/members/**").hasRole("USER")
                                .antMatchers(HttpMethod.POST,"/*/coffees").hasRole("ADMIN")
                                .antMatchers(HttpMethod.PATCH,"/*/coffees/**").hasRole("ADMIN")
                                .antMatchers(HttpMethod.GET,"/*/coffees").hasAnyRole("USER", "ADMIN")
                                .antMatchers(HttpMethod.GET,"/*/coffees/**").hasAnyRole("USER", "ADMIN")
                                .antMatchers(HttpMethod.DELETE,"/*/coffees/**").hasRole("ADMIN")
                                .antMatchers(HttpMethod.POST,"/*/orders").hasAnyRole("USER", "ADMIN")
                                .antMatchers(HttpMethod.PATCH,"/*/orders/**").hasAnyRole("USER", "ADMIN")
                                .antMatchers(HttpMethod.GET,"/*/orders").hasRole("ADMIN")
                                .antMatchers(HttpMethod.GET,"/*/orders/**").hasAnyRole("USER", "ADMIN")
                                .antMatchers(HttpMethod.DELETE,"/*/orders").hasAnyRole("USER", "ADMIN")
                                .anyRequest().permitAll() // 위에 설정한 요청 외의 모든 요청 허용
                );
        return http.build();
    }

    @Bean
    public PasswordEncoder passwordEncoder() {
        return PasswordEncoderFactories.createDelegatingPasswordEncoder(); // PasswordEncoder Bean 객체 생성
    }

    // CORS 정책 설정하는 방법
    @Bean
    CorsConfigurationSource corsConfigurationSource() { // CorsConfigurationSource Bean 생성을 통해 구체적인 CORS 정책을 설정
        CorsConfiguration configuration = new CorsConfiguration();
        configuration.setAllowedOrigins(Arrays.asList("*"));   // 모든 출처(Origin)에 대해 스크립트 기반의 HTTP 통신을 허용하도록 설정
        configuration.setAllowedMethods(Arrays.asList("GET","POST", "PATCH", "DELETE"));  // 파라미터로 지정한 HTTP Method에 대한 HTTP 통신을 허용

        UrlBasedCorsConfigurationSource source = new UrlBasedCorsConfigurationSource();   // CorsConfigurationSource 인터페이스의 구현 클래스인 UrlBasedCorsConfigurationSource 클래스의 객체를 생성
        source.registerCorsConfiguration("/**", configuration);      // 모든 URL에 앞에서 구성한 CORS 정책(CorsConfiguration)을 적용
        return source;
    }

    // Custom Configurer 클래스 (JwtAuthenticationFilter를 등록하는 역할)
    public class CustomFilterConfigurer extends AbstractHttpConfigurer<CustomFilterConfigurer, HttpSecurity> {  // AbstractHttpConfigurer를 상속해서 Custom Configurer를 구현할 수 있다.
        @Override
        public void configure(HttpSecurity builder) throws Exception {  // configure() 메서드를 오버라이드해서 Configuration을 커스터마이징
            AuthenticationManager authenticationManager = builder.getSharedObject(AuthenticationManager.class);  // AuthenticationManager 객체 가져오기

            JwtAuthenticationFilter jwtAuthenticationFilter = new JwtAuthenticationFilter(authenticationManager, jwtTokenizer);  // JwtAuthenticationFilter를 생성하면서 JwtAuthenticationFilter에서 사용되는 AuthenticationManager와 JwtTokenizer를 DI
            jwtAuthenticationFilter.setFilterProcessesUrl("/v11/auth/login");          // setFilterProcessesUrl() 메서드를 통해 디폴트 request URL인 “/login”을 “/v11/auth/login”으로 변경
            jwtAuthenticationFilter.setAuthenticationSuccessHandler(new MemberAuthenticationSuccessHandler());  // 인증 성공시 사용할 객체 등록
            jwtAuthenticationFilter.setAuthenticationFailureHandler(new MemberAuthenticationFailureHandler());  // 인증 실패시 사용할 객체 등록
            // 빈등록으로 DI 안하고 new 쓴 이유는??
            // 일반적으로 인증을 위한 Security Filter마다 AuthenticationSuccessHandler와 AuthenticationFailureHandler의 구현 클래스를 각각 생성할 것이므로 new 키워드를 사용해서 객체를 생성해도 무방하다.

            JwtVerificationFilter jwtVerificationFilter = new JwtVerificationFilter(jwtTokenizer, authorityUtils);  // JwtVerificationFilter의 인스턴스를 생성하면서 JwtVerificationFilter에서 사용되는 객체들을 생성자로 DI

            builder.addFilter(jwtAuthenticationFilter)  // addFilter() 메서드를 통해 JwtAuthenticationFilter를 Spring Security Filter Chain에 추가
                   .addFilterAfter(jwtVerificationFilter, JwtAuthenticationFilter.class);   // JwtVerificationFilter는 JwtAuthenticationFilter에서 로그인 인증에 성공한 후 발급 받은 JWT가 클라이언트의 request header(Authorization 헤더)에 포함되어 있을 경우에만 동작한다.
        }
    }
}
유효하지 않거나 만료된 JWT일 경우
권한이 없는 리소스에 request 전송 시
올바른 JWT + 권한
핵심 포인트
-
SecurityContext에
Authentication을 저장하게 되면 Spring Security의 세션 정책(Session Policy)에 따라서 세션을 생성할 수도 있고, 그렇지 않을 수도 있다.- JWT 환경에서는 세션 정책(Session Policy) 설정을 통해 세션 자체를 생성하지 않도록 설정(세션에 인증정보를 저장해둘 필요 X /요청마다 JWT 담아서 보내는 방식)
-
SecurityContext에 클라이언트의 인증 정보(
Authentication객체)가 저장되지 않은 상태로 다음(next) Security Filter 로직을 수행하다 보면 결국에는AuthenticationException이 발생하게 되고, 이AuthenticationException은AuthenticationEntryPoint가 처리하게 된다. -
AccessDeniedHandler는 인증에는 성공했지만 해당 리소스에 대한 권한이 없으면 호출되는 핸들러이다.
