하드웨어 재밌다!
Step 1 : 공유기 쉘
UART 포트 연결
telnet 이용
- 디버깅 환경 구축을 위한 시작점은 바로 공유기의 쉘을 띄우는 것이다.
- 운이 좋게 기본적으로
telnet데몬이 실행되는 경우라면 바로 23번 포트로 접속하면 된다. - 하지만 이런 경우가 많지 않기 때문에 결국은
UART포트를 찾아서 연결하게 된다.
UART 포트 연결

- UART 포트를 찾는 방법은 해커스쿨 UART 해킹 기초 강의자료에 잘 나와 있다.
- 그래도 나중에 UART 포트 찾는 방법에 대해 포스팅을 해둘 예정!
- 사실 일반적으로 보드명이나, 임베디드 장비명을 구글링하면 웬만한 경우는 시리얼 포트 정보가 나올 것이다.
- 그러나 내가 실습할 때 이용한 공유기는 시리얼 포트 관련 정보가 없었다. 게다가...
- PCB에 별다른 식자가 존재하지 않았다.
- CPU도 사진에 보이는 것처럼 철판 같은 것으로 가려져 있어서 데이터시트를 보고
RX,TX핀의 위치를 따라갈 수 없었다. - 멀티테스터 장비도 보유하고 있지 않았다.
- 그래서 육안으로
GND를 식별한 후 나머지 핀을 게싱해서 찾아야 했다.USB-to-TTL시리얼 케이블이 망가질 각오 정도는 하고 임해야 한다..😢- 그래도 나는 운 좋게 케이블 고장 없이 포트를 찾았다😎
터미널 실행
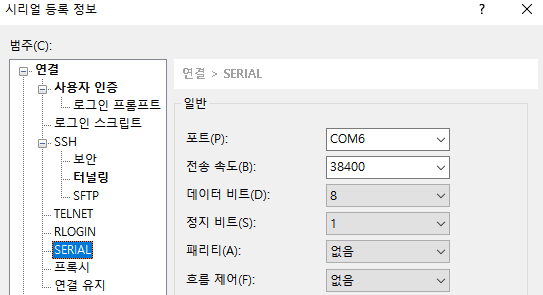

- 그리고
PuTTY나XShell로 장치가 연결된 시리얼 포트와Baudrate를 지정해 주면, 쉘에 접속할 수 있다. - UART 핀을 찾는 것 처럼 위험을 감수할 필요가 없기 때문에, 주로 많이 쓰이는 Baudrate 중에서 이것저것 시도해 보면 된다.
115200, 57600, 38400, 19200, 9600
Step 2 : gdbserver
환경 : 공유기 (mips)
gdbserver 바이너리 준비
- 먼저 공유기 환경에 맞는
gdbserver바이너리를 준비하여 공유기에 옮겨 주어야 한다. - 직접
OpenWRT툴체인 등을 통해 빌드할 수도 있고, 빌드가 된 바이너리를 이용할 수도 있다. - 만약 옛날 장비를 디버깅하고자 한다면 빌드된 바이너리를 찾아서 넣는 게 좋다.. (직접 빌드하는 과정이 아주 고통스럽기 때문)
gdbserver바이너리가 존재한다는 가정 하에, 이를 공유기에 옮겨 주어야 한다.- USB 포트가 존재하는 경우 : USB에 바이너리를 담은 후 공유기에 연결해 주면 된다.
- USB 포트가 존재하지 않는 경우 :
telnet이나nc등을 이용해서 바이너리를 원격으로 전송한다.busybox명령어에nc가 존재하면 먼저nc를 이용하는 것이 좋다.
# find / -name 'gdbserver'
/media/sda1/gdbserver- USB 포트로 연결한 경우 보통은
/mnt디렉토리에 마운트가 될 텐데, 그렇지 않은 경우도 있으니 잘 찾아보아야 한다. - 내 공유기는
/media/sda1폴더 안에 USB 안의 파일들이 존재했다.
디버깅 대상 식별
Usage:	gdbserver [OPTIONS] COMM PROG [ARGS ...]
	gdbserver [OPTIONS] --attach COMM PID
	gdbserver [OPTIONS] --multi COMM

COMM may either be a tty device (for serial debugging),
HOST:PORT to listen for a TCP connection, or '-' or 'stdio' to use
stdin/stdout of gdbserver.
PROG is the executable program.  ARGS are arguments passed to inferior.
PID is the process ID to attach to, when --attach is specified.

Operating modes:

  --attach              Attach to running process PID.
  --multi               Start server without a specific program, and
                        only quit when explicitly commanded.
  --once                Exit after the first connection has closed.
  --help                Print this message and then exit.
  --version             Display version information and exit.

Other options:

  --wrapper WRAPPER --  Run WRAPPER to start new programs.
  --disable-randomization
                        Run PROG with address space randomization disabled.
  --no-disable-randomization
                        Don't disable address space randomization when
                        starting PROG.

Debug options:

  --debug               Enable general debugging output.
  --debug-format=opt1[,opt2,...]
                        Specify extra content in debugging output.
                          Options:
                            all
                            none
                            timestamp
  --remote-debug        Enable remote protocol debugging output.
  --disable-packet=opt1[,opt2,...]
                        Disable support for RSP packets or features.
                          Options:
                            vCont, Tthread, qC, qfThreadInfo and
threads (disable all threading packets).gdbserver는 다양한 옵션이 존재한다.- 바이너리 실행 파일 자체를 인자로 줄 수도 있지만,
PID(프로세스 ID)로attach할 수도 있다. - 이번에는
PID로gdbserver를 실행한 후, 리눅스 환경에서 리모트 디버깅을 시도할 것이다.
대상 PID 식별
# ps | grep telnet
8201 root 1336 S /bin/telnetdps명령어로 디버깅을 수행할 대상 프로세스의 PID를 확인한다.
gdbserver 실행
# /media/sda1/gdbserver :8888 --attach 8201
Attached; pid = 8201
Listening on port 8888- 이후 공유기에서
gdbserver를 실행한다.--attach옵션 뒤에PID를 입력해야 한다. - 참고로
:8888은 포트 번호이며, 자유롭게 지정해 주면 된다.
Step 3 : gdb-multiarch
환경 : Ubuntu 20.04
- 공유기에서
gdbserver를 실행했으니 이제는 리눅스 환경에서gdb를 붙여 보자.
gdb-multiarch 설치
$ sudo apt install gdb-multiarcharchitecture가 다른 경우gdb-multiarch를 설치해 주어야 한다.- 우분투 환경 :
amd64/ 공유기 환경 :mips
- 우분투 환경 :
gdb-multiarch 실행
$ gdb-multiarch

# 실행 후

(gdb) set arc mips # 공유기 아키텍쳐
(gdb) target remote 192.168.0.1:8888 # 공유기에서 열어둔 포트 지정- 설치가 완료 되었다면
gdb-multiarch를 실행해 주고, 딱 두 가지 명령어만 입력하면 된다.
(gdb) set arc mips
The target architecture is assumed to be mips

(gdb) target remote 192.168.0.1:8888
Remote debugging using 192.168.0.1:8888
Reading /bin/busybox from remote target...
warning: File transfers from remote targets can be slow. Use "set sysroot" to access files locally instead.
Reading /bin/busybox from remote target...
Reading symbols from target:/bin/busybox...
(No debugging symbols found in target:/bin/busybox)
Reading /lib/libc.so.0 from remote target...
Reading /lib/libgcc_s.so.1 from remote target...
Reading /lib/ld-uClibc.so.0 from remote target...
Reading symbols from target:/lib/libc.so.0...
(No debugging symbols found in target:/lib/libc.so.0)
Reading symbols from target:/lib/libgcc_s.so.1...
(No debugging symbols found in target:/lib/libgcc_s.so.1)
Reading symbols from target:/lib/ld-uClibc.so.0...
(No debugging symbols found in target:/lib/ld-uClibc.so.0)
Reading /lib/ld-uClibc.so.0 from remote target...
warning: Unable to find dynamic linker breakpoint function.
GDB will be unable to debug shared library initializers
and track explicitly loaded dynamic code.
0x2aace484 in ?? ()- 그러면 위와 같이
gdb가 잘 붙은 것을 확인할 수 있을 것이다.
gef
# via the install script
## using curl
$ bash -c "$(curl -fsSL http://gef.blah.cat/sh)"

## using wget
$ bash -c "$(wget http://gef.blah.cat/sh -O -)"

# or manually
$ wget -O ~/.gdbinit-gef.py -q http://gef.blah.cat/py
$ echo source ~/.gdbinit-gef.py >> ~/.gdbinit

# or alternatively from inside gdb directly
$ gdb -q
(gdb) pi import urllib.request as u, tempfile as t; g=t.NamedTemporaryFile(suffix='-gef.py'); open(g.name, 'wb+').write(u.urlopen('https://tinyurl.com/gef-master').read()); gdb.execute('source %s' % g.name)- 참고로 위 스크립트를 이용하여
gef를 설치하면gdb-multiarch실행시gef로 훨씬 편하게 디버깅을 수행할 수 있다.

블로그 이전 -> wisdom-lee.xyz