이 글은 기존 운영했던 WordPress 블로그인 PyxisPub: Development Life (pyxispub.uzuki.live) 에서 가져온 글 입니다. 모든 글을 가져오지는 않으며, 작성 시점과 현재 시점에는 차이가 많이 존재합니다.
작성 시점: 2017-09-01
안드로이드에서 앱 안에 파일을 넣는 방법 중 가장 흔한 것이 에셋, assets이다.
assets 폴더 안에 넣어놓고 Context.getAssets()로 얻어와서 접근하거나, 내장 메모리로 내보내서 접근하거나 여러 방법이 있다.
그 중, 내장 메모리로 보내서 접근하는 방법은 Assets에 있는 파일 하나하나를 InputStream 으로 읽어 내장메모리에 FileOutputStream 로 내보내는 형식이다.
이전 글에 있는 코드를 보내면 알겠지만, 코틀린에서 I/O 작업은 대부분 use 메소드를 사용하여 짧게 가능하다.
그러면, assets 폴더에 있는 모든 폴더 / 파일을 옮기는 코드를 줄여보려고 한다.
1. 자바
public class AssetsUtils {

    public static void copyAssets(Context context, String path) {
        AssetManager assetManager = context.getAssets();
        String assets[] = null;
        try {
            assets = assetManager.list(path);
            if (assets.length == 0) {
                copyFile(context, path);
            } else {
                String fullPath = context.getExternalFilesDir(null) + "/" + path;
                File dir = new File(fullPath);
                dir.mkdirs()
                for (String asset : assets) {
                    String p;
                    if (path.equals(""))
                        p = "";
                    else
                        p = path + "/";
                    copyAssets(context, p + asset);
                }
            }
        } catch (IOException ex) {
            Log.e("tag", "I/O Exception", ex);
        }
    }

    private static void copyFile(Context context, String filename) {
        AssetManager assetManager = context.getAssets();

        InputStream in = null;
        OutputStream out = null;
        String newFileName = null;
        try {
            in = assetManager.open(filename);
            newFileName = context.getExternalFilesDir(null) + "/" + filename;
            out = new FileOutputStream(newFileName);

            byte[] buffer = new byte[1024];
            int read;
            while ((read = in.read(buffer)) != -1) {
                out.write(buffer, 0, read);
            }
            in.close();
            in = null;
            out.flush();
            out.close();
            out = null;
        } catch (Exception e) {
            Log.e("tag", "Exception in copyFile() of " + newFileName);
            Log.e("tag", "Exception in copyFile() " + e.toString());
        }
    }
}
copyAssets 메소드는 assets에 있는 파일에 대한 리스트를 가져와 비어있으면 파일이거나 빈 디렉토리 란 뜻이므로 copyFile 메소드로 넘기고, 그 이외에는 재귀함수 형태로 폴더 하나씩 들어가면서 copyAssets 메소드를 계속 부르는 구조고,
copyFile 메소드는 copyAssets에서 받은 파일 경로를 InputStream으로 가져와 FileOutStream으로 새로운 파일에 작성하는 구조이다.
I/O 작업인 만큼 두 메소드 둘 다 try-catch 로 감싸져 있다.
2. 단순 변환
언제나 그랬듯이, Convert JAVA to Kotlin 기능을 사용하여 변환해보자.
fun copyAssets(context Context, path: String) {
    val assetManager = context.assets
    val assets: Array<String>?
    try {
        assets = assetManager.list(path)
        if (assets.isEmpty()) {
            copyFile(this, path)
        } else {
            val fullPath = "${context.getExternalFilesDir(null)}/$path"
            val dir = File(fullPath)
            dir.mkdirs()
            for (asset in assets) {
                val p: String = if (path == "") "" else path + "/"
                copyAssets(p + asset)
            }
        }
    } catch (ex: IOException) {
        Log.e("tag", "I/O Exception", ex)
    }
}

private fun copyFile(context: Context, filename: String) {
    val assetManager = context.assets
    val `in`: InputStream
    val out: OutputStream
    var newFileName: String? = null
    try {
        Log.i("tag", "copyFile() " + filename)
        `in` = assetManager.open(filename)
        newFileName = context.getExternalFilesDir(null).toString() + "/" + filename
        out = FileOutputStream(newFileName)

        val buffer = ByteArray(1024)
        var read: Int = 0
        while (read != -1) {
            out.write(buffer, 0, read)
            read = `in`.read(buffer)
        }
        `in`.close()
        out.flush()
        out.close()
    } catch (e: Exception) {
        Log.e("tag", "Exception in copyFile() of " + newFileName!!)
        Log.e("tag", "Exception in copyFile() " + e.toString())
    }
}
코틀린은 메소드를 담기 위해 별도 클래스가 필요치 않으므로 클래스 선언을 지우는 등 작업만 해도 9줄 이상 줄었다.
3. tryCatch 확장 메소드
위에서도 말했다싶이 해당 작업은 I/O 작업이므로 문제가 생기는 것을 방지하기 위해 예외처리를 적절히 해줘야 한다.
자바에서도, 코틀린에서도 try-catch을 사용하지만 의외로 코드가 많이 늘어나게 된다.
이를 조금이나마 줄일 수 있게, tryCatch란 확장 메소드를 만들어보자.
inline fun <T, R> T.tryCatch(block: (T) -> R): R {
    try {
        return block(this)
    } catch (e: Exception) {
        Log.e("TAG", "I/O Exception", e)
        throw e
    }
}
모든 타입에 사용할 수 있도록 Generic 타입을 사용했고, 파라미터로는 를 파라미터로 가지는 고차 함수(Higher-order functions) 를 가진다.
만일 액티비티나 프래그먼트 등이면 굳이 변수에 사용하지 않아도 바로 사용할 수 있긴 하다.
이걸 사용하면...
fun copyAssets(context Context, path: String) {
    val assetManager = context.assets
    val assets: Array<String> = assetManager.list(path)
    assets.tryCatch {
        if (assets.isEmpty()) {
            copyFile(this, path)
            return
        }
        val fullPath = "${context.getExternalFilesDir(null)}/$path"
        val dir = File(fullPath)
        dir.mkdirs()
        assets.forEach {
            val dirPath = if (path == "") "" else path + "/"
            copyAssets("$dirPath$it")
        }
    }
}

private fun copyFile(context: Context, filename: String) {
    val assetManager = context.assets
    val \`in\`: InputStream
    val out: OutputStream
    var newFileName: String? = null
    assetsManager.tryCatch {
        \`in\` = assetManager.open(filename)
        newFileName = context.getExternalFilesDir(null).toString() + "/" + filename
        out = FileOutputStream(newFileName)

        val buffer = ByteArray(1024)
        var read: Int = 0
        while (read != -1) {
            out.write(buffer, 0, read)
            read = \`in\`.read(buffer)
        }
        \`in\`.close()
        out.flush()
        out.close()
    }
}
생각보다 줄었음을 알 수 있다.
4. 본격 줄이기 - copyAssets
2번에서 나온 copyAssets에도 개선점이 몇 부분이 있다.
- assetManager를 한 곳 밖에 쓰지 않으니 통합한다.
- assets 변수 ->
- fullPath ~ dir 부분을 통합한다.
- Context 의 확장 메소드로 만든다.
위 4개 작업을 반영하면 아래와 같은 코드가 나온다.
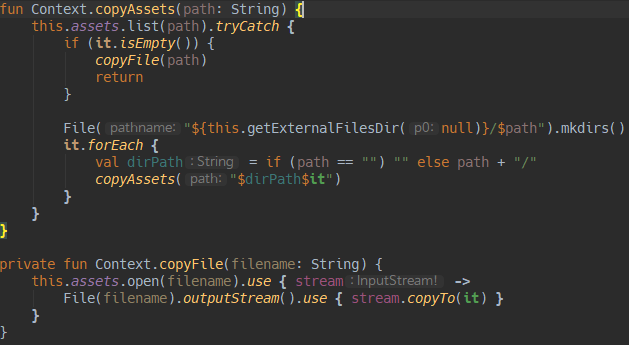
fun Context.copyAssets(path: String) {
    this.assets.list(path).tryCatch {
        if (it.isEmpty()) {
            copyFile(path)
            return
        }

        File("${this.getExternalFilesDir(null)}/$path").mkdirs()
        it.forEach {
            val dirPath = if (path == "") "" else path + "/"
            copyAssets(this, "$dirPath$it")
        }
    }
}
이로서 액티비티에서 사용하는건 copyAssets("/") 면 되게 되었다.
5. 본격 줄이기 - copyFile
언제나 그랬던 것 처럼, use를 적당히 활용해서 InputStream, FIleOutputStream을 줄인다.
개선점은 아래와 같다.
- InputStream.use를 사용한다.
- InputStream은
AssetManager.open(fileName)로 얻을 수 있다. - FileOutputStream도 사용해야 되니, it 대신 stream 란 이름으로 지정한다.
- InputStream은
- File.outputStream().use 를 사용한다.
- fileName 가 String 형태니, File 로 감싸서 객체를 얻어낸다.
- 안에 들어갈 코드는 copyTo 뿐이니, it를 사용한다.
- Context의 확장 메소드로 만든다.
- 버퍼를 읽는 대신, 코틀린에 내장된 copyTo 기능으로 바이트를 복사한다.
위 4개 작업을 반영하면 아래와 같은 코드가 나온다.
private fun Context.copyFile(filename: String) {
    this.assets.open(filename).use { stream ->
        File(filename).outputStream().use { stream.copyTo(it) }
    }
}
6. 종합
/**
 * Assets to Internal storage
 * @param [path] path to copy
 */
fun Context.copyAssets(path: String) {
    this.assets.list(path).tryCatch {
        if (it.isEmpty()) {
            copyFile(path)
            return
        }

        File("${this.getExternalFilesDir(null)}/$path").mkdirs()
        it.forEach {
            val dirPath = if (path == "") "" else path + "/"
            copyAssets("$dirPath$it")
        }
    }
}

private fun Context.copyFile(filename: String) {
    this.assets.open(filename).use { stream ->
        File("${this.getExternalFilesDir(null)}/$filename").outputStream().use { stream.copyTo(it) }
    }
}
순수 코드 20줄로, 자바에서의 54줄과 비교하면 반 이상 줄어든 셈이다.
글을 세개 째 작성하면서 느낀 거지만, use와 implicit parameter의 조합은.. 정말로 최고다.
7. (부가) Semantic highlighting

마무리