📍 해당 글은 Udemy의 Certified Kubernetes Administrator (CKA) with Practice Tests 강의를 듣고 정리했습니다.
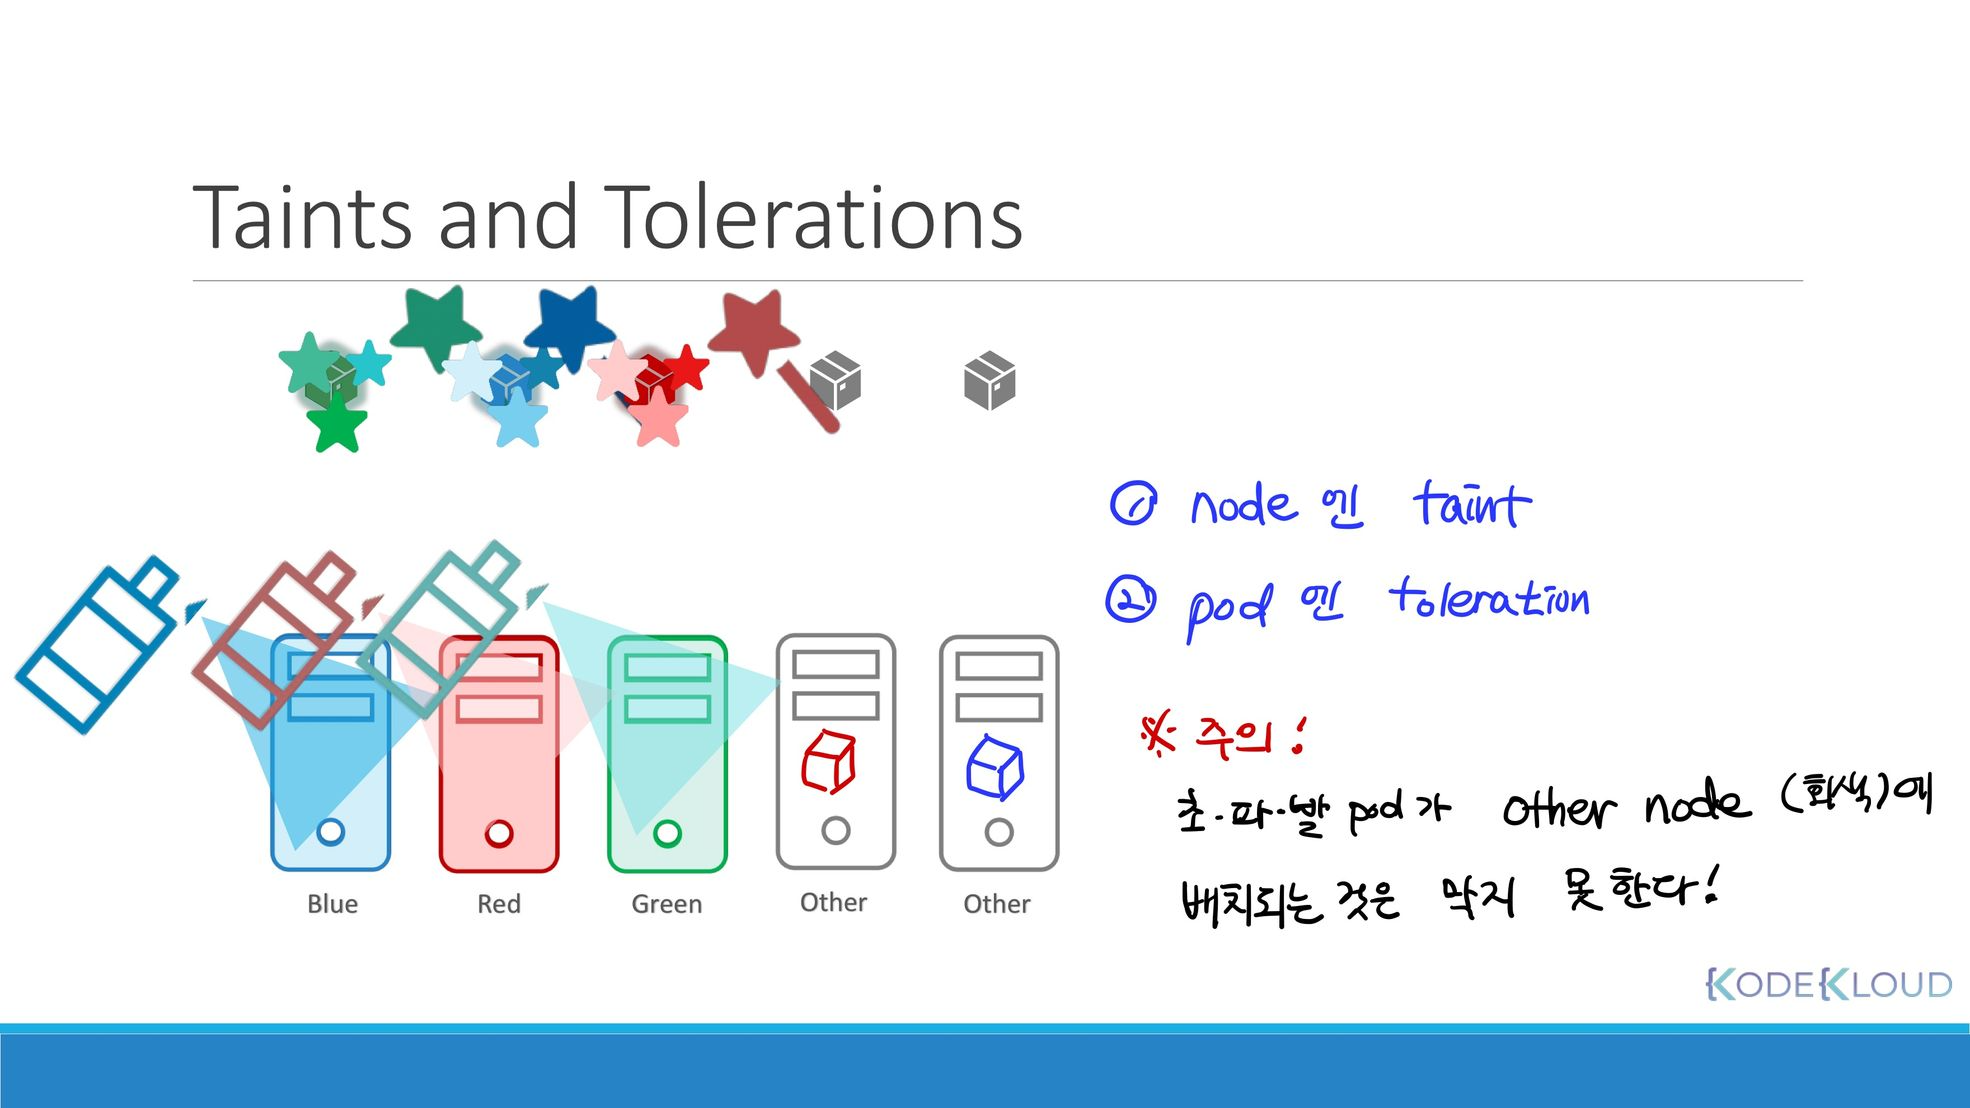
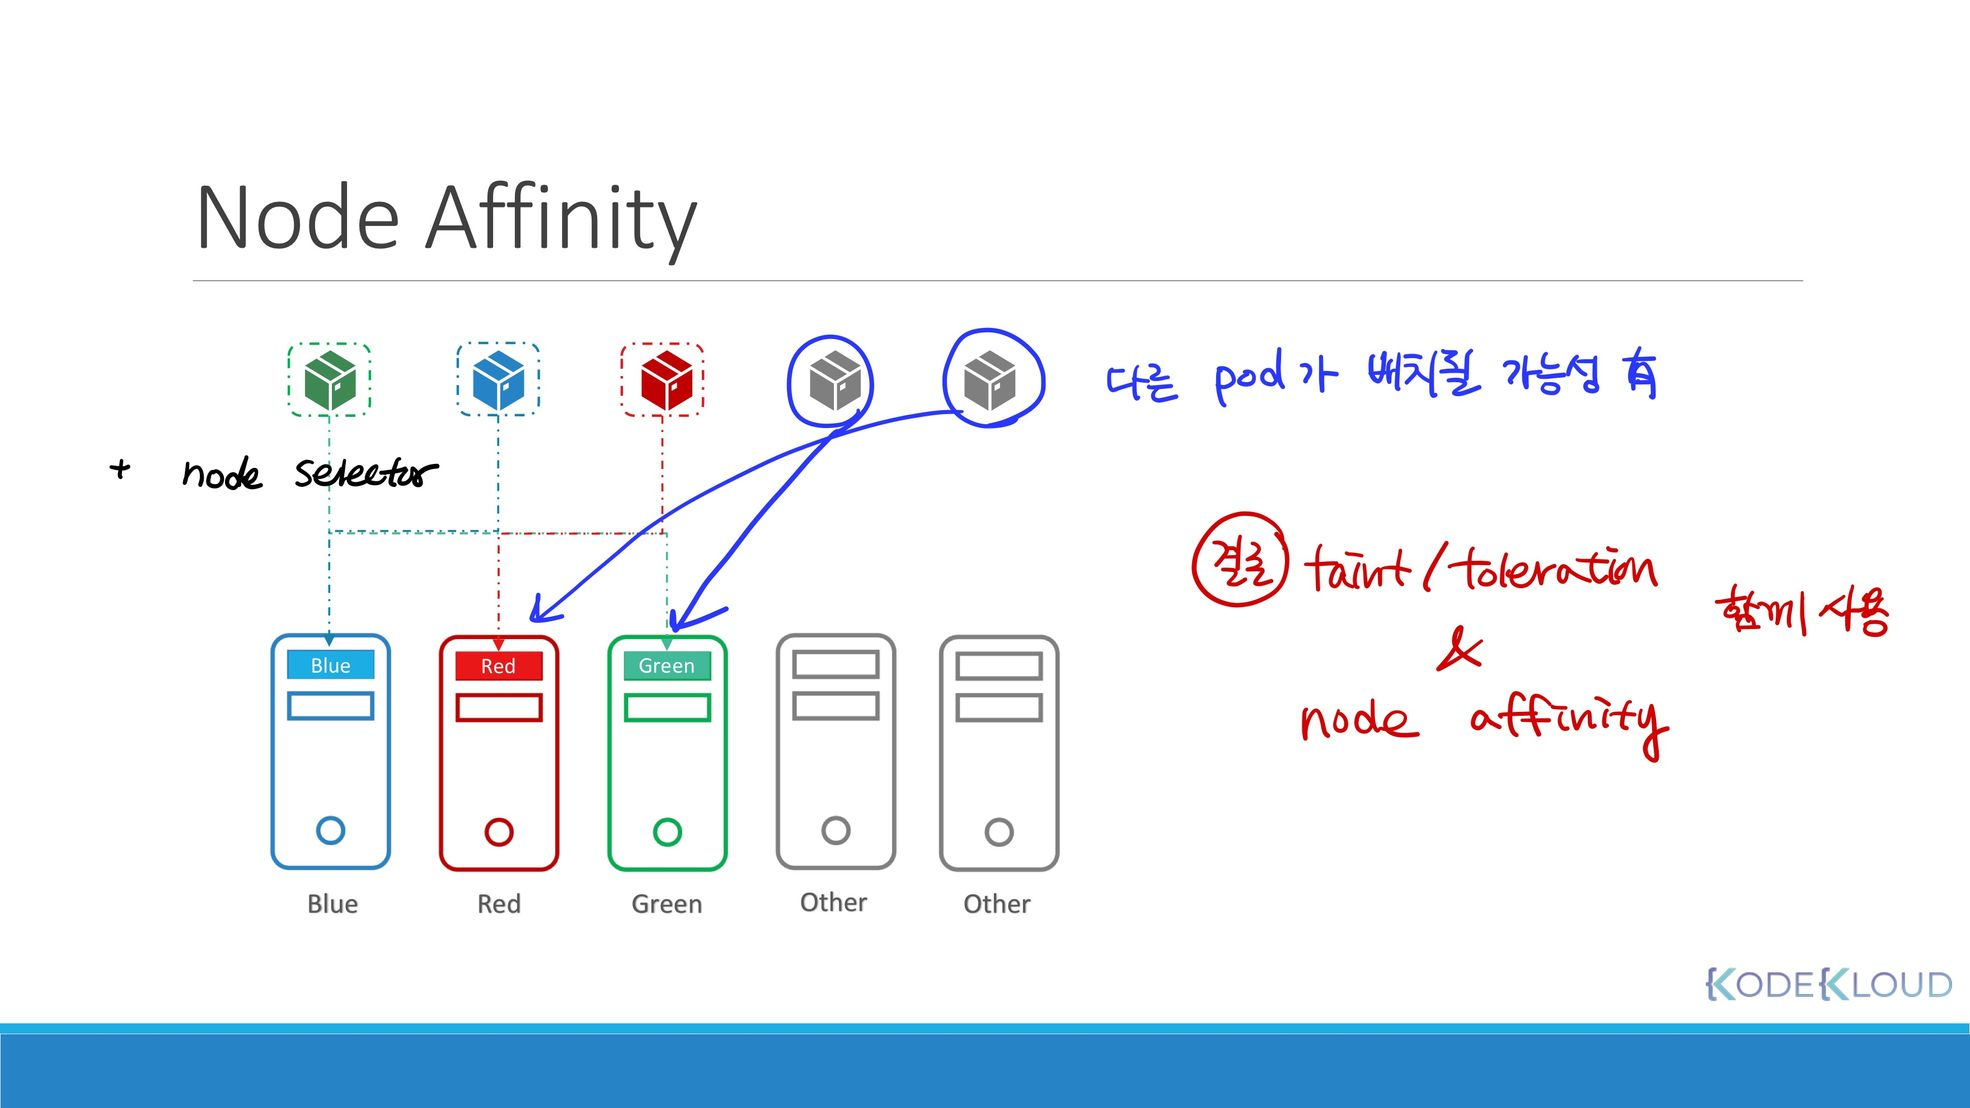
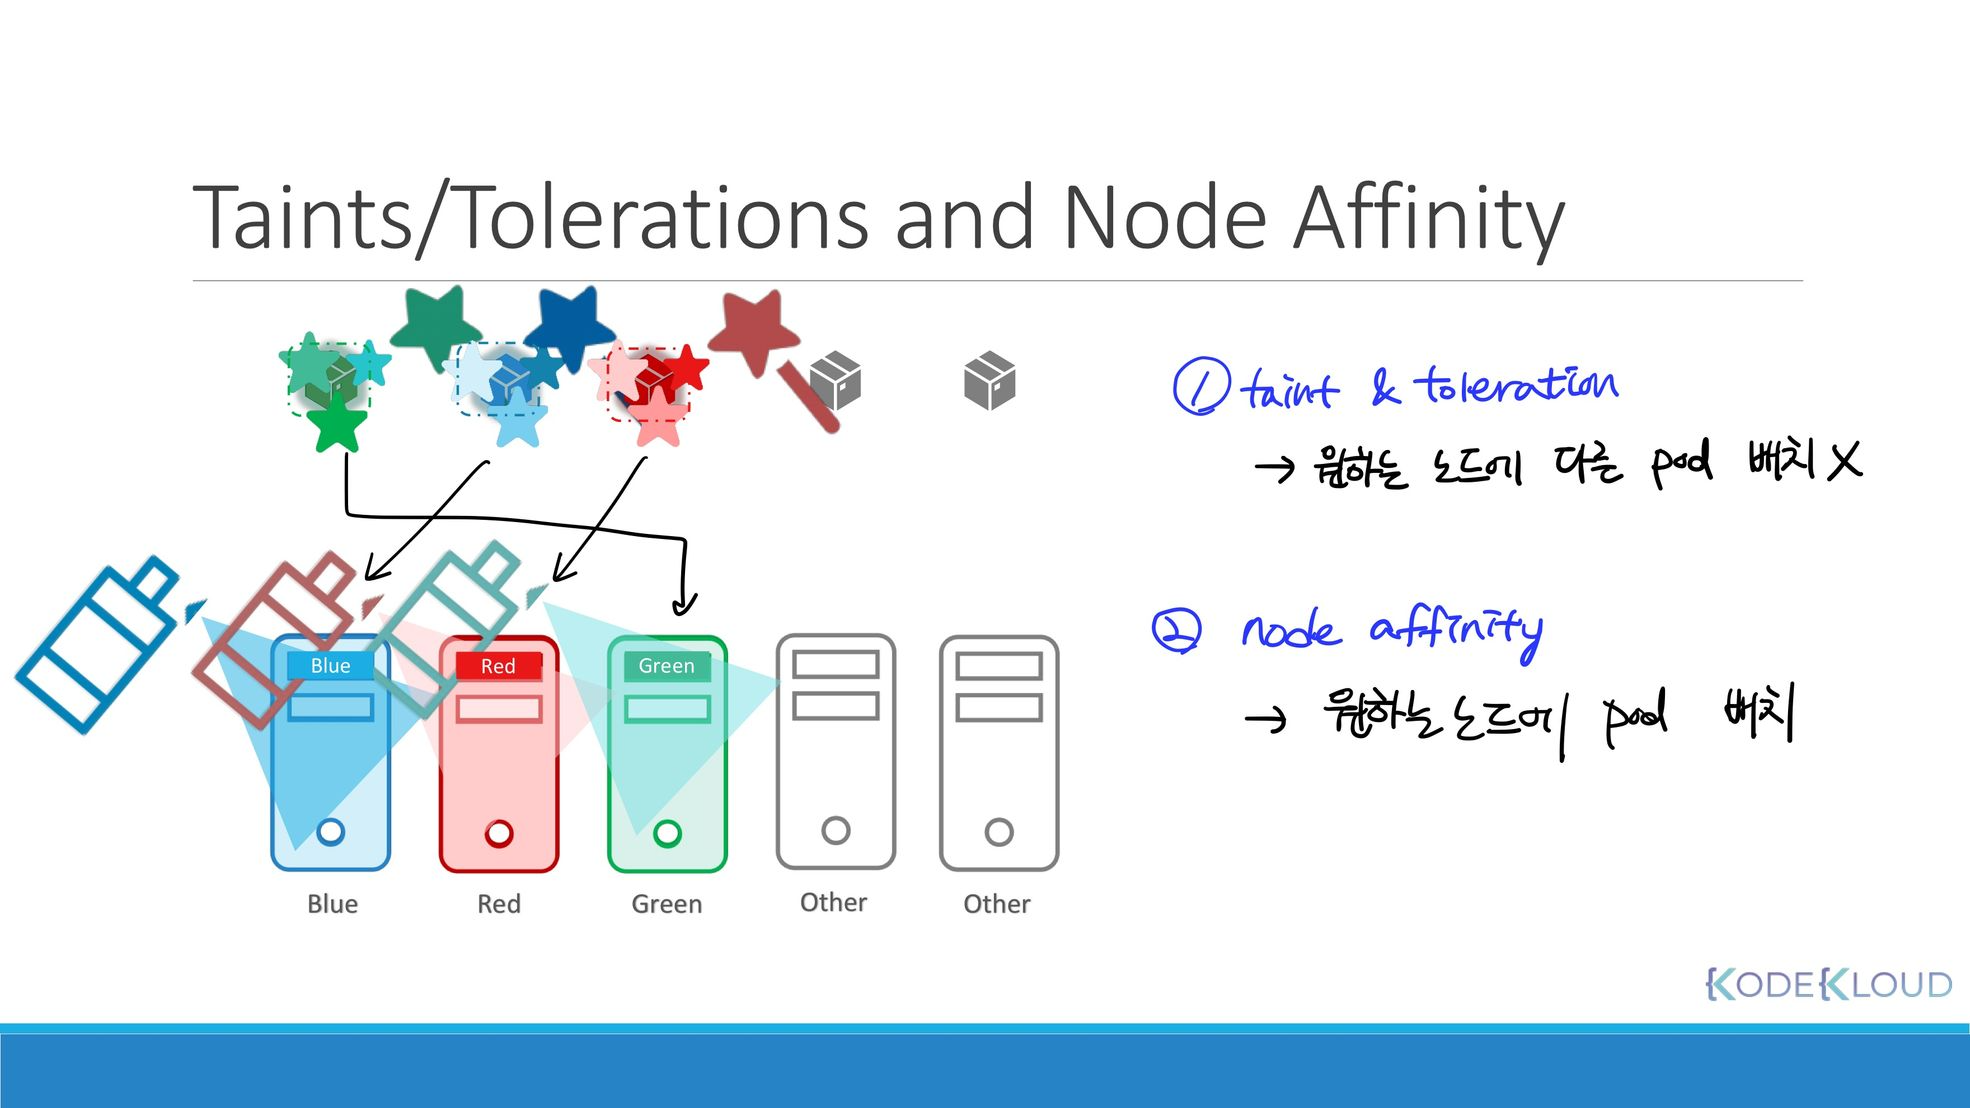
64. Taints and Tolerations vs Node Affinity
65. Resources Requirements and Limits
클러스터의 각 노드에는 사용 가능한 CPU 메모리와 디스크 리소스가 있다.
이전 세션에서 배운 것처럼 Pod가 배치될 노드를 결정하는 것은 Scheduler이다. 이때 Scheduler는 Pod가 필요로하는 리소스와 노드에서 사용 가능한 리소스의 양을 고려한다.
노드에 충분한 리소스가 없다면 스케줄러는 해당 노드에 pod를 배치하지 않고, 충분한 리소스를 사용할 수 있는 노드에 파드를 배치한다.
만약, 리소스가 충분한 노드가 없다면, k8s는 Pod의 배치(스케줄링)을 보류한다.
- 보류(
Pending) 상태의 파드,Events섹션에서 Pending의 이유를 확인할 수 있다.

Resource Requests
파드 내 컨테이너에게 요구되는 최소 리소스의 default 로는 0.5 CPU, 256 Mi를 가정한다. → namespace에 LimitRange를 생성하고, defalut 값을 설정해야한다. 세션 66 참고
만약, 이보다 더 많은 리소스가 필요한 경우에는 Pod 또는 Deployment definition 파일의 spec: containers:섹션에서 값을 수정할 수 있다.
# pod-definition.yaml
...
spec:
	containers:
	- name:
		image:
		resources:
			requests:
				memory: "1Gi" # 1GiB
				cpu: 1 # cpu 1개
Resource - CPU
cpu : 1 가 실제로 의미하는 것은 무엇일까?
vCPU 1개 즉, AWS의 vCPU 1개, GCP or Azure의 Core 1개 또는 Hyperthread 1개를 의미한다.
이 필드는 0.1처럼 작은 값도 지정 가능하고, 1 cpu는 100m로 표시 가능하다. m은 밀리를 나타내는데, 1m까지 내려갈 수 있지만 이보다 작을 순 없다.
Resource - Memory
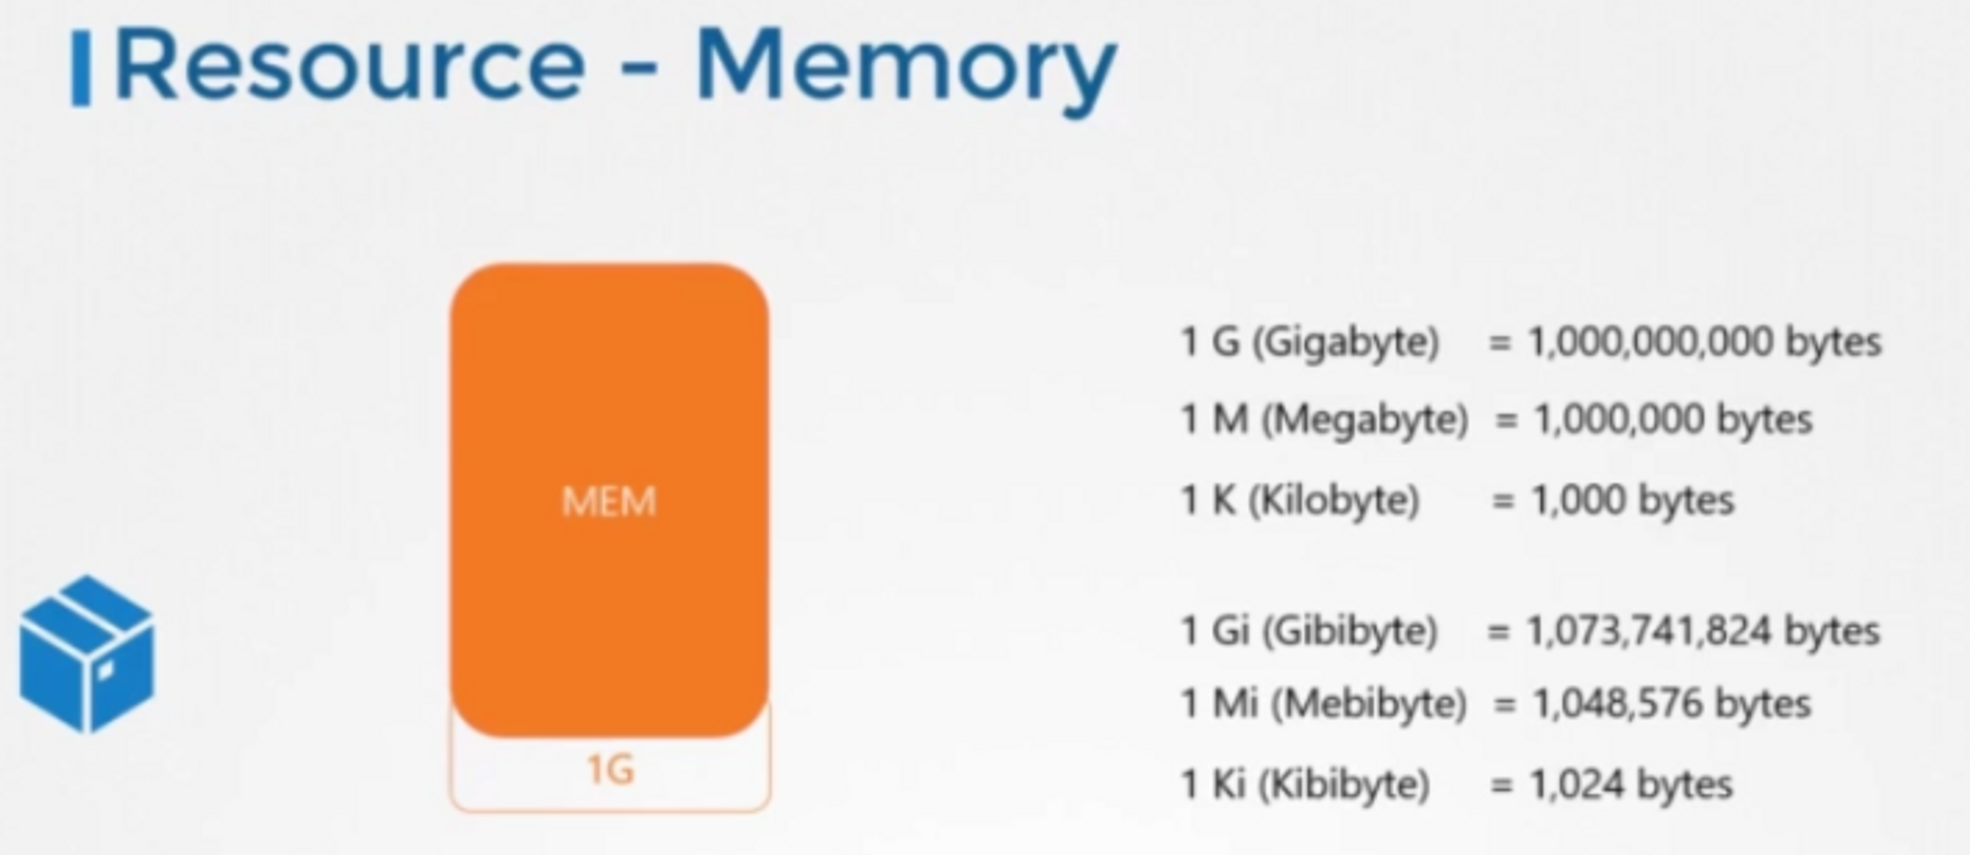
기가바이트, 기비바이트, 메가바이트 메비바이트 등 단위에 조심하자.
Resource Limits
노드에서 실행되는 “컨테이너”에 집중해보자.
먼저, 도커에서 컨테이너는 사용할 수 있는 리소스 제한이 없다.
하지만, k8s에서는 Pod에 리소스 사용량에 대한 제한을 설정할 수 있다.
k8s에서 컨테이너가 사용할 수 있는 default Limit의 defalut는 vCPU 1개, 512MiB이다.
이 Limit은 Resource Request와 마찬가지로 definition file에서 변경할 수 있다.
💡 Resource Request와 Limit은
Pod 내 각 컨테이너에게 적용되는 것이다.
spec:
  containers:
	- name:
		image:
		resource:
			requests:
				memory: "1Gi"
				cpu: 1
			limits:
				memory: "2Gi"
				cpu: 2
Limit 초과
만약 Pod가 지정된 Limit을 초과하여 리소스를 사용하려하면 어떻게 될까?
CPU의 경우에는, 컨테이너가 limit보다 더 많은 cpu 리소스를 사용할 수 없다.
메모리의 경우는, 지속적으로 limit을 초과하려하면 Pod가 termianate(종료) 된다.
66. Note on default resource requirements and limits
Configure Default Memory Requests and Limits for a Namespace
Configure Default CPU Requests and Limits for a Namespace
Assign Memory Resources to Containers and Pods
apiVersion: v1
kind: LimitRange
metadata:
  name: mem-limit-range
spec:
  limits:
  - default:
      memory: 512Mi
    defaultRequest:
      memory: 256Mi
    type: Container
67. A quick note on editing PODs and Deployments
Edit a POD & Deployment with kubelet edit
- spec.containers[*].image
- spec.initContainers[*].image
- spec.activeDeadlineSeconds
- spec.tolearations
위 목록은 :wq 로 저장 후 변경할 수 있다.

외에는 저장할 수 없다고 나오는데, 이때 생성된 /tmp/~.yaml 파일을 이용하면된다.
k replace —force -f [파일명] 68. Practice Test - Resource Requirements and Limits
69. Solution: Resource Limits: (Optional)
# 파드 및 디플로이먼트 옵션 수정하기
k edit pod elephant

> vi에서 수정을 마친 후 :wq!를 하면 /tmp에 yaml 파일이 저장되었다는 문구를 확인할 수 있다.

# replace --force -f 명령어로 파드를 삭제 및 재실행하자.
k replace --force -f /tmp/파일명.yaml

# 위 명령어는 아래 명령어 두 줄과 같은 일을 수행한다.
k delete po
k apply -f
70. DaemonSets
- DaemonSet 이란?
- DaemonSet 활용 사례
- DaemonSet 생성
- DaemonSet 동작 방식
DaemonSet이란?
DaemonSet이란 ReplicaSet처럼 Pod의 여러 인스턴스를 배포하는 데 도움을 준다.
클러스터의 각 노드에서 하나의 파드의 복사본을 만들고, 노드가 추가되면 파드가 자동으로 생성되고, 노드가 제거되면 파드도 자동으로 제거된다.
DaemonSet 활용 사례
💡 데몬 셋으로 클러스터 내의 각 노드에 배포한다고 할 때, 클러스터에 변화가 있을 때 노드에서 알아서 모니터링 에이전트를 추가하거나 제거하기때문에 편리하다.
- Monitoring Solution & Log Viewer
- kube-proxy
- Networking
DaemonSet 생성
Definition file이 ReplicaSet과 kind만 다를 뿐 매우 비슷하다.
apiVersion: apps/v1
kind: DaemonSet
metadata:
  name: monitoring-daemon
  labels:
    app: nginx
spec:
  selector:
    matchLabels:
      app: monitoring-agent
  template:
    metadata:
     labels:
       app: monitoring-agent
    spec:
      containers:
      - name: monitoring-agent
        image: monitoring-agent
kubectl create -f daemon-set-definition.yaml # 생성
kubectl get daemonsets # 조회
kubectl describe daemonsets monitoring-daemon # 자세한 정보DaemonSet 동작 방식
DaemonSet은 어떻게 각 노드의 pod 스케줄을 알고, 어떻게 모든 노드에 파드가 생성되었는지 알 수 있을까?
→ NodeAffinity와 default scheduler를 이용한다.
71. Practice Test - DaemonSets
72. Solution - DaemonSets
DaemonSets 생성하기
k create daemonset 이라는 명령은 존재하지 않으니
k create deployment + --dry-run=client -o yaml 을 이용해 변경하자
73. Static Pods
kubelet은 kube-apiserver에 의존해 어떤 노드에 어떤 파드를 생성할 지 지시를 내린다.
이 결정은 etcd에 저장된 kube-scheduler 의 결정을 따르는 것이다.
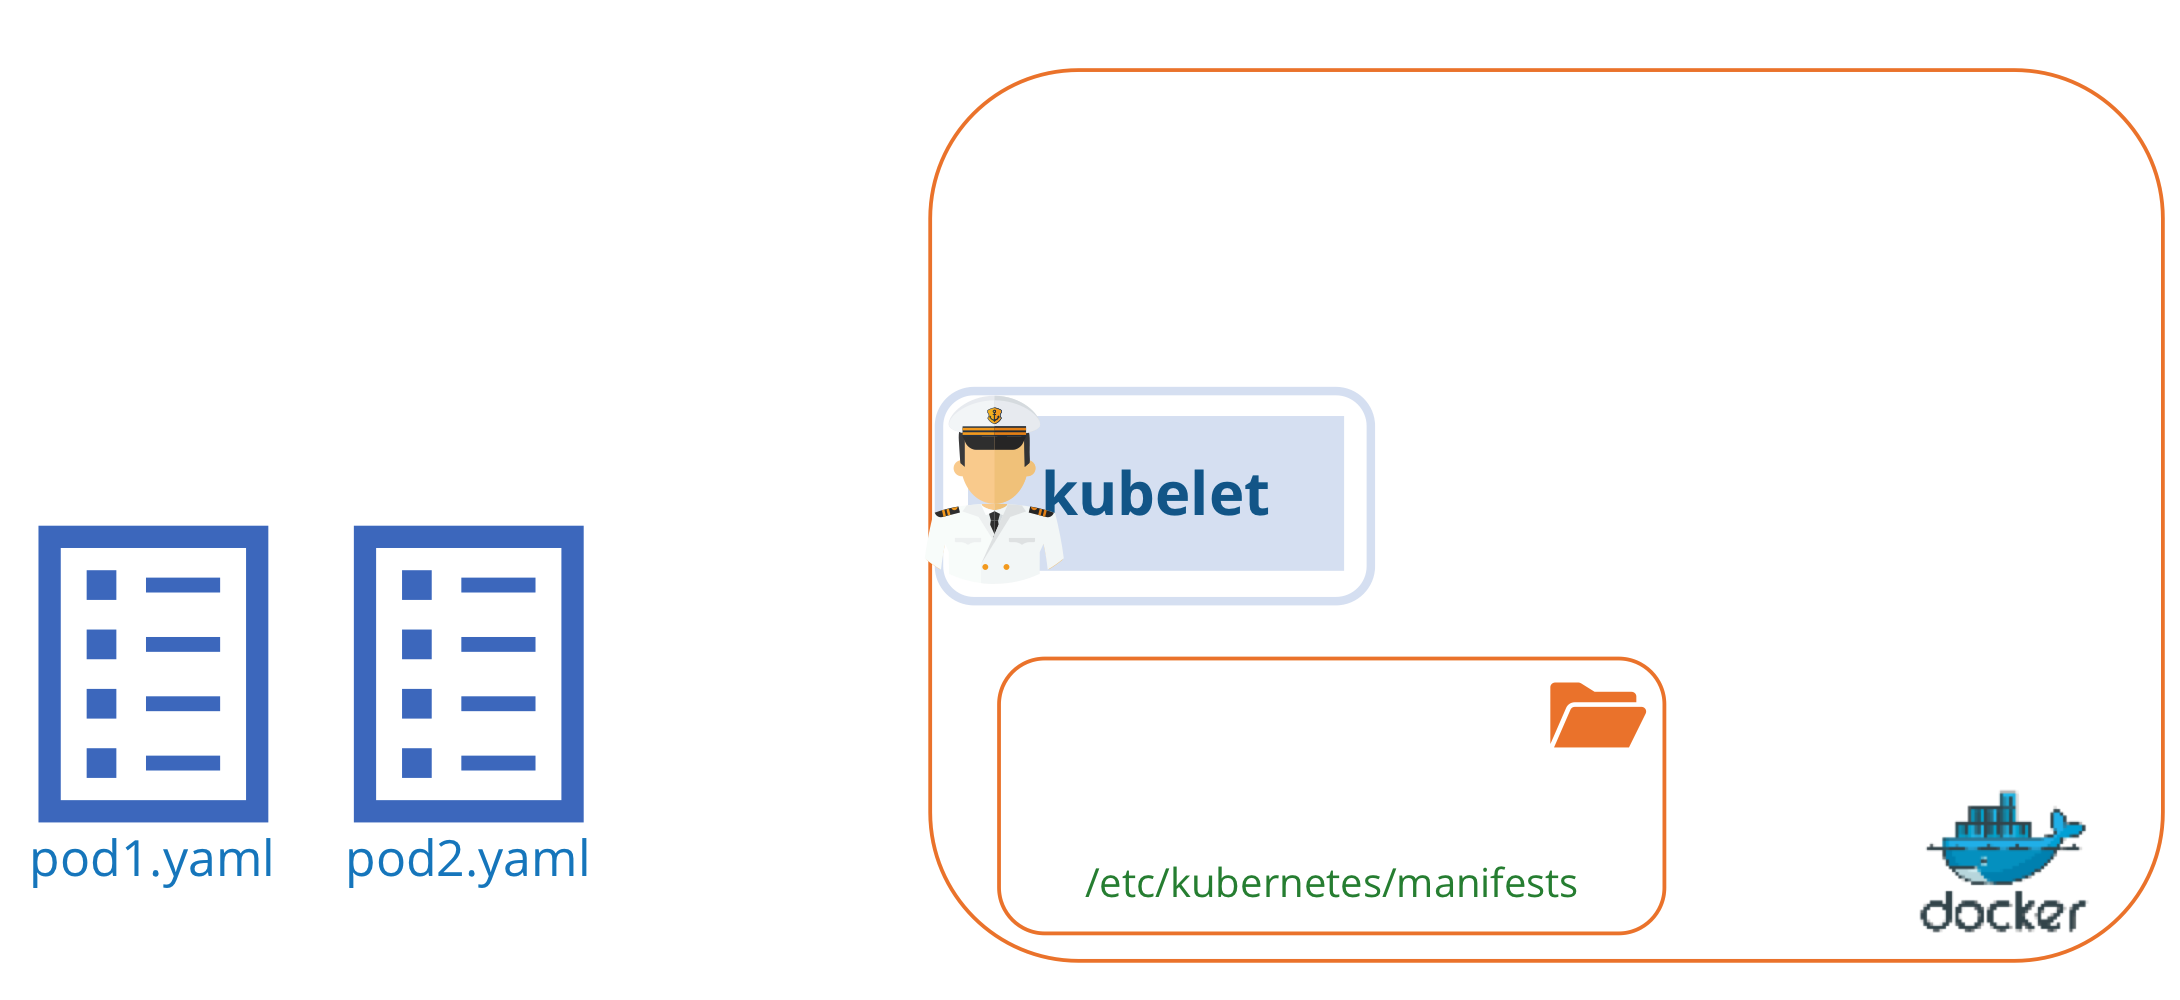
하지만, 이 때 kube-apiserver가 없다면 pod-definition file을 kubelet에 어떻게 제공할까?
→ 파드에 대한 정보를 저장하도록 지정된 서버의 디렉터리에서 pod-definition file을 읽어오도록 kubelet을 구성할 수 있다.
kubelet은 주기적으로 이 디렉토리를 확인하고 파일을 읽고 pod의 생존을 보장한다.
어플리케이션이 죽으면 kubelet이 다시 재시작하고, 디렉터리의 파일을 바꾸면 kubelet이 pod를 재시작하고, 디렉터리의 파일을 삭제하면 pod를 삭제한다.
이처럼 kube-apiserver나 다른 k8s 구성요소의 개입없이 kubelet이 스스로 만든 pod를 static-pod 라고 한다.
kubelet은 pod 수준으로만 이해할 수 있기때문에 ReplicaSet이나 Service 같은 다른 구성요소를 만들 순 없다.
Designated foler 지정된 폴더
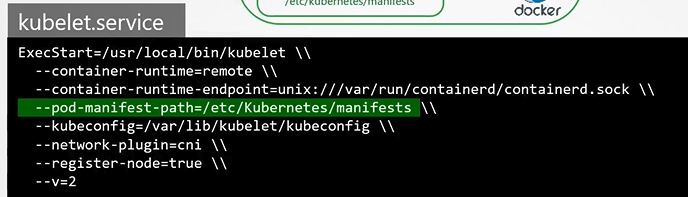
방법1. kubelet.service 파일에서 직접 옵션 지정하기
지정된 디렉토리는 호스트의 모든 디렉토리가 될 수 있고, 해당 디렉토리의 위치는 서비스를 실행하는 동안 옵션으로 kubelet에게 전달된다.
- 옵션: —pod-manifest-path
방법2. config 파일로 staticPodPath옵션을 사용하여 디렉터리 경로 제공하기
# kubeconfig.yaml
staticPodPath: /etc/kubernetes/manifest/...
💡 kubelet.service 파일의 옵션을 먼저 확인하고 여기에 디렉터리 경로가 없으면 kubeconfig.yaml 파일을 확인한다.
Static-Pod 조회
현재는 kube-apiserver가 없는 상황을 가정했기때문에 kubelet 명령어를 사용할 수 없다.
따라서 static-pod 조회를 위해서는 docker 명령을 이용한다.
# static-pod 조회
docker ps
kube-apiserver가 존재한다면 두 종류의 파드(static pod와 apiserver의 pod)를 동시에 생성할 수 있다.
kube-apiserver는 static pod의 존재를 알고 있다.
왜 Static-pod를 사용하나요?
static-pod는 k8s control plane의 의존하지 않기때문에, 서비스 충돌을 걱정할 필요가 없다.

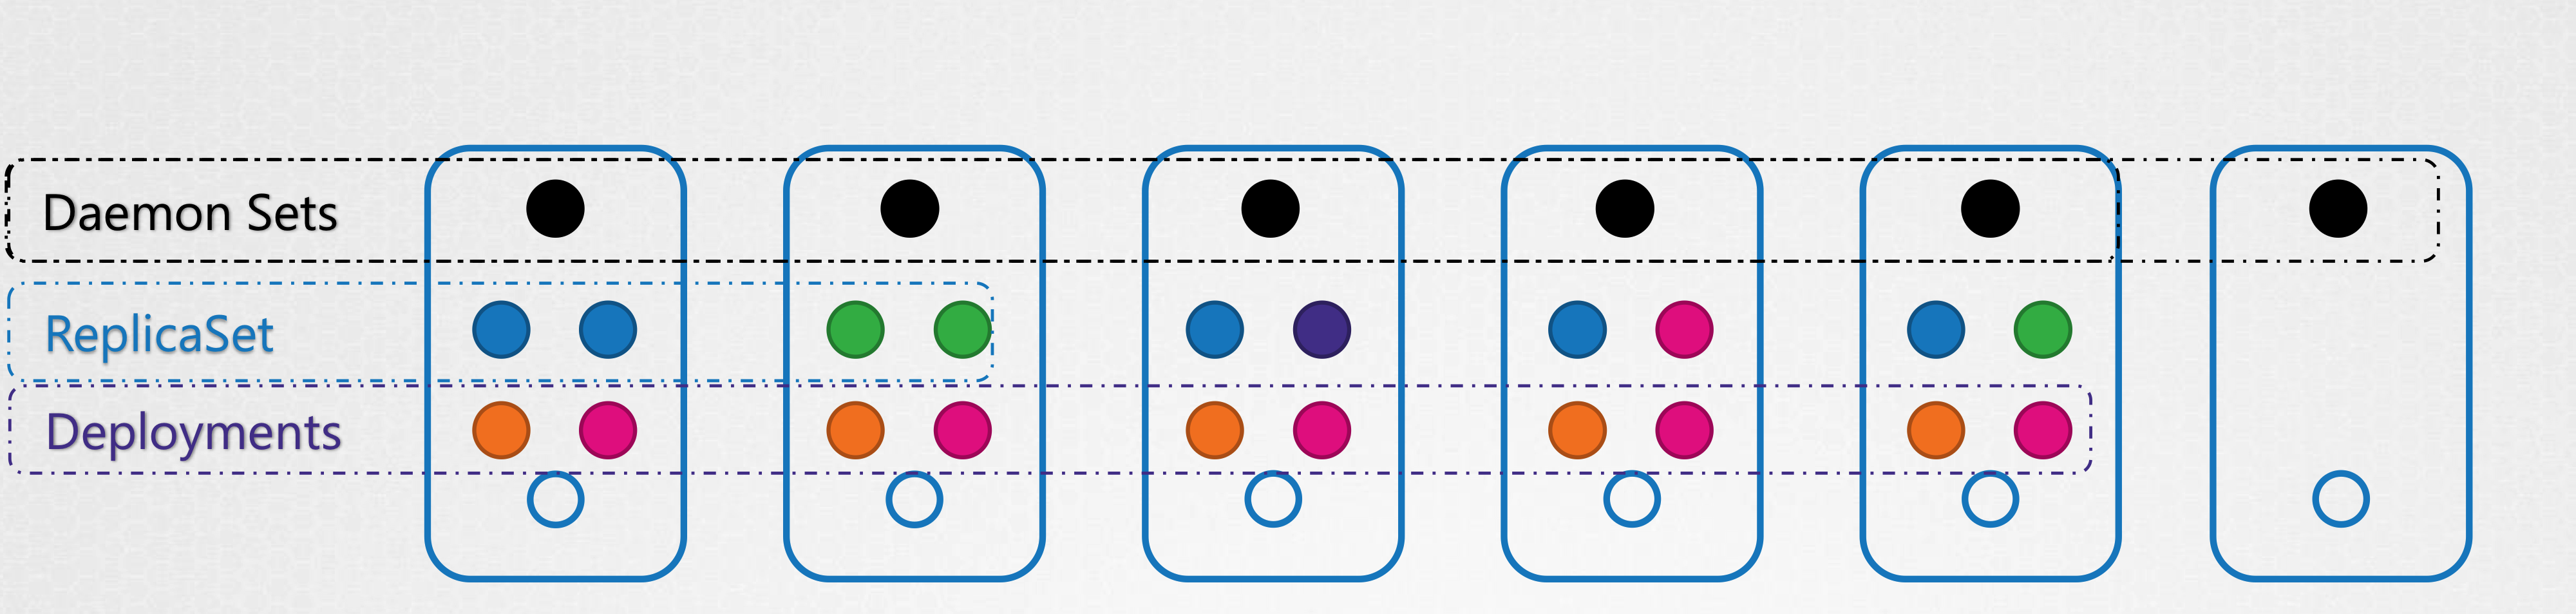
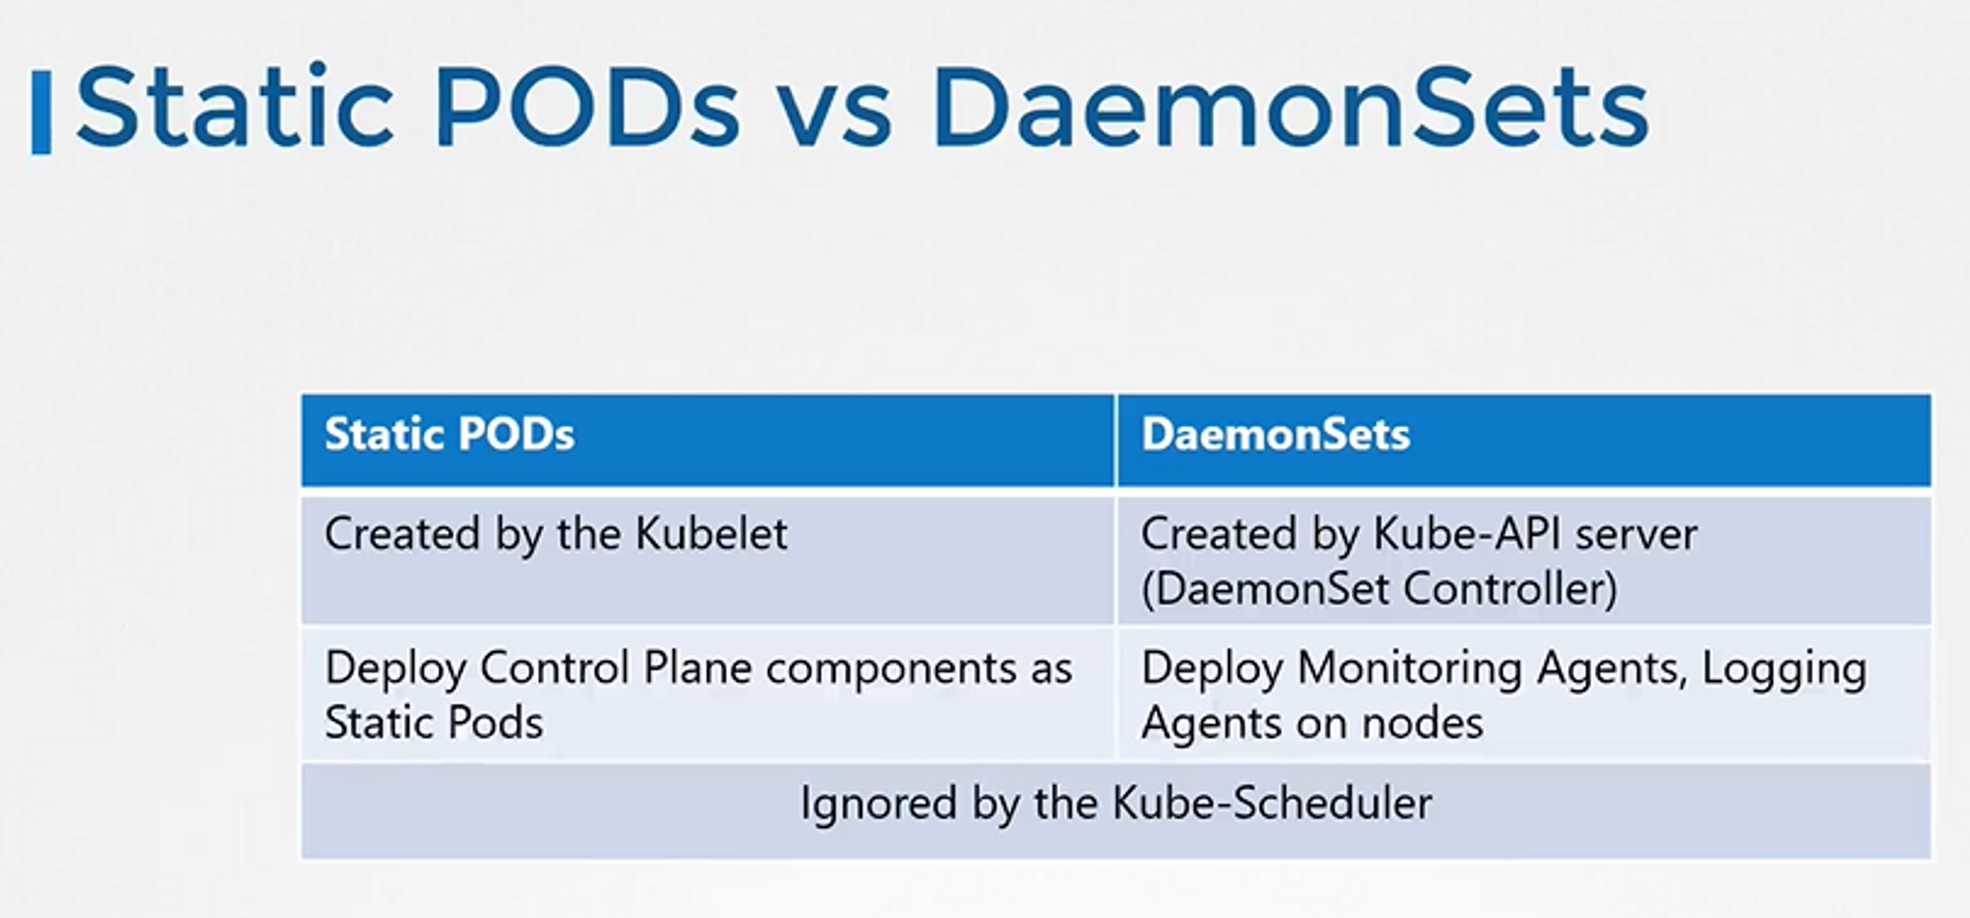
Static PODs vs DaemonSets
DaemonSet은 인스턴스 하나가 클러스터 내의 모든 노드에서 사용 가능하도록 할 때 사용하고, kube-apiserver를 통해 만들어진다.
Static PODs는 kubelet이 직접 만들고, kube-apiserver 등의 영향을 받지 않는다.
74. Practice Test - Static Pods
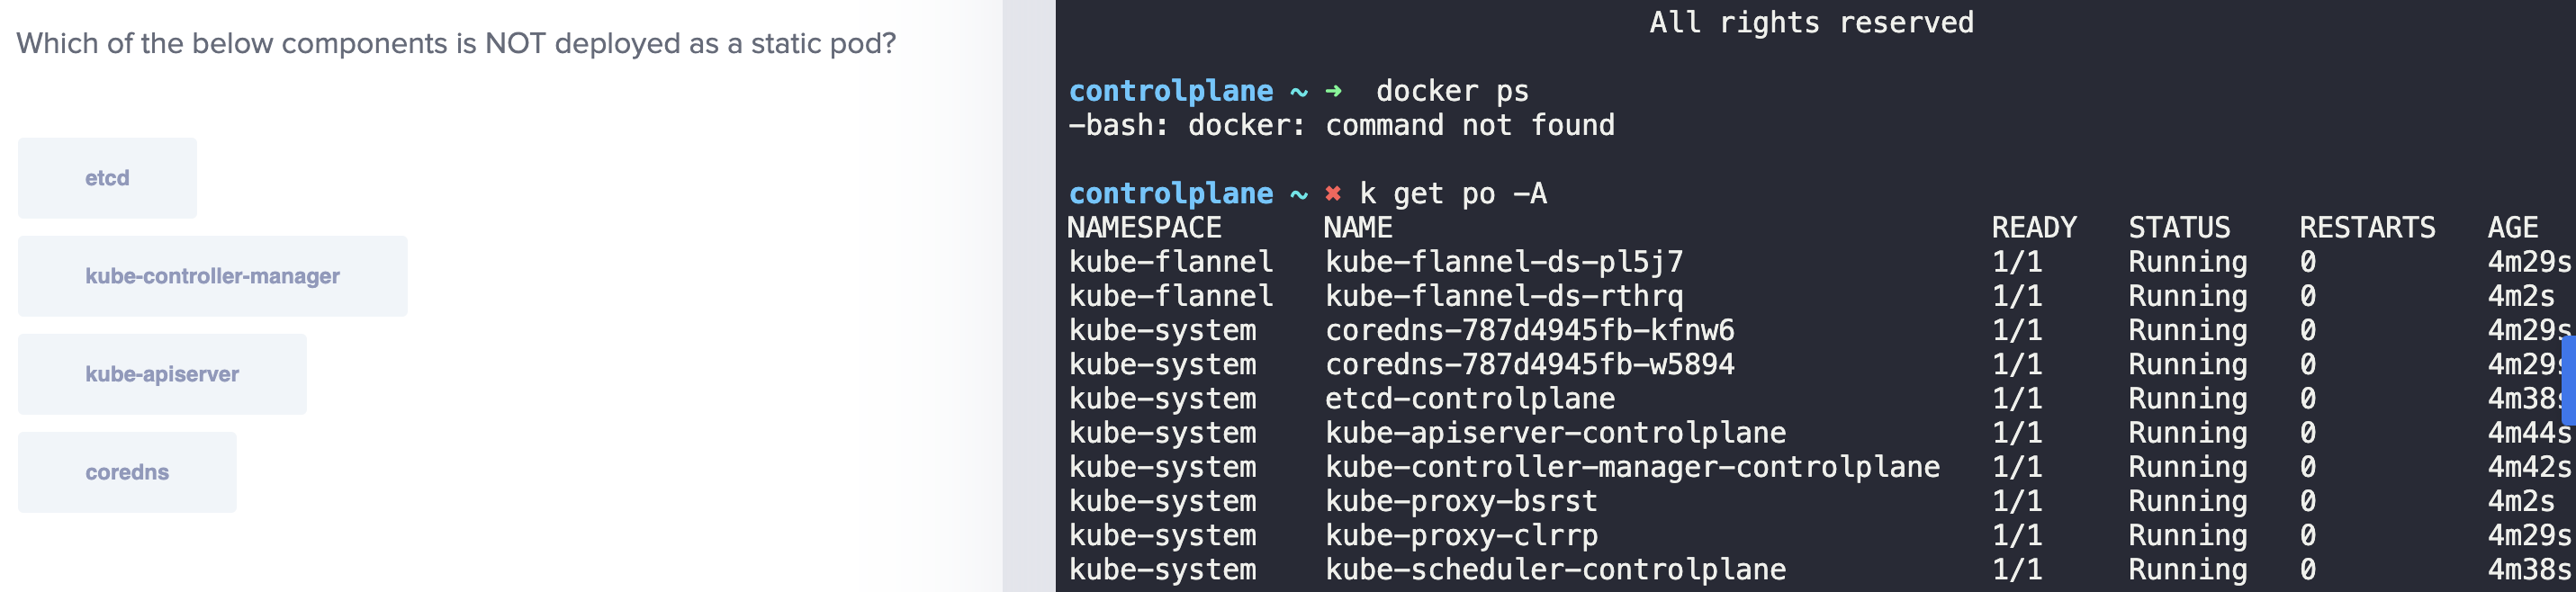
By default,
static podsare created for the controlplane components and hence, they are only created in thecontrolplane
node.
Q. What is the path of the directory holding the static pod definition files?
- ps -aux | grep kubelet OR ps -aux | grep /usr/bin/kubelet
- —config=/var/lib/kubelet/config.yaml 해당 옵션 찾아서 kubelet의 config 파일 위치 찾기
- grep -i staticpod /var/lib/kubelet/config.yaml
Q. Create a static pod named static-busybox that uses the busyboximage and the command sleep 1000
A. kubectl run --restart=Never --image=busybox static-busybox --dry-run=client -o yaml --command -- sleep 1000 > /etc/kubernetes/manifests/static-busybox.yaml
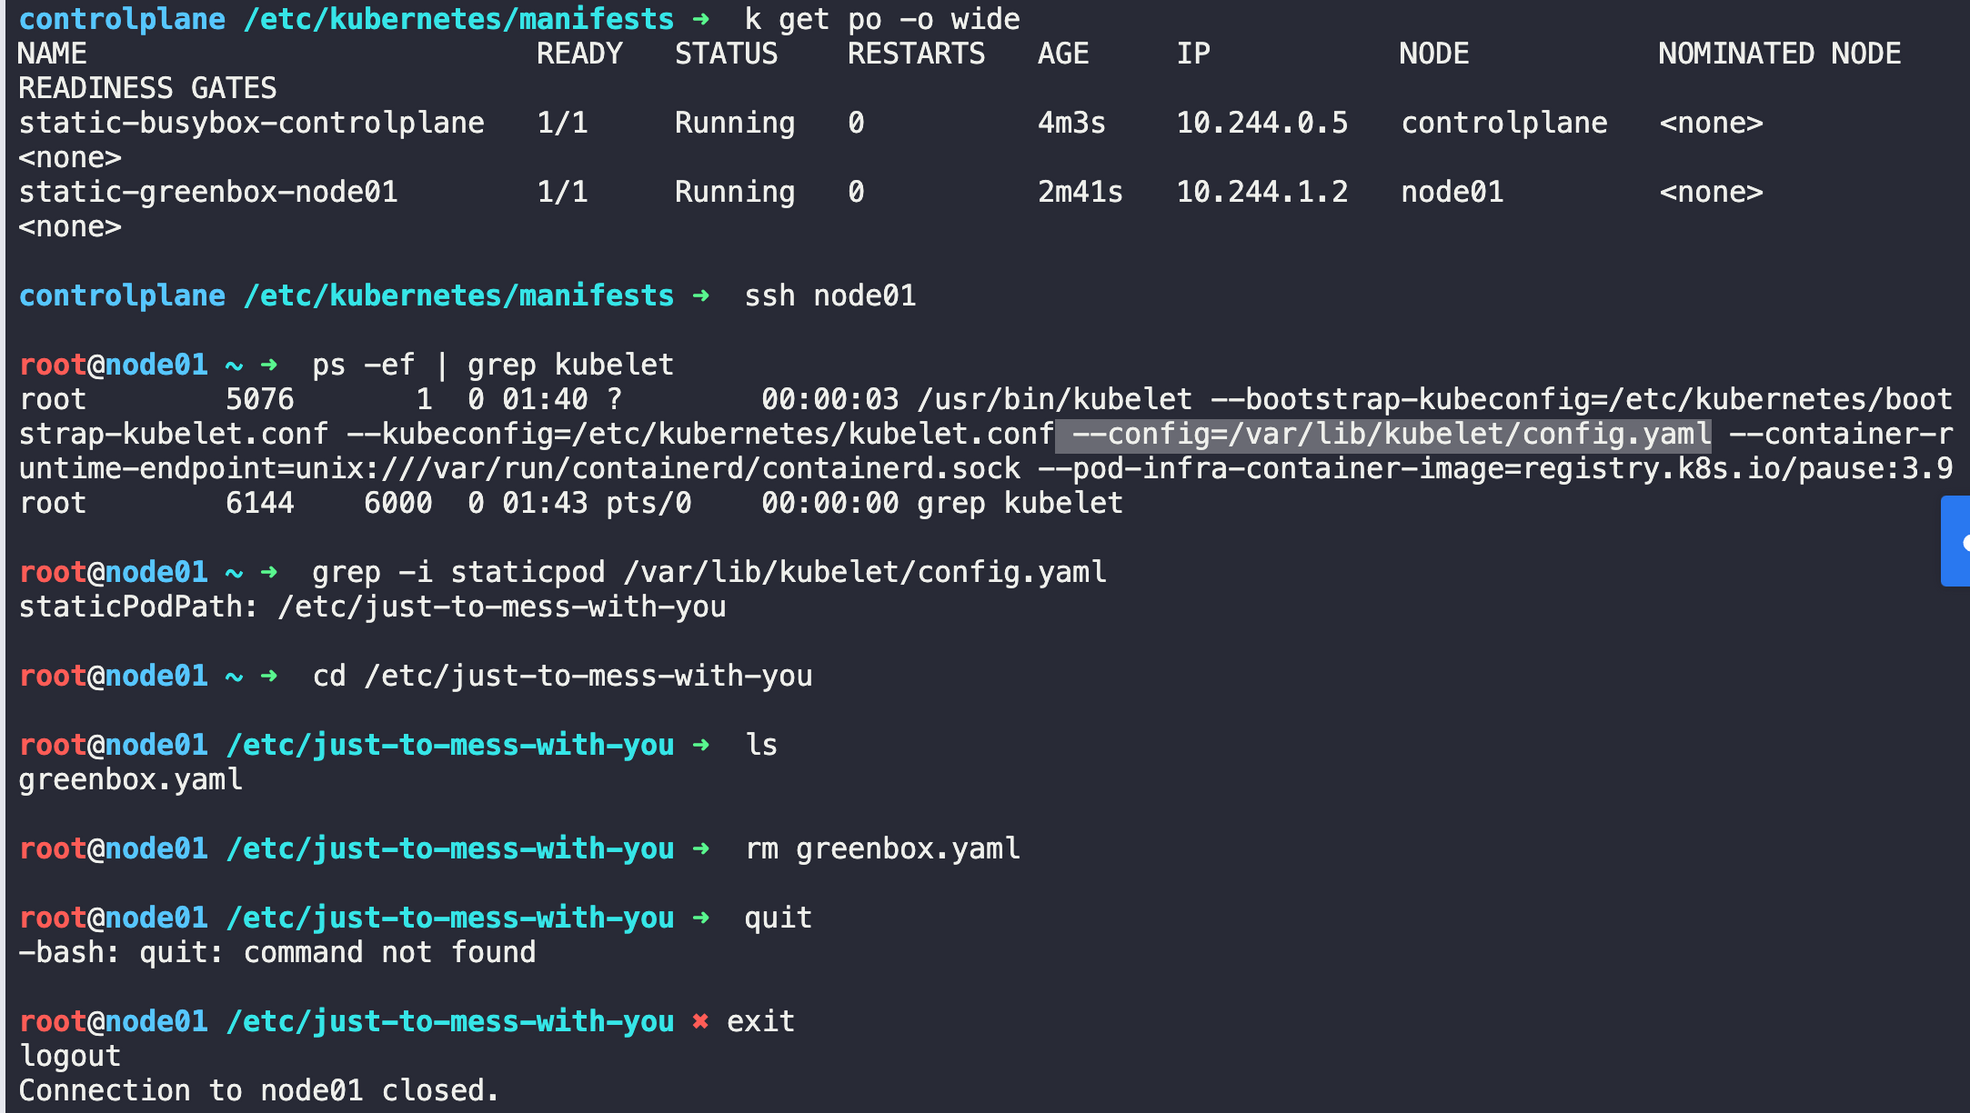
Q. We just created a new static pod named static-greenbox. Find it and delete it.
This question is a bit tricky. But if you use the knowledge you gained in the previous questions in this lab, you should be able to find the answer to it.
- 주의사항
- static-pod는 yaml 파일을 지워야한다. 지금 static-greenbox pod는 node01에 위치한다.
k get po -o wide
ssh node01- kubelet의 설정 파일을 확인하기 위해 먼저 설정 파일이 무엇인지 부터 찾자.
ps -ef | grep kubelet후에--config옵션 찾기
- config 파일에서 staticPodPath를 찾자
grep -i staticpod [config파일경로]
- cd staticPodPath
- yaml 파일 삭제
exit로 ssh 연결 종료
- static-pod는 yaml 파일을 지워야한다. 지금 static-greenbox pod는 node01에 위치한다.