- 로그인 과정
인증(AuthN) -> ID(/etc/passwd), Pwd(/etc/shadow) 검증 수행 -> 접근 허용/비허용
: 암호 인증은/etc/shadow에서 진행한다.
ID/Password 확인
-
유저 july 생성

-
/etc/passwd에 새로운 유저가 july가 추가됨

-
/etc/shadow새로운 유저 july의 비밀번호가 암호화된 형태로 추가되었다.

shellscript
반복적인 작업의 편의성 제공 -> 업무 자동화에 도움
But, 단점 ) 시각적 작업의 불편함 -> python의 경우 시스템 모듈을 통한 시각화가 가능하다.
- 날짜 및 달력을 출력하는 shellscript 작성
[root@server1 LAMs]# vim time.sh # time.sh 작성
[root@server1 LAMs]# cat time.sh
echo '---------------------------'
date
cal
echo '---------------------------'
[root@server1 LAMs]# chmod 700 time.sh # 실행파일로 만들기위해 실행 권한 부여
[root@server1 LAMs]# ./time.sh # time.sh 실행
---------------------------
Wed Aug 31 17:19:07 KST 2022
     August 2022
Su Mo Tu We Th Fr Sa
    1  2  3  4  5  6
 7  8  9 10 11 12 13
14 15 16 17 18 19 20
21 22 23 24 25 26 27
28 29 30 31
---------------------------
-
시스템 환경변수 확인
env -
환경변수는
${ENV}이용한다. ex)echo ${HOME} -
새로운 유저 july의 쉘 바꾸기
chsh {유저명}
[root@server1 LAMs]# chsh july
Changing shell for july.
New shell [/bin/bash]: /bin/csh   # 변경 원하는 쉘 입력
Shell changed.
[root@server1 LAMs]# grep july /etc/passwd
july:x:1001:1001::/home/july:/bin/csh # july의 쉘이 변경됨- 서버 1에서 서버 2로 로그파일 보내기
sar 2 3 > sar_server1_$(date '+%Y-%m-%d').log && scp sar_server1_$(date '+%Y-%m-%d').log 192.168.56.102:/BACKUP/LOG중요한 파일 보호하기
- 현재 세션 전체에 대한 덮어쓰기 금지 ( 중요한 파일 보호 )
set -o noclobber # 덮어쓰기 방지
set +o noclobber # 덮어쓰기 허용- 특정 파일에 대한 쓰기 금지 ( 덮어쓰기보다 더 강한 보호 )
lsattr 디렉토리or파일명: 디렉토리 혹은 파일에 걸려 있는 속성 확인
[root@server1 LAMs]# chattr +i time.sh
[root@server1 LAMs]# lsattr
---------------- ./services
----i----------- ./time.sh
---------------- ./sar_server1_2022-09-01.log
[root@server1 LAMs]# echo 'overwrite' > time.sh
-bash: time.sh: Permission denied
[root@server1 LAMs]#- alias
단,alias는 세션 레벨 : 해당 세션만 사용가능, 해당 세션이 유지되는 동안만 사용됨.
사용자 레벨 : 해당 사용자 설정이 영구적으로 사용됨
✍
source .bashrc# alias 영구 저장! 이 과정 생략하면 재부팅 후에 alias 추가한 것들 사라짐
alias
[root@server1 LAMs]# alias hello="echo hi"
[root@server1 LAMs]# hello
hi

[root@server1 LAMs]# alias pssh='ps -ef | grep ssh'
[root@server1 LAMs]# pssh
root      1043     1  0 07:47 ?        00:00:00 /usr/sbin/sshd -D
yji       2129  1997  0 07:48 ?        00:00:00 /usr/bin/ssh-agent /bin/sh -c exec -l /bin/bash -c "env GNOME_SHELL_SESSION_MODE=classic gnome-session --session gnome-classic"
root      3090  1043  0 07:54 ?        00:00:00 sshd: root@notty
root      3102  3090  0 07:55 ?        00:00:00 /usr/libexec/openssh/sftp-server
root     25186  1043  0 09:10 ?        00:00:01 sshd: root@pts/0
root     26489 25198  0 10:21 pts/0    00:00:00 grep --color=auto ssh
단점 ) alias은 인자처리가 불가능하다.
[root@server1 ~]# find / -type f \( -perm -04000 -o -perm -02000 \) -exec ls -l {} \; | /bin/mail -s "SUID/SGID LIST" root
find / -type f \( -perm -04000 -o -perm -02000 \) : 각종 디바이스 파일과 특수파일 등을 제외한 일반 파일(-type f) 중에서 set uid
또는 set gid가 걸린 파일(\( -perm -4000 -o -2000 \))을 검색한다.
() : 검색의 우선 순위 적용
-exec \;: 조건을 가지고 찾은 파일들을 대상으로 \;까지의 명령어를 실행해라.
 /bin/mail -s "SUID/SGID LIST" root : root 사용자에게 파이프 전까지의 결과를 보내주세요

->
-> 4000, 2000 특수권한을 갖고 있는 파일을 최상위 / 에서 찾아서 root 사용자에게 ls -l 한 결과를 메일로 보내주세요.
daemon
[root@server1 LAMs]# systemctl enable httpd.service
Created symlink from /etc/systemd/system/multi-user.target.wants/httpd.service to /usr/lib/systemd/system/httpd.service.
[root@server1 LAMs]# daemon-reload
bash: daemon-reload: command not found...
[root@server1 LAMs]# start httpd.service
bash: start: command not found...
[root@server1 LAMs]# systemctl daemon-reload
[root@server1 LAMs]# systemctl start httpd.service
[root@server1 LAMs]# systemctl status httpd.service
● httpd.service - The Apache HTTP Server
   Loaded: loaded (/usr/lib/systemd/system/httpd.service; enabled; vendor preset: disabled)
   Active: active (running) since Thu 2022-09-01 11:09:51 KST; 7s ago
     Docs: man:httpd(8)
           man:apachectl(8)
 Main PID: 27232 (httpd)
   Status: "Processing requests..."
    Tasks: 6
   CGroup: /system.slice/httpd.service
           ├─27232 /usr/sbin/httpd -DFOREGROUND
           ├─27236 /usr/sbin/httpd -DFOREGROUND
           ├─27237 /usr/sbin/httpd -DFOREGROUND
           ├─27238 /usr/sbin/httpd -DFOREGROUND
           ├─27239 /usr/sbin/httpd -DFOREGROUND
           └─27240 /usr/sbin/httpd -DFOREGROUND

Sep 01 11:09:51 server1.kakao.com systemd[1]: Starting The Apache HTTP Ser....
Sep 01 11:09:51 server1.kakao.com systemd[1]: Started The Apache HTTP Server.
Hint: Some lines were ellipsized, use -l to show in full.- CentOS 7내의 firefox로 IP 주소로 들어갔을 떄 아래와같은 창이 뜨면 성공

-> 🤔 그런데 크롬에서는 열리지않음
firewall-cmd --add-service=http --permanent # http를 영구적으로 방화벽에 허용
success

[root@server1 LAMs]# firewall-cmd --add-port=80/tcp --permanent
success

⭐⭐ firewall-cmd --reload # 추가한 서비스, 포트 적용
success

[root@server1 LAMs]# firewall-cmd --list-all
public (active)
  target: default
  icmp-block-inversion: no
  interfaces: enp0s3 enp0s8
  sources:
  services: dhcpv6-client http ssh
  ports: 80/tcp
  protocols:
  masquerade: no
  forward-ports:
  source-ports:
  icmp-blocks:
  rich rules:
이제 크롬에서도 접근이 가능하다.

- 접근 막기
[root@server1 LAMs]# firewall-cmd --remove-service=http --permanent
success
[root@server1 LAMs]# firewall-cmd --remove-port=80/tcp --permanent
success
[root@server1 LAMs]# firewall-cmd --reload
success
[root@server1 LAMs]# firewall-cmd --list-all
public (active)
  target: default
  icmp-block-inversion: no
  interfaces: enp0s3 enp0s8
  sources:
  services: dhcpv6-client ssh
  ports:
  protocols:
  masquerade: no
  forward-ports:
  source-ports:
  icmp-blocks:
  rich rules:
위 실습 sh로 만들기
- fw_enable.sh
#!/bin/bash
# 사용자 입력받아서 방화벽 열기
echo 'input service: '
read service

echo 'input port: '
read port

echo 'input protocol[tcp|udp]: '
read protocol

firewall-cmd --add-service=$service --permanent
firewall-cmd --add-port=$port/$protocol --permanent
firewall-cmd --reload
firewall-cmd --list-all
fw_enable.sh 실행한 후 방화벽 열기
input 값: http, 80, tcp
[root@server1 LAMs]# chmod 700 fw_enable.sh
[root@server1 LAMs]# ./fw_enable.sh
input service:
http
input port:
80
input protocol[tcp|udp]:
tcp
success
success
success
public (active)
  target: default
  icmp-block-inversion: no
  interfaces: enp0s3 enp0s8
  sources:
  services: dhcpv6-client http ssh
  ports: 80/tcp
  protocols:
  masquerade: no
  forward-ports:
  source-ports:
  icmp-blocks:
  rich rules:
fw_disable.sh 생성
1. cp fw_enable.sh fw_disable.sh
2. vim fw_disable.sh
3. :%s/add/remove/g
4. :wq
- PuTTY 접근 막아보기
- 서버에 html 올리기
- index.html
<h1> Welcome ! </h1>
[root@server1 LAMs]# vim index.html
[root@server1 LAMs]# cp index.html /var/www/html/index.html
-
프롬프트
[]: 사용자정의
root: 접속사용자 ->\u
@: 사용자정의
server1: 호스트명 ->\h
~: 현재 경로(마지막경로 / 전체 경로) ->\W
#: 사용자타입 ->#(root),$(일반사용자) ->\$ -
프롬프트 표시 변경
[server1 LAMs]# PS1='[\h]\$ '
[server1]#
q1. (history)|(time)==@user{경로}] 형태로 프롬프트 바꾸기
[151|12:24 PM==@root{LAMs}]root#PS1='[(\!)|(\t)==@\u{\W}]\$'
[(152)|(12:26:15)==@root{LAMs}]#
default: PS1='[\u@\h \W]\$'
- directory : 파일 및 디렉토리들의 "주소"를 저장한 "파일"
text file -> vi로 편집이 가능한 파일 형태
binary file ->
-
기본: TCP, voice data : UDP
-
클라우드 네이티브에 기반한 : 클라우드에 지향점을 두어라. 윈도우에서만 잘 돌아가는 건 소용없다.
cluster로 연결된 서버간의 신뢰 구성
- /etc/hosts에 호스트네임과 IP 주소 등록
192.168.56.101  server1 server1.kakao.com
192.168.56.102 server2 server2.kakao.com- 아래 명렁어를 실행하면 잘 작동하는 것을 볼 수 있다.
scp -r LABs 192.168.56.102:/root
scp -r LABs Server2:/root
scp -r LABs Server2.kakao.com:/root

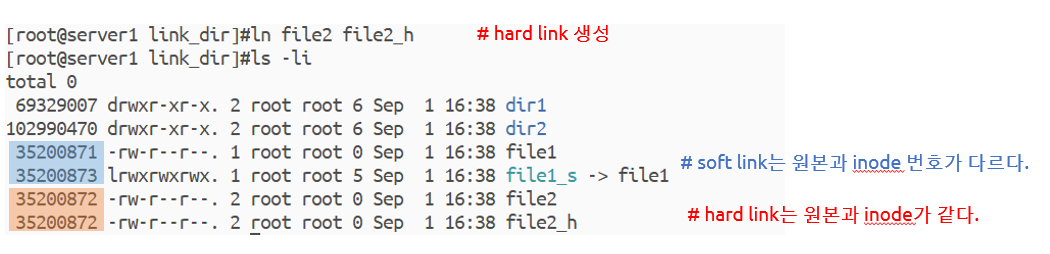
링크
-
soft link, Symbolic link (
ln -s 원본파일 링크이름)

-
hard link