✍ Apache Tomcat 설치 및 개발설정과 servlet 개념과 사용법
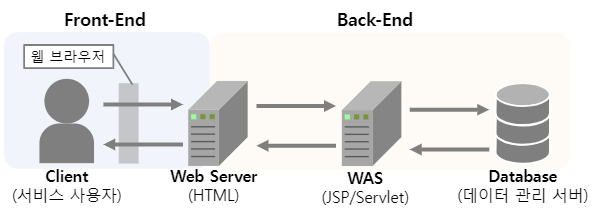
위 이미지의 행위를 하기위해 공부를한다.
사용자가 보는것은 HTML이다. 모든 응답은 HTML로 해줘야한다.
Web Server영역에선 정적으로 모두 똑같은 HTML,CSS,JS을 보게된다. (static)
WAS (Web Application Server) DB에 있는 사용자의 다른 정보 조회,동적으로 HTML을 만든다. (dynamic)
WAS(tomcat)는 정적,동적HTML을 처리할 수 있다.
TOMCAT설치
1. 톰캣 다운로드
https://tomcat.apache.org/download-90.cgi (톰캣 9버전)
우리가 만든 프로젝트는 톰캣이 실행해 주는데 webapps 파일 하위에서 실행된다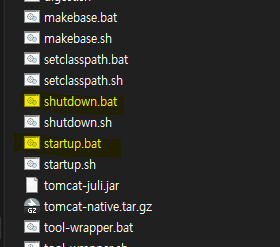
bin -> startup.bat (서버실행)
-> startdown.bat (서버종료)
2. 포트수정
오라클서비스가 웹요청을 받는 포트가 localhost:8080을 쓰고 있다.
한 컴퓨터에서 같은 포드를 공유할 수 없어서 오류가뜬다
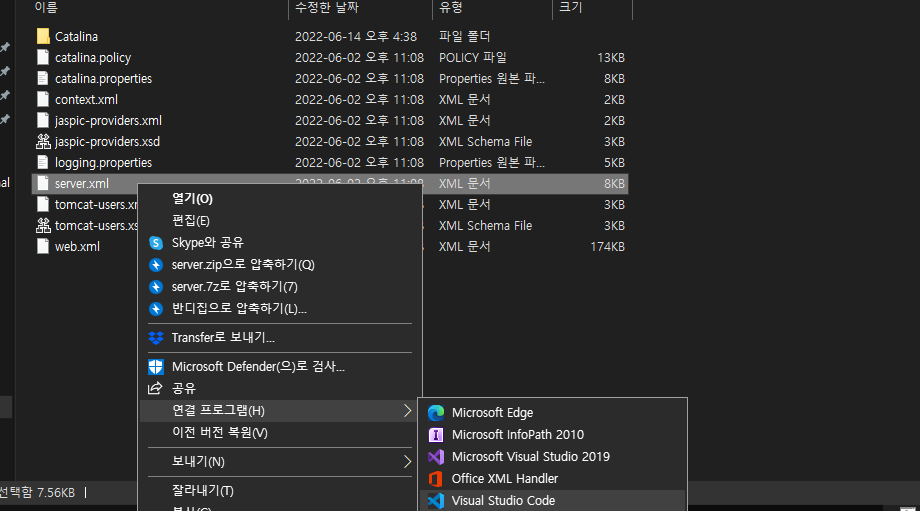
톰캣 vscode이용 69번째줄 9090포트변경
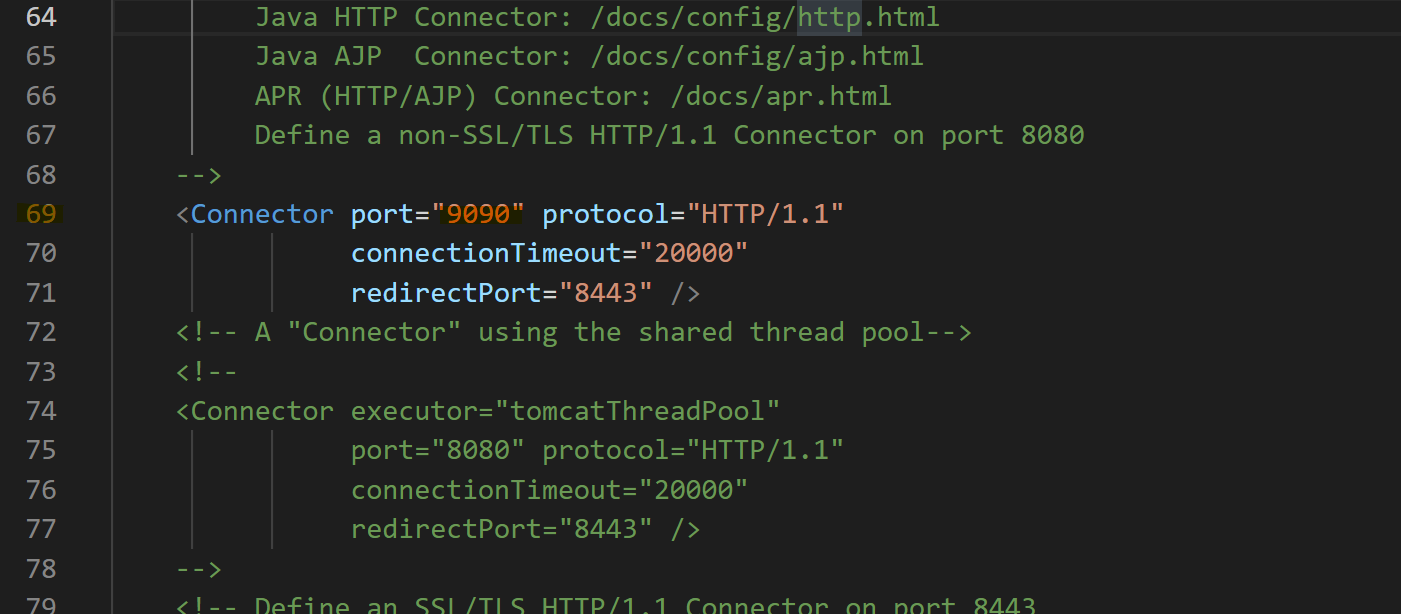
다시 재실행 bin -> startup.bat
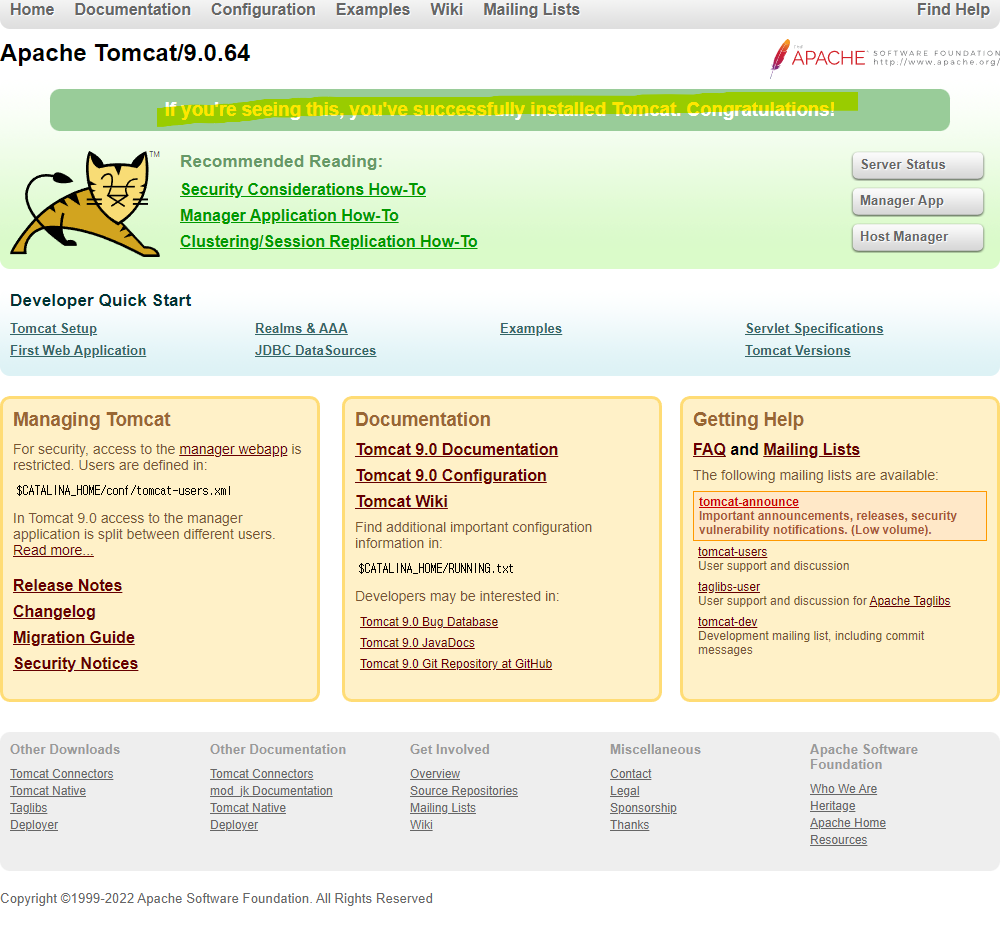
실행시 메세지 나오면 성공!
3.이클립스 Server Runtime Environments 설정
개발환경에서 직접제어는 불편하다. CATALINA_HOME -> eclipse 제어
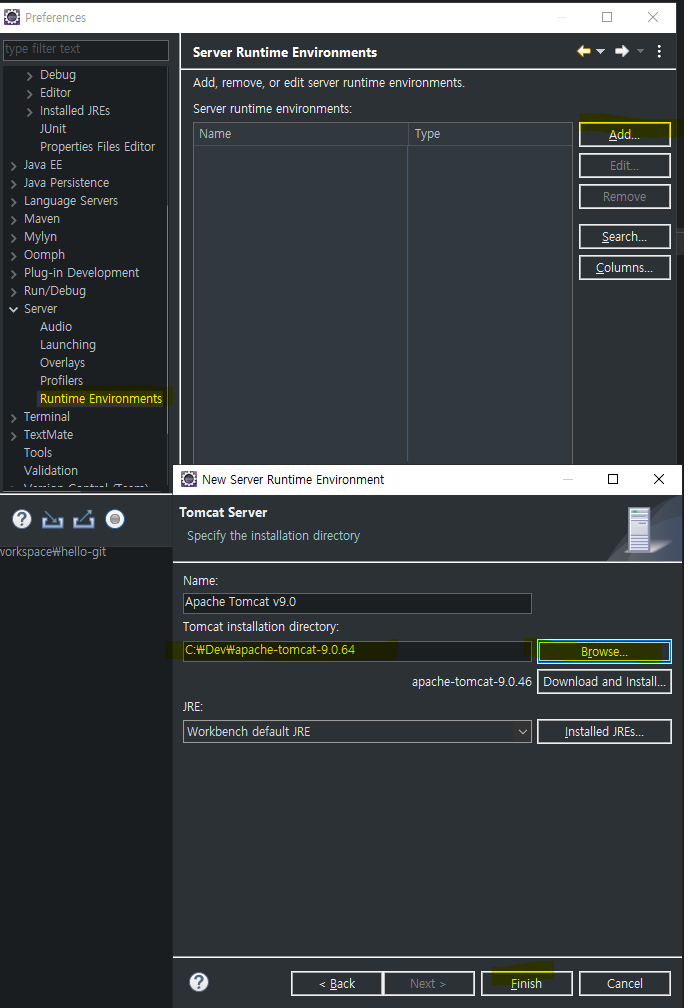
4.local server 만들기
Server Runtime Environments을 참조하여 local server를 만든다. (포트번호만 다르게 하면 여러개 생성)
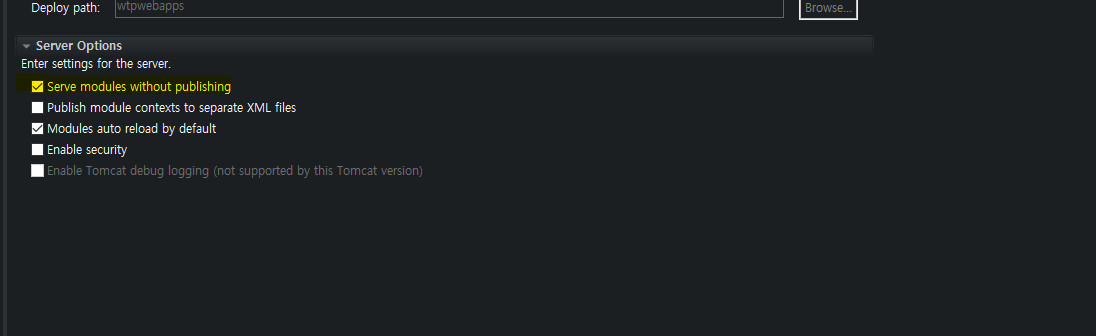
modules publishing 체크
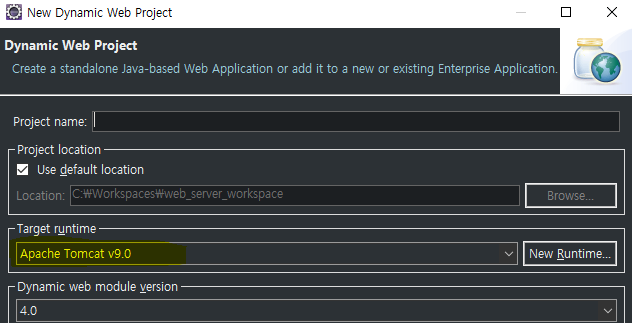
5. Dynamic Web Project 생성 후 서버 등록
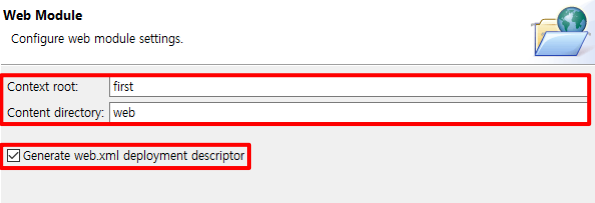
Context root의 이름을 웹 서버를 호출할 별칭으로 변경
체크박스를 체크하여 웹 프로젝트 기본 설정 파일인 web.xml 생성
프로젝트 생성 후 서버를 만들어도 상관없다.
서버런타임 참조확인
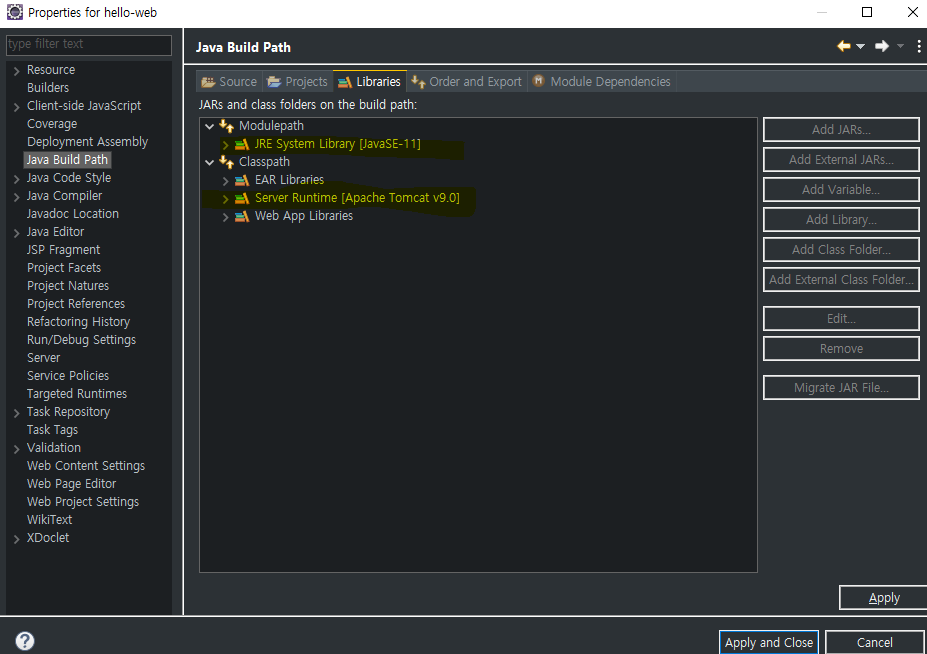
프로젝트 설정 후 java build path 설정확인
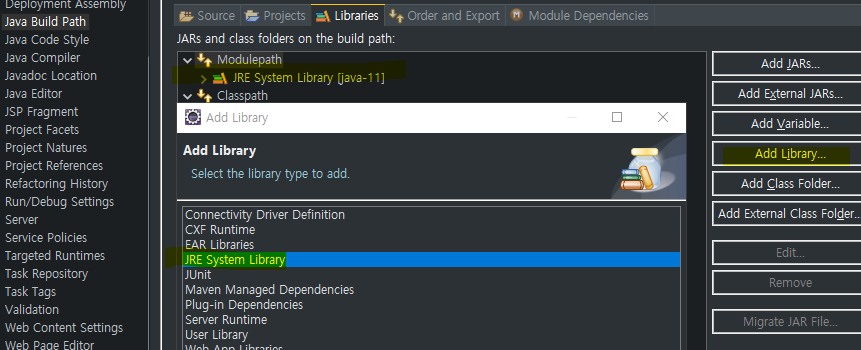
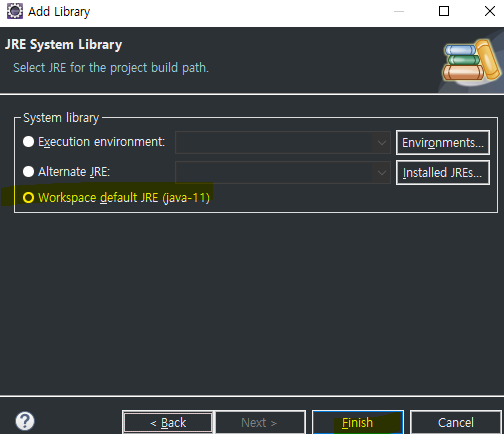
modulepath 없다면 AddLibary -> JRE System Libary
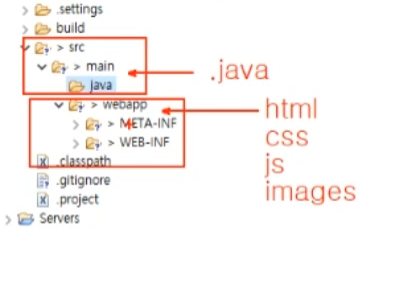
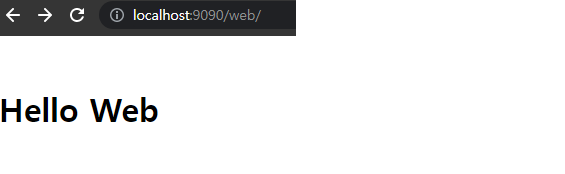
webapp 하위 index.html 생성 -> <h1>Hello Web</h1>
http://localhost:9090/web/ 접속 후 확인
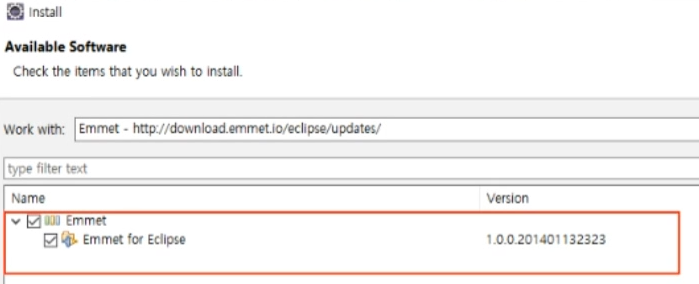
Emmet추가하기
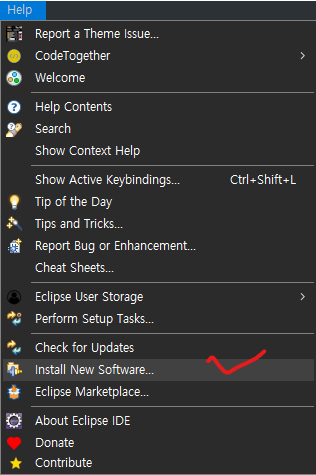
http://download.emmet.io/eclipse/updates/ 에밋 복사주소 추가
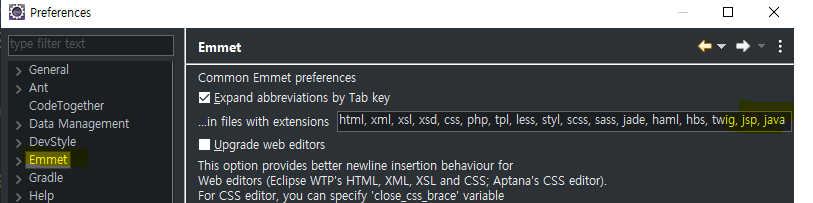
, jsp, java 에밋에 추가
servlet/JSP
index.html
<!DOCTYPE html>
<html>
<head>
<meta charset="UTF-8">
<title>Hello Web</title>
</head>
<body>
	<h1>Hello Web</h1>
	<p>웹서비스를 시작합니다.</p>

	<h2>개인취향검사</h2>
	<ul>
		<li><a href="/web/testPerson1.html">GET</a></li>
		<li><a href="/web/testPerson2.html">POST</a></li>
		<li><a href="/web/servlet/lifeCycle.do">Servlet 생명주기</a></li>
		<li><a href="/web/testPerson3.html">Servlet & JSP</a></li>
	</ul>

</body>
</html>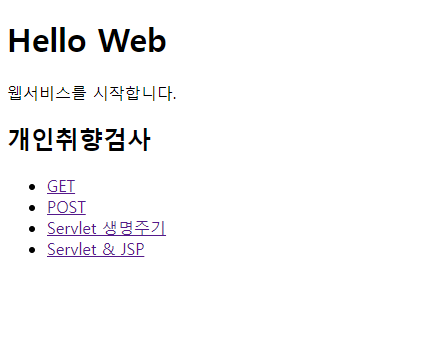
localhost:9090/web/ 접속 시 localhost:9090/web/index.html을 출력한다.
testPerson1.html
<!DOCTYPE html>
<html>
<head>
<meta charset="UTF-8">
<title>개인 취향 테스트</title>
</head>
<body>
<h2>개인 취향 테스트(GET)</h2>
당신의 취향을 테스트 합니다.<br/>
데이터 입력후 확인 버튼을 누르세요<br/>
<form name="personFrm" action="/web/testPerson1.do" method="get">
<ul style="list-style: none; line-height: 200%;">
<li>이름은?
<input type="text" name="name" size="10" required/>
</li>
<li>좋아하는 색?
<input type="radio" id="red" name="color" value="빨강" required/><label for="red">빨강</label>
<input type="radio" id="blue" name="color" value="파랑" /><label for="blue">파랑</label>
<input type="radio" id="yellow" name="color" value="노랑" /><label for="yellow">노랑</label>
<input type="radio" id="green" name="color" value="초록" /><label for="green">초록</label>
</li>
<li>좋아하는 동물은?
<select name="animal">
<option value="강아지">강아지</option>
<option value="고양이">고양이</option>
<option value="병아리">병아리</option>
</select>
</li>
<li>좋아하는 음식?(모두 고르세요)
<input type="checkbox" name="food" id="food1" value="짜장면" /><label for="food1">짜장면</label>
<input type="checkbox" name="food" id="food2" value="짬봉" /><label for="food2">짬봉</label>
<input type="checkbox" name="food" id="food3" value="탕수육" /><label for="food3">탕수육</label>
<input type="checkbox" name="food" id="food4" value="양장피" /><label for="food4">양장피</label>
<input type="checkbox" name="food" id="food5" value="팔보채" /><label for="food5">팔보채</label>
</li>
<li>
<br/>
<input type="submit" id="btnOK" value="확인" />
<input type="reset" value="취소" />
</li>
</ul>
</form>
</body>
</html>선택 할수 있는 form이다 톰캣 하위 webapp에서 html을 생성하는데 get방식에 주목해 볼 필요가 있다.
action="/web/testPerson1.do" method="get"
TestPersonServlet1.java
package com.kh.web;

import java.io.IOException;
import java.io.PrintWriter;
import java.util.Arrays;

import javax.servlet.ServletException;
import javax.servlet.http.HttpServlet;
import javax.servlet.http.HttpServletRequest;
import javax.servlet.http.HttpServletResponse;

public class TestPersonServlet1 extends HttpServlet {

	@Override
	protected void doGet(HttpServletRequest request, HttpServletResponse response)
			throws ServletException, IOException {

		// 1. 요청 인코딩처리 (GET방식은 생략가능)
		request.setCharacterEncoding("utf-8");

		// 2. 사용자입력값 처리
		// ?name=유재식&color=빨강&animal=고양이&food=짜장면&food=짬봉&food=탕수육
		// 사용자입력값은 모두 문자열이다.
		String name = request.getParameter("name"); // 대소문자구분
		String color = request.getParameter("color");
		String animal = request.getParameter("animal");
		String[] foods = request.getParameterValues("food"); // 복수개의 값처리

		System.out.println("name = " + name);
		System.out.println("color = " + color);
		System.out.println("animal = " + animal);
		System.out.println("food = " + (foods != null ? Arrays.toString(foods) : null));

		// 3. 업무로직

		// 4. 응답메세지 작성
		// 헤더(설정정보)
		response.setContentType("text/html; charset=utf-8");

		// 바디(html)
		PrintWriter out = response.getWriter(); // 응답메세지를 대상으로 하는 문자기반 출력스트림
		out.println("<!doctype html>");
		out.println("<html>");
		out.println("<head>");
		out.println("<meta charset='utf-8'>");
		out.println("<title>개인취향검사결과</title>");
		out.println("</head>");
		out.println("<body>");
		out.println("<h1>개인취향검사결과 " + request.getMethod() + "</h1>");
		out.println("<p>이름 : " + name + "</p>");
		out.println("<p>선호색상 : " + color + "</p>");
		out.println("<p>선호동물 : " + animal + "</p>");
		out.println("<p>선호중국음식 : " + (foods != null ? Arrays.toString(foods) : "없음") + "</p>");
		out.println("</body>");
		out.println("</html>");


	}
}
Servlet
- 웹요청을 처리할 수 있는 자바클래스
- 웹요청 처리기능이 있는 HttpServlet클래스를 상속해서 servlet 작성
- 요청방식에 따라 doGet, doPost 오버라이드
Get방식
- HttpServletRequest 요청관련 정보를 가진 객체
- HttpServletResponse 응답처리관련 정보를 가진 객체
- 인코딩처리
- 사용자입력값처리
- 업무로직
- 응답메세지작성
testPerson2.html
action="/web/testPerson2.do" method="post"위 TestPerson1.html 에서 get방식이 post로 바뀌였다.
TestPersonServlet2.java
reuqest.setCharacterEncoding("utf-8")TestPersonServlet1.java과 같다
단, POST방식이라 인코딩처리를 필수로 해야된다.
testPerson3.html
action="/web/testPerson3.do" method="post"testPerson2와 동일하다
TestPersonServlet3.java
		RequestDispatcher reqDispatcher =
				request.getRequestDispatcher("/testPersonResult.jsp");
		reqDispatcher.forward(request, response);
마지막 응답메세지를 작성할 때 웹에서 받은 메세지를 직접 HTML코드가 아닌 jsp에 위임한다.
servlet를 사용할 때 의 복잡함을 jsp문법으로 좀더 쉽게 처리 가능하다
testPersonResult.jsp
<%@ page language="java" contentType="text/html; charset=UTF-8"
    pageEncoding="UTF-8" import="java.util.Arrays" %>
<%
	// jsp scriptlet - java영역
	// request, response객체에 선언없이 접근 가능
	String name = request.getParameter("name");
	String color = request.getParameter("color");
	String animal = request.getParameter("animal");
	String[] foods = request.getParameterValues("food");

	System.out.println("name@jsp = " + name);
	System.out.println("color@jsp = " + color);
	System.out.println("animal@jsp = " + animal);
	System.out.println("food@jsp = " + (foods != null ? Arrays.toString(foods) : null));

%>
<!doctype html>
<html>
<head>
<meta charset='utf-8'>
<title>개인취향검사결과</title>
</head>
<body>
<h1>개인취향검사결과 <%= request.getMethod() %></h1>
<p>이름 : <%= name %></p> <%-- 출력식 --%>
<p>선호색상 : <%= color %></p>
<p>선호동물 : <%= animal %></p>
<p>선호중국음식 : <%= foods != null ? Arrays.toString(foods) : "없음" %></p>
</body>
</html>
SerletLifeCycleTest.java
package com.kh.web;

import java.io.IOException;
import javax.servlet.ServletConfig;
import javax.servlet.ServletException;
import javax.servlet.annotation.WebServlet;
import javax.servlet.http.HttpServlet;
import javax.servlet.http.HttpServletRequest;
import javax.servlet.http.HttpServletResponse;

/**
 * Servlet
 * - GenericServlet 추상클래스 : Servlet인터페이스를 구현
 *   - HttpServlet 추상클래스
 * 		- ServletLifeCycle
 *
 * - 사용자요청이 접수되면 HttpServlet#service 메소드가 호출 되고,
 * 		그 안에서 전송방식에 따라 doGet, doPost 호출 처리
 *
 * - Servlet은 tomcat(WAS/Web Container)에 의해 Singletone패턴으로 관리된다.
 * 	(프로그램 운영중에 단 하나의 객체만 만들어서 운영)
 * - 사용자요청당 하나의 쓰레드가 생성되어 처리(응답성 향상)
 *
 * - Servlet LifeCycle
 * 	1. 생성자 호출
 * 	2. init 호출
 *
 *  3. service - doGet/doPost
 *
 * 	4. destroy 호출
 *
 *
 *
 *
 * @WebServlet web.xml에 url-pattern과 servlet클래스 바인딩하는 것과 동일한 작업
 */
@WebServlet("/servlet/lifeCycle.do")
public class ServletLifeCycleTest extends HttpServlet {
	private static final long serialVersionUID = 1L;

    /**
     * @see HttpServlet#HttpServlet()
     */
    public ServletLifeCycleTest() {
       System.out.println("[ServletLifeCycleTest 생성자 호출]");
    }

	/**
	 * @see Servlet#init(ServletConfig)
	 */
	public void init(ServletConfig config) throws ServletException {
		System.out.println("[init 호출]");
	}

	/**
	 * @see Servlet#destroy()
	 */
	public void destroy() {
		System.out.println("[destroy 호출]");
	}

	/**
	 * @see HttpServlet#doGet(HttpServletRequest request, HttpServletResponse response)
	 */
	protected void doGet(HttpServletRequest request, HttpServletResponse response) throws ServletException, IOException {
		System.out.println("[GET /servlet/lifeCycle.do 호출!]");
		response.getWriter().append("Served at: ").append(request.getContextPath());
	}

	/**
	 * @see HttpServlet#doPost(HttpServletRequest request, HttpServletResponse response)
	 */
	protected void doPost(HttpServletRequest request, HttpServletResponse response) throws ServletException, IOException {
		// TODO Auto-generated method stub
		doGet(request, response);
	}

}
web.xml
<?xml version="1.0" encoding="UTF-8"?>
<web-app xmlns:xsi="http://www.w3.org/2001/XMLSchema-instance" xmlns="http://xmlns.jcp.org/xml/ns/javaee" xsi:schemaLocation="http://xmlns.jcp.org/xml/ns/javaee http://xmlns.jcp.org/xml/ns/javaee/web-app_4_0.xsd" id="WebApp_ID" version="4.0">
  <display-name>hello-web</display-name>
  <!-- 배포서술자 Deployment Descriptor -->

  <servlet>
  	<servlet-name>TestPersonServvvvvvvlet1</servlet-name>
	<servlet-class>com.kh.web.TestPersonServlet1</servlet-class>
  </servlet>
  <servlet-mapping>
  	<servlet-name>TestPersonServvvvvvvlet1</servlet-name>
  	<url-pattern>/testPerson1.do</url-pattern>
  </servlet-mapping>

  <servlet>
  	<servlet-name>TestPersonServlet2</servlet-name>
  	<servlet-class>com.kh.web.TestPersonServlet2</servlet-class>
  </servlet>
  <servlet-mapping>
  	<servlet-name>TestPersonServlet2</servlet-name>
  	<url-pattern>/testPerson2.do</url-pattern>
  </servlet-mapping>

</web-app>
/web/testPerson(1,2,3)을 PersonTestservlet(1,2,3)에서 처리하고 싶을 때 web.xml(배포서술자)에서 처리한다.
rul에 요청이 들어올시 mapping에 있는 name과 같은 servlet을 찾고 class에서 name을 처리하는 방식
servlet,mapping은 필수 작성
name 설정은 자유롭다
url-pattern시 / 필수작성
.png)