
저희 서비스에서는 push notification 으로 일부분을 OneSignal 을 사용합니다.
OneSignal 을 세팅할 때 iOS 에서 Extension 설정하는 부분이 있습니다.
그런데 저희 서비스의 iOS 인증서를 fastlane으로 동기화하는 과정에 있어서 OneSignal Extension 또한 동기화된 인증서를 생성해줘야 match가 되는 것을 알게 되었습니다.
// cd ios/fastlane/Fastfile

platform :ios do
  desc "Prepare Notification Extension"
  lane :setNotificationExtension do
    produce(
        app_identifier: "com.xxx.xxx.OneSignalNotificationServiceExtension",
        app_name: "{your_project_name} OneSignalNotificationServiceExtension",
        skip_itc: true,
        enable_services: {
          app_group: "on",
        }
    )
    match(
        app_identifier: ["com.xxx.xxx","com.xxx.xxx.OneSignalNotificationServiceExtension"],
        type: "development",
    )
    match(
        app_identifier: ["com.xxx.xxx","com.xxx.xxx.OneSignalNotificationServiceExtension"],
        type: "appstore",
    )

  end

 end
실행
cd ios

fastlane setNotificationExtension
1. lane produce
fastlane produce document
https://docs.fastlane.tools/actions/produce/
-
먼저 lane 으로 Extension 의 identifier 를 설정해주도록 합니다.
com.xxx.xxx 는 project 의 identifier 입니다. 서비스의 identifier 를 입력해주시면 됩니다.
-
skip_itc 는 Appstore Connect 에 앱을 추가하는 것을 skip 할 것인지 여부입니다. 스킵하기 위해 true 로 설정해줍니다. 다른 옵션을 설정하고 싶다면 위 document 링크를 참조하면 됩니다.
-
OneSignal 은 app_group 이라는 capability 를 추가로 사용합니다. 이를 위해 enable_services 에 추가해주고 'on' 으로 설정해줍니다.
2. match
저희 서비스에서는 provisioning profile 로 개발용, 배포용 2개를 사용하고 있습니다. 이와 매칭시키기 위해 extension 의 match provisioning profile도 development 와 appstore 를 생성해줍니다.
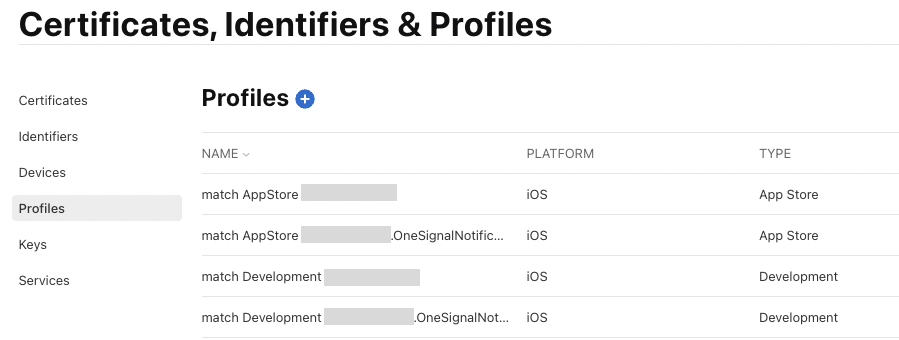
그러면 위와 같이 프로젝트의 profile 외에 Extension 의 profile도 생성됩니다.
3. Xcode Signing 변경
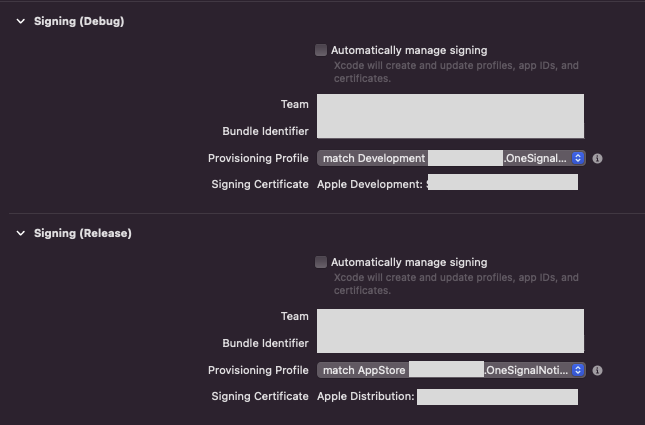
Xcode > Target > OneSignal Extension 에서 Automatically manage signing 을 꺼주고
match provision profile 로 매칭시켜 줍니다.