CNN (VGGNet)
-
지금까지 정리
-
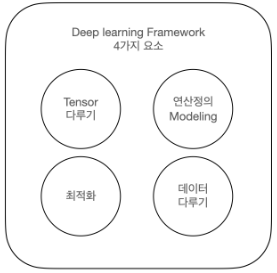
딥러닝 프로젝트를 수행하기 위해서 아래 4 단계를 구현 하면 된다.

- 모델을 정의 하는 방법!
- Sequencial 사용하기 (우리가 지금까지 모델을 만들던 방식)
- Functional API model
- Sub class model
Convolutional Neural Network; CNN
import numpy as np
import pandas as pd
import tensorflow as tf

import matplotlib.pyplot as plt
import seaborn as sns
%matplotlib inline
np.random.seed(7777)
tf.random.set_seed(7777)VGGNet 구현해보기
Dataloader
Flatten => 채널 차원 추가로 변경
(Convolution Layer는 주로 이미지데이터처리를 위해 사용되기 때문에, 컬러이미지는 (height, width, 3) 흑백은 (height, width, 1)로 사용한다.)
ex) (num_data, 28, 28) => (num_data, 28, 28, 1)
# reshape : https://nov19.tistory.com/101

class DataLoader():
    def __init__(self):
        (self.train_x, self.train_y), (self.test_x, self.test_y) = tf.keras.datasets.mnist.load_data()

    def validate_pixel_scale(self, x):
        return 255 >= x.max() and 0 <= x.min()

    def scale(self, x):
        return (x / 255.0).astype(np.float32)

    def preprocess_dataset(self, dataset):
        feature, target = dataset

        validated_x = np.array([x for x in feature if self.validate_pixel_scale(x)])
        validated_y = np.array([y for x, y in zip(feature, target) if self.validate_pixel_scale(x)])

        # scale
        scaled_x = np.array([self.scale(x) for x in validated_x])

        # expand
        expanded_x = scaled_x[:, :, :, np.newaxis]

        # label encoding
        ohe_y = np.array([tf.keras.utils.to_categorical(y, num_classes=10) for y in validated_y])

        return expanded_x, ohe_y

    def get_train_dataset(self):
        return self.preprocess_dataset((self.train_x, self.train_y))

    def get_test_dataset(self):
        return self.preprocess_dataset(self.test_x, self.test_y)
mnist_loader = DataLoader()
train_x, train_y = mnist_loader.get_train_dataset()
test_x, test_y = mnist_loader.get_train_dataset()
print(train_x.shape)
print(train_y.shape)
print(test_x.shape)
print(test_y.shape)-
VGGNet에서 사용되는 Layer들
tf.keras.layers.Conv2D
tf.keras.layers.Activation
tf.keras.layers.MaxPool2D
tf.keras.layers.Flatten
tf.keras.layers.Dense -
Conv2D
- filters: layer에서 사용할 Filter(weights)의 갯수
- kernel_size: Filter(weights)의 사이즈
- strides: 몇 개의 pixel을 skip 하면서 훑어지나갈 것인지 (출력 피쳐맵의 사이즈에 영향을 줌)
- padding: zero padding을 만들 것인지. VALID는 Padding이 없고, SAME은 Padding이 있음 (출력 피쳐맵의 사이즈에 영향을 줌)
- activation: Activation Function을 지정
tf.keras.layers.Conv2D(64, 3, 1, padding = 'same', activation='relu')- MaxPool2D
- pool_size: Pooling window 크기
- strides: 몇 개의 pixel을 skip 하면서 훑어지나갈 것인지
- padding: zero padding을 만들 것인지
tf.keras.layers.MaxPool2D- Flatten
tf.keras.layers.Flatten- Dense
- units : 노드 갯수
- activation : 활성화 함수
- use_bias : bias 를 사용 할 것인지
- kernel_initializer : 최초 가중치를 어떻게 세팅 할 것인지
- bias_initializer : 최초 bias를 어떻게 세팅 할 것인지
Layer들을 이용해 모델 만들기 - Sequencial 방식
from tensorflow.keras.layers import Conv2D, MaxPool2D, Flatten, Densemodel = tf.keras.Sequential()model.add(Conv2D(32, kernel_size = 3, padding = 'same', activation = 'relu', input_shape=(28, 28,1)))
model.add(Conv2D(32, kernel_size = 3, padding = 'same', activation = 'relu'))
model.add(MaxPool2D())
model.add(Conv2D(64, kernel_size = 3, padding = 'same', activation = 'relu'))
model.add(Conv2D(64, kernel_size = 3, padding = 'same', activation = 'relu'))
model.add(MaxPool2D())
model.add(Flatten())
model.add(Dense(128, activation='relu'))
model.add(Dense(64, activation='relu'))
model.add(Dense(10, activation='softmax'))model.summary()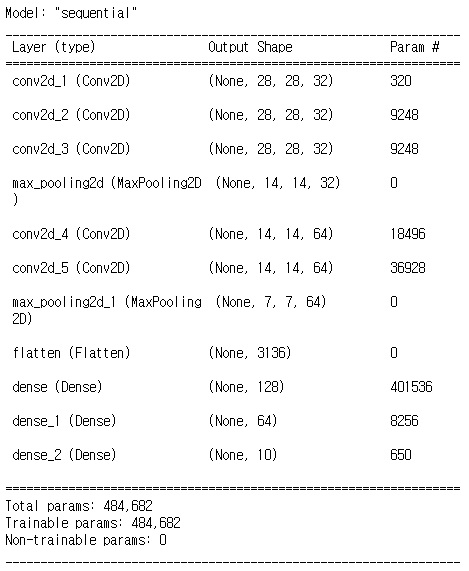
lr = 0.03
opt = tf.keras.optimizers.Adam(lr)
loss = tf.keras.losses.categorical_crossentropy

model.compile(optimizer=opt, loss=loss, metrics=['accuracy'])
hist = model.fit(train_x, train_y, epochs = 2, batch_size=128, validation_data = (test_x, test_y))hist.historyplt.figure(figsize = (10, 5))
plt.subplot(221)
plt.plot(hist.history['loss'])
plt.subplot(222)
plt.plot(hist.history['accuracy'])
plt.subplot(223)
plt.plot(hist.history['val_loss'])
plt.subplot(224)
plt.plot(hist.history['val_accuracy'])
plt.tight_layout()
plt.show()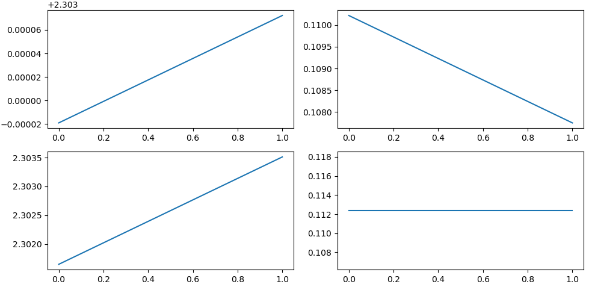
Functional 모델링
import numpy as np
import pandas as pd
import tensorflow as tf

import matplotlib.pyplot as plt
import seaborn as sns
%matplotlib inline
np.random.seed(7777)
tf.random.set_seed(7777)Functional API
- tf.keras.Sequential 보다 더 유연하게 모델을 정의할 수 있는 방법
from tensorflow.keras.layers import Input, Conv2D, MaxPool2D, Flatten, Denseinput_shape = (28, 28, 1)inputs = Input(input_shape)
net = Conv2D(32, kernel_size = 3, padding='same', activation = 'relu')(inputs)
net = Conv2D(32, kernel_size = 3, padding='same', activation = 'relu')(net)
net = MaxPool2D()(net)
net = Conv2D(64, kernel_size = 3, padding='same', activation = 'relu')(net)
net = Conv2D(64, kernel_size = 3, padding='same', activation = 'relu')(net)
net = MaxPool2D()(net)
net = Flatten()(net)
net = Dense(128, activation='relu')(net)
net = Dense(64, activation='relu')(net)
net = Dense(10, activation='softmax')(net)model = tf.keras.Model(inputs = inputs, outputs = net) # name ='' 이름도 입력 가능model.summary()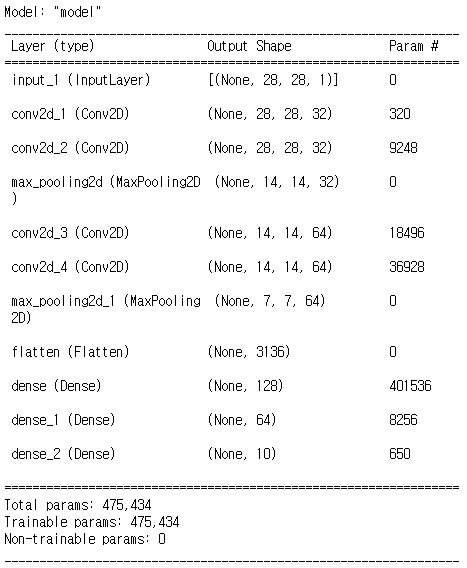
ResNet 구현
import numpy as np
import pandas as pd
import tensorflow as tf

import matplotlib.pyplot as plt
import seaborn as sns
%matplotlib inline
np.random.seed(7777)
tf.random.set_seed(7777)Functional API
tf.keras.Sequential 보다 더 유연하게 모델을 정의할 수 있는 방법
from tensorflow.keras.layers import Input, Conv2D, MaxPool2D, Flatten, Dense, Adddef build_resnet(input_shape):
inputs = Input(input_shape)
net = Conv2D(32, kernel_size = 3, strides = 2, padding = 'same', activation = 'relu')(inputs)
net = MaxPool2D()(net)
net1 = Conv2D(64, kernel_size = 1, padding = 'same', activation = 'relu')(net)
net2 = Conv2D(64, kernel_size = 3, padding = 'same', activation = 'relu')(net1)
net3 = Conv2D(64, kernel_size = 1, padding = 'same', activation = 'relu')(net2)
net1_1 = Conv2D(64, kernel_size = 1, padding = 'same', activation = 'relu')(net)
net = Add()([net1_1, net3])
net1 = Conv2D(64, kernel_size = 1, padding = 'same', activation = 'relu')(net)
net2 = Conv2D(64, kernel_size = 3, padding = 'same', activation = 'relu')(net1)
net3 = Conv2D(64, kernel_size = 1, padding = 'same', activation = 'relu')(net2)
net = Add()([net, net3])
net = MaxPool2D()(net)
net = Flatten()(net)
net = Dense(10, activation = 'softmax')(net)
model = tf.keras.Model(inputs = inputs, outputs = net)
return modelmodel = build_resnet((32, 32, 3))model.summary()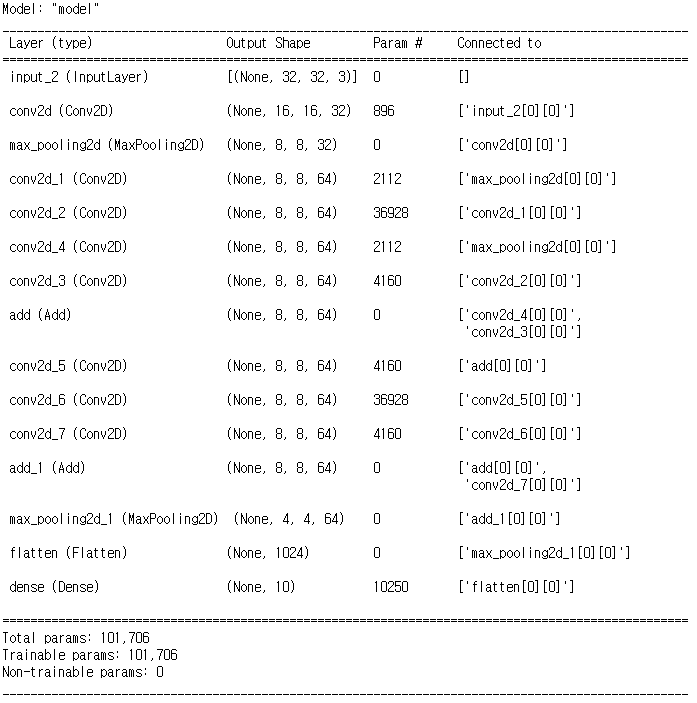
CIfar10 dataset을 이용해 학습을 해본다
# reshape : https://nov19.tistory.com/101

class DataLoader():
    def __init__(self):
        (self.train_x, self.train_y), (self.test_x, self.test_y) = tf.keras.datasets.cifar10.load_data()

    def validate_pixel_scale(self, x):
        return 255 >= x.max() and 0 <= x.min()

    def scale(self, x):
        return (x / 255.0).astype(np.float32)

    def preprocess_dataset(self, dataset):
        feature, target = dataset

        validated_x = np.array([x for x in feature if self.validate_pixel_scale(x)])
        validated_y = np.array([y for x, y in zip(feature, target) if self.validate_pixel_scale(x)])

        # scale
        scaled_x = np.array([self.scale(x) for x in validated_x])


        # label encoding
        ohe_y = np.array([tf.keras.utils.to_categorical(y, num_classes=10) for y in validated_y])

        return scaled_x, np.squeeze(ohe_y, axis=1)
        # test데이터가 (50000,1, 10)로 나와서 중간에 있는 1을 없애기 위해

    def get_train_dataset(self):
        return self.preprocess_dataset((self.train_x, self.train_y))

    def get_test_dataset(self):
        return self.preprocess_dataset(self.test_x, self.test_y)
loader = DataLoader()
train_x, train_y = loader.get_train_dataset()
test_x, test_y = loader.get_train_dataset()
print(train_x.shape)
print(train_y.shape)
print(test_x.shape)
print(test_y.shape)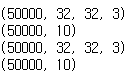
lr = 0.03
opt = tf.keras.optimizers.Adam(lr)
loss = tf.keras.losses.categorical_crossentropy

model.compile(optimizer = opt, loss = loss, metrics = ['accuracy'])
hist = model.fit(train_x, train_y, epochs = 3, batch_size = 128, validation_data=(test_x, test_y))hist.historySub Class 모델링
모델 이란 것은 Input을 Output으로 만들어주는 수식이다.
해당 기능을 수행하는 두 가지 클래스가 tf.keras.layers.Layer 와 tf.keras.layers.Model 클래스이다.
두가지 모두 연산을 추상화 하는 것으로 동일한 역할을 하지만, tf.keras.layers.Model 클래스의 경우 모델을 저장 하는 기능 과 fit 함수를 사용할 수 있다는 점에서 차이가 있다.
tf.keras.layers.Layer
tf.keras.layers.Model
import numpy as np
import pandas as pd
import tensorflow as tf

import matplotlib.pyplot as plt
import seaborn as sns
%matplotlib inline
np.random.seed(7777)
tf.random.set_seed(7777)Linear Regression을 Layer로 만들어 보자.
class LinearRegression(tf.keras.layers.Layer):
    def __init__(self, units = 1):
        # units : 몇 개의 output을 만들 것인지...

        super(LinearRegression, self).__init__()
        self.units = units

    def build(self, input_shape):
        self.w = self.add_weight(
            shape = (input_shape[-1], self.units),
            initializer = 'random_normal',
            trainable = True
            )
        self.b = tf.Variable(0.0)

    #y_hat = w * input + b
    def call(self, inputs):
        return tf.matmul(inputs, self.w) + self.b
가상 데이터
W_true = np.array([3., 2., 4., 1.]).reshape(4, 1) # w와 같은 형태로 만들어주기 위해
B_true = np.array([1.])
X = tf.random.normal((500, 4))
noise = tf.random.normal((500, 1))
y = X @ W_true + B_true + noiseopt = tf.keras.optimizers.SGD(learning_rate=0.03)
linear_layer = LinearRegression(1)for epoch in range(100):
with tf.GradientTape() as tape:
y_hat = linear_layer(X)
loss = tf.reduce_mean(tf.square(y - y_hat))
grads = tape.gradient(loss, linear_layer.trainable_weights)
opt.apply_gradients(zip(grads, linear_layer.trainable_weights))
if epoch % 10 == 0:
print('epoch : {} loss : {}' .format(epoch, loss.numpy()))ResNet - Sub Class 로 구현 하기
Residual Block - Layer
ResNet - Model
from tensorflow.keras.layers import Input, Conv2D, MaxPool2D, Flatten, Dense, Addclass ResidualBlock(tf.keras.layers.Layer):
def __init__(self, filters=32, filter_match=False):
super(ResidualBlock, self).__init__()
self.conv1 = Conv2D(filters, kernel_size=1, padding='same', activation='relu')
self.conv2 = Conv2D(filters, kernel_size=3, padding='same', activation='relu')
self.conv3 = Conv2D(filters, kernel_size=1, padding='same', activation='relu')
self.add = Add()
self.filters = filters
self.filter_match = filter_match
if filter_match:
self.conv_ext = Conv2D(filters, kernel_size=1, padding='same')
def call(self, inputs):
net1 = self.conv1(inputs)
net2 = self.conv2(net1)
net3 = self.conv3(net2)
if self.filter_match:
res = self.add([self.conv_ext(inputs), net3])
else:
res = self.add([inputs, net3])
return res class ResNet(tf.keras.Model):
def __init__(self, num_classes):
super(ResNet, self).__init__()
self.conv1 = Conv2D(32, kernel_size=3, strides=2, padding='same', activation='relu')
self.maxp1 = MaxPool2D()
self.block_1 = ResidualBlock(64, True)
self.block_2 = ResidualBlock(64)
self.maxp2 = MaxPool2D()
self.flat = Flatten()
self.dense = Dense(num_classes)
def call(self, inputs):
x = self.conv1(inputs)
x = self.maxp1(x)
x = self.block_1(x)
x = self.block_2(x)
x = self.maxp2(x)
x = self.flat(x)
return self.dense(x)
model = ResNet(num_classes=10)학습 시켜보기
# reshape : https://nov19.tistory.com/101

class DataLoader():
    def __init__(self):
        (self.train_x, self.train_y), (self.test_x, self.test_y) = tf.keras.datasets.cifar10.load_data()

    def validate_pixel_scale(self, x):
        return 255 >= x.max() and 0 <= x.min()

    def scale(self, x):
        return (x / 255.0).astype(np.float32)

    def preprocess_dataset(self, dataset):
        feature, target = dataset

        validated_x = np.array([x for x in feature if self.validate_pixel_scale(x)])
        validated_y = np.array([y for x, y in zip(feature, target) if self.validate_pixel_scale(x)])

        # scale
        scaled_x = np.array([self.scale(x) for x in validated_x])


        # label encoding
        ohe_y = np.array([tf.keras.utils.to_categorical(y, num_classes=10) for y in validated_y])

        return scaled_x, np.squeeze(ohe_y, axis=1)
        # test데이터가 (50000,1, 10)로 나와서 중간에 있는 1을 없애기 위해

    def get_train_dataset(self):
        return self.preprocess_dataset((self.train_x, self.train_y))

    def get_test_dataset(self):
        return self.preprocess_dataset(self.test_x, self.test_y)
loader = DataLoader()
train_x, train_y = loader.get_train_dataset()
test_x, test_y = loader.get_train_dataset()
print(train_x.shape)
print(train_y.shape)
print(test_x.shape)
print(test_y.shape)lr = 0.03
opt = tf.keras.optimizers.Adam(lr)
loss = tf.keras.losses.categorical_crossentropy
model.compile(optimizer=opt, loss=loss, metrics=["accuracy"])hist = model.fit(train_x, train_y,
epochs = 2, batch_size = 128,
validation_data=(test_x, test_y))plt.figure(figsize=(10, 5))
plt.subplot(221)
plt.plot(hist.history['loss'])
plt.title("loss")
plt.subplot(222)
plt.plot(hist.history['accuracy'], 'b-')
plt.title("acc")
plt.subplot(223)
plt.plot(hist.history['val_loss'])
plt.title("val_loss")
plt.subplot(224)
plt.plot(hist.history['val_accuracy'], 'b-')
plt.title("val_accuracy")
plt.tight_layout()
plt.show()어렵다...
💻 출처 : 제로베이스 데이터 취업 스쿨