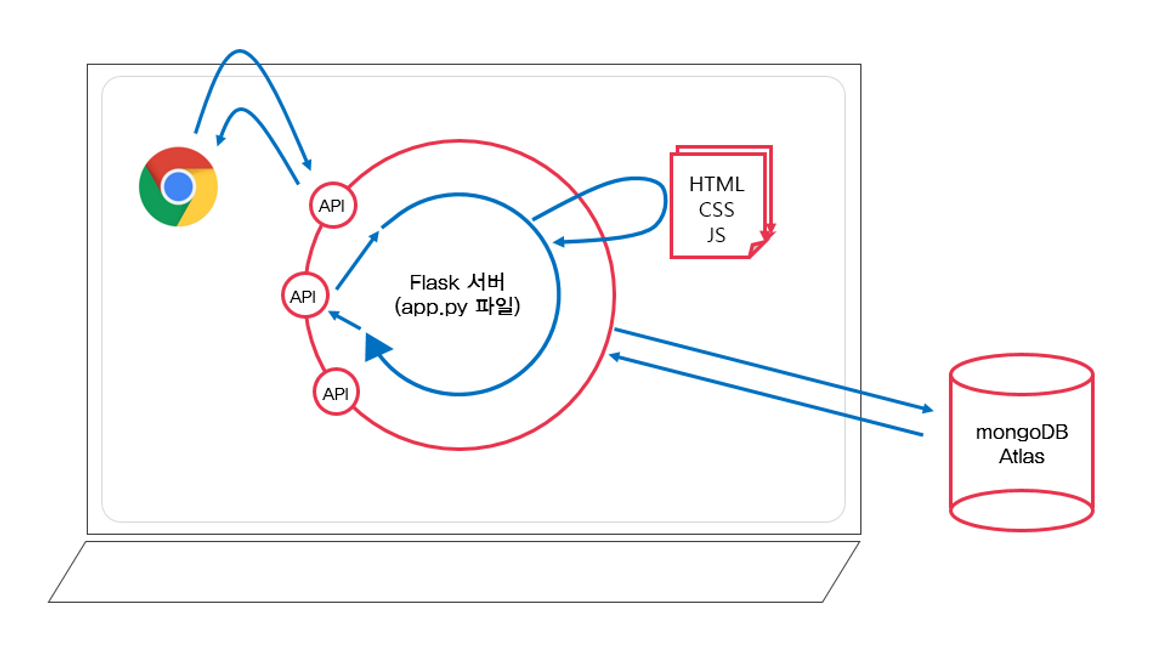
오늘은 Flask 프레임워크를 활용해 API를 만들고 클라이언트에 연결해보자
Flask
파이썬으로 작성된 마이크로 웹 프레임워크
- 서버를 구동시켜주는 편한 코드 모음이라고 생각하자
우선 가상환경 설정해주고
3주차 참고
패키지 설치
pip install flaskFlask 프로젝트 폴더 구조
/project
|— venv(가상환경 폴더)
|— app.py (서버 파일)
|— templates
	|— index.html (클라이언트 파일)
기본 서버코드(app.py)
from flask import Flask, render_template, request, jsonify
app = Flask(__name__)

@app.route('/')
def home():
   return render_template('index.html')

if __name__ == '__main__':
   app.run('0.0.0.0',port=5000,debug=True)
이제 API를 만들어보자
POST 연습(Create)
과정
1. 데이터 명세
- 요청정보: URL('/new'), POST방식
- 클라이언트(fetch)->서버(flask): author, contents
- 서버(flask)->클라이언트(fetch): 메세지 보냄(저장완료!)
2. 클라이언트와 서버 연결 확인하기
서버코드(app.py)
@app.route("/new", methods=["POST"])
def new_post():
    sample_receive = request.form['sample_give']
    print(sample_receive)
    return jsonify({'msg': 'POST 연결 완료!'})
클라이언트코드(index.html)
function save() {
    let formData = new FormData();
		formData.append("sample_give", "샘플데이터");

    fetch('/mars', {method: "POST",body: formData,}).then((res) => res.json()).then((data) => {
            console.log(data);
            alert(data["msg"]);
          });
}

<button onclick="save()" type="button" class="btn btn-warning mybtn">저장</button>
3. 서버부터 만들기
데이터베이스부터 연결
from pymongo import MongoClient

client = MongoClient('내 URL')
db = client.dbsparta
author, contents 데이터를 받아서 데이터베이스에 저장
@app.route("/new", methods=["POST"])
def new_post():
    author_receive = request.form['author_give'] # formData형식에서 키가 가리키는 값 가져오기
    contents_receive = request.form['contents_give']

    doc = {
        'author': author_receive,
        'contents': contents_receive,
    }

    db.posts.insert_one(doc) # 데이터베이스에 저장

    return jsonify({'msg': '저장 완료!'}) # 클라이언트측에 날려줄 메세지
4. 클라이언트 만들기
author, contents 데이터를 보내기
function save() {
        let author = $("#author").val() //해당 아이디의 값 가져오기
        let contents = $("#contents").val()

        let formData = new FormData()
        formData.append("author_give", author)
        formData.append("contents_give", contents)

        fetch('/new', {method: "POST",body: formData,}).then((res) => res.json()).then((data) => {
            alert(data["msg"]) // 서버측 메세지 띄우기
            window.location.reload() // 페이지 새로고침
          });
      }
5. 완성 확인하기
데이터를 입력하고 DB에 잘 들어갔나 확인
GET 연습(Read)
과정
1. 데이터 명세
- 요청정보: URL('/mypost'), GET방식
- 클라이언트(fetch)->서버(flask): 없음
- 서버(flask)->클라이언트(fetch): 게시글 보내주기
2. 클라이언트와 서버 연결 확인하기
서버코드(app.py)
@app.route("/mypost", methods=["GET"])
def mypost_get():
    return jsonify({'msg': 'GET 연결 완료!'})
클라이언트코드(index.html)
$(document).ready(function() {
	show_mypost()
})
function show_mypost() {
    fetch('/mypost').then((res) => res.json()).then((data) => {
            console.log(data);
            alert(data["msg"]);
          });
}
3. 서버부터 만들기
받을 것은 없기 때문에 result에 게시글을 담아서 내려준다
@app.route("/mypost", methods=["GET"])
def mypost_get():
    post_data = list(db.posts.find({},{'_id':False}))
    return jsonify({'result':post_data})
4. 클라이언트 만들기
게시글 리스트를 받아서 하나씩 제이쿼리로 append
function show_post() {
        fetch('/mypost').then((res) => res.json()).then((data) => {
            let rows = data['result']
						$("#my-post").empty()
	            rows.forEach((a) => {
              let author = a["author"]
              let contents = a["contents"]

              let temp_html = `<tr>
                        <td>${name}</td>
                        <td>${contents}</td>
                      </tr>`
              $("#my-post").append(temp_html)
            })
          })
      }
5. 완성 확인하기
새로고침시 게시글이 모두 잘 뜨는지 확인

공부한 내용은 바로바로 기록하자!